


User’s Guide

All rights reserved. No part of this publication may be reproduced, stored in a retrieval system, or transmitted, in any form or by any means, electronic, mechanical, photocopying, recording, or otherwise, without the prior written permission of Seiko Epson Corporation. The information contained herein is designed only for use with this Epson product. Epson is not responsible for any use of this information as applied to other equipment.
Neither Seiko Epson Corporation nor its affiliates shall be liable to the purchaser of this product or third parties for damages, losses, costs, or expenses incurred by the purchaser or third parties as a result of accident, misuse, or abuse of this product or unauthorized modifications, repairs, or alterations to this product, or (excluding the U.S.) failure to strictly comply with Seiko Epson Corporation’s operating and maintenance instructions.
Seiko Epson Corporation shall not be liable for any damages or problems arising from the use of any options or any consumable products other than those designated as Original Epson Products or Epson Approved Products by Seiko Epson Corporation.
Epson, Epson Stylus, PRINT Image Matching, and PRINT Image Framer are registered trademarks and PictureMate and P.I.F. are trademarks of Seiko Epson Corporation. PhotoPC is a registered trademark and Epson Store and Sound Advice are service marks of Epson America, Inc.
General notice: Other product names used herein are for identification purposes only and may be trademarks of their respective owners. Epson disclaims any and all rights in those marks.
RESPONSIBLE USE OF COPYRIGHTED MATERIALS
Digital cameras, like photocopiers and conventional cameras, can be misused by improper copying of copyrighted material. While some countries’ laws permit limited copying in certain circumstances, those circumstances may not be as broad as some people assume. Epson encourages each user to be responsible and respectful of the copyright laws when using digital cameras.
© 2004 Epson America, Inc. 6/04
2

Contents
Introduction
Safety Instructions . . . . . . . . . . . . . . . . . . . . . . . . 7 Warnings, Cautions, and Notes . . . . . . . . . . . . 7
Chapter 1 Getting Started
Unpacking Your Camera . . . . . . . . . . . . . . . . . . |
12 |
Camera lights . . . . . . . . . . . . . . . . . . . . . . . . . |
16 |
Camera Parts and Their Function. . . . . . . . . . . . |
13 |
Installing the Battery . . . . . . . . . . . . . . . . . . . . . |
17 |
Front/top view . . . . . . . . . . . . . . . . . . . . . . . . |
13 |
Battery life . . . . . . . . . . . . . . . . . . . . . . . . . . . |
18 |
Bottom/rear view . . . . . . . . . . . . . . . . . . . . . . |
14 |
Installing and Removing Memory Cards . . . . . . |
19 |
Back view . . . . . . . . . . . . . . . . . . . . . . . . . . . |
14 |
Turning Your Camera On and Off . . . . . . . . . . . |
22 |
Camera buttons . . . . . . . . . . . . . . . . . . . . . . . |
15 |
Making the Initial Settings . . . . . . . . . . . . . . . . . |
23 |
Chapter 2 Taking Photos
Taking Photos Using the LCD Screen . . . . . . . . |
25 |
Selecting the Resolution and Compression . . . . |
31 |
Zooming In and Out. . . . . . . . . . . . . . . . . . . . . . |
25 |
Reading the LCD Screen Icons. . . . . . . . . . . . . . |
33 |
Controlling the Flash . . . . . . . . . . . . . . . . . . . . . |
27 |
Taking Photos Using the Viewfinder Only. . . . . |
35 |
Flash range. . . . . . . . . . . . . . . . . . . . . . . . . . . |
28 |
Continuous Shooting. . . . . . . . . . . . . . . . . . . . . . |
35 |
Taking Close-ups With Macro Mode. . . . . . . . . |
28 |
Setting White Balance . . . . . . . . . . . . . . . . . . . . |
36 |
Taking Pictures With the Self-Timer . . . . . . . . . |
29 |
Setting Light Sensitivity . . . . . . . . . . . . . . . . . . . |
37 |
Selecting the Scene Mode . . . . . . . . . . . . . . . . . |
30 |
Setting Exposure Compensation. . . . . . . . . . . . . |
38 |
Contents 3

Recording Videos. . . . . . . . . . . . . . . . . . . . . . . . |
39 |
Recording sound memos . . . . . . . . . . . . . . . . |
40 |
Enabling the Quick View and Sound |
|
Adjusting Camera Settings . . . . . . . . . . . . . . . . . |
41 |
Memo Features . . . . . . . . . . . . . . . . . . . . . . . . . |
40 |
SETUP mode settings. . . . . . . . . . . . . . . . . . . |
42 |
Chapter 3 Viewing and Managing Your Photos
Viewing Photos . . . . . . . . . . . . . . . . . . . . . . . . . 45 Viewing a slide show of your photos. . . . . . . 46 Playing Videos . . . . . . . . . . . . . . . . . . . . . . . . . . 46 Recording and Playing Sound Memos. . . . . . . . 47 Viewing Picture Information . . . . . . . . . . . . . . . 48 Selecting Photos for Printing . . . . . . . . . . . . . . . 49 Deleting Photos . . . . . . . . . . . . . . . . . . . . . . . . . 50
Deleting photos individually . . . . . . . . . . . . . 50 Deleting all photos . . . . . . . . . . . . . . . . . . . . . 51 Deleting a group of continuous images . . . . . 51
Copying Photos From the Camera to a
Memory Card. . . . . . . . . . . . . . . . . . . . . . . . . . . 52 Copying Photos to Your Computer . . . . . . . . . . 52
Chapter 4 Using PRINT Image Framer (P.I.F.)
Taking Photos With Frames. . . . . . . . . . . . . . . . |
54 |
Deleting and Copying Frames . . . . . . . . . . . . . . |
56 |
Adding or Changing Frames . . . . . . . . . . . . . . . |
55 |
|
|
Chapter 5 Using Direct Print
Connecting the Camera to Your Printer. . . . . . . 58 Printing Photos. . . . . . . . . . . . . . . . . . . . . . . . . . 59
Printing the photo displayed on the
LCD screen . . . . . . . . . . . . . . . . . . . . . . . . . 60
Printing all your saved photos . . . . . . . . . . . . 61 Printing selected photos . . . . . . . . . . . . . . . . . 62 Album printing . . . . . . . . . . . . . . . . . . . . . . . . 63 Making Print Settings . . . . . . . . . . . . . . . . . . . . . 64
Contents 4

Running Printer Maintenance Programs . . . . . . 65 Checking the ink level . . . . . . . . . . . . . . . . . 65 Checking the print head nozzles . . . . . . . . . . 66
Cleaning the print head nozzles . . . . . . . . . . . 67 Aligning the print head . . . . . . . . . . . . . . . . . . 68
Chapter 6 Maintenance and Troubleshooting
Maintenance . . . . . . . . . . . . . . . . . . . . . . . . . . . . |
69 |
Image problems . . . . . . . . . . . . . . . . . . . . . . . |
75 |
Cleaning your camera . . . . . . . . . . . . . . . . . . |
69 |
Printing problems . . . . . . . . . . . . . . . . . . . . . . |
77 |
Storing your camera. . . . . . . . . . . . . . . . . . . . |
70 |
List of Error Messages . . . . . . . . . . . . . . . . . . . . |
78 |
Problems and Solutions . . . . . . . . . . . . . . . . . . . |
71 |
Where to Get Help . . . . . . . . . . . . . . . . . . . . . . . |
81 |
Camera problems . . . . . . . . . . . . . . . . . . . . . . |
71 |
|
|
Appendix A Specifications and Optional AC Adapter
Specifications . . . . . . . . . . . . . . . . . . . . . . . . . . . |
83 |
Using the AC adapter . . . . . . . . . . . . . . . . . . . |
86 |
Optional AC adapter . . . . . . . . . . . . . . . . . . . . . |
86 |
|
|
Index
Contents 5

Introduction
Your new Epson® PhotoPC® L-410 is a compact digital camera that lets you capture all the special moments in your life and print beautiful photos without a computer. Its features include:
4.0 megapixel resolution, for clear, beautiful photos
3x optical zoom and 3x digital zoom
Continuous shooting mode that lets you take up to three photos per second
Direct printing to supported Epson Stylus® Photo and PictureMate™ printers
PRINT Image Framer® for adding fun frames to your photos—without a computer
PRINT Image Matching® II technology, so you can get the best possible prints
Introduction 6

Safety Instructions
Read all of these instructions before using the camera, and keep this guide handy for later reference. Follow all warnings and instructions marked on the camera and the options.
Warnings, Cautions, and Notes
w Warnings must be followed carefully to avoid bodily injury. c Cautions must be observed to avoid damage to your equipment.
Notes contain important information and useful tips on the operation of your product.
Using the camera
Do not expose the camera to severe impact; doing so may cause malfunctions, especially while the camera is operating.
Follow all warnings and instructions marked on this product.
Do not insert objects into the slots or openings on this product.
Do not touch the components inside this product unless instructed to do so in the user documentation. Never force this product’s components into place. Although this product is designed to be sturdy, rough handling can damage it.
Introduction 7

Never spill liquid onto this product.
If this product emits unusual noises, odors, or smoke, cancel the current operation and turn it off immediately. Remove the batteries and disconnect the AC adapter from the product, then unplug the AC adapter from the power outlet.
To prevent fire or electric shock, do not cover this product with a blanket or other covering that may give off a static electric shock.
To prevent fire or electric shock, do not expose this product or its options to rain or moisture.
To prevent fire or explosion, do not use this product where flammable or volatile gas is stored.
Do not use this product outdoors during a thunderstorm.
Do not use this product after moving it between extreme temperatures, which may cause condensation to form on electronic parts.
Use only the recommended AC adapter (B867062) for this product.
Using the battery
If battery acid gets into your eyes or on your skin, immediately rinse the affected area thoroughly with water and seek medical treatment. If a battery is swallowed, seek medical treatment immediately.
Use only AA-size batteries or a CR-V3 type battery for the camera according to the directions in the user documentation.
Do not use the battery that comes with this product for other devices.
To protect against short-circuiting, do not remove the outside sleeve of the battery.
Introduction 8

Do not handle the battery with wet hands or use it near water.
Do not expose the battery to water or high humidity.
Do not drop, puncture, disassemble, mutilate, or short-circuit the battery.
Do not place the battery near or into fire or water.
Do not use a battery that is leaking or damaged in any way.
Keep the battery away from heat sources.
Do not insert objects into any openings in the battery as they may touch dangerous voltage points or short-circuit components.
Prevent the battery from coming into contact with metal objects that could short-circuit it, such as coins or keys.
Do not use the battery if its terminals are soiled.
Do not insert the battery into power outlets or other power sources such as car cigarette lighter sockets.
Do not solder wires or terminals directly to the battery.
Do not touch the battery terminals.
Keep the battery away from open flame.
If overheating, discoloration, or distortion occur, remove the battery from this product and do not use it.
When using a rechargable battery, recharge the battery after discharging it completely.
Introduction 9

Storing the battery
When not using this product for a long period, remove the battery and store it separately.
Do not store the battery where the temperature or humidity is very high.
Store the battery out of children’s reach.
Disposing of the battery
Before disposing of the battery, make sure you discharge it completely.
wWarning:
Be sure to completely cover the ends of the battery with tape to prevent combustion or explosion when disposing of it.
Do not dispose of the battery as ordinary refuse. Instead, dispose of it in a collection or recycle box in accordance with local laws.
Using a memory card
Only memory cards designed for the product’s specifications can be used.
The methods for using memory cards vary according to card type. Be sure to refer to the documentation included with your memory card for details.
Turn the camera off before installing or removing the memory card.
Introduction 10
Using the LCD monitor
The LCD monitor on this product may contain a few small bright or dark spots. These are normal and do not mean that your LCD monitor is damaged in any way.
If the LCD monitor on this product is damaged, consult your dealer.
If the liquid crystal solution contained in the LCD monitor on this product leaks out and gets onto your hands, wash them thoroughly with soap and water. If it gets into your eyes, flush them immediately with water. If discomfort or vision problems remain after a thorough flushing, see a doctor immediately.
Use only a soft, dry cloth to clean the display. Do not use liquid or chemical cleaners.
Storing, maintaining, or transporting the camera
Do not store this product outdoors, near water, or in a location subject to high temperature or humidity, rapid changes in temperature or humidity, direct sunlight, or strong light sources.
Unplug this product from the power outlet before cleaning it. Use a damp cloth for cleaning and do not use liquid or aerosol cleaners.
Remove the batteries and unplug this product and refer servicing to qualified service personnel under the following conditions: The power cord or plug is damaged; liquid has entered this product or its options; this product or its options have been dropped or the case is damaged; this product or its options do not operate normally or exhibit a distinct change in performance.
Introduction 11
Chapter 1
Getting Started
This chapter identifies the items included with your camera, describes the parts of the camera, and tells you how to set it up.
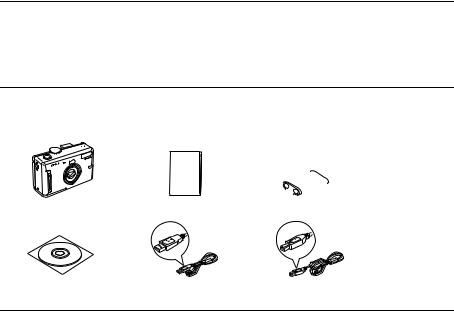
Unpacking Your Camera
Make sure that all of the items shown below were included in the box with your camera.
|
|
|
|
|
|
|
Camera |
Camera Basics guide |
CR-V3 battery |
||||
Software CD-ROM |
PC USB cable B |
Printer USB cable A |
Getting Started |
12 |

Camera Parts and Their Function
See “Camera buttons” on page 15 for more information.
Front/top view
Mode dial
Shutter button
Strap holder 
Microphone
Manual mode
Continuous shooting mode
Video mode
Automatic
mode 
 Setup mode Playback mode
Speaker
Flash
 Self-timer light
USB light
 Lens barrier
Getting Started |
13 |

Bottom/rear view
Connector cover |
|
Battery/memory card cover |
|
|
|
USB connector |
Tripod mount |
|
|
AC adapter connector |
|
Back view |
|
|
Indicator lights Viewfinder |
POWER button |
Zoom buttons |
|
|
|
|
|
Self-timer / u button |
|
|
OK button |
Print button |
|
Flash / r button |
|
|
|
P.I.F. button |
|
Delete / d button |
Display button |
Macro / l button |
|
|
||
Memory access light |
MENU button |
|
|
|
|
Getting Started |
14 |

Camera buttons
Name |
Function |
|
|
|
|
Mode dial |
Switch camera modes by turning this dial. |
|
|
|
|
Shutter button |
Take a photo. |
|
|
|
|
|
Print button |
Print photos using the direct print feature. |
|
|
|
|
P.I.F. button |
Print with frames or make P.I.F. settings. |
|
|
|
POWER button |
Turn the camera on or off. |
|
|
|
|
|
Zoom buttons |
Press the W button to zoom out (wide angle). Press the T button to |
|
|
zoom in (telephoto). |
|
|
|
MENU button |
Display or cancel the menu (not available in automatic mode). |
|
|
|
|
u |
button |
Select menu items or set the self-timer when you are taking pictures |
|
|
(automatic or manual mode). |
|
|
|
d |
button |
Select menu items or delete the selected photo in playback mode. |
|
|
|
r |
button |
Select menu items or set the flash when you are taking pictures |
|
|
(automatic or manual mode). |
|
|
|
l |
button |
Select menu items or select macro mode when you are taking |
|
|
pictures (automatic or manual mode). |
|
|
|
Getting Started |
15 |

Name |
Function |
|
|
OK button |
Confirm the currently selected setting or menu item. |
|
|
DISP button |
Turn the LCD screen and settings display on or off. |
|
|
Camera lights
Name |
Function |
|
|
USB light |
Flashes blue when the camera is connected to a computer or printer. |
|
|
Two Indicator lights |
Green light (upper) is on when the focus is locked. It flashes when: |
|
• the focus is not locked |
|
• the camera is in power save mode |
|
• shooting a video |
|
• a photo is being processed |
|
• a “shake warning” is detected |
|
Red light (lower) flashes when: |
|
• battery power is low |
|
• the camera cannot determine the exposure setting |
|
• the memory card is full |
|
|
Self-timer light |
Flashes red when taking a photo with the self-timer |
|
|
Memory access light |
Turns orange when accessing a memory card or computer. |
|
|
Getting Started |
16 |
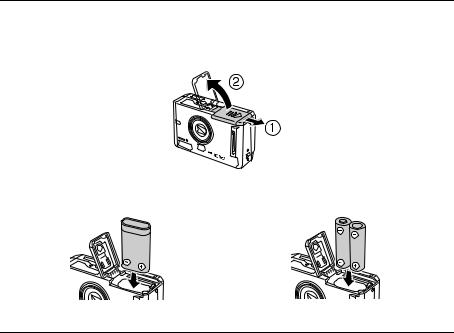
Installing the Battery
You can use either a CR-V3 battery, like the one included with the camera, or two AA batteries.
1.To open the battery/memory card cover, slide it to the right until it pops up.
2.Insert the battery into the compartment, positioning the + and – ends as shown on the inside of the battery/memory card cover.
CR-V3 battery |
Two AA-type batteries |
Getting Started |
17 |

3.To close the battery/memory card cover, press it down, then slide it back into place.
wWarning:
Do not carry loose batteries in your pockets.
Battery life
As the battery loses power, the icon that appears when you turn on the camera changes from 
 to
to 
 . When
 is flashing, battery power is low and you can no longer take photos. When the red indicator lamp flashes and the camera automatically shuts off, you need to replace the battery.
Getting Started |
18 |

Installing and Removing Memory Cards
You can take pictures and save them in the camera without a memory card. However, you can store more pictures when you use a memory card. Once a card is inserted, all the photos you take are saved on the card, not in the camera, and you can only view the photos on the card.
You can use either of the following types of cards:
SD card (Secure Digital®) up to 512 MB
MM card (Multimedia,® MMC V 2.1 or later) up to 512 MB (Hitachi® and SanDisk® MM cards are recommended)
cCaution:
Avoid using or storing memory cards in direct sunlight, or in places that are extremely hot, humid, or dusty.
Make sure the camera is turned off before installing or removing a memory card.
Make sure you insert memory cards in the correct orientation. Otherwise, the memory card and the camera may be damaged.
Getting Started |
19 |

To install a memory card:
1.Make sure the camera is turned off.
1.To open the battery/memory card cover, slide it to the right until it pops up.
2.Position the card as shown and slide it all the way into the slot:
 Notch
Notch
Getting Started |
20 |
3.To close the battery/memory card cover, press it down, then slide it back into place.
To remove a memory card:
1.Make sure the camera is turned off.
2.Open the battery/memory card cover.
3.Push the memory card to release it. The card pops out.
4.Pull out the card and close the cover.
Getting Started |
21 |

Note:
You can protect the data in the memory card by sliding the lock lever on the side of the card. This prevents you from deleting or storing additional photos on the card.
Turning Your Camera On and Off
To turn on the camera, press the POWER button. The lens cover opens and the lens extends. To turn off the camera, press the POWER button. The lens retracts and the lens cover closes.
 POWER button
The LCD screen may turn off to save battery power. Press any button to turn the screen back on. If the camera is idle for more than three minutes, the power shuts off. Press the POWER button to turn it back on.
You can change the power save timing if you want. See “Adjusting Camera Settings” on page 41 for more information.
Getting Started |
22 |

Making the Initial Settings
When you turn on the camera the first time, you need to select your language and set the date and time.
1.Select the language you want to use with the u d l r buttons, then press the OK button.
The Date/Time screen is displayed. This allows you to set the time and change the format from a 24-hour clock to a 12-hour clock.
2.Press the u d buttons to change the value of the selected item.
3.After you finish making settings, select a different item by pressing the l r buttons.
4.Repeat steps 2 and 3 until you finish making the date and time settings, then press the OK button.
Note:
You can change these and other settings later from the Setup Menu. For details, see “Adjusting Camera Settings” on page 41.
Getting Started |
23 |

Chapter 2
Taking Photos
Your camera has several modes for taking pictures. Turn the dial on top of the camera to choose the mode you want to use.
Automatic mode
Camera settings are automatically adjusted to give you the best shot. All you have to do is press the shutter button.
Manual mode
You can adjust a variety of camera settings, including resolution, exposure compensation, sensitivity, white balance, and more.
Continuous shooting mode
You can capture a series of shots, up to 3 photos per second. (For details, see “Continuous Shooting” on page 35.)
Video mode
You can record videos with sound. (For details, see “Recording Videos” on page 39).
Taking Photos |
24 |

Taking Photos Using the LCD Screen
You can take photos while viewing the subject on the LCD screen in either automatic or manual modes. (For instructions on taking pictures using just the viewfinder, which saves power, see “Taking Photos Using the Viewfinder Only” on page 35.)
1.Turn the Mode dial to  automatic or
  manual mode.
2.Center your subject in the middle of the square focus frame on the screen.
3.Press and hold the shutter button halfway down. The focus frame turns green and the focus is set. If you want to reframe your picture, move the camera until the photo you want appears on the screen.
4.Press the shutter button all the way down. The camera beeps as it captures the image.
If you want to turn off or change the beep sound, see “Adjusting Camera Settings” on page 41.
Note:
The LCD screen may turn off to save battery power after you take a picture. Press any button or turn the Mode dial to turn the screen back on.
Zooming In and Out
For most photos you must stand at least 20 inches (50 cm) away from your subject. (For close-up shooting, you can use the macro setting; see “Taking Close-ups With Macro Mode” on page 28.) You can use both optical and digital zoom to capture a closer view of your subject.
Taking Photos |
25 |

Optical zoom
To zoom in on your subject, press the  T (telephoto) button.
To zoom out, press the  W (wide-angle) button.
Digital zoom
The digital zoom feature lets you move in even closer to your subject. First, you need to use Setup Menu 1 to enable digital zoom. For instructions, see “Adjusting Camera Settings” on page 41.
1.To use digital zoom, press and hold the  T button to maximize the optical zoom.
2.Release the button, then press it again. The digital zoom indicator appears on the right side of the zoom bar at the bottom of the screen, and the zoom increases to 2×.
3.Repeat step 2 to increase to 3×. The digital zoom indicator moves further right on the zoom bar.
4.To return to optical zoom mode, press the  W button.
Digital zoom can reduce the resolution of your photos, as indicated in the following table:
Quality (Resolution) setting |
Resolution without |
Resolution with |
Resolution with |
|
digital zoom |
2× Digital zoom |
3× Digital zoom |
N640 |
640 × 480 |
640 × 480 |
640 × 480 |
N1600 |
1600 × 1200 |
1280 × 960 |
800 × 600 |
N2304 |
2304 × 1728 |
1280 × 960 |
800 × 600 |
Taking Photos |
26 |

Controlling the Flash
You can change the flash setting by pressing the r  Flash button. The flash mode changes each time you press the
  Flash button.
|
Auto-flash (default setting) |
The camera detects the brightness automatically and sets off |
|
|
the flash if necessary. In a dark setting, the flash is used |
|
|
automatically. |
|
|
|
|
Flash off |
Turns off the flash even in dark settings. |
|
|
|
|
Auto red-eye reduction |
Use this setting when photographing people with the flash at |
|
|
night or indoors. The flash will go off once and will go off again |
|
|
when the photo is taken. This will help to reduce the red-eye |
|
|
effect. |
|
|
|
|
Fill-in flash (manual mode |
The flash will go off for every shot. Use this setting when the |
|
only) |
background is bright or when you are shooting against the sun. |
|
|
|
|
Slow synchro (manual |
The flash is combined with a slow shutter speed. This allows you |
|
mode only) |
to take an action photo with a blurred background. |
|
|
|
Taking Photos |
27 |

Flash range
The flash range varies depending on the sensitivity setting. For automatic shooting, the flash range is 1.6 to 12 feet (wide-angle) or 1.6 to 6.9 feet (telephoto).
ISO sensitivity |
Wide angle |
Telephoto |
|
|
|
Automatic |
1.6 to 12 feet (0.5 to 3.7 m) |
1.6 to 6.9 feet (0.5 to 2.1 m) |
|
|
|
100 |
2.3 to 8.5 feet (0.7 to 2.6 m) |
1.6 to 4.9 feet (0.5 to 1.5 m) |
|
|
|
200 |
3.3 to 12.1 feet (1.0 to 3.7 m) |
1.9 to 6.9 feet (0.6 to 2.1 m) |
|
|
|
400 |
4.6 to 17.1 feet (1.4 to 5.2 m) |
2.6 to 9.9 feet (0.8 to 3.0 m) |
|
|
|
For information about ISO sensitivity, see “Setting Light Sensitivity” on page 37.
Taking Close-ups With Macro Mode
The macro mode allows you to focus on subjects between 4.3 and 19.6 inches (11 and 50 cm) away from the camera. Use of the flash is not recommended for macro close-ups, so make sure you have adequate lighting. For best results, use a tripod when shooting in the macro mode.
1.Turn the Mode dial to  automatic or
  manual mode.
2.Press the  l button to switch to the macro mode.
3.Center your subject in the middle of the square focus frame on the screen.
Taking Photos |
28 |

4.Press and hold the shutter button halfway down. The focus frame turns green and the focus is set. If you want to reframe your picture, move the camera until the photo you want appears on the screen.
5.Press the shutter button all the way down. The camera beeps as it captures the image.
Taking Pictures With the Self-Timer
You can use the self-timer to create a delay between the time you press the shutter and the actual image capture. This allows you to take a picture of yourself.
1.Secure the camera on a flat surface or on a tripod.
2.Turn the Mode dial to  automatic or
  manual mode.
3.Press the u  button. The
  self-timer icon is displayed on the LCD screen.
4.Center the image and press the shutter button all the way down. The countdown starts, and 10 seconds later the shutter releases automatically.
Note:
In manual or continuous shooting mode, you can switch the timer from 10 seconds to 2 seconds. In step 3 above, press the  self-timer button twice to switch the timer to 2 seconds.
Taking Photos |
29 |
 Loading...