


 Loading...
®
English
User’s Guide
1

All rights reserved. No part of this publication may be reproduced, stored in a retrieval system, or transmitted in any form or by any means, electronic, mechanical, photocopying, recording, or otherwise, without the prior written permission of SEIKO EPSON CORPORATION. The information contained herein is designed only for use with this EPSON product. EPSON is not responsible for any use of this information as applied to other products.
Neither SEIKO EPSON CORPORATION nor its affiliates shall be liable to the purchaser of this product or third parties for damages, losses, costs, or expenses incurred by the purchaser or third parties as a result of accident, misuse, or abuse of this product or unauthorized modifications, repairs, or alterations to this product, or (excluding the U.S.) failure to strictly comply with SEIKO EPSON CORPORATION’s operating and maintenance instructions.
SEIKO EPSON CORPORATION shall not be liable for any damages or problems arising from the use of any options or any consumable products other than those designated as Original EPSON Products or EPSON Approved Products by SEIKO EPSON CORPORATION.
SEIKO EPSON CORPORATION shall not be held liable for any damage resulting from electromagnetic interference that occurs from the use of any interface cables other than those designated as EPSON Approved Products by SEIKO EPSON CORPORATION.
EPSON is a registered trademark and EPSON Stylus is a trademark of SEIKO EPSON CORPORATION.
Microsoft and Windows are registered trademarks of Microsoft Corporation.
Apple and Macintosh are registered trademarks of Apple Computer, Inc.
SD is a trademark.
General Notice: Other product names used herein are for identification purposes only and may be trademarks of their respective owners. EPSON disclaims any and all rights in those marks.
Copyright © 2003 by SEIKO EPSON CORPORATION, Nagano, Japan
2

Contents
English
Chapter 1 Introduction
Main Features . . . . . . . . . . . . . . . . . . . . . . . . . . . . . . . . . . . . .7
Safety Instructions . . . . . . . . . . . . . . . . . . . . . . . . . . . . . . . . .7
Warnings, Cautions, and Notes . . . . . . . . . . . . . . . . .7
Chapter 2 Getting Started
Unpacking Your PhotoPC P-1000 . . . . . . . . . . . . . . . . . . .14 Parts and Their Functions . . . . . . . . . . . . . . . . . . . . . . . . . .15 Setting Up PhotoPC P-1000. . . . . . . . . . . . . . . . . . . . . . . . .17 Charging the battery . . . . . . . . . . . . . . . . . . . . . . . . .17 Setting and removing a memory card. . . . . . . . . . .19 Turning the power on . . . . . . . . . . . . . . . . . . . . . . . .22 Turning the power off . . . . . . . . . . . . . . . . . . . . . . . .24 How to use the menu. . . . . . . . . . . . . . . . . . . . . . . . .24 About the stand . . . . . . . . . . . . . . . . . . . . . . . . . . . . .25 About the AC adapter . . . . . . . . . . . . . . . . . . . . . . . .25
Chapter 3 Viewing and Managing Images
Viewing Images. . . . . . . . . . . . . . . . . . . . . . . . . . . . . . . . . . 27 Available types of image files . . . . . . . . . . . . . . . . . 27 Displaying images as thumbnails. . . . . . . . . . . . . . 27 Displaying images as a slide show . . . . . . . . . . . . . 29 Zooming an image . . . . . . . . . . . . . . . . . . . . . . . . . . 30
Copying or Deleting the Images . . . . . . . . . . . . . . . . . . . . 31 Copying images from a memory card to
PhotoPC P-1000 . . . . . . . . . . . . . . . . . . . . . . . . . . 31 Copying images from PhotoPC P-1000 to a
memory card. . . . . . . . . . . . . . . . . . . . . . . . . . . . . 32 Copying images from the Card Case to
an album . . . . . . . . . . . . . . . . . . . . . . . . . . . . . . . . 33 Deleting images . . . . . . . . . . . . . . . . . . . . . . . . . . . . . 34 Using Albums . . . . . . . . . . . . . . . . . . . . . . . . . . . . . . . . . . . 34 About the Album Case . . . . . . . . . . . . . . . . . . . . . . . 34 Copying a favorite image to an album. . . . . . . . . . 34
Copying all the images in a folder to
an album . . . . . . . . . . . . . . . . . . . . . . . . . . . . . . . . 35 Using the Pop Up Menu. . . . . . . . . . . . . . . . . . . . . . . . . . . 36
3

Chapter 4 Direct Printing
Before Printing . . . . . . . . . . . . . . . . . . . . . . . . . . . . . . . . . . . 40 Supported printers. . . . . . . . . . . . . . . . . . . . . . . . . . . 40 Available types of paper . . . . . . . . . . . . . . . . . . . . . . 40 Connecting PhotoPC P-1000 to a printer . . . . . . . . 41 Selecting the appropriate printer driver. . . . . . . . . 41
Printing Images . . . . . . . . . . . . . . . . . . . . . . . . . . . . . . . . . . 43
Chapter 5 Using PhotoPC P-1000 With Other Devices
Using PhotoPC P-1000 With a Computer . . . . . . . . . . . . 45 Displaying images on the monitor . . . . . . . . . . . . . 45 Using Video Output . . . . . . . . . . . . . . . . . . . . . . . . . . . . . . 46 Storing Images to a CD-R/RW . . . . . . . . . . . . . . . . . . . . . 46
Chapter 6 Customizing Settings
Customizing Albums . . . . . . . . . . . . . . . . . . . . . . . . . . . . . 49 Creating a new album . . . . . . . . . . . . . . . . . . . . . . . . 49 Changing an album’s name . . . . . . . . . . . . . . . . . . . 50 Copying an album to CD-R/RW. . . . . . . . . . . . . . . 51 Deleting an album . . . . . . . . . . . . . . . . . . . . . . . . . . . 51
Changing PhotoPC P-1000 Settings. . . . . . . . . . . . . . . . . . 52 Display settings . . . . . . . . . . . . . . . . . . . . . . . . . . . . . 53 Slide show settings . . . . . . . . . . . . . . . . . . . . . . . . . . 53 Language setting . . . . . . . . . . . . . . . . . . . . . . . . . . . . 54 Date and time settings. . . . . . . . . . . . . . . . . . . . . . . . 54
Sound setting. . . . . . . . . . . . . . . . . . . . . . . . . . . . . . . 55 LCD setting . . . . . . . . . . . . . . . . . . . . . . . . . . . . . . . . 55 Power save settings . . . . . . . . . . . . . . . . . . . . . . . . . 56 Video out setting. . . . . . . . . . . . . . . . . . . . . . . . . . . . 56 Copy mode settings . . . . . . . . . . . . . . . . . . . . . . . . . 57 Album shortcut settings. . . . . . . . . . . . . . . . . . . . . . 57
Changing the Printer Driver Settings . . . . . . . . . . . . . . . 58
Chapter 7 Operating the Software
System Requirements. . . . . . . . . . . . . . . . . . . . . . . . . . . . . 59
Installing the Software . . . . . . . . . . . . . . . . . . . . . . . . . . . . 60
Starting the Software . . . . . . . . . . . . . . . . . . . . . . . . . . . . . 61
For Windows . . . . . . . . . . . . . . . . . . . . . . . . . . . . . . . 61
For Macintosh . . . . . . . . . . . . . . . . . . . . . . . . . . . . . . 61
Uninstalling the Software . . . . . . . . . . . . . . . . . . . . . . . . . 61
Finding More Information. . . . . . . . . . . . . . . . . . . . . . . . . 62
Chapter 8 Maintenance and Troubleshooting
Cleaning PhotoPC P-1000 . . . . . . . . . . . . . . . . . . . . . . . . . 63 Troubleshooting . . . . . . . . . . . . . . . . . . . . . . . . . . . . . . . . . 63 Status and error messages . . . . . . . . . . . . . . . . . . . . 63 Problems and solutions . . . . . . . . . . . . . . . . . . . . . . 66 Power supply problems. . . . . . . . . . . . . . . . . . . . . . 67 Image display problems . . . . . . . . . . . . . . . . . . . . . 67 Image operation problems. . . . . . . . . . . . . . . . . . . . 67 Printing problems . . . . . . . . . . . . . . . . . . . . . . . . . . . 68
4

Registering a new printer driver . . . . . . . . . . . . . . . . . . . .69 Using Printer Utilities . . . . . . . . . . . . . . . . . . . . . . . . . . . . .70 Resetting PhotoPC P-1000. . . . . . . . . . . . . . . . . . . . . . . . . .72 Contacting Customer Support . . . . . . . . . . . . . . . . . . . . . .72
Appendix A Appendix
Standards and Approvals . . . . . . . . . . . . . . . . . . . . . . . . . .75 PhotoPC P-1000 . . . . . . . . . . . . . . . . . . . . . . . . . . . . .75 AC adapter . . . . . . . . . . . . . . . . . . . . . . . . . . . . . . . . .75
Specifications. . . . . . . . . . . . . . . . . . . . . . . . . . . . . . . . . . . . .75 General. . . . . . . . . . . . . . . . . . . . . . . . . . . . . . . . . . . . .75 Electrical. . . . . . . . . . . . . . . . . . . . . . . . . . . . . . . . . . . .76 Interface . . . . . . . . . . . . . . . . . . . . . . . . . . . . . . . . . . . .76 Battery . . . . . . . . . . . . . . . . . . . . . . . . . . . . . . . . . . . . .76 AC adapter (P62L) . . . . . . . . . . . . . . . . . . . . . . . . . . .77
About Optional Accessories . . . . . . . . . . . . . . . . . . . . . . . .77
English
5

6

Chapter 1
Introduction
Main Features
With PhotoPC P-1000, you can easily view, keep, and print images you have taken with a digital camera. The main features are described below.
You can view images easily in high resolution anywhere, anytime without a computer or other special device.
You can print images directly to your EPSON photo printer. PhotoPC P-1000 can connect with various EPSON photo printers without a computer and print images directly.
You can store images in PhotoPC P-1000, and you can also archive the images in a CD-R/RW.
Note:
Do not expose the PhotoPC P-1000 to severe impact, doing so may cause malfunctions especially during turning operations.
We strongly recommend you back up files stored on the HDD to another storage device periodically.
EPSON is not liable for any problems resulting from the loss or corruption of data on the HDD.
Safety Instructions
Read all of these instructions before using PhotoPC P-1000, and keep this guide handy for later reference. Follow all warnings and instructions marked on PhotoPC P-1000 and the options.
Warnings, Cautions, and Notes
wWarnings
must be followed carefully to avoid bodily injury.
cCautions
must be observed to avoid damage to your equipment.
1English
1
1
1
1
1
1
1
1
1
Introduction 7

Notes
contain important information and useful tips on the operation of your product.
When using PhotoPC P-1000
Follow all warnings and instructions marked on this product.
Do not insert objects into the slots or openings on this product.
Do not touch the components inside this product unless instructed to do so in the user documentation. Never force this product’s components into place. Although this product is designed to be sturdy, rough handling can damage it.
Never spill liquid onto this product.
If this product emits unusual noises, odors, or smoke, cancel the current operation and turn it off immediately. Remove the battery and disconnect the AC adapter from the product, then unplug the AC adapter from the power outlet. Contact our Customer Support.
To prevent fire or electric shock, do not cover this product with a blanket or other covering that may give off a static electric shock.
To prevent fire or electric shock, do not expose this product or its options to rain or moisture.
To prevent fire or explosion, do not use this product where flammable or volatile gas is stored.
Do not use this product outdoors during a thunderstorm.
Do not use this product after moving it between extreme temperatures, which may cause condensation to form on electronic parts.
When using the battery
If battery acid gets into your eyes or on your skin, immediately rinse the affected area thoroughly with water and seek medical treatment. If a battery is swallowed, seek medical treatment immediately.
Use only an EPSON Li-ion battery for PhotoPC P-1000 according to the directions in the user documentation.
8 Introduction

Do not use the battery that comes with this product for other devices.
To protect against short-circuiting, do not remove the outside sleeves of the battery.
Do not handle the battery with wet hands or use them near water.
Do not expose the battery to water or high humidity.
Do not drop, puncture, disassemble, mutilate, or short-circuit the battery.
Do not place the battery near or into fire or water.
Do not use batteries that are leaking or damaged in any way.
Do not charge the battery on devices except this product.
Do not charge the battery near open flame or in very hot locations.
Keep batteries away from heat sources.
Do not insert objects into any openings as they may touch dangerous voltage points or short-circuit components.
Prevent the battery from coming into contact with metal objects that could short-circuit it, such as coins or keys.
Do not insert the battery into power outlets or other power sources such as car cigarette lighter sockets.
Do not solder wires or terminals directly to the battery.
Do not touch battery terminals.
Keep batteries away from open flame if they leak or smell strange.
If overheating, discoloration, or distortion occur, remove the battery from this product and do not use it.
When Storing the batteries
When not using this device for a long period, remove the batteries from this product and store them separately.
1English
1
1
1
1
1
1
1
1
1
Introduction 9

Do not store batteries where the temperature or humidity is very high.
Store batteries out of children’s reach.
Discharge the battery completely before storing it for a long time.
When not using the battery for a long time, charge the battery and then discharge it completely about once a year during storage.
When Disposing of the batteries
Before disposing of batteries, make sure you discharge them completely.
wWarning:
Be sure to securely cover the all end of the battery with tape to prevent combustion or explosion when disposing.
Do not dispose of batteries as ordinary refuse. Instead, dispose of them in a collection or recycle box in accordance with local laws.
For the Netherlands users:
Do not dispose of the batteries with ordinary refuse. Instead, dispose of them as small chemical waste in accordance with local laws, and the following Dutch Government Gazette 45, KCA Marking:
Bij dit produkt zijn batterijen geleverd. Wanneer deze leeg zijn, moet u ze niet weggooien maar inleveren als KCA.
For German users:
Do not dispose of batteries with ordinary refuse. Instead, dispose of them in a recycle box in accordance with local laws.
When using the AC adapter
Use only the type of power source indicated on the AC adapter’s label, and always supply power directly from a standard, domestic power outlet with a power cord that meets the relevant local safety standards.
Place the AC adapter near an electrical outlet where the power cord can be easily unplugged.
10 Introduction
The AC adapter is designed for use and provided with this product. Do not attempt to use it with other electronic devices unless specified.
Do not remove the AC adapter from this device during operations.
The AC adapter included is designed for use with this product. Use of any other adapter could result in fire, electrical shock, or injury.
Use only the power source that meets the power requirements indicated on the label attached to the product. If you are not sure of the power supply specifications in your area, contact our local power company or contact our Customer Support.
Make sure the total amperage of all devices plugged into the power outlet does not exceed the power outlet’s ampere rating.
If you plan to use this product in Germany, the building installation must be protected by a 16 amp circuit breaker to provide adequate short-circuit protection and over-current protection for this product.
Do not use a damaged or frayed AC adapter.
If you use an extension cord with this product, make sure the total amperage of all devices plugged into the extension cord does not exceed the cord’s amperage rating.
Never disassemble, modify, or attempt to repair the AC adapter by yourself except as specifically explained in this guide.
Do not use power outlets controlled by wall switches or automatic timers.
Do not use power outlets on the same circuit as large motors or other appliances that may cause voltage fluctuations.
Avoid using outlets on the same circuit as photocopies or air control systems that regularly switch on and off.
Position this product’s power cord so that it will not be stepped on or run over.
Do not place any objects on the power cord and the AC adapter.
Keep the power cord straight at the ends and at the points where it enters the transformer.
1English
1
1
1
1
1
1
1
1
1
Introduction 11

The power cord should be placed to avoid abrasions, cuts, fraying, crimping, kinking, and other damage.
If you cannot insert the plug into the power outlet, contact an electrician.
When using a memory card
Only memory cards designed for the product’s specifications can be used.
The methods for using memory cards vary according to card type. Be sure to refer to the documentation included with your memory card for details.
Do not remove a memory card or turn off the product while the ACCESS light is flashing.
When using the LCD
The LCD panel on this product may contain a few small bright or dark spots. These are normal and do not mean that your LCD panel is damaged in any way.
If the LCD panel on this product is damaged, consult your dealer.
If the liquid crystal solution contained in the LCD panel on this product leaks out and gets onto your hands, wash them thoroughly with soap and water. If it gets into your eyes, flush them immediately with water. If discomfort or vision problems remain after a thorough flushing, see a doctor immediately.
Only use a soft, dry cloth to clean the display. Do not use liquid or chemical cleaners.
When storing, maintaining, or transporting PhotoPC P-1000
Do not store this product outdoors.
Do not store this product near water.
Do not store this product in a location subject to high temperature or humidity.
Do not store this product in a location subject to rapid changes in temperature or humidity.
Do not store this product in a location subject to direct sunlight or strong light sources.
12 Introduction

Unplug this product from the power outlet before cleaning it. Use a damp cloth for cleaning and do not use liquid or aerosol cleaners.
Remove the battery from and unplug this product and refer servicing to qualified service personal under the following conditions: The power cord or plug is damaged; liquid has entered this product or its options; this product or its options have been dropped or the case is damaged; this product or its options do not operate normally or exhibit a distinct change in performance.
Safety information for United Kingdom users
The following safety information applies to the AC adapter.
wWarning:
Refer to the rating plate for the voltage and check that the appliance voltage corresponds to the supply voltage.
Important:
The wires in the mains lead fitted to this appliance are colored in accordance with the following code:
Blue — Neutral
Brown — Live
As the colours of the wires in the mains lead of this appliance may not correspond with the coloured markings identifying the terminals in your plug, proceed as follows;
The blue wire must be connected to the terminal in the plug marked with the letter N.
The brown wire must be connected to the terminal in the plug marked with the letter L.
If damage occurs to the plug, replace the cord set or consult a qualified electrician.
For United Kingdom, Hong Kong, and Singapore users
Replace fuses only with fuses of the correct size and rating.
1English
1
1
1
1
1
1
1
1
1
Introduction 13

Chapter 2
Getting Started
Unpacking Your PhotoPC P-1000
Make sure that all of the items shown below were included in the box with your PhotoPC P-1000.
PhotoPC P-1000 |
Stand |
Carrying case |
USB cables (two types) |
VIDEO cable |
Lithium-ion battery |
AC adapter*
|
|
|
|
|
|
|
|
|
|
|
|
|
|
|
|
|
|
|
|
|
|
|
|
|
|
|
|
|
|
|
|
|
|
|
User’s Guide (this guide) |
Software CD-ROM |
|||||
*The plug type for the AC adapter may vary, depending on the local standards.
14 Getting Started

Parts and Their Functions |
Back |
|
|
|
|
Front |
battery cover connector cover |
video output connector |
|
|
|
|
|
reset switch |
memory card slot |
power switch |
USB |
|
|
|
|
|
interface |
|
|
connector |
|
|
AC adapter |
|
|
connector |
battery cover release
LCD |
control panel |
2English
2
2
2
2
2
2
2
2
2
Getting Started |
15 |
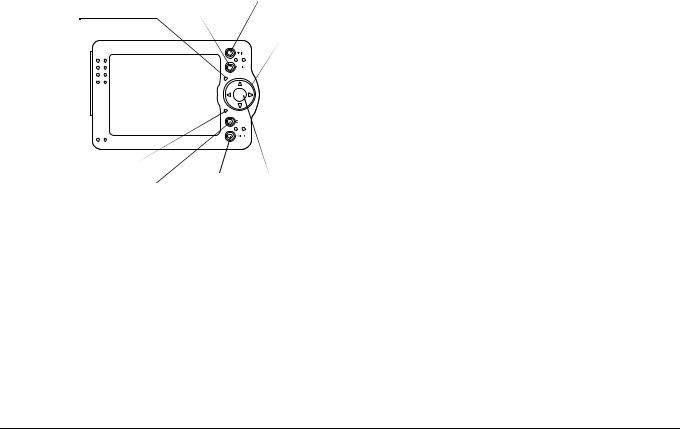
LCD and control panel
|
PRINT button |
|
MENU button |
ACCESS light |
Four-way |
|
button |
CHARGE light |
|
|
CANCEL button |
|
|
OK button |
|
|
|||
|
|
|
|||
|
|
||||
|
|
|
|
|
|
|
|
|
ILLUMINATION light |
||
PRINT button |
Press this button to display |
|
the Print menu. |
|
|
MENU button |
Press this button once to |
|
display the pop up menu. For |
|
details, see “Using the Pop Up |
|
Menu” on page 36. |
|
Hold this button down for a |
|
short time to delete the |
|
selected image or folder. |
|
|
ACCESS light (Red) |
On when accessing data on |
|
the HDD or a memory card. |
|
|
Four-way button |
Press this button to move the |
(Up/ down/Left/Right) |
cursor or highlight. You can |
|
select an object by pressing |
|
this button to the right, left, |
|
up, or down. |
|
|
ILLUMINATION light |
Flashes during such |
(Blue) |
operations as turning the |
|
power on, or during printing. |
|
|
CHARGE light (Green) |
Flashes when the battery is |
|
being charged. |
|
|
OK button |
Press this button to determine |
|
the selection and proceed to |
|
the next step. |
|
|
CANCEL button |
Press this button to cancel the |
|
selection and return to the |
|
previous screen. |
|
|
16 Getting Started
Setting Up PhotoPC P-1000
After unpacking your PhotoPC P-1000, set it up so it is ready to use. This section describes how to charge the battery, set the memory card, and turn the power on and off.
Charging the battery
Your PhotoPC P-1000 comes with a lithium-ion battery. See the following sections for details on installing and replacing it.
Installing the battery
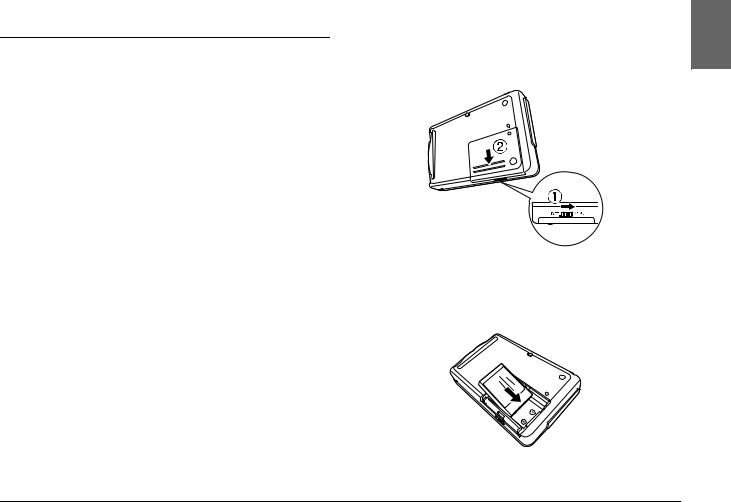
Install the battery as shown in the instructions below.
and remove the battery cover. |
English |
1. Slide the battery cover release as shown below |
2 |
|
|
|
2 |
|
2 |
|
2 |
2
2.Insert the battery into the compartment,
positioning the + and - ends with those on the |
2 |
inside of the compartment. |
|
|
2 |
2
2
2
Getting Started |
17 |
wWarning:
Do not carry loose batteries in your pockets.
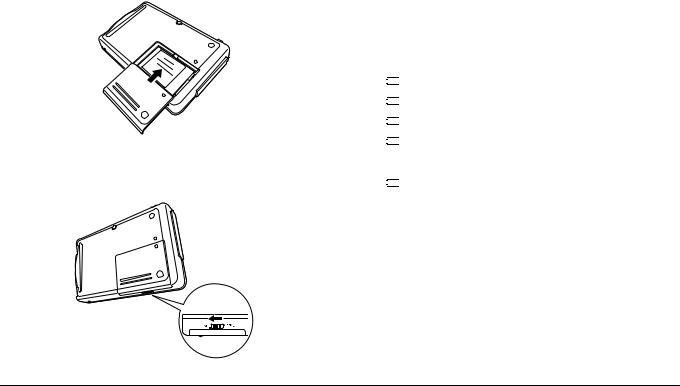
3.Reattach the battery cover.
4.Slide the battery cover release as shown below to lock the cover.
Charging the battery
After installing the battery, charge the battery using the AC adapter. If the battery is out of power, PhotoPC P-1000 turns off automatically. Be sure to recharge the battery.
Note:
The battery status is always displayed at the top right corner of the LCD.


 : Indicates sufficient battery power.


 : Indicates moderate battery power.


 : Indicates low battery power.


 : Indicates battery power is running out. PhotoPC P-1000 is shut down automatically. Charge the battery using the AC adapter.


 : Indicates the battery is charging.
18 Getting Started

1.Remove the connector cover.
connector cover
2.Connect the AC adapter to PhotoPC P-1000 and a power outlet as shown below.
cCaution:
Do not connect the AC adapter when the battery is not installed. Doing so may cause PhotoPC P-1000 to be damaged.
The CHARGE light flashes during charging. When the battery is fully charged, the CHARGE light turns off. It takes about 3.5 hours to fully charge the battery.
Setting and removing a memory card
This section describes how to set a memory card. See “Available types of memory cards” on page 20 for the types of memory cards that can be used.
cCaution:
To use a memory card correctly, read manuals provided with the memory card. When using other devices with a memory card, read manuals provided with those devices also.
Never remove a memory card while the ACCESS light is on. Doing so may cause data in the card or HDD to be lost or damaged.
Avoid using or storing the card in direct sunlight, or in places that are extremely hot, humid, or dusty.
2English
2
2
2
2
2
2
2
2
2
Getting Started |
19 |

Available types of memory cards
The following memory cards are available.
CF (CompactFlash) memory card (Type 1 and Type 2, 3.3 V, including MicroDrive)
SD memory card
Memory Stick
Smart Media (3.3 V only)
MultiMedia Card
xD-Picture Card
Note:
A commercially available CF adapter is needed to use any memory cards other than CF cards.
Setting a memory card
1.Insert the memory card into the memory card slot facing up.
Note:
Insert memory cards in the correct direction. Otherwise, the memory card and PhotoPC P-1000 may be damaged.
20 Getting Started
2.Push the memory card into the slot until the memory card lock clicks.
Note:
When inserting the memory card, the eject button does not pushed out.
Removing a memory card
1.Make sure that the ACCESS light is off.
c Caution:
Never remove a memory card while the ACCESS light is on. Doing so may cause data in the card to be lost or damaged.
2. Push the eject button down.
Note:
When the memory card is not ejected, push the eject button again. The memory card is pushed out.
The memory card is pushed out.
2English
2
2
2
2
2
2
2
2
2
Getting Started |
21 |
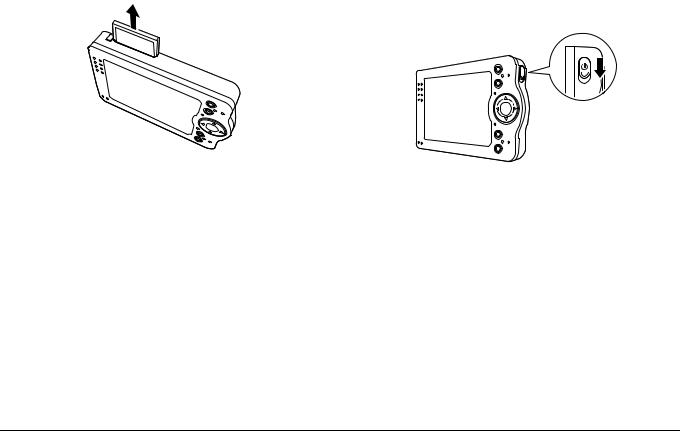
3. Pull out the memory card. |
Turning the power on |
1. Slide the power switch as shown below.
Note:
When using the memory card set in the CF adapter, do not remove only the memory card. Remove the CF adapter from the PhotoPC P-1000.
 ILLUMINATION light
The ILLUMINATION light turns on.
22 Getting Started

Setting the language
When you turn on PhotoPC P-1000 the first time, the language setting screen is displayed. Select the language you want to use with the Four-way button, and press the OK button.
 Language Setting
 Language
|
English |
|
Fran ais |
Deutsch |
Italiano |
Espanol |
Portugues |
Press OK to select and return to the previous screen. Press cancel to disregard the selection.
Setting the date and time
When you turn on PhotoPC P-1000 for the first time, the Date and Time Settings screen is displayed after you select the language. Set the date and time.
Note:
If you remove the battery from PhotoPC P-1000, the date and time settings will be erased after approximately two days maximum after the last time to used P-1000.
After changing the battery, make sure that the date and time is set correctly. If necessary, set the date and time again.
You can change the settings later. See “Changing PhotoPC P-1000 Settings” on page 52 for details about setting the date and time settings.
1.Turn the power on. The Date and Time Settings screen appears.
Date and Time Settings |
|
|
Year: |
Month: |
Day: |
2003 |
01 |
01 |
Hour: |
Minute: |
Format: |
12 |
00 |
YYYY.MM.DD |
Use the up or down button to select the year. Press OK to apply the setting.
2.Press the UP and Down buttons on the control panel to change the value of the selected item.
3.After you finish making settings, select a different item by pressing the Right and Left buttons on the control panel.
2English
2
2
2
2
2
2
2
2
2
Getting Started |
23 |
4.Repeat steps 2 and 3 until you finish making the date and time settings.
5.After you finish making all settings, press the OK button.
How to use the menu
When turning PhotoPC P-1000 on, the Main Menu appears first. All the operations can be started from this screen.
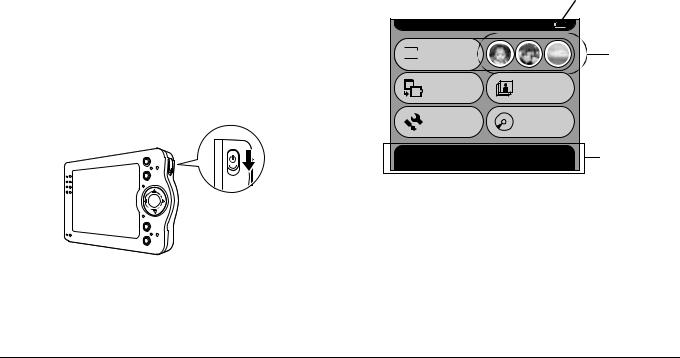
Turning the power off
1.Make sure that the ACCESS light is off.
2.Slide the power switch as shown below and hold it down for several seconds until the ILLUMINTATION light turns off.
 ILLUMINATION light
Battery icon


 Main Menu


 Browse
Copy to the |
Slide Show |
|
HDD |
||
|
Settings
 Copy to
CD-R/RW
Browse pictures in the HDD, on a memory card, or CD-R/RW. Press OK to continue.
Shortcut icons
Message area
Battery icon |
Indicates the remaining |
|
charge in the battery. See |
|
“Charging the battery” on |
|
page 18 for details. |
|
|
Browse |
Select to display images. |
|
|
24 Getting Started

Shortcut icons |
Select to access a favorite |
|
album. You can set a shortcut |
|
icon for an album. See |
|
“Album shortcut settings” on |
|
page 57 for details. |
|
|
Copy to the |
Select to copy images from |
HDD |
the memory card to the |
|
PhotoPC P-1000’s HDD. |
|
|
Slide Show |
Select to display the images in |
|
an Album as a slide show. |
|
|
Settings |
Select to set PhotoPC P-1000’s |
|
various settings. |
|
|
Copy to |
Select to store images from |
CD-R/RW |
the HDD to a CD-R/RW. |
|
|
Message area |
A message concerning the |
|
current selection is |
|
displayed. |
|
|
You can also use the pop up menu by pressing the MENU button. For details, see “Using the Pop Up Menu” on page 36.
About the stand
You can view images on the digital photo stand.
Set PhotoPC P-1000 to the stand as shown below.
About the AC adapter
PhotoPC P-1000 comes with the AC adapter (P62L).
wWarning:
Only use the AC adapter provided, which is designed for the PhotoPC P-1000. Using another adapter could cause fire, electrical shock, or injury.
2English
2
2
2
2
2
2
2
2
2
Getting Started |
25 |
Loading...