


 Loading...
Epson Stylus® NX400 Series
Quick Guide
Basic Copying, Printing, and Scanning
Maintaining Your All-in-One
Solving Problems
Contents
Introduction . . . . . . . . . . . . . . . . . . . . . . . . . . . . . . . . . . . . . . . . . . . |
4 |
Loading Paper . . . . . . . . . . . . . . . . . . . . . . . . . . . . . . . . . . . . . . . . . |
5 |
Using Special Papers . . . . . . . . . . . . . . . . . . . . . . . . . . . . . . . . . . . . . . . . |
7 |
Copying a Document or Photo . . . . . . . . . . . . . . . . . . . . . . . . . . 9 Placing the Original on the Glass . . . . . . . . . . . . . . . . . . . . . . . . . . . . . . . 9
Copying a Document . . . . . . . . . . . . . . . . . . . . . . . . . . . . . . . . . . . . . . 10
Copying a Photo . . . . . . . . . . . . . . . . . . . . . . . . . . . . . . . . . . . . . . . . . 11
Restoring and Cropping Photos . . . . . . . . . . . . . . . . . . . . . . . . . . . . . . . 12
Copy and Restore Print Settings . . . . . . . . . . . . . . . . . . . . . . . . . . . . . . . 13
Printing From a Memory Card . . . . . . . . . . . . . . . . . . . . . . . . . . |
14 |
Compatible Cards and Image Formats . . . . . . . . . . . . . . . . . . . . . . . . . . |
14 |
Inserting the Card . . . . . . . . . . . . . . . . . . . . . . . . . . . . . . . . . . . . . . . . |
15 |
Selecting Individual Photos for Printing . . . . . . . . . . . . . . . . . . . . . . . . . |
16 |
Selecting All Photos for Printing . . . . . . . . . . . . . . . . . . . . . . . . . . . . . . . |
17 |
Printing Photos From an Index Sheet . . . . . . . . . . . . . . . . . . . . . . . . . . . |
18 |
Memory Card Print Settings . . . . . . . . . . . . . . . . . . . . . . . . . . . . . . . . . |
20 |
Printing From Your Computer . . . . . . . . . . . . . . . . . . . . . . . . . . |
21 |
Printing in Windows . . . . . . . . . . . . . . . . . . . . . . . . . . . . . . . . . . . . . . |
21 |
Printing With a Macintosh . . . . . . . . . . . . . . . . . . . . . . . . . . . . . . . . . . |
23 |
Selecting the Correct Paper Type . . . . . . . . . . . . . . . . . . . . . . . . . . . . . . |
27 |
Scanning a Document or Photo . . . . . . . . . . . . . . . . . . . . . . . . |
28 |
Basic Scanning . . . . . . . . . . . . . . . . . . . . . . . . . . . . . . . . . . . . . . . . . . . |
28 |
Restoring and Correcting Photos . . . . . . . . . . . . . . . . . . . . . . . . . . . . . . |
29 |
2 Contents
Maintaining Your All-in-One . . . . . . . . . . . . . . . . . . . . . . . . . . . 30
Checking the Print Head Nozzles . . . . . . . . . . . . . . . . . . . . . . . . . . . . . . 30
Cleaning the Print Head . . . . . . . . . . . . . . . . . . . . . . . . . . . . . . . . . . . . 31
Checking Ink Levels . . . . . . . . . . . . . . . . . . . . . . . . . . . . . . . . . . . . . . . 32
Purchasing Epson Ink Cartridges . . . . . . . . . . . . . . . . . . . . . . . . . . . . . . 32
Replacing Ink Cartridges . . . . . . . . . . . . . . . . . . . . . . . . . . . . . . . . . . . . 33
. . . . . . . . . . . . . . . . . . . . . . . . . . . . . . . . . . . . . 36 Checking for Software Updates . . . . . . . . . . . . . . . . . . . . . . . . . . . . . . . 36
Error Indicators . . . . . . . . . . . . . . . . . . . . . . . . . . . . . . . . . . . . . . . . . . 37
Problems and Solutions . . . . . . . . . . . . . . . . . . . . . . . . . . . . . . . . . . . . . 38
Where To Get Help . . . . . . . . . . . . . . . . . . . . . . . . . . . . . . . . . . . . . . . 40
Notices. . . . . . . . . . . . . . . . . . . . . . . . . . . . . . . . . . . . . . . . . . . . . . . 41
Contents 3
Introduction
After you have set up your Epson Stylus® NX400 Series all-in-one as described on the Start Here sheet, turn here to:
■Load paper
■Make a copy of a document or photo
■Print from a memory card or digital camera
■Get the basic steps for printing from your computer
■Scan a document or photo and restore or correct the color
■Perform routine maintenance
■Solve simple problems
This book tells you how to do most of these things without ever turning on your computer! Of course, your NX400 Series can do a lot more when you connect it to your Windows® or Macintosh® computer. For additional instructions, see the on-screen User’s Guide by double-clicking its icon on your desktop.
Please follow these guidelines as you read your NX400 Series instructions:
Warning:
Warnings must be followed carefully to avoid bodily injury.
Caution:
Cautions must be observed to avoid damage to your equipment.
Note:
Notes contain important information about your NX400 Series.
Tip:
Tips contain hints for better copying, scanning, and printing.
4 Introduction

Loading Paper
You can print documents and photos on a variety of paper types and sizes. For details, see page 7.
1.Open the paper support and pull up the extensions. Then open the output tray, pull out the extensions, and raise the stopper.
2. Squeeze the edge guide and slide it left.
Tip:
If the feeder guard is in the way, flip it forward.
Loading Paper 5
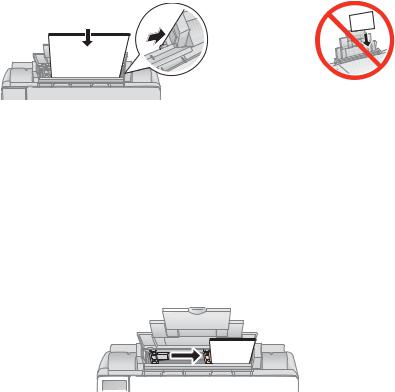
3.Insert the paper, glossy or printable side up, against the right side and beneath the tab. (Load letterhead or pre-printed paper top edge first.)
Always load paper short edge first, even for landscape printing.
You can load up to 120 sheets of plain paper, 80 sheets of matte, or 20 sheets of photo paper. Load other special papers one sheet at a time.
Note:
The type of paper you choose affects the way your printout looks. If you are just making a copy or printing a rough draft, plain paper is fine. However, for the best results, you’ll want to use one of Epson’s special ink jet papers designed for your printer. For example, your photos will look great printed on Epson Premium Photo Paper Glossy (see page 7 for more information).
4. Slide the edge guide against the paper, but not too tightly.
Note:
For instructions on loading envelopes, see your on-screen User’s Guide.
6 Loading Paper

Using Special Papers
Epson offers a wide array of high quality papers, making it easy to maximize the impact of your photos, presentations, and creative projects.
You can purchase genuine Epson ink and paper at Epson Supplies CentralSM at www.epson.com/ink3 (U.S. sales) or www.epson.ca (Canadian sales). You can also purchase supplies from an Epson authorized reseller. To find the nearest one, call 800-GO-EPSON (800-463-7766).
|
|
Part |
Sheet |
|
Paper type |
Size |
number |
count |
|
Epson Ultra Premium Photo Paper |
Borderless 4 × 6 inches |
S041934 |
50 |
|
Glossy |
|
S042181 |
60 |
|
|
|
S042174 |
100 |
|
|
|
|
|
|
|
Borderless 5 × 7 inches |
S041945 |
20 |
|
|
|
|
|
|
|
Letter (8.5 × 11 inches) |
S041935 |
20 |
|
|
|
S042182 |
25 |
|
|
|
S042175 |
50 |
|
|
|
|
|
|
Epson Premium Photo Paper |
Borderless 4 × 6 inches |
S041808 |
40 |
|
Glossy |
|
S041727 |
100 |
|
|
|
|
|
|
|
Borderless 5 × 7 inches |
S041464 |
20 |
|
|
|
|
|
|
|
Borderless 8 × 10 inches |
S041465 |
20 |
|
|
|
|
|
|
|
Letter (8.5 × 11 inches) |
S041286 |
20 |
|
|
|
S042183 |
25 |
|
|
|
S041667 |
50 |
|
|
|
|
|
|
Epson Premium Photo Paper |
Borderless 4 × 6 inches |
S041982 |
40 |
|
Semi-gloss |
|
|
|
|
Letter (8.5 × 11 inches) |
S041331 |
20 |
||
|
||||
|
|
|
|
|
Epson Photo Paper Glossy |
Borderless 4 × 6 inches |
S041809 |
50 |
|
|
|
S042038 |
100 |
|
|
|
|
|
|
|
Letter (8.5 × 11 inches) |
S041141 |
20 |
|
|
|
S041649 |
50 |
|
|
|
S041271 |
100 |
|
|
|
|
|
|
Epson Bright White Paper |
Letter (8.5 × 11 inches) |
S041586 |
500 |
|
|
|
|
|
|
Epson Premium Presentation |
Borderless 8 × 10 inches |
S041467 |
50 |
|
Paper Matte |
|
|
|
|
Letter (8.5 × 11 inches) |
S041257 |
50 |
||
|
||||
|
|
S042180 |
100 |
|
|
|
|
|
|
Epson Premium Presentation |
Letter (8.5 × 11 inches) |
S041568 |
50 |
|
Paper Matte Double-sided |
|
|
|
|
|
|
|
|
Using Special Papers 7
|
|
Part |
Sheet |
Paper type |
Size |
number |
count |
Epson Presentation Paper Matte |
Letter (8.5 x 11 inches) |
S041062 |
100 |
|
|
|
|
|
Legal (8.5 x 14 inches) |
S041067 |
100 |
|
|
|
|
Epson Photo Quality Self-adhesive |
A4 (8.3 × 11.7 inches) |
S041106 |
10 |
Sheets |
|
|
|
|
|
|
|
Epson Iron-on Cool Peel Transfer |
Letter (8.5 x 11 inches) |
S041153 |
10 |
Paper |
|
|
|
|
|
|
|
8 Loading Paper
Copying a Document or Photo
Follow the instructions in this section to position your originals correctly on the glass and make color or black and white copies.
Placing the Original on the Glass
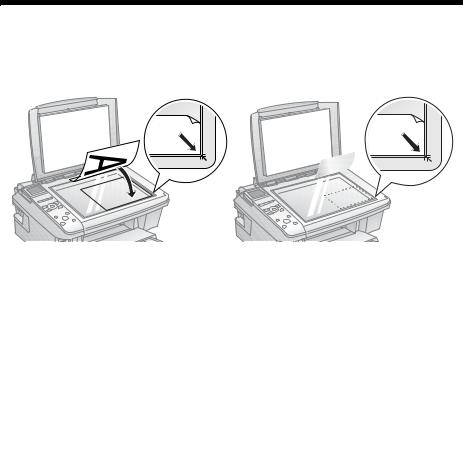
1.Open the document cover and place your original face-down on the glass, with the top facing into the front right corner.
Move the photo or document slightly away from the edges.
2. Close the cover gently so you don’t move the original.
Copying a Document or Photo 9
Copying a Document
You can copy documents onto letteror A4-size plain paper or Epson special paper just like you would on a copy machine.
1. Press the P On button to turn on the NX400 Series.
2. Load letteror A4-size plain paper or Epson special paper in the sheet feeder (see page 5).
3. Place your original document on the document table (see page 9).
4. Press the Copy button to enter copy mode.
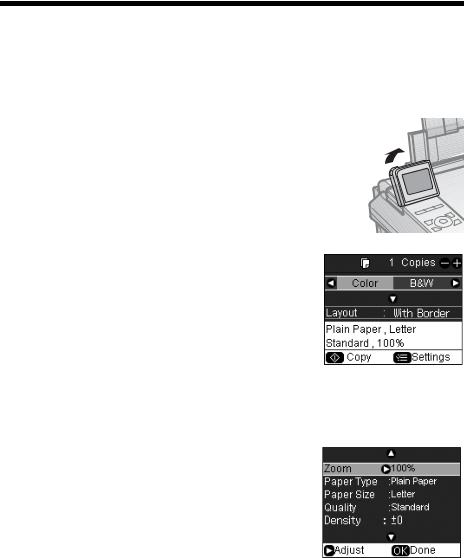
5. Flip up the LCD display screen.
6.To print more than 1 copy, press + or – to select the number (up to 99).
7.Press l or r to select Color or B&W copies.
8.Press d, then press r to change the layout.
Select With Border to leave a small margin around the image or select Borderless to expand the
image all the way to the edge of the paper (slight cropping may occur).
Note:
You cannot print borderless on plain paper.
9.To change any other print settings, press Menu and select your settings (see page 13 for details). When you’re done, press OK.
10.Press x Start to begin copying.
If you need to cancel copying, press y Stop/Clear Settings.
10 Copying a Document or Photo
Copying a Photo
You can copy photos onto 4 × 6-inch, 5 × 7-inch, letter-size, or A4-size Epson® photo paper (various types available) for instant photo reprints. You can also print with or without borders and convert color photos to black and white.
1.Press the P On button to turn on the NX400 Series.
2.Load 4 × 6-inch, 5 × 7-inch, letter-size, or A4-size Epson photo paper in the sheet feeder (see page 5).
3.Place your original photo on the document table (see page 9).
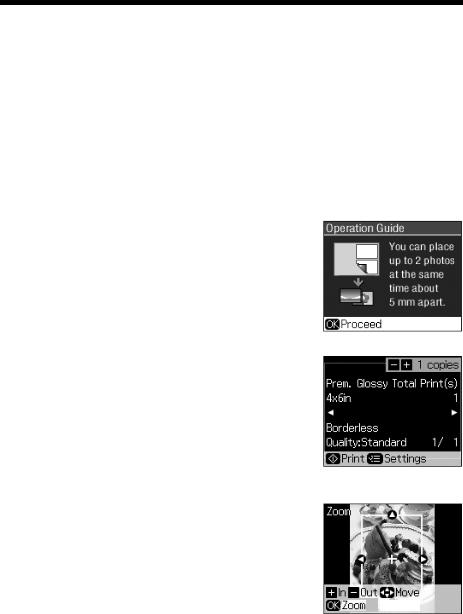
Note:
You can copy up to 2 photos at the same time. Place them 0.2 inches (5 mm) apart.
4. Press the Copy button.
5. Flip up the LCD display screen.
6. To print more than 1 copy, press + or – to select the number (up to 99).
7. Press l or r to select Color or B&W copies.
8. Press d, then press r to change the layout.
Select With Border to leave a small margin around the image or select Borderless to expand the image all the way to the edge of the paper (slight cropping may occur).
Note:
You cannot print borderless on plain paper.
9.To change any other print settings, press Menu and select your settings (see page 13 for details). When you’re done, press OK.
10.Press x Start to begin copying.
If you need to cancel copying, press y Stop/Clear Settings.
Copying a Photo 11
Restoring and Cropping Photos
You can restore old, faded photos to their original brilliance. You can also crop your photos to zoom in on the subject.
Note:
To restore photos larger than 5 × 7 inches, use the NX400 Series software on your computer.
1.Press the P On button to turn on the NX400 Series.
2.Load 4 × 6-inch, 5 × 7-inch, letter-size, or A4-size Epson photo paper.
3.Place your original photo on the document table.
Note:
You can copy up to 2 photos at the same time. Place them 0.2 inches (5 mm) apart.
4.Press the Restore button, and press OK.
5.To turn on Color Restoration, press r and select On and press OK. (If your photo is not faded, do not turn on Color Restoration.)
6.Press OK again to prescan your photo. You see these settings over a preview of your photo:
7.To print more than 1 copy, press + or – to select the number.
8.If you want to crop your photos and enlarge the resulting image area to fit onto your paper, press
Display/Crop.
■To resize the image area, press + or –.
■To move the image area, use the arrow buttons.
■To check the zoomed image, press OK.
After you are done cropping your photo, press OK.
9.To change print settings, press Menu and select your settings (see page 13). When you’re done, press OK.
10.Press x Start to begin copying. If you need to cancel copying, press y Stop/ Clear Settings.
12 Copying a Document or Photo

Copy and Restore Print Settings
Press the Menu button to change settings. When you’re done, press OK.
■To adjust the copy size, select Zoom (reduction/enlargement) and choose Actual (to select a percentage using + or –) or Auto Fit Page
(to automatically size the image to fit your paper).
■To change the paper type, select Paper Type and choose the type of paper you loaded.
Paper type |
Paper Type setting |
|
|
Plain paper |
Plain Paper |
|
|
Epson Bright White Paper |
|
|
|
Epson Presentation Paper Matte |
|
|
|
Epson Premium Presentation Paper Matte |
Matte |
|
|
Epson Premium Photo Paper Glossy |
Prem. Glossy |
|
|
Epson Premium Photo Paper Semi-gloss |
|
|
|
Epson Ultra Premium Photo Paper Glossy |
Ultra Glossy |
|
|
Epson Photo Paper Glossy |
Photo Paper |
|
|
■To change the paper size, select Paper Size and choose the size you loaded.
Note:
Paper Size options depend on the Paper Type you choose.
■To change the print quality, select Quality and choose Draft, Standard, or
Best.
Note:
For photos, the default setting for Quality is Standard.
■To adjust the darkness or lightness of the print, select Density and choose a higher (darker) or lower (lighter) setting.
■To adjust the amount of image expansion when printing borderless photos, select Expansion and choose Standard, Min, or Mid.
Note:
You may see white borders on your printed photo if you use the Min setting.
Copy and Restore Print Settings 13
Printing From a Memory Card
The NX400 Series all-in-one lets you print photos directly from your digital camera’s memory card; just insert it into one of the memory card slots and you’re ready to print.
See the User’s Guide for instructions on copying memory card files between your NX400 Series and a computer; printing photos directly from your camera; printing photos pre-selected in your camera (DPOF™ or Digital Print Order Format); printing photos by date; and printing photos from a slideshow.
Compatible Cards and Image Formats
You can use the following types of cards with your NX400 Series:
|
|
|
|
Left slot |
|
Slot |
Type of card |
|
|
|
|
|
|
Left slot |
SD™ |
|
|
|
SDHC™ |
|
|
|
miniSD™* |
|
|
|
miniSDHC* |
|
|
|
microSD* |
|
|
|
microSDHC* |
|
|
|
MultiMediaCard™ |
|
|
|
Memory Stick™ |
|
|
|
|
Right slot |
|
|
Memory Stick Duo™* |
|
|
Memory Stick PRO™ |
|
|
|
|
Memory Stick PRO Duo™* |
|
|
|
Memory Stick Micro* |
|
|
|
MagicGate™ Memory Stick |
|
|
|
MagicGate Memory Stick Duo™* |
|
|
|
xD-Picture Card™ |
|
|
|
xD-Picture Card Type H |
|
|
|
xD-Picture Card Type M |
|
|
|
|
|
|
Right slot |
CompactFlash® Type I and II |
|
|
|
Microdrive™ |
|
|
|
|
* Adapter required
14 Printing From a Memory Card
The NX400 Series supports image files that meet the following requirements:
Media format |
DCF version 1.0 or 2.0 compliant* |
|
|
File format |
JPEG |
|
Supports Exif version 2.21 |
|
|
Image size |
80 × 80 pixels to 9200 × 9200 pixels |
|
|
Number of files |
Up to 999 |
|
|
*DCF is the “Design rule for Camera File system” standard
Note:
You can print only in color when printing directly from a memory card; you cannot print in black and white.
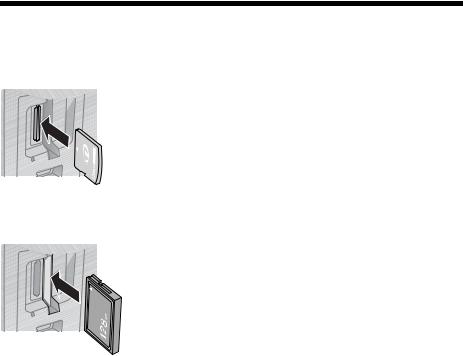
Inserting the Card
1.Make sure the NX400 Series is turned on.
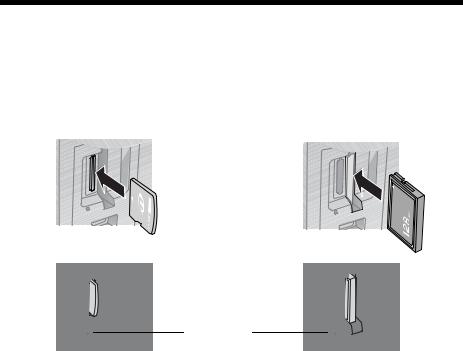
2.Insert your card into the correct slot as shown:
Insert just one card at a time (it won’t go in all the way)
Left slot |
|
Right slot |
|
|
|
|
|
Memory card access light
The memory card access light flashes and stays lit. Now you can:
■View your photos on the LCD display screen and print them (page 16)
■Print an index sheet so you can select which photos to print (see page 18)
Inserting the Card 15
Loading...