


Epson MovieMate® 60
User’s Guide
Copyright Notice
All rights reserved. No part of this publication may be reproduced, stored in a retrieval system, or transmitted in any form or by any means, electronic, mechanical, photocopying, recording, or otherwise, without the prior written permission of Seiko Epson Corporation. The information contained herein is designed only for use with this Epson product. Epson is not responsible for any use of this information as applied to other products.
Neither Seiko Epson Corporation nor its affiliates shall be liable to the purchaser of this product or third parties for damages, losses, costs, or expenses incurred by purchaser or third parties as a result of: accident, misuse, or abuse of this product or unauthorized modifications, repairs, or alterations to this product, or (excluding the U.S.) failure to strictly comply with Seiko Epson Corporation’s operating and maintenance instructions.
Seiko Epson Corporation shall not be liable for any damages or problems arising from the use of any options or any consumable products other than those designated as Original Epson Products or Epson Approved Products by Seiko Epson Corporation.
Responsible Use
This unit is equipped with Macrovision copy protection. The intellectual property rights to the patent of this copy protection technology are owned by the Macrovision Company of America, and others. When employing this technology, a license is required from the Macrovision Company. The Macrovision Company does not authorize the use of this technology except for a limited range of intended purposes, including home use. Further, remodeling, disassembly, and reverse engineering are prohibited.
Reproduction of a disc for the purposes of broadcast, projection in public, public musical performance, or rental (regardless of compensation, remuneration, or lack thereof) without the permission of the copyright owner, is strictly prohibited. This publication and the features described herein are subject to change without notice.
Trademarks
Epson is a registered trademark and Epson Exceed Your Vision is a registered logomark of Seiko Epson Corporation.
Epson MovieMate and PrivateLine are registered trademarks and Extra Care is a service mark of Epson America, Inc.
General Notice: Other product names used herein are for identification purposes only and may be trademarks of their respective owners. Epson disclaims any and all rights in those marks.
This information is subject to change without notice.
© 2009 Epson America, Inc. |
7/09 |
CPD-27690
2
Contents
Welcome |
6 |
Registration and Warranty |
6 |
Optional Accessories |
7 |
About This Manual |
7 |
Epson MovieMate 60 Parts and Controls |
8 |
Important Safety Instructions |
11 |
Unpacking and Setting Up |
15 |
Unpacking |
15 |
Choosing a Location |
16 |
Setting Up Epson MovieMate |
19 |
Turning the Projector Off |
20 |
Playing Movies |
21 |
Wall and Projection Screen Recommendations |
21 |
Viewing on a Wall |
21 |
Viewing on a Projection Screen |
21 |
Starting a DVD |
23 |
Adjusting the Picture |
24 |
Adjusting the Sound |
25 |
Controlling Playback |
26 |
Pausing |
26 |
Searching (Fast Forward or Reverse) |
27 |
Playing in Slow Motion |
27 |
Skipping |
27 |
Zooming In or Out |
27 |
Using DVD Menus |
28 |
Contents 3
Temporarily Stopping Audio |
28 |
Adjusting the Color Mode |
29 |
Adjusting the Sound and Audio Modes |
29 |
Listening with Headphones |
30 |
Connecting a Microphone |
31 |
Using Epson MovieMate with Other Equipment |
32 |
Viewing Video from External Devices |
32 |
Connecting a USB Device |
35 |
Playing Projector Audio Through an External Audio System |
36 |
Connecting a Computer or Laptop |
37 |
Doing More with Epson MovieMate |
39 |
Playing Music and DivX Videos and Viewing Photos |
39 |
Playing Music CDs |
39 |
Playing MP3/WMA Music or DivX Videos |
40 |
Viewing JPEG Photos |
41 |
Using Advanced Playback Controls |
42 |
Repeating a Chapter, Title, Track, or File |
42 |
Changing the Play Sequence (Program Play) |
43 |
Selecting Language, Subtitles, and Camera Angles |
44 |
Using the Playback Information Screen |
44 |
Playing Video CDs with Playback Control (PBC) |
45 |
Customizing Epson MovieMate |
46 |
Locking DVDs |
46 |
Locking the Power Button on the Control Panel |
47 |
Saving Power |
48 |
Changing Language Settings |
49 |
Adjusting Picture Quality |
49 |
Using the Others Setup Page |
50 |
Adjusting Dolby Audio Settings |
51 |
4 Contents
Setting Video and Other Options |
51 |
Viewing Status Information and Resetting the Lamp Timer |
53 |
Caring for Your Epson MovieMate |
54 |
Protecting Epson MovieMate |
54 |
Cleaning the Lens |
54 |
Cleaning the Case |
55 |
Cleaning and Replacing the Air Filter |
55 |
Replacing the Lamp |
57 |
Resetting the Lamp Timer |
59 |
Storing Epson MovieMate |
60 |
Transporting Epson MovieMate |
61 |
Problem Solving |
62 |
What To Do When the Lights Flash |
62 |
Solving Epson MovieMate Operation Problems |
64 |
Solving Picture and Sound Problems |
65 |
Problems with External Video Equipment |
67 |
Where To Get Help |
69 |
Internet Support |
69 |
Speak to a Support Representative |
69 |
Purchase Supplies and Accessories |
69 |
Specifications |
70 |
Index |
77 |
Contents 5

Welcome
Your Epson MovieMate® 60 is a portable, lightweight home cinema system that delivers high-quality, big-screen entertainment anywhere you want. In just a few minutes, you can set up Epson MovieMate and watch a DVD, play a video game, or view your favorite photos.
Epson MovieMate offers these outstanding features:
■Flexibility to set up in any room (or even outdoors), from 2.2 feet to 29.9 feet (0.66 meters to 9.1 meters) away from a screen or wall
■DVD resolution of 540p
■Widescreen viewing with 16:9 aspect ratio
■Up to 2000 lumens of White and Color Light Output (brightness), enough for viewing in daylight
■HDMI interface for connecting high-end video equipment.
■DVD player with Dolby® Digital and DTS®
■Built-in speakers with DTS digital surround sound
■Long-life bulb providing up to 5000 hours of use
■Two-year Home Service
Registration and Warranty
Your Epson MovieMate comes with a warranty that lets you project with confidence. For details, see the warranty brochure included with your projector.
In addition, Epson® offers free Extra CareSM Home Service during your warranty period. In the unlikely event of an equipment failure, you won’t have to wait for your unit to be repaired. Instead, Epson will ship you a replacement unit anywhere in the United States or Canada. See the brochure included with your projector for details.
We encourage you to register your Epson MovieMate. You can register using the CD that came in the box. Or you can register online at http://www.epson.com/webreg. Registering also lets you receive special updates on new accessories, products, and service.
6 Welcome

Optional Accessories
Epson provides these replacement parts and optional accessories for the Epson MovieMate:
Product |
Part number |
|
|
Replacement lamp (ELPLP56) |
V13H010L56 |
|
|
Replacement air filter (ELPAF26) |
V13H134A26 |
|
|
Kensington® security lock |
ELPSL01 |
Portable floor-standing and |
For details on these and other optional |
wall-mountable screens |
accessories, see: |
|
www.epson.com/homeentertainment |
Ceiling-mountable screens |
|
|
|
You can purchase accessories from an Epson authorized reseller. To find the nearest reseller, call 800-GO-EPSON (800-463-7766). Or you can purchase online at www.epsonstore.com (U.S. sales) or www.epson.ca (Canadian sales).
About This Manual
See the Quick Setup sheet to set up your Epson MovieMate and start using it. This book contains information on using all the features of Epson MovieMate, troubleshooting tips, and specifications.
Please follow these guidelines as you read through the manual:
Warnings: Must be followed carefully to avoid bodily injury.
Cautions: Must be observed to avoid damage to your equipment.
Notes: Contain important information about your equipment.
Tips: Contain helpful projection tips.
Need additional help? Visit Epson’s U.S. support website or Canadian support website for solutions to common problems. You can download utilities and documentation, get FAQ’s and troubleshooting advice, or e-mail Epson with your questions.
If you need more help, you can use the Epson PrivateLine® Support service. Call
(800) 637-7661 and enter the PIN on the PrivateLine support card that came with Epson MovieMate.
Welcome 7

Epson MovieMate 60 Parts and Controls
Front View
Lens cover slide
|
|
|
|
|
Remote control |
|
|
|
|
|
receiver |
Lens |
|
|
|
|
|
cover |
|
|
|
|
Air intake |
|
|
|
|
|
|
|
|
|
|
|
vent |
Foot |
|
|
|
|
|
adjustment |
|
|
|
|
|
lever |
|
|
|
|
|
Adjustable |
|
|
|
|
Security |
foot |
|
|
|
|
slot |
Disc slot |
|
|
|
|
Handle |
Eject |
|
|
|
|
|
button |
|
|
|
|
Foot |
|
|
|
|
|
|
Disc |
Lens |
|
|
adjustment |
|
|
|
lever |
|||
|
|
|
|||
indicator light |
|
|
|
||
|
Headphone |
Adjustable |
|||
|
|
|
|||
|
|
|
jack |
|
foot |
Back View |
|
|
|
|
|
Audio |
|
|
|
Remote control |
|
inputs |
|
|
receiver |
|
|
Video port |
|
|
|
|
Air exhaust |
|
|
|
|
|
vent |
HDMI port |
|
|
|
|
|
Computer |
|
|
|
|
|
port |
|
|
|
|
|
Speaker |
|
|
|
|
|
Component |
|
|
|
|
|
video ports |
|
|
|
|
|
Mic input |
|
|
|
|
Storage |
|
|
|
|
feet |
|
port |
|
|
|
|
|
Power |
Digital coaxial |
|
|
|
|
inlet |
audio-out port |
USB port |
|
||
|
|
|
|
||
Speaker
8 Welcome
Top View
Lamp cover
Focus image
|
|
|
|
|
|
|
|
Ambient light |
|
|
|
||
|
|
|
|
|||
Power |
sensor |
|
Access Setup |
|
||
status light |
|
|
|
|
|
|
|
|
|
|
menu |
Access |
|
|
|
|
|
Play/Pause |
||
|
|
|
|
|
||
|
|
|
|
|
DVD menu |
|
|
|
|
|
|
|
|
|
|
|
|
|
|
|
Turn Epson MovieMate on or off
 Select menu settings
Lamp warning light 
Temperature |
|
|
|
|
|
|
|
|
|
|
|
|
|
|
|
|
|
warning light |
|
|
|
|
Return to |
Project from |
Stop |
|
|
||
|
|
previous menu |
|||
external equipment |
|
|
|
|
|
|
|
|
|
|
|
|
|
|
|
|
|
|
|
Control |
Access Visual |
||
|
|
volume |
|||
|
|
|
|
|
Setup menu |
Welcome 9

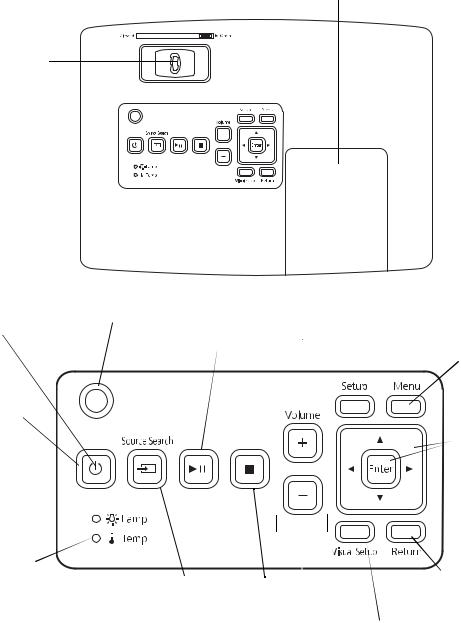
Remote Control
Turn Epson MovieMate on or off
Project from external equipment
Adjust picture for different lighting
Fix image shape (if Epson MovieMate is tilted)
Note: The remote control buttons can glow in the dark. Expose the remote control to light for several minutes before using it in the dark.
Function/numerics |
Eject DVD |
toggle switch |

 Pause movie and
  turn on light
Control playback
Control volume
Access DVD features
10 Welcome
Important Safety Instructions
Follow these safety instructions when setting up and using your Epson MovieMate:
■Except as specifically explained in this User’s Guide, do not attempt to service this product yourself. Refer all servicing to qualified service personnel.
■Never open any cover on the projector, except the lamp and filter covers. Dangerous electrical voltages inside the projector can severely injure you.
■The projector’s accessories come packaged in plastic bags. Keep plastic bags away from small children to avoid any risk of suffocation.
■Never look into the projector lens when the lamp is turned on; the bright light can damage your eyes. Never let children or pets look into the lens when it is on.
■Don’t place the projector on an unstable cart, stand, or table. Also, don’t stand on the projector or place heavy objects on it.
■Never push objects through the cabinet slots or spill liquid into the projector.
■Do not use the projector near water, or sources of heat or vibration. Do not expose it to rain or moisture.
■Do not move the unit during playback.
■Do not touch the projection lens with bare hands.
■Use a damp cloth for cleaning. Do not use liquid or aerosol cleaners. Do not use solvents such as alcohol, thinner, or benzine. Unplug the projector from the wall outlet before cleaning.
■Do not use the projector in places where flammable gases or explosive gases may be present in the atmosphere.
■Do not use the projector in places where there is excessive humidity or dust, near cooking or heating appliances, or in places where it may come into contact with smoke or steam. Do not use or store the projector outdoors for an extended length of time.
■Never try to remove the lamp immediately after use. Doing so will result in serious burns. Before removing the lamp, turn off the projector and wait approximately one hour for the lamp to cool completely.
■The lamp is fragile and can easily break. If the lamp breaks, handle the projector with extreme care to avoid injury from broken glass, and contact Epson to replace the lamp.
■Do not use the lamp after the lamp replacement period has elapsed, because the possibility of lamp breakage increases. When the lamp replacement message appears, replace the lamp with a new one as soon as possible.
Welcome 11
■ The lamp(s) in this product contain mercury. Please consult your state and local regulations regarding disposal or recycling. Do not put in the trash.
■The lamp in this projector is under high internal pressure and may make a loud noise if it breaks. If it breaks, ventilate the room to prevent mercury gas inside the lamp from being inhaled or coming into contact with the eyes or mouth.
■Do not bring your face close to the projector while it is in use, to prevent burns from hot air leaving the exhaust vent, and to prevent inhaling or contact with the gases inside the lamp if it breaks.
■Do not place anything that can become warped or damaged by heat near the air exhaust vents.
■Do not place the projector near a flame.
■Before you move the projector, make sure it is turned off, the plug is disconnected from the outlet, and all cables are disconnected.
■If the lamp breaks and gas from the lamp or fragments of broken glass are inhaled or get into the eyes or mouth, or if any other ill effects are noticed, immediately seek medical advice.
■Do not disassemble or damage the lamp or subject it to any impacts.
■Use the type of power source indicated on the projector. If you’re not sure of the power available, consult the power company.
■If you use the projector in a country other than where you purchased it, use the correct power cord for that country.
■Place the projector near a wall outlet where the plug can be easily unplugged.
■Don’t place the projector where the cord can be walked on. This may result in fraying or damage to the plug.
■Do not bend, twist, or pull the power cable excessively, and do not place heavy objects on top of the power cable.
■Do not modify the power cable.
■Keep the power cable away from hot electrical appliances.
■Do not pull the power cable when disconnecting the plug. Always be sure to hold the plug when disconnecting it.
■Don’t insert the plug into an outlet with dust present, and insert the plug firmly into the outlet. Failure to do so could result in sparks or fire.
■Don’t handle the plug with wet hands.
12 Welcome
■Don’t overload wall outlets, extension cords, or integral convenience receptacles. This can cause fire or electric shock.
■Unplug the projector from the wall outlet and refer servicing to qualified service personnel under the following conditions: when the power cord or plug is damaged or frayed; if liquid has been spilled into the projector, or if it has been exposed to rain, water, or excessive humidity; if smoke, unusual smells, or unusual noises come from the projector; if it doesn’t operate normally when you follow the operating instructions, or if it exhibits a distinct change in performance, indicating a need for service; if it has been dropped or the housing has been damaged.
■If there is an electrical storm, do not touch the power plug, otherwise you may receive an electric shock.
■Keep the projector unplugged during electrical storms and when the projector is not in use for extended periods.
■Keep the batteries for the remote control out of the reach of children. Batteries are choking hazards and can be very dangerous if swallowed. If they are swallowed, seek medical attention immediately.
■Replace the batteries as soon as they run out.
■Do not expose batteries to heat or flame and do not put them in water.
■Dispose of used batteries according to local regulations.
■Remove the batteries if you won’t be using the projector for an extended period.
■Insert batteries so that the polarities are correct, and do not mix new and old batteries.
■Do not use batteries other than those specified in this User’s Guide.
■Don’t block the slots and openings in the projector case. They provide ventilation and prevent the projector from overheating. Don’t operate the projector on a sofa, rug, or other soft surface, or in a closed-in cabinet unless proper ventilation is provided.
■Don’t leave the projector or remote control on top of heat-producing equipment or in a heated place, such as a car.
■Don’t use the projector outside of the required temperature range (41 to 95 °F [5 to 35 °C]). Doing so may cause an unstable display and could lead to projector damage.
■Don’t store the projector outside of the required temperature range (14 to 140 °F [–10 to 60 °C]) or in direct sunlight for long periods of time. Doing so may cause damage to the case.
■Make sure there is at least 8 inches of space between the exhaust ventilation slots and the wall or other object.
Welcome 13
■Make sure there is at least 4 inches of space between the intake ventilation slots and the wall or other object.
■Avoid projecting a high-contrast still image for more than 15 minutes to prevent burn-in. If this happens, project a bright screen until the burn-in disappears (from 30 to 60 minutes). If you can’t eliminate the burn-in, contact Epson as described on page 69.
■Do not turn the volume too high, especially when using headphones. Listening to high volume sounds over an extended period can damage your hearing. Sudden high volume can also damage the speakers.
WARNING: The cords included with this product contain chemicals, including lead, known to the State of California to cause birth defects or other reproductive harm. Wash hands after handling. (This notice is provided in accordance with Proposition 65 in Cal. Health & Safety Code § 25249.5 and following.)
14 Welcome

Unpacking and Setting Up
Follow these instructions to unpack your projector, choose a location, and set up your projector.
Unpacking
Make sure you have all the parts shown here:
|
Remote control and |
Epson MovieMate 60 |
2 AA Batteries |
|
CD with User’s Guide
Padded bag
Power cord
Unpacking and Setting Up 15

Choosing a Location
You can use your Epson MovieMate just about anywhere—in the living room, bedroom, or even outside. You can use it with an optional floor-, wall-, or ceiling-mounted screen, or simply project on a flat white wall.
The following pictures show three different setups:
Front
Back |
Floor |
To project onto a wall, choose a flat white wall with a smooth surface. When you find a suitable wall for projection, you may want to consider coating the area with projection paint to enhance the image quality. For details, see “Wall and Projection Screen Recommendations” on page 21.
16 Unpacking and Setting Up

Your projector should be directly in front of the screen or wall, facing straight ahead (at a 90-degree angle to the surface).
If the image is too low, you can raise it by extending the feet and tilting the projector up. This causes the image to lose its rectangular shape. You can adjust the shape using the keystone buttons on the remote control or the Visual Setup menu. See page 24 for instructions.
The farther you place the projector from the screen or wall, the larger the image will be.
The following tables list the distances required for various image sizes (measured diagonally). Note that the zoom adjustment also affects image size.
Wide screen aspect ratio (16:9)
Image size (diagonal) |
Projection distance |
|
|
30 in. |
2.9 to 4 ft. (0.89 to 1.2 meters) |
|
|
50 in. |
4.9 to 6.7 ft. (1.5 to 2 meters) |
|
|
60 in. |
5.9 to 8 ft. (1.8 to 2.4 meters) |
|
|
70 in. |
6.9 to 9.4 ft. (2.1 to 2.9 meters) |
|
|
80 in. |
7.9 to 10.7 ft. (2.4 to 3.3 meters) |
|
|
100 in. |
9.9 to 13.4 ft. (3.0 to 4.1 meters) |
|
|
150 in. |
14.9 to 20.1 ft. (4.5 to 6.1 meters) |
|
|
200 in. |
19.9 to 26.9 ft. (6.1 to 8.2 meters) |
|
|
300 in. |
29.9 ft. (9.1 meters) |
|
|
Unpacking and Setting Up 17
Standard aspect ratio (4:3)
Image size (diagonal) |
Projection distance |
|
|
21 in. |
2.5 to 3.4 ft. (0.8 to 1 meter) |
|
|
30 in. |
3.6 to 4.9 ft. (1.1 to 1.5 meters) |
|
|
50 in. |
6 to 8.2 ft. (1.8 to 2.5 meters) |
|
|
60 in. |
7.2 to 9.8 ft. (2.2 to 3.0 meters) |
|
|
70 in. |
8.5 to 11.5 ft. (2.6 to 3.5 meters) |
|
|
80 in. |
9.7 to 13.1 ft. (3.0 to 4.0 meters) |
|
|
100 in. |
12.1 to 16.4 ft. (3.7 to 5.0 meters) |
|
|
150 in. |
18.3 to 24.7 ft. (5.6 to 7.5 meters) |
|
|
200 in. |
24.4 ft (7.4 m) |
|
|
Wide screen aspect ratio (16:10)
Image size (diagonal) |
Projection distance |
|
|
21 in. |
2.2 to 3 ft. (0.66 to 0.91 meters) |
|
|
30 in. |
3.1 to 4.3 ft. (0.96 to 1.3 meters) |
|
|
50 in. |
5.3 to 7.2 ft. (1.6 to 2.2 meters) |
|
|
60 in. |
6.4 to 8.7 ft. (2.0 to 2.6 meters) |
|
|
70 in. |
7.5 to 10.1 ft. (2.3 to 3.1 meters) |
|
|
80 in. |
8.6 to 11.6 ft. (2.6 to 3.5 meters) |
|
|
100 in. |
10.7 to 14.5 ft. (3.3 to 4.4 meters) |
|
|
150 in. |
16.1 to 21.8 ft. (4.9 to 6.6 meters) |
|
|
200 in. |
21.5 to 29.1 ft. (6.6 to 8.9 meters) |
|
|
When setting up the projector, keep these considerations in mind:
■Make sure you don’t block the air vents on the sides.
■Make sure you place the projector within 9 feet (2.7 meters) of an electrical outlet, power strip, or extension cord.
■Do not tilt the projector more than 10 degrees while playing CDs or DVDs.
18 Unpacking and Setting Up

Setting Up Epson MovieMate
1.If you have a screen, set it up following the instructions included with the screen. Make sure you read all the instructions to avoid damaging the screen.
2.Put the batteries in the remote control.
Note: Use only AA-size alkaline or manganese dry batteries.
3. Reattach the battery cover.
4.Expose the remote control to bright light for several minutes before using it in the dark. The buttons will glow in the dark briefly.
Unpacking and Setting Up 19

5.Open the lens cover, then connect the power cord and plug in the projector. The  light turns orange.
Turning the Projector Off
1.If there is a disc inside the projector, eject it.
2.Press the  button on the projector or the
  on the remote control. The projector will beep twice when it is finished powering off.
Warning: Do not disconnect the power cable before the projector beeps, or you may damage the projector.
3. Close the lens cover.
20 Unpacking and Setting Up
Playing Movies
Follow the instructions in this section to play a DVD, and control playback.
Wall and Projection Screen Recommendations
To optimize viewing of projector images, follow the recommendations in this section.
Viewing on a Wall
You can easily view Epson MovieMate’s high quality images on any flat white wall in your home. There is no cost or setup involved, and you can project and resize the image up to any size that fits on your wall. To enhance the image quality even further, you may want to paint the wall with projection paint that is specially designed for optimum reflectivity and contrast in your viewing environment.
Viewing on a Projection Screen
If you don’t have a suitable wall in your home or want a professional quality viewing experience, you can use a projection screen. These screens have optical coatings with special reflective properties that enhance brightness, contrast, and sharpness as well as providing a frame around the image.
Projection screens are available in many shapes, sizes, mounting styles, colors, and surface qualities, as described below.
Considering Screen Shape and Size
In a home theater setting—for watching DVD movies, HDTV broadcasts, or other widescreen content—the best screen shape ratio is 16:9, where the width is almost twice the height. Most DVD movies and HDTV broadcasts will fill the screen vertically and horizontally for maximum impact. The most popular sizes are from 45 to 100 inches (114 to 254 cm) diagonal.
Playing Movies 21
Standard screens have a 4:3 shape ratio, which is better suited for viewing computer presentations and standard TV broadcasts. Watching DVD movies or HDTV broadcasts on a 4:3 ratio screen limits the image width and leaves unused screen area above and below the image. Available screen sizes vary, but are usually up to 60 inches (152 cm) diagonal (the same height as an 80-inch [203-cm] diagonal 16:9 screen).
Considering Screen Mounting Style
Most screens are either floor-standing, wall-mounted, or ceiling-mounted. Consider these characteristics as you choose which type would be best for your viewing environment:
Screen mounting style |
Characteristics |
|
|
Floor-standing screens |
Portable |
|
Can be used in multiple locations |
|
Can be stored out of the way |
|
Some may also be wall-mountable |
|
|
Wall-mounted screens |
Typically permanently installed |
|
Can be partially hidden out of the way |
|
Some may be disguised as artwork |
|
|
Ceiling-mounted screens |
Typically permanently installed |
|
Can be partially hidden out of the way |
|
Some may be recessed into the ceiling and hidden completely |
|
Can be manually or electronically dropped and raised |
|
|
Outdoor screens |
Resistant to outdoor environmental factors |
|
Can be used on patios, and around pools and landscaping |
|
Usually made of inflatable plastic or vinyl |
|
|
Considering Color and Surface Quality
For home theater settings, screens come in white or shades of gray. Gray screens (sometimes called high contrast screens) increase the natural contrast of images projected in rooms with ambient light by absorbing the room light and preserving the darker blacks. If you have a dedicated home theater room with dark walls, ceiling, floor, and furniture, a gray screen may not provide better contrast than a white screen. However, if you usually project images in a typical living room or family room with some reflected light, a gray screen will provide better contrast and a truer viewing experience.
22 Playing Movies

Screen surface quality can also affect the reflectivity of light in your projected image. Screen reflective properties are measured as “gain” rates, with 1.0 gain as the reflectivity of a white board. Highly reflective screen surfaces (above 1.0 gain) create a brighter image, but the brightness may not be uniform enough for a dedicated home theater environment and the colors may appear to shift from different viewing angles.
In a home theater room with darkened surroundings and controlled lighting, a screen surface with less than 1.0 gain is best. For rooms where you cannot control the light or will always have ambient light, you may want to select a screen surface with more than 1.0 gain to compensate for the additional brightness.
Starting a DVD
Insert your DVD into the slot.
Warning: Close the lens cover before inserting or ejecting a disc. When the picture appears, do not look into the lens, and do not allow children or pets to look into the lens. The bright light may affect your vision.
After about 30 seconds, the projector warms up and the picture comes on.
Playing Movies 23

Adjusting the Picture
After you set up and start the projector, you may need to make certain adjustments.
■If the image is too low, you can extend the feet (by pressing the foot adjustment levers) and tilt the projector up.
■ If the image is horizontally tilted, you can turn the feet to level it.
■Your projector automatically detects the vertical tilt and corrects the image shape. If you find that the image is not rectangular, however, use the Keystone buttons on the remote control or the Keystone setting in the Signal menu (see page 52) to adjust the image shape.
24 Playing Movies
 Loading...