


 Loading...
PowerLite® S7/79/W7
Multimedia Projector
User’s Guide

Important Safety Information
WARNING: Never look into the projector lens when the lamp is turned on; the bright light can damage your eyes. Never let children look into the lens when it is on. Never open any cover on the projector, except the lamp and filter covers. Dangerous electrical voltages inside the projector can severely injure you. Except as specifically explained in this User’s Guide, do not attempt to service this product yourself. Refer all servicing to qualified service personnel.
WARNING: The projector and its accessories come packaged in plastic bags. Keep plastic bags away from small children to avoid any risk of suffocation.
Caution: When you replace the lamp, never touch the new lamp with your bare hands; the invisible residue left by the oil on your hands may shorten the lamp life. Use a cloth or glove to handle the new lamp.
Copyright Notice
All rights reserved. No part of this publication may be reproduced, stored in a retrieval system, or transmitted in any form or by any means, electronic, mechanical, photocopying, recording, or otherwise, without the prior written permission of Seiko Epson Corporation. The information contained herein is designed only for use with this Epson product. Epson is not responsible for any use of this information as applied to other products.
Neither Seiko Epson Corporation nor its affiliates shall be liable to the purchaser of this product or third parties for damages, losses, costs, or expenses incurred by purchaser or third parties as a result of: accident, misuse, or abuse of this product or unauthorized modifications, repairs, or alterations to this product, or (excluding the U.S.) failure to strictly comply with Seiko Epson Corporation’s operating and maintenance instructions.
Seiko Epson Corporation shall not be liable for any damages or problems arising from the use of any options or any consumable products other than those designated as Original Epson Products or Epson Approved Products by Seiko Epson Corporation.
Software Copyright:
This product uses free software as well as software to which this company holds the rights. The following is information on the free software used by this product.
Hereafter, each author, the conditions, and so on are described in the original. Furthermore, there is no guarantee for free software because of the characteristics of the free software that has already been used in this product; any problems in this product (including problems that originate with the free software concerned) do not influence the conditions of the guarantee (written guarantee) issued by this company.
(1) libjpeg
© 1991-1998 Thomas G. Lane.
This software is based in part on the work of the Independent JPEG Group.
(2) libpng
©1998-2004 Glenn Randers-Pehrson
©1996-1997 Andreas Dilger
©1995-1996 Guy Eric Schalnat, Group 42, Inc.
(3) zlib
© 1995-2003 Jean-loup Gailly and Mark Adler
2

Trademarks
Epson and Instant Off are registered trademarks, and Epson Exceed Your Vision is a registered logomark of Seiko Epson Corporation.
PowerLite, PrivateLine, and Accolade are registered trademarks, SizeWise and Duet are trademarks, and Extra Care is a service mark of Epson America, Inc.
Pixelworks, DNX, and the DNX logo are trademarks of Pixelworks, Inc.
General Notice: Other product names used herein are for identification purposes only and may be trademarks of their respective owners. Epson disclaims any and all rights in those marks.
This information is subject to change without notice.
© 2009 Epson America, Inc. |
7/09 |
|
CPD-27606 |
3

4

|
Contents |
|
|
Welcome . . . . . . . . . . . . . . . . . . . . . . . . . . . . . . . . . . . . . |
. 9 |
|
Using Your Documentation . . . . . . . . . . . . . . . . . . . . . . . . . |
10 |
|
Getting More Information . . . . . . . . . . . . . . . . . . . . . . . |
10 |
|
Projector Parts . . . . . . . . . . . . . . . . . . . . . . . . . . . . . . . . . . . |
11 |
|
Projector Control Panel . . . . . . . . . . . . . . . . . . . . . . . . . |
12 |
|
Remote Control . . . . . . . . . . . . . . . . . . . . . . . . . . . . . . . |
13 |
|
Projector Dimensions. . . . . . . . . . . . . . . . . . . . . . . . . . . |
14 |
|
Registration and Warranty . . . . . . . . . . . . . . . . . . . . . . . . . . |
15 |
|
Optional Accessories. . . . . . . . . . . . . . . . . . . . . . . . . . . . . . . |
15 |
|
Setting Up the Projector . . . . . . . . . . . . . . . . . . . . . |
17 |
1 |
Unpacking the Projector. . . . . . . . . . . . . . . . . . . . . . . . . . . . |
18 |
|
Additional Components. . . . . . . . . . . . . . . . . . . . . . . . . |
19 |
|
Positioning the Projector . . . . . . . . . . . . . . . . . . . . . . . . . . . |
19 |
|
Projector Placement Options . . . . . . . . . . . . . . . . . . . . . |
24 |
|
Connecting to a Computer. . . . . . . . . . . . . . . . . . . . . . . . . . |
25 |
|
Connecting to the USB Port . . . . . . . . . . . . . . . . . . . . . |
26 |
|
Connecting to the VGA Computer Port . . . . . . . . . . . . |
27 |
|
Connecting to Video Equipment . . . . . . . . . . . . . . . . . . . . . |
28 |
|
Connecting a Composite Video Source . . . . . . . . . . . . . |
29 |
|
Connecting an S-Video Source . . . . . . . . . . . . . . . . . . . |
30 |
|
Connecting a Component Video Source . . . . . . . . . . . . |
31 |
|
Connecting an RGB Video Source. . . . . . . . . . . . . . . . . |
32 |
|
Connecting an External Monitor . . . . . . . . . . . . . . . . . . . . . |
33 |
|
Playing Sound Through the Projector. . . . . . . . . . . . . . . . . . |
34 |
|
Connecting External Speakers . . . . . . . . . . . . . . . . . . . . |
34 |
|
Turning the Projector On and Off . . . . . . . . . . . . . . . . . . . . |
36 |
|
Using the Direct Power On Function . . . . . . . . . . . . . . |
37 |
|
Shutting Down the Projector . . . . . . . . . . . . . . . . . . . . . |
38 |
5

|
Displaying and Adjusting the Image . . . . . . . . |
39 |
2 |
Selecting an Image Source . . . . . . . . . . . . . . . . . . . . . . . . . . |
40 |
|
Adjusting the Image . . . . . . . . . . . . . . . . . . . . . . . . . . . . . . . |
40 |
|
Adjusting the Position of the Image . . . . . . . . . . . . . . . . |
41 |
|
Adjusting the Image Shape. . . . . . . . . . . . . . . . . . . . . . . |
41 |
|
Focusing and Zooming the Image . . . . . . . . . . . . . . . . . |
43 |
|
Selecting the Color Mode . . . . . . . . . . . . . . . . . . . . . . . |
44 |
|
Resizing Video Images . . . . . . . . . . . . . . . . . . . . . . . . . . |
45 |
|
Presenting With the Remote Control . . . . . . . . |
47 |
3 |
Using the Remote Control . . . . . . . . . . . . . . . . . . . . . . . . . . |
48 |
|
Controlling the Picture and Sound. . . . . . . . . . . . . . . . . . . . |
48 |
|
Turning Off the Picture and Sound . . . . . . . . . . . . . . . . |
48 |
|
Stopping Action. . . . . . . . . . . . . . . . . . . . . . . . . . . . . . . |
49 |
|
Zooming In on Your Image . . . . . . . . . . . . . . . . . . . . . . |
49 |
|
Controlling the Volume. . . . . . . . . . . . . . . . . . . . . . . . . |
50 |
|
Operating Your Computer With the Remote Control . . . . . |
50 |
|
Highlighting Your Presentation . . . . . . . . . . . . . . . . . . . . . . |
52 |
|
Using the Pointer Tool . . . . . . . . . . . . . . . . . . . . . . . . . |
52 |
|
Customizing the Pointer Tool . . . . . . . . . . . . . . . . . . . . |
52 |
|
Fine-Tuning the Projector. . . . . . . . . . . . . . . . . . . |
53 |
4 |
Using the Menu System . . . . . . . . . . . . . . . . . . . . . . . . . . . . |
54 |
|
Restoring the Default Settings . . . . . . . . . . . . . . . . . . . . |
55 |
|
Adjusting the Image . . . . . . . . . . . . . . . . . . . . . . . . . . . . . . . |
55 |
|
Adjusting Signal Settings . . . . . . . . . . . . . . . . . . . . . . . . . . . |
57 |
|
Customizing Projector Features . . . . . . . . . . . . . . . . . . . . . . |
59 |
|
Customizing Power and Operation . . . . . . . . . . . . . . . . . . . |
60 |
|
Using the Projector Security Features . . . . . . . . . . . . . . . . . . |
62 |
|
Enabling Password Protection . . . . . . . . . . . . . . . . . . . . |
63 |
|
Creating Your Own Startup Screen . . . . . . . . . . . . . . . . |
65 |
|
Disabling the Projector’s Buttons. . . . . . . . . . . . . . . . . . |
66 |
|
Using Security Locking . . . . . . . . . . . . . . . . . . . . . . . . . |
67 |
6

|
Maintaining the Projector. . . . . . . . . . . . . . . . . . . |
69 |
5 |
Cleaning the Lens . . . . . . . . . . . . . . . . . . . . . . . . . . . . . . . . . |
70 |
|
Cleaning the Projector Case . . . . . . . . . . . . . . . . . . . . . . . . . |
70 |
|
Cleaning the Air Filter . . . . . . . . . . . . . . . . . . . . . . . . . . . . . |
70 |
|
Replacing the Air Filter. . . . . . . . . . . . . . . . . . . . . . . . . . . . . |
71 |
|
Replacing the Lamp . . . . . . . . . . . . . . . . . . . . . . . . . . . . . . . |
72 |
|
Resetting the Lamp Timer . . . . . . . . . . . . . . . . . . . . . . . |
75 |
|
Checking Lamp Usage . . . . . . . . . . . . . . . . . . . . . . . . . . |
75 |
|
Replacing the Remote Control Batteries . . . . . . . . . . . . . . . . |
76 |
|
Transporting the Projector . . . . . . . . . . . . . . . . . . . . . . . . . . |
77 |
|
Solving Problems . . . . . . . . . . . . . . . . . . . . . . . . . . . . |
79 |
6 |
Using On-Screen Help . . . . . . . . . . . . . . . . . . . . . . . . . . . . . |
80 |
|
Checking Projector Status. . . . . . . . . . . . . . . . . . . . . . . . . . . |
81 |
|
What To Do When the Lights Flash . . . . . . . . . . . . . . . |
81 |
|
Solving Projector Operation Problems . . . . . . . . . . . . . . . . . |
83 |
|
Solving Problems With the Image or Sound . . . . . . . . . . . . . |
83 |
|
Solving Problems With the Remote Control. . . . . . . . . . . . . |
89 |
|
Where To Get Help . . . . . . . . . . . . . . . . . . . . . . . . . . . . . . . |
90 |
|
Speak to a Support Representative . . . . . . . . . . . . . . . . . |
90 |
A B
Technical Specifications . . . . . . . . . . . . . . . . . . . . . 93
Notices . . . . . . . . . . . . . . . . . . . . . . . . . . . . . . . . . . . . . . 101
Important Safety Instructions . . . . . . . . . . . . . . . . . . . . . . . 101
FCC Compliance Statement. . . . . . . . . . . . . . . . . . . . . . . . 104
Index. . . . . . . . . . . . . . . . . . . . . . . . . . . . . . . . . . . . . . . . 105
7

8

-
Welcome
The PowerLite® S7/79/W7 is an easy-to-use, compact, lightweight projector with a built-in speaker. It offers up to 2300 lumens (PowerLite S7) or 2200 lumens (PowerLite W7/PowerLite 79) of white and color light output (brightness). It also provides a native SVGA (PowerLite S7), XGA (PowerLite 79), or WXGA (PowerLite W7) resolution. You can connect it to a wide range of computers and video sources.
Your projector offers these easy setup, control, and security features:
■Plug n’ Play instant setup—instantly project images from a Windows® PC via USB connection
■Quick, convenient control—Direct Power On, sleep mode, Instant Off ®/On
■Easy picture adjustment—ultra flexible, Keystone correction with digital zoom (PowerLite S7) or optical zoom (PowerLite 79/PowerLite W7)
■Security features—password protection, user’s logo, projector button lock, security cable attachment (cable not included), and a slot for an optional Kensington® security lock
Additional enhancements:
■Closed captioning
■Audio out and monitor out
■2000:1 contrast ratio (in Dynamic color mode with Auto Iris setting turned on)
■Integral lens cover (A/V Mute slide) that won’t get lost
■Low power, long-lasting lamp with 2 Power Consumption modes
■Carrying case and remote control included
9

Using Your Documentation
This book contains all the information you need to set up and use your projector. Please follow these guidelines as you read through it:
■Warnings must be followed carefully to avoid bodily injury.
■Cautions must be observed to avoid damage to your equipment.
■Notes contain important information about your projector.
■Tips contain additional projection hints.
Getting More Information
Need quick steps for setting up your projector? Here’s where you can look for help:
■Quick Setup sheet
Provides information for connecting the projector to your equipment, displaying and adjusting the image, and solving display problems.
■Built-in help system
Provides assistance for common problems. Available from the
? Help button on the projector or the remote control. See page 80 for details.
■epson.com/support
Download FAQs and e-mail your questions to Epson support.
■PrivateLine® support
If you still need help after checking this User’s Guide and the sources listed in this section, you can use the Epson PrivateLine Support service to get help fast. Call (800) 637-7661 and enter the PIN on the PrivateLine card. Or take advantage of Epson’s automated support services 24 hours a day. See page 90 for more information.
10 Welcome
Projector Parts
Front |
Zoom ring (PowerLite 79/W7 only) |
|||
|
||||
Lamp cover |
|
|
||
Ventilation |
Focus ring |
|
Control panel |
|
|
|
|
||
slots |
|
|
|
|
|
|
|
Air filter |
|
A/V mute slide |
|
|
cover |
|
(lens cover) |
|
|
|
|
Foot release |
|
|
|
|
lever |
|
|
|
|
|
Adjustable |
Infrared |
Air |
|
|
filter |
|||
|
foot |
receiver |
Kensington |
|
|
|
|
lock port |
|
Back |
|
|
|
|
|
USB (TypeB) port |
|
||
S-Video port |
|
|
||
Audio |
Video |
Monitor |
Lamp cover |
|
port |
Out port |
|||
Out port |
screw |
|||
|
|
|||
Infrared |
|
|
|
|
receiver |
|
|
|
|
|
|
|
|
|
|
|
|
|
|
|
|
|
|
|
|
|
|
|
|
|
|
|
|
|
|
|
|
|
|
|
|
|
|
|
|
|
|
|
|
|
|
|
|
|
|
|
|
|
|
|
|
|
|
|
|
|
|
|
|
|
|
|
|
|
|
|
|
|
|
|
|
|
|
|
|
Computer |
|
|
|
|
|
|
|
|
|
|
Rear |
|
|
|
|
|
|
|
|
AC |
|
Rear adjustable |
|||||||||||||||||
|
|
|
|
|
|
|
|
power |
(Component |
|
foot |
|||||||||||||||||
adjustable |
|
|
|
|||||||||||||||||||||||||
|
|
inlet |
Video) port |
|
|
|
|
|
|
|
|
|
|
|||||||||||||||
foot |
|
|
|
|
|
|
|
|
|
|
|
|
|
|
|
|
|
|
||||||||||
|
|
|
|
|
|
|
|
|
|
|
|
|
|
|
|
|
|
|
|
|
|
|
|
|
||||
|
|
|
|
|
|
|
|
|
|
|
|
|
|
|
|
|
|
|
|
|
|
|
|
|
|
|
|
|
|
|
|
|
|
|
Audio |
|
|
|
|
|
|
|
|
|
|
|
|||||||||||
|
|
|
|
|
|
port |
|
|
|
|
|
|
|
|
|
|
|
|||||||||||
Welcome 11

Projector Control Panel
PowerLite S7 |
|
|
|
|
Keystone button |
|
|
|
(corrects screen shape) |
||
|
Menu button |
Esc button |
|
Source Search button |
(exits menu |
||
(displays |
|||
(searches for connected |
projector menus) |
items) |
|
video sources) |
|
|
|
Power |
|
|
|
light |
|
|
|
Power |
|
Help |
|
button |
|
button |
|
|
Wide button |
Tele button |
|
|
(decreases |
||
|
(increases |
||
|
image size |
||
|
image size |
||
|
|
||
Lamp and |
Keystone button |
Enter button |
|
(selects |
|||
Temperature |
(corrects screen |
menu items) |
|
warning lights |
shape) |
|
|
PowerLite 79/PowerLite W7 |
|
||
|
Keystone button |
|
|
|
(corrects screen shape) |
||
|
Menu button |
Esc button |
|
Source Search button |
(exits menu |
||
(displays |
|||
(searches for connected |
projector menus) |
items) |
|
video sources) |
|
|
|
Power |
|
|
|
light |
|
|
|
Power |
|
Help |
|
button |
|
button |
|
|
Volume |
Volume up |
|
|
button |
||
|
down button |
||
|
|
||
Lamp and |
Keystone button |
Enter button |
|
(selects |
|||
Temperature |
(corrects screen |
menu items) |
|
warning lights |
shape) |
|
|
12 Welcome
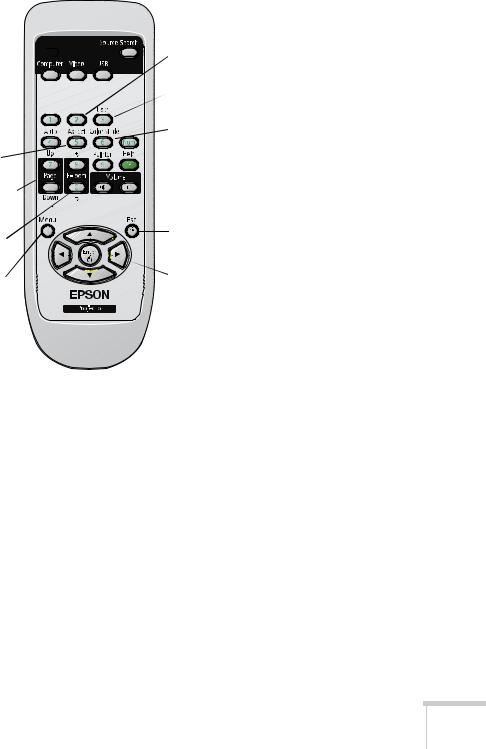
Remote Control
Power button 

A/V Mute button (turns off image) 


Aspect button (changes screen size)
Page Up/Down buttons (control PowerPoint®  slides; USB cable required)
E-Zoom +/– buttons (zoom into image)
Menu button (accesses projector menus)
Source Search and  Source buttons (select image source)
Freeze button
 (stops image)
User button  (lets you assign function)
 Color Mode button (changes display mode)
Num button (activates number buttons)
Esc button (exits menus)
Menu navigation  (arrow) buttons and Enter button
Welcome 13

Projector Dimensions
Use the dimensions below to guide you in placing or installing the projector.
11.61 in.
(295 mm)
|
1.5 in. |
|
3.11 in. |
(38.3 mm) |
|
1.57 in. |
||
(79 mm) |
||
(39.8 mm); |
||
|
||
|
center of lens |
|
|
to mounting |
|
3.03 in. |
bracket holes |
|
|
||
(77 mm) |
3.62 in. |
|
|
(92 mm) |
9.59 in.
(243.5 mm) 0.98 in.
(25 mm)
5.04 in. (128 mm)
1.48 in.
(37.5 mm)
3.66 in.
(93 mm)
0.51 in.
(13 mm)
8.98 in.
(228 mm)
Mounting screw holes
14 Welcome

Registration and Warranty
Your projector comes with a basic warranty that lets you project with confidence. For details, see the warranty brochure included with your projector.
In addition, Epson offers free Extra CareSM Road Service. In the unlikely event of an equipment failure, you won’t have to wait for your unit to be repaired. Instead, Epson will ship you a replacement unit anywhere in the United States or Canada. See the brochure included with your projector for details.
You can register using the included CD, or you can register online at epson.com/webreg. Registering also lets you receive special updates on new accessories, products, and service.
Optional Accessories
To enhance your use of the projector, Epson offers the following optional accessories:
Product |
Part number |
|
|
Replacement lamp |
V13H010L54 |
|
|
Replacement air filter set |
V13H134A25 |
|
|
Universal projector ceiling mount |
ELPMBPJF |
Adjustable suspended ceiling channel kit |
ELPMBP01 |
False ceiling plate kit |
ELPMBP02 |
Structural round ceiling plate |
ELPMBP03 |
Adjustable extension column (pipe) 8” - 11” |
ELPMBC01 |
|
|
Kensington security lock |
ELPSL01 |
|
|
50-inch portable screen (4:3 aspect ratio) |
ELPSC06 |
80-inch portable pop-up screen (4:3 aspect ratio) |
ELPSC08 |
Accolade® Duet™ Portable Projector Screen (4:3/16:9) |
ELPSC80 |
|
|
Welcome 15

Product |
Part number |
|
|
Component-to-VGA video cable |
ELPKC19 |
S-Video cable |
ELPSV01 |
|
|
DC-06 document camera (ELPDC06) |
V12H321001 |
DC-10s document camera |
ELPDC10S |
|
|
Soft shoulder case for projector and notebook |
ELPKS61 |
Wheeled soft carrying case |
ELPKS62 |
Molded hard-shell wheeled carrying case |
ELPKS58 |
Swiss Gear® backpack |
ELPKS63 |
|
|
You can purchase screens or other accessories from an Epson authorized reseller. To find the nearest reseller, call 800-GO-EPSON (800-463-7766). Or you can purchase online at www.epsonstore.com (U.S. sales) or www.epson.ca (Canadian sales).
16 Welcome

Setting Up the Projector
This chapter tells you how to unpack the projector and connect it to a notebook or desktop computer or to video equipment, such as a VCR, DVD player, or video camera.
Follow the instructions in this chapter on:
■Unpacking the projector
■Positioning the projector
■Connecting to a computer
■Connecting to video equipment
■Connecting an external monitor
■Playing sound through the projector
■Turning the projector on and off
17

Unpacking the Projector
After unpacking the projector, make sure you have all these parts:
PDF manuals and |
Password Protected |
registration CD-ROM |
sticker |
Projector
2 AA batteries
(for remote control)
Power cord |
Remote control |
|
VGA computer cable |
Carrying case |
Save all packaging in case you need to ship the projector. Always use the original packaging (or the equivalent) when you need to send the projector to another location. See page 77 for transportation instructions. (If you are moving the projector by hand, use the carrying case.)
18 Setting Up the Projector

Additional Components
Depending on how you plan to use the projector, you may need additional components:
■To receive a component video signal from a DVD player or other video device, you’ll need a component-to-VGA video cable. One may be included with your video equipment, or you can purchase the ELPKC19 cable from Epson. See “Optional Accessories” on page 15.
■To receive an S-Video signal, you’ll need an S-Video cable. One may be included with your video equipment, or you can purchase one from Epson. See “Optional Accessories” on page 15.
■To receive an audio signal, you’ll need an RCA-type audio cable with two male plugs, or a stereo mini-jack audio adapter cable (with red and white jacks on one end).
Positioning the Projector
If the projector isn’t already installed in the room you’re using, you’ll probably want to place it on a table in front of the screen. This lets you stand in the front of the room, face the audience, and remain close enough to the equipment to be able to control it.
Keep these considerations in mind as you position the projector:
■Place the projector on a sturdy, level surface.
■Make sure there is plenty of space for ventilation around and under the projector.
■Make sure the projector is within 5.9 feet (1.8 meters) of a grounded electrical outlet or extension cord.
Setting Up the Projector 19

Image size increases with distance, but can vary depending on the aspect ratio (image shape), how you zoom into the image, and whether you’ve adjusted other image settings. Use the illustrations and tables below to help you determine the projection distance.
Center of |
lens |
Center of lens
You can also use the Image Size Calculator on the Epson website.
PowerLite S7 (4:3 images)
|
Projection distance (A) |
|
Screen size |
Wide to Tele |
Offset (B) |
|
|
|
30 inches |
34 to 47 inches |
–2 inches |
(76 cm) |
(87 to 119 cm) |
(–5 cm) |
|
|
|
50 inches |
58 to 79 inches |
–3.3 inches |
(127 cm) |
(147 to 200 cm) |
(–8 cm) |
|
|
|
60 inches |
70 to 95 inches |
–3.9 inches |
(152 cm) |
(177 to 240 cm) |
(–10 cm) |
|
|
|
80 inches |
93 to 126 inches |
–5.2 inches |
(203 cm) |
(237 to 321 cm) |
(–13 cm) |
|
|
|
100 inches |
117 to 158 inches |
–6.5 inches |
(254 cm) |
(297 to 402 cm) |
(–17 cm) |
|
|
|
150 inches |
176 to 238 inches |
–9.8 inches |
(381 cm) |
(447 to 605 cm) |
(–25 cm) |
|
|
|
200 inches |
235 to 318 inches |
–13.1 inches |
(508 cm) |
(597 to 807 cm) |
(–33 cm) |
|
|
|
20 Setting Up the Projector
PowerLite S7 (16:9 images)
|
Projection distance (A) |
|
Screen size |
Wide to Tele |
Offset (B) |
|
|
|
30 inches |
37 to 51 inches |
+0.3 inch |
(76 cm) |
(95 to 130 cm) |
(+1 cm) |
|
|
|
50 inches |
63 to 86 inches |
+ 0.5 inch |
(127 cm) |
(161 to 218 cm) |
(+1 cm) |
|
|
|
60 inches |
76 to 103 inches |
+0.6 inch |
(152 cm) |
(193 to 262 cm) |
(+2 cm) |
|
|
|
80 inches |
102 to 138 inches |
+0.8 inch |
(203 cm) |
(259 to 350 cm) |
(+2 cm) |
|
|
|
100 inches |
128 to 173 inches |
+1.1 inches |
(254 cm) |
(324 to 438 cm) |
(+3 cm) |
|
|
|
150 inches |
192 to 259 inches |
+1.6 inches |
(381 cm) |
(487 to 659 cm) |
(+4 cm) |
|
|
|
200 inches |
256 to 346 inches |
+2.1 inches |
(508 cm) |
(651 to 880 cm) |
(+5 cm) |
|
|
|
PowerLite 79 (4:3 images)
|
Projection distance (A) |
|
Screen size |
Wide to Tele |
Offset (B) |
|
|
|
30 inches |
35 to 42 inches |
–2 inches |
(76 cm) |
(89 to 107 cm) |
(–5 cm) |
|
|
|
40 inches |
47 to 56 inches |
–2.7 inches |
(102 cm) |
(119 to 143 cm) |
(–7 cm) |
|
|
|
50 inches |
59 to 71 inches |
–3.3 inches |
(127 cm) |
(150 to 180 cm) |
(–8 cm) |
|
|
|
60 inches |
71 to 85 inches |
–4 inches |
(152 cm) |
(180 to 217 cm) |
(–10 cm) |
|
|
|
80 inches |
95 to 114 inches |
–5.3 inches |
(203 cm) |
(241 to 290 cm) |
(–14 cm) |
|
|
|
100 inches |
119 to 143 inches |
–6.7 inches |
(254 cm) |
(302 to 363 cm) |
(–17 cm) |
|
|
|
150 inches |
179 to 215 inches |
–10 inches |
(381 cm) |
(454 to 546 cm) |
(–25 cm) |
|
|
|
200 inches |
239 to 287 inches |
–13.3 inches |
(508 cm) |
(607 to 729 cm) |
(–34 cm) |
|
|
|
250 inches |
299 to 359 inches |
–16.7 inches |
(635 cm) |
(759 to 912 cm) |
(–42 cm) |
|
|
|
Setting Up the Projector 21

|
Projection distance (A) |
|
Screen size |
Wide to Tele |
Offset (B) |
|
|
|
300 inches |
359 to 431 inches |
–20 inches |
(762 cm) |
(912 to 1095 cm) |
(–51 cm) |
|
|
|
PowerLite 79 (16:9 images)
|
Projection distance (A) |
|
Screen size |
Wide to Tele |
Offset (B) |
|
|
|
30 inches |
38 to 46 inches |
+0.3 inch |
(76 cm) |
(97 to 117 cm) |
(+1 cm) |
|
|
|
40 inches |
51 to 62 inches |
+0.4 inch |
(102 cm) |
(130 to 156 cm) |
(+1 cm) |
|
|
|
50 inches |
64 to 77 inches |
+0.5 inch |
(127 cm) |
(163 to 196 cm) |
(+1 cm) |
|
|
|
60 inches |
77 to 93 inches |
+0.5 inch |
(152 cm) |
(196 to 236 cm) |
(+1 cm) |
|
|
|
80 inches |
103 to 124 inches |
+0.7 inch |
(203 cm) |
(263 to 316 cm) |
(+2 cm) |
|
|
|
100 inches |
130 to 156 inches |
+0.9 inch |
(254 cm) |
(329 to 396 cm) |
(+2 cm) |
|
|
|
150 inches |
195 to 234 inches |
+1.4 inches |
(381 cm) |
(495 to 595 cm) |
(+3 cm) |
|
|
|
200 inches |
260 to 313 inches |
+1.8 inches |
(508 cm) |
(661 to 794 cm) |
(+5 cm) |
|
|
|
250 inches |
326 to 391 inches |
+2.3 inches |
(635 cm) |
(827 to 994 cm) |
(+6 cm) |
|
|
|
275 inches |
358 to 430 inches |
+2.5 inches |
(699 cm) |
(910 to 1093 cm) |
(+6 cm) |
|
|
|
PowerLite W7 (16:10 image)
Diagonal screen |
Projection distance (A) |
|
size |
Wide to Tele |
Offset (B) |
|
|
|
40 inches |
44 to 53 inches |
–3 inches |
(102 cm) |
(111 to 134 cm) |
(–8 cm) |
|
|
|
50 inches |
55 to 66 inches |
–3.8 inches |
(127 cm) |
(139 to 168 cm) |
(–10 cm) |
|
|
|
60 inches |
66 to 79 inches |
–4.5 inches |
(152 cm) |
(168 to 202 cm) |
(–12 cm) |
|
|
|
80 inches |
88 to 106 inches |
–6.1 inches |
(203 cm) |
(225 to 270 cm) |
(–15 cm) |
|
|
|
22 Setting Up the Projector

Diagonal screen |
Projection distance (A) |
|
size |
Wide to Tele |
Offset (B) |
|
|
|
100 inches |
111 to 133 inches |
–7.6 inches |
(254 cm) |
(281 to 338 cm) |
(–19 cm) |
|
|
|
150 inches |
167 to 200 inches |
–11.4 inches |
(381 cm) |
(424 to 509 cm) |
(–29 cm) |
|
|
|
200 inches |
223 to 268 inches |
–15.1 inches |
(508 cm) |
(566 to 680 cm) |
(–38 cm) |
|
|
|
320 inches |
357 to 429 inches |
–24.2 inches |
(813 cm) |
(907 to 1089 cm) |
(–62 cm) |
|
|
|
PowerLite W7 (4:3 image)
|
Projection distance (A) |
|
Screen size |
Wide to Tele |
Offset (B) |
|
|
|
40 inches |
50 to 60 inches |
–3.4 inches |
(102 cm) |
(126 to 152 cm) |
(–9 cm) |
|
|
|
50 inches |
62 to 75 inches |
–4.3 inches |
(127 cm) |
(158 to 190 cm) |
(–11 cm) |
|
|
|
60 inches |
75 to 90 inches |
–5.1 inches |
(152 cm) |
(190 to 229 cm) |
(–13 cm) |
|
|
|
80 inches |
100 to 121 inches |
–6.9 inches |
(203 cm) |
(255 to 306 cm) |
(–17 cm) |
|
|
|
100 inches |
126 to 151 inches |
–8.6 inches |
(254 cm) |
(319 to 383 cm) |
(–22 cm) |
|
|
|
150 inches |
189 to 227 inches |
–12.9 inches |
(381 cm) |
(480 to 577 cm) |
(–33 cm) |
|
|
|
200 inches |
252 to 303 inches |
–17.1 inches |
(508 cm) |
(641 to 770 cm) |
(–44 cm) |
|
|
|
280 inches |
354 to 425 inches |
–24 inches |
(711 cm) |
(898 to 1079 cm |
(–61 cm) |
|
|
|
Setting Up the Projector 23

note
After positioning the projector, you may want to connect a Kensington MicroSaver® anti-theft device to the lock port on the projector. You can purchase this from Epson; see
page 15.
PowerLite W7 (16:9 image)
|
Projection distance (A) |
|
Screen size |
Wide to Tele |
Offset (B) |
|
|
|
40 inches |
45 to 54 inches |
–2 inches |
(102 cm) |
(114 to 137 cm) |
(–5 cm) |
|
|
|
50 inches |
56 to 68 inches |
–2.5 inches |
(127 cm) |
(143 to 172 cm) |
(–6 cm) |
|
|
|
60 inches |
68 to 82 inches |
–3 inches |
(152 cm) |
(172 to 208 cm) |
(–8 cm) |
|
|
|
80 inches |
91 to 109 inches |
–4 inches |
(203 cm) |
(231 to 278 cm) |
(–10 cm) |
|
|
|
100 inches |
114 to 137 inches |
–5.1 inches |
(254 cm) |
(289 to 348 cm) |
(–13 cm) |
|
|
|
150 inches |
171 to 206 inches |
–7.6 inches |
(381 cm) |
(435 to 523 cm) |
(–19 cm) |
|
|
|
200 inches |
229 to 275 inches |
–10.1 inches |
(508 cm) |
(582 to 699 cm) |
(–26 cm) |
|
|
|
310 inches |
356 to 427 inches |
–15.7 inches |
(787 cm) |
(903 to 1084 cm) |
(–40 cm) |
|
|
|
Projector Placement Options
When projecting from the front, you should place the projector directly in front of the center of the screen, facing the screen squarely. The center of the lens should be about level with the bottom of the screen.
Front projection
If you place the projector below screen level, you may need to tilt it up by extending the front adjustable foot. Tilting the projector causes the image to become “keystone” shaped, bu/t you can correct the distortion (see page 41).
24 Setting Up the Projector
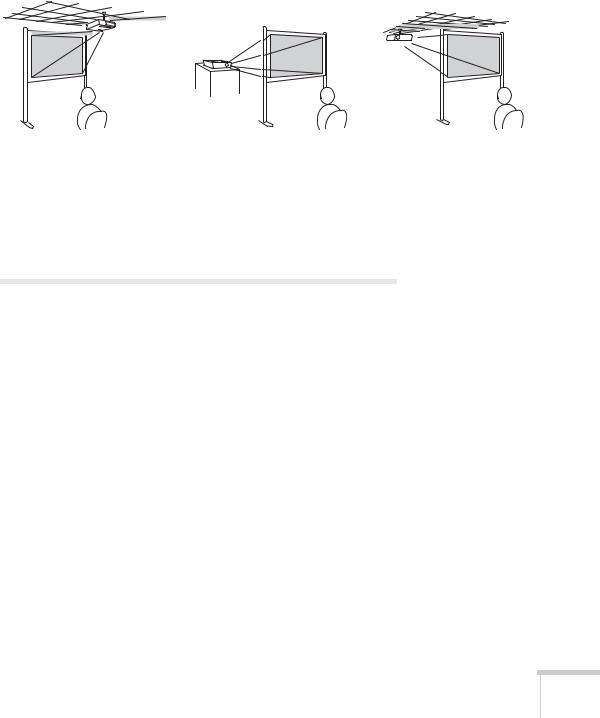
You can also install the projector in three other viewing setups: ceiling projection, rear projection onto a semi-transparent screen, or rear/ceiling projection.
Ceiling projection |
Rear projection |
Rear/ceiling projection |
To project from overhead, you’ll need the optional ceiling mounting hardware (see page 15). You’ll also need to select the appropriate Projection setting in the projector’s Extended menu to orient the image correctly (see page 61).
Connecting to a Computer
You can connect the projector to a Windows computer using the projector’s TypeB USB port. This lets you carry a lightweight cable with you when you transport the projector (see page 26).
You can connect the projector to any computer that has a standard video output (monitor) port, including desktop models, PC notebook computers, Macintosh PowerBook® and iBook® computers, and hand-held devices. See page 27 for instructions.
To play sound through the projector, connect an audio cable (see page 34).
You may be able to use your remote control as a wireless mouse when projecting from a computer (see page 50).
Setting Up the Projector 25
note
The USB Display feature does not support Mac OS.
note
If the software does not install automatically, you can install it manually.
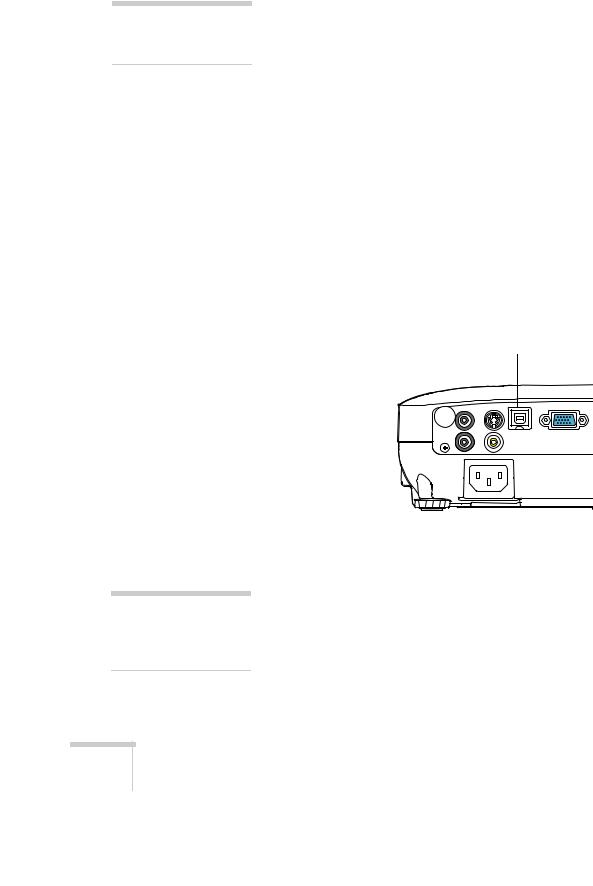
Connecting to the USB Port
You can connect a Windows Vista, XP, or Windows 2000 (SP4) computer to the projector’s TypeB (square) 

 USB port and project your computer’s display. A USB 2.0 connection (recommended) provides better picture quality and response than USB 1.1.
The first time you connect a computer to the projector’s USB port, software from the projector is installed on your computer.
1.Follow the instructions beginning on page 36 to turn on the projector.
2.Make sure the USB Type B setting on the Extended menu is set to USB Display (see page 60).
3.Turn on your computer.
4.Connect the square end of a USB cable to the projector’s TypeB (square) 

 USB port.
USB TypeB port
5.Connect the flat end of the cable to any available USB port on your notebook or desktop computer.
Messages appear on your computer screen as the projector is recognized and the software is installed automatically.
6.Follow the instructions on the screen to install the Epson USB Display software. If you see a “Digital Signature Warning,” select Continue or Continue Anyway. (You see these instructions only the first time you connect.)
26 Setting Up the Projector

After the software is installed, you see your computer’s current desktop displayed by the projector. You can switch the projector to other image sources using the Source Search or Search button on the remote control or the projector.
7.You can connect an optional audio cable if you want to play sound through the projector (see page 34).
When you’ve finished making connections, see Chapter 2 for instructions on displaying and adjusting the image.
When you’re done projecting from your computer, disconnect the USB cable.
Connecting to the VGA Computer Port
You can connect to the projector using the VGA computer cable that came with it (the monitor port on your computer must be a D-sub 15-pin port).
1.Connect one end of the VGA computer cable to the projector’s
Computer (Component Video) port and the other end to your computer’s monitor port.
Computer (Component
Video) port
2.You may need to change the Input Signal setting in the projector’s Signal menu to RGB or Auto (see page 58).
3.You can connect an optional audio cable to play sound through the projector (see page 34).
caution
Don’t try to force a connector to fit a port with a different shape or number of pins. You may damage the port or connector, or the device you are trying to connect.
Setting Up the Projector 27

4.You may also be able to use the remote control as a wireless mouse (see page 50).
When you’ve finished making connections, see page 36 for instructions on turning on the projector and Chapter 2 for instructions on displaying and adjusting the image.
Connecting to Video Equipment
You can connect several video sources to the projector at the same time. Before starting, look at your video equipment to determine its available video output connections:
■If your video player has a yellow RCA video output connector, see “Connecting a Composite Video Source” on page 29.
■If your video player has an S-Video connector, see “Connecting an S-Video Source” on page 30.
■If your video player has a component video port (three connectors labeled either Y/Cb/Cr or Y/Pb/Pr), see “Connecting a Component Video Source” on page 31.
■If your video player has an RGB video port, see “Connecting an RGB Video Source” on page 32.
After connecting video cables, you may also want to connect an optional audio cable to play sound through the projector; see page 34.
When you’ve finished making connections, see page 36 for instructions on turning on the projector and Chapter 2 for instructions on displaying and adjusting the image.
28 Setting Up the Projector
Connecting a Composite Video Source
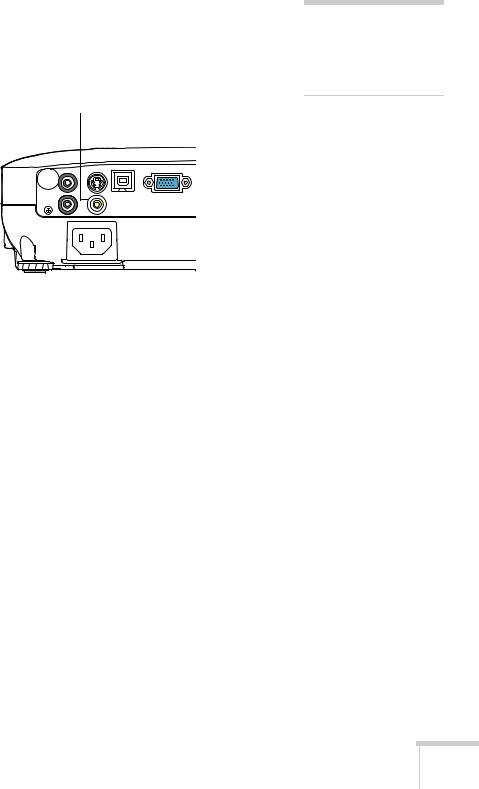
1.If your video cable has an RCA connector, connect it to the yellow video output connector on your player and the yellow Video port on the projector.
Video port
2.If you want to play sound through the projector, see page 34 for instructions on connecting an audio cable.
When you’ve finished making connections, see page 36 for instructions on turning on the projector and Chapter 2 for instructions on displaying and adjusting the image.
note
If the video cable was not provided with your video device, you can purchase one from an electronics dealer.
Setting Up the Projector 29

note
If the S-Video cable was not provided with your video device, you can purchase one from Epson; see page 15.
Connecting an S-Video Source
1.Connect the S-Video cable to the S-Video connector on your player and the S-Video port on the projector.
S-Video port
2.If you want to play sound through the projector, see page 34 for instructions on connecting an audio cable.
When you’ve finished making connections, see page 36 for instructions on turning on the projector and Chapter 2 for instructions on displaying and adjusting the image.
30 Setting Up the Projector
Loading...