


 Loading...
Epson® SureColor® P400 User's Guide

Contents |
|
SureColor P400 User's Guide..................................................................................................................... |
9 |
Product Basics .......................................................................................................................................... |
10 |
Control Panel Buttons and Lights ....................................................................................................... |
10 |
Product Parts Locations ..................................................................................................................... |
11 |
Product Parts - Front ..................................................................................................................... |
11 |
Product Parts - Inside .................................................................................................................... |
12 |
Product Parts - Back...................................................................................................................... |
13 |
The Power Off Timer .......................................................................................................................... |
13 |
Changing the Power Off Timer Setting - Windows......................................................................... |
14 |
Changing the Power Off Timer Setting - OS X............................................................................... |
15 |
Epson Connect Solutions for Smartphones, Tablets, and More ......................................................... |
15 |
Using the Epson iPrint Mobile App ................................................................................................ |
16 |
Wi-Fi or Wired Networking........................................................................................................................ |
17 |
Wi-Fi Infrastructure Mode Setup......................................................................................................... |
17 |
Wi-Fi Protected Setup (WPS)............................................................................................................. |
18 |
Using WPS to Connect to a Network ............................................................................................. |
18 |
Printing a Network Status Sheet......................................................................................................... |
19 |
Changing or Updating Network Connections ..................................................................................... |
19 |
Accessing the Web Config Utility................................................................................................... |
19 |
Changing a USB Connection to a Wi-Fi Connection...................................................................... |
19 |
Changing a Wi-Fi Connection to a Wired Network Connection...................................................... |
20 |
Connecting to a New Wi-Fi Router ................................................................................................ |
20 |
Loading Media ........................................................................................................................................... |
22 |
Loading Paper in the Sheet Feeder.................................................................................................... |
22 |
Loading Fine Art Media ...................................................................................................................... |
24 |
Loading Posterboard and Thick Media............................................................................................... |
28 |
Loading Roll Paper............................................................................................................................. |
30 |
Cutting and Removing Roll Paper ................................................................................................. |
34 |
Cut Sheet Media Loading Capacity .................................................................................................... |
36 |
Available Epson Papers ..................................................................................................................... |
38 |
3
Borderless Paper Type Compatibility ................................................................................................. |
43 |
Paper or Media Type Settings - Product Software.............................................................................. |
44 |
Printing from a Computer ......................................................................................................................... |
46 |
Printing with Windows ........................................................................................................................ |
46 |
Selecting Basic Print Settings - Windows ...................................................................................... |
46 |
Print Quality Options - Windows ............................................................................................... |
49 |
Color Management Options - Windows .................................................................................... |
49 |
Advanced Color Controls - Windows ........................................................................................ |
51 |
Paper Source Options - Windows ............................................................................................. |
51 |
Using Layout Manager - Windows Only .................................................................................... |
53 |
Selecting Print Layout Options - Windows..................................................................................... |
59 |
Reduce/Enlarge Options - Windows ......................................................................................... |
60 |
Multi-Page Printing Options - Windows..................................................................................... |
60 |
Double-sided Printing Options - Windows................................................................................. |
61 |
Selecting Additional Settings - Windows ....................................................................................... |
61 |
Printing Your Document or Photo - Windows................................................................................. |
63 |
Checking Print Status - Windows.............................................................................................. |
65 |
Saving, Sharing, and Customizing the Printer Settings ................................................................. |
65 |
Saving and Sharing Print Settings - Windows........................................................................... |
66 |
Saving and Sharing Media Settings - Windows......................................................................... |
67 |
Editing Print Setting Displays - Windows .................................................................................. |
68 |
Selecting Default Print Settings - Windows.................................................................................... |
70 |
Changing the Language of the Printer Software Screens.............................................................. |
72 |
Changing Automatic Update Options ............................................................................................ |
73 |
Printing with OS X .............................................................................................................................. |
74 |
Selecting Basic Print Settings - OS X ............................................................................................ |
74 |
Advanced Color Settings - OS X ............................................................................................... |
78 |
Output Resolution Settings - OS X............................................................................................ |
80 |
Print Options - OS X.................................................................................................................. |
80 |
Selecting Roll Paper Settings - OS X............................................................................................. |
80 |
Selecting Print Layout Options - OS X........................................................................................... |
82 |
Managing Color - OS X.................................................................................................................. |
82 |
Color Matching Options - OS X ................................................................................................. |
83 |
4
Sizing Printed Images - OS X ........................................................................................................ |
84 |
Selecting Printing Preferences - OS X........................................................................................... |
84 |
Printing Preferences - OS X...................................................................................................... |
85 |
Printing Your Document or Photo - OS X....................................................................................... |
85 |
Checking Print Status - OS X .................................................................................................... |
86 |
Managing Colors with Profiles............................................................................................................ |
87 |
Printing on CDs/DVDs............................................................................................................................... |
88 |
Loading a CD/DVD............................................................................................................................. |
88 |
Removing a Printed CD/DVD ............................................................................................................. |
90 |
Printing on CDs/DVDs from a Computer ............................................................................................ |
91 |
Starting Epson Print CD - Windows ............................................................................................... |
91 |
Printing Your CD/DVD Design - Windows ..................................................................................... |
92 |
Starting Epson Print CD - OS X .................................................................................................... |
93 |
Printing Your CD/DVD Design - OS X............................................................................................ |
94 |
Replacing Ink Cartridges .......................................................................................................................... |
96 |
Check Cartridge Status ...................................................................................................................... |
96 |
Checking Cartridge Status with Windows...................................................................................... |
96 |
Checking Cartridge Status with OS X ............................................................................................ |
99 |
Purchase Epson Ink Cartridges........................................................................................................ |
100 |
Ink Cartridge Part Numbers ......................................................................................................... |
100 |
Removing and Installing Ink Cartridges............................................................................................ |
101 |
Adjusting Print Quality............................................................................................................................ |
106 |
Print Head Maintenance................................................................................................................... |
106 |
Print Head Nozzle Check............................................................................................................. |
106 |
Checking the Nozzles Using the Control Panel....................................................................... |
106 |
Checking the Nozzles Using a Computer Utility...................................................................... |
108 |
Print Head Cleaning .................................................................................................................... |
110 |
Cleaning the Print Head Using the Control Panel ................................................................... |
110 |
Cleaning the Print Head Using a Computer Utility................................................................... |
111 |
Print Head Alignment ....................................................................................................................... |
114 |
Aligning the Print Head Using a Computer Utility......................................................................... |
114 |
Using Ink Density Optimization......................................................................................................... |
117 |
Cleaning the Paper Guide Rollers .................................................................................................... |
117 |
5
Cleaning and Transporting Your Product ............................................................................................. |
119 |
Cleaning Your Product ..................................................................................................................... |
119 |
Transporting Your Product ............................................................................................................... |
119 |
Solving Problems .................................................................................................................................... |
122 |
Checking for Software Updates........................................................................................................ |
122 |
Product Light Status ......................................................................................................................... |
123 |
Running a Product Check ................................................................................................................ |
126 |
Solving Setup Problems ................................................................................................................... |
126 |
Noise After Ink Installation ........................................................................................................... |
127 |
Software Installation Problems .................................................................................................... |
127 |
Solving Network Problems ............................................................................................................... |
128 |
Product Cannot Connect to a Wireless Router or Access Point .................................................. |
128 |
Network Software Cannot Find Product on a Network................................................................. |
129 |
Product Does Not Appear in OS X Printer Window...................................................................... |
130 |
Cannot Print Over a Network....................................................................................................... |
130 |
Solving Paper Problems................................................................................................................... |
131 |
Paper Feeding Problems............................................................................................................. |
132 |
Paper Jam Problems - Sheet Feeder .......................................................................................... |
133 |
Paper Jam Problems - Rear Manual Feed Tray .......................................................................... |
136 |
Paper Jam Problems - Thick Media or CD/DVD .......................................................................... |
137 |
Paper Jam Problems - Roll Paper ............................................................................................... |
137 |
Paper Ejection Problems ............................................................................................................. |
138 |
Solving Problems Printing from a Computer..................................................................................... |
139 |
Nothing Prints.............................................................................................................................. |
139 |
Noise Occurs, But Nothing Prints ................................................................................................ |
140 |
Product Icon Does Not Appear in Windows Taskbar ................................................................... |
141 |
Error After Cartridge Replacement .............................................................................................. |
141 |
Printing is Slow ............................................................................................................................ |
142 |
Solving Page Layout and Content Problems.................................................................................... |
143 |
Inverted Image............................................................................................................................. |
143 |
Too Many Copies Print ................................................................................................................ |
143 |
Blank Pages Print ........................................................................................................................ |
144 |
Incorrect Margins on Printout....................................................................................................... |
144 |
6
Border Appears on Borderless Prints .......................................................................................... |
145 |
Incorrect Characters Print............................................................................................................ |
145 |
Incorrect Image Size or Position.................................................................................................. |
146 |
Slanted Printout........................................................................................................................... |
146 |
Solving Print Quality Problems......................................................................................................... |
147 |
White or Dark Lines in Printout .................................................................................................... |
147 |
Blurry or Smeared Printout .......................................................................................................... |
148 |
Faint Printout or Printout Has Gaps ............................................................................................. |
149 |
Grainy Printout............................................................................................................................. |
150 |
Incorrect Colors ........................................................................................................................... |
151 |
Solving CD/DVD Problems............................................................................................................... |
152 |
Image Not Centered on CD/DVD................................................................................................. |
152 |
Image Does Not Cover Printable Area of Disc............................................................................. |
152 |
Ink Smears on CD/DVD............................................................................................................... |
152 |
Faint Image on CD/DVD .............................................................................................................. |
152 |
Uninstall Your Product Software....................................................................................................... |
153 |
Uninstalling Printing Software - Windows .................................................................................... |
153 |
Uninstalling Product Software - OS X .......................................................................................... |
154 |
Where to Get Help............................................................................................................................ |
154 |
Technical Specifications ........................................................................................................................ |
156 |
Windows System Requirements ...................................................................................................... |
156 |
OS X System Requirements............................................................................................................. |
157 |
Paper Specifications ........................................................................................................................ |
157 |
Printable Area Specifications ........................................................................................................... |
159 |
Ink Cartridge Specifications.............................................................................................................. |
163 |
Dimension Specifications ................................................................................................................. |
164 |
Electrical Specifications ................................................................................................................... |
164 |
Environmental Specifications ........................................................................................................... |
165 |
Interface Specifications .................................................................................................................... |
166 |
Network Interface Specifications ...................................................................................................... |
166 |
Safety and Approvals Specifications ................................................................................................ |
166 |
Notices ..................................................................................................................................................... |
168 |
Important Safety Instructions............................................................................................................ |
168 |
7
General Printer Safety Instructions.............................................................................................. |
168 |
Ink Cartridge Safety Instructions.................................................................................................. |
169 |
Wireless Connection Safety Instructions ..................................................................................... |
170 |
FCC Compliance Statement............................................................................................................. |
171 |
Trademarks...................................................................................................................................... |
171 |
Copyright Notice............................................................................................................................... |
172 |
A Note Concerning Responsible Use of Copyrighted Materials................................................... |
172 |
Default Delay Times for Power Management for Epson Products ............................................... |
173 |
Copyright Attribution.................................................................................................................... |
173 |
8

SureColor P400 User's Guide
Welcome to the SureColor P400 User's Guide.
For a printable PDF copy of this guide, click here.
9

Product Basics
See these sections to learn about the basic features of your product.
Control Panel Buttons and Lights Product Parts Locations
The Power Off Timer
Epson Connect Solutions for Smartphones, Tablets, and More
Control Panel Buttons and Lights
1The  power button
2The Wi-Fi button
3The 
 network status button
4The 
 paper/cancel button
5The  ink button
6The  roll paper button
7The  ink light
8The 
 paper/cancel light
9The  power light
10The network light
10
Parent topic: Product Basics
Product Parts Locations
See these sections to identify the parts on your product.
Product Parts - Front
Product Parts - Inside
Product Parts - Back
Parent topic: Product Basics
Product Parts - Front
1Printer cover
2Output tray and extensions
3Front manual feed tray
4Control panel
5Automatic sheet feeder
6Edge guide
11
7 Paper support and extensions
Parent topic: Product Parts Locations
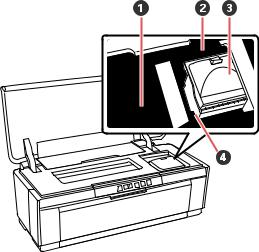
Product Parts - Inside
1Ink absorber
2Ink check lights
3Cartridge cover
4Print head
Parent topic: Product Parts Locations
12
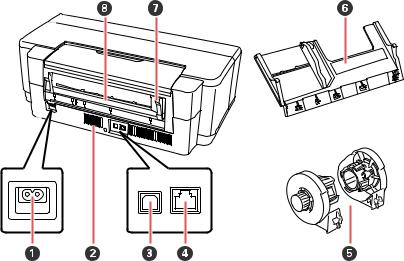
Product Parts - Back
1AC inlet
2Vent
3USB port
4LAN port
5Roll paper holders
6Rear manual feed guide
7Roll paper edge guide
8Roll paper feeder
Parent topic: Product Parts Locations
The Power Off Timer
The product turns off automatically if it is not used for a period of time after it enters sleep mode. You can adjust the time period before power off, but increasing the time reduces the product's energy efficiency.
Changing the Power Off Timer Setting - Windows
13
Changing the Power Off Timer Setting - OS X
Parent topic: Product Basics
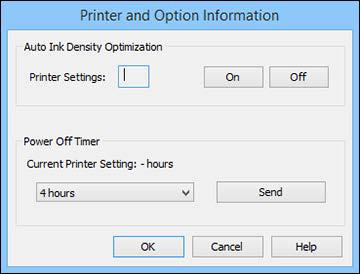
Changing the Power Off Timer Setting - Windows
You can use the printer software to change the time period before the printer turns off automatically.
1.Access the Windows Desktop, right-click the product icon in the Windows taskbar, and select
Printer Settings.
2.Click the Utility tab and select Printer and Option Information. You see this window:
3.In the drop-down menu, select the length of time after which you want the product to automatically turn off when it is not in use.
4.Click Send.
5.When you see the time you selected listed as the Current Printer Setting, click OK.
Parent topic: The Power Off Timer
14
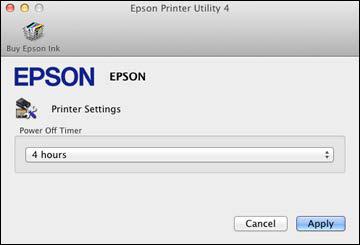
Changing the Power Off Timer Setting - OS X
You can use the printer software to change the time period before the printer turns off automatically.
1.In the Apple menu or the Dock, select System Preferences. Select Print & Fax, Print & Scan, or Printers & Scanners, select your product, and select Options & Supplies. Select Utility and select
Open Printer Utility.
2.Select Printer Settings. You see this window:
3.Select the length of time after which you want the product to automatically turn off when it is not in use as the Power Off Timer setting.
4.Click Apply.
5.Close the Printer Settings window.
Parent topic: The Power Off Timer
Epson Connect Solutions for Smartphones, Tablets, and More
You can use your smartphone, tablet, or computer to print documents, photos, emails, and web pages from your home or office.
Using the Epson iPrint Mobile App
15
Parent topic: Product Basics
Related topics
Wi-Fi or Wired Networking
Using the Epson iPrint Mobile App
Use this free Apple and Android app to print to nearby Epson networked products.
1.Set up your product on a network. See the link below.
2.Visit epson.com/connect to learn more about Epson iPrint and check the compatibility of your mobile device.
3.Download Epson iPrint from the Apple App Store or Google Play.
4.Connect your mobile device to the same wireless network that your product is using.
5.Print from your mobile device to your Epson product.
Parent topic: Epson Connect Solutions for Smartphones, Tablets, and More
Related topics
Wi-Fi or Wired Networking
16

Wi-Fi or Wired Networking
See these sections to use your product on a Wi-Fi or wired network.
Wi-Fi Infrastructure Mode Setup
Wi-Fi Protected Setup (WPS)
Printing a Network Status Sheet
Changing or Updating Network Connections
Wi-Fi Infrastructure Mode Setup
You can set up your product to communicate with your computer using a wireless router or access point. The wireless router or access point can be connected to your computer over a wireless or wired network.
1Epson product
2Wireless router or access point
3Computer with a wireless interface
17
4Computer
5Internet
6Ethernet cable (used only for wired connection to the wireless router or access point)
Parent topic: Wi-Fi or Wired Networking
Wi-Fi Protected Setup (WPS)
If your network uses a WPS-enabled wireless router or access point, you can quickly connect your product to the network using Wi-Fi Protected Setup (WPS).
Note: To check if your router is WPS-enabled, look for a button labeled WPS on your router or access point. If there is no hardware button, there may be a virtual WPS button in the software for the device. Check your network product documentation for details.
Using WPS to Connect to a Network
Parent topic: Wi-Fi or Wired Networking
Using WPS to Connect to a Network
If you have a WPS-enabled router or access point, you can use Wi-Fi Protected Setup (WPS) to connect your device to the network.
Note: To check if your router is WPS-enabled, look for a button labeled WPS on your router or access point. If there is no hardware button, there may be a virtual WPS button in the software for the device. Check your network product documentation for details.
1.To connect to a WPS-enabled router, press the WPS button on your router or access point.
2.Press and hold down the Wi-Fi button on your product for 3 seconds.
The left side of the network light turns blue to indicate a successful connection.
Note: Be sure to press and hold the Wi-Fi button on your product within 2 minutes of pressing the WPS button on your router or access point.
Parent topic: Wi-Fi Protected Setup (WPS)
18
Printing a Network Status Sheet
You can print a network status sheet to help you determine the causes of any problems you may have using your product on a network.
To print the status sheet, press the 
 network status button on the product. Examine the settings shown on the network status sheet to diagnose any problems you have.
Parent topic: Wi-Fi or Wired Networking
Changing or Updating Network Connections
See these sections to change or update how your product connects to a network.
Accessing the Web Config Utility
Changing a USB Connection to a Wi-Fi Connection
Changing a Wi-Fi Connection to a Wired Network Connection
Connecting to a New Wi-Fi Router
Parent topic: Wi-Fi or Wired Networking
Accessing the Web Config Utility
You can select your product's network settings and confirm its operating status using a web browser. You do this by accessing your product's built-in Web Config utility from a computer or other device that is connected to the same network as your product.
1.Print a network status sheet.
2.Locate the IP Address for your product that is listed on the network status sheet.
3.On a computer or other device connected to the same network as your product, open a web browser.
4.Enter your product's IP address into the address bar.
You see the available Web Config utility options.
Parent topic: Changing or Updating Network Connections
Related tasks
Printing a Network Status Sheet
Changing a USB Connection to a Wi-Fi Connection
If you have already connected your product to your computer using a USB connection, you can change to a Wi-Fi connection.
19
1.Disconnect the USB cable from your product.
2.Uninstall your product software.
3.Download and install your product software from the Epson website using the instructions on the
Start Here sheet.
Parent topic: Changing or Updating Network Connections
Related tasks
Uninstalling Printing Software - Windows
Uninstalling Product Software - OS X
Changing a Wi-Fi Connection to a Wired Network Connection
If you have already connected your product to your computer wirelessly, you can change to a wired network connection if necessary.
1.Connect one end of an Ethernet network cable to the product's LAN port.
2.Connect the other end to any available LAN port on your router or access point.
3.Uninstall your product software.
4.Download and install your product software from the Epson website.
5.Follow the on-screen instructions to install the software.
6.When you see the Select Your Connection screen, select Wired network connection.
7.If you see a Select Setup Option screen, select Set up printer for the first time.
8.Continue following the rest of the on-screen instructions.
Parent topic: Changing or Updating Network Connections
Related tasks
Uninstalling Printing Software - Windows
Uninstalling Product Software - OS X
Connecting to a New Wi-Fi Router
If you change the wireless router you have been using on your network, you need to update your product's Wi-Fi connection to the new router.
Note: If you switch to a 5 GHz wireless router, set the router to operate in dual band (2.4 GHz and 5 GHz) mode. See your router documentation for instructions.
20
1.Do one of the following:
•Windows: Uninstall your product software.
•OS X: Go to the next step.
2.Download and install your product software from the Epson website using the instructions on the
Start Here sheet.
Parent topic: Changing or Updating Network Connections
Related tasks
Uninstalling Printing Software - Windows
21
Loading Media
Before you print, load media for the type of printing you will do.
Loading Paper in the Sheet Feeder
Loading Fine Art Media
Loading Posterboard and Thick Media
Loading Roll Paper
Cut Sheet Media Loading Capacity
Available Epson Papers
Borderless Paper Type Compatibility
Paper or Media Type Settings - Product Software
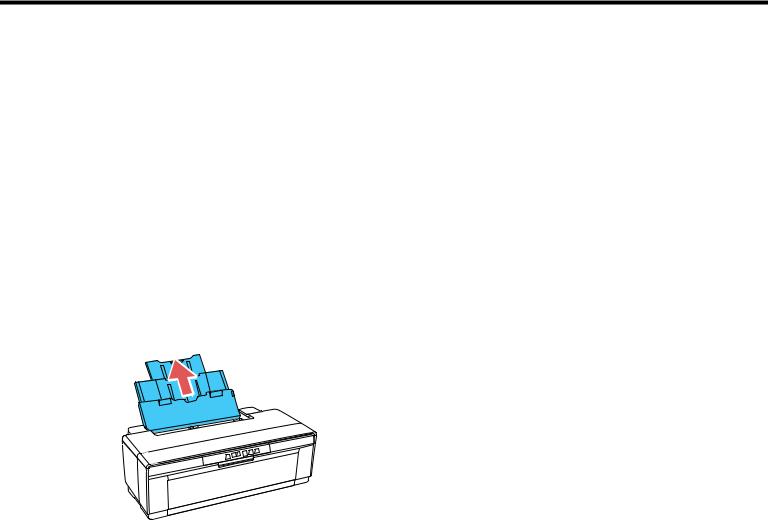
Loading Paper in the Sheet Feeder
You can load a variety of paper types and sizes in the sheet feeder.
1.Turn on your product.
2.Open the paper support and pull up the extensions.
22
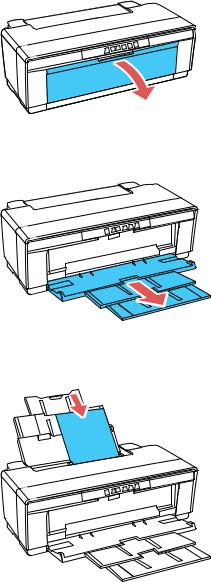
3. Open the front cover.
4. Extend the output tray.
5. Insert paper, glossy or printable side up, short edge first, against the right edge and behind the tab.
23
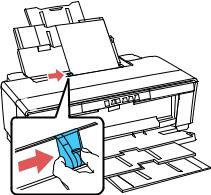
6. Press the button on the edge guide and slide it to the edge of the paper.
Always follow these paper loading guidelines:
•Load only the recommended number of sheets.
•Load paper short edge first, no matter which way your document faces.
•Load the printable side faceup.
•Load letterhead or pre-printed paper top edge first.
•Do not load paper above the arrow mark inside the edge guide.
•Check the paper package for any additional loading instructions.
Parent topic: Loading Media
Related references
Cut Sheet Media Loading Capacity
Related tasks
Loading Fine Art Media
Loading Posterboard and Thick Media
Loading Fine Art Media
Use the rear manual feed guide to load fine art media.
Note: You can load fine art media with a thickness of 0.012 to 0.028 inch (0.3 to 0.7 mm).
24
1.Turn on your product.
2.Remove any paper from the sheet feeder and close the paper support.
3.Remove any roll paper and the roll paper holders.
4.Slide the rear roll paper edge guide all the way to the right.
25

5.Align the arrows on the rear manual feed guide with the arrows on the back of the product and hook the feed guide on the rail.
6. Open the front cover.
26

7. Open the output tray.
8.Insert a single sheet of fine art paper into the rear manual feed guide, short edge first and printable side up. Slide the edge guide to the edge of the paper.
9.Feed the paper until it stops and hold it there for about three seconds. The product feeds the paper automatically.
Always follow these paper loading guidelines:
•Load only one sheet at a time.
•Load fine art media short edge first, no matter which way your document faces.
•Load the printable side face up.
•Check the paper package for any additional loading instructions.
27

Note: If you need to eject the paper from the rear of the printer without printing, press the  roll paper button for three seconds. Remove the paper and press the
  roll paper button again to clear the flashing
 paper/cancel light
Parent topic: Loading Media
Related references
Cut Sheet Media Loading Capacity
Available Epson Papers
Related tasks
Loading Roll Paper
Loading Paper in the Sheet Feeder
Loading Posterboard and Thick Media
Loading Posterboard and Thick Media
Use the front manual feed tray to load media with a thickness of 0.028 to 0.051 inch (0.7 to 1.3 mm).
Caution: Do not open the front manual feed tray or load thick paper while the product is operating. This may damage your product.
Note: Be sure to leave at least 13 inches (32 cm) of space behind your product for the media to feed through.
1.Turn on your product.
2.Remove any paper from the sheet feeder and close the paper support.
3.Remove any roll paper and the roll paper holders.
4.Open the front cover.
28
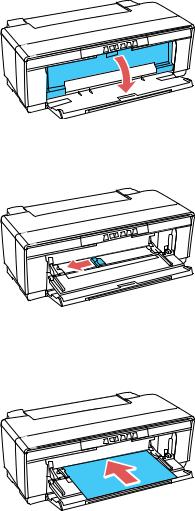
5. Open the front manual feed tray.
6. Slide the edge guide all the way to the left.
7.Insert a single sheet of posterboard or thick media into the manual feed tray, short edge first and printable side up.
Caution: Never load media from the rear or you could damage your product.
29
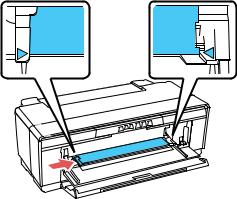
8.Feed the paper up to the triangles near the end of the tray. Make sure the paper is flush against the right side and slide the edge guide to the edge of the paper.
Parent topic: Loading Media
Related references
Cut Sheet Media Loading Capacity
Related tasks
Loading Fine Art Media
Loading Paper in the Sheet Feeder
Loading Roll Paper
You can load 13-inch (329 mm, A3+) wide roll paper for printing large or panoramic images, or multiple photos (with or without borders).
Note: It’s a good idea to check the ink status and replace cartridges, if necessary, before printing a large print job. If you need to replace a cartridge during printing, you can continue to print but you might notice a color difference in your printout depending on drying conditions.
1.Turn on your product.
2.Remove any paper from the sheet feeder and close the paper support.
3.Remove the rear manual feed guide, if installed.
30
Loading...