


 Loading...
EPSON® PowerLite® Cinema 200
Home Theater Projector
User’s Guide
Copyright Notice
All rights reserved. No part of this publication may be reproduced, stored in a retrieval system, or transmitted in any form or by any means, electronic, mechanical, photocopying, recording, or otherwise, without the prior written permission of SEIKO EPSON CORPORATION. The information contained herein is designed only for use with this EPSON product. EPSON is not responsible for any use of this information as applied to other products.
Neither SEIKO EPSON CORPORATION nor its affiliates shall be liable to the purchaser of this product or third parties for damages, losses, costs, or expenses incurred by purchaser or third parties as a result of: accident, misuse, or abuse of this product or unauthorized modifications, repairs, or alterations to this product, or (excluding the U.S.) failure to strictly comply with SEIKO EPSON CORPORATION’s operating and maintenance instructions.
SEIKO EPSON CORPORATION shall not be liable for any damages or problems arising from the use of any options or any consumable products other than those designated as Original EPSON Products or EPSON Approved Products by SEIKO EPSON CORPORATION.
EPSON is a registered trademark of SEIKO EPSON CORPORATION.
EPSON Extra Care, EPSON Connection and EPSON Store are service marks, and PrivateLine and PowerLite are registered trademarks of Epson America, Inc.
Pixelworks and DNX are trademarks of Pixelworks, Inc.
General Notice: Other product names used herein are for identification purposes only and may be trademarks of their respective owners. EPSON disclaims any and all rights in those marks.
Copyright © 2003 by Epson America, Inc. |
10/03 |
|
CPD-17301 |
2
Contents
Introduction |
7 |
Registration and Warranty |
7 |
Projector Parts |
8 |
Projection Controls |
9 |
Optional Accessories |
10 |
Using This Manual |
11 |
Getting More Information |
11 |
Setting Up the Projector |
13 |
Choosing a Location |
13 |
Connecting the Cables |
15 |
Other Connections |
16 |
Displaying and Adjusting the Image |
17 |
Focusing and Zooming the Image |
17 |
Inverting and Mirroring the Image |
18 |
Selecting the Input Signal Setting |
18 |
Positioning the Image |
19 |
Performing Keystone Correction |
19 |
Basic Operation |
21 |
Turning On the Projector |
21 |
Turning the Projector Off |
22 |
Selecting the Image Source |
22 |
Choosing the Aspect Ratio |
23 |
Choosing the Color Mode |
24 |
Locking the Projector |
25 |
3
Making Adjustments |
27 |
Using the Menu System |
27 |
Changing How the Menu Displays |
28 |
Adjusting the Image Quality |
29 |
Brightness and Contrast Settings |
29 |
Sharpness and Picture Quality Settings |
30 |
Color Settings |
31 |
Adjustments for Computer Images |
32 |
Saving and Resetting Menu Selections |
33 |
Creating Memory Settings |
33 |
Resetting the Projector |
34 |
Customizing Projector Features |
35 |
Image Sizing |
35 |
Screen Options |
36 |
Other Setup Options |
36 |
Using Cinema Color Editor |
39 |
Setting Up Your Computer |
39 |
System Requirements |
39 |
Installing the Software |
40 |
Connecting to the Computer |
41 |
Using Cinema Color Editor |
42 |
Remote Control Operations |
43 |
Adjusting the Picture Quality |
44 |
Adjusting the Color |
45 |
Saving and Recalling Picture Settings |
46 |
Managing Your Settings |
48 |
4
Maintenance |
49 |
Cleaning the Lens |
49 |
Cleaning the Projector Case |
49 |
Changing the Remote Control’s Batteries |
50 |
Cleaning and Replacing the Air Filter |
51 |
Replacing the Lamp |
52 |
Resetting the Lamp Usage Timer |
53 |
Storing the Projector |
54 |
Transporting the Projector |
54 |
Problem Solving |
55 |
What To Do When the Lights Flash |
55 |
Checking the Projector Status |
56 |
Solving Picture Problems |
57 |
Solving Remote Control Problems |
60 |
Where To Get Help |
61 |
Specifications |
63 |
General |
63 |
Lamp |
63 |
Remote Control |
63 |
Dimensions |
64 |
Electrical |
64 |
Environmental |
64 |
Safety |
64 |
Compatible Video Formats |
65 |
Aspect Ratio Settings |
66 |
5
Notices |
69 |
Important Safety Information |
69 |
Remote Control Information |
70 |
FCC Compliance Statement |
71 |
Declaration of Conformity |
72 |
Epson America, Inc., Limited Warranty |
72 |
Index |
75 |
6

Introduction
The EPSON® PowerLite® Cinema 200 projector lets you enjoy theater-quality images in the relaxing environment of your own home. Designed especially for home cinema use, it offers these outstanding features:
■1280 × 720 resolution, 800:1 contrast ratio, and up to 1300 lumens for incredibly rich, sharp images
■PixelworksTM Digital Natural ExpressionTM technology to make fast-moving images appear clear and lifelike
■True 16:9 wide-format projection
■Flexible setup configurations, including front or rear projection and ceiling mounted, with a screen trigger port to automatically raise and lower your projection screen
■Vertical and horizontal lens shift to position the image without distortion
■Adjustable color modes to quickly optimize viewing for different lighting environments, and Cinema Color Editor software for making fine custom color adjustments
■Electronic zoom and focus for precise image adjustment
■Parental control using the projector’s child lock
Registration and Warranty
The EPSON PowerLite Cinema 200 comes with a basic two-year carry-in warranty. For details, see page 72.
In addition, for customers who register their projector, EPSON offers free Extra CareSM Home Service. In the unlikely event of an equipment failure, you won’t have to wait for your unit to be repaired. Instead, EPSON will ship you a replacement unit anywhere in the United States or Canada, usually via overnight delivery. See your Extra Care Home Service brochure for details.
To register, simply fill out the registration card that came with your projector and mail it to EPSON. Or you can register online at http://www.epson.com/webreg. Registering also lets you receive special updates on new accessories, products, and service.
7

Projector Parts
Vertical lens shift knob
Control panel
Horizontal lens shift knob
Lamp cover
Lens cover
Ventilation slots 
Infrared receiver
Adjustable foot
Input B |
S-Video port |
|
Control (RS-232C) port |
||
(computer VGA port) |
||
Input A |
USB port |
|
(component video) |
||
|
Infrared receiver
D4 port (used mainly in Japan)
Trigger out port
Kensington® lock port
AC power inlet
Video port (composite video)
8

Projection Controls
Menu navigation |
Menu button |
|
Displays the on-screen menu |
||
buttons |
||
|
||
Focus button |
Source button |
|
Switches the video input source |
||
|
Indicator lights
Power button
 Aspect button
Changes the picture’s aspect ratio
Esc button
Exits the current menu item
Zoom
button |
Keystone correction buttons |
Corrects the shape of a non-rectangular image
Menu button
Displays the projector’s menus
Memory button
Recalls custom picture settings
Menu navigation buttons 


Menu selection/Line menu
Selects menu items or opens
Line Menu
Blank button
Turns off the screen image
Pattern button
Displays test patterns to adjust the image
On/Off buttons
Color Mode button
Optimizes viewing for different lighting environments
 Aspect button
Changes the picture’s aspect ratio
ESC button
Exits the current menu item
 Source buttons
Switch between equipment connected to the projector
Zoom and Focus buttons


 Illumination button
Lights the buttons on the remote control
9

Optional Accessories
EPSON provides the following optional accessories for the projector:
Product |
Part number |
|
|
Replacement lamp (ELPLP28) |
V13H010L28 |
|
|
Air filter replacement (ELPAF04) |
V13H134A04 |
|
|
Ceiling mount |
ELPHB01 |
|
|
Kensington security lock |
ELPSL01 |
|
|
Projection screens: |
|
50-inch portable screen |
ELPSC06 |
60-inch portable pop-up screen |
ELPSC07 |
80-inch portable pop-up screen |
ELPSC08 |
|
|
Macintosh® adapter set (includes monitor adapter |
ELPAP01 |
and desktop adapter) |
|
|
|
S-video cable |
ELPSV01 |
|
|
You can purchase many of these accessories from your dealer, by calling EPSON at (800) 873-7766, or by visiting the EPSON StoreSM at www.epsonstore.com (U.S. sales only). In Canada, please call (800) 463-7766 for dealer referral.
10
Using This Manual
This book contains all the information you need to use the projector, in addition to basic setup and maintenance instructions, troubleshooting tips, important safety instructions, specifications, and warranty information.
Please follow these guidelines as you read through the manual:
Warnings: Must be followed carefully to avoid bodily injury.
Cautions: Must be observed to avoid damage to your equipment.
Notes: Contain important information about your projector.
Tips: Contain helpful projection tips.
Getting More Information
Need additional help? Take advantage of EPSON’s automated support services 24 hours a day at http://support.epson.com. Use this site to download FAQs or product information and e-mail your questions to EPSON support.
If you need more help, you can use the EPSON PrivateLine® Support service. Call (800) 637-7661 and enter the PIN on the PrivateLine support card that came with your projector.
11
12
Setting Up the Projector
Follow the instructions in this section to choose a location for the projector, connect the cables, and display and adjust the image.
Choosing a Location
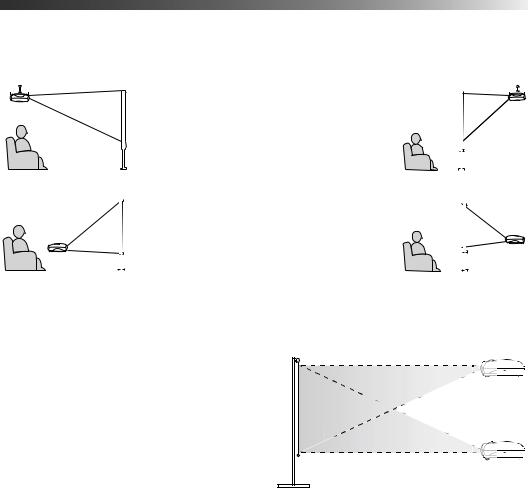
You can install the projector for various viewing setups, as shown below.
|
|
|
Front/Ceiling |
Rear/Ceiling |
|
|
|
|
|
|
|
|
|
|
|
||
|
|
|
|
|
|
|
|
|
|
|
|
|
|
|
|
|
|
|
|
|
Front |
Rear |
|
|
|
|
|
|
|
|
|
||
|
|
|
|
|
|
||
|
|
|
|
|
|
|
|
|
|
|
|
|
|
|
|
|
|
|
|
|
|
|
|
If you install the projector in a rear or overhead position, you’ll need to flip and/or mirror the image by selecting the correct Projection option (see page 18). For overhead projection, you’ll also need to install the optional ceiling mount bracket (see page 10 for ordering information).
For all setups, it’s best to place the projector at a height where its lens is between the top and bottom of the screen. That way, you can keep the projector level and use the vertical lens shift knob to position the image. This produces the best-looking picture.
If you place the projector above or below
screen level, you’ll have to tilt it up or down to
aim the image at the screen; this distorts the shape of the image, but you can correct its shape using the projector’s Keystone function (see page 19).
13

If you place the projector off to the side, aim it straight ahead (rather than at the center of the screen), then use the horizontal lens shift knob to center the image. Do not place the projector farther to the left or right than the edge of the screen, or you will not be able to project a square (or rectangular) image.
Vertical lens shift knob
Horizontal lens shift knob
The maximum size of the image is determined by the distance from the projector’s lens to the screen. Depending on how you use the Zoom and other settings, the actual size may be smaller. Use this table as a rough guide for projector placement:
Projection distance |
Maximum image size (16:9) |
|
|
|
|
2.9 feet |
30 in. (26 × 14 in.) |
|
|
|
|
3.9 feet |
40 in. (34 × 19 in.) |
|
|
|
|
5.9 feet |
60 in. (52 × 29 in.) |
|
|
|
|
7.9 feet |
80 in. (69 × 39 in.) |
|
|
|
|
9.9 feet |
100 in. (87 × 49 in.) |
|
|
|
|
19.9 feet |
200 in. (174 |
× 98 in.) |
|
|
|
29.9 feet |
300 in. (261 |
× 147 in.) |
|
|
|
Also keep these considerations in mind:
■Make sure there is plenty of space for ventilation around and under the projector. Do not set the projector on top of loose materials that could block the vents underneath.
■Make sure the projector is within 10 feet of a grounded electrical outlet or extension cord.
14
Connecting the Cables
You can connect the projector to any type of video equipment, such as a VCR, DVD player, HDTV tuner, cable or satellite box, video game console, camcorder, or digital camera. You can also connect it to a desktop or laptop PC or Apple® Macintosh system.
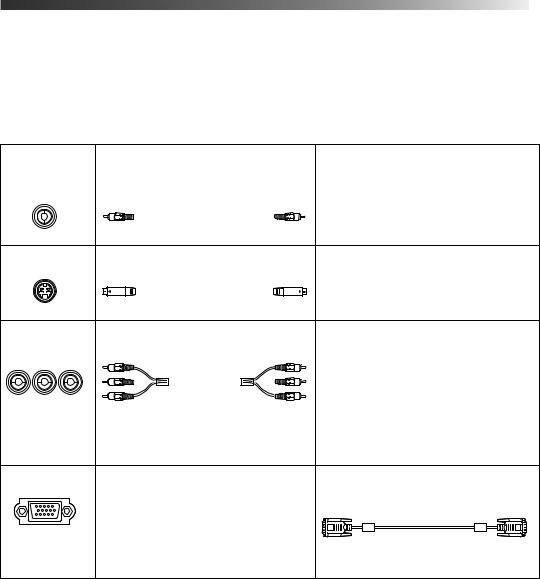
You can connect up to four pieces of equipment at the same time, as shown in this table:
Port name |
Video equipment connection |
Computer connection |
||
|
|
|
|
|
Video |
Use a standard RCA video cable: |
— |
||
|
|
|
|
|
|
|
|
|
|
S-Video |
Use a standard S-video cable: |
— |
||
|
|
|
|
|
|
|
|
|
|
Input A |
Use a standard component video |
— |
||||||
(Component) |
cable (with RCA-style connectors): |
|
||||||
|
|
|
|
|
|
|
|
|
|
|
|
|
|
|
|
|
|
|
|
|
|
|
|
|
|
|
|
Select YCbCr, YPbPr, or |
|
|
RGB-Video as the Input Signal |
|
|
setting (see page 18). |
|
Input B |
— |
Use a standard VGA computer |
|
|
cable: |
Note: For details on compatible video formats, see page 65.
15
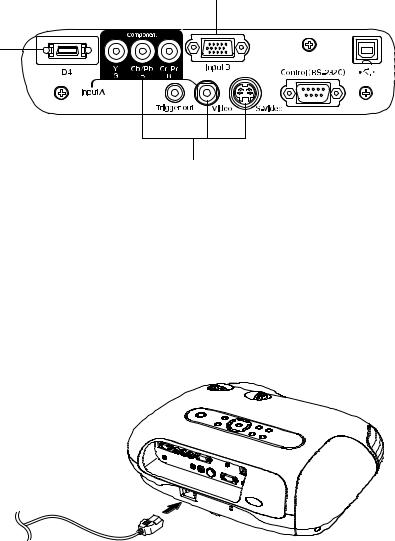
Connect your video or computer equipment to these ports:
Connect a computer to this port
(D4 used mainly in Japan)
Connect video equipment to one of these ports
If you connect to the Input A port, be sure to select the correct Input Signal setting for your equipment, or the image may not display properly (see page 18).
Other Connections
■Power cable
Plug the power cable into the projector and a grounded electrical outlet. The P power light on the projector’s control panel turns orange when the projector is receiving power and is in standby mode.
■Control (RS-232C) and  USB ports
Connect a computer to one of these ports to use the Cinema Color Editor software. See page 41 for details.
16

■Trigger out port
This port outputs a 12-volt DC signal when the projector is turned on. This lets a central control system monitor whether the projector is on or off, and can be used to raise or lower your projection screen automatically when the projector is in use.
Connect to it using a 3.5-mm mini jack cable, as shown.
Displaying and Adjusting the Image
Make sure your video or computer equipment is turned on, then turn on the projector as described on page 21. If necessary, select the correct source to display the image (see page 22).
Note: If you turn on the connected equipment before starting the projector, the projector automatically detects and displays the image. If you turn on the projector first, or have multiple pieces of connected equipment, you may have to select the source manually.
If an image does not appear, check the troubleshooting tips on page 57.
Focusing and Zooming the Image
To adjust the sharpness or size of the image:
1.Press the Focus or Zoom button on the projector or remote control. You see this screen:
2. Use the  arrow
arrow  buttons to adjust the image.
Note: If you use the remote control, you can stand close to the screen while focusing the image. This lets you adjust the picture more precisely.
3. Press ESC when done.
17

Inverting and Mirroring the Image
If the image is displayed upside-down or backward, select the correct Projection option:
1.Press the Menu button on the remote control.
2.Use the menu navigation buttons to open the Setting
menu, then open the Screen menu, and then select
Projection. Menu button 
3. Choose from these options:
■Front if the projector is located in front of the screen (for example, on a table).
Menu
■ Front/Ceiling if the projector is located in front navigation
buttons
of the screen and mounted overhead.
■Rear if the projector is located behind the screen.
■Rear/Ceiling if the projector is located behind the screen and mounted overhead.
Selecting the Input Signal Setting
If you’re using the projector’s Input A port, select the correct setting for the type of video equipment you’ve connected to it:
1.Press the Menu button on the remote control.
2.Use the menu navigation buttons to open the Setting menu, then open the Input Signal menu, and then select Input A.
3.Choose from these options:
■YCbCr for a video player that outputs an NTSC signal.
■YPbPr for a video player that outputs an HDTV signal.
■RGB-Video if your video player outputs an RGB video signal.
Note: Check the label next to the port on your video equipment, if you’re unsure which setting to use.
18
Positioning the Image
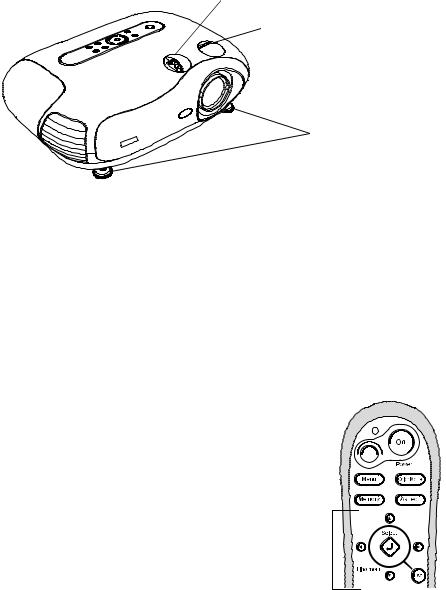
If the image is not centered on the screen, use the horizontal and vertical lens shift knobs to adjust its position.
Note: You can display a test pattern to facilitate adjustment. Press the Pattern button on the remote control, then select Cross-hatching.
Vertical lens shift knob
Horizontal lens shift knob
Adjustable feet
If you still need to raise the height of the image after using the vertical lens shift knob, lift the front of the projector and rotate the adjustable feet until the image is positioned correctly. You can also use the feet to correct the angle of the image if it’s tilted.
Performing Keystone Correction
If the projected image looks like  or
or  , use the Keystone function to correct its shape.
Note: If the image is shaped like  or
or  , the projector has been placed off to the side of the screen and angled toward it. Face the projector straight ahead (instead of at the center of the screen), then use the horizontal lens shift knob to center the image.
To perform keystone correction:
1.Press the Menu button on the remote control.
2.Use the menu navigation buttons to open the Setting menu, then open the Screen menu, and then select
Keystone.
3.Use the  arrow
arrow  buttons to adjust the shape of the image.
4.Press the Menu button when done.
Menu  button
Menu navigation buttons
19
20
Basic Operation
Make sure the projector is set up as described on page 13, then follow the instructions below to turn it on and display an image.
Turning On the Projector
1. Remove the lens cap.
2. Press the On button on the remote control, or press the |
Turn on the projector |
Power button on the projector. |
|
Note: If this is your first time using the remote control, make sure batteries are installed as described on page 50.
To keep children from turning on the projector, you can use the projector’s Child Lock (see page 25).
The projector takes about 30 seconds to warm up and display an image. If you don’t see a picture, you may need to change the image source as described on the next page.
21

Turning the Projector Off
To turn off the projector, press the Off button on the remote control (or press the Power button on the projector twice).
Let the projector cool while the P power light flashes red (about 30 seconds). Once the light stops flashing and stays on, it’s safe to unplug the projector.
Caution: Turn the projector off when not in use. Continuous 24-hour-a-day use may reduce its overall life. Never unplug the projector without pressing the Off button and letting it cool, or you could damage the projector and reduce lamp life.
Selecting the Image Source
The Source buttons let you switch between images output from different pieces of equipment connected to the projector (such as a DVD player, cable or satellite box, or video game console).
If you don’t see the image you want, press the Source button that corresponds to the port to which your video source is connected.
For example:
To select the image source connected to |
. . . press the Video button |
the Video port . . .
Note: If you’re projecting in a darkened room, press the  button (located near the bottom of the remote control). This lights up all the keys.
To temporarily turn off the image and darken the screen (without turning off the projector), press the Blank button. Press the Blank button again to return to normal viewing.
22

Choosing the Aspect Ratio
Composite and S-video signals are sized automatically to fit on your screen when Auto is selected as the Aspect setting. If you’re viewing a component video signal, you may need to change the size of the image (or aspect ratio) by pressing the Aspect button on the remote control.
■If your video source is connected to the projector’s Video or S-Video port, select Auto to automatically display your image in the correct size.
■If the Auto option is unavailable (when the source is connected to the Input A or B port), you’ll most likely want to choose one of these settings:
Normal for standard TV broadcasts, computer images, or images having a 4:3 aspect ratio.
Zoom for images recorded in 16:9 (wide-screen) format.
4:3 image using Normal setting |
|
16:9 image using Zoom setting |
||
|
|
|
|
|
|
|
|
|
|
On occasion, you may wish to select one of these options:
■Squeeze for DVDs or video recordings made in a compressed (or anamorphic) 16:9 format, sometimes called “Squeeze Mode.”
■Through if your image is smaller than 1280 × 720 pixels and you want to display it at its original pixel size without resizing it to fit on the screen.
■Squeeze Through if your image is recorded in Squeeze Mode, is smaller than 1280 × 720 pixels, and you want to display it at its original pixel size.
Note: If you display a 4:3 image using the Zoom setting, the edges of the image will be cut off. You can use the Zoom Caption option to resize and reposition the image to your liking (see page 35).
For details on how the projector resizes the picture size when you choose an Aspect setting, see page 66.
23

Choosing the Color Mode
You can change the Color Mode to automatically adjust brightness, contrast, and color, letting you quickly optimize the projected image for various lighting environments. You can also select a different color mode for each input source—which is useful if you view different types of images from different sources. (For example, you might set the S-Video source to Living Room if it’s usually used for watching movies, and then set the Video source to Dynamic for playing video games.)
Select the image source you want to adjust, then press the Color Mode button on the remote control. Choose from these settings:
■Dynamic for projecting in bright rooms; images retain their natural color.
■Living Room for projecting in rooms with subdued lighting; images retain their natural color.
■Natural for projecting in darkened rooms; increases contrast and makes flesh tones appear more natural.
■Theatre for projecting movies with dark scenes.
■sRGB for projecting computer images that conform to the sRGB color standard.
Note: You can fine-tune the color and other image quality settings using the projector’s menu system (see page 29) or the Cinema Color Editor software (see page 39). You can also create your own customized groups of settings (see page 33).
24
Loading...