


ENGLISH FRANÇAIS DEUTSCH NEDERLANDS
Setting Up the FAX
Read this manual after finishing the operation of Getting Started.
To use the fax features of the machine, you can enter the fax settings through the Easy setup.
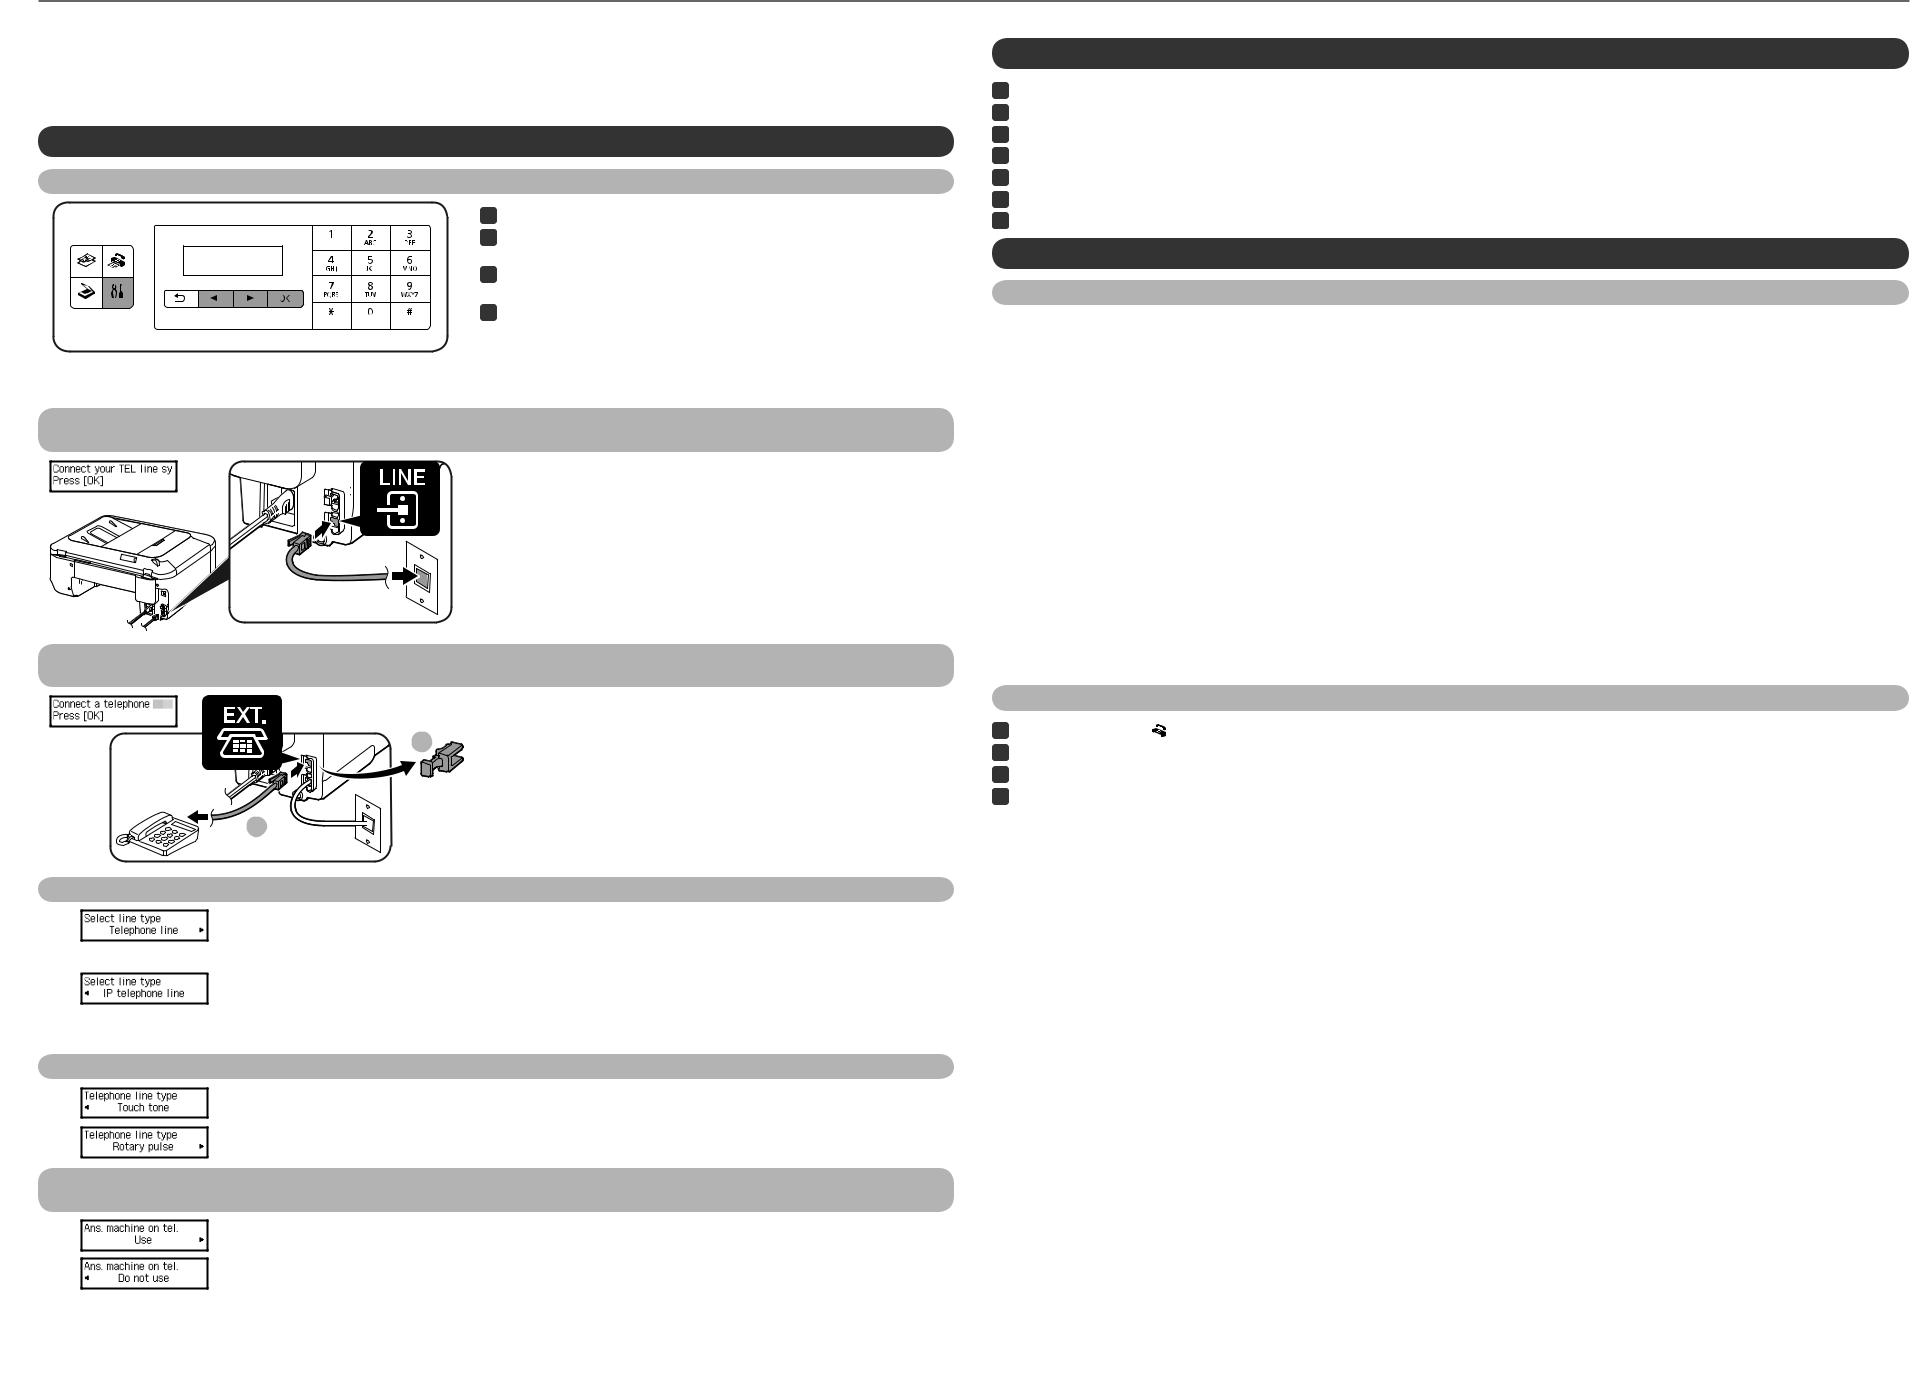
Connecting the Telephone Line
Starting Easy setup
1 |
Press the button to display the Setup menu. |
2 |
Use the [] button to select Fax settings, then press the OK button. |
3 |
Use the [] button to select Easy setup, then press the OK button. |
4 |
Use the [] button to select Start setup, then press the OK button. |
Easy setup starts up.
Follow the on-screen instruction to complete the settings in accordance with the operating environment.
When "Connect your TEL line system to the device's LINE jack" is displayed
Connect the machine to a telephone jack with the supplied telephone line cable, then press the OK button.
• A basic connection method is shown in this figure. For other connection methods, refer to the Online Manual.
• Users in Europe: If you prepare your own telephone line cable, be sure it is a 6-wire telephone line cable.
When a message to prompt connection of a telephone or an answering machine is displayed
1
2
When "Select line type" is displayed
If you want to connect a telephone or an answering machine, remove the Cap, connect a telephone or an answering machine with a telephone line cable and press the OK button.
If you do not want to connect a telephone or an answering machine, just press the OK button.
•Do not use a telephone jack line duplexer.
•Users in the UK: Use a B.T. adapter for connection as required.
If you want to connect to:
• the telephone jack on the wall directly
• a PBX extension line or an xDSL splitter
Use the [] button to select Telephone line, then press the OK button.
If you want to connect to:
• an internet telephone
• an xDSL modem
• an ISDN line
Use the [] button to select IP telephone line, then press the OK button.
When "Telephone line type" is displayed
You can select Touch tone or Rotary pulse.
Use the [] button to select your Telephone line type, then press the OK button.
When "Ans. machine on tel." is displayed (in case fax and telephone are on the same line)
If you want to use an answering machine,
Use the [] button to select Use, then press the OK button.
If you do not want to use an answering machine,
Use the [] button to select Do not use, then press the OK button.
After finishing Easy setup, enter the Setup menu again and make other settings.
Entering the FAX User Settings
1Press the button to display the Setup menu.
2Use the [] button to select Fax settings, then press the OK button.
3Use the [] button to select FAX user settings, then press the OK button.
4Use the [] button to select Unit TEL no. registr., then press the OK button.
5Use the Numeric buttons to enter the sender fax number, then press the OK button.
6Use the [] button to select Unit name registr., then press the OK button.
7Use the Numeric buttons to enter the sender name, then press the OK button.
Selecting the Receive Mode
About the Receive Mode
You can select the receive mode suitable for your fax use conditions.
Receive mode |
Your fax use condition |
Receiving operation |
TEL priority mode |
When using a telephone and a fax with the same |
When a call incomes and the connected telephone rings, pick up the |
|
telephone number: |
handset. |
|
|
If the call is a voice call, talk on the telephone. |
|
|
If the call is a fax, hang up the handset after the machine starts receiving |
|
|
the fax. |
|
|
|
DRPD or Network switch |
When using a fax with the telephone number |
When a call incomes, the machine detects whether the call is a fax call. If |
|
subscribing to a ring pattern detection service: |
the call is a fax, the machine will receive the fax automatically. |
|
|
If the machine does not detect the fax ring pattern, the telephone will |
|
|
continue ringing. Answer the telephone. |
|
|
|
Fax only mode |
When using the machine for a telephone number for |
When a fax incomes, the machine will receive the fax automatically. |
|
fax only: |
|
•DRPD is available only in the US and Canada.
•Network switch may not be available depending on the region or country.
•The telephone may not ring when a call incomes depending on the type or settings of the external telephone.
Setting the Receive Mode
1Press the button.
2Press the Menu button.
3Use the [] button to select Receive mode set., then press the OK button.
4Use the [] button to select the receive mode you want to set, then press the OK button.
The confirmation screen asking whether to make advanced settings is displayed.
If you select Yes and press the OK button, you can specify the advanced settings of each receive mode.
Advanced setting in TEL priority mode
•Manual/auto switch
The machine automatically receives faxes after the external device rings a specified length of time. You can specify the length of time.
•User-friendly RX
The machine switches fax reception automatically after the answering machine connected to the machine answers.
Advanced setting in DRPD
•DRPD: FAX ring pat.
Specify the ring pattern to match the DRPD service pattern assigned by your telephone company.
•Incoming ring
You can specify the number of times the external device rings when incoming.
Advanced setting in Network switch
•Incoming ring
You can specify the number of times the external device rings when incoming.
Advanced setting in Fax only mode
•Incoming ring
You can specify the number of times the external device rings when incoming.
For details on the sender information and receive mode, and setting the date/time, refer to the Online Manual.
Configuration du FAX
Lisez ce manuel une fois l'étape Démarrage terminée.
Pour utiliser les fonctionnalités de fax de la machine, vous pouvez entrer les paramètres via Configuration facile.
Connexion de la ligne téléphonique
Démarrage de la Configuration facile
1 Appuyez sur le bouton pour afficher le Menu Configuration.
2 Utilisez le bouton [] pour sélectionner Paramètres fax, puis appuyez sur le bouton OK.
3 Utilisez le bouton [] pour sélectionner Configuration facile, puis appuyez sur le bouton OK.
4 Utilisez le bouton [] pour sélectionner Lancer config., puis appuyez sur le bouton OK.
Configuration facile démarre.
Suivez les instructions à l'écran pour définir le paramétrage en fonction de l'environnement de fonctionnement.
Lorsque « Reliez votre système téléphonique à la prise tél. du périph. » s'affiche
Connectez la machine à une prise téléphonique à l'aide du câble téléphonique fourni, puis appuyez sur le bouton OK.
• Une méthode de connexion de base est illustrée dans cette figure. Pour d'autres méthodes de connexion, reportez-vous au Manuel en ligne.
• Pour les utilisateurs en Europe : si vous utilisez votre propre câble téléphonique, assurez-vous que celui-ci comporte 6 fils.
Lorsqu'un message demandant la connexion d'un téléphone ou d'un répondeur s'affiche
2
Lorsque « Se connecter à » s'affiche
Si vous voulez connecter un téléphone ou un répondeur, retirez le capuchon, connectez un téléphone ou un répondeur à l'aide du câble téléphonique et
1appuyez sur le bouton OK.
Si vous ne souhaitez pas connecter un téléphone ou un répondeur, appuyez
simplement sur le bouton OK.
•N'utilisez pas de duplexeur de prise téléphonique.
•Pour les utilisateurs du Royaume-Uni : l'utilisation d'un adaptateur B.T. pour la connexion est requise.
Pour une connexion à :
• la prise téléphonique murale directement
• la ligne d'un poste de standard ou un répartiteur xDSL
Utilisez le bouton [] pour sélectionner Ligne téléphonique, puis appuyez sur le bouton OK.
Pour une connexion à :
• un téléphone Internet
• un modem xDSL
• une ligne RNIS
Utilisez le bouton [] pour sélectionner Ligne tél. IP, puis appuyez sur le bouton OK.
Lorsque « Type ligne téléph. » s'affiche
Vous pouvez sélectionner Tonalités ou Impulsion rotative.
Utilisez le bouton [] pour sélectionner votre Type ligne téléph., puis appuyez sur le bouton OK.
Entrée des paramètres utilisateurs FAX
1Appuyez sur le bouton pour afficher le Menu Configuration.
2Utilisez le bouton [] pour sélectionner Paramètres fax, puis appuyez sur le bouton OK.
3Utilisez le bouton [] pour sélectionner Param. utilisat. FAX, puis appuyez sur le bouton OK.
4Utilisez le bouton [] pour sélectionner Enreg. n° tél unité, puis appuyez sur le bouton OK.
5Utilisez les boutons numériques pour entrer le numéro de fax de l'expéditeur, puis appuyez sur le bouton OK.
6Utilisez le bouton [] pour sélectionner Enreg. nom unité, puis appuyez sur le bouton OK.
7Utilisez les boutons numériques pour entrer le nom de l'expéditeur, puis appuyez sur le bouton OK.
Sélection du mode de réception
À propos du mode de réception
Vous pouvez sélectionner le mode de réception adapté à vos conditions d'utilisation du fax.
Mode de réception |
Vos conditions d'utilisation du fax |
Réception |
Mode priorité tél |
Lors de l'utilisation d'un téléphone et d'un fax avec le |
Lorsque vous recevez un appel et que le téléphone connecté sonne, |
|
même numéro de téléphone : |
décrochez. |
|
|
S'il s'agit d'un appel vocal, parlez au téléphone. |
|
|
S'il s'agit d'un appel par fax, raccrochez dès le début de la réception du fax. |
|
|
|
DRPD ou Commutation |
Lors de l'utilisation d'un fax avec le numéro de |
Lors de la réception d'un appel, la machine détecte s'il s'agit d'un |
réseau |
téléphone avec abonnement à un service de détection |
appel par fax. S'il s'agit d'un appel par fax, la machine reçoit le fax |
|
de type de sonnerie : |
automatiquement. |
|
|
Si la machine ne détecte pas le type de sonnerie, le téléphone continue |
|
|
de sonner. Répondez au téléphone. |
|
|
|
Mode fax seulement |
Lors de l'utilisation d'une machine pour un numéro de |
Lors de la réception d'un fax, la machine reçoit le fax automatiquement. |
|
téléphone en mode fax uniquement : |
|
•DRPD n'est disponible qu'aux États-Unis et au Canada.
•Commutation réseau peut ne pas être disponible suivant la région ou le pays où vous résidez.
•Le téléphone risque de ne pas sonner lors de la réception d'un appel selon le type ou les paramètres du téléphone externe.
Définition du mode de réception
1Appuyez sur le bouton .
.
2Appuyez sur le bouton Menu .
.
3Utilisez le bouton [] pour sélectionner Param. mode récept., puis appuyez sur le bouton OK.
4Utilisez le bouton [] pour sélectionner le mode de réception à définir, puis appuyez sur le bouton OK.
L'écran de confirmation demandant si vous souhaitez définir des paramètres avancés s'affiche.
Si vous sélectionnez Oui et appuyez sur le bouton OK, vous pouvez spécifier les paramètres avancés de chaque mode de réception.
Paramètres avancés en Mode priorité tél
•Commut. man/auto
La machine reçoit automatiquement les fax après que le périphérique externe a sonné pendant un délai spécifié. Vous pouvez définir le délai.
•REC conviviale
La machine passe automatiquement à la réception de fax une fois que le répondeur connecté à la machine a répondu.
Paramètres avancés en mode DRPD
•DRPD : Sonnerie fax
Spécifiez la sonnerie correspondant au modèle du service DRPD affecté à votre entreprise.
•Sonnerie entrante
Vous pouvez spécifier le nombre de sonneries du périphérique externe lors d'un appel entrant.
Paramètres avancés en mode Commutation réseau
•Sonnerie entrante
Vous pouvez spécifier le nombre de sonneries du périphérique externe lors d'un appel entrant.
Paramètres avancés en Mode fax seulement
•Sonnerie entrante
Vous pouvez spécifier le nombre de sonneries du périphérique externe lors d'un appel entrant.
Lorsque « Répondeur sur tél. » s'affiche (si le fax et le téléphone sont sur la même ligne)
Pour plus de détails sur les informations concernant l'expéditeur, le mode de réception et la définition de la date/heure, reportez-vous au Manuel en ligne.
Si vous souhaitez utiliser un répondeur,
Utilisez le bouton [] pour sélectionner Utiliser, puis appuyez sur le bouton OK.
Si vous ne souhaitez pas utiliser un répondeur,
Utilisez le bouton [] pour sélectionner Ne pas utiliser, puis appuyez sur le bouton OK. Une fois la Configuration facile terminée, sélectionnez de nouveau le Menu Configuration et configurez d'autres paramètres.
QT5-6695-V01 |
XXXXXXXX |
© CANON INC. 2014 |
PRINTED IN XXXXXXXX |
 Loading...