


Copyright ©2002 Canon Inc. all rights reserved.
•Unauthorized transfer or duplication of all or any part of this document is prohibited.
•The content of this document is subject to change without notice.
•Every effort has been made to ensure that the information contained in this guide is correct. If any error or omission is found, contact us directly or an authorized Canon representative.
•Canon is not responsible for any damages, direct or indirect, arising from or related to the use of this printer.
Trademarks
•Canon, the Canon logo, BJ, and NetSpot are registered trademarks of Canon Inc.
•Microsoft®, Windows®, Windows NT® and MS-DOS® are registered trademarks of Microsoft Corporation in the United States and/or other countries.
•NetWare and Novell are registered trademarks of Novell, Inc. in the United States and other countries. NDS, NDPS, NLM, and Novell Client is a trademark of Novell, Inc. in the United States.
•Other brand and product names may be trademarks or registered trademarks of their respective companies.

Notations About Text
Conventions
To ensure the safe and most efficient use of this printer, important information is provided under the headings listed below. Before you use this guide, make sure that you understand what these headings mean and remember the important information described under these headings.
Warning
zFailure to follow these instructions could result in fatal or serious injury. Always remember and follow the guidelines and advice described under this heading to ensure your own safety and the safety of other people working around the printer.
Caution
zFailure to follow these instructions could lead to mistakes in the use of printer and result in minor injury or serious damage to the printer. Always remember and follow the guidelines and advice described under this heading to ensure safe use of the printer.
 Important
zInstructions and guidelines for operation of the printer provided under this heading describe restrictions and other important information which if ignored could cause minor damage to the printer or other equipment or result in the loss of valuable data. Always remember and follow the guidelines and advice under this heading to avoid mistakes in procedure.
 Note
Note
zInformation under this heading includes tips and hints that will help you avoid minor problems and use the printer more efficiently.
Illustrations and Screen Examples
The illustrations and screen examples used in this guide were created with the N1000 but they also apply to the N2000. Operations described herein apply to both models.
i

Abbreviations
Throughout this document the following abbreviations are used in text.
•Microsoft® Windows® Millennium Edition is abbreviated as “Windows Me”
•Microsoft® Windows® 98 is abbreviated as “Windows 98”
•Microsoft® Windows® 95 is abbreviated as “Windows 95”
•Microsoft® Windows® XP is abbreviated as “Windows XP”
•Microsoft® Windows® 2000 is abbreviated as “Windows 2000”
•Microsoft® Windows NT® is abbreviated as “Windows NT”
•Microsoft® Windows® is abbreviated as “Windows ”
•The term “GARO”, used in the name of this printer driver, is an acronym for “Graphic Arts Language with Raster Operations”, a printer language of creating raster images.
Legal Notice
•It is illegal to reproduce currency, bills, negotiable securities and other documents prohibited by law. Reproduction of such items may be subject to criminal prosecution.
•It is illegal to reproduce legal certificates, licenses, travel tickets, and certain public and private documents prohibited from reproduction by law. Reproduction of such items may be subject to criminal prosecution.
•Please note that intellectual property protected by copyright may not be reproduced without the express permission of the copyright holder except for personal or household use under limited circumstances.
ii
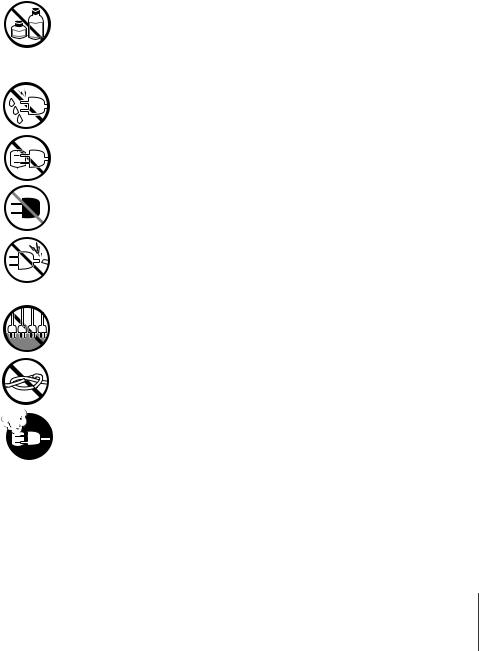
Safety Warnings and Precautions
Read and follow all the warnings and guidelines described below to prevent the hazards of fire or electrical shock and ensure safe use of this printer.
 Warning
Location
zThe electrical contacts inside the printer become extremely hot during normal operation. To avoid causing a fire, never store flammable substances like alcohol, thinner, etc. near the printer.
Power Supply
zTo avoid personal injury from an electrical shock, never handle the power cord or plug when your hands are wet.
zTo avoid causing a fire or serious electrical shock, make sure that the power plug is securely and completely inserted into the power source.
zTo avoid causing a fire or serious electrical shock, always use the power cord provided with this printer, and do not use this power cord with any other electrical device.
zTo avoid a fire or serious electrical shock caused by a short circuit, avoid
damaging the AC adapter cord or the power cord. Never attempt to modify the power cord in any way. Never apply force to the cord by pulling on it, and never place a heavy object on the power cord.
zTo avoid a fire or serious electrical shock, connect the printer power cord to an independent power source that is not shared by other equipment or
appliances.
zTo avoid a fire or serious electrical shock, never knot the power cord or wrap it around itself.
zTo avoid a fire hazard, occasionally disconnect the power cord from the printer and the power supply and use a soft dry cloth to clean the cord connectors and the connection points. Leaving the cord plugged in and not cleaned for a long period, especially in an area subject to dust, oil, and high humidity, could cause the insulation material to deteriorate.
iii

In an Emergency...
zTo avoid a fire or serious electrical shock, if the printer emits smoke or a strange odor, immediately press the Power button to switch the printer off
and unplug the power cord from the power supply. Discontinue using the printer and call for service.
Cleaning the Printer
zUse only a damp, clean cloth to clean the surfaces of the printer. The electrical contacts inside the printer become hot during normal operation. To avoid a fire or serious electrical shock, never use alcohol, benzene, thinner, or any other type of flammable liquid cleaner to clean the printer.
Pacemakers
zThis printer generates a low magnetic field. If anyone wearing a pacemaker experiences discomfort while working around the printer should leave the area. Consult a physician before continuing to work around the printer.
 Caution
Printer location
zTo avoid damage to the printer or possible personal injury, place the printer on a flat, stable surface that is safe from sudden shocks or strong vibrations
to ensure that it will not fall.
zTo avoid damage to the printer which could result in a fire or electrical shock, place the printer in a location where it is not exposed dust, direct
sunlight, high temperature, or high humidity. Use the printer location in an environment where temperature and humidity are within the ranges of 5oC~35oC (41oF~95oF) and 10~90% RH (with no condensation).
zTo avoid anything entering the printer and causing a fire, never place the printer on a heavy wool or shag carpet.
zThere are ventilation holes on the left side of this product, so when you install it, make sure the holes are not blocked by a wall or other object. Install so that the holes are at least 30cm (12 in.) from a wall or other object. If the ventilation holes are blocked, the inside of this product may become overheated, resulting in fire.
zTo avoid the hazard of a dangerous fire, keep the area around the power
supply where the printer power cord is connected so you can disconnect it immediately if the printer starts operating abnormally (emitting smoke or odd noises, etc.).
iv

zTo ensure normal operation of the printer and avoid possible damage, never install the printer near large office equipment or any other type of electrical device that emits a strong magnetic field.
Moving the Printer
zTo avoid dropping and damaging the printer or the paper feed unit or causing personal injury when moving it, always grip the printer or the paper
feed unit by the lift handles provided on the left and right side of the printer or the paper feed unit.
zTo avoid breaking a paper cassette and personal injury, always remove the cassettes before lifting and moving the printer or a paper feed unit.
zThe Model N2000 weighs 16 kg (35 lb.) To avoid back strain or other
personal injuries, at least two people, lifting together at the front and back of the printer, are required to move the printer.
Power Supply
zTo avoid damaging the power plug, which could cause a short circuit and cause a fire or electrical shock, never pull on the power cord to unplug the cord from the power supply. Always grip the plug to remove it from the power supply.
zTo avoid a fire or electrical shock, do not use an extension cord.
zTo prevent fire or electrical shock, never use a power supply source other
than the one rated for the printer in the country where you purchased the printer.
AC 100-127 V, 50/60 Hz
AC 220-240 V, 50/60 Hz
Cleaning the Printer
zTo avoid minor burns or minor injury from moving parts, before cleaning the printer always press the Power button to switch off the printer then unplug the power cord from the power supply and allow the electrical contacts inside the printer to cool.
Printhead and Ink Tanks
zStore the ink tanks out of the reach of small children. If a child accidentally ingests ink from an ink tank, contact a physician immediately.
zTo avoid staining clothing or your work area with spilled ink, never shake or drop the printhead or an ink tank.
v

zThe electrical contacts of the printhead become extremely hot during normal operation. To avoid minor burns, never touch the electrical contacts after removing the printhead from the printer.
General Caution
zThere are high voltage points inside the printer. To avoid a fire or electrical shock, never attempt to disassemble the printer or attempt repairs.
zTo avoid a fire or electrical shock, never use flammable sprays around the printer.
zTo avoid minor injury from moving parts inside the printer, never open a cover or insert your hand into the printer while the printer is operating.
zTo avoid a fire, electrical shock, or damage to the printer, never place
anything on the printer such as small metal objects like staples, paper clips, or any type of liquid container, especially containers of flammable liquids which could fall accidentally into the printer.
zTo prevent a fire hazard or dangerous electrical shock, if a foreign object falls or a liquid spills into the printer, press the Power button immediately to switch the printer off then unplug the printer power cord from the power supply. Call for service and do not use the printer until it has been checked by a qualified service technician.
vi

Contents
Notations About Text . . . . . . . . . . . . . . . . . . . . . . . . . . . . . . . . . . . . . i
Conventions . . . . . . . . . . . . . . . . . . . . . . . . . . . . . . . . . . . . . . . . . . . . . . . . . . i Illustrations and Screen Examples . . . . . . . . . . . . . . . . . . . . . . . . . . . . . . . . . i Abbreviations . . . . . . . . . . . . . . . . . . . . . . . . . . . . . . . . . . . . . . . . . . . . . . . . .ii Legal Notice . . . . . . . . . . . . . . . . . . . . . . . . . . . . . . . . . . . . . . . . . . . . . . . . . .ii
Safety Warnings and Precautions . . . . . . . . . . . . . . . . . . . . . . . . . . iii Contents . . . . . . . . . . . . . . . . . . . . . . . . . . . . . . . . . . . . . . . . . . . . . vii
Chapter 1 Before Using the Printer
Printer Part Names . . . . . . . . . . . . . . . . . . . . . . . . . . . . . . . . . . . . 1-2 Switching the Printer On and Off . . . . . . . . . . . . . . . . . . . . . . . . . . 1-7
Switching the Printer On . . . . . . . . . . . . . . . . . . . . . . . . . . . . . . . . . . . . . . 1-7
Switching the Printer Off . . . . . . . . . . . . . . . . . . . . . . . . . . . . . . . . . . . . . . 1-8
Setting the Printer Online and Offline . . . . . . . . . . . . . . . . . . . . . . 1-9
Setting the Printer Online . . . . . . . . . . . . . . . . . . . . . . . . . . . . . . . . . . . . . . 1-9
Setting the Printer Offline . . . . . . . . . . . . . . . . . . . . . . . . . . . . . . . . . . . . 1-10
Chapter 2 Print Media You Can Use
Print Media That Can Be Used . . . . . . . . . . . . . . . . . . . . . . . . . . . 2-2
Types of Print Media . . . . . . . . . . . . . . . . . . . . . . . . . . . . . . . . . . . . . . . . . 2-2
Paper Sizes . . . . . . . . . . . . . . . . . . . . . . . . . . . . . . . . . . . . . . . . . . . . . . . . . 2-4
Maximum Stack Size . . . . . . . . . . . . . . . . . . . . . . . . . . . . . . . . . . . . . . . . . 2-5
Printing Area . . . . . . . . . . . . . . . . . . . . . . . . . . . . . . . . . . . . . . . . . . . . . . . 2-6
Handling Print Media . . . . . . . . . . . . . . . . . . . . . . . . . . . . . . . . . . . . . . . . . 2-6
Loading Paper Cassettes . . . . . . . . . . . . . . . . . . . . . . . . . . . . . . . 2-7
Loading the Paper Cassette . . . . . . . . . . . . . . . . . . . . . . . . . . . . . . . . . . . . 2-7
Selecting the Print Media Size and Type . . . . . . . . . . . . . . . . . . . . . . . . . 2-12
Loading the Tray . . . . . . . . . . . . . . . . . . . . . . . . . . . . . . . . . . . . . 2-15
Chapter 3 Printing from Windows
Printing . . . . . . . . . . . . . . . . . . . . . . . . . . . . . . . . . . . . . . . . . . . . . 3-2
Print Procedure . . . . . . . . . . . . . . . . . . . . . . . . . . . . . . . . . . . . . . . . . . . . . . 3-2
Canceling a Print Job . . . . . . . . . . . . . . . . . . . . . . . . . . . . . . . . . . 3-3 Viewing Online Help . . . . . . . . . . . . . . . . . . . . . . . . . . . . . . . . . . . 3-4
Opening Online Help . . . . . . . . . . . . . . . . . . . . . . . . . . . . . . . . . . . . . . . . . 3-4
Chapter 4 Using the Operation Panel
What’s On the Operation Panel? . . . . . . . . . . . . . . . . . . . . . . . . . . 4-2
Reading the Display . . . . . . . . . . . . . . . . . . . . . . . . . . . . . . . . . . . . . . . . . . 4-2
Using the Operation Panel Buttons . . . . . . . . . . . . . . . . . . . . . . . . . . . . . . 4-4
Reading Operation Panel Lamps . . . . . . . . . . . . . . . . . . . . . . . . . . . . . . . . 4-6
vii

Function Menus . . . . . . . . . . . . . . . . . . . . . . . . . . . . . . . . . . . . . . . 4-7
Types of Menus . . . . . . . . . . . . . . . . . . . . . . . . . . . . . . . . . . . . . . . . . . . . . 4-7 Printer Function Priorities . . . . . . . . . . . . . . . . . . . . . . . . . . . . . . . . . . . . . 4-7 Menu Flow Summaries . . . . . . . . . . . . . . . . . . . . . . . . . . . . . . . . . . . . . . . 4-8
How to Perform Menu Settings . . . . . . . . . . . . . . . . . . . . . . . . . . . 4-9
Setting the Printer Online and Offline . . . . . . . . . . . . . . . . . . . . . . . . . . . . 4-9 Performing Settings . . . . . . . . . . . . . . . . . . . . . . . . . . . . . . . . . . . . . . . . . . 4-9
Menu Settings Summary Tables . . . . . . . . . . . . . . . . . . . . . . . . . 4-11
Setup Menu . . . . . . . . . . . . . . . . . . . . . . . . . . . . . . . . . . . . . . . . . . . . . . . 4-11 Utility Menu . . . . . . . . . . . . . . . . . . . . . . . . . . . . . . . . . . . . . . . . . . . . . . . 4-13 Media Set Menu . . . . . . . . . . . . . . . . . . . . . . . . . . . . . . . . . . . . . . . . . . . . 4-14
Chapter 5 Maintenance
Replacing Ink Tanks . . . . . . . . . . . . . . . . . . . . . . . . . . . . . . . . . . . 5-2
When to Replace an Ink Tank . . . . . . . . . . . . . . . . . . . . . . . . . . . . . . . . . . 5-2
Replacing an Ink Tank . . . . . . . . . . . . . . . . . . . . . . . . . . . . . . . . . . . . . . . . 5-3
Cleaning the Printer . . . . . . . . . . . . . . . . . . . . . . . . . . . . . . . . . . . . 5-8
Replacing the Printhead . . . . . . . . . . . . . . . . . . . . . . . . . . . . . . . 5-10
How to Replace the Printhead . . . . . . . . . . . . . . . . . . . . . . . . . . . . . . . . . 5-10
Chapter 6 Troubleshooting
Having a problem? . . . . . . . . . . . . . . . . . . . . . . . . . . . . . . . . . . . . 6-2
Printer not Operating Correctly . . . . . . . . . . . . . . . . . . . . . . . . . . . 6-3
Cannot Print . . . . . . . . . . . . . . . . . . . . . . . . . . . . . . . . . . . . . . . . . . . . . . . . 6-3
Printing Does Not Start . . . . . . . . . . . . . . . . . . . . . . . . . . . . . . . . . . . . . . . 6-5
Printing Halts During Print Job . . . . . . . . . . . . . . . . . . . . . . . . . . . . . . . . . 6-6
Print Job Results Abnormal . . . . . . . . . . . . . . . . . . . . . . . . . . . . . . 6-7
Poor Print Quality . . . . . . . . . . . . . . . . . . . . . . . . . . . . . . . . . . . . . . . . . . . 6-7
Print Results Do Not Match Print Job Content . . . . . . . . . . . . . . . . . . . . . 6-9
Colors Wrong . . . . . . . . . . . . . . . . . . . . . . . . . . . . . . . . . . . . . . . . . . . . . . 6-10
Other Problems . . . . . . . . . . . . . . . . . . . . . . . . . . . . . . . . . . . . . . . . . . . . . 6-10
Error Messages . . . . . . . . . . . . . . . . . . . . . . . . . . . . . . . . . . . . . . . . . . . . . 6-11
Removing Paper Jams . . . . . . . . . . . . . . . . . . . . . . . . . . . . . . . . 6-15
Performing a Print Test . . . . . . . . . . . . . . . . . . . . . . . . . . . . . . . . 6-20
Cleaning the Printhead . . . . . . . . . . . . . . . . . . . . . . . . . . . . . . . . 6-23
Types of Printhead Cleaning . . . . . . . . . . . . . . . . . . . . . . . . . . . . . . . . . . 6-23
Head Cleaning Procedure . . . . . . . . . . . . . . . . . . . . . . . . . . . . . . . . . . . . . 6-23
Aligning the Printhead . . . . . . . . . . . . . . . . . . . . . . . . . . . . . . . . . 6-26
Correcting Banding . . . . . . . . . . . . . . . . . . . . . . . . . . . . . . . . . . . 6-29
Chapter 7 Other Important Information
Options . . . . . . . . . . . . . . . . . . . . . . . . . . . . . . . . . . . . . . . . . . . . . 7-2
Paper Feed Units . . . . . . . . . . . . . . . . . . . . . . . . . . . . . . . . . . . . . . . . . . . . 7-2
Universal Cassettes . . . . . . . . . . . . . . . . . . . . . . . . . . . . . . . . . . . . . . . . . . 7-3
viii
Network Interface Board . . . . . . . . . . . . . . . . . . . . . . . . . . . . . . . . . . . . . . 7-4
Uninstalling the Software . . . . . . . . . . . . . . . . . . . . . . . . . . . . . . . . 7-5
Uninstalling the Printer Driver . . . . . . . . . . . . . . . . . . . . . . . . . . . . . . . . . . 7-5
Uninstalling NetSpot Suite Service . . . . . . . . . . . . . . . . . . . . . . . . . . . . . . 7-5
Uninstalling NetSpot . . . . . . . . . . . . . . . . . . . . . . . . . . . . . . . . . . . . . . . . . 7-6
Uninstalling the LPR Port . . . . . . . . . . . . . . . . . . . . . . . . . . . . . . . . . . . . . 7-6
Uninstalling NetBIOS/NetBEUI Port Monitor . . . . . . . . . . . . . . . . . . . . . 7-7
Specifications . . . . . . . . . . . . . . . . . . . . . . . . . . . . . . . . . . . . . . . . 7-8
Index . . . . . . . . . . . . . . . . . . . . . . . . . . . . . . . . . . . . . . . . . . . . . . 7-10
ix

x

1 Before Using the Printer
This section describes printer parts and procedures you should know before you use the printer.
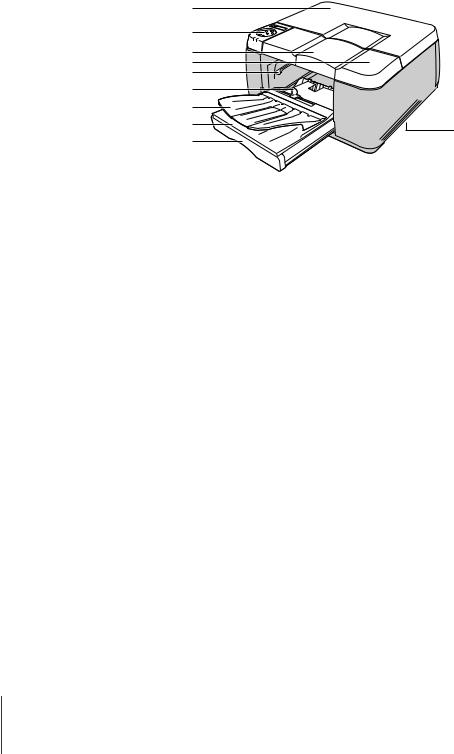
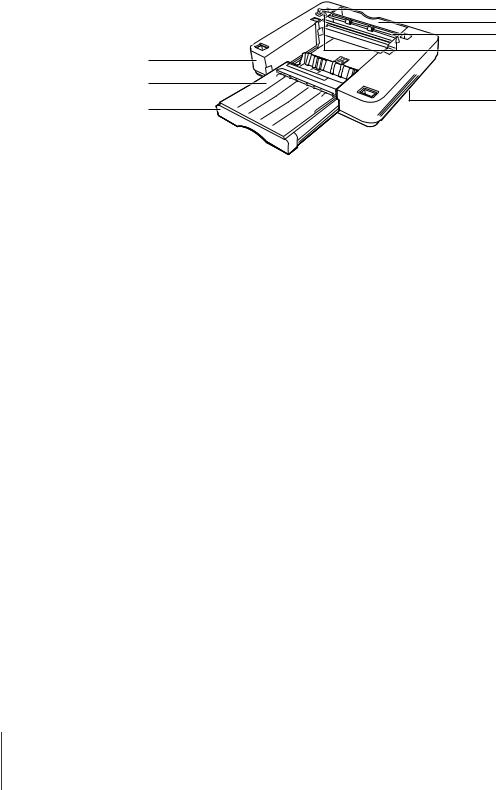
Printer Part Names
Front View
a |
|
|
b |
|
|
c |
|
|
d |
|
|
e |
|
|
f |
|
|
g |
|
|
h |
j |
|
i |
||
|
aBack upper cover
Remove to install the printhead or to remove jammed paper. (ÆP.5-10, P.6-15)
bOperation panel
Provides Power button, Online button, Ink Replace button, LCD display, and other important buttons used to operate the printer. For details, see Chapter 4 “Using the Operation Panel Buttons”. (ÆP.4-4)
cFront upper cover
Remove to set paper in the tray or to remove jammed paper. (ÆP.2-15, P.6-15)
dRight cover
Open to replace ink tanks. This cover is normally locked. To unlock this cover for removal in order to replace ink tanks, press the Ink Replace button on the operation panel.
eManual feed lever
Releases the paper feed roller to allow manual paper feed. Raise this lever to feed paper manually for printing or to remove jammed paper. (ÆP.2-15, P.6-15)
fSlide lever
Slide to the left or right to fit the size of the paper for manual feeding. (ÆP.2-15)
gTray
Set paper here for manual feed printing. Also functions as the paper exit
1-2 Before Using the Printer
tray during normal printing. (ÆP.2-15)
hCassette cover
Protects paper loaded in the cassette.
iCassette 1
The standard paper cassette provided with the printer is a universal type cassette that can hold a variety paper sizes and types: plain paper, coated paper, transparencies (OHP film), etc. (ÆP.2-7)
jLift handles
Grasp these handles provided on the left and right side to lift or move the printer.
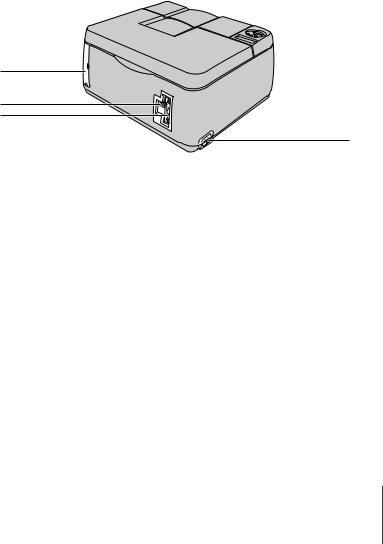
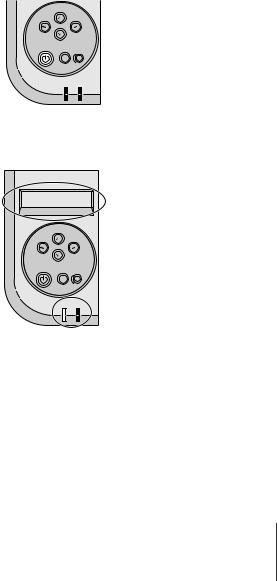
Back View
a
b c
d
aConnector cover
Protects the expansion slot. The standard model provides one slot, and the network model provides one slot for a network interface board (NB11FB). (ÆSetup Guide)
bUSB port
Provides a connection point for a USB cable connected to the USB port of the computer. (ÆSetup Guide)
cParallel port
Provides a connection point for a parallel cable connected to the parallel port of the computer. (ÆSetup Guide)
dPower connector
Provides a connection point for the printer power cord.
Printer Part Names 1-3

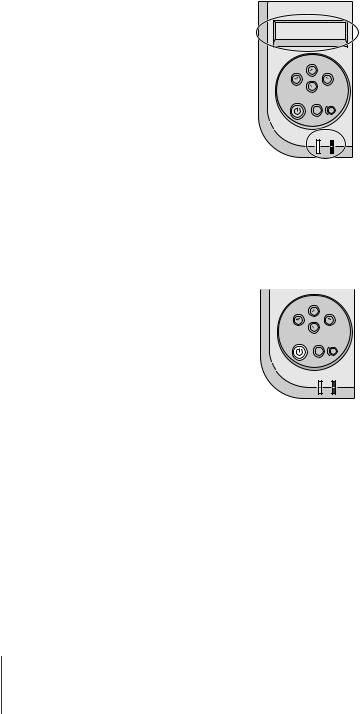
Under the Back Upper Cover
a
b c d
aPrinthead lock lever
Locks the printhead lock cover. Pull down to open then install the printhead. (ÆSetup Guide)
bPrinthead lock cover
Protects the printhead. Raise to open and install the printhead. (ÆSetup Guide)
cPrinthead
Equipped with the nozzles that supply the inks for printing. This important part is not installed before shipping, so you must install it before you can use the printer. (ÆSetup Guide)
dCarriage
Holds the printhead and moves it left and right across the paper during printing.
1-4 Before Using the Printer
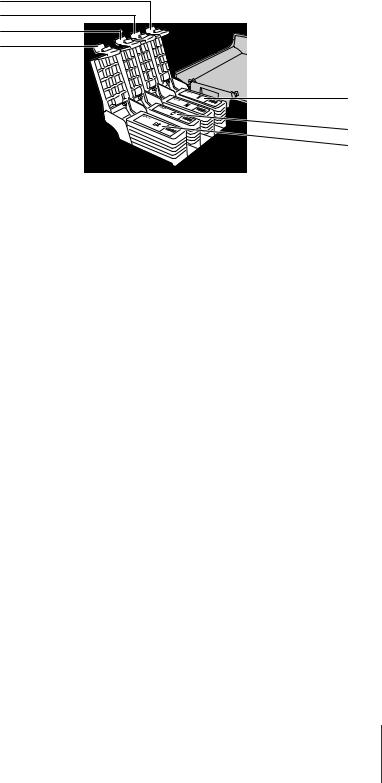
Under the Right Cover
a
b c
d
e
 f g h
f g h
aY ink tank cover
bM ink tank cover
cC ink tank cover
dBk ink tank cover
The ink tank covers protect the tanks and lock them in place. To replace an ink tank, press the Ink Replace button on the operation panel to release the right cover. Open the right cover then raise the ink tank cover.
eY ink tank
fM ink tank
gC ink tank
hBk ink tank
These tanks hold the ink. The ink tanks are not installed before shipping, so you must install all the ink times before you can use the printer. (ÆSetup Guide)
Printer Part Names 1-5
Paper Feed Unit (option)
d |
e |
f |
g |
a
b
h
c
aPaper feed unit
A paper feed unit installed below the printer provides an additional paper feed source. The Model N1000 allows installation of two paper feed units Cassette 2 (middle) and Cassette 3 (bottom). The Model N2000 allows installation of one paper feed unit, Cassette 2 (bottom).
bCassette cover
Attached to Cassette 2 (or Cassette 3) to protect paper loaded in the paper cassette. The shape of the cassette cover for Cassette 1 is different.
cCassette 2 (Cassette 3)
Paper Cassette 2 (or Cassette 3).
dPaper feed unit connector
This important connector connects the paper feed unit. Avoid hitting or applying great force to this connector.
eBack cover
fBack inner covers
Open these covers and the back cover to remove jammed paper from Cassette 2 (or Cassette 3).
gGuide pins
These two pins, located at the back of the paper feed unit, align the paper feed unit correctly for installation.
hLift handles
Grasp these handles provided on the left and right side when lifting or moving the paper feed unit.
1-6 Before Using the Printer
Switching the Printer On and Off
Follow the procedure below to switch the printer on and off.
The examples below demonstrate normal operation of the printer after it is set up and ready for normal operation. If the printer has not been set up completely, follow the procedures in the Setup Guide to complete the setup procedures before you execute the procedures below.
Switching the Printer On
Switch on the printer before you execute a print job from the computer.
1 Press the Power button.
Set Media |
|
Cancel Job/ |
Setup |
Utility |
|
Reset/Enter |
|
Power |
|
Online |
Ink Replace |
Online Message
The Online lamp and Message lamp flash for a few seconds while the printer warms up. After the printer has warmed up, the Online lamp lights and remains on, and “Ready” is displayed.
Ready
Set Media |
|
Cancel Job/ |
Setup |
Utility |
|
Reset/Enter |
|
Power |
|
Online |
Ink Replace |
Online Message
The Message lamp flashes when a message is displayed. Read the message and perform the required procedure.(ÆP.6-11)
If the display or Online lamp do not light, check the power cord connections at the printer and the power supply and make sure that they are secure. (ÆSetup Guide)
Switching the Printer On and Off 1-7
Switching the Printer Off
When you are finished using the printer, follow this procedure to switch the printer off.
1 Check the display to make sure that a print job is not in progress.
Ready
Set Media |
|
Cancel Job/ |
Setup |
Utility |
|
Reset/Enter |
|
Power |
|
Online |
Ink Replace |
Online Message
If you see an error message displayed, follow the procedure to correct the problem, and make sure the print job has completed. If a print job is in progress, wait for the print job to complete before switching off the printer.
2 Press and hold down the Power button for two seconds then release it.
Set Media |
|
Cancel Job/ |
Setup |
Utility |
|
Reset/Enter |
|
Power |
|
Online |
Ink Replace |
Online Message
“Please wait …” is displayed for a few seconds, then the printer goes off.
1-8 Before Using the Printer
Setting the Printer Online and Offline
While the printer is on, it can be set online or offline.
When the printer is online, the printer can accept data from the computer to execute a print job. The printer enters the online mode automatically every time the printer is switched on.
When the printer is offline, the printer cannot receive data to execute a print job. The printer must be set in the offline mode to use the operation panel to open the menus and make selections. The printer enters the offline mode automatically when an error message alerts you about a problem so you can perform the procedure to correct the problem.
When you are finished performing settings with the operation panel and display, or after you have corrected an error, press the Online button to set the printer online again for printing.
Setting the Printer Online
Follow this procedure to set the printer online.
1 Press the Online button. The Online lamp lights.
Set Media |
|
Cancel Job/ |
Setup |
Utility |
|
Reset/Enter |
|
Power |
|
Online |
Ink Replace |
Online Message
The printer can print while the Online lamp is on.
 Note
Note
zPressing the Online button repeatedly switches the printer between the online and offline modes.
Setting the Printer Online and Offline 1-9

Setting the Printer Offline
Follow the procedure below to set the printer offline.
1 Press the Online button. The Online lamp goes off.
Set Media |
|
Cancel Job/ |
Setup |
Utility |
|
Reset/Enter |
|
Power |
|
Online |
Ink Replace |
Online |
Message |
When the Online lamp off, the printer is offline.
 Note
Note
zPressing the Online button repeatedly switches the printer between the online and offline modes.
1-10 Before Using the Printer

2 Print Media You Can Use
This chapter describes the types of print media that can be used and how to load each type.

Print Media That Can Be Used
A variety of print media can be used with this printer. The size and types of paper or special media, the print area for each type, and other details are described below.
 Note
Note
zFor more details about Canon print media, please refer to the instructions provided with each package.
Types of Print Media
The types of paper and other print media are described below.
Plain Paper
Canon original inks produce on plain paper images of brilliant colors that resist fading due to exposure to light.
Canon product:
Bubble Jet Paper (LC-301)
 Note
Note
zThe water resistance of Color Bubble Jet Paper (LC-301) is improved.
zYou can also use plain copy paper (64 ~ 105 g/m2) intended for use on copy machines.
Coated Paper
Specially coated for use with BJ printers, coated paper reproduces brilliant colors without blurring. This media is ideal for printing materials with color graphics, photographs, and all types of color presentations for business.
Canon product:
High Resolution Paper (HR-101)
Transparencies (OHP Film)
Highly transparent film used to produce printed color presentations with an overhead projector at conferences and presentations. Printing can be done on either side of the sheets.
Canon product:
Color Bubble Jet Transparencies (CF-102)
2-2 Print Media You Can Use

 Important
zNever touch the printed surface of a printed transparency until it has dried for at least 15 minutes, and never stack printed transparencies.
zRemove each sheet from the output tray as it is ejected from the printer. To prevent smearing, never allow printed transparencies to stack on the output tray.
zColor Bubble Jet Transparencies (CF-102) should not be printed at high speed. Printing at high speed could cause double-feeding and jamming.
zUsing transparencies of another manufacturer could cause them to jam.
Quick Dry Transparencies
Highly transparent film that dries quickly. Ideal for large volume print jobs with transparencies.
Canon product:
Color Bubble Jet Transparencies Quick Drying Type (CF-401)
 Important
zYou must always print on the correct print side (the rough side) of this film, and load the edge of each sheet marked with the white tape into the printer first.
zTo prevent a jam, do not remove the white tape from the sheet before printing. The tape can be removed after printing.
Print Media That Can Be Used 2-3

Paper Sizes
Here is a table that lists the paper sizes and feed methods that can be used with this printer.
|
Paper Size |
|
|
N1000 |
|
|
N2000 |
|
||
|
|
Cassette 1 |
Cassette 2 |
Cassette 3 |
Tray |
Cassette 1 |
Cassette 2 |
Tray |
||
|
|
|
|
(Option) |
(Option) |
(Option) |
||||
A3+ |
|
329.0 x |
483.0 mm |
– |
– |
– |
– |
Yes |
Yes |
Yes |
|
12.95 x |
19.02 in |
||||||||
|
|
|
|
|
|
|
|
|
||
|
|
|
|
|
|
|
|
|
|
|
A3 |
|
297.0 x |
420.0 mm |
– |
– |
– |
– |
Yes |
Yes |
Yes |
|
11.69 x 16.54 in |
|||||||||
|
|
|
|
|
|
|
|
|
||
|
|
|
|
|
|
|
|
|
|
|
B4 (JIS) |
|
257.0 x |
364.0 mm |
– |
– |
– |
– |
Yes |
Yes |
Yes |
|
10.12 x |
14.33 in |
||||||||
|
|
|
|
|
|
|
|
|
||
|
|
|
|
|
|
|
|
|
|
|
A4 |
|
210.0 x |
297.0 mm |
Yes |
Yes |
Yes |
Yes |
Yes*1 |
Yes*1 |
Yes*1 |
|
8.27 x 11.69 in |
|||||||||
|
|
|
|
|
|
|
|
|
||
|
|
|
|
|
|
|
|
|
|
|
B5 (JIS) |
|
182.0 x |
257.0 mm |
Yes |
Yes |
No |
Yes |
Yes |
Yes |
Yes |
|
7.17 x 10.12 in |
|||||||||
|
|
|
|
|
|
|
|
|
||
|
|
|
|
|
|
|
|
|
|
|
B5 (ISO) |
|
176.0 x |
250.0 mm |
No |
No |
No |
Yes |
No |
No |
Yes |
|
6.93 x 9.84 in |
|||||||||
|
|
|
|
|
|
|
|
|
||
|
|
|
|
|
|
|
|
|
|
|
Ledger |
|
279.4 x |
431.8 mm |
– |
– |
– |
– |
Yes |
Yes |
Yes |
|
11.00 x 17.00 in |
|||||||||
|
|
|
|
|
|
|
|
|
||
|
|
|
|
|
|
|
|
|
|
|
Regal |
|
215.9 x |
355.6 mm |
No |
No |
No |
Yes |
Yes |
Yes |
Yes |
|
8.50 x 14.00 in |
|||||||||
|
|
|
|
|
|
|
|
|
||
|
|
|
|
|
|
|
|
|
|
|
Letter |
|
215.9 x |
279.4 mm |
Yes |
Yes |
Yes |
Yes |
Yes*1 |
Yes*1 |
Yes*1 |
|
8.50 x 11.00 in |
|||||||||
|
|
|
|
|
|
|
|
|
||
|
|
|
|
|
|
|
|
|
|
|
Executive |
|
184.2 x266.7 mm |
No |
No |
No |
Yes |
No |
No |
Yes |
|
|
7.25 x 10.50 in |
|||||||||
|
|
|
|
|
|
|
|
|
||
|
|
|
|
|
|
|
|
|
|
|
Custom |
|
|
– |
No |
No |
No |
Yes*2 |
No |
No |
Yes*3 |
*1. A4 and Letter size paper must be loaded vertically for short-edge feed.
*2. Size range of paper for loading: 100 ~ 215.9 mm (Width) x 148 ~ 355.6 mm (Length) 3.9 x 8.5 in. (Width) ~ 5.8 x 14 in. (Length)
*3. Size range of paper for loading: 100 ~ 329 mm (Width) x 148 ~ 483 mm (Length) 3.9 x 13 in. (Width) ~ 5.8 x 19 in. (Length)
 Note
Note
zSkew may occur when feeding paper manually from the tray. If this occurs, remove all of the paper from the paper cassette and print.
2-4 Print Media You Can Use

Maximum Stack Size
The table below describes for each media type the maximum number of sheets that can be loaded for the paper feed source.
Media type |
|
N1000 (Sheets) |
|
N2000 (Sheets) |
||||||
Cassette 1 |
Cassette 2 |
Cassette 3 |
*1 |
Cassette 1 |
Cassette 2 |
Tray |
||||
|
|
|
(Option) |
(Option) |
Tray |
(Option) |
||||
Plain Paper |
|
250 |
250 |
250 |
10*2 |
250 |
250 |
10*2 |
||
|
|
A3+ |
– |
– |
– |
1 |
50 |
50 |
1 |
|
|
|
A3 |
– |
– |
– |
1 |
100 |
100 |
1 |
|
Coated Paper |
|
B4 (JIS) |
– |
– |
– |
1 |
100 |
100 |
1 |
|
|
A4 |
150 |
150 |
150 |
1 |
150 |
150 |
1 |
||
(HR-101) |
|
|
|
|
|
|
|
|
|
|
|
B5 (JIS) |
150 |
150 |
– |
1 |
150 |
150 |
1 |
||
|
|
|||||||||
|
|
Ledger |
– |
– |
– |
1 |
100 |
100 |
1 |
|
|
|
Letter |
150 |
150 |
150 |
1 |
150 |
150 |
1 |
|
Transparencies |
|
|
50 |
50 |
50 |
1 |
50 |
50 |
1 |
|
(CF-102, CF-401) |
||||||||||
|
|
|
|
|
|
|
||||
|
|
|
|
|
|
|
|
|
|
|
*1. When feeding manually with the tray set, add one sheet of plain paper to the stack. *2. For Canon Bubble-Jet Paper LC-301, use only one sheet.
 Important
zTo prevent jams or damage to the printer, never load too many sheets in a paper cassette. Load only the number of sheets recommended for the paper or other print media in the table above, or never load higher than the load limit mark, whichever is less.
Print Media That Can Be Used 2-5
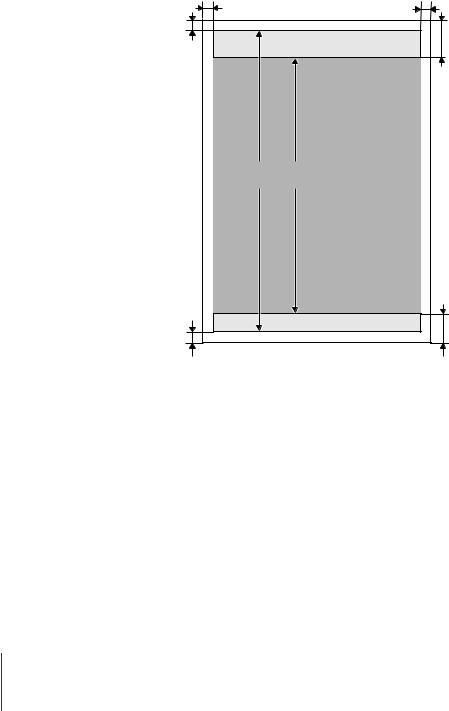
Printing Area
This printer can print in the area (a) show in the illustration. However, printing in this area could cause poor print quality or misfeeds. Printing in area (b) is recommended for best results.
5mm |
5mm |
5mm |
|
|
46.2mm |
a |
b |
5mm |
26.8mm |
|
Handling Print Media
Observe the following points regarding loading and handling paper and other print media:
zPrint media that cannot be used:
•Folded
•Curled
•Wrinkled
•Looseleaf sheets or any type of punched paper with holes.
zFor details about handling and storing print media, please refer to the instructions provided with the package.
2-6 Print Media You Can Use
Loading Paper Cassettes
This is the general procedure for loading a paper cassette:
•Load the print media in the paper cassette.
•Select the media size and type on the printer operation panel.
•Start the print job on the computer.
 Important
zStore unused paper and other media in its original package. Store the package in a cool, dry location that is not exposed to sunlight.
zTo prevent jams, never remove a paper cassette during printing.
Loading the Paper Cassette
Follow the procedure below to load the paper cassette. (The procedure is the same for loading optional paper cassettes.)


 Note
Note
zThe paper cassette holds approximately 250 sheets of standard weight (64 to 105 g/ m2) plain paper. (Æ P.2-5)
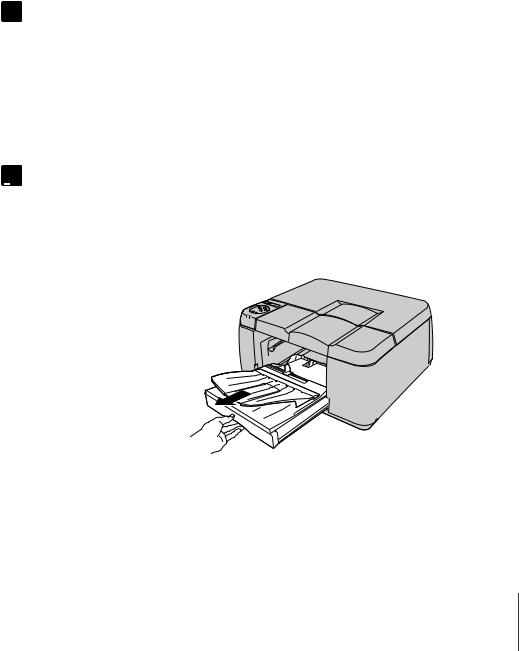
1 Remove the cassette from the printer.
Loading Paper Cassettes 2-7
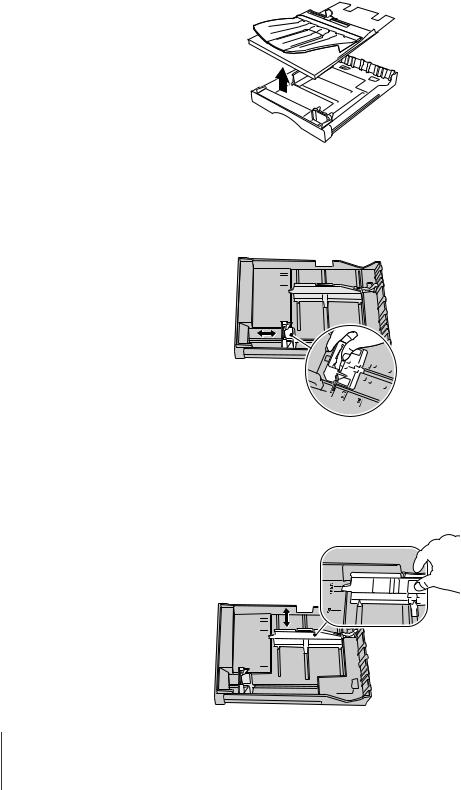
2 Remove the cassette cover.
3 Pinch the lever on the length guide so it moves freely and move the guide to the holes for the size of the paper.
Marks for standard paper sizes are provided on the length guide. Move the guide to the desired mark.
4 Pinch the lever on the width guide so it moves freely and move the guide to the paper size mark.
The width guide can be set and locked every 0.5 mm (0.02 in.). Set the width guide slightly larger than the desired paper size.
2-8 Print Media You Can Use
 Loading...