


 Loading...
PUB.DIE-171
DIGITAL VIDEO CAMCORDER
Instruction Manual
Mini Digital
Video
Cassette
This instruction book explains the use of the MV5, MV5i and MV5i MC camcorders. There are two main differences between these models. The models with an ‘i’ include DV Recording and Analog Line-in function. The MV5i MC has an additional Memory Card function. Please note that illustrations and explanations in this instruction book refer mainly to the MV5i MC model.
|
|
|
|
E |
|
|
|
|
|
|
|
Introduction |
|
|
|
|
|
|
|
|
Basics the |
Mastering |
|
|
|
|
|
|
|
|
|
|
Features of Range |
Full the Using |
|
|
|
|
|
|
|
|
|
|
|
|
|
Editing |
|
|
|
|
|
|
|
|
|
|
|
|
|
|
|
|
|
Memory a Using |
MC MV5i |
|
Card |
|
|
|
|
|
|
|
|
Information |
Additional |
|
PAL
E
Introduction
Important Usage Instructions
WARNING:
TO REDUCE THE RISK OF ELECTRIC SHOCK, DO NOT REMOVE COVER (OR BACK). NO USER SERVICEABLE PARTS INSIDE. REFER SERVICING TO QUALIFIED SERVICE PERSONNEL.
WARNING:
TO REDUCE THE RISK OF FIRE OR ELECTRIC SHOCK, DO NOT EXPOSE THIS PRODUCT TO RAIN OR MOISTURE.
CAUTION:
TO REDUCE THE RISK OF ELECTRIC SHOCK AND TO REDUCE ANNOYING INTERFERENCE, USE THE RECOMMENDED ACCESSORIES ONLY.
CAUTION:
DISCONNECT THE MAINS PLUG FROM THE SUPPLY SOCKET WHEN NOT IN USE.
For Users in the UK
When replacing the fuse only a correctly rated approved type should be used and be sure to re-fit the fuse cover.
CAUTION:
CUSTOMERS IN THE U.K. SHOULD READ THIS BEFORE USING THIS PRODUCT.
CHANGING THE FUSE
THE MAINS LEAD ON THIS PRODUCT IS FITTED WITH A NON-REWIREABLE (MOULDED) PLUG, INCORPORATING A 3 AMP FUSE. SHOULD THE FUSE NEED TO BE REPLACED AN ASTA OR BSI APPROVED BS1362 FUSE OF THE SAME RATING MUST BE USED.
ALWAYS REFIT THE FUSE COVER AFTER REPLACING THE FUSE. NEVER USE THE PLUG WITH THE FUSE COVER OMITTED.
CHANGING THE PLUG
IF THE FITTED PLUG IS NOT SUITABLE FOR YOUR SOCKET OUTLETS, IT SHOULD BE CUT OFF AND AN APPROPRIATE PLUG FITTED IN ITS PLACE. IF POSSIBLE FIT AN APPROPRIATE 3 AMP FUSE. IF THE NEW PLUG HAS NO FUSE, THEN FIT A 5 AMP FUSE AT THE DISTRIBUTION BOARD.
AC POWER CORD CONNECTION
The wires in the mains lead of this apparatus are coloured in accordance with the following cord.
(IMPORTANT)
Mains Lead |
BLUE .................. |
NEUTRAL |
|
BROWN |
LIVE |
||
|
As the colours of the wires in the mains lead may not correspond with the coloured markings identifying the terminals in your plug, proceed as follows: The wire which is coloured BLUE must be connected to the terminal which is marked with the letter N or coloured black. The wire which is coloured BROWN must be connected to the terminal which is marked with the letter L or coloured red. Neither Blue wire or Brown wire is to be connected to the Earth pin of a 3 pin plug.
THE SEVERED PLUG MUST BE DESTROYED IMMEDIATELY TO AVOID ANY POSSIBLE ELECTRIC SHOCK HAZARD.
CA-PS 700 identification plate is located on the bottom.
•Use of CV-150F/CV-250F DV cable is necessary to comply with the technical requirement of EMC Directive.
2

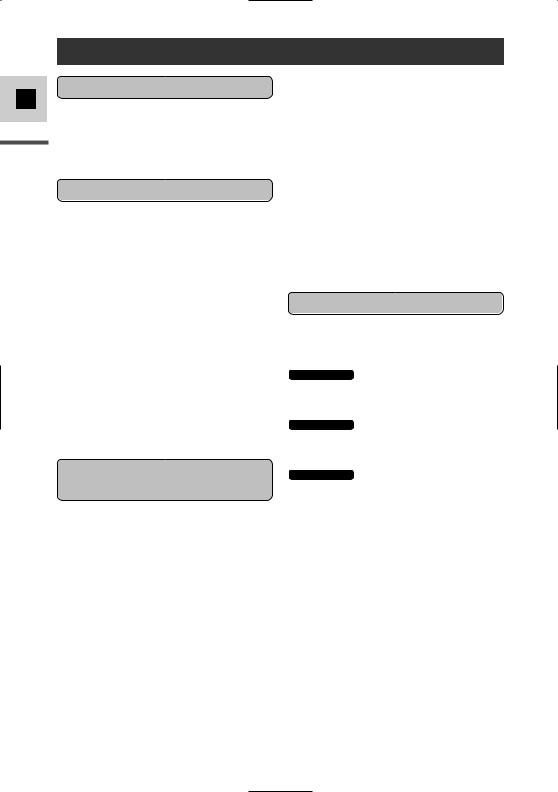
MV5i MC Operating Steps and Reference Guide
Your camcorder is supplied with two manuals: the “Digital Video Camcorder MV5i MC Instruction Manual” and the “Digital Video Solution Disk Instruction Manual”.
Digital Video Camcorder MV5i MC
Instruction Manual
Mastering the Basics
Using the Full Range of Features
Editing
Using the Memory Card
E
Introduction
Digital Video Solution Disk Instruction Manual
Installing the Software
Connecting the Camcorder to a Computer
Downloading Still Images/Movies to a Computer
3
E
Introduction
Contents |
|
Introduction |
|
Important Usage Instructions .................... |
2 |
Operating Steps and Reference Guide ...... |
3 |
Thank you for Choosing a Canon .............. |
7 |
Introducing the MV5/MV5i/MV5i MC .... |
8 |
Mastering the Basics |
|
Finding Your Way Around the |
|
MV5/MV5i/MV5i MC.......................... |
9 |
~ Preparations ~ |
|
Powering Your Camcorder ...................... |
12 |
Loading a Cassette .................................. |
16 |
~ Basic Recording ~ |
|
Recording Movies onto a Tape ................ |
18 |
Zooming .................................................. |
23 |
Using the LCD Screen ............................ |
25 |
~ Basic Playback ~ |
|
Playing Back a Tape ................................ |
28 |
Connections for Playback |
|
on a TV Screen.................................... |
32 |
Tips for Making Better Videos ................ |
36 |
Using the Full Range of |
|
Features |
|
~ General ... ~ |
|
Searching and Reviewing |
|
While Recording ................................ |
38 |
Using the Menus ...................................... |
39 |
Using the Wireless Controller .................. |
48 |
~ For Recording ... ~ |
|
Setting the Date and Time........................ |
51 |
Recording Still Images onto a Tape ........ |
54 |
Turning the Image Stabilizer Off ............ |
56 |
Using the Various Recording Programs .. |
57 |
Using Digital Effects ................................ |
61 |
Using the Multi-Image Screen ................ |
67 |
Audio Recording ...................................... |
69 |
Setting the Self-Timer .............................. |
71 |
~ When Making Manual Adjustments ... ~
Adjusting AE Shift .................................. |
73 |
Setting the Shutter Speed ........................ |
74 |
Adjusting Focus Manually ...................... |
76 |
Setting the White Balance ........................ |
77 |
~ For Playback ... ~ |
|
Enlarging the Image during Playback ...... |
79 |
Displaying Date, Time and |
|
Camcorder Data (Data Code).............. |
80 |
Searching the Tape |
|
(Photo Search/Date Search) ................ |
83 |
Returning to a Pre-Marked Position ........ |
84 |
Editing |
|
Editing to a VCR ...................................... |
85 |
Dubbing to/from a Tape |
|
with Digital Video Equipment ............ |
86 |
MV5i/MV5i MC Recording from a VCR, |
|
TV or Analog Camcorder |
|
(Analog Line-in).................................. |
90 |
MV5i/MV5i MC Digitally Outputting Analog |
|
Video and Audio Signals (Analog- |
|
Digital Converter)................................ |
92 |
MV5i/MV5i MC Recording Over Existing |
|
Scenes (AV Insert Editing).................. |
94 |
Audio Dubbing ........................................ |
97 |
Setting the Audio Mix ............................ |
103 |
Connecting to a PC Using a DV Cable.. |
105 |
4
MV5i/MV5i MC Using a Memory Card
Copying Still Images |
|
from Tape to Memory Card .............. |
143 |
Copying Still Images |
|
from Memory Card to Tape .............. |
144 |
Formatting a Memory Card.................... |
145 |
Utilizing Memory Card Still Images/ |
|
Movies on a PC ................................ |
146 |
Other Information and Precautions ........ |
147 |
Additional Information |
|
Preparing the Camcorder........................ |
150 |
Notes on Using the Batteries.................. |
151 |
Maintenance .......................................... |
154 |
Troubleshooting...................................... |
158 |
The MV5/MV5i/MV5i MC System |
|
Diagram ............................................ |
162 |
Optional Accessories .............................. |
163 |
Screen Displays ...................................... |
165 |
Specifications ........................................ |
173 |
Index ...................................................... |
175 |
Menu at a Glance .................................. |
178 |
Using the Card Photo Printer CP-10 |
|
(Optional) .......................................... |
133 |
Symbols used in this instruction manual
 : Reference page numbers
 : Functions that can be operated from the body of the camcorder
 : Functions that can be operated from the wireless controller
 : Supplementary notes for camcorder operation
` : Operation confirmation beeps (  22)
22)
•Capital letters are used to refer to settings displayed in the menus and buttons labelled on the camcorder itself, e.g. Press the MENU button.
E
Introduction
5

E
Introduction
Switch Positions by Operating Modes
|
|
MV5i MC |
Operating Mode |
POWER switch |
TAPE/CARD switch |
CAMERA |
CAMERA |
TAPE |
|
|
|
PLAY (VCR) |
PLAY (VCR) |
TAPE |
|
|
|
MV5i MC CARD CAMERA |
CAMERA |
CARD |
|
|
|
MV5i MC CARD PLAY (VCR) |
PLAY (VCR) |
CARD |
|
|
|
*Available functions vary depending on the operating mode. It is indicated as follows:
CAMERA : Function can be used in this mode.
CAMERA |
: Function cannot be used in this mode. |
6
Thank you for Choosing a Canon
First, we’d like to thank you for purchasing this Canon camcorder. Its advanced technology makes it very easy to use — you will soon be making high-quality videos which will give you pleasure for years to come.
To get the most out of your new camcorder, we recommend that you read this manual thoroughly — there are many sophisticated features which will add to your recording enjoyment.
Getting started
To get started we suggest that you master the basic operations of the camcorder first, before moving on to use its full range of features.
•When connecting the camcorder to your personal computer, use the optional CV-150F or CV-250F DV cable.
MV5i MC When connecting the
camcorder to your PC equipped with a USB terminal, use the supplied IFC-300PCU USB cable.
*Required when you wish to use your PC to work on still images/movies recorded on a memory card with the camcorder.
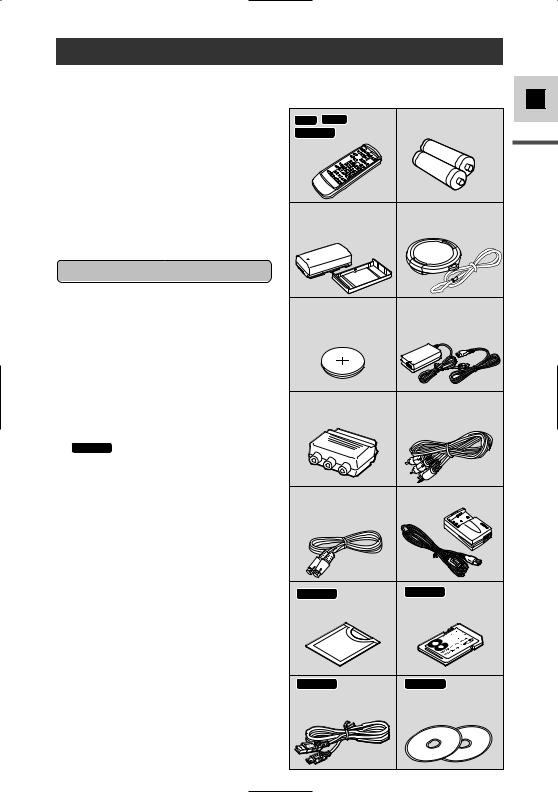
Your camcorder is supplied with the following accessories:
MV5 MV5i WL-D74 Two AA batteries
MV5i MC WL-D77 Wireless
Controller
NB-2L |
Lens cap and lens cap |
Battery Pack |
cord |
|
Lithium button battery |
CA-PS700 Compact |
CR1616 |
Power Adapter |
|
(including AC power cable) |
PC-A10 |
SCART |
STV-250N Stereo |
Adapter |
(Europe, Asia) |
Video Cable |
S-150 S-video Cable |
CB-2LTE Battery |
|
Charger |
MV5i MC Soft Case |
MV5i MC SDC-8M SD |
for SD Memory Card |
Memory Card (with pre- |
|
recorded sample images) |
MV5i MC IFC- |
MV5i MC Software |
300PCU USB Cable* |
CD-ROM |
|
Digital Video Solution Disk* |
|
ArcSoft Camera Suite CD |
E
Introduction
7
E
Introduction
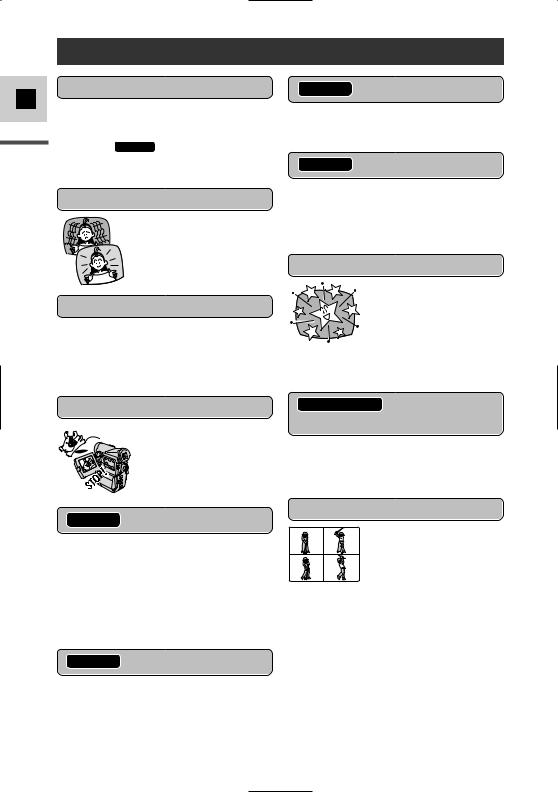
Introducing the MV5/MV5i/MV5i MC
10× Optical Zoom (200× Digital Zoom)
This zoom range will more than take care of all your picture-taking needs, from wide-angle shots to close-ups at full telephoto ( MV5i MC 7× optical zoom and 30× digital zoom when using a memory card).
Image Stabilizer
MV5i MC Panoramic Images
MV5i MC USB Terminal
Night Mode
Still Images
MV5i MC Memory Card
You can record still images and movies onto a SD Memory Card or MultiMediaCard. Still images from the memory can be combined with other recordings. The memory card also enables easy transfer of still images/movies to a PC. Use the supplied software to edit or attach still images/movies to your e-mail.
MV5i MC XGA-Size Still Images
IEEE 1394 DV Terminal
MV5i/MV5i MC Analog Line-in
Recording
Digital Effects
8
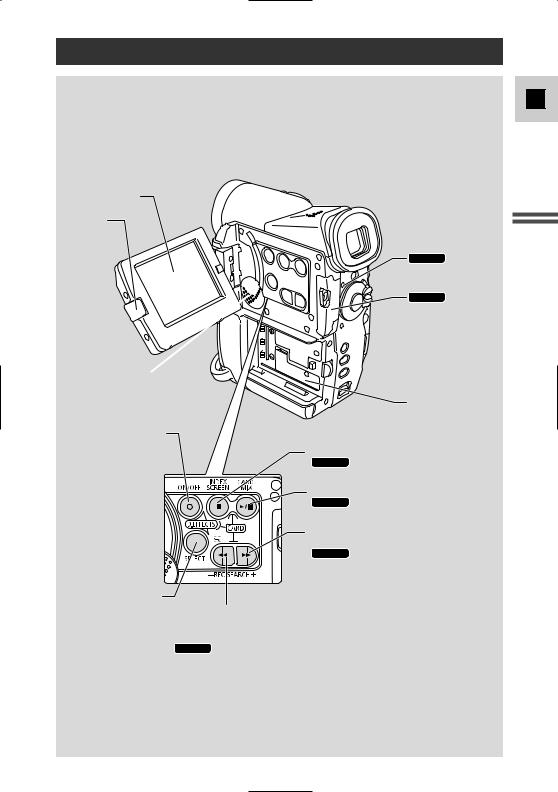
Finding Your Way Around the MV5/MV5i/MV5i MC
E
LCD screen (p. 25)
LCD panel OPEN button (p. 25)
Speaker (p. 31) 

D.EFFECTS ON/OFF button (p. 65)
MV5i MC
Card access indicator (p. 107)
MV5i MC
Memory card compartment cover (p. 107)
 BATT. (battery) RELEASE button (p. 15)
Battery attachment unit (p. 15)
 (stop) button (p. 28)/
MV5i MC INDEX SCREEN button (p. 124)
 (play/pause) button (p. 28)/
MV5i MC Card Mix button (p. 140)
REC SEARCH + button (p. 38)/
 (fast forward) button (p. 28)/
MV5i MC CARD + button (p. 122)
D.EFFECTS SELECT
button (p. 65)
REC (record) SEARCH – button(p. 38)/  Record review button (p. 38)/
 (rewind) button (p. 28)/
MV5i MC CARD – button (p. 122)
Mastering Basics the
9
E
Mastering the Basics
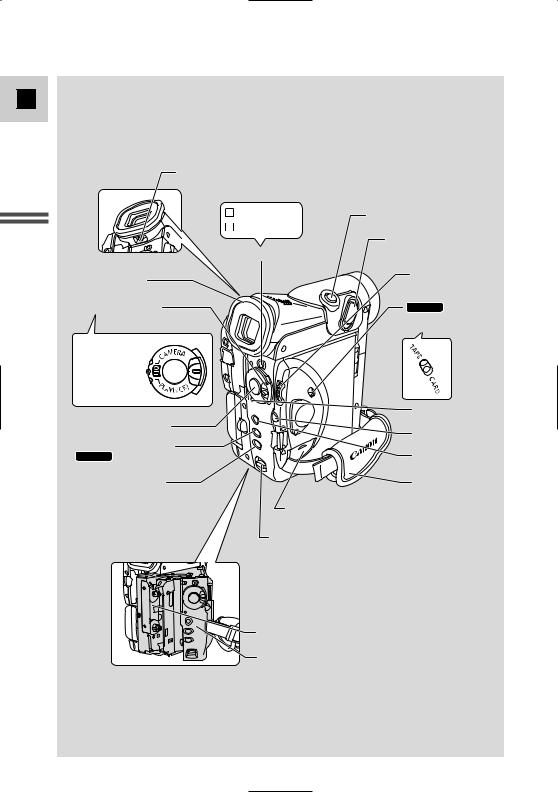
Viewfinder focusing lever (p. 150)
P Program AE |
PHOTO button (p. 54, 112) |
|
Easy Recording |
|
|
|
Zoom controller (p. 23) |
|
Program selector (p. 57) |
|
|
Viewfinder (p. 150) |
Selector dial |
|
(p. 31, 40) |
||
|
||
POWER switch (p. 18) |
MV5i MC |
|
|
TAPE/CARD switch |
|
|
(p. 18) |
|
CAMERA |
|
|
• |
|
|
OFF |
|
|
PLAY(VCR)• } |
|
|
• |
POWER indicator |
|
|
||
Start/Stop button (p. 19) |
(p. 18) |
|
SET button (p. 40) |
||
|
||
AE SHIFT button (p. 73)/ |
MENU button |
|
MV5i MC SLIDE SHOW button |
||
(p. 124) |
(p. 40) |
|
FOCUS button (p. 76)/ |
Grip belt (p. 150) |
DATA CODE button (p. 80)
Backup battery cover (p. 153)
OPEN/EJECT switch (p. 16)
Cassette compartment (p. 16)
Cassette compartment cover (p. 16)
10

S-video OUT terminal (p. 34)
MV5i |
MV5i MC |
|
S-Video IN/OUT terminal (p. 34, 94) |
||
|
Stereo microphone (p. 97) |
|
|
Terminal cover |
|
|
Terminal cover |
|
Remote sensor (p. 48) |
u (LANC) terminal (p. 85) |
|
|
||
Tally Lamp (p. 50) |
MV5i MC USB terminal |
|
|
(p. 146) |
|
|
DC IN terminal (p. 12) |
|
|
MIC terminal (p. 69, 97) |
|
DV OUT terminal |
|
|
(p. 86) |
Bottom view |
|
MV5i MV5i MC |
||
|
||
DV IN/OUT terminal |
|
|
(p. 87, 105, 115) |
|
|
AV (audio/video) |
|
|
OUT terminal (p. 33) |
|
|
MV5i MV5i MC |
|
|
AV IN/OUT terminal (p. 33, 90) |
Tripod socket (p. 36) |
|
(phones) terminal (p. 31) |
||
PHOTO button (p. 54, 112) |
|
|
|
|
START/STOP |
|
|
|
|
button (p. 19) |
|
|
|
|
MENU button (p. 40) |
|
|
|
|
SELF TIMER button (p. 71) |
START |
|
ZOOM |
|
TV SCREEN button (p. 165) |
/STOP |
PHOTO |
W |
T |
TIMER |
MENU |
|
|
|
|
SELF |
|
|
|
DATA CODE button (p. 80) |
SCREEN |
|
|
SET |
|
TV |
|
|
|
D.EFFECTS (Digital effects) |
DATA |
D.EFFECTS |
|
ON/OFF |
CODE |
|
|||
|
MONITOR |
MIX |
ST-2 |
|
button (p. 65) |
|
ST-1 |
||
|
|
AUDIO |
BALANCE |
|
AUDIO MONITOR button (p. 103)
MV5i MV5i MC
REC PAUSE button (p. 88, 91) ZERO SET MEMORY button (p. 84)
MV5i MC
CARD 

 buttons (p. 122)
AUDIO DUB. button (p. 101)
MV5i MV5i MC
AV INSERT button (p. 94)
REMOTE SET button (p. 49)
REC |
– CARD + |
|
|
PAUSE |
SLIDESHOW |
||
ZERO SET |
SEARCH |
|
|
MEMORY |
SELECT |
|
|
AUDIO |
REW |
|
FF |
DUB. |
PLAY |
||
AV |
–/ |
STOP |
+/ |
INSERT |
|||
REMOTE SET PAUSE |
SLOW |
×2 |
|
WIRELESS CONTROLLER WL-D77
Transmitter
Zoom buttons (p. 23)
Controller buttons (p. 40) SET button (p. 40)
Digital effects ON/OFF button (p. 65)
MIX BALANCE buttons (p. 103)
MV5i MC
SLIDE SHOW button (p. 124) Search buttons (p. 83)
SEARCH SELECT button (p. 83) FF  button (p. 28)
PLAY  button (p. 28)


 button (p. 29)
× 2 button (p. 30) STOP  button (p. 28)
SLOW  button (p. 29)
REW  button (p. 28)


 button (p. 29)
PAUSE  button (p. 29)
E
Mastering Basics the
11

Powering Your Camcorder
Before operating your camcorder, you will need to use the power adapter to:
E
Provide power from a household power socket or
Charge a battery pack
|
|
|
|
Notes: |
|
|
|
|
|
|
• The power adapter converts current from a household power socket (100–240 V |
|||
|
|
|
AC, 50/60 Hz) to the DC current used by your camcorder. |
|
|
• |
|
If the adapter is used next to a TV, it may cause bars to appear on the TV — |
|
|
||||
Mastering Basicsthe |
|
|
move the adapter away from the TV or the aerial cable. |
|
|
|
|
||
|
• |
|
Do not connect an unspecified product to the camcorder’s DC terminal. |
|
Likewise, do not connect the power adapter to an unspecified product.
Connecting the camcorder to a household power socket
1
4

 3 2
3 2 


Use the power adapter to provide your camcorder with instant power from a household power socket. Always turn the camcorder off before connecting/removing the power source.
1.Set the POWER switch to OFF.
2.Connect the power adapter to the camcorder’s DC IN terminal.
3.Connect the power cable to the power adapter.
4.Plug the power cable into a household power socket.
5.Disconnect the power adapter from the camcorder after use. Unplug the power cable from the household power socket, then disconnect it from the adapter.
12
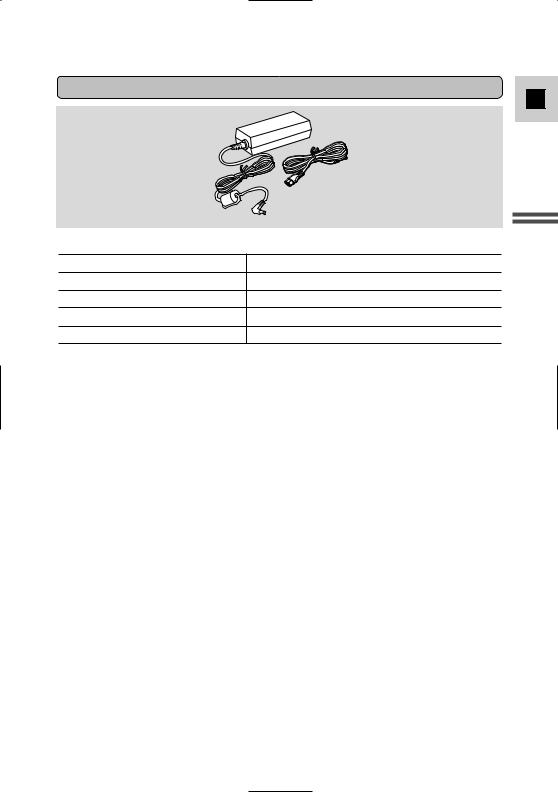
CA-PS700 Compact Power Adapter
E
Mastering Basics the
13
E
Mastering the Basics
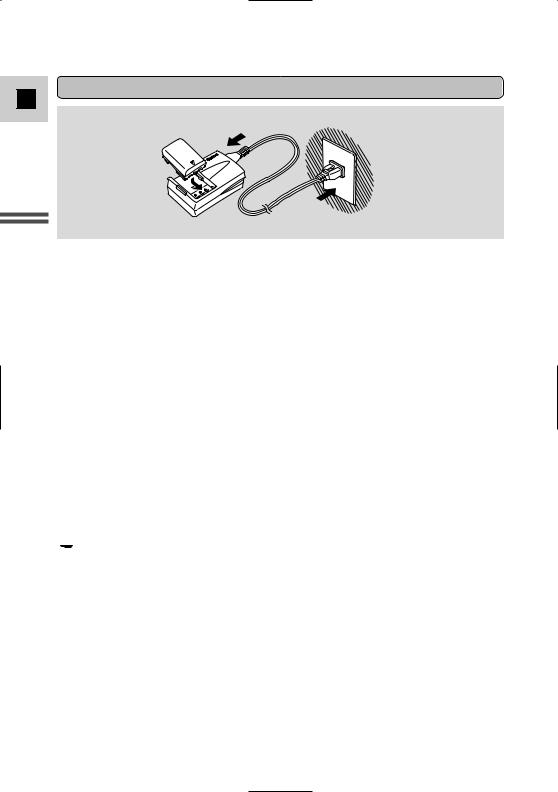
Charging the battery pack
1
2
3
Your battery pack has been partially charged before it left the factory. It should have enough power for you to check that your camcorder is working properly. Charge the battery pack fully using the Battery Charger CB-2LTE if you want it to power the camcorder for more than a few minutes.
Always turn the camcorder off before attaching/removing the battery pack.
1.Connect the power cable to the charger.
2.Attach the battery pack to the charger.
•Align the front end of the battery pack with the guides on the charger, then press and slide the battery pack into the charger to set it in place.
3.Plug the AC plug into a household power socket.
•The charge indicator lights in red and charging starts.
•The indicator light changes to green when the battery pack is fully charged.
4.Unplug the charger from the household power socket.
5.Remove the battery pack by sliding it out.
6.Disconnect the power cable form the charger.
 Note:
Note:
•You can find details on using the battery pack in the “Notes on Using the
Battery Pack” (  151). These notes include charging and recording times and how to install the backup battery.
14

Attaching the battery pack
E
2, 3 |
1 |
1.Turn the POWER switch to OFF.
2.Align the front end of the battery pack with the line on the camcorder, press lightly and slide the battery until it clicks into place.
3.Remove the battery pack after use.
Press the BATT. RELEASE button and remove the battery.
CB-2LTE Battery Charger
Mastering Basics the
15
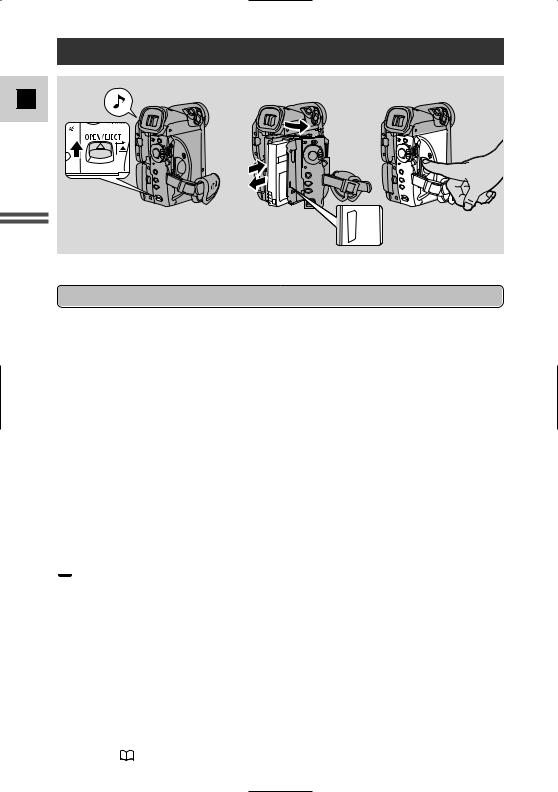
Loading a Cassette
E
Mastering the Basics
PUSH
Only use videocassettes marked with the D logo.*
Loading and unloading
1.Make sure that you have attached a power source.
2.Slide the OPEN / EJECT 5 switch to release the cassette compartment cover.
•Pull the cover fully open (while holding the button) and wait a couple of seconds for the cassette compartment to open automatically.
•The confirmation beep sounds when the cassette cover fully opens.
3.Load or unload the cassette.
•Insert the cassette gently with the window facing outward, and the REC/SAVE tab to the bottom.
•Remove the cassette by pulling it straight out.
4.Press the P mark on the compartment until it clicks, and wait for it to close.
5.Click the cover back into place.
* D is a trade mark.
 Notes:
•Do not interfere with the cassette compartment while it is opening or closing automatically, and do not attempt to close the cover until the cassette compartment has fully retracted.
•After loading a cassette, use record search (  38) to find the point where you want to start recording.
• Be careful not to get your fingers caught in the cassette compartment cover.
• Do not leave the cassette in the camcorder after use — return it to its case and store it in a cool, clean, dry place.
• When you turn the camcorder’s power on, v flashes in the display until you load a cassette.
• With some types of tapes, the remaining tape display may not give an accurate
reading ( 166).
16

Protecting tapes from accidental erasure
E
REC 
SAVE 
REC 
SAVE 
To protect your recording from accidental erasure, slide the tab on the cassette so that it exposes the hole. (This switch position is usually labelled SAVE or ERASE OFF.)
If you load a protected cassette, “THE TAPE IS SET FOR ERASURE PREVENTION” is displayed for approx. 4 seconds and then the v mark flashes in the display.
If you want to record on the cassette again, slide the tab back so the hole is closed.
Handling cassettes
Cassette memory
You are unable to use the cassette memory function with this camcorder.
Mastering Basics the
17

Recording Movies onto a Tape
E
Mastering the Basics
18
3
1
 4, 5
4, 5
Before you start recording
Recording
1. Press and hold the small button on the POWER switch and turn the POWER switch to CAMERA. ( : Make sure the TAPE/CARD switch is set to TAPE.)
•The camcorder automatically sets to record pause mode. PAUSE appears in the display.
•If you haven’t set the date and time display, SET THE TIME ZONE, DATE AND TIME appears in the display. For setting the time zone, see p. 51. For setting the date and time, see p. 53.
•The camcorder power indicator lights up.
•The confirmation beep sounds.
•The camcorder will turn itself off if you leave it in record pause mode for more than about 5 minutes. To return to record pause mode, turn the POWER switch to OFF and then back to CAMERA.
•MV5i MC Recording still images onto a memory card (  112), recording
movies onto a memory card (  117).
117).
2.Load a cassette (  16).
16).
3.Slide the program selector to [.
•This selects the camcorder’s Easy Recording program. It allows you to simply point and shoot without making any manual adjustments (  57).
57).
4.Press and release the start/stop button once to begin recording.
•For still image recording to a tape, see p. 54.
•The tally lamp flashes rapidly and REC appears in the display.
5.Press and release the start/stop button again to pause recording.
•The camcorder returns to record pause mode and PAUSE reappears in the display.
•You can stop and restart recording as often as you like by pressing the start/stop button.
 Note:
Note:
• After loading a cassette, start recording when the tape counter has stopped.
When you have finished recording
E
Mastering Basics the
19
E
Mastering the Basics
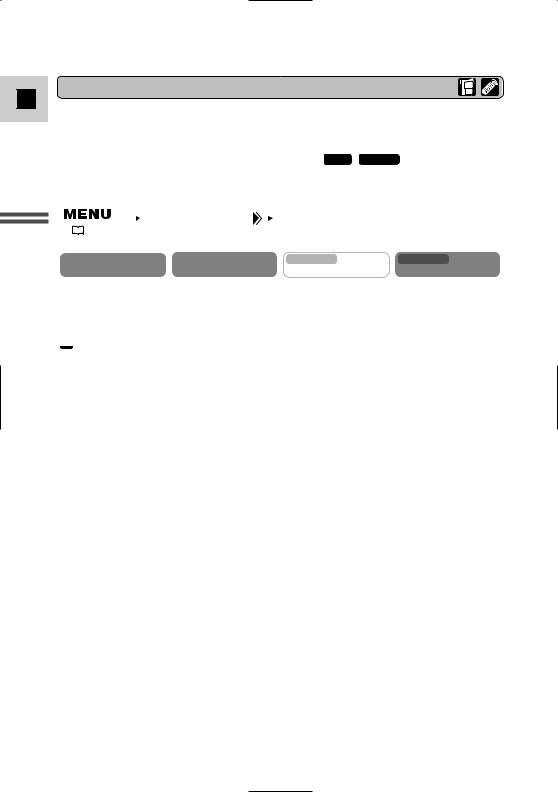
Changing the Recording Mode
You can choose between SP (standard play) and LP (long play). LP extends the tape usage by 1.5 times.
It is not possible to dub audio or insert images ( MV5i MV5i MC |
: AV insert) to a |
|||||||
tape that has been recorded in LP mode. |
|
|||||||
|
|
|
|
|
|
|
|
|
|
|
|
|
|
|
|
|
|
|
|
|
VCR SET UP |
|
REC MODE••••SP |
|
|
|
( |
|
39) |
|
|
|
|
|
|
|
|
|
|
|
|
|
||
|
|
CAMERA |
PLAY (VCR) |
MV5i MC |
MV5i MC |
|||
|
|
CARD CAMERA |
CARD PLAY (VCR) |
|||||
To change to LP mode, open the menu, select VCR SET UP, REC MODE and set it to LP.
 Notes:
•Depending on the nature and usage condition of the tape, recording/playback in LP mode may cause image or sound distortion. We recommend using the SP mode for important recordings.
•If you record in both modes on the same tape, the image may become distorted during playback and the time code may not be written correctly.
•If you playback a tape recorded on another digital equipment on this camcorder, or vice versa, image and sound may become distorted.
20
16:9 (Wide screen TV recording)
E
Produces images in the 16:9 format for playback on wide screen TVs.
CAMERA |
PLAY (VCR) |
MV5i MC |
MV5i MC |
|
CARD CAMERA |
CARD PLAY (VCR) |
|||
|
|
|||
CAM.SET UP |
|
16:9••••••••OFF |
|
( |
39) |
To switch 16:9 to ON, open the menu and select CAM.SET UP. Then select 16:9, set it to ON and close the menu.
 Notes:
•“16:9” is shown in the display when you switch the 16:9 mode on.
•You cannot use the 16:9 mode with the Easy Recording program.
•You cannot use the multi-image screen when setting the 16:9 mode on.
•If you play back a recording made for 16:9 on a normal TV screen, the image will appear to be vertically “squashed” (compressed).
Mastering Basics the
21

Confirmation/Warning beeps
E
Mastering the Basics
CAMERA |
PLAY (VCR) |
MV5i MC |
MV5i MC |
CARD CAMERA |
CARD PLAY (VCR) |
To turn the beep off, open the menu and select SYSTEM. Then select BEEP, set it to OFF and close the menu.
Demonstration mode
CAMERA |
PLAY (VCR) |
MV5i MC |
MV5i MC |
CARD CAMERA |
CARD PLAY (VCR) |
||
|
DISP.SET UP |
DEMO MODE••••ON |
|
( |
39) |
To turn the demonstration mode off, open the menu and select DISP. SET UP. Then select DEMO MODE, set it to OFF and close the menu.
 Note:
Note:
•To cancel the demo mode once it has begun: push any button, turn off the power, load a cassette or insert a memory card.
22
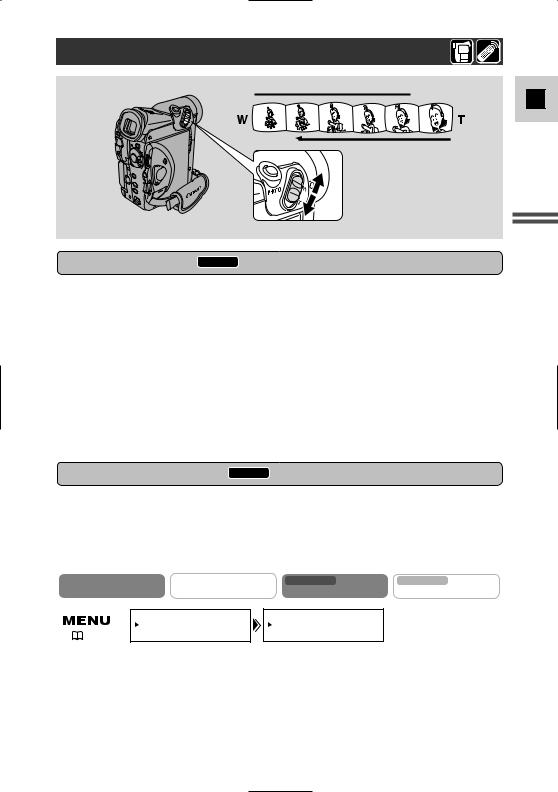
Zooming
 Zoom in
10× optical zoom ( MV5i MC card 7×)
40×/200× digital zoom ( MV5i MC card 30×)
Magnifies the camcorder’s zoom range by up to 20× in TAPE CAMERA mode. The zoom control continues to work as usual. You can freely zoom in and out between 1× and 200× magnification — the camcorder automatically switches between optical zooming (up to 10×) and digital zooming (10× to 40× or 10× to 200×).
CAMERA |
PLAY (VCR) |
MV5i MC |
MV5i MC |
CARD CAMERA |
CARD PLAY (VCR) |
||
CAM.SET UP |
|
D.ZOOM••••••40× |
|
( |
39) |
To change the digital zoom, open the menu and select CAM.SET UP. Then select D.ZOOM, set it to OFF or 200× and close the menu.
E
Mastering Basics the
23

E
Mastering the Basics
 Notes:
•When zooming, as a rule, keep at least 1 m (3 ft 33/8 in) between you and your subject. However when the zoom is at the wide-angle position, you can focus on a subject as close as 1 cm (3/8 in).
•Image resolution is slightly lower when the magnification is greater than 10×.
•You cannot use digital zoom in the Night recording program.
•You cannot use digital zoom when the multi-image screen is set. The display becomes “– – –”.
•The zoom indicator appears for 4 seconds. When the digital zoom is set to 40×, the zoom indicator extends (light blue). When the digital zoom is set to 200× zoom, the zoom indicator extends again (a darker blue).
24
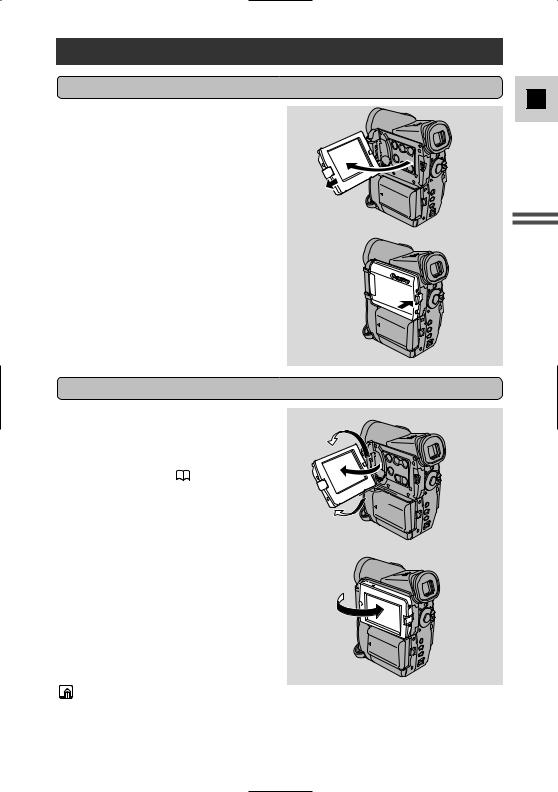
Using the LCD Screen
Opening and closing the LCD screen
E
Mastering Basics the
Changing the angle of the LCD screen
180
90°
90°
You can also push the panel flat against the camcorder until it is flush with the side, with the screen facing outwards.
Notes:
•Avoid touching the LCD screen when moving the LCD panel.
•Do not hold the camcorder by the LCD panel or the viewfinder.
•Make sure you open the LCD panel at 90°, before attempting to rotate it.
25

• Always rotate the LCD panel vertically into place, before closing it or pushing
Eit flat against the side of the camcorder.
•Always fully close the LCD panel until it clicks securely.
•Be careful not to leave the LCD, viewfinder or lens exposed to direct sunlight outdoors or in a window. Doing so could cause damage.
•Bright light falling on the LCD screen may cause glare that makes it difficult for you to view the image. In this case, switch to using the viewfinder. You are also able to adjust the brightness of the screen (see “Adjusting the LCD screen” below).
Mastering the Basics
Adjusting the LCD screen
You can adjust the brightness of the LCD screen.
CAMERA |
PLAY (VCR) |
MV5i MC |
MV5i MC |
|||||||
CARD CAMERA |
CARD PLAY (VCR) |
|||||||||
|
|
|
|
|
|
|
|
|
|
|
|
DISP.SET UP |
BRIGHTNESS••– |
|
|
|
+ |
|
|||
|
|
|
|
|
||||||
|
|
|
||||||||
( |
39) |
Open the menu and select DISP.SET UP from the menu. Then select BRIGHTNESS, adjust the level with the selector dial and close the menu.
A bar showing the level appears in the display.
•Turn the selector dial up to make the display brighter.
•Turn the selector dial down to make the display darker.
 Notes:
•The camcorder will remember your brightness setting even after you turn it off.
•The brightness of the LCD does not affect that of the recorded images or the viewfinder.
About the LCD Screen
The LCD screen built into this camcorder is a high precision product. However, small black dots or bright points of light (red, blue or green) may
appear constantly on the LCD screen. This is not a malfunction of the LCD screen and they are not recorded on the tape. (Effective dots: more than 99.99%)
26
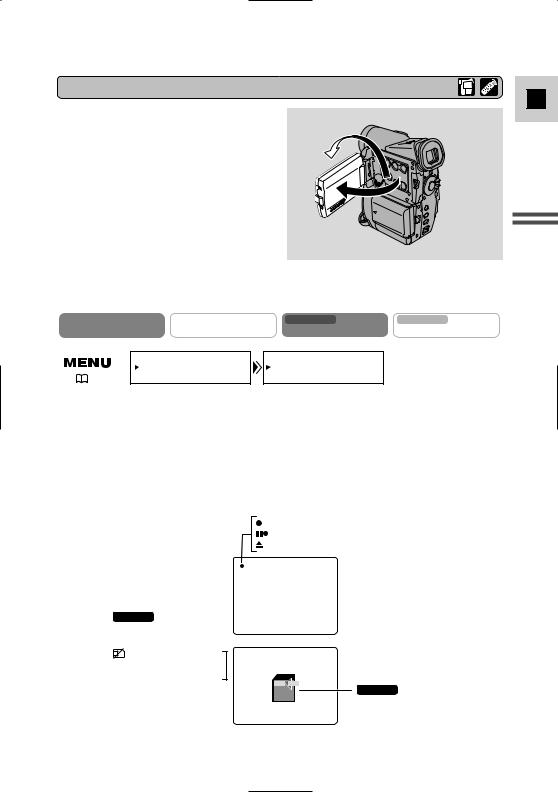
Allowing the subject to monitor recording
When you turn the LCD panel so that it faces the same direction as the lens, you can watch yourself during recording or let your subject monitor recording. The viewfinder is also activated when the panel is in this position. (Adjust the viewfinder,
 150)
150)
•You can choose the display style, reversed (mirror on) or not (mirror off). The recording itself is unaffected regardless of which one you choose.
CAMERA |
PLAY (VCR) |
MV5i MC |
MV5i MC |
CARD CAMERA |
CARD PLAY (VCR) |
||
|
DISP.SET UP |
LCD MIRROR••ON |
|
( |
39) |
To turn the mirror mode off, open the menu and select DISP.SET UP. Then select LCD MIRROR, set it to OFF and close the menu.
TAPE CAMERA mode
REC
REC PAUSE
EJECT
MV5i MC
CARD CAMERA mode
No card


 Recording to a
 memory card
MV5i MC
CARD CAMERA mode
Recording to a memory card
E
Mastering Basics the
27

Playing Back a Tape
E |
1 |
3


 1
1


Mastering the Basics
You can use the LCD screen for instant, on-the-spot playback. The camcorder also plays back the sound track via the built-in speaker (  31).
31).
•When you play back a tape, you can also close the LCD panel with its screen side facing up.
•When you’re using the viewfinder to view playback, close the LCD panel.
For playing back your recordings on a TV, see p. 32.
For using the wireless controller, see p. 48.
 Note:
Note:
•To avoid accidental recording, make sure that you slide the tab on the cassette so that it exposes the hole (the switch position is usually labelled SAVE or ERASE OFF).
1.Attach a power source and turn the POWER switch to PLAY (VCR). ( MV5i MC : Make sure the TAPE/CARD switch is set to TAPE.)
•The power indicator lights up.
2.Load the cassette.
3.Press the e (play) button to start playback.
•To end playback, press the 3 (stop) button.
•To wind the tape forwards, stop playback and press the 1 (fast forward) button.
•To wind the tape backwards, stop playback and press the ` (rewind) button.
•If the playback picture is rough (mosaic-like noise), clean the video heads using a Canon DVM-CL Digital Video Head Cleaning Cassette or a commercially available digital video head cleaning cassette.
28
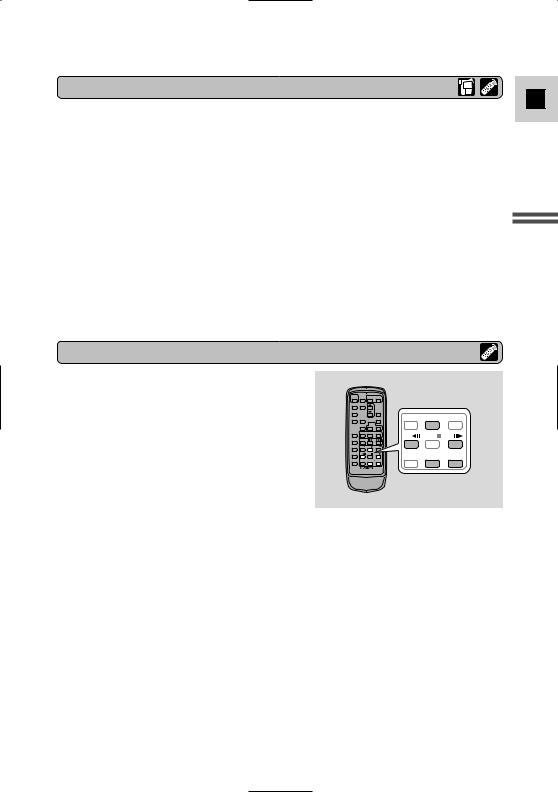
Other playback modes
E
Mastering Basics the
Special playback
Frame Advance
To play back frame by frame, press the +/ ae button repeatedly during playback pause.
Press and hold to play back continuous frame advance.
Frame Reverse
To play back in reverse frame by frame, press the –/4a button repeatedly during playback pause.
Press and hold to play back continuous frame reverse.
Slow Forward Playback
REW PLAY
PLAY FF
FF
– / |
STOP |
+ / |
PAUSE SLOW
SLOW × 2
× 2
To play back at about 1/3 normal speed, press the SLOW M button during normal playback.
Press the PLAY e button to return to normal playback.
Slow Reverse Playback
To play back in reverse at about 1/3 normal speed, press the –/4a button and then the SLOW M button during normal playback.
Press the PLAY e button to return to normal playback.
29

E
Mastering the Basics
Reverse Playback
To play back in reverse at normal speed, press the –/4a button during normal forward playback.
Press the PLAY e button to return to normal forward playback.
Forward ×2 Playback
Press the ×2 button during normal playback.
Press the PLAY e button to return to normal playback.
Reverse ×2 Playback
Press the –/4a button and then the ×2 button during normal playback. Press the PLAY e button to return to normal playback.
 Notes:
•Mosaic-like noise appears on the screen during some of the special playback modes.
•There’s no audio during special playback.
30
Loading...