


ENGLISH
ESPAÑOL
Office All-In-One
Equipo multifunción de oficina


 series
Getting Started
Read Me First
Guía de inicio
Léame en primer lugar
Make sure to read this manual before using the machine. Please keep it in hand for future reference.
Asegúrese de leer este manual antes de usar el equipo. Consérvelo a mano para utilizarlo como referencia en el futuro.

■ Symbols Used in This Document
Prohibited actions.
 Instructions including important information.
 Informational notes.
Operations that take some time to complete.
Indicates operations in Windows.
Indicates operations in Macintosh.
In this guide, Windows 7 operating system is referred to as Windows 7 and Windows Vista operating system as Windows Vista.
•Microsoft is a registered trademark of Microsoft Corporation.
•Windows is a trademark or registered trademark of Microsoft Corporation in the U.S. and/or other countries.
•Windows Vista is a trademark or registered trademark of Microsoft Corporation in the U.S. and/or other countries.
•Internet Explorer is a trademark or registered trademark of Microsoft Corporation in the U.S. and/or other countries.
•Macintosh, Mac, and AirPort are trademarks of Apple Inc., registered in the U.S. and other countries.
•Bonjour is a trademark of Apple Inc., registered in the U.S. and other countries.
Model Number: K10349 (MX350)
■ Símbolos utilizados en este documento
Acciones prohibidas.
 Instrucciones que incluyen información importante.
 Notas informativas.
Operaciones que tardan cierto tiempo en completarse.
Indica las operaciones en Windows.
Indica las operaciones en Macintosh.
En esta guía, se hace referencia al sistema operativo Windows 7 como Windows 7 y al sistema operativo Windows Vista como Windows Vista.
•Microsoft es una marca comercial registrada de Microsoft Corporation.
•Windows es una marca comercial o una marca comercial registrada de Microsoft Corporation en
EEUU y/u otros países.
•Windows Vista es una marca comercial o una marca comercial registrada de Microsoft Corporation en
EEUU y/u otros países.
•Internet Explorer es una marca comercial o una marca comercial registrada de Microsoft Corporation en EE UU y/u otros países.
•Macintosh, Mac y AirPort son marcas comerciales de Apple Inc., registradas en EE UU y en otros países.
•Bonjour es una marca comercial de Apple Inc., registrada en EE UU y en otros países.
Número de modelo: K10349 (MX350)
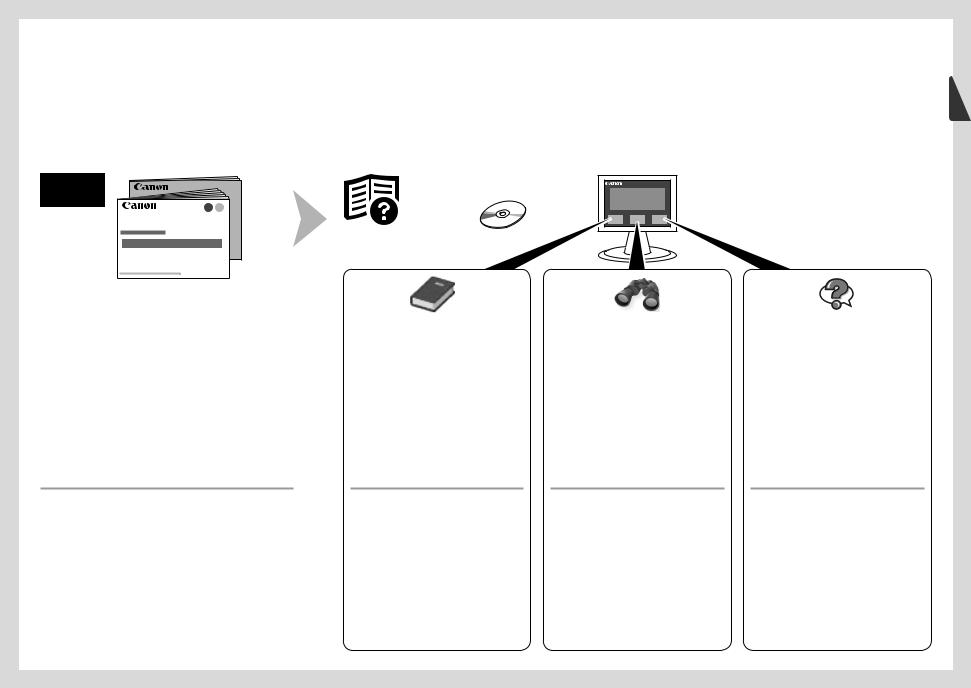
On-screen manuals can be viewed on a computer. They are included on the Setup CD-ROM and are installed during the software installation. For some languages parts of the manual may be displayed in English. For details on opening the on-screen manuals, refer to page 75.
Los manuales en pantalla se pueden ver en un ordenador. Se incluyen en el Setup CD-ROM y se instalan durante el proceso de instalación del software. Quizá en algunos idiomas haya partes del manual que aparezcan en inglés. Para obtener más información sobre cómo abrir los manuales en pantalla, consulte la página 75.
•Getting Started
(this manual)
•Network Setup Troubleshooting
Describes how to set up and use your machine.
•Guía de inicio
(este manual)
•Solución de problemas de configuración de red
Basic Guide
Describes basic operations and media, and gives an introduction to other functions available.
Guía básica
Describe las operaciones básicas y los soportes y ofrece una introducción a otras funciones disponibles.
Advanced Guide
Describes various operating procedures to make full use of machine.
Guía avanzada
Describe distintos procedimientos de funcionamiento para aprovechar al máximo todas las funciones del equipo.
Troubleshooting
Describes troubleshooting tips for problems you may encounter when using the machine.
Solución de problemas
Proporciona consejos para solucionar los problemas que puedan surgir al utilizar el equipo.
Describe cómo configurar y usar el equipo.
■ Contents |
|
|
■ Contenido |
|
||
|
|
|
||||
1 |
Check the Included Items |
P.5 |
1 |
Comprobación de los elementos incluidos P.5 |
||
2 |
Remove the Protective Material P.6 |
2 |
Retirada del material protector |
P.6 |
||
3 |
Connect the Telephone Line |
P.9 |
3 |
Conexión de la línea telefónica |
P.9 |
|
4 |
Turn the Power On P.11 |
|
|
4 |
Encendido del equipo P.11 |
|
5 |
Install the FINE Cartridges |
P.14 |
5 |
Instalación de los cartuchos FINE (FINE Cartridges) P.14 |
||
6 |
Load Paper P.19 |
|
|
6 |
Carga del papel P.19 |
|
7 |
Set Up for Fax Reception |
P.21 |
7 |
Configuración del equipo para la recepción de fax P.21 |
||
8 |
Select Connection Method |
P.25 |
8 |
Selección del método de conexión P.25 |
||
9 |
Install the Software (USB Connection) P.27 |
9 |
Instalación del software (Conexión USB) P.27 |
|||
10 |
Wireless Setup P.35 |
|
|
10 |
Configuración inalámbrica P.35 |
|
|
Wireless Setup Using Easy Setup P.37 |
|
Configuración inalámbrica mediante Configuración fácil (Easy Setup) P.37 |
|||
|
Wireless Setup Using WPS (Wi-Fi Protected Setup) P.42 |
|
Configuración inalámbrica mediante WPS (Wi-Fi Protected Setup) P.42 |
|||
|
Wireless Setup Using WCN (Windows Connect Now) P.47 |
|
Configuración inalámbrica mediante WCN (Windows Connect Now) P.47 |
|||
11 |
Wired Setup P.54 |
|
|
11 |
Conexión por cable P.54 |
|
12 |
Install the Software (Network Connection) P.59 |
12 |
Instalación del software (Conexión de red) P.59 |
|||
|
Install the Software (Registration) |
P.65 |
|
Instalación del software (Registro) |
P.65 |
|
|
Install the Software (Information) |
P.69 |
|
Instalación del software (Información) P.69 |
||
13 |
Use from Additional Computers P.73 |
13 |
Uso desde ordenadores adicionales P.73 |
|||
14 |
Try Using the Machine P.74 |
|
14 |
Pruebe el equipo P.74 |
|
|
|
Try Copying P.76 |
|
|
|
Realice una prueba de copia P.76 |
|
|
Print Photos from a Computer |
P.78 |
|
Impresión de fotografías desde un ordenador P.78 |
||
|
Send Faxes P.80 |
|
|
|
Envío de faxes P.80 |
|
15 |
Maintenance P.83 |
|
|
15 |
Mantenimiento P.83 |
|
16 |
Specifications P.84 |
|
|
16 |
Especificaciones P.86 |
|
|
|
|
|
|
|
|

■Machine Installation Flow
■Flujo de instalación del equipo
USB Connection |
|
Conexión USB |
Wireless Connection |
|
|
|
Conexión inalámbrica |
Machine Preparation |
|
Preparación del equipo |
|
Fax Reception Setup
Configuración de recepción de faxes
|
Machine Wireless Setup |
|
Configuración inalámbrica |
|
del equipo |
|
P.25 - 26, 35 - 53 |
Software Installation |
Software Installation |
Instalación del software |
Instalación del software |
P.25 - 34 |
|
Installation Complete
Instalación finalizada
Network Connection
Conexión de red
Wired Connection
Conexión por cable
P.4 - 20
P.21 - 24
Machine Wired Setup
Conexión por cable del equipo
P.25 - 26, 54 - 58
|
P.59 - 72 |
Try Using the Machine |
|
Pruebe el equipo |
P.74 - 82 |
|
Using from Additional Computers
(when the machine is already connected to the network and you want to add computers from which to use the machine)
Uso desde ordenadores adicionales
(cuando el equipo ya está conectado a la red y se desea agregar ordenadores desde los que utilizar el equipo)
Software Installation
Instalación del software
P.73, 59 - 72

■Devices Required for Wireless/Wired Connection
■Dispositivos necesarios para la conexión inalámbrica/por cable
When using the machine over a wireless/wired connection, the following devices are required depending on the connection method.
Cuando el equipo se utilice mediante una conexión inalámbrica/por cable, se necesitarán los dispositivos siguientes en función del método de conexión.
Wireless Connection
Conexión inalámbrica
Access point or wireless router
Punto de acceso o router inalámbrico
A commercial access point or router that supports IEEE802.11b/g is required.
Se necesita un punto de acceso o un router (disponibles en comercios) que sea compatible con IEEE802.11b/g.
Wired Connection
Conexión por cable
|
Ethernet cable |
Router, etc. |
|
Router, etc. |
Cable Ethernet |
|
A commercial network device (router, etc.) and Ethernet cable are required.
Se necesita un dispositivo de red (router, etc.) y un cable Ethernet (disponibles en comercios).

1
Comprobación de los elementos incluidos
Check the Included Items
Check that all the items shown below are included in the box.
Compruebe que todos los elementos que se citan a continuación están incluidos en la caja.
Color |
Black |
|
Telephone line cable |
|
|
|
|
|
|
|
Power cord |
||||||||
FINE cartridges |
|
|
|
|
|
|
|
|
|
|
|
|
|
|
|
|
|
||
Color |
Negro |
|
|
|
|
|
|
|
|
|
|
|
|||||||
|
Cable de línea telefónica |
|
|
|
|
|
Cable de alimentación |
||||||||||||
Cartuchos FINE (FINE Cartridges) |
|
|
|
|
|
|
|
|
|
|
|
|
|
|
|
|
|||
|
|
|
|
|
|
|
|
|
|
|
|
|
|
|
|
|
|
|
|
|
|
|
|
|
|
|
|
|
|
|
|
|
|
|
|
|
|
|
|
|
|
|
|
|
|
|
|
|
|
|
|
|
|
|
|
|
|
|
|
|
|
|
|
|
|
|
|
|
|
|
|
|
|
|
|
|
|
|
|
|
|
|
|
|
|
|
|
|
|
|
|
|
|
|
|
|
|
|
|
|
|
|
|
|
|
|
|
|
|
|
|
|
|
|
|
|
|
|
|
|
|
|
|
|
|
|
|
|
|
|
|
|
|
|
|
|
|
|
|
|
|
|
|
|
|
|
|
|
|
|
|
|
|
|
|
|
|
|
|
|
|
|
|
|
|
|
|
|
|
|
|
|
|
|
|
|
|
|
|
|
|
|
|
|
|
|
|
|
|
|
|
|
|
|
|
|
|
|
|
|
|
|
|
|
|
|
|
|
|
|
|
|
|
|
|
|
|
|
|
|
|
|
|
|
|
|
|
|
|
|
|
|
|
|
|
|
|
|
|
|
|
|
|
|
|
|
|
|
|
|
|
|
|
|
|
|
|
|
|
Setup CD-ROM (containing the drivers, applications and on-screen manuals)
Setup CD-ROM (que contiene los controladores, las aplicaciones
y los manuales en pantalla)
Manuals Other documents
Manuales Otros documentos
 • A USB cable is necessary to connect the machine with your computer (USB connection only).
 • Se necesita un cable USB para conectar el equipo al ordenador (sólo mediante conexión USB).

2
Retirada del material protector
Remove the Protective Material
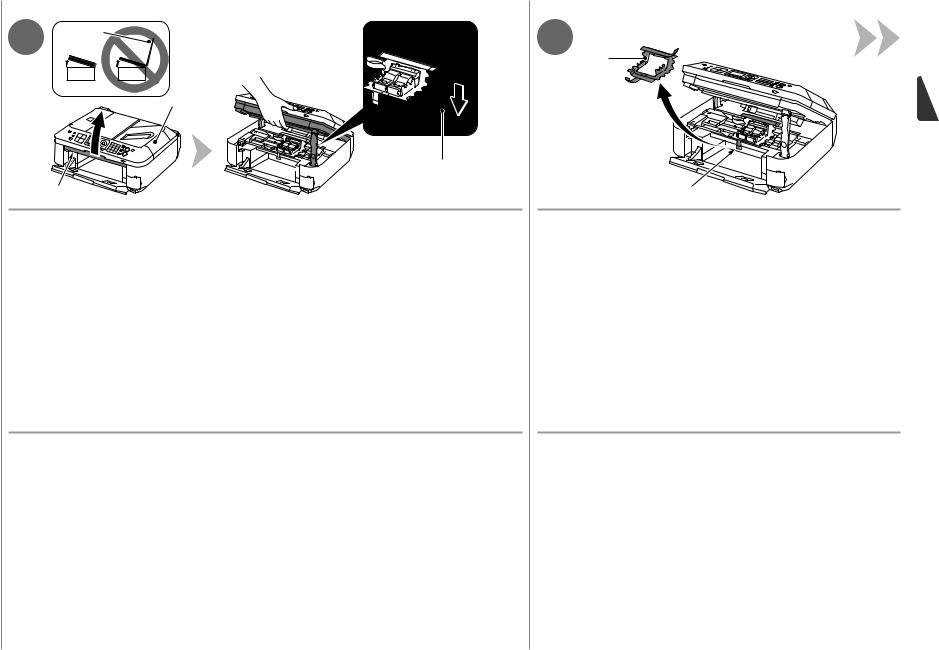
1 |
2 |
Remove all the protective materials and orange tape from the outside of the machine.
 • The tape and protective materials may differ in shape and position from what they actually are.
Retire la cinta naranja y todos los materiales protectores del exterior del equipo.

 • La forma y la posición de la cinta y los materiales protectores pueden variar respecto
 a las reales.
A
Open the Paper Output Tray (A).
Abra la bandeja de salida del papel (A).
3 D
D
C
B
Lift the Scanning Unit (Cover) (B) and fix it with the Scanning Unit Support (C).
Close the Document Cover (D) and lift it with the Scanning Unit (Cover).
4
F
E
Remove the orange tape (E) carefully.
The protective material (F) is removed along with the orange tape.
Levante la unidad de escaneado (cubierta) (B) y sujétela con el soporte de la unidad de escaneado (C).
Cierre la cubierta de documentos (D) y levántela con la unidad de escaneado (cubierta).
Retire la cinta naranja (E) con cuidado.
El material protector (F) se retira junto con la cinta naranja.

5 |
1 |
|
2
 3
3

Lift the Scanning Unit (Cover) slightly (1) and fold the Scanning Unit Support (2), then gently close the Scanning Unit (Cover) (3).
Levante la unidad de escaneado (cubierta) ligeramente (1) y pliegue el soporte de la unidad de escaneado (2) para cerrar después la unidad de escaneado (cubierta)
(3) con cuidado.
3
Telephone Line |
línea telefónica |
Connect the |
Conexión de la |
Do not turn the power on yet.
No encienda aún el equipo.
To use the machine as a fax, a telephone line needs to be connected.
This section describes the basic method of telephone line connection.
For other connection methods, refer to the on-screen manual: Basic Guide.
When not using as a fax:
 Go to "4 Turn the Power On" on page 11. When using as both a fax and telephone:


 on page 10.
When using as a fax only: 
 on page 10.
•If you cannot send faxes after installing the machine, check the telephone line type. For details, refer to "Confirming the Telephone Line Connection" in the on-screen manual: Basic Guide.
Para utilizar el equipo como fax, se debe conectar una línea telefónica.
En esta sección se describe el método básico para conectarla.
Para obtener información sobre otros métodos, consulte el manual en pantalla: Guía básica (Basic Guide).
Si no utiliza el equipo como fax:
 Vaya a “4 Encendido del equipo” en la página 11. Si utiliza el equipo como fax y teléfono:


 en la página 10.
Si utiliza el equipo como fax exclusivamente: 
 en la página 10.
•Si no logra enviar faxes tras instalar el equipo, compruebe el tipo de línea telefónica. Para obtener más información, consulte “Comprobación de la conexión de la línea telefónica” en el manual en pantalla: Guía básica (Basic Guide).

1 |
2 |
Only when connecting a |
1 |
|
|||
telephone: |
C |
||
|
|
|
Sólo al conectar un
teléfono:
2
A
B
Connect one end of supplied telephone line cable (A) to the lower connector labeled
"L" on the machine, and then connect the other end to the telephone jack on the wall (B).
When using as a fax only:
 Go to "4 Turn the Power On" on page 11.
Conecte un extremo del cable de teléfono suministrado (A) al conector inferior con la etiqueta "L" del equipo y conecte el otro extremo a la clavija de línea telefónica de la pared (B).
Si utiliza el equipo como fax exclusivamente:
 Vaya a “4 Encendido del equipo” en la página 11.
Remove the Cap (C) (1), then connect a telephone with the telephone line cable
(2).
•Do not connect the machine and a telephone in parallel to the same telephone line using a distribution adapter. The machine may not operate properly.
Retire la tapa (C) (1) y, a continuación, conecte un teléfono mediante el cable de línea telefónica (2).
•No conecte el equipo y el teléfono en paralelo a la misma línea telefónica mediante un adaptador de distribución. De lo contrario, puede que el equipo no funcione correctamente.
10

4
Encendido del equipo
Turn the Power On
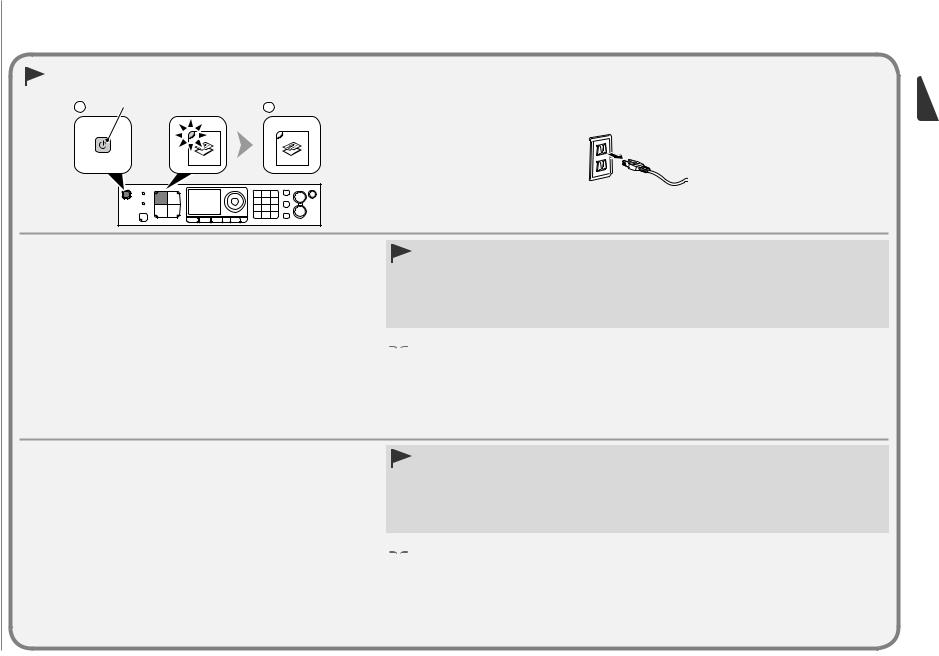
1
A
Insert the power cord into the connector on the left side of the machine and into the wall outlet.
• Do NOT connect the USB cable or Ethernet cable at this stage.
• Make sure that the Document Cover (A) is closed.
•Do not install the machine where an object may fall on it. The object may fall inside the machine, resulting in malfunction.
•Do not place any object on top of the machine. It may fall into the machine when opening covers, resulting in malfunction.
•No instale el equipo donde le pueda caer algún objeto. El objeto podría caer en el equipo y provocar fallos de funcionamiento.
•No coloque ningún objeto encima del equipo. Podría caerse en éste al abrir las cubiertas y provocar fallos en el funcionamiento.
Introduzca el cable de alimentación en el conector situado en la parte izquierda del equipo y enchúfelo a la toma de corriente.
•NO conecte el cable USB o Ethernet en este momento.
•Asegúrese de que la cubierta de documentos (A) esté cerrada.
11

2 B |
3 |
|
4 |
E |
D |
|
 C
C
Press the ON button (B) to turn on the machine.
Pulse el botón ACTIVADO (ON) (B) para encender el equipo.
Use the { or } button (C) on the Operation Panel to select
the language for the LCD (Liquid Crystal Display) (D), then press the OK button.
Utilice el botón { o } (C) del panel de control para seleccionar el idioma de la pantalla LCD (pantalla de cristal líquido) (D) y, a continuación, pulse el botón OK.
Make sure that the above screen is displayed and go to the next step.
•If an unintended language is displayed on the LCD, press the Back button (E) to return to the Language selection screen.
Compruebe que aparezca la pantalla anterior y vaya al paso siguiente.
•Si el idioma de la pantalla LCD no es el deseado, pulse el botón Atrás (Back) (E) en el panel de control para volver a la pantalla Selección idioma (Language selection).
12
When it is necessary to power off the machine Cuando sea necesario apagar el equipo
1 |
A |
2 |
|
Be sure to follow the procedure below.
1.Press the ON button (A) to turn off the machine.
2.Make sure that all the lamps on the Operation Panel are not lit.
•When removing the power plug, make sure that all the lamps on the Operation Panel are not lit before removing the plug. Removing the power plug while all the lamps on the Operation Panel light up or flash may cause drying and clogging of the FINE Cartridges, resulting in poor printing.
If your machine is used as fax
Operating noise may continue for up to 30 seconds until the machine turns off.
•Removing the power plug deletes all faxes stored in memory. Send or print faxes as necessary before removing the power plug.
 • The specification of the power cord differs for each country or region.
Asegúrese de seguir el procedimiento que se explica a continuación.
1.Pulse el botón ACTIVADO (ON) (A) para apagar el equipo.
2.Asegúrese de que todas las luces del panel de control estén apagadas.
Hasta que el equipo se apague, se podrán seguir escuchando ruidos de funcionamiento durante hasta 30 segundos.
•Antes de retirar el cable de alimentación, asegúrese de que todas las luces del panel de control estén apagadas. Si se retira el cable de alimentación mientras las luces del panel de control están encendidas o parpadeando, los cartuchos FINE (FINE Cartridges) se pueden secar y obstruir teniendo como resultado una impresión de mala calidad.
Si se utiliza el equipo como fax
•Si se retira el cable de alimentación, se eliminan todos los faxes almacenados en la memoria. Envíe o imprima los faxes según convenga antes de retirar el cable de alimentación.
 • Las especificaciones del cable de alimentación varían según el país o la región de uso.
13
5
the FINE Cartridges |
FINE(FINE Cartridges) |
Install |
cartuchos |
|
Instalación de los |
14
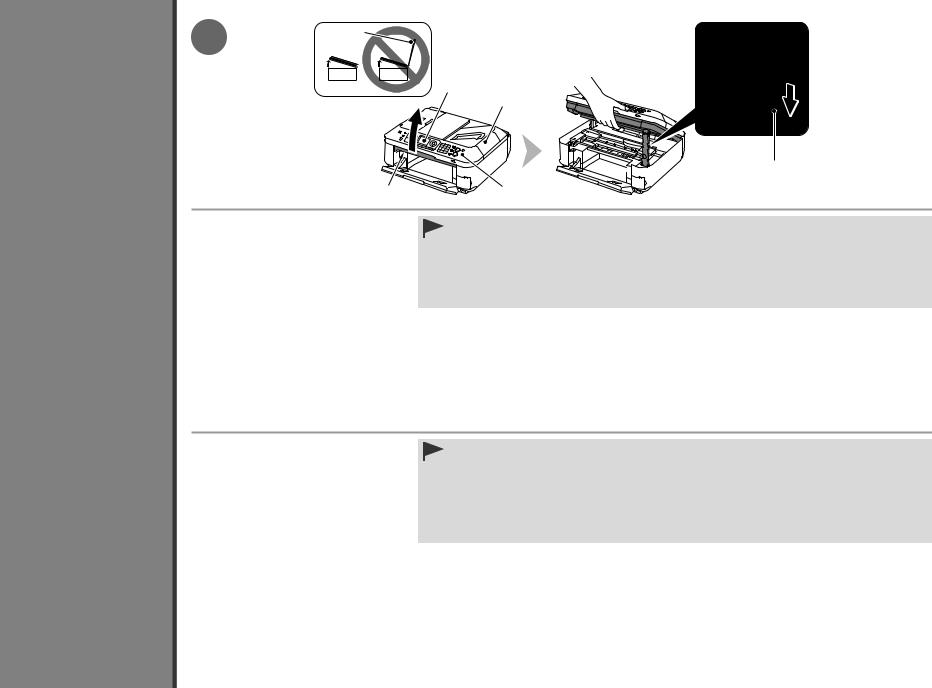
1 E
F
E
|
D |
A |
G |
Lift the Scanning Unit (Cover) (A) and fix |
• Do not touch the buttons or LCD (F) on the Operation Panel (G). May result in unintended operation. |
it with the Scanning Unit Support (D). |
• When opening the Scanning Unit (Cover), the FINE Cartridge Holder moves automatically. |
|
• If the FINE Cartridge Holder does not move, make sure that the machine is turned on. |
Close the Document Cover (E) and lift it with the |
• If the Scanning Unit (Cover) is left open for more than 10 minutes, the FINE Cartridge Holder moves to the right. |
Scanning Unit (Cover). |
In this case, close and reopen the Scanning Unit (Cover). |
Levante la unidad de escaneado
(cubierta) (A) y sujétela con el soporte de la unidad de escaneado (D).
Cierre la cubierta de documentos (E) y levántela con la unidad de escaneado (cubierta).
•No toque los botones ni la pantalla LCD (F) del panel de control (G). Puede producirse un funcionamiento imprevisto.
•Al abrir la unidad de escaneado (cubierta), el soporte de cartucho FINE (FINE Cartridge Holder) se desplaza automáticamente.
•Si el soporte de cartucho FINE (FINE Cartridge Holder) no se desplaza, compruebe que el equipo esté encendido.
•Si la unidad de escaneado (cubierta) se queda abierta durante más de 10 minutos, el soporte de cartucho FINE (FINE Cartridge Holder) se desplaza a la derecha. En tal caso, cierre y vuelva a abrir la unidad de escaneado
(cubierta).

2 H
Make sure that the FINE Cartridge
Holder (H) moves to the installation position.
Asegúrese de que el soporte de cartucho FINE (FINE Cartridge Holder)
(H) se desplaza hasta la posición de instalación.
3 |
4 |
Follow the next procedure to insert the Black  and Color
  FINE Cartridges into their corresponding slots
  and
and  .
.
I
Open the Ink Cartridge Locking Cover  on the right side.
Pinch (I) firmly and pull up the cover.
Siga el procedimiento que se indica a continuación |
Abra la tapa de bloqueo del cartucho de tinta |
del lado derecho. |
|||
para insertar los cartuchos FINE (FINE Cartridges) |
|
|
|||
negro |
y de color |
en sus ranuras |
y |
Sujete (I) firmemente y levante la tapa. |
|
correspondientes. |
|
|
|
|
|
15
5 |
6 |
L |
|
K |
|||
|
|
|
J |
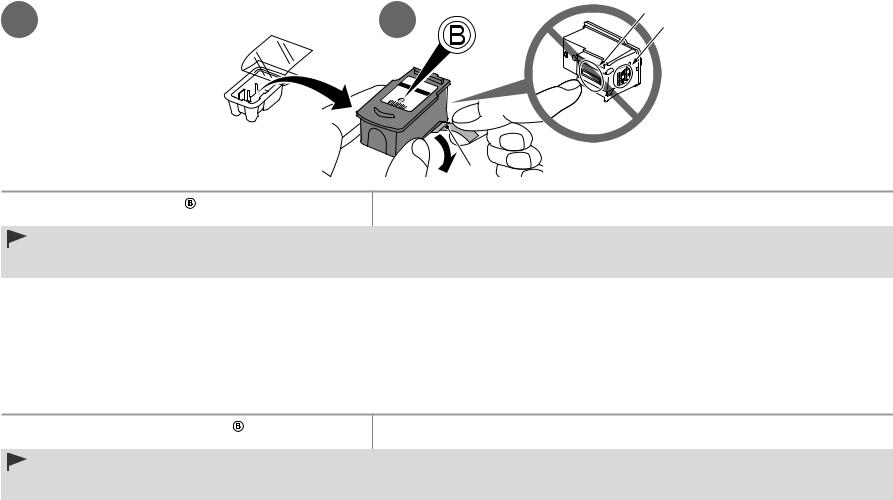
Remove the Black FINE Cartridge from its package. |
Pull the orange protective tape (J) in the direction of the arrow and remove it carefully. |
•Handle the FINE Cartridges carefully. Do not drop or apply excessive pressure to them.
•Be sure to use the supplied FINE Cartridges.
•Be careful not to stain your hands or surrounding work area with ink on the removed protective tape.
•Do not touch the Electrical Contacts (K) or Print Head Nozzles (L) on a FINE Cartridge. The machine may not print properly if you touch them.
Extraiga el cartucho FINE (FINE Cartridge) |
negro del paquete. |
Tire de la cinta naranja protectora (J) en la dirección de la flecha y extráigala cuidadosamente. |
•Instale los cartuchos FINE (FINE Cartridges) con cuidado. No los deje caer ni les aplique una presión excesiva.
•Asegúrese de usar los cartuchos FINE (FINE Cartridges) suministrados.
•Tenga cuidado para no mancharse las manos ni manchar el área de trabajo circundante con tinta de la cinta protectora retirada.
•No toque los contactos eléctricos (K) ni los inyectores del cabezal de impresión (L) del cartucho FINE (FINE Cartridge). Si los toca, puede que el equipo no imprima correctamente.
16

7 |
8 |
Place the Black FINE Cartridge  into the right slot
  .
.
•Do not knock the FINE Cartridge against the sides of the holder.
•Install in a well-lit environment.
•Install the Black FINE Cartridge  into the right slot
  , and the Color FINE Cartridge
  into the left slot
  .
.
Coloque el cartucho FINE (FINE Cartridge)  negro en la ranura
  derecha.
•Procure que el cartucho FINE (FINE Cartridge) no golpee los lados del soporte.
•Instálelo en un entorno bien iluminado.
•Instale el cartucho FINE (FINE Cartridge)  negro en la ranura
  derecha y el cartucho FINE (FINE Cartridge)
  de color en la ranura
  izquierda.
Push down  of the Ink Cartridge Locking Cover until you hear a click to close it completely.
View the Ink Cartridge Locking Cover  straight on and check that it is locked correctly (not at an angle).
Empuje  de la tapa de bloqueo del cartucho de tinta hacia abajo hasta que oiga un clic y quede totalmente cerrada.
Compruebe que la tapa de bloqueo del cartucho de tinta  esté derecha y correctamente cerrada, es decir, que no esté inclinada.
17
9 |
10 |
1 |
11 |
|
|
|
|
|
|
|
2 |
|
|
3 |
|
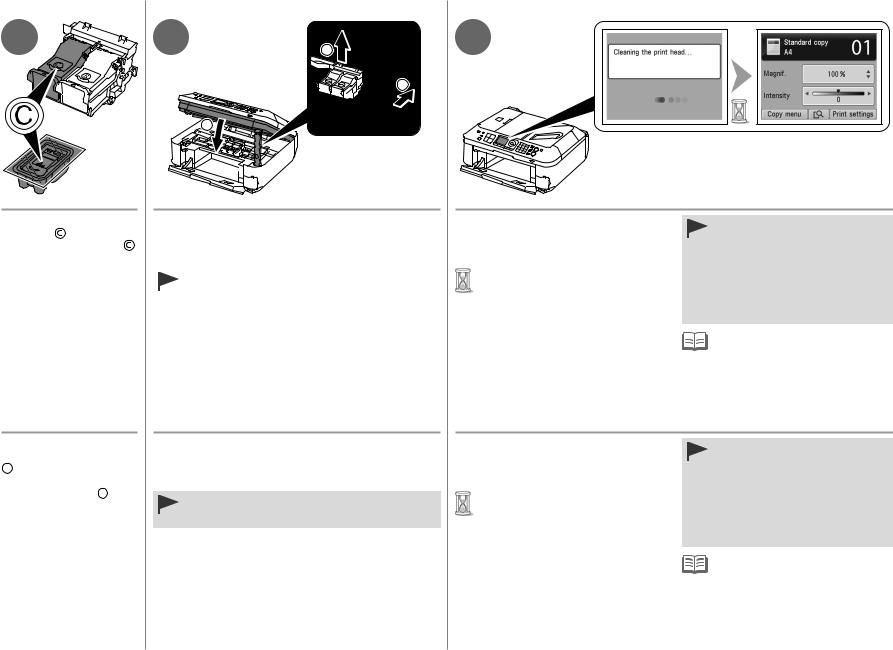
Insert the Color FINE |
Lift the Scanning Unit (Cover) slightly (1) and fold |
|
Cartridge |
into the left |
the Scanning Unit Support (2), then gently close |
FINE Cartridge Holder |
the Scanning Unit (Cover) (3). |
|
in the same way as the |
|
|
Black FINE Cartridge. |
|
|
• Do not touch the buttons or LCD on the Operation Panel. |
||
|
|
May result in unintended operation. |
|
|
|
Make sure that the LCD changes as shown in the illustration and go to the next step.
•It takes about 1 - 2 minutes before the LCD changes.
•Once you have installed the FINE
Cartridges, do not remove them unnecessarily.
•If an error message is displayed on the LCD, make sure that the FINE Cartridges are correctly installed.
 • The LCD will turn off if the machine
is not operated for about 5 minutes.
To restore the display, press any button except the ON button.
Introduzca el cartucho FINE (FINE Cartridge)
 de color en el soporte de cartucho FINE (FINE
Cartridge Holder)  del mismo modo que lo hizo con el cartucho FINE (FINE Cartridge) negro.
Levante la unidad de escaneado (cubierta) ligeramente (1) y pliegue el soporte de la unidad de escaneado (2) para cerrar después la unidad de escaneado (cubierta) (3) con cuidado.
•No toque los botones ni la pantalla LCD del panel de control. Podría producirse un funcionamiento imprevisto.
Asegúrese de que la pantalla LCD cambie como se muestra en la ilustración y vaya al siguiente paso.
•La pantalla LCD tarda de 1 a 2 minutos en cambiar.
18
•Una vez instalados los cartuchos FINE (FINE Cartridges), no los retire si no es necesario.
•Si aparece un mensaje de error en la pantalla LCD, asegúrese de que los cartuchos FINE (FINE Cartridges) estén correctamente instalados.
• Cuando el equipo no se utiliza durante unos 5 minutos, la pantalla LCD se desconecta. Para reactivarla, pulse cualquier botón excepto el botón
ACTIVADO (ON).
6
Carga del papel
Load Paper
1 |
2 |
2 |
A |
1 |
|
B
Open the Paper Support (A). |
Move the Paper Guides (B) to both edges. |
Abra el soporte del papel (A). |
Desplace las guías del papel (B) hasta ambos bordes. |
19

3
C
Load paper in the center of the Rear Tray (C).
Load paper in portrait orientation with the printing side facing up.
Cargue el papel en el centro de la bandeja posterior (C).
Cargue el papel con orientación vertical con la cara de impresión hacia arriba.
4 |
D |
Slide the left and right Paper Guides against both edges of the paper.
Make sure that the height of the paper stack does not exceed the line (D).

 • For details on how to handle paper, refer to "Loading Paper" in the on-screen manual:
Basic Guide after installation is complete.
Deslice las guías de papel izquierda y derecha contra ambos bordes del papel.
Compruebe que la altura de la pila de papel no supere la línea (D).

 • Para obtener más información sobre cómo manipular el papel, consulte “Carga del papel” en el
 manual en pantalla: Guía básica después de finalizar la instalación.
20

7
Configuración del equipo para la recepción de fax
Set Up for Fax Reception
Read this section only when using the machine as a fax.
If not using the machine as a fax, go to "8 Select Connection Method" on page 25.
Lea esta sección sólo si va a utilizar el equipo como fax.
De lo contrario, vaya a “8 Selección del método de conexión” en la página 25.
The following four modes are available for receiving faxes. Select a receive mode according to your needs. You can change the receive mode any time. Refer to the on-screen manual: Basic Guide.

 • Even when a telephone is connected to the machine, the telephone's ringtone may not sound
 for an incoming call depending on the type or settings of the telephone.
Para la recepción de faxes están disponibles estos cuatro modos. Seleccione el modo de recepción según convenga. Puede cambiar el modo de recepción en cualquier momento. Consulte el manual en pantalla: Guía básica.
• Aunque esté conectado al equipo un teléfono, puede que no suene el tono de llamada del teléfono para una llamada entrante en función del tipo o de la configuración del teléfono.
21

Intended Use
Uso previsto
•Want to use a telephone line for voice calls and faxes.
•Want to prioritize voice call reception over fax call reception because there are more opportunities to receive voice calls.
•Want to automatically receive voice messages and faxes, connect the answering machine to the fax.
•Si desea utilizar una línea de teléfono para las llamadas de voz y los faxes.
•Si desea dar prioridad a la recepción de llamadas de voz respecto a la recepción de llamadas de fax porque hay más posibilidades de recibir las primeras.
•Si desea recibir automáticamente mensajes de voz y faxes, conecte el contestador automático al fax.
•Want to use a telephone line for voice calls and faxes.
•Want to prioritize fax call reception over voice call reception because there are more opportunities to receive faxes.
•Si desea utilizar una línea de teléfono para las llamadas de voz y los faxes.
•Si desea dar prioridad a la recepción de llamadas de fax respecto a la recepción de llamadas de voz porque hay más posibilidades de recibir las primeras.
•Want to use a dedicated fax line.
•Want to use as a fax only.
•Si desea utilizar una línea de fax dedicada.
•Si desea usar sólo el fax.
•If you use Distinctive Ring Pattern Detection (DRPD) service
•Si utiliza un servicio de detección de patrones de sonido (DRPD)
Receive Mode
Modo de recepción
TEL priority mode
Modo prioridad teléfono
Voice calls cannot be received unless a telephone is connected.
No se pueden recibir llamadas de voz a menos que haya conectado un teléfono.
FAX priority mode
Modo prioridad fax
FAX only mode
Modo sólo fax
DRPD
DRPD
22

TEL priority mode |
Modo prioridad teléfono |
FAX priority mode |
Modo prioridad fax |
FAX only mode |
Modo sólo fax |
DRPD |
DRPD |
|
Responses to Calls in Each Mode |
|
Respuestas a llamadas en cada modo |
When a fax call arrives: |
When a voice call arrives: |
Si recibe una llamada de fax: |
Si recibe una llamada de voz: |
While the telephone's ringtone sounds, pick up the handset. When the fax reception starts, replace the handset. If an answering machine is connected, the fax is received automatically.
Mientras suene el tono de llamada del teléfono, descuelgue el auricular. Cuando se inicie la recepción de fax, cuelgue el auricular. Si está conectado un contestador automático, el fax se recibe automáticamente.
The telephone's ringtone sounds. The fax is received automatically.
Suena el tono de llamada del teléfono. El fax se recibe automáticamente.
While the telephone's ringtone sounds, pick up the handset to answer the call.
Mientras suene el tono de llamada del teléfono, descuelgue el auricular para responder a la llamada.
While the telephone's ringtone sounds, pick up the handset to answer the call. When it switches to the machine's ringtone, pick up the handset and press the Stop button to answer the call.
Mientras suene el tono de llamada del teléfono, descuelgue el auricular para responder a la llamada. Cuando cambie al tono de llamada del equipo, descuelgue el auricular y pulse el botón
Parar (Stop) para responder a la llamada.
The fax is received automatically.
El fax se recibe automáticamente.
The telephone's ringtone sounds. The fax is received automatically when the machine detects the fax ring pattern.
Suena el tono de llamada del teléfono. El fax se recibe automáticamente cuando el equipo detecta el patrón de sonido de fax.
The call cannot be answered.
No se puede responder a la llamada.
The telephone continues to ring.
Pick up the handset to answer the call.
Sigue sonando el teléfono.
Descuelgue el auricular para responder a la llamada.
23
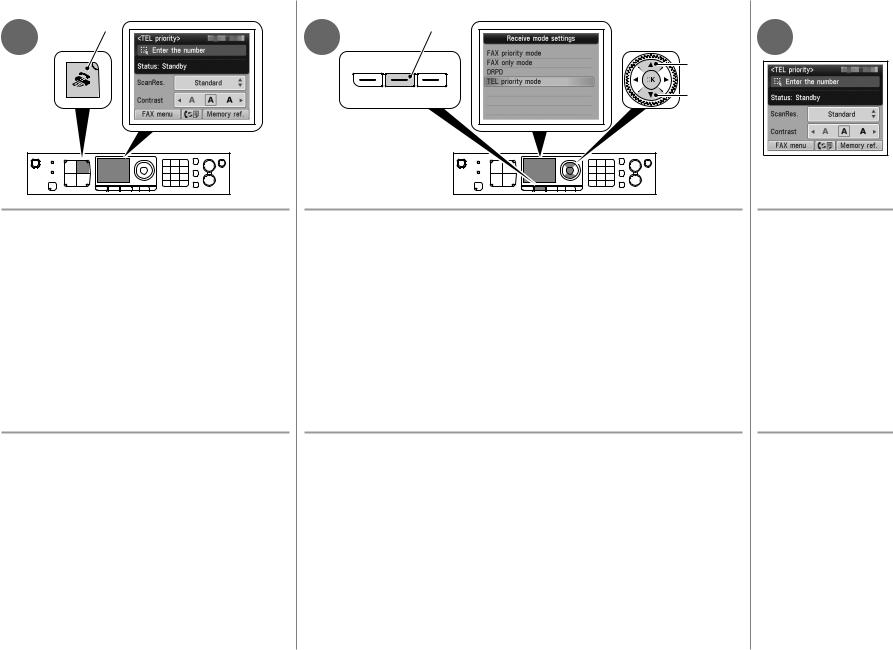
1 A
Press the FAX button (A).
The fax standby screen is displayed.
Pulse el botón FAX (A).
Aparecerá la pantalla de fax en espera.
2 |
B |
3 |
|
 C
C
Press the FUNCTION button (B), then select a receive mode using the { or } |
Press the OK button. |
button (C). |
|
|
The fax standby screen |
|
returns. |
Pulse el botón FUNCIÓN (FUNCTION) (B) y seleccione después un modo |
Pulse el botón OK. |
de recepción con el botón { o } (C). |
|
|
Volverá a la pantalla de fax |
|
en espera. |
24

8
Selección del método de conexión
Select Connection Method
Intended Use
Uso previsto
•Want to connect to a computer with a USB cable.
•Si desea conectarlo a un ordenador con un cable USB.
•Want to connect to computers without using cables.
•Want to use from multiple computers.
•Si desea conectarlo a los ordenadores sin usar cables.
•Si desea utilizarlo desde varios ordenadores.
•Want to use from multiple computers.
•Want to connect to a computer with an
Ethernet cable.
•Si desea utilizarlo desde varios ordenadores.
•Si desea conectarlo a un ordenador con un cable Ethernet.
Connection Method |
Device Required |
Método de conexión |
Dispositivo necesario |
USB Connection
Conexión USB
Wireless Connection
Conexión inalámbrica
Wired Connection
Conexión por cable
USB cable
Cable USB
Access point or wireless router
Punto de acceso o router inalámbrico
Ethernet cable, router, etc.
Cable Ethernet, router, etc.
Go to "9 Install the Software (USB Connection)" on page 27.
 Vaya a “9 Instalación del software (Conexión USB)” en la página 27.
Go to "10 Wireless Setup" on page 35.
Also refer to the information on page 26.
 Vaya a “10 Configuración inalámbrica” en la página 35.
Consulte también la información de la página 26.
Go to "11 Wired Setup" on page 54.
Also refer to the information on page 26.
 Vaya a “11 Conexión por cable” en la página 54.
Consulte también la información de la página 26.
25
 Loading...