


 Loading...
Brother MFC-J280W, MFC-J425W, MFC-J430W, MFC-J435W, MFC-J625DW Software User Guide
...SOFTWARE
USER’S GUIDE
For DCP users; This documentation is for both MFC and DCP models. Where it says 'MFC' in this user's guide, please read 'MFC' as 'DCP'.
Not all models are available in all countries.
Version 0
USA

Applicable models
This User’s Guide applies to the following models.
MFC-J280W/J430W/J625DW/J825DW/J835DW
Definitions of notes
We use the following icons throughout this User’s Guide:
CAUTION |
CAUTION indicates a potentially hazardous situation which, if not avoided, |
|
may result in minor or moderate injuries. |
||
|
||
|
|
|
IMPORTANT |
IMPORTANT indicates a potentially hazardous situation which, if not |
|
avoided, may result in damage to property or loss of product functionality. |
||
|
||
|
|
|
Note |
Notes tell you how you should respond to a situation that may arise or give |
|
tips about how the operation works with other features. |
||
|
||
|
|
Compilation and publication notice
Under the supervision of Brother Industries, Ltd., this manual has been compiled and published, covering the latest product’s descriptions and specifications.
The contents of this manual and the specifications of this product are subject to change without notice.
Brother reserves the right to make changes without notice in the specifications and materials contained herein and shall not be responsible for any damages (including consequential) caused by reliance on the materials presented, including but not limited to typographical and other errors relating to the publication.
©2011 Brother Industries, Ltd.
IMPORTANT NOTE
This product is approved for use in the country of purchase only. Do not use this product outside the country of purchase as it may violate the wireless telecommunication and power regulations of that country.
Windows® XP in this document represents Windows® XP Professional, Windows® XP Professional x64 Edition and Windows® XP Home Edition.
Windows Server® 2003 in this document represents Windows Server® 2003, Windows Server® 2003 x64 Edition, Windows Server® 2003 R2 and Windows Server® 2003 R2 x64 Edition.
Windows Server® 2008 in this document represents Windows Server® 2008 and Windows Server® 2008 R2.
This manual used the LCD messages from the MFC-J825DW if not specified.
i

Table of Contents |
|
||
Section I |
Windows® |
|
|
1 |
Printing |
2 |
|
|
Using the Brother printer driver.................................................................................................................. |
2 |
|
|
Features .................................................................................................................................................... |
2 |
|
|
Choosing the right type of paper................................................................................................................ |
3 |
|
|
Simultaneous printing, scanning and faxing .............................................................................................. |
3 |
|
|
Clearing data from the memory ................................................................................................................. |
3 |
|
|
Status Monitor............................................................................................................................................ |
4 |
|
|
|
Monitoring the machine’s status .......................................................................................................... |
4 |
|
|
Turning off the Status Monitor ............................................................................................................. |
5 |
|
Printer driver settings................................................................................................................................. |
6 |
|
|
Accessing the printer driver settings.......................................................................................................... |
6 |
|
|
Basic tab .................................................................................................................................................... |
7 |
|
|
|
Media Type.......................................................................................................................................... |
8 |
|
|
Print Quality ......................................................................................................................................... |
9 |
|
|
Paper Size ......................................................................................................................................... |
10 |
|
|
Color Mode ........................................................................................................................................ |
10 |
|
|
Orientation ......................................................................................................................................... |
11 |
|
|
Copies ............................................................................................................................................... |
11 |
|
|
Multiple Page..................................................................................................................................... |
12 |
|
|
Duplex / Booklet ................................................................................................................................ |
12 |
|
Advanced tab........................................................................................................................................... |
14 |
|
|
|
Color/Grayscale................................................................................................................................. |
15 |
|
|
Color Settings .................................................................................................................................... |
16 |
|
|
Ink Save Mode................................................................................................................................... |
17 |
|
|
Use Watermark.................................................................................................................................. |
18 |
|
|
Watermark Settings ........................................................................................................................... |
18 |
|
|
Header-Footer Print........................................................................................................................... |
20 |
|
|
Other Print Options............................................................................................................................ |
21 |
|
Print Profiles tab ...................................................................................................................................... |
27 |
|
|
|
Add Profile ......................................................................................................................................... |
28 |
|
|
Delete Profile ..................................................................................................................................... |
28 |
|
Support .................................................................................................................................................... |
29 |
|
|
Trial Photo Print....................................................................................................................................... |
30 |
|
|
Using FaceFilter Studio for photo printing by REALLUSION................................................................... |
31 |
|
|
|
Starting FaceFilter Studio with your Brother machine turned On ...................................................... |
32 |
|
|
Starting FaceFilter Studio when your Brother machine is turned Off ................................................ |
33 |
|
|
Printing an image............................................................................................................................... |
34 |
|
|
Smart Portrait .................................................................................................................................... |
36 |
|
|
Red-eye Reduction............................................................................................................................ |
36 |
|
|
Print Expression List.......................................................................................................................... |
37 |
|
|
Uninstalling FaceFilter Studio............................................................................................................ |
37 |
|
Using Homepage Print 2 by Corpus ........................................................................................................ |
38 |
|
|
|
Installing Homepage Print 2 .............................................................................................................. |
38 |
ii

2 |
Scanning |
39 |
|
Scanning a document using the TWAIN driver........................................................................................ |
39 |
|
Scanning a document into the computer ........................................................................................... |
39 |
|
Pre-Scanning to crop a portion you want to scan.............................................................................. |
41 |
|
Auto Crop .......................................................................................................................................... |
42 |
|
Settings in the Scanner Setup dialog box.......................................................................................... |
43 |
|
Scanning a document using the WIA driver............................................................................................. |
47 |
|
WIA compliant ................................................................................................................................... |
47 |
|
Scanning a document into the computer ........................................................................................... |
47 |
|
Pre-Scanning and cropping a portion using the scanner glass ......................................................... |
49 |
|
Scanning a document using the WIA driver |
|
|
(Windows® Photo Gallery and Windows® Fax and Scan users) .......................................................... |
52 |
|
Scanning a document into the computer ........................................................................................... |
52 |
|
Pre-Scanning and cropping a portion using the scanner glass ......................................................... |
54 |
|
Using ScanSoft™ PaperPort™12SE with OCR by NUANCE™.............................................................. |
55 |
|
Viewing items .................................................................................................................................... |
55 |
|
Organizing your items in folders ........................................................................................................ |
56 |
|
Quick links to other applications ........................................................................................................ |
56 |
|
ScanSoft™ PaperPort™12SE with OCR lets you convert image text into text you can edit............. |
57 |
|
Importing items from other applications............................................................................................. |
57 |
|
Exporting items into other formats..................................................................................................... |
57 |
|
Uninstalling ScanSoft™ PaperPort™12SE with OCR....................................................................... |
58 |
|
Using BookScan Enhancer and Whiteboard Enhancer by REALLUSION .............................................. |
59 |
|
Installing BookScan Enhancer and Whiteboard Enhancer................................................................ |
59 |
3 |
ControlCenter4 |
60 |
|
Overview.................................................................................................................................................. |
60 |
|
Changing the user interface .............................................................................................................. |
60 |
|
Using ControlCenter4 in Home Mode...................................................................................................... |
61 |
|
ControlCenter4 Features for Home Mode users ............................................................................... |
62 |
|
Photo tab (For MFC-J625DW/J825DW/J835DW) ................................................................................... |
63 |
|
Copying images from a memory card or USB Flash memory drive .................................................. |
63 |
|
Opening the ControlCenter4 folder tree ............................................................................................ |
63 |
|
Opening the folder tree...................................................................................................................... |
64 |
|
Printing images.................................................................................................................................. |
64 |
|
Editing images ................................................................................................................................... |
64 |
|
Attaching images to E-mail................................................................................................................ |
65 |
|
Opening images with an application.................................................................................................. |
65 |
|
Scan tab .................................................................................................................................................. |
66 |
|
File types ........................................................................................................................................... |
67 |
|
Document Size .................................................................................................................................. |
67 |
|
Saving the scanned image ................................................................................................................ |
67 |
|
Printing the scanned image ............................................................................................................... |
68 |
|
Opening the scanned image with an application ............................................................................... |
68 |
|
Attaching the scanned data to E-mail................................................................................................ |
69 |
|
Using the OCR feature ...................................................................................................................... |
69 |
|
PC-FAX tab (For MFC models) ............................................................................................................... |
70 |
|
Sending an image file from your computer........................................................................................ |
71 |
|
Sending a scanned image ................................................................................................................. |
71 |
|
Viewing and printing received PC-FAX data (For MFC-J625DW/J825DW/J835DW) ....................... |
72 |
|
|
iii |

|
Device Settings tab.................................................................................................................................. |
73 |
|
Configuring Remote Setup ................................................................................................................ |
73 |
|
Accessing Quick Dial......................................................................................................................... |
73 |
|
Configuring the Scan button settings................................................................................................. |
74 |
|
Launching the BRAdmin utility........................................................................................................... |
75 |
|
Support tab .............................................................................................................................................. |
76 |
|
Opening ControlCenter Help ............................................................................................................. |
76 |
|
Using the Brother Solutions Center ................................................................................................... |
76 |
|
Accessing the Brother CreativeCenter .............................................................................................. |
76 |
|
Using ControlCenter4 in Advanced Mode ............................................................................................... |
77 |
|
ControlCenter4 Features for Advanced Mode users ......................................................................... |
78 |
|
Scan tab .................................................................................................................................................. |
79 |
|
File types ........................................................................................................................................... |
80 |
|
Document Size .................................................................................................................................. |
80 |
|
Opening the scanned image with an application ............................................................................... |
81 |
|
Using the OCR feature ...................................................................................................................... |
81 |
|
Attaching the scanned data to E-mail................................................................................................ |
81 |
|
Saving the scanned image ................................................................................................................ |
82 |
|
How to change the default settings of each button............................................................................ |
82 |
|
PC-Copy tab ............................................................................................................................................ |
83 |
|
Printing the scanned image ............................................................................................................... |
83 |
|
Photo tab (For MFC-J625DW/J825DW/J835DW) ................................................................................... |
84 |
|
Printing/Editing images...................................................................................................................... |
84 |
|
Opening PCC folder (PCC: PhotoCapture Center™)........................................................................ |
85 |
|
Copying files from PCC folder ........................................................................................................... |
85 |
|
Copying files to an application........................................................................................................... |
85 |
|
PC-FAX tab (For MFC models) ............................................................................................................... |
86 |
|
Sending an image file from your computer........................................................................................ |
86 |
|
Sending a scanned image ................................................................................................................. |
86 |
|
Viewing and printing received PC-FAX data (For MFC-J625DW/J825DW/J835DW) ....................... |
87 |
|
Device Settings tab.................................................................................................................................. |
88 |
|
Configuring Remote Setup ................................................................................................................ |
88 |
|
Accessing Quick Dial......................................................................................................................... |
88 |
|
Configuring Scan button settings....................................................................................................... |
89 |
|
Launching the BRAdmin utility........................................................................................................... |
90 |
|
Support tab .............................................................................................................................................. |
91 |
|
Opening ControlCenter Help ............................................................................................................. |
91 |
|
Using the Brother Solutions Center ................................................................................................... |
91 |
|
Accessing the Brother CreativeCenter .............................................................................................. |
91 |
|
Custom tab .............................................................................................................................................. |
92 |
|
Creating a Custom tab....................................................................................................................... |
92 |
|
Creating a Custom button.................................................................................................................. |
92 |
4 |
Remote Setup (For MFC-J625DW/J825DW/J835DW) |
94 |
|
Remote Setup.......................................................................................................................................... |
94 |
iv

5 |
Brother PC-FAX Software (MFC models only) |
96 |
|
PC-FAX sending ...................................................................................................................................... |
96 |
|
Setting up user information................................................................................................................ |
96 |
|
Sending setup.................................................................................................................................... |
97 |
|
Setting up a cover page..................................................................................................................... |
98 |
|
Entering cover page information........................................................................................................ |
98 |
|
Sending a file as a PC-FAX using the Facsimile style user interface................................................ |
99 |
|
Sending a file as a PC-FAX using the Simple style user interface .................................................. |
100 |
|
Address Book ........................................................................................................................................ |
102 |
|
Brother Address Book ..................................................................................................................... |
103 |
|
Setting up a member in the Address Book ...................................................................................... |
103 |
|
Speed Dial setup ............................................................................................................................. |
104 |
|
Setting up a group for broadcasting ................................................................................................ |
105 |
|
Editing member information............................................................................................................. |
106 |
|
Deleting a member or group............................................................................................................ |
106 |
|
Exporting the Address Book ............................................................................................................ |
106 |
|
Importing to the Address Book ........................................................................................................ |
107 |
|
PC-FAX receiving (For MFC-J625DW/J825DW/J835DW) .................................................................... |
109 |
|
Enabling the PC-FAX Receiving software on your machine ........................................................... |
110 |
|
Running the PC-FAX Receiving software on your computer........................................................... |
111 |
|
Setting up your computer ................................................................................................................ |
111 |
|
Configuring the Network PC-FAX Receiving Settings ..................................................................... |
113 |
|
Viewing new PC-FAX messages..................................................................................................... |
114 |
6 |
PhotoCapture Center™ (For MFC-J625DW/J825DW/J835DW) |
115 |
|
Using PhotoCapture Center™ ............................................................................................................... |
115 |
|
For Network Users................................................................................................................................. |
116 |
7 |
Firewall settings (For Network users) |
117 |
|
Before using the Brother software ......................................................................................................... |
117 |
|
Windows® XP SP2 or higher users ................................................................................................. |
117 |
|
Windows Vista® users ..................................................................................................................... |
119 |
|
Windows® 7 users ........................................................................................................................... |
121 |
v

Section II Apple Macintosh |
|
|
8 |
Printing and Faxing |
127 |
|
Setting up your computer....................................................................................................................... |
127 |
|
Choosing the right type of paper............................................................................................................ |
127 |
|
Simultaneous printing, scanning and faxing .................................................................................... |
127 |
|
Clearing data from the memory ....................................................................................................... |
127 |
|
Status Monitor ................................................................................................................................. |
128 |
|
Using the Brother printer driver.............................................................................................................. |
130 |
|
Choosing page setup options .......................................................................................................... |
130 |
|
Duplex Printing ................................................................................................................................ |
132 |
|
Choosing printing options ................................................................................................................ |
134 |
|
Print Settings ......................................................................................................................................... |
135 |
|
Media Type...................................................................................................................................... |
135 |
|
Print Quality ..................................................................................................................................... |
136 |
|
Color/Grayscale............................................................................................................................... |
136 |
|
Advanced settings ........................................................................................................................... |
137 |
|
Color Settings ........................................................................................................................................ |
140 |
|
Advanced Color Settings ................................................................................................................. |
140 |
|
Sending a fax (MFC models only) ......................................................................................................... |
142 |
|
Drag a vCard from the Mac OS X Address Book application (Mac OS X 10.4.11) ......................... |
145 |
|
Using Mac OS X 10.5.x to 10.6.x Addresses panel......................................................................... |
147 |
9 |
Scanning |
149 |
|
Scanning a document using the TWAIN driver...................................................................................... |
149 |
|
Accessing the TWAIN driver............................................................................................................ |
149 |
|
Scanning an image into your computer ........................................................................................... |
150 |
|
Pre-Scanning an image ................................................................................................................... |
150 |
|
Settings in the Scanner window ...................................................................................................... |
152 |
|
Scanning a document using the ICA driver (Mac OS X 10.6.x)............................................................. |
155 |
|
Using Image Capture....................................................................................................................... |
155 |
|
Scanning directly from the Print & Fax section................................................................................ |
158 |
|
Using Presto! PageManager.................................................................................................................. |
161 |
|
Features .......................................................................................................................................... |
161 |
|
System requirements for Presto! PageManager ............................................................................. |
161 |
|
Technical support ............................................................................................................................ |
162 |
10 |
ControlCenter2 |
164 |
|
Using ControlCenter2 ............................................................................................................................ |
164 |
|
Turning the AutoLoad feature off..................................................................................................... |
165 |
|
SCAN..................................................................................................................................................... |
166 |
|
File types ......................................................................................................................................... |
167 |
|
Document Size ................................................................................................................................ |
167 |
|
Image (example: Apple Preview)..................................................................................................... |
168 |
|
OCR (word processing application)................................................................................................. |
170 |
|
E-mail .............................................................................................................................................. |
171 |
|
File................................................................................................................................................... |
172 |
vi

|
CUSTOM SCAN .................................................................................................................................... |
173 |
|
File types ......................................................................................................................................... |
174 |
|
Document Size ................................................................................................................................ |
174 |
|
User-defined button ......................................................................................................................... |
174 |
|
Scan to Image ................................................................................................................................. |
175 |
|
Scan to OCR ................................................................................................................................... |
176 |
|
Scan to E-mail ................................................................................................................................. |
177 |
|
Scan to File...................................................................................................................................... |
178 |
|
COPY / PC-FAX (PC-FAX for MFC models only).................................................................................. |
179 |
|
DEVICE SETTINGS .............................................................................................................................. |
181 |
|
Remote Setup.................................................................................................................................. |
182 |
|
Quick-Dial........................................................................................................................................ |
183 |
|
Ink Level .......................................................................................................................................... |
183 |
11 |
Remote Setup & PhotoCapture Center™ |
|
|
(For MFC-J625DW/J825DW/J835DW) |
184 |
|
Remote Setup........................................................................................................................................ |
184 |
|
PhotoCapture Center™ ......................................................................................................................... |
186 |
|
For USB cable users ....................................................................................................................... |
186 |
|
For network users............................................................................................................................ |
187 |
Section III Using the Scan key |
|
|
12 |
USB cable scanning |
189 |
|
Using the Scan key over a USB cable connection ................................................................................ |
189 |
|
Scan to E-mail ................................................................................................................................. |
189 |
|
Scan to Image ................................................................................................................................. |
190 |
|
Scan to OCR ................................................................................................................................... |
192 |
|
Scan to File...................................................................................................................................... |
193 |
|
Scan to Media (For MFC-J625DW/J825DW/J835DW) ................................................................... |
195 |
|
How to set a new default for Scan to Media .................................................................................... |
198 |
13 |
Network Scanning |
200 |
|
Before using Network Scanning ............................................................................................................ |
200 |
|
Network license (Windows®) ........................................................................................................... |
200 |
|
Configuring Network Scanning for Windows® ................................................................................. |
201 |
|
Configuring network scanning for Macintosh................................................................................... |
205 |
|
Using the Scan key on your network ..................................................................................................... |
207 |
|
Scan to E-mail (PC)......................................................................................................................... |
207 |
|
Scan to Image ................................................................................................................................. |
208 |
|
Scan to OCR ................................................................................................................................... |
210 |
|
Scan to File...................................................................................................................................... |
212 |
|
Using Web Services for scanning on your network |
|
|
(Windows Vista® SP2 or later and Windows® 7)................................................................................ |
214 |
|
Using Web Services for scanning on your network from a computer |
|
|
(Windows Vista® SP2 or later and Windows® 7)......................................................................... |
214 |
|
Using Web Services for scanning on your network from the Brother machine |
|
|
(Windows Vista® SP2 or later and Windows® 7)......................................................................... |
216 |
|
|
vii |

Section IV Printing on a Disc |
|
|
14 |
Printing on a Disc (MFC-J825DW/J835DW only) |
219 |
|
How to load a printable disc................................................................................................................... |
219 |
|
Print by copying ..................................................................................................................................... |
222 |
|
Copying a disc label or document image......................................................................................... |
222 |
|
Adjust the print position ................................................................................................................... |
224 |
|
Print from media .................................................................................................................................... |
225 |
|
Print from a computer (Windows®) ........................................................................................................ |
227 |
|
Install NewSoft CD Labeler ............................................................................................................. |
227 |
|
How to print a disc label from a computer ....................................................................................... |
227 |
|
Print from a computer (Macintosh) ........................................................................................................ |
229 |
|
Install NewSoft CD Labeler ............................................................................................................. |
229 |
|
How to print a disc label from a computer ....................................................................................... |
229 |
A |
Index |
231 |
viii

Section I
Windows®
Printing |
2 |
Scanning |
39 |
ControlCenter4 |
60 |
Remote Setup (For MFC-J625DW/J825DW/J835DW) |
94 |
Brother PC-FAX Software (MFC models only) |
96 |
PhotoCapture Center™ |
115 |
(For MFC-J625DW/J825DW/J835DW) |
|
Firewall settings (For Network users) |
117 |
 1 Printing
1
 Note
Note
•The screens in this section are from Windows® XP. Screens on your computer may vary depending on your operating system.
•If your computer is protected by a firewall, and you are unable to network print, network scan or PC-Fax, you may need to configure the firewall settings. If you are using the Windows® Firewall and you installed MFL-Pro Suite from the CD-ROM, the necessary Firewall settings have already been made. If you did not install from the CD-ROM, see Firewall settings (For Network users) uu page 117 to configure your Windows® Firewall. If you are using any other personal Firewall software, see the user’s guide for your software or contact the software manufacturer.
Using the Brother printer driver
A printer driver translates the data from your application, and using a page description language, converts it into a format that can be understood by the printer/multi-function device.
You will find appropriate drivers on the CD-ROM supplied with the machine. Install those drivers by following the Quick Setup Guide. You can also download the latest drivers from the Brother Solutions Center at:
http://solutions.brother.com/
Features
This machine offers many features you will find in a high quality ink jet printer.
Brilliant High Quality Output
Printing at up to 1200 6000 dpi on glossy paper to get the best possible resolution. The printer driver supports N in 1, Watermark printing, Color Enhancement technology and many other features.
Low Running Cost
Whenever a particular ink color requires replacement, you only have to replace that individual cartridge.
USB
The Universal Serial Bus interface provides fast communication with your computer.
Ethernet (For Wired Network models)
The Ethernet interface lets your machine communicate with multiple computers connected on a network. This feature is available for Wired Network models only.
Wireless LAN (IEEE802.11b/g/n)
The wireless LAN capability lets your machine communicate with other wireless devices using the IEEE802.11b/g/n wireless standard in Infrastructure and Ad-hoc modes. uuNetwork User’s Guide
2

Printing
Choosing the right type of paper
1
For high quality printing, it is important to choose the right type of paper. Be sure to read Loading paper and Loading documents in the Basic User’s Guide before buying paper, and to determine the printable area depending on the settings in the printer driver.
Simultaneous printing, scanning and faxing
Your machine can print from your computer while sending or receiving a fax in memory, or while scanning a document into the computer. Fax sending will not be stopped during computer printing.
However, when the machine is copying or receiving a fax on paper, it pauses the computer printing operation, and then continues printing when copying or fax receiving has finished.
If the LCD shows Ink low, one or more of the ink cartridges are near the end of their life. If a sending machine has a color fax to send, your machine’s “handshake” will ask that the fax be sent as black & white. If the sending machine has the ability to convert it, the color fax will be printed at your machine as a black & white fax. You can continue printing until the LCD shows Cannot Print.
Clearing data from the memory
If the LCD shows Data Remaining, you can clear the data that is left in the printer memory by pressing the Stop/Exit key on the control panel.
3
Printing
Status Monitor
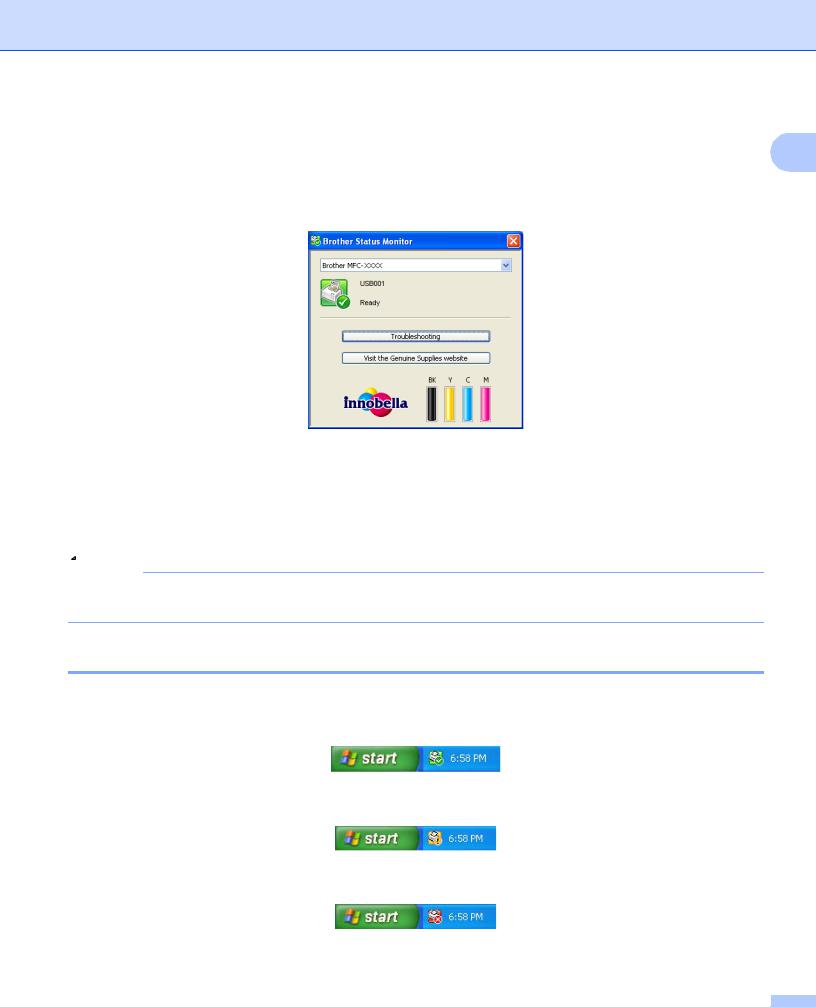
1
The Status Monitor utility is a configurable software tool for monitoring the status of one or more devices, allowing you to get immediate notification of error messages such as paper empty, paper jam or ink replacement required.
You can check the device status at anytime by double-clicking the icon in the tasktray or by choosing
Status Monitor located in Start/All Programs/Brother/MFC-XXXX on your computer.
There is also a link to the Genuine Brother Supplies web site. Click the
Visit the Genuine Supplies website button for more information on Brother genuine supplies. Click the Troubleshooting button to access the troubleshooting web site.
 Note
Note
For more information about using the Status Monitor software, right-click the Brother Status Monitor icon and choose Help.
Monitoring the machine’s status
Once you start up your computer, the Brother Status Monitor icon appears on the tasktray.
A green icon indicates the normal stand-by condition.
A yellow icon indicates a warning.
A red icon indicates an error has occurred.
The Status Monitor can be displayed in the tasktray or on the desktop of your computer.
4

Printing
Turning off the Status Monitor
|
1 |
|
If you want to switch off the Status Monitor, follow these steps: |
||
|
a Right-click the Brother Status Monitor icon or window and click Load Status Monitor on Startup to clear the check mark.
b Right-click again then click Exit.
 Note
Note
Even if the Status Monitor is off, you can check the machine’s status at any time by clicking Status Monitor from the Start menu on your computer.
5

Printing
Printer driver settings
1
You can change the following printer settings when you print from your computer:
Media Type
Print Quality
Paper Size
Orientation
Color / Grayscale
Ink Save Mode
Scaling
Accessing the printer driver settings
a From an application such as Microsoft® Notepad, click File, then Print in your application.
b Choose Brother MFC-XXXX Printer (where XXXX is your model name) and click Preferences. The printer driver window appears.
6

Printing
Basic tab
18
1Media Type drop-down list
2Slow Drying Paper check box
3Print Quality drop-down list
4Paper Size drop-down list
5Borderless check box
6Color Mode option
7Orientation option
8Copies option
9Collate check box
10Reverse Order check box
11Multiple Page drop-down list
12Page Order drop-down list
13Border Line drop-down list
14Duplex / Booklet drop-down list
15Duplex Settings button
16Default button
17OK button
18Current settings view
1
1
2
3
4
5
6
7
8
9
10
11
12
13
14  15
15
 16
16
17
7

Printing
a Choose your settings for Media Type, Slow Drying Paper and Print Quality.
Note |
1 |
|
|
|
|
Check Slow Drying Paper when printing with plain paper on which ink dries slowly. This setting may cause some slight blurring of text.
b Choose Paper Size, Borderless, Color Mode, Orientation, number of Copies and the page order, Collate, Reverse Order, Multiple Page, Page Order, Border Line and Duplex / Booklet (if required).
c Click OK to apply your chosen settings.
To return to the default settings, click Default, then OK.
Media Type
To achieve the best print results, the media being printed on should be selected in the driver. The machine changes the way to print depending on the selected media type.
Plain Paper
Inkjet Paper
Brother BP71 Photo Paper
Brother BP61 Photo Paper
Other Photo Paper
Printable Disc (For MFC-J825DW/J835DW)
Glossy Printable Disc (For MFC-J825DW/J835DW)
Transparencies
 Note
Note
(For Disc Print)
If the printed image runs off the edges of the disc, you may need to adjust the print position. (See Adjust the print position uu page 224.)
8

Printing
Print Quality
|
1 |
|
The Print Quality selection lets you choose the print resolution. As print quality and speed are related, the |
||
|
||
higher the quality, the longer it will take to print the document. The quality selections that are available will |
|
|
vary depending on the media type you choose. |
|
Best
Use for printing precise images such as photographs. This is the best resolution and slowest speed.
Photo
Use for printing photographs. Since the print data is much larger than a normal document, the processing time, data transfer time and print time will be longer.
High
Better print quality than Normal mode and faster print speed than Photo.
Normal
Good print quality with typical print speed.
Fast
The fastest print mode and the lowest amount of ink used. Use for printing large volume documents or documents for proofing.
Media Type |
Color/Grayscale |
Print Quality Selection |
Plain Paper |
Color / Grayscale |
Fast, Normal, High, Best |
|
|
|
Inkjet Paper |
Color / Grayscale |
Normal, Photo |
|
|
|
Brother BP71 Photo Paper, |
Color / Grayscale |
Fast, Photo, Best |
Brother BP61 Photo Paper or |
|
|
Other Photo Paper |
|
|
|
|
|
Printable Disc |
Color / Grayscale |
Normal, Slow Drying |
(For MFC-J825DW/J835DW) |
|
|
|
|
|
Glossy Printable Disc |
Color / Grayscale |
Normal |
(For MFC-J825DW/J835DW) |
|
|
|
|
|
Transparencies |
Color / Grayscale |
Normal |
|
|
|
 Note
Note
The default settings are shown in bold.
9

Printing
Paper Size
|
1 |
|
The Paper Size drop-down list includes a large selection of standard paper sizes. If you want, you can create |
||
|
||
a custom size ranging from 3.5 5 in. (88.9 127.0 mm) to 8.5 14 in. (215.9 355.6 mm). From the |
|
|
drop-down list, choose the Paper Size you are using. |
|
You can create a custom size by choosing User Defined. Specify the Width and Height values, and enter any name you want for this custom size. Choose the correct paper thickness to improve the quality of your output.
To do borderless printing
Check the Borderless check box.
Color Mode
Color is adjusted to get the closest color match with the monitor.
Natural: Use for photographic images. The color is adjusted to print more natural colors.
Vivid: Use for business graphics such as charts, graphics and text. The color is adjusted to print more vivid colors.
10
Printing
Orientation
|
1 |
|
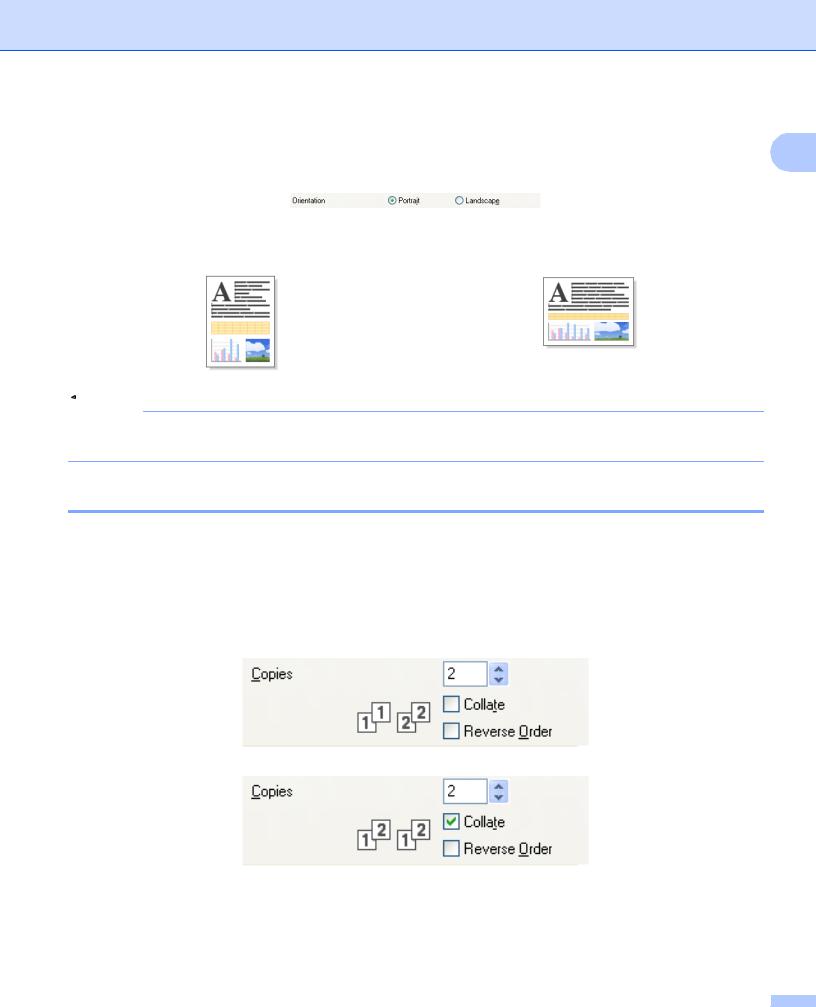
Orientation chooses the position that your document will be printed (in Portrait or Landscape). |
||
|
Portrait (Vertical) |
Landscape (Horizontal) |
|
|
 Note
Note
If your application software contains a similar function to this, we recommend you use the one in the application.
Copies
The Copies selection sets the number of copies that will be printed (1 to 999).
Collate
With Collate checked, one complete copy of your document will be printed and then reprinted according to the number of copies you choose. If Collate is unchecked, then each page will be printed according to the number of copies chosen before the next page of the document is printed.
11
Printing
Reverse Order
Reverse Order prints the pages of your document in the opposite order. The last page of your document will 1 be printed first.
Multiple Page
The Multiple Page option lets you choose the N in 1 options or the 1 in N options. The N in 1 options print 2, 4, 9 or 16 pages of a document on 1 sheet of paper. The 1 in N options enlarges your print size and prints the document in poster print mode.
Page Order
When the N in 1 option is selected, the Page Order can be selected from the drop-down list.
Border Line
When the N in 1 option is selected, you can choose to have a solid border, dashed border or no border around each page on the sheet.
Duplex / Booklet
When you want to print a booklet or do duplex printing, use this function.
None
Disable duplex printing.
Duplex / Duplex (Manual)
When you want to do duplex printing, use these options.
•Duplex (For MFC-J625DW/J825DW/J835DW)
The machine prints on both sides of the paper automatically.
•Duplex (Manual) (For MFC-J280WJ430W)
The machine prints all the odd numbered pages first. Then the printer driver will stop and show the instructions required to re-install the paper. When you click OK the even numbered pages will be printed.
When you choose Duplex or Duplex (Manual), the Duplex Settings button becomes available to choose. You can set the following settings in the Duplex Settings dialog box.
•Duplex Type
There are four types of duplex binding directions available for each orientation.
•Binding Offset
When you check Binding Offset, you can also specify the offset for binding in inches or millimeters.
12

Printing
Booklet / Booklet (Manual) |
|
Use this option to print a document in booklet format using duplex printing; it will arrange the document |
1 |
according to the correct page number and allows you to fold at the center of the print output without having |
|
to change the order of the page number.
•Booklet (For MFC-J625DW/J825DW/J835DW)
The machine prints on both sides of the paper automatically.
•Booklet (Manual) (For MFC-J280WJ430W)
The machine prints all the even numbered sides first. Then the printer driver will stop and show the instructions required to re-install the paper. When you click OK the odd numbered sides will be printed.
When you choose Booklet or Booklet (Manual), the Duplex Settings button becomes available to choose. You can set the following settings in the Duplex Settings dialog box.
•Duplex Type
There are two types of duplex binding directions available for each orientation.
•Booklet Printing Method
When Divide into Sets is selected:
This option allows you to print the whole booklet into smaller individual booklet sets, it still allows you to fold at the center of the smaller individual booklet sets without having to change the order of the page number. You can specify the number of sheets in each smaller booklet set, from 1 to 15. This option can help when folding the printed booklet that has a large number of pages.
•Binding Offset
When you check Binding Offset, you can also specify the offset for binding in inches or millimeters.
 Note
Note
The Borderless feature is not available for duplex printing and booklet printing.
13
Printing
Advanced tab
1
1
2
 3
3
4
5
6
7
8
9
10
11
1Color / Grayscale option
2Color Settings button
3Ink Save Mode check box
4Scaling option
5Mirror Print check box
6Reverse Print check box
7Use Watermark check box
8Header-Footer Print check box
9Other Print Options button
10Default button
11OK button
a Choose your setting for Color / Grayscale.
b Choose Ink Save Mode to help reduce ink consumption.
c Choose your setting for the Scaling feature.
Choose Off to print the document as it appears on your screen.
Choose Fit to Paper Size to enlarge or reduce the document to fit the paper size.
Choose Free to change the size.
14

Printing
d You can choose reverse printing options.
Check Mirror Print to reverse the data from left to right. |
1 |
Check Reverse Print to reverse the data from up to down.
 Note
Note
Mirror Print is not available when choosing Transparencies as a Media Type.
e You can print a logo or text onto your document as a watermark. You can choose one of the preset watermarks, or you can use a bitmap file or text file that you have created.
f You can print the date and time from your computer's system clock, and the computer login user name or your entered text on your document using Header-Footer Print.
 Note
Note
Header-Footer Print is not available if you are using Borderless.
g Click Other Print Options to set more Printer functions.
h Click OK to apply your chosen settings.
To return to the default settings, click Default, then OK.
Color/Grayscale
This function can be used to print documents in color, or black and white using grayscale.
15
Printing
Color Settings
|
1 |
|
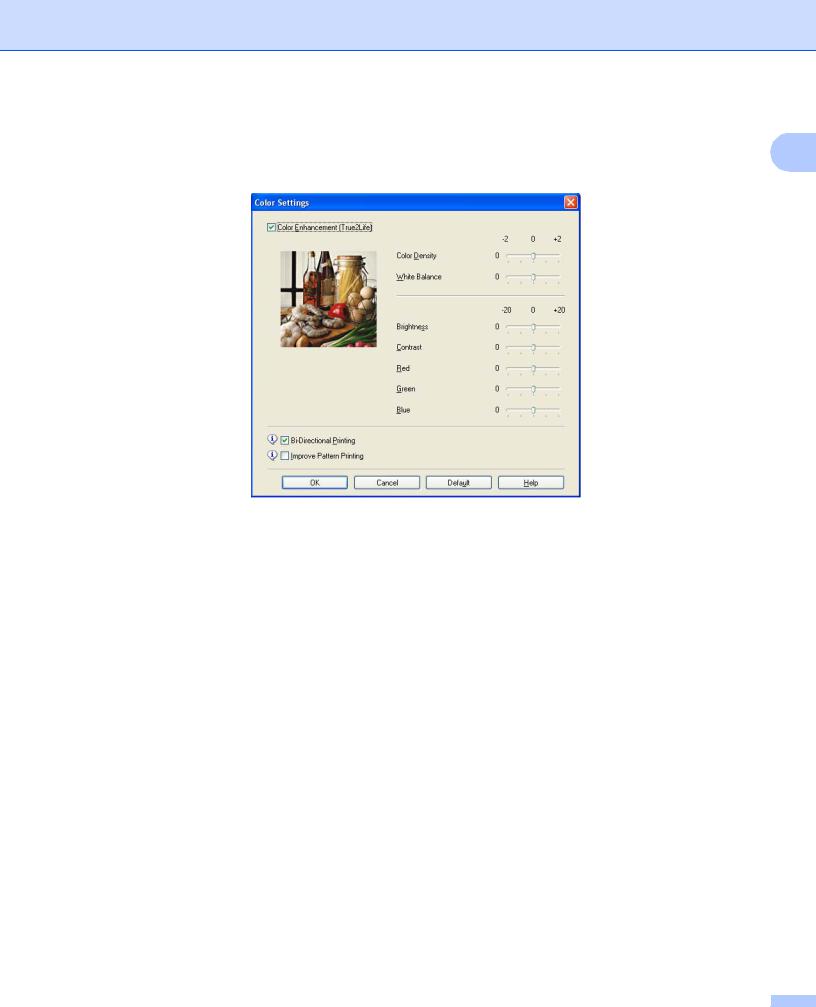
Click Color Settings on the Advanced tab to see options for enhanced print settings. |
||
|
Color Enhancement (True2Life)
Checking the Color Enhancement (True2Life) option enables the True2Life feature. This feature analyzes your image to improve its sharpness, white balance and color density. This process may take several minutes depending on the size of the image and the specifications of your computer.
Color Density
Adjusts the total amount of color in the image. You can increase or decrease the amount of color in an image to improve a washed out or weak-looking picture.
White Balance
Adjusts the hue of the white areas of an image. Lighting, camera settings and other influences will affect the appearance of white. The white areas of a picture may be slightly pink, yellow or some other color. By adjusting the white balance you can adjust those white areas.
Brightness
Adjusts the brightness of the whole image. To lighten or darken the image, move the slider to the right or left.
Contrast
Adjusts the contrast of an image. This will make darker areas darker and lighter areas lighter. Increase the contrast when you want an image to be clearer. Decrease the contrast when you want an image to be more subdued.
16

Printing
Red
Increases the intensity of Red in the image to make the image redder. |
1 |
Green
Increases the intensity of Green in the image to make the image greener.
Blue
Increases the intensity of Blue in the image to make the image bluer.
Bi-Directional Printing
When Bi-Directional Printing is checked, the print head prints in both directions offering faster print speeds. When unchecked, the print head will only print in one direction giving higher quality printouts, but slower printing speeds.
Improve Pattern Printing
Select the Improve Pattern Printing option if the printed fills and patterns appear different to how they appear on your screen.
Ink Save Mode
When you choose Ink Save Mode, the machine prints the colors lighter and emphasizes the outlines of the images. The amount of ink that is saved varies depending on the type of documents that are printed.
Ink Save Mode may make your printouts look different to what you see on your screen.
Ink Save Mode: Off |
Ink Save Mode: On |
17
Printing
Use Watermark
|
1 |
|
You can print a logo or text onto your document as a watermark. You can choose one of the preset |
||
|
||
watermarks, or you can use a bitmap file or text file that you have created. |
|
Check Use Watermark and then click Settings on the Advanced tab.
Watermark Settings
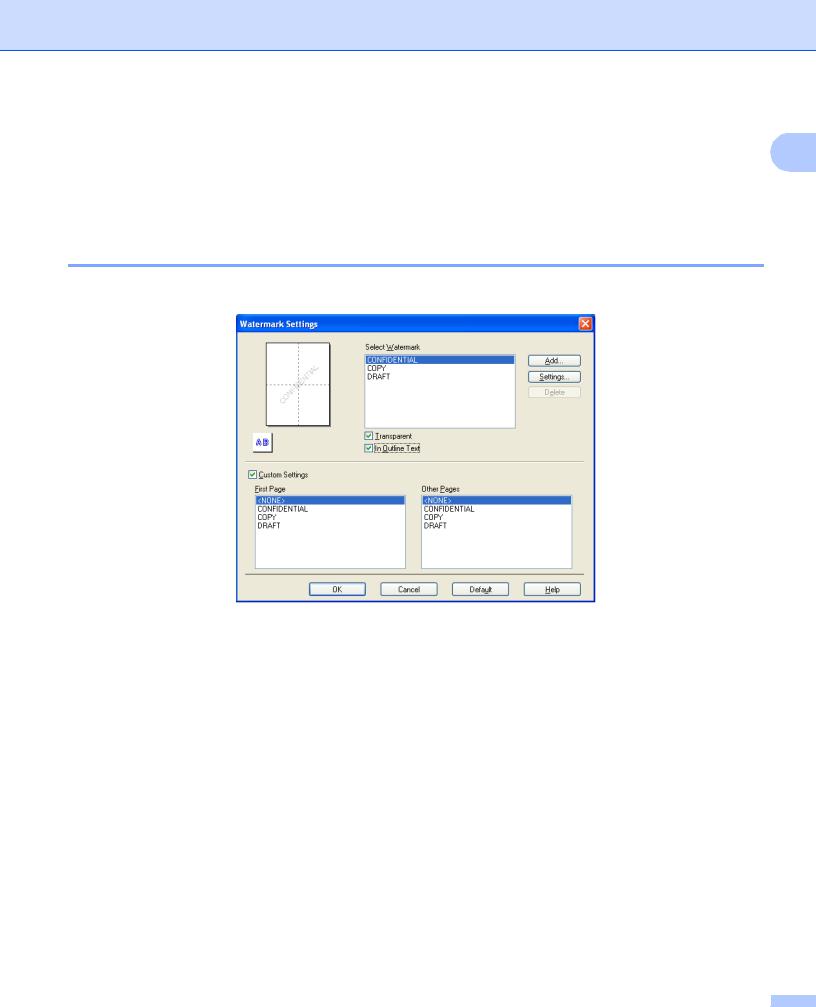
Choose a watermark you want to use or edit from Select Watermark.
Transparent
Check Transparent to print the watermark image in the background of your document. If this feature is unchecked, the watermark is printed at the front of your document.
In Outline Text
Check In Outline Text if you only want to print an outline of the watermark. This feature is available when choosing a text watermark.
Custom Settings
You can choose a watermark to be printed on the first page or on the other pages.
You can change watermark settings and add a new watermark. Click Settings to change the settings or click Add to add a new watermark.
18

Printing
1
You can change the watermark settings with this feature. If you want to add a new watermark, enter Title and then choose Use Text or Use Bitmap File in Watermark Style.
Title
Enter a title you like in the field when adding a new watermark. Your chosen watermark is overwritten with this title.
Text
Enter your watermark text in Text, then choose Font, Style, Size and Choose Color.
Bitmap
Enter a file name and location of your bitmap image in File, or click Browse to search for the file. You can also configure the scaling size and transparency of the image.
Position
Use this setting if you want to adjust the position of the watermark on the page.
19
Printing
Header-Footer Print
|
1 |
|
You can print the date and time from your computer's system clock, and the computer login user name or |
||
|
||
your entered text on your document. To customize the settings, click Settings on the Advanced tab. |
|
ID Print
You can choose your computer login user name or your entered text as a header or footer from the following ways:
Choosing Login User Name to print your computer login user name.
Choosing Custom to print your entered text in the Custom text box.
20
Printing
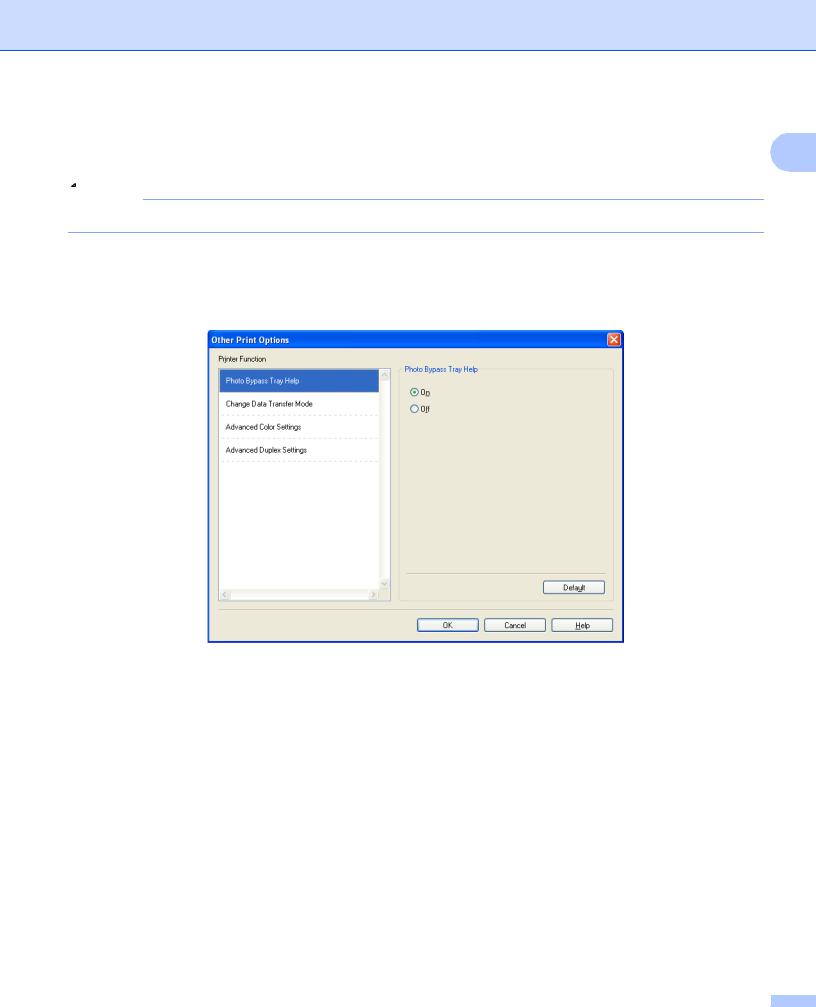
Other Print Options
|
1 |
|
Click Other Print Options on the Advanced tab to set more printer functions. |
||
|
 Note
Note
The screen shown in this section may vary depending on your machine.
Photo Bypass Tray Help (For MFC-J625DW/J825DW/J835DW)
Set the Photo Bypass Tray Help to On to display help instructions on how to use the photo paper tray when you select 4 x 6 in, 3.5 x 5 in or Postcard paper.
21
Loading...