


MFC-740

,
,
,
,
,
,
,
,
,
,
,
,
,
,
,
,
,
,
,
,
,
,
,
,
,
,
,
,
,
,
,
,
,
,
,
,
,
,
,
MFC-730
MFC-740
,
®
OWNER’S MANUAL

Legal and safety requirements
Telecommunication Authorities (P.T.T.s) require that this product is manufactured
specifically for the country into which it is originally imported for sale by Brother.
Brother advises that this product may not function correctly and does not offer any
warranty should this product be used on any other public exchange equipment other
than that of the original country of sale.
Brother also advises that any use of this equipment in other countries may render
the user to prosecution according to local regulations.
APPROVED FOR CONNECTION TO TELECOMMUNICATIONS SYSTEMS
SPECIFIED IN THE INSTRUCTIONS FOR USE SUBJECT TO THE CONDITIONS
SET OUT THEREIN.
APPROVAL CERTIFICATE NUMBER : 610154 (MFC-730)
608761 (MFC-740)
IMPORTANT SAFETY WARNING
MAIN APPARATUS PORT (modular socket on “T” - shaped line cord connector
for EXTENSION TELEPHONE or ANSWERING MACHINE)
Please ensure that any external device connected into the equipment’s external device socket
meets the isolation and other safety requirements of BS6301, EN41003 or EN60950 (including
Amendment 2). BABT approval of such external devices indicates compliance with one of
these safety standards.
STATUTORY STATEMENTS
Your Brother fax machine (the “series apparatus”) may be used in conjunction with additional
apparatus (the “main apparatus”) supplied separately, such as telephones and/or an answering
machine. The total REN must not in any case exceed 4; for an explanation of REN see
chap. 2.
No additional series apparatus may be connected between the incoming line and the equipment.
The voltage drop at 40mA introduced by the equipment and the PSTN is 0.5V.
In case additional devices are connected downstream of your equipment, difficulties may
occasionally be experienced when making calls from such downstream devices. These
difficulties may include:
(a) Difficulty in making calls.
(b) Problems in conversation being experienced by both parties to a call.
THIS EQUIPMENT IS NOT DESIGNED FOR MAKING
TELEPHONE CALLS WHEN THE POWER FAILS.
ALTERNATIVE ARRANGEMENTS SHOULD BE MADE
FOR ACCESS TO EMERGENCY SERVICES.
© 1996–1998 Brother Industries, Ltd.

REQUEST TO INSTALL SOCKETS
This equipment needs to be connected to a new-style modular telephone socket. If your
telephone line does not have such a socket, your local Telephone Area Sales Office can fit one
for you. If you have extensions that need re-wiring, your Telephone Area Sales Office can also
do this for you, or you can do it yourself using one of the many approved extension kits
available on the market. Complete the form below and send it to your local Telephone Area
Sales Office, whose address you can find in your telephone directory.
Note that a charge is made for this service.
REQUEST TO INSTALL SOCKET(S)
I/we request the installation of new style telephone socket(s).
Customer’s name........................................................................................................................
Address.......................................................................................................................................
....................................................................................................................................................
....................................................................................................................................................
....................................................................................................................................................
....................................................................................................................................................
Postcode .....................................................................................................................................
Telephone number......................................................................................................................
Equipment : BROTHER MFC-730, MFC-740
APPROVAL CERTIFICATE NUMBER : 610154 (MFC-730), 608761 (MFC-740)
Special installation instructions..................................................................................................
....................................................................................................................................................
....................................................................................................................................................
Customer’s signature...........................................................................Date ..............................
Ordering Accessories and Supplies
For the best quality results use only genuine Brother
accessories. These are available from most Brother dealers or
alternatively you can contact our mail order department on
telephone number 0161 931 2258 or fax number 0161 931 2218.
Description Item
Ink Cartridge <black> LC02BK
Ink Cartridge <cyan>(blue) LC02C
Ink Cartridge <magenta>(red) LC02M
Ink Cartridge <yellow> LC02Y
360 dpi High Quality Coated Paper (200 sheets) BP36CA
720 dpi High Quality Coated Paper (200 sheets) BP72CA
Glossy Paper (20 sheets) BPGLA
Transparancies (ink jet compatible)
Print Head HD002
2MB Upgrade Memory Board (Only for MFC-740) ME2000
Brother Coated Paper is Ink Jet Paper.

Table of Contents
2
3
4
i
Introduction
1
MFC Setup and
Connections
Using This Manual................................................................................. 1
Finding Information.............................................................................. 1
Symbols Used In This Manual.............................................................. 2
About Fax Machines ............................................................................. 2
Fax Tones and Handshake .................................................................... 2
ECM (Error Correction Mode) ............................................................. 3
MFC-730 Control Panel Overview ..................................................... 4
MFC-740 Control Panel Overview ..................................................... 6
Packing List ............................................................................................ 9
Choosing a Location............................................................................ 10
Caution .................................................................................................. 11
Assembly ............................................................................................... 11
IMPORTANT: ................................................................................ 11
Installing the Ink Cartridges ............................................................... 17
Important ........................................................................................ 18
Multi-Line Connections (PABXs) ...................................................... 21
If you are installing the MFC to work with a PABX: ................ 21
Ringer Equivalence Number (REN)............................................... 21
Using Extension Telephones .......................................................... 22
Connecting an External Telephone Answering Device (TAD) ........... 23
Sequence......................................................................................... 23
Connections .................................................................................... 23
Outgoing Message (OGM) of External TAD ................................. 24
Connecting an External Telephone ..................................................... 24
Paper
On-Screen
Programming
About Brother Paper........................................................................... 25
Paper Specifications for Cassette and Manual Slot ............................ 26
Print Area ............................................................................................ 27
User-Friendly Programming.............................................................. 29
Function Mode.................................................................................... 29
Alternating Displays ........................................................................... 30
Function Selection Table..................................................................... 30

ii
TABLE OF CONTENTS
Initial
Setup
5
Setup
Receive
6
Getting Started..................................................................................... 35
Setting the Dialling Mode (Tone/Pulse) ............................................. 35
Setting the Date and Time................................................................... 35
Setting the Station ID.......................................................................... 36
Entering T ext .................................................................................. 38
Inserting spaces .............................................................................. 38
Making corrections ......................................................................... 38
Repeating letters ............................................................................. 38
Special characters and symbols ...................................................... 38
Setting the Beeper Volume.................................................................. 39
PABX and TRANSFER...................................................................... 39
Setting PABX...................................................................................... 39
Setting the Clock Change ................................................................... 40
Setting the Speaker Volume ................................................................ 40
Setting the Ring Volume ..................................................................... 41
Memory Storage ................................................................................. 41
Basic Receiving Operations................................................................ 43
Select Answer Mode ........................................................................... 43
Manual Reception (Manual Mode)..................................................... 44
Automatic Fax Only Reception (Fax Mode) ...................................... 44
Setting the Ring Delay ........................................................................ 45
Setting the F/T (Fax/Tel) Ring Time (For Fax/Tel Mode Only)......... 45
Recording the Fax/Tel Outgoing Announcement (F/T MESSAGE)
(Only for MFC-740) ......................................................................... 46
Fax Detect ........................................................................................... 46
Printing a Reduced Incoming Document............................................ 47
Reception into Memory ...................................................................... 48
Advanced Receiving Operations ....................................................... 49
Operation from an External or Extension Telephone ......................... 49
For Fax/Tel Mode Only .................................................................. 49
Changing Remote Codes ................................................................ 50
To change Remote Codes........................................................... 50
Printing a Fax from Memory (Only for MFC-730) ............................ 50
Caller ID (Caller IDentification) (Only for the UK)........................... 51
Advantages of Caller ID ................................................................. 51
Set the Caller ID to ON....................................................................... 51
How Does the Caller ID Work? .......................................................... 52
The Caller ID Appears on the Display When Your Telephone
Rings............................................................................................. 52
Helpful Hints .............................................................................. 52
The Caller ID is Stored in Your Machine’s Memory...................... 52
Selecting a Caller ID from the Memory for Call Reply ..................... 53
To Activate Certain Network Services When Using Call Reply .... 54
Call Reply to DDI numbers via Caller ID ...................................... 54
Clearing the Caller ID Stored in Memory ...................................... 55
Printing Caller ID List .................................................................... 55

7
Setup
Send
Setup
Quick-Dial
Numbers
8
TABLE OF CONTENTS
Polling ................................................................................................. 55
Secure Polling................................................................................. 55
Setup for Polling Receive ............................................................... 55
Setup for Polling Receive with Secure Code ................................. 56
Setup Delayed Polling Receive ...................................................... 57
Sequential Polling........................................................................... 57
Setting PC Interface Mode.................................................................. 58
Before You Begin .................................................................................. 59
Resolution ........................................................................................... 60
Contrast ............................................................................................... 60
Automatic Transmission ..................................................................... 61
Manual Transmission.......................................................................... 61
Fax Redial ........................................................................................... 61
Dual Access......................................................................................... 61
Real Time Transmission ..................................................................... 62
Basic Sending Operations................................................................... 63
Composing an Electronic Cover Page ................................................ 63
Cover Page for Next Fax Only ....................................................... 63
Always Send Cover Page ............................................................... 64
Using a Printed Cover Page............................................................ 65
Cover Page Message ........................................................................... 65
Composing Your Own Comments .................................................. 65
Advanced Sending Operations .......................................................... 66
Overseas Mode ................................................................................... 66
Call Reservation.................................................................................. 66
Print Sample Call Back Message........................................................ 67
Delayed Transmission (T imer) ........................................................... 67
Broadcasting ....................................................................................... 68
Multiple Resolution Transmission...................................................... 69
Setup for Polling Transmit.................................................................. 70
Setup for Polling Transmit with Secure Code ................................ 70
Cancelling a Job While Scanning the Document................................ 71
Checking Job Status............................................................................ 71
Cancelling a Scheduled Job in Memory ............................................. 71
Interrupting Delayed Fax and Polling Transmit Jobs ......................... 72
Storing Numbers for Easy Dialling................................................... 73
Storing One Touch Dial Numbers....................................................... 73
Storing Speed Dial Numbers .............................................................. 74
Changing One Touch and Speed Dial Numbers ................................. 75
Setting Groups for Broadcasting......................................................... 75
iii

iv
9
TABLE OF CONTENTS
Telephone
(Voice)
Operation
Remote Fax
Options
(Only for MFC-730)
10
Copy
Operations
11
Making V oice Calls .............................................................................. 77
Manual Dialling .................................................................................. 77
Full-Duplex Digital Speakerphone (Only for MFC-740) ................... 77
One Touch Dialling............................................................................. 78
Speed Dialling..................................................................................... 78
Mute .................................................................................................... 78
Pause ................................................................................................... 78
On Hook Dialling................................................................................ 79
Searching Telephone Index................................................................. 79
Chain Dialling..................................................................................... 79
Tone/Pulse........................................................................................... 80
Fax/Tel Mode ...................................................................................... 80
Answering Calls with the Speaker Phone (Only for MFC-740)......... 80
Tel Key (Only for MFC-730).............................................................. 80
Fax Forwarding ................................................................................... 81
Programming a Fax Forwarding Number ........................................... 81
Setting Fax Storage.............................................................................. 82
Changing the Remote Access Code................................................... 82
Remote Retrieval.................................................................................. 83
Using Your Remote Access Code ................................................... 83
Remote Commands ........................................................................ 83
Change Fax Forwarding Setting................................................. 84
Retrieve a Fax ............................................................................ 84
Check the Receiving Status........................................................ 84
Change Answer Mode ................................................................ 84
Exit Remote Operation............................................................... 84
Retrieving the Memory Status List................................................. 85
Retrieving Fax Messages................................................................ 85
Changing the Fax Forwarding Number .......................................... 86
Basic Copy Operations........................................................................ 87
Copying One Page .............................................................................. 87
Making Multiple Copies ..................................................................... 88
Making Enlarged or Reduced Copies (Temporary Setting)................ 89
Copy Quality – Temporary Settings ................................................. 89
Using the Copy Quality Key............................................................... 90
Using the Paper Type Key .................................................................. 91
Using the Brightness Key ................................................................... 91
Copy Quality – Default Settings........................................................ 92
Changing Default Settings .................................................................. 92
Select Paper Type................................................................................ 94
Select Copy Quality ............................................................................ 95
Select Type of Original ....................................................................... 95
Colour Adjustment .............................................................................. 96

Message
Manager
(Only for MFC-740)
12
TABLE OF CONTENTS
Copy Brightness.................................................................................. 96
Copy Contrast ..................................................................................... 96
Selecting a Single Colour (One Colour) ............................................. 97
Memory Full Message......................................................................... 97
Legal Limitations ................................................................................. 98
Introduction.......................................................................................... 99
Message Manager Mode ..................................................................... 99
Flexible Memory Settings (Message Store)...................................... 100
Setting Up Message Manager ........................................................... 100
Setting the Message Store................................................................. 101
Recording the Message Manager’s Outgoing Message
(TAD MESSAGE) .......................................................................... 101
Listening to the Outgoing Message (OGM) ................................. 102
Erasing the Outgoing Message (OGM) ........................................ 102
Activating Message Manager Mode ................................................. 102
Message Indicator ............................................................................. 103
What Happens When the Memory Is Full... ................................. 103
Playing Voice Messages and Memos ................................................ 104
Printing a Fax Message..................................................................... 104
Backup Printing Option .................................................................... 105
Erasing Messages.............................................................................. 105
To erase voice messages individually ...................................... 105
To erase messages all at once ................................................... 106
Setting the Maximum Time for Incoming Messages........................ 106
Setting the Toll Saver........................................................................ 106
ICM Recording Monitor (Call Screening)........................................ 107
Recording a Memo............................................................................ 107
Recording a Conversation................................................................. 107
Fax Forwarding/Paging..................................................................... 108
Programming a Fax Forwarding Number..................................... 108
Recording the Paging Outgoing Message (OGM) ....................... 108
Programming the Paging Number ................................................ 109
Remote Retrieval ............................................................................... 109
Using the Remote Access Code........................................................ 110
Changing the Remote Access Code.................................................. 110
Remote Control Commands...............................................................111
Remote control commands........................................................111
Detail Operation ........................................................................111
Retrieving the Memory Status List................................................... 112
Retrieving Fax Messages .................................................................. 112
Changing the Fax Forwarding Number ............................................ 112
v

vi
13
14
15
16
TABLE OF CONTENTS
Using MFC
as Printer
Walk-Up
Video Printing
Printing
Reports
Setting Up the
MFC and
Computer to
Work Together
Features ............................................................................................... 115
Printer Driver..................................................................................... 116
Choosing the Right Kind of Paper.................................................. 116
Multi-purpose Sheet Feeder............................................................. 116
Loading Paper ................................................................................... 117
Manual Feed Slot .............................................................................. 118
Setup for Envelopes .......................................................................... 118
Simultaneous Printing/Fax............................................................... 119
Printer Operation Keys .................................................................... 119
On/Off Line Key ............................................................................... 119
Reset Key.......................................................................................... 120
Priority Key....................................................................................... 120
Ink Management Key........................................................................ 120
Turning Off Bi-directional Printing .................................................. 120
Getting Started................................................................................... 121
Auto Switch ...................................................................................... 122
Colour Video Printing....................................................................... 122
Black & White Video Printing......................................................... 123
Video Print Quality – Temporary Settings .................................... 123
Using the Copy Quality Key............................................................. 123
Using the Paper Type Key ................................................................ 124
Using the Brightness Key ................................................................. 125
Changing Default Settings................................................................ 125
Setting Paper Type ............................................................................ 126
Setting Video Printing Quality.......................................................... 127
Setting Video Type ............................................................................ 127
Setting Print Size .............................................................................. 128
Video Printing Colour Adjustment ................................................... 128
Video Printing Brightness................................................................. 129
MFC Settings and Journal ............................................................... 131
To Print a Report............................................................................... 132
Transmission Verification (Xmit) Report ......................................... 132
Journal Period ................................................................................... 132
Before You Begin ................................................................................ 135
Connecting the MFC to Your Computer ........................................... 135
Notice to PC User ............................................................................. 136
How to Attach the Filter Core to the Double Shielded Parallel
I/F Cable: .................................................................................... 136
Computer Requirements ................................................................... 137
Installing Drivers for your MFC -730 in Windows
Software / Drivers ............................................................................. 137
Installing MFC-730 Printer Driver................................................. 138
®
.................... 137

TABLE OF CONTENTS
If you are using Windows NT® W orkstation Version 4.0: ................ 138
If you are using Windows® 3.1 or 3.11:........................................... 140
If you are using Windows® 95 or 98: ................................................ 140
Installing Brother Drivers for your MFC-740 in Windows
Brother Drivers ................................................................................. 141
Installing Brother Drivers for your MFC-740 under Windows
Installing the Maintenance Utility on MS-DOS
Installing the MFC-740 Maintenance Utility for DOS ..................... 144
Using the MFC-740 Maintenance Utility for DOS .......................... 144
®
.......................... 143
®
...... 141
®
....... 142
vii
Optional
Accessories
17
(Only for MFC-740)
PC Printing
18
Memory Board ................................................................................... 147
Optional Memory for the Fax Operations......................................... 147
Installing the Optional Memory Board ............................................. 148
Printer Emulation.............................................................................. 151
Using the Maintenance Utility Program for Printing from DOS
(Only for MFC-740) ........................................................................ 151
Maintenance...................................................................................... 151
Data 1 ................................................................................................ 152
Data 2 ................................................................................................ 152
Using the Brother MFC-730/740 Printer Driver .......................... 152
The Paper Tab .................................................................................... 153
Paper Size ......................................................................................... 154
User Defined Paper Size ................................................................... 154
Paper Source ..................................................................................... 155
Feeder ........................................................................................... 155
Manual Feed ................................................................................. 155
Orientation ........................................................................................ 155
Scaling .............................................................................................. 155
2 in 1 ............................................................................................. 155
1 in N ............................................................................................ 155
Copies ............................................................................................... 156
Collate........................................................................................... 156
Reverse Order ............................................................................... 156
The Quality/Colour Tab.................................................................... 157
Quality .............................................................................................. 158
Media ................................................................................................ 158
Colour/Mono..................................................................................... 159
Colour ........................................................................................... 159
Mono............................................................................................. 159
Controlling the Colour ...................................................................... 159
Document.......................................................................................... 160
Custom Setting.................................................................................. 160
Colour Matching........................................................................... 160
Halftone Pattern............................................................................ 161
Effect ............................................................................................ 161

viii
2
2
TABLE OF CONTENTS
The Control/Maintenance Tab.......................................................162
Monitor Calibration ...................................................................... 163
Bi-Directional Printing ..................................................................... 163
Maintenance...................................................................................... 163
The Cleaning Tab.............................................................................. 163
Test Print....................................................................................... 163
Cleaning........................................................................................ 164
The Printer Adjustment Tab.............................................................. 164
Vertical Alignment ........................................................................ 164
Important
Information
19
Troubleshooting
and Maintenance
0
Important Safety Instructions ................................................... 165
BABT Approval............................................................................ 166
Radio Interference (220-240 V Model Only) ............................... 167
IMPORTANT -For Your Safety..................................................... 168
Disconnect device .................................................................... 168
Troubleshooting.................................................................................. 169
Error Messages ................................................................................. 169
Document Jam .................................................................................. 170
Printer Jam or Paper Jam .................................................................. 171
If You Are Having Difficulty with Your MFC .................................. 174
How to Improve Print Quality......................................................... 176
Test Print........................................................................................... 176
Cleaning the Print Head .................................................................... 177
Aligning Ink Cartridges .................................................................... 177
Turning Off Bi-directional Printing .................................................. 179
Packing and Shipping the MFC ...................................................... 180
Regular Maintenance ........................................................................ 183
Cleaning the Scanner ........................................................................ 183
Cleaning the MFC Printer Platen...................................................... 183
Cleaning the Pick-up Roller.............................................................. 184
Replacing the Ink Cartridges ............................................................ 184
Specifications
1
Product Description........................................................................... 189
Fax Specifications .............................................................................. 189
Printer Specifications ........................................................................ 190
Printing ............................................................................................. 190
Controller .......................................................................................... 191
Print Media ....................................................................................... 191
Compilation and Publication Notice................................................. 192
Trademarks ....................................................................................... 192
Glossary............................................................................................... 193
Index .................................................................................................... 199

CHAPTER ONE
Introduction
1
Using This Manual
Thank you for purchasing a Brother multifunction center (MFC).
1
This MFC has been designed to be simple to use, with LCD screen
prompts to guide you through functions. However, you can use your
MFC to its fullest potential by taking a few minutes to read this manual.
Additionally, your MFC has a Help Key for assistance. Press Help/
Broadcast to print a list of basic operational steps and functions.
Finding Information
All chapter headings and subheadings are listed in the Table of Contents.
You will also be able to find information about a specific feature or
function by checking the Index at the back of this manual. Also,
throughout this manual, you will see special symbols alerting you to
important information, cross-references, and warnings. Illustrations of
some screen displays also help you choose the correct key-presses.
2
CHAPTER ONE
Symbols Used In This Man ual
Note or additional information.
The MFC may be damaged or may not work
correctly if this is not observed.
Warning. Damage can result if this is not observed.
About Fax Machines
If you are a first-time fax machine user, fax operation might seem a little
mysterious. You will soon get used to the unusual fax tones on your
phone line, and be able to send and receive faxes easily.
Fax T ones and Handshake
When someone is sending a fax, the MFC sends fax calling tones, (CNG
tones)—soft, intermittent beeps at 4-second intervals. You will hear them
when you dial and press Start, and they continue for about 40 seconds
after dialling. During that time, the sending machine must begin the
“handshake” with the receiving machine. Each time you use automatic
procedures to send a fax, you are sending CNG tones over the phone
line. You will soon learn to listen for these soft beeps each time you
answer a phone on your MFC line, so you can know if you are about to
receive a fax message.
The receiving fax responds with fax receiving tones—loud, chirping
sounds. A receiving fax chirps for about 40 seconds over the phone line,
and the screen displays RECEIVING. If your MFC is set to the Fax
mode, it will answer every call automatically with fax receiving tones.
Even if the other party hangs up, your MFC continues to send the
“chirps” for about 40 seconds, and the screen continues to display
RECEIVING. To cancel the receiving mode, press Stop.

INTRODUCTION
When your MFC is in Fax/Tel mode, it answers with a short beep. After
this beep, the fax machine listens for CNG tones, and then responds with
receiving tones if the CNG tones are present. If it is a voice incoming
call, the MFC makes an attention sound.
The fax “handshake” is the time in which the sending machine’s CNG
tones and the receiving machines “chirps” overlap. This must be for at
least 2 to 4 seconds, so the fax machines can understand how each is
sending and receiving the fax. The handshake cannot begin until the call
is answered, and the CNG tones only last for about 40 seconds after the
number is dialled. Therefore, it is important for the receiving machine to
answer the call in as few rings as possible. We suggest 2 rings as the
standard setting.
When you have an external telephone answering device (T AD) on your
MFC line, your T AD will determine the number of rings before the call is
answered. Pay special attention to the directions in the Installation chapter
for connecting a TAD (or answering machine) to your MFC.
3
ECM (Error Correction Mode)
The Error Correction Mode (ECM) is a way for the MFC to check the
integrity of a fax transmission while it is in progress. ECM transmissions
are possible only between machines that both have the ECM feature. If
they do, you may send and receive fax messages that are continuously
checked for their integrity. Because of this you should send and receive
error free documents, thus avoiding the need to resend.
Sufficient memory must be available in your MFC for this feature to
work.
4
CHAPTER ONE
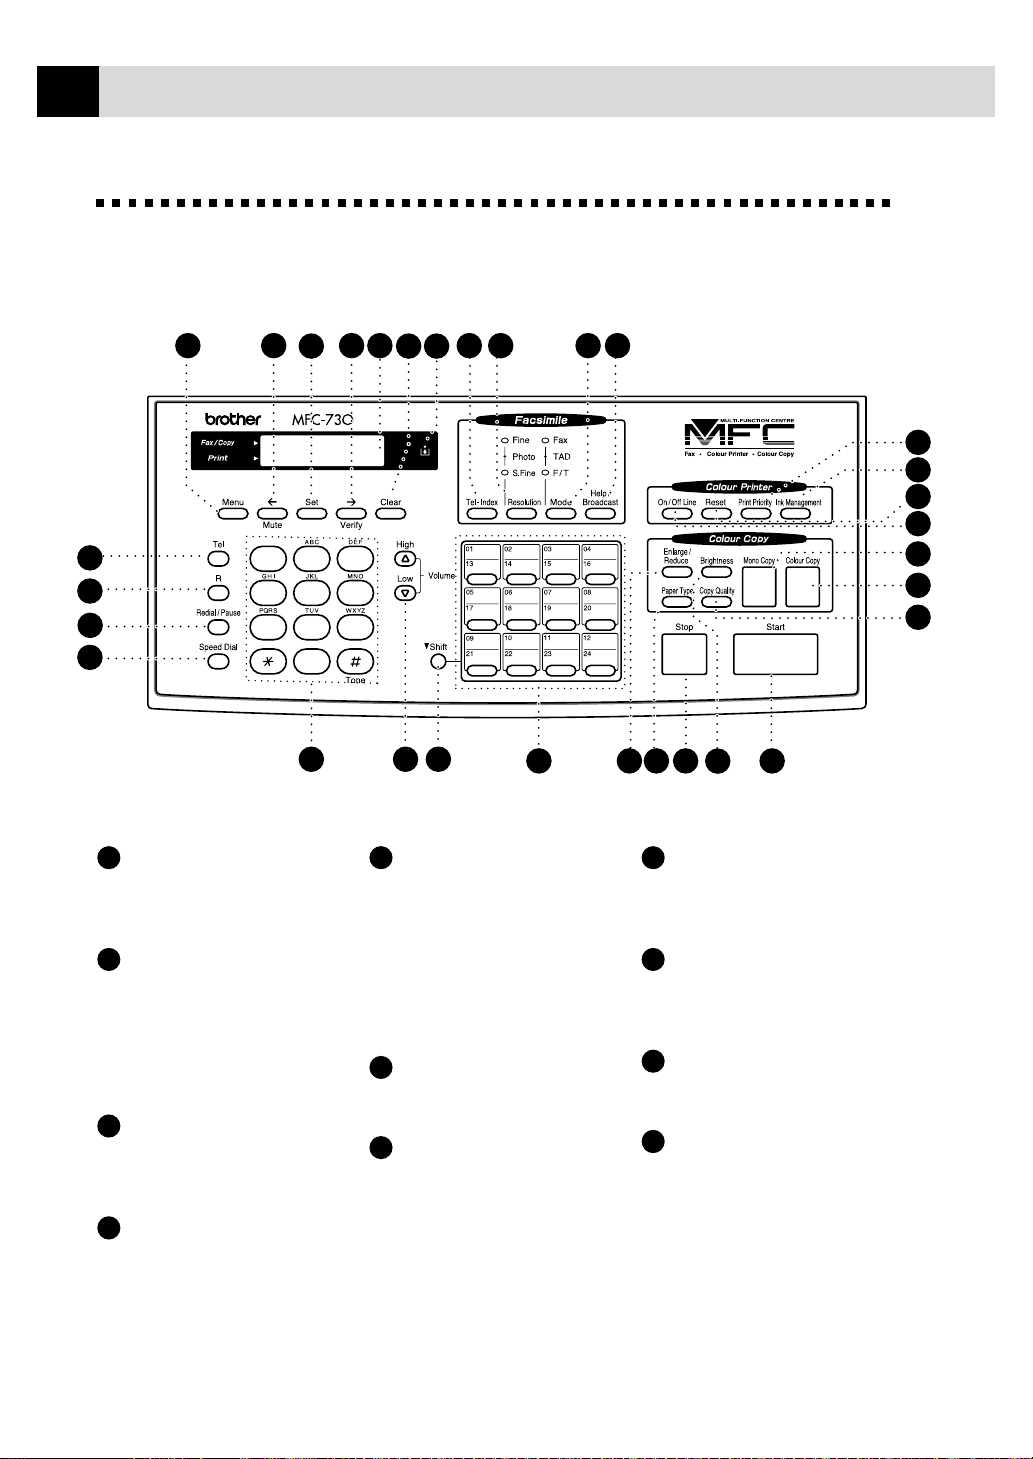
MFC-730 Control P anel Overview
29
status
status
1
2
3
4
1
Tel
Use to shuttle the line
between handset and monitor
speaker.
2
R (Recall)
Use this key to gain access
to an outside line and/or to
recall the operator or transfer
a call to another extension
when it is connected to a
PABX.
3
Redial / Pause
Redials the last number
called. Also inserts a pause
in autodial numbers.
4
Speed Dial
Lets you dial stored phone
numbers by pressing a twodigit number.
28 27
30 31
2
1
5
4
8
7
0
5 6 7
26
25
3
6
9
5
Dial Pad
Dials phone and fax
numbers, and can be used as
a keyboard for entering
information into the MFC.
# key lets you switch the
dialling type during a
telephone call from
“PULSE” to “TONE”.
6
V olume High / Lo w
Adjusts speaker and ring
volume.
7
Shift
Use to access memory
locations 13 through 24 in
the One Touch keys and the
Verify and Mute key.
21222324
20
19
18
17
16
15
14
8
11
9
13
8
One T ouch Keys
These 12 keys give you
instant access to previously
stored phone numbers.
9
Stop
Stops a fax, cancels an
operation, or exits from
function mode.
10
Start
Starts an operation, such as
sending a fax.
11
Enlarge/Reduce
Lets you reduce or enlarge
copies depending on the
ratio you select.
12
10

INTRODUCTION
5
12
Brightness
Lets you adjust the
brightness of the whole
image to be lighter or darker.
13
Paper T ype
Use this key to temporarily
change the paper type setting
for Copy and Video Printing
modes.
14
Copy Quality
Use this key to temporarily
change the quality and type
of original for Copy and
Video Printing modes.
15
Colour Copy
Makes a full-colour copy.
16
Mono Copy
Makes a black-and-white or
one-colour copy.
17
On/OffLine
Use this key to turn the
printer online (ready to
receive PC data) and offline
(not ready to receive PC
data) alternately. When the
printer is online, the LCD
displays ONLINE.
18
Reset
Clears data from the printer
memory, and then resets and
restores to the factory default
settings.
19
Ink Management
Cleans the ink print heads
and/or resets the ink dot
counter after replacing an
ink cartridge.
20
Priority
When you press this key the
MFC enters printer mode,
and will not print faxes on
paper. Instead, faxes are
stored in the memory until
you press Priority again.
21
Help/Broadcast
Press this key whenever you
want a quick reference Help
List printed. The Help List
shows how to perform
functions, how to register
information, and how to get
basic information. Also use
this key whenever you want
to broadcast faxes to many
different locations,
maximum of 130.
22
Mode
Use to select how the MFC
will handle incoming calls.
23
Resolution
Sets the resolution when you
send a fax.
24
Tel-Index
Lets you look up numbers
stored in the dialling
memory.
25
Ink Empty Indicator
Flashes when ink cartridge is
low and stays lit when ink is
empty.
26
Liquid Crystal
LCD displays messages to
help you set and operate
your MFC.
27
(Right Arr ow)
Verify
Moves the LCD cursor to the
right. When the machine is
idle, you can also use this
key to print the Transmission
Verification Report for your
last transmission.
28
(Left Arr ow)
Mute
Moves the LCD cursor to the
left. You can also use this
key to put calls on hold.
29
Menu
Lets you access the function
and programming mode.
30
27
Set
Stores a function setting in
the MFC.
31
Clear
Deletes entered data or backs
up one step in function
procedure.
6
CHAPTER ONE
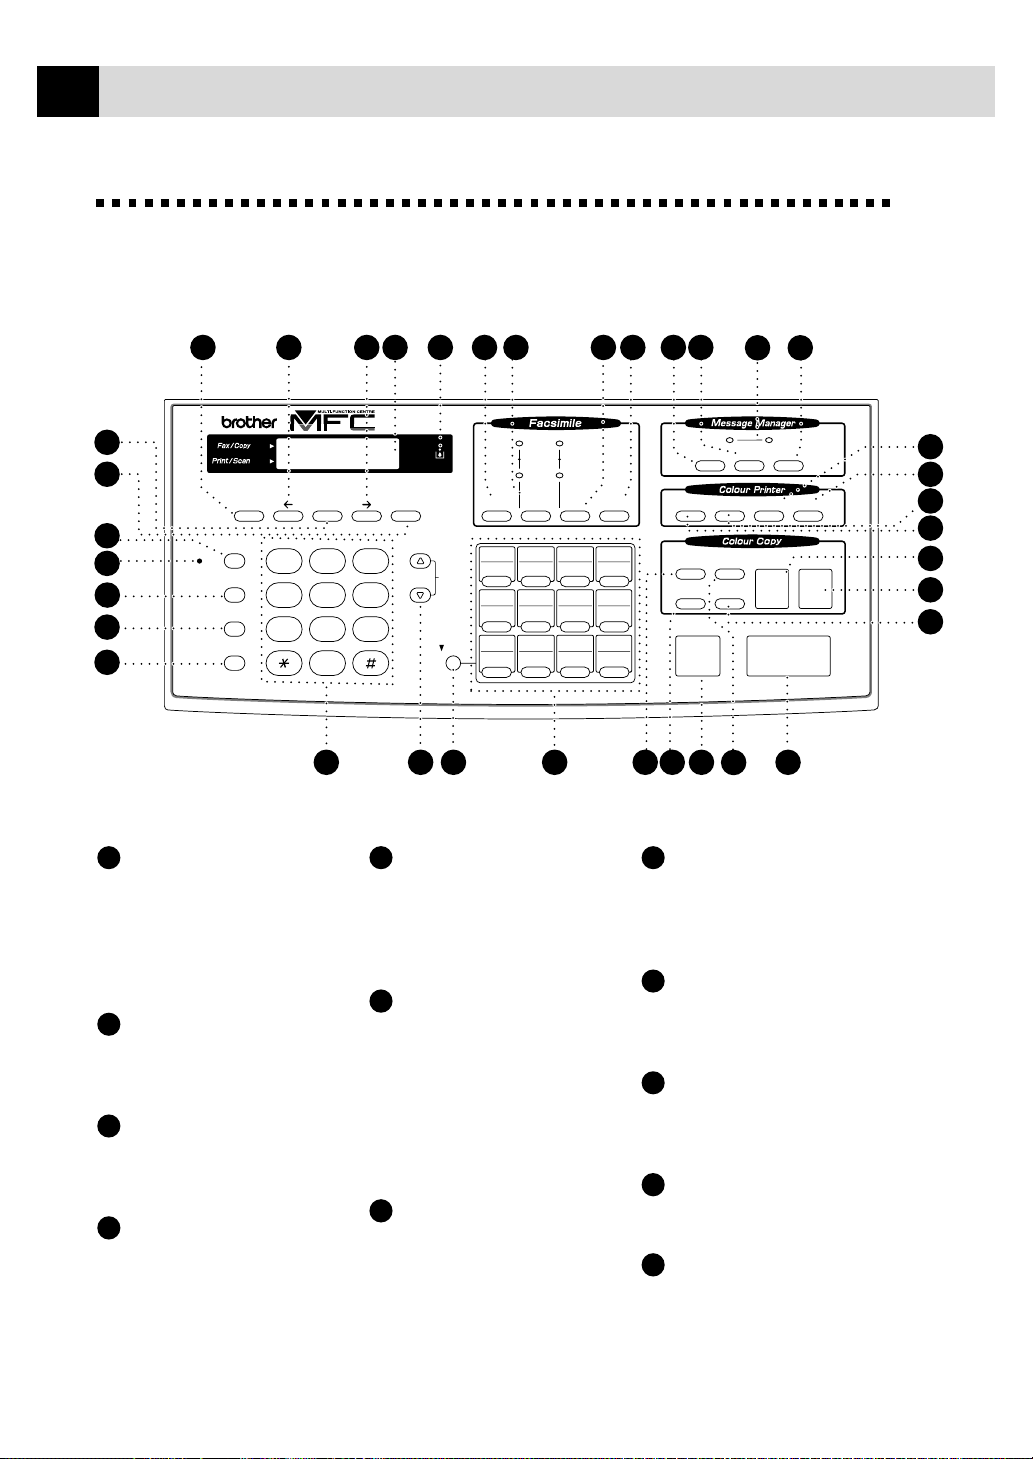
MFC-740 Control P anel Overview
34
35
status
status
36
1
2
3
MIC
R
Redial / Pause
Speed Dial
4
5
Speaker Phone
1
R (Recall)
Use this key to gain access
to an outside line and/or to
recall the operator or transfer
a call to another extension
when it is connected to a
PABX.
2
Microphone
Picks up your voice when
you speak to another party
using speaker phone.
3
Redial / Pause
Redials the last number
called. Also inserts a pause
in autodial numbers.
4
Speed Dial
Lets you dial stored phone
numbers by pressing a twodigit number.
33 32
VerifyMute
ABC DEF
2
1
GHI JKL MNO
5
4
PQRS TUV WXYZ
8
7
0
Tone
6 7
31 30 24 222526272829 23
74O
Resolution
Volume
Shift
Tel - Index
01
13
05
17
09
21
02
14 15
06
18
10
22 23 24
ClearMenu Set
High
3
Low
6
9
8
5
Speaker Phone
(Handsfree mode)
Lets you speak to the person
at the other end and dial
telephone and fax numbers
Fine
Photo
S.Fine
FAX
TAD
F / T
Mode
03
07
19 20
11
9
Help /
Broadcast
04
16
08
12
12
Voice
Record Erase Play
On / Off Line
Enlarge /
Reduce
Brightness
Copy Quality
Paper Type
Stop
14
10
8
Shift
Use to access memory
locations 13 through 24 in
the One Touch keys and the
Verify and Mute key.
without lifting the handset.
9
6
Dial Pad
Dials phone and fax
numbers, and can be used as
One T ouch Keys
These 12 keys give you
instant access to previously
stored phone numbers.
a keyboard for entering
10
information into the MFC.
# key lets you switch the
dialling type during a
telephone call from
“PULSE” to “TONE”.
7
V olume High / Lo w
Adjusts speaker and ring
volume. The speaker volume
is for message playback and
speaker phone conversation.
Stop
Stops a fax, cancels an
operation, or exits from
function mode.
11
Start
Starts an operation, such as
sending a fax.
12
Enlarge/Reduce
Lets you reduce or enlarge
copies depending on the
ratio you select.
Reset
13
Doc
Priority
Mono Copy
Start
11
Ink Management
Colour Copy
21
20
19
18
17
16
15

INTRODUCTION
7
13
Brightness
Lets you adjust the
brightness of the whole
image to be lighter or darker.
14
Paper T ype
Use this key to temporarily
change the paper type setting
for Copy and Video Printing
modes.
15
Copy Quality
Use this key to temporarily
change the quality and type
of original for Copy and
Video Printing modes.
16
Colour Copy
Makes a full-colour copy.
17
Mono Copy
Makes a black-and-white or
one-colour copy.
18
On/OffLine
Use this key to turn the
printer online (ready to
receive PC data) and offline
(not ready to receive PC
data) alternately. When the
printer is online, the LCD
displays ONLINE.
19
Reset
Clears data from the printer
memory, and then resets and
restores to the factory default
settings.
20
Ink Management
Cleans the ink print heads
and/or resets the ink dot
counter after replacing an
ink cartridge.
21
Priority
When you press this key the
MFC enters printer mode,
and will not print faxes on
paper. Instead, faxes are
stored in the memory until
you press Priority again.
22
Play
Lets you listen to voice
messages and outgoing
messages.
23
Message Indicator
Lights
Notify you that you have
voice or fax messages in the
memory.
24
Erase
Lets you delete voice
messages, and/or fax
messages from the memory.
25
Record
Lets you record Outgoing
Messages (OGM), memos
and telephone calls.
26
Help/Broadcast
Press this key whenever you
want a quick reference Help
List printed. The Help List
shows how to perform
functions, how to register
information, and how to get
basic information. Also use
this key whenever you want
to broadcast faxes to many
different locations,
maximum of 174.
27
Mode
Use to select how the MFC
will handle incoming calls.
28
Resolution
Sets the resolution when you
send a fax.
29
Tel-Inde x
Lets you look up numbers
stored in the dialling
memory.
30
27
Ink Empty Indicator
Flashes when ink cartridge is
low and stays lit when ink is
empty.
31
Liquid Crystal
LCD displays messages to
help you set and operate
your MFC.
32
(Right Arr ow)
Verify
Moves the LCD cursor to the
right. When the machine is
idle, you can also use this
key to print the Transmission
Verification Report for your
last transmission.
33
(Left Arr ow)
Mute
Moves the LCD cursor to the
left. You can also use this
key to put calls on hold.
34
Menu
Lets you access the function
and programming mode.
35
Set
Stores a function setting in
the MFC.
36
Clear
Deletes entered data or backs
up one step in function
procedure.

8
CHAPTER ONE
2
CHAPTER TWO
MFC Setup and
Connections
Packing List
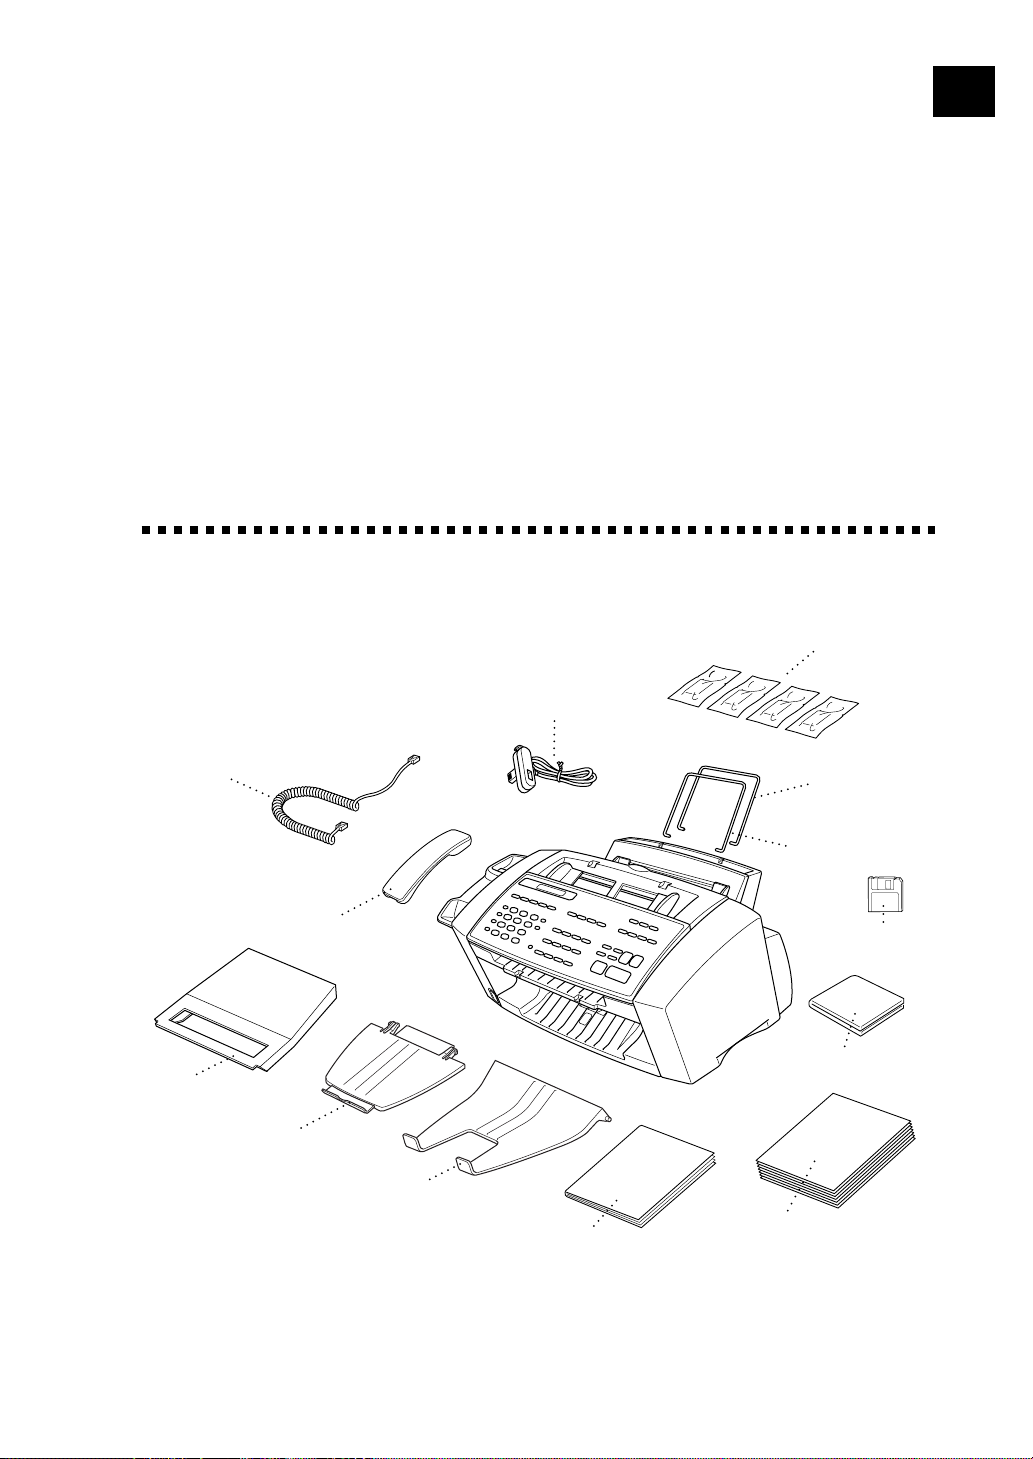
9
Handset
Curled Cord
Dust cover
Make sure you have the f ollowing items:
Telephone Handset
Document Tray
Paper Tray
Telephone
Line Cord
Owner’s Manual
Ink Cartridges
Paper Wire
Extension
Document
Wire Extension
Printer Drive
Floppy Disks**
Brother Colour Suite
1 CD-ROM*
Starter Coated Paper
(Ink Jet Paper)
* ... Only for MFC-740
** ... Only for MFC-730
Whenever you transport the MFC, use the packing materials that came
with your MFC and pack the MFC correctly.
10
CHAPTER TWO
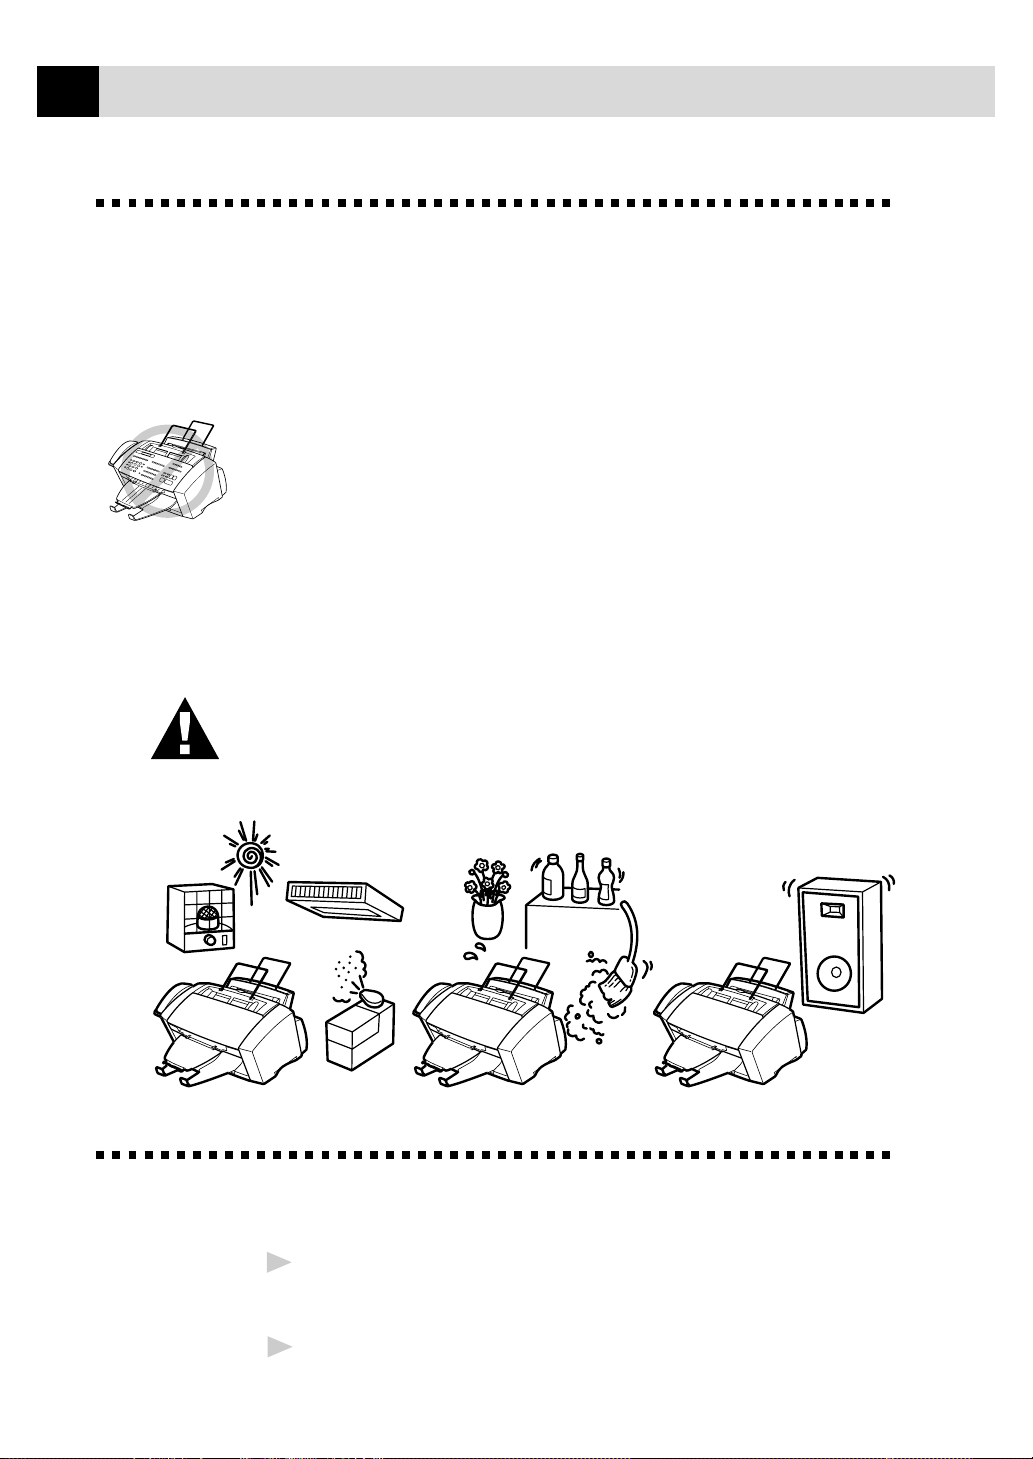
Choosing a Location
Place your MFC on a flat, stable surface, such as a desk. Select a place
that is free of vibration and shocks. Locate the MFC near a telephone
socket and a standard, earthed electrical socket. Choose a location where
the temperature remains between 10°C and 32°C (50°–90°F).
Avoid placing your MFC where it may be knocked. Do not place near
heaters, air conditioners, water, chemicals, or refrigerators. Do not
expose the MFC to direct sunlight, excessive heat, moisture, or dust. Do
not connect your MFC to electrical outlets controlled by wall switches or
automatic timers as disruption of power can wipe out information in the
unit’s memory. Do not connect your MFC to electrical outlets on the
same circuit as large appliances or other equipment that might disrupt the
power supply . Avoid interference sources, such as speakers or the base
units of cordless phones. Ensure the airflow from the fan on the right
hand side of the MFC is not impeded.
Caution
Keep the MFC out of strong light such as direct sunlight.
NO !
NO !
NO !
Caution
Never touch telephone wires or terminals that are not insulated
1
unless the telephone line has been disconnected at the network
interface.
Use caution when installing or modifying telephone lines.
2
Assembly
1
2
3
MFC SETUP AND CONNECTIONS
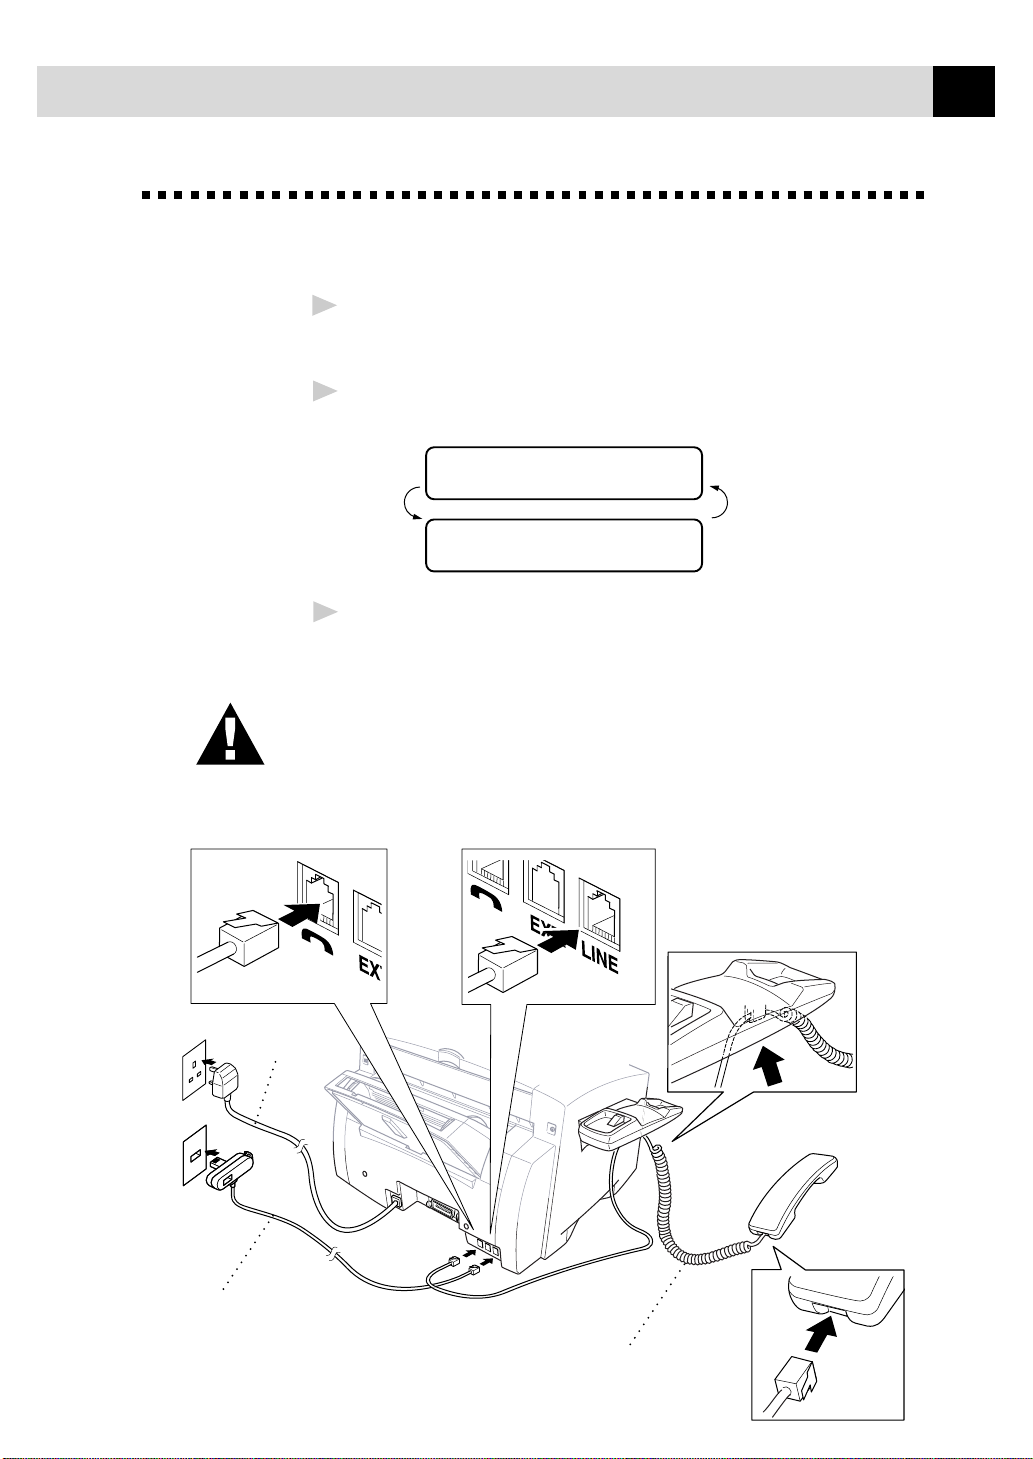
Connect the handset.
Connect the longer end of the curled handset cord to the MFC and
the shorter end to the handset.
Connect the power cord.
When you connect the power, the screen alternately displays
SET CARTRIDGES
OFFLINE
PLS OPEN COVER
OFFLINE
Connect the telephone line cord.
Connect one end of the telephone line cord to the socket on the MFC
and the other end to a modular wall socket.
11
Caution
Operating the MFC before you install the ink cartridges will permanently
damage the print head.
Power
Cord
Telephone
Line Cord
Handset
Curled Cord

12
CHAPTER TWO
NOTICE:
■ The MFC must be fitted with an earthed plug.
■ Since the MFC is earthed via the mains plug, you can protect
yourself from potentially hazardous electrical conditions on the
telephone network by keeping the power to your MFC on when you
connect it to a telephone line. Similarly, you can protect yourself
when you want to move your MFC, by disconnecting the telephone
line first, and then the power cord.
IMPORTANT:
If you need to remove the moulded mains plug in order to fit an appropriate
type, you must discard the moulded plug immediately having cut it off, in
order that it is not inadvertently inserted into a live socket, thus presenting a
shock hazard. The wires in the mains lead of this appliance are coloured in
accordance with the following code.
Green-and-yellow : Earth
Blue : Neutral
Brown : Live
As the wires in the mains lead of this apparatus may not correspond with the
coloured markings identifying the terminals in your plug, proceed as follows:
The wire which is coloured green-and-yellow must be connected to the
terminal in the plug which is marked by the letter “E” or by the safety earth
symbol or coloured green or green-and-yellow.
The wire which is coloured blue must be connected to the terminal which is
marked with the letter “N” or coloured black.
The wire which is coloured brown must be connected to the terminal which
is marked with the letter “L” or coloured red.
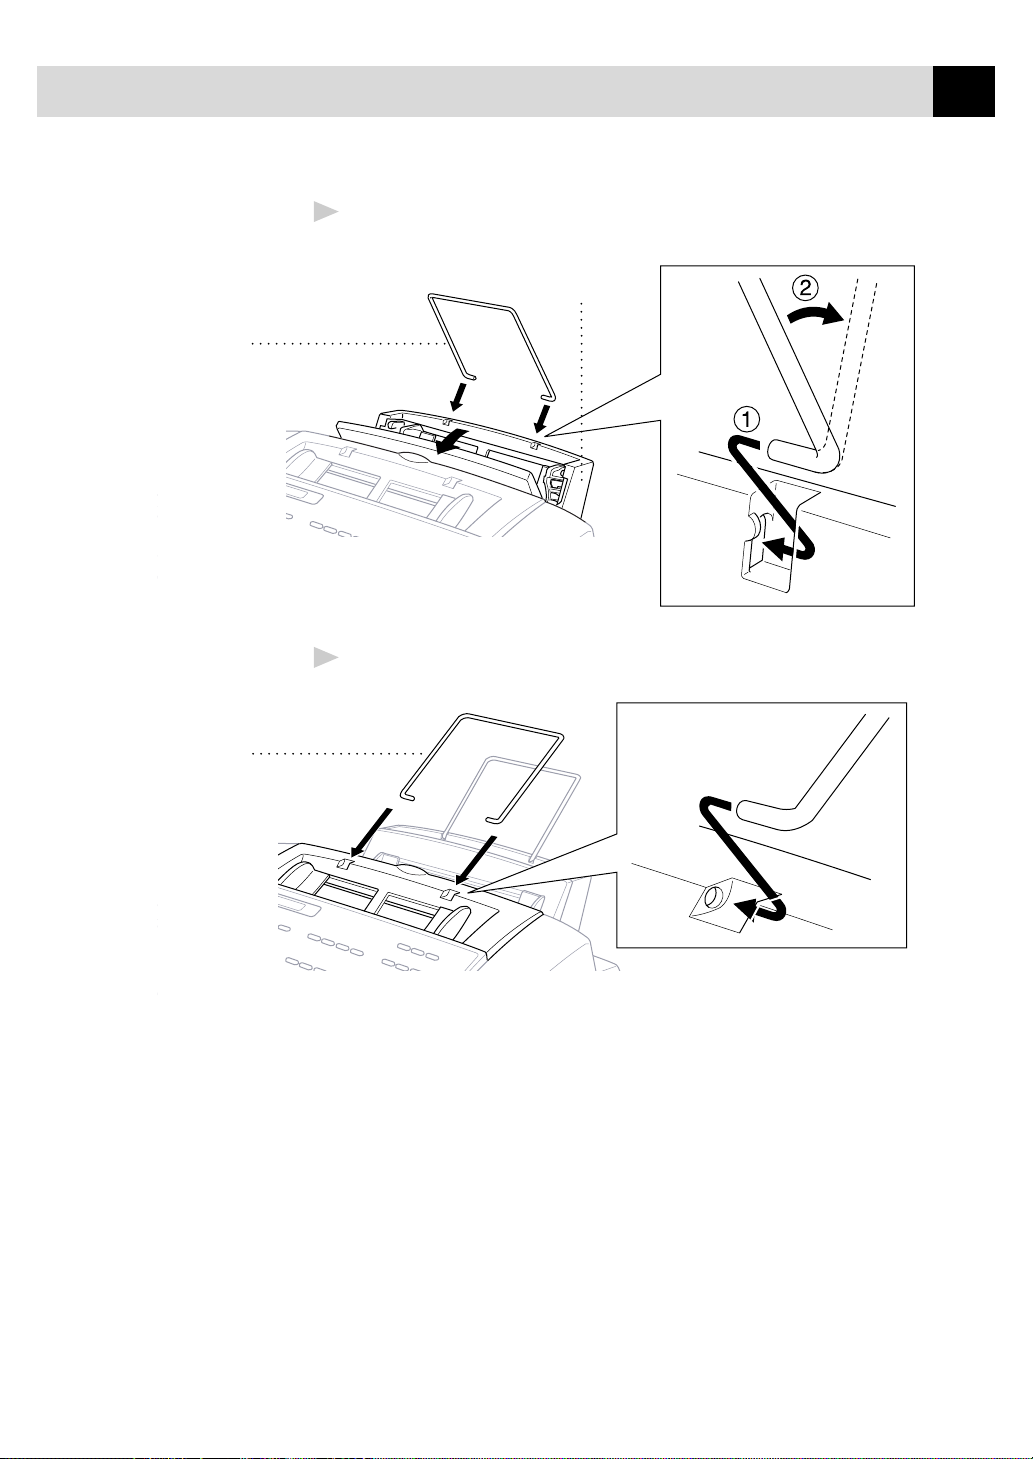
Paper Wire
Extension
MFC SETUP AND CONNECTIONS
Attach the paper wire extension to the multi-purpose sheet feeder.
4
Multi-purpose
Sheet Feeder
Attach the document wire extension.
5
13
Document
Extension
Wire
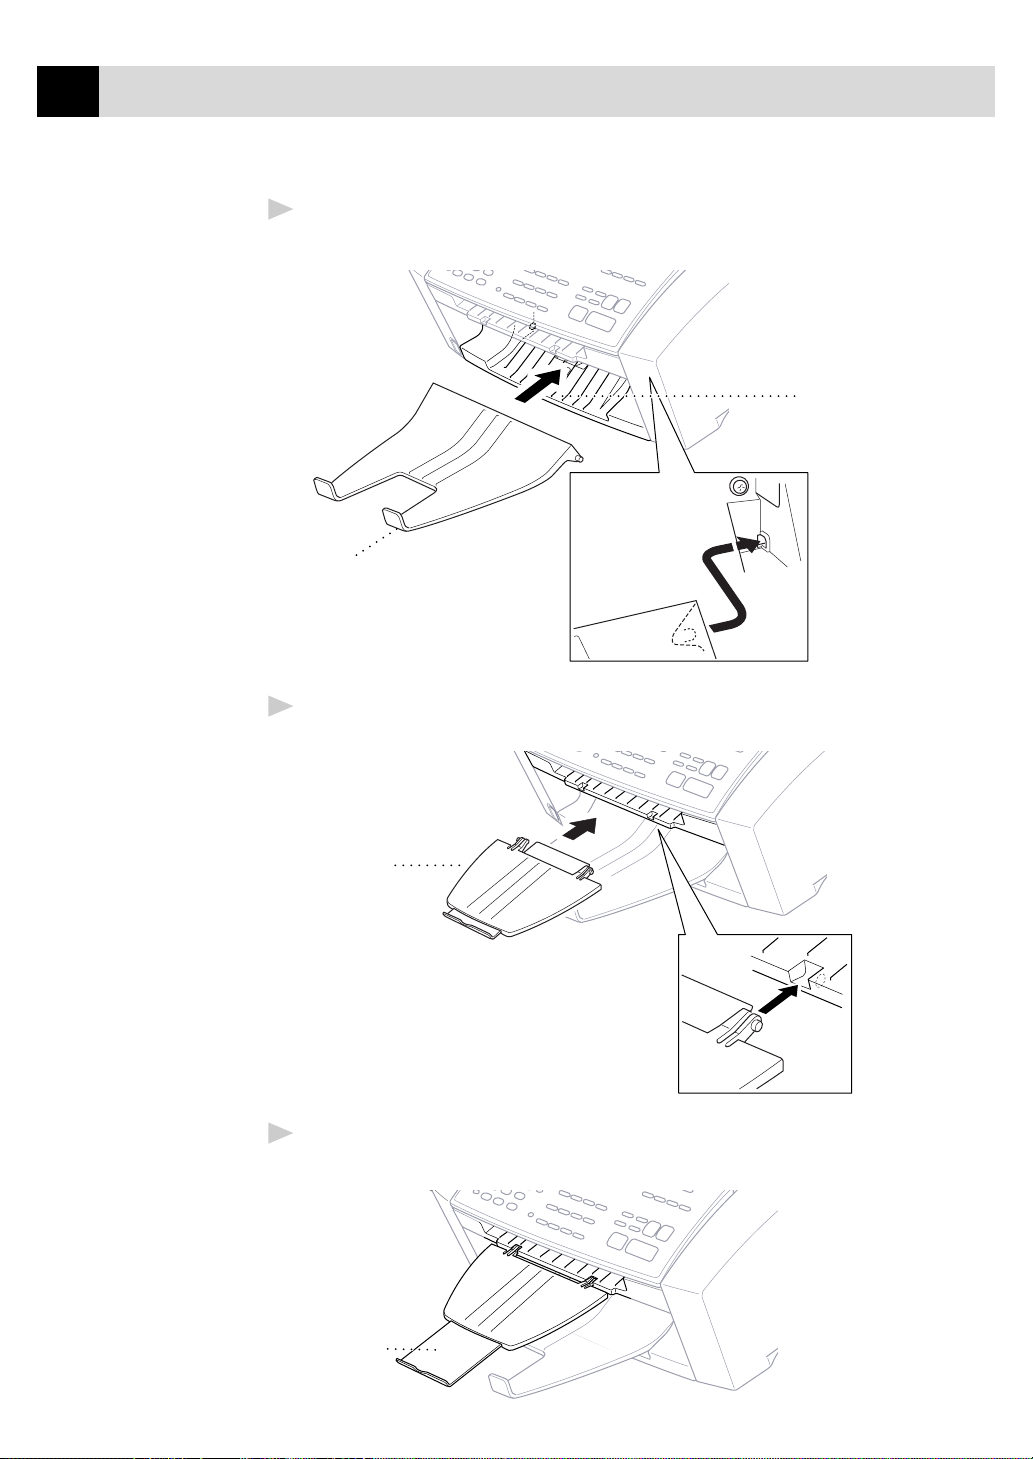
14
CHAPTER TWO
Attach the paper tray to the paper output slot to prevent paper
6
jams and maintain print quality.
Paper Tray
Paper
Output
Slot
Attach the document tray.
7
Document Tray
Pull out the plastic extension of the document tray.
8
Plastic
Extension

MFC SETUP AND CONNECTIONS
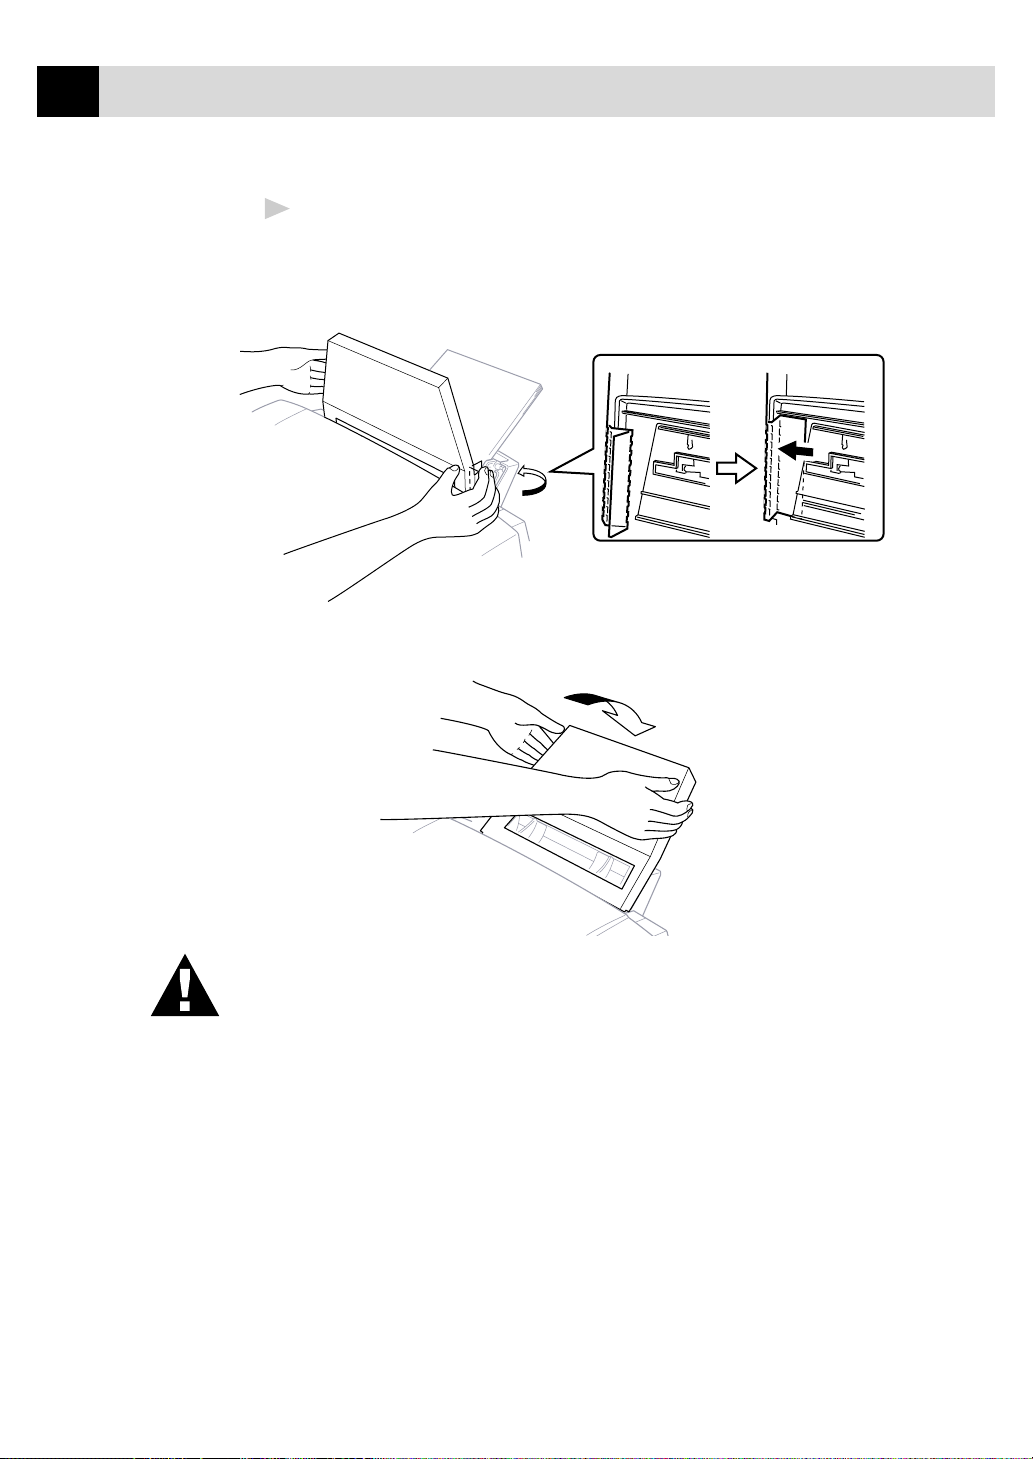
Loading paper in the multi-purpose sheet feeder (paper cassette).
9
A Open the multi-purpose sheet feeder cover.
Multi-purpose
Sheet Feeder
Cover
B Fan the paper well. Load the paper. Make sure the printing
surface is towards you and the paper level is stacked below the
paper guide line.
15
Paper
Guide
Line
C Adjust the guides to fit the paper width.
Guide
16
CHAPTER TWO
Attaching Dust Cover
10
A Attach the dust cover to the multi-purpose sheet feeder cover,
B Close the multi-purpose sheet feeder cover.
pressing the dust cover sides around the feeder until they snap into
place.
W ARNING
It is essential to keep the dust cover on your MFC to prevent dust from
entering the print mechanism. Using the dust cover on your MFC should
prolong the life of the print head.
MFC SETUP AND CONNECTIONS
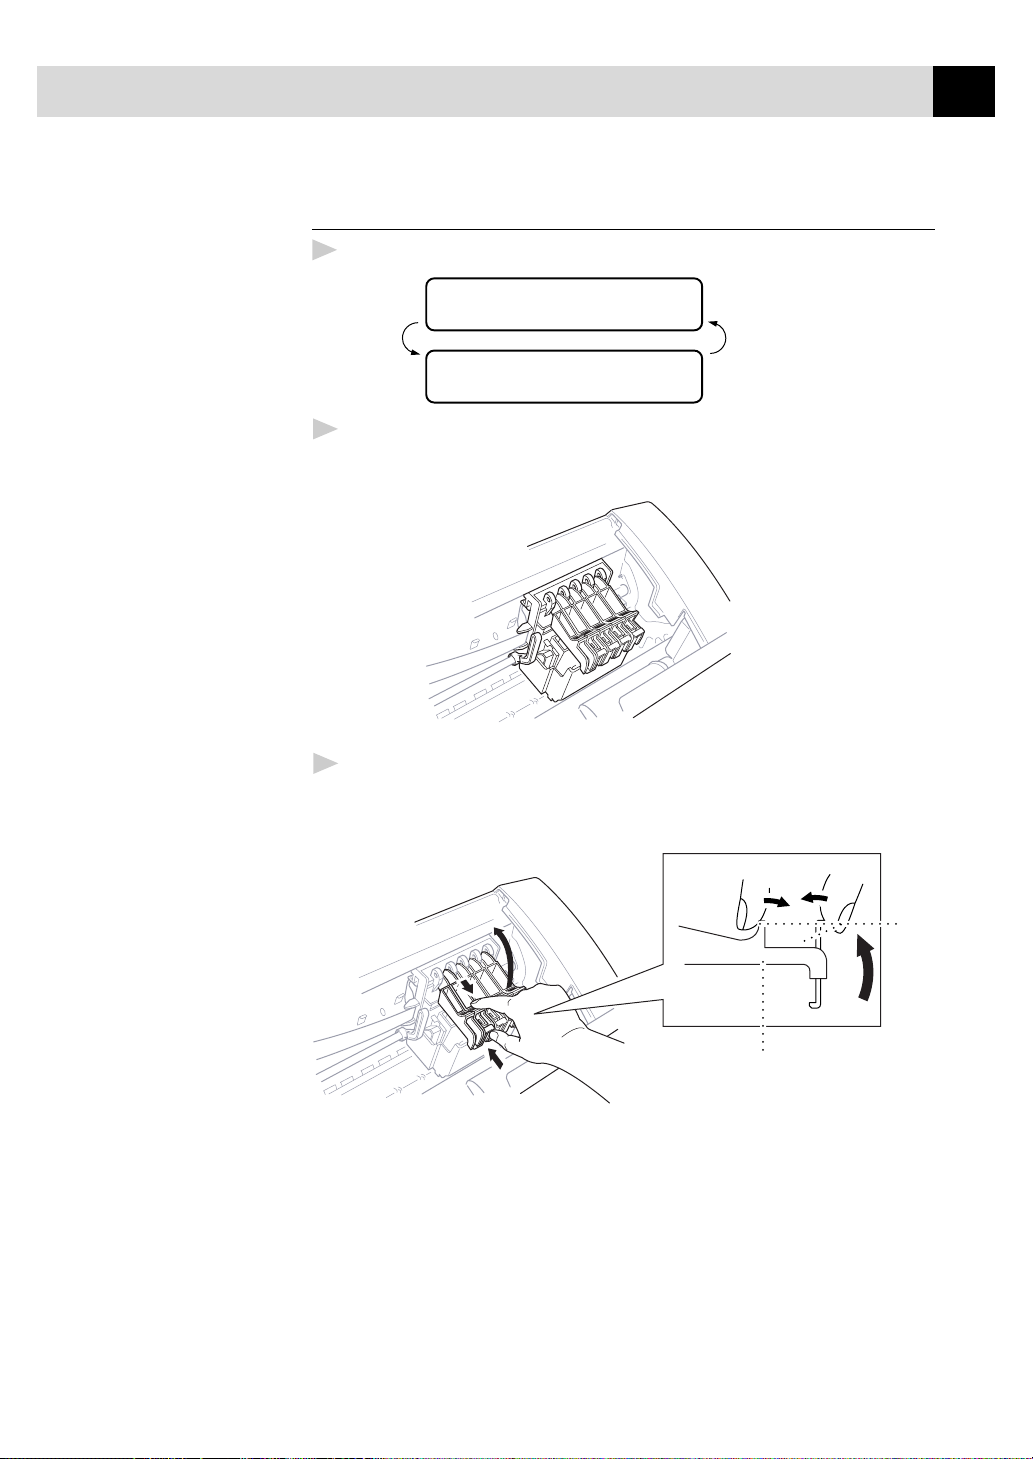
Installing the Ink Cartridges
Be sure that the power is on. The screen alternately displays
1
SET CARTRIDGES
OFFLINE
PLS OPEN COVER
OFFLINE
Open the top cover by pulling it toward you. The print head will
2
move left to its replacement position after a few seconds.
17
Open the ink cartridge cover by pinching the clip as shown in the
3
illustration.
Cartridge
Cover
Clip
18
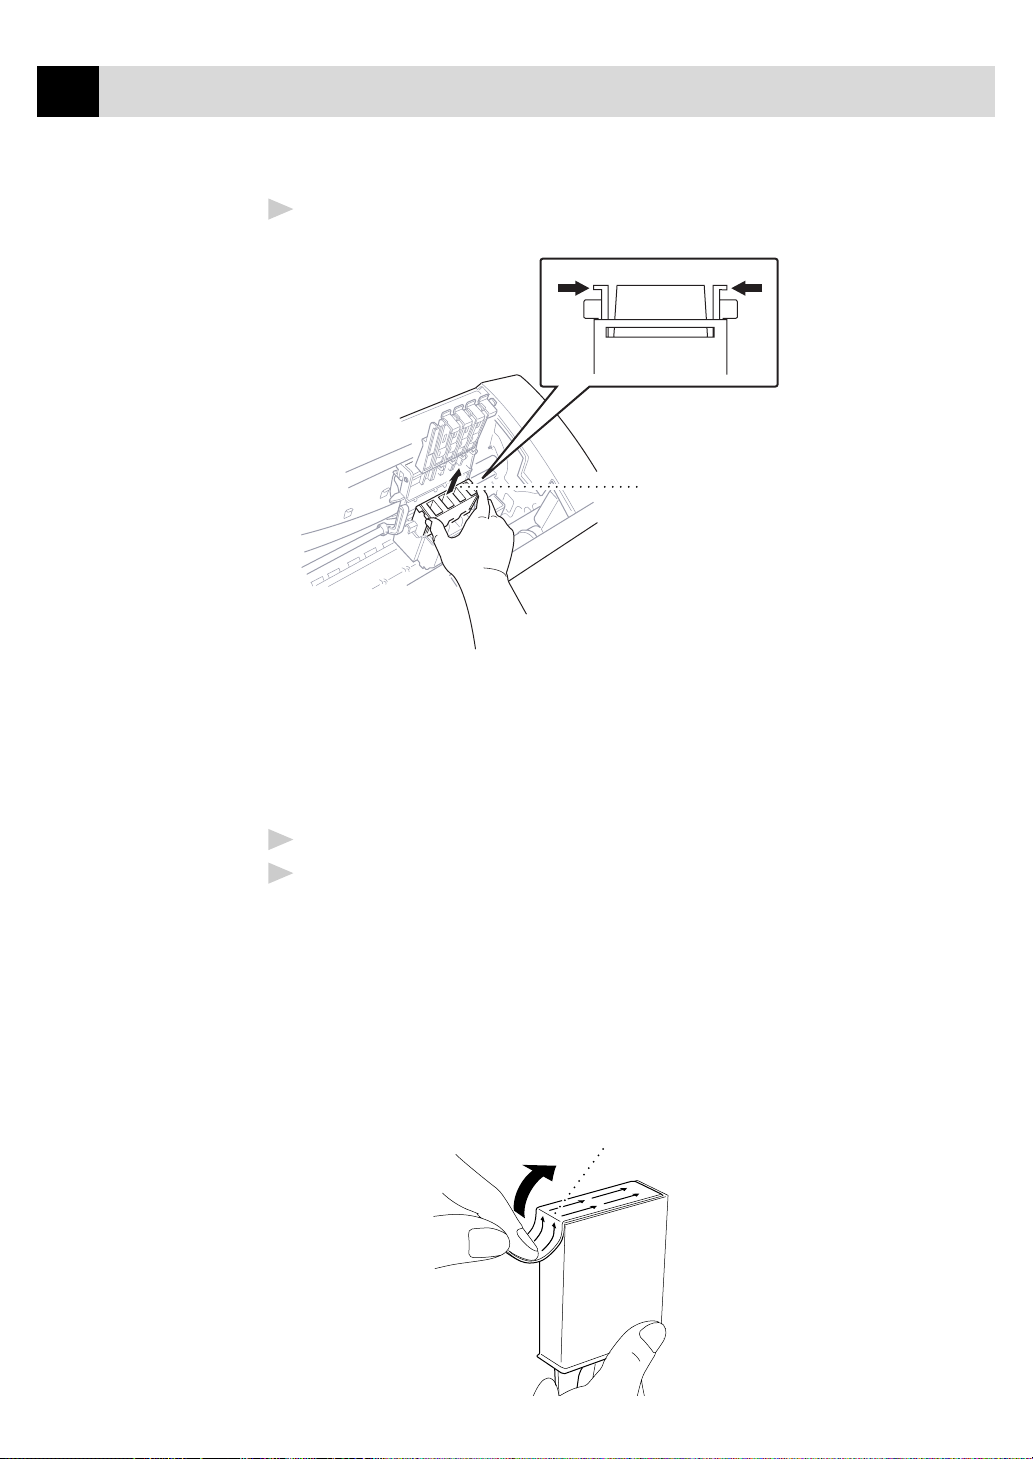
Yellow
Shipping
Cover
CHAPTER TWO
Remove the yellow shipping cover by lifting it up and out.
4
We recommend that you install the ink cartridges from left to right in
this order: Black, Yellow, Cyan, Magenta.
Keep the yellow shipping cover in a safe place. You will need it in the
future when you replace the print head.
Open the Black ink cartridge bag and remove the ink cartridge.
5
Carefully remove the sealing tape from the side of the ink cartridge.
6
Be sure to peel the tape from the side of the cartridge in the direction
away from you.
Important
To prevent spilling ink and staining your hands and clothing, remove the
sealing tape gently and slowly. Do not touch the ink opening on the
cartridge or the removed tape.
opening
 Loading...