


 Loading...
Brother HL-630, HL-630M, HL-631, HL-640, HL-641 User Guide
...Brother Laser Printer
HL-600 Series
User’s Guide
Click Here for Table of Contents
I

Shipment of the Printer
If for any reason you must ship your Printer, carefully package the Printer to avoid any damage during transit. It is recommended that you save and use the original packaging. The Printer should also be adequately insured with the carrier.
Warning
When shipping the Printer, the DRUM UNIT assembly including the TONER CARTRIDGE must be removed from the Printer and place it in the plastic bag. Failure to remove it and place it in the plastic bag during shipping, will cause severe damage to the Printer and will VOID THE WARRANTY.
1 Remove the drum unit.
2Place it in the plastic bag and fold the plastic bag under the drum unit.
3 Wrap it in the corrugated cardboard.
4 Re-pack the printer.
See “REPACKING THE PRINTER” in Chapter 5.
II
Laser Printer HL-600 Series User’s Guide
(For USA & CANADA Only)
For technical and operational assistance, please call:
In USA |
1-800-276-7746 (outside California) |
|
714-859-9700 (within California) |
In Canada |
1-800-361-6466 |
If you have comments or suggestions, please write us at:
In USA |
Printer Customer Support |
|
Brother International Corporation |
|
15 Musick |
|
Irvine, CA 92718 |
In Canada |
Brother International Corporation, Ltd. |
|
1, Rue Hôtel De Ville |
|
Dollard-des-Ormeaux P.Q. |
|
Canada H9B3H6 |
i
USER’S GUIDE
Trademarks
The brother logo is a registered trademark of Brother Industries, Ltd.
Apple, the Apple Logo, and Macintosh are trademarks, registered in the United States and other countries, and TrueType is a trademark of Apple Computer, Inc.
Epson is a registered trademark and FX-80 and FX-850 are trademarks of Seiko Epson Corporation.
Hewlett Packard is a registered trademark and HP LaserJet II, IIP, and IID are trademarks of Hewlett-Packard Company.
IBM, IBM PC, and Proprinter are registered trademarks of International Business Machines Corporation.
Microsoft and MS-DOS are registered trademarks of Microsoft Corporation. Windows is a registered trademark of Microsoft in the U.S. and other countries.
All other brand and product names mentioned in this User’s Guide are registered trademarks of their respective companies.
Compilation and Publication Notice
Under the supervision of Brother Industries Ltd., this manual has been compiled and published, covering the latest product’s descriptions and specifications.
The contents of this manual and the specifications of this product are subject to change without notice.
Brother reserves the right to make changes without notice in the specifications and materials contained herein and shall not be responsible for any damages (including consequential) caused by reliance on the materials presented, including but not limited to typographical and other errors relating to the publication.
©1994 Brother Industries Ltd.
ii

TABLE OF CONTENTS
TABLE OF CONTENTS
REGULATIONS |
v |
|
|
|
|
|
|
|
CHAPTER 1 INTRODUCTION |
|
|
|
|
||||
ABOUT THE GUIDEBOOKS |
1-1 |
|
|
|||||
Finding Out How to Use the Printer |
1-1 |
|
||||||
Definitions of Warnings, Cautions, and Notes |
1-1 |
|||||||
ABOUT YOUR PRINTER 1-2 |
|
|
||||||
Printer Overview |
1-2 |
|
|
|
||||
Features |
1-3 |
|
|
|
|
|
|
|
OPERATING AND STORAGE ENVIRONMENT |
1-5 |
|||||||
Power Supply |
1-5 |
|
|
|
|
|||
Environment |
1-5 |
|
|
|
|
|||
CHAPTER 2 PAPER HANDLING |
|
|
|
|||||
PAPER SPECIFICATIONS |
2-1 |
|
|
|||||
MULTI-PURPOSE SHEET FEEDER |
2-4 |
|
||||||
MANUAL FEED SLOT |
2-8 |
|
|
|
||||
OUTPUT TRAY AND PAPER SUPPORT WIRE |
2-10 |
|||||||
CHAPTER 3 CONTROL PANEL |
|
|
|
|||||
LAMPS |
3-1 |
|
|
|
|
|
|
|
READY Lamp |
|
3-1 |
|
|
|
|
||
DATA Lamp |
3-2 |
|
|
|
|
|||
MANUAL Lamp |
3-2 |
|
|
|
||||
ALARM Lamp |
|
3-2 |
|
|
|
|||
SWITCHES |
3-3 |
|
|
|
|
|
|
|
SELECT (RESET) switch |
3-3 |
|
|
|||||
SELECT Switch |
3-3 |
|
|
|
||||
RESET Switch |
3-4 |
|
|
|
||||
FF/CONT (TEST) switch |
3-4 |
|
|
|||||
FF/CONT Switch |
3-4 |
|
|
|||||
TEST Switch |
3-4 |
|
|
|
||||
OTHER CONTROL FEATURES |
3-5 |
|
||||||
Reprint Function |
3-5 |
|
|
|
||||
Sleep Mode |
|
3-5 |
|
|
|
|||
Test Print Mode |
3-6 |
|
|
|
||||
Reset/Hex Dump Mode |
3-7 |
|
|
|||||
iii
USER’S GUIDE
CHAPTER 4 OPTIONS |
|
|
|
|
|
|
|
|
|
SERIAL INTERFACE BOARD |
4-1 |
|
|
|
|
||||
Selecting the RS-422A or RS-232C Serial Interface |
4-2 |
||||||||
Setting the Serial Interface Parameters |
4-3 |
|
|
||||||
Connecting the Serial Interface Cable |
|
4-5 |
|
|
|||||
MEMORY BOARD |
4-6 |
|
|
|
|
|
|
||
CHAPTER 5 MAINTENANCE |
|
|
|
|
|
|
|||
REPLACING THE TONER CARTRIDGE |
5-1 |
|
|||||||
REPLACING THE DRUM UNIT |
5-5 |
|
|
|
|
||||
ADJUSTING THE PRINT DENSITY |
5-9 |
|
|
||||||
CLEANING THE PRINTER 5-10 |
|
|
|
|
|
||||
Cleaning the Printer Exterior |
5-10 |
|
|
|
|
||||
Cleaning the Printer Interior and Drum Unit |
5-11 |
|
|||||||
REPACKING THE PRINTER |
5-14 |
|
|
|
|
||||
CHAPTER 6 TROUBLESHOOTING |
|
|
|
|
|
|
|||
ALARM INDICATIONS AT A GLANCE |
6-1 |
|
|
||||||
Operator Calls |
6-1 |
|
|
|
|
|
|
||
Service Calls |
6-4 |
|
|
|
|
|
|
||
PAPER JAMS |
6-5 |
|
|
|
|
|
|
|
|
Q & A 6-8 |
|
|
|
|
|
|
|
|
|
Setting up the Printer Hardware |
6-8 |
|
|
|
|||||
Setting up the Printer for DOS |
6-8 |
|
|
|
|
||||
Setting up the Printer for Windows |
6-9 |
|
|
||||||
Setting up the Printer for Apple Macintosh Computers |
6-10 |
||||||||
Paper Handling |
|
6-11 |
|
|
|
|
|
|
|
Printing |
6-11 |
|
|
|
|
|
|
|
|
Print Quality |
6-13 |
|
|
|
|
|
|
||
APPENDICES |
|
|
|
|
|
|
|
|
|
PRINTER SPECIFICATIONS |
Appendix-1 |
|
|
||||||
Printing |
Appendix-1 |
|
|
|
|
|
|
||
Functions |
Appendix-2 |
|
|
|
|
|
|
||
Electrical and Mechanical |
Appendix-2 |
|
|
||||||
PARALLEL INTERFACE SPECIFICATION |
Appendix-3 |
||||||||
RESIDENT FONTS |
Appendix-4 |
|
|
|
|
|
|||
CHARACTER SETS |
Appendix-5 |
|
|
|
|
|
|||
INDEX Index-1
iv

REGULATIONS
REGULATIONS
Federal Communications Commission Compliance Notice (For USA Only)
This equipment has been tested and found to comply with the limits for a Class B digital device, pursuant to Part 15 of the FCC Rules. These limits are designed to provide reasonable protection against harmful interference in a residential installation. This equipment generates, uses, and can radiate radio frequency energy and, if not installed and used in accordance with the instructions, may cause harmful interference to radio communications. However, there is no guarantee that interference will not occur in a particular installation. If this equipment does cause harmful interference to radio or television reception, which can be determined by turning the equipment off and on, the user is encouraged to try to correct the interference by one or more of the following measures:
Reorient or relocate the receiving antenna.
Increase the separation between the equipment and receiver.
Connect the equipment into an outlet on a circuit different from that to which the receiver is connected.
Consult the dealer or an experienced radio/TV technician for help.
Important – About the Interface Cable
This printer has been certified to comply with FCC standards, which are applied to the U.S.A. only. A shielded interface cable should be used according to FCC 15.27(C). In addition, a grounded plug should be plugged into a grounded AC outlet after checking the rating of the local power supply for the printer to operate properly and safely.
Caution
Changes or modifications not expressly approved by Brother Industries, Ltd. could void the user’s authority to operate the equipment.
Laser Safety (For 110–120 V Model Only)
This printer is certified as a Class I laser product under the U.S. Department of Health and Human Services (DHHS) Radiation Performance Standard according to the Radiation Control for Health and Safety Act of 1968. This means that the printer does not produce hazardous laser radiation.
Since radiation emitted inside the printer is completely confined within protective housings and external covers, the laser beam cannot escape from the machine during any phase of user operation.
Radio Interference (For 220 - 240 V Model Only)
This apparatus complies with EN55022 (CISPR Publication 22) / Class B.
v

USER’S GUIDE
FDA Regulations
U.S. Food and Drug Administration (FDA) implemented regulations for laser products manufactured from August 2, 1976. These regulations apply to laser products manufactured from August 1, 1976. Compliance is mandatory for products marketed in the United States. The label shown on the back of the printer indicates compliance with the FDA regulations and must be attached to laser products marketed in the United States.
MANUFACTURED: BROTHER INDUSTRIES, LTD.
15-1 Naeshiro-cho Mizuho-ku Nagoya, 467 Japan
This product complies with FDA radiation performance standards, 21 CFR Subchapter J
Caution
Use of controls, adjustments or performance of procedures other than those specified in this manual may result in hazardous radiation exposure.
For Your Safety
To ensure safe operation the three-pin plug supplied must be inserted only into a standard three-pin power point which is effectively grounded through the normal household wiring.
Extension cords used with the equipment must be three-conductor and be correctly wired to provide connection to ground. Incorrectly wired extension cords are a major cause of fatalities.
The fact that the equipment operates satisfactorily does not imply that the power is grounded and that the installation is completely safe. For your safety, if in any doubt about the effective grounding of the power, consult a qualified electrician.
IEC 825 Laser Class (For 220–240 V Model Only)
CLASS 1 LASER PRODUCT.
APPAREIL Å LASER DE CLASSE 1.
LASER KLASSE 1
LUOKAN 1 LASERLAITE
KLASS 1 LASER APPARAT
KLASS 1 : LASER
KLASSE 1 LASER PRODUKT
For Finland and Sweden
Varoitus! Laitteen käyttäminen muulla kuin tässä käyttöohjeessa mainitulla tavalla saattaa altistaa käyttäjän turvallisuusluokan 1 ylittävälle näkymättömälle lasersäteilylle.
Varning – Om apparaten används på annat sätt än i denna Bruksanvisning specificerats, kan användaren utsättas för osynlig laserstrålning, som överskrider gränsen för laserklass 1.
vi

REGULATIONS
Disconnect device
The equipment must be installed near the socket outlet which must be easily accessible.
Manufactured at
Brother Industries Ltd.
Kariya Plant
1-5, Kitajizoyama, Noda-cho, Kariya-shi, Aichi-ken 448, Japan.
Kariya Plant is carried out under a Quality System which is registered by JQA Quality Assurance and BSI Quality Assuarance.
JQA Certificate of Registration No. 0340.
BSI Certificate of Registration No. FM27391
Canadian Department of Communications Compliance Statement
This digital apparatus does not exceed the Class B limits for radio noise emissions from digital apparatus as set out in the interference-causing equipment standard entitled “Digital Apparatus”, ICES-003 of the Department of Communications.
Avis de conformité aux normes du ministère des Communications du Canada
Cet appareil numérique respecte les limites de bruits radioélectriques applicables aux appareils numériques de Class B prescrites dans la norme sur le matériel brouilleur : “Appareils Numériques”, NMB-003 édictée par le ministère des Communications.
DECLARATION OF CONFORMITY (EUROPE)
We, Brother International Europe Ltd.,
Brother House 1 tame Street, Guide Bridge,
Audenshaw, Manchester M34 5JE, UK.
declare that this product is in conformity with the following normative documents:
Safety: |
EN 60950, |
EN 60825 |
EMC: |
EN 55022 Class B, |
EN 50082-1 |
following the provisions of the Low Voltage Directive 73/23/EEC and the Electromagnetic Compatibility Directive 89/336/EEC (as amended by 91/263/EEC and 92/31/EEC).
Manufacture at the following facilities is carried out under a Quality System which is registered by BSI Quality Assurance and JQA Quality Assurance.
Brother Industries, Ltd., Kariya Plant
1-5, Kitajizoyama, Noda-cho, Kariya-shi, Aichi-ken 448, Japan.
BSI Certificate of Registration No. FM27391
JQA Certificate of Registration No. 0340
Issued by:
Brother International Europe Ltd.
European Development and Technical Services Division
vii
USER’S GUIDE
IMPORTANT (For U.K. only)
If the power cord supplied with this printer is not suitable for your electrical outlet, remove the plug from the mains cord and fit an appropriate three pin plug. If the replacement plug is intended to take a fuse then fit the same fuse as the original.
If a moulded plug is severed from the power cord then it should be destroyed because a plug with cut wires is dangerous if plugged into a live socket outlet. Do not leave it where a child might find it.
In the event of replacing the plug fuse, fit a fuse approved by ASTA to BS1362 with the same rating as the orginal fuse.
Always replace the fuse cover. Never use a plug with the cover omitted.
WARNING - THIS PRINTER MUST BE PROPERLY EARTHED.
The wires in the mains cord are cololured in accordance with the following code:
Green and yellow : |
Ground |
Blue : |
Neutral |
Brown : |
Live |
The colours of the wiring in the power lead of this printer may not correspond with the markings which identify the terminals in your plug. If you need to fit a different plug, proceed as follows.
Remove a length of the cord outer sheath, taking care not to damage the coloured insulation of the wires inside.
Cut each of the three wires to the appropriate length. If the construction of the plug permits, leave the green and yellow wire longer than the others so that, in the event that the cord is pulled out of the plug, the green and yellow wire will be the last to disconnect.
Remove a short section of the coloured insulation to expose the wires.
The wire which is coloured green and yellow must be connected to the terminal in the plug which is marked with the letter “E” or by the earth symbol or coloured green or green and yellow.
The wire which is coloured blue must be connected to the terminal which is marked with the letter “N” or coloured black or blue.
The wire which is coloured brown must be connected to the terminal which is marked with the letter “L” or coloured red or brown.
The outer sheath of the cord must be secured inside the plug. The coloured wires should not hang out of the plug.
viii
CHAPTER 1 INTRODUCTION
CHAPTER 1
INTRODUCTION
ABOUT THE GUIDEBOOKS
Finding Out How to Use the Printer
You have three guidebooks for this printer. Read each guidebook in the following order:
1.Read the Quick Setup Guide to set up your printer and connect it to your computer.
2.Read the Software Setup Guide to set up your computer for your printer by installing the printer driver, fonts and Remote Printer Console Program.
3.Read the User’s Guide to get information about the following.
•Features and operating environment requirements of your printer – Chapter 1
•Paper Handling – Chapter 2
•Control Panel – Chapter 3
•Options – Chapter 4
•Maintenance – Chapter 5
•Troubleshooting – Chapter 6
•Specifications – Appendices
•Index
Definitions of Warnings, Cautions, and Notes
The following conventions are used in this User’s Guide:
Warning
Indicates warnings that must be observed to prevent possible personal injury or damage to the printer.
Caution
Indicates cautions that must be observed to use the printer properly.
Note
Indicates notes and useful tips to remember when using the printer.
1–1
USER’S GUIDE
ABOUT YOUR PRINTER
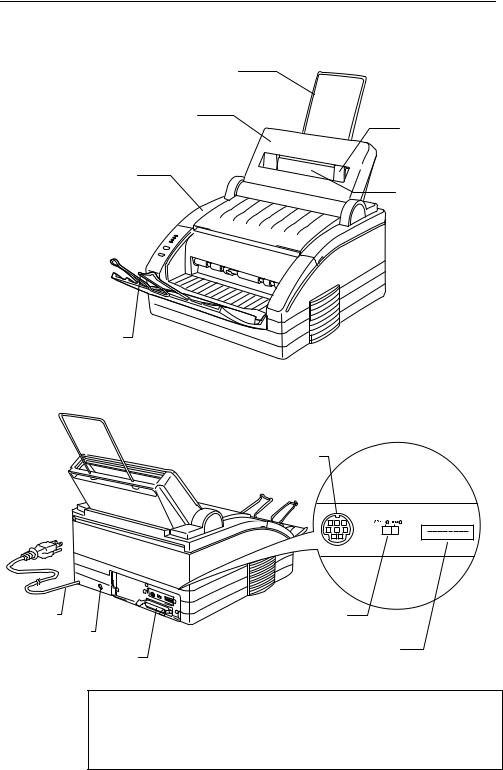
Printer Overview
Paper Support
Multi-Purpose Sheet Feeder
Paper Guide
Top Cover
Manual Feed Slot
Control Panel 
Output Tray 
Paper Support Wire
Fig. 1-1 Front View
RS-422A/RS-232C
Serial Interface
ON 


1 2 3 4 5 6 7 8
Power Cord |
Slide Switch |
Print Density Dial |
|
DIP Switches
Parallel Interface Port
Fig. 1-2 Rear View
Note (*)
RS-422A/RS-232C Serial Interface Port, RS-422A/RS-232C Slide Switch and DIP Switches for Serial are optionally available. Some models have these options pre-installed.
1–2
CHAPTER 1 INTRODUCTION
Features
This printer has the following features:
300 dpi Resolution and 6ppm Printing Speed
300 dots per inch (dpi) with microfine toner and six pages per minute (ppm) printing speed (A4 or Letter paper).
Versatile Paper Handling
The printer has a multi-purpose sheet feeder and straight paper path mechanism. Using this mechanism, you can load A4, letter, legal, B5, A5 and executive sizes of paper, and various types of paper including envelopes, postcards, organizer paper, and your custom paper size. The multi-purpose sheet feeder also allows manual paper loading, so you can also use labels and transparencies.
Windows® Printing
The dedicated printer driver and TrueType™-compatible fonts for Microsoft® Windows 3.1 are available on the floppy disk supplied
with your printer. You can easily install them into your Windows system using our installer program. The driver supports our unique compression mode to enhance printing speed in Windows applications, and allows you to set various printer settings including economy printing mode, custom paper size and sleep mode settings.
Remote Printer Console Program for DOS
The utility program, Remote Printer Console (RPC), is available on a floppy disk supplied with your printer. When you operate your computer in the DOS (Disk Operating System) environment, this program allows you to easily change the default settings of the printer such as fonts, page setup, emulations and so on.
This program also provides a status monitor program, which is a Terminate-and-Stay Resident (TSR) program. It can monitor the printer status while running in the background and report the current status or errors on your computer screen.
Popular Printer Emulation Support
This printer supports three printer emulation modes, HP LaserJet IIP, Epson FX-850, and IBM Proprinter XL. When you use DOS application software or Windows version 3.0 or earlier, you can use any of these emulations to operate the printer. The printer also supports Auto-emulation switching between HP and Epson or HP and IBM. If you want to set the printer emulation, you can do it using the Remote Printer Console Program.
1–3
USER’S GUIDE
Bi-Directional Parallel Interface
The parallel interface of this printer allows bi-directional communication with a computer. This interface allows the printer to communicate back to the computer useful information such as the amount of memory installed, and other printer setup conditions. As the supplied Remote Printer Console or Windows 3.1 driver both support the bi-directional mode, they can both report the printer status.
Optional Apple Macintosh Interface (Pre-installed in some countries)
The optional Apple Macintosh serial interface kit is available, which allows your printer to be connected to Apple Macintosh computers. With this option, you can use your printer with both an IBM PC, or compatible and an Apple Macintosh at the same time. This optional interface board can be used as an RS-422A interface for Macintosh or an RS-232C serial interface for IBM PC or compatible.
Enhanced Memory Management
The printer has its own Data Compression Technology, which can automatically compress graphic data and download font data efficiently into the printer’s memory. You can avoid memory errors and print most full page 300 dpi graphic and text data, including larger fonts, with the printer’s standard memory.
Environmentally Friendly Economy Printing Mode
This feature will cut your printing cost by around 50% by saving toner. This feature is useful when draft copies are used for proofreading. You can select this mode on/off through the Remote Print Console software or Windows printer driver supplied with your printer.
Sleep Mode
Sleep mode automatically reduces power consumption when the printer is not in use. The printer consumes less than 10W when in sleep mode.
Low Running Cost
The toner cartridge is separate from the Drum Unit. You need to replace only the toner cartridge after around 3,000 pages, which is cost effective and ecologically friendly.
1–4

CHAPTER 1 INTRODUCTION
OPERATING AND STORAGE ENVIRONMENT
Please take note of the following before using the printer.
Power Supply
Use the printer within the specified power range.
AC power: ±10% of the rated power voltage in your district
Frequency: 50 Hz (220 V– 240 V) or 60 Hz (110–120 V)
The power cord, including extensions, should not exceed 5 meters (16.5 feet).
Do not share the same power circuit with other high-power appliances, particularly an air conditioner, copier, shredder and so on. If it is unavoidable that you must use the printer with these appliances, it is recommended that you use a voltage transformer or a high-frequency noise filter.
Use a voltage regulator if the power source is not stable.
Environment
The printer should be installed near a power outlet, which is easily accessible.
Use the printer only within the following ranges of temperature and humidity.
Ambient temperature: |
10°C to 32.5°C (59°F to 90.5°F) |
Ambient humidity: |
20% to 80% (without condensation) |
Ventilate the room where you use the printer.
Place the printer on a flat, horizontal surface.
Keep the printer clean. Do not place the printer in a dusty place.
Do not place the printer where the ventilation hole of the printer is blocked.
Do not place the printer where it is exposed to direct sunlight. Use a blind or a heavy curtain to protect the printer from direct sunlight when the printer is unavoidably set up near a window.
Do not place the printer near devices that contain magnets or generate magnetic fields.
Do not subject the printer to strong physical shocks or vibrations.
Do not expose the printer to open flames or salty or corrosive gasses.
Do not place objects on top of the printer.
Do not place the printer near an air conditioner.
Keep the printer horizontal when carrying.
1–5
USER’S GUIDE
1–6

CHAPTER 2 PAPER HANDLING
CHAPTER 2
PAPER HANDLING
PAPER SPECIFICATIONS
The printer can handle paper that has the following specifications.
Paper Type |
Paper Size |
Paper Weight |
Sheet |
Manual |
|
|
|
Feeder |
|
Cut sheet |
A4, Letter, Legal, B5, A5, |
|
● |
● |
|
Executive, Custom size |
60-135 g/m2 |
|
|
|
70-216 x 127-356 mm, |
(16-36 lbs) |
|
|
|
2.75-8.5 x 5-14 inches |
|
|
|
Envelopes |
DL, C5, COM-10, |
|
● |
● |
|
Monarch |
|
|
|
Organizer |
Day-Timer® , J,K,L,M |
|
● |
● |
|
70-216 x 127-356mm |
|
|
|
|
2.75-8.5 x 5-11 inches |
|
|
|
Labels |
70-216 x 127-356 mm, |
|
|
● |
Trans- |
2.75-8.5 x 5-14 inches |
|
|
● |
parencies |
|
|
|
|
Paper Capacity in Feeder Multi-purpose
Sheet Feeder : Up to 22 mm (0.87 inch) in Height ( below the mark. ) Approx. 200 sheets of 75 g/m2 (20 lbs) A4/Letter paper or 10 envelopes
Output Tray : Approx. 100 sheets of 75 g/m2 (20 lbs) A4/Letter paper
Remarks It is recommended that you test paper, especially special sizes and types of paper, on this printer before purchasing large quantities.
Avoid feeding labels with carrier sheets exposed, or your printer will be damaged.
Use a recommended type of paper, especially plain paper and transparencies, for optimum printing. For more information on paper specifications, consult your nearest authorised sales representative or the place of purchase of your printer.
We recommend you use label or transparancies which are designed for laser printer.
We recommend you use long-grained paper for the best print quality.
If the paper will not load from the multi-purpose sheet feeder, use the manual feed slot and try again.
2–1
USER’S GUIDE
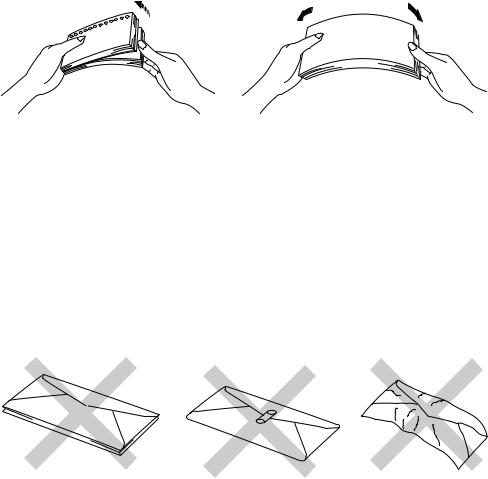
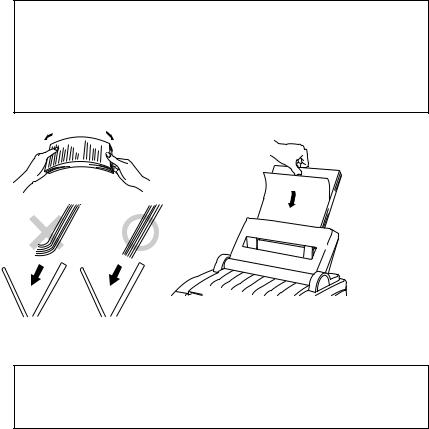
Before using paper with holes such as organizer sheets, you must fan the stack well to avoid the paper jams and misfeeds.
Before using any paper, make sure that it has no curl. If so, you should straighten the paper as much as possible. Feeding curled paper cause paper jams and misfeeds.
Fig. 2-1 Fan the Paper and
Straighten the Paper
The following types of envelopes are not recommended for use.
∙Damaged, curled, wrinkled, or irregularly shaped envelopes
∙Extremely shiny or highly textured envelopes
∙Envelopes with clasps
∙Envelopes of baggy construction
∙Envelopes not sharply creased
∙Embossed envelopes
∙Envelopes already printed with a laser printer
∙Envelopes pre-printed on the inside
∙Envelopes that cannot be arranged uniformly when placed in a pile
Fig. 2-2 Envelopes
2–2
CHAPTER 2 PAPER HANDLING
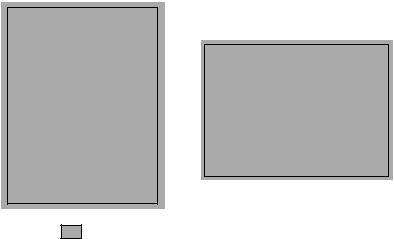
Printable Area |
The figure below shows the physically printable area. |
||||||
|
|
|
|
|
|
|
|
|
|
|
|
|
|
|
|
|
|
|
|
|
|
|
|
|
|
|
|
|
|
|
|
|
|
|
|
|
|
|
|
|
|
|
|
|
|
|
|
|
|
|
|
|
|
|
|
|
|
|
|
|
|
|
|
Unprintable area
Approximately 4 mm(0.16 inch) for any sizes of paper
Fig. 2-3 Printable Area
2–3

USER’S GUIDE
MULTI-PURPOSE SHEET FEEDER
The printer has a multi-purpose sheet feeder that can feed plain paper, envelopes and organizer paper.
Caution
When you use labels, or transparencies for overhead projectors, be sure to use the manual feed slot. See the next section “MANUAL FEED SLOT” for more details.
To use the multi-purpose sheet feeder, follow these steps:
1.Make sure that you have selected the proper paper source, paper size and orientation.
Note
∙You may select the proper paper source, paper size, and orientation in your application software.
∙If your application software does not support your custom paper size, select the next paper size up that is closest but larger than the custom size. Then adjust the print area by changing right and left margins in your application software.
2.Make sure that the multi-purpose sheet feeder contains the selected size of paper in the selected orientation. If necessary, change the paper in the feeder.
3.Make sure that the multi-purpose sheet feeder is properly placed in the printer.
4.Choose a print command to send a file or document to the printer.
When the printer receives data, it begins the print process by loading paper from the multi-purpose sheet feeder. If the printer is in sleep mode when it receives data, it wakes up and starts the printing process automatically.
2–4
CHAPTER 2 PAPER HANDLING
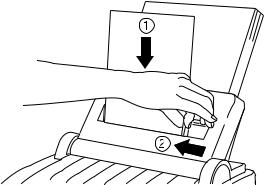
Loading Paper into the Feeder
To load paper into the feeder, follow these steps.
1.Open the multi-purpose sheet feeder. ( )
2.Load paper into the multi-purpose sheet feeder with the printing surface face down. ( )
Caution
∙The feeder can hold up to 200 sheets of plain paper. If you load too many sheets, paper jams could occur.
∙Make sure that the paper is stacked below the mark.
∙If there is still some paper in the feeder, you must first remove it, put it together with the new paper and then insert the stack in the feeder.
Fig. 2-4 Opening the Feeder and
Loading Paper or Envelope in the Feeder
Note
If you load envelopes in the feeder, make sure they are inserted in the direction shown above.
2–5

USER’S GUIDE
3.Move the paper guide to the paper width. ( )
4.Close the multi-purpose sheet feeder. ( )
Fig. 2-5 Moving the Paper Guide
and Closing the Feeder
Note
If the multi-purpose sheet feeder runs out of paper when you try to print, the ALARM and PAPER lamps blink to alert you with a paper empty error. You have to load paper in the feeder and push the FF/CONT switch to cancel the alarm and continue printing. If paper jams in the printer, the ALARM and PAPER lamps also blink. If the error is a paper jam, clear it referring to “PAPER JAMS” in Chapter 6.
2–6
CHAPTER 2 PAPER HANDLING
Two Side Printing (Manual Duplexing)
The supplied printer driver for Windows 3.1 enables manual duplex printing. For more information about settings, see the help text of the printer driver.
The printer prints all the even numbered pages on one side of the paper first, and then prints all the odd pages on the reverse side of the paper.
When you have finished printing on one-side of the paper, the driver instructs you to re-insert the paper by a pop-up message on the computer. Follow the instructions on how to reinsert the paper.
Caution
∙Before re-inserting the paper, you have to straighten them well, or you get the paper errors.
∙Use of very thin or very thick paper is not recommended.
∙If you encounter the double feeding error, we recommend you to hold the paper except the front sheet whilst the printer is feeding it.
Fig. 2-6 Notes for Manual Duplexing
Note
When you use Manual Duplex function, it is possible that paper jam occurs or print quality might not be satisfactory.
2–7

USER’S GUIDE
MANUAL FEED SLOT
The multi-purpose sheet feeder also has a manual feed slot. You can manually load paper sheet by sheet into this slot. You do not need to remove paper from the multi-purpose sheet feeder.
When you use labels or transparencies, be sure to use this slot. For information on paper specifications, see “PAPER SPECIFICATIONS” in the previous section.
Load paper manually as follows:
1.Make sure that you have selected the manual paper feed, paper size and orientation in your software application.
Note
∙You may select manual paper feed, paper size, and orientation in your application software. If your application software does not allow these settings, you should make them by using the RPC program supplied with your printer.
∙If you do not select manual paper feed and insert a page in the manual feed slot, the printer loads the first page from the manual feed slot and loads the subsequent pages from the multi-purpose sheet feeder.
∙If your application software does not support your custom paper size, select the next paper size up that is closest but larger than the custom size. Then adjust the print area by changing right and left margins in your application software.
2.Choose a print command to send a file or document to the printer. If the printer is in sleep mode, receiving data wakes it up.
A blinking MANUAL lamp alerts you to insert a sheet of paper into the manual paper feed slot.
2–8
CHAPTER 2 PAPER HANDLING
3.Holding the selected size of paper in the selected orientation (Portrait or Landscape). Place the side of the paper you wish to print on face down into the manual feed slot. Align the paper to the left side of the feed slot, insert it all the way into the manual feed slot. ( ) Move the paper guide of the manual feed slot to the paper width you are using. ( )
Fig. 2-7 Moving the Paper Guide
4.Press the FF/CONT switch.
The printer loads the paper from the manual feed slot and starts printing.
After the printer ejects the first page, the MANUAL lamp blinks again to alert you to insert the paper.
5.Insert the next sheet of paper all the way into the manual feed slot, aligning it as straight as possible.
6.Press the FF/CONT switch for the next page.
You need to press the FF/CONT switch for every paper you load manually. Repeat steps 5 and 6 until you have printed all the pages.
2–9
USER’S GUIDE
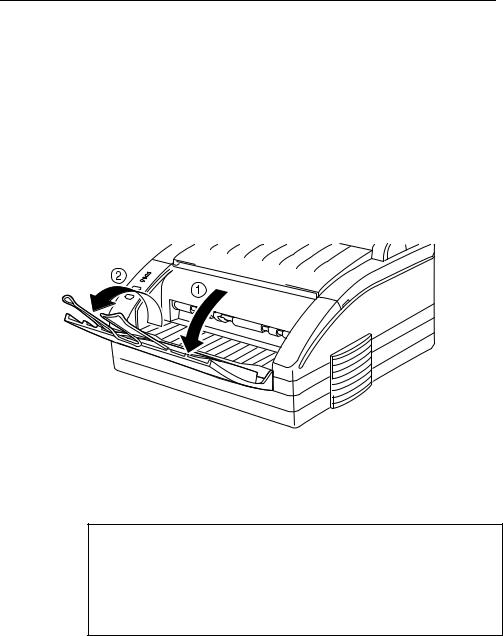
OUTPUT TRAY AND PAPER SUPPORT WIRE
The printer ejects paper with printed surfaces face down into the output tray at the front of the printer.
When the output tray is closed, the ejected paper comes out sheet by sheet through the slit at the front. When you open the tray, sheets can be stacked on the tray.
Follow these steps to open the output tray:
1.Pull the top of the tray down.
2.Extend the paper support wire.
Fig. 2-8 Opening the Output Tray and
Extending the Paper Support Wire
You can stack up to 100 sheets in the output tray.
Caution
∙When you use transparencies, remove each sheet immediately after printing. Stacking sheets may cause toner to smear onto the back of the previous sheet.
∙When the output tray is closed, you have to remove the ejected sheet, or you will get a paper jam when the second sheet is ejected.
2–10
Loading...