


 Loading...
User’s Guide
Brother Color Printer
HL-3150CDN
HL-3170CDW
For visually-impaired users
You can read this manual with Screen Reader ‘text-to-speech’ software.
You must set up the hardware and install the driver before you can use the machine.
Please use the Quick Setup Guide to set up the machine. You can find a printed copy in the box. Please read this User’s Guide thoroughly before you use the machine.
Please visit us at http://solutions.brother.com/ where you can get product support, the latest driver updates and utilities, and answers to frequently asked questions (FAQs) and technical questions.
Note: Not all models are available in all countries.
Version 0
ARL/ASA/NZ/SAF/GLF

User's Guides and where do I find them?
Which Guide? |
What's in it? |
Where is it? |
Product Safety Guide |
Read this Guide first. Read the Safety Instructions |
Printed / In the box |
|
before you set up your machine. See this Guide for |
|
|
trademarks and legal limitations. |
|
|
|
|
Quick Setup Guide |
Follow the instructions for setting up your machine |
Printed / In the box |
|
and installing the drivers and software for the |
|
|
operating system and connection type you are using. |
|
|
|
|
User’s Guide |
Learn the print operations, how to replace |
PDF file / CD-ROM / In the box |
|
consumables, and performing routine maintenance. |
|
|
See troubleshooting tips. |
|
|
|
|
Network User's Guide |
This Guide provides useful information about wired |
PDF file / CD-ROM / In the box |
|
and wireless network settings and security settings |
|
|
using the Brother machine. You can also find |
|
|
supported protocol information for your machine and |
|
|
detailed troubleshooting tips. |
|
|
|
|
Wi-Fi Direct™ Guide |
This Guide provides information about how to |
PDF file / Brother Solutions Center |
(HL-3170CDW) |
configure and use your Brother machine for wireless |
at http://solutions.brother.com/ |
printing directly from a mobile device supporting the |
|
|
|
|
|
|
Wi-Fi Direct™ standard. |
|
|
|
|
Google Cloud Print |
This Guide provides information about how to |
PDF file / Brother Solutions Center |
Guide |
configure your Brother machine to a Google account |
at http://solutions.brother.com/ |
|
and use Google Cloud Print services for printing over |
|
|
the Internet. |
|
|
|
|
Mobile Print/Scan |
This Guide provides useful information about printing |
PDF file / Brother Solutions Center |
Guide for Brother |
from your mobile device and scanning from your |
at http://solutions.brother.com/ |
iPrint&Scan |
Brother machine to your mobile device when |
|
|
connected on a Wi-Fi network. |
|
AirPrint Guide |
This Guide provides information for using AirPrint to |
PDF file / Brother Solutions Center |
|
print from OS X v10.7.x, 10.8.x, your iPhone, iPod |
at http://solutions.brother.com/ |
|
touch, iPad, or other iOS device to your Brother |
|
|
machine without installing a printer driver. |
|
|
|
|
i

Using the documentation
Thank you for buying a Brother machine! Reading the documentation will help you make the most of your machine.
Symbols and conventions used in the documentation
The following symbols and conventions are used throughout the documentation.
 WARNING
WARNING indicates a potentially hazardous situation which, if not avoided, could result in death or serious injuries.
IMPORTANT
IMPORTANT indicates a potentially hazardous situation which, if not avoided, may result in damage to property or loss of product functionality.
NOTE |
Notes tell you how you should respond to a situation that may arise or give tips |
|||
|
|
|
|
about how the operation works with other features. |
|
|
|
|
Electrical Hazard icons alert you to possible electrical shocks. |
|
|
|
|
Fire Hazard icons alert you to the possibility of a fire. |
|
|
|
|
Hot Surface icons warn you not to touch machine parts that are hot. |
|
|
|
|
|
|
|
|
|
Prohibition icons indicate actions that must not be performed. |
Bold |
Bold style identifies keys on the machine control panel or computer screen. |
|||
Italics |
Italicized style emphasizes an important point or refers you to a related topic. |
|||
Courier New |
Courier New font identifies the messages shown on the LCD of the machine. |
|||
NOTE |
|
|
||
|
|
|||
If you are using a tablet running Windows® 8, you can make your selections either by tapping the screen or by clicking with your mouse.
ii

Table of Contents |
|
|
1 |
Printing Methods |
1 |
|
About this Machine .................................................................................................................................... |
1 |
|
Front view and Back view.................................................................................................................... |
1 |
|
Acceptable paper and other print media.................................................................................................... |
2 |
|
Type and size of paper ........................................................................................................................ |
2 |
|
Handling and using special paper ....................................................................................................... |
4 |
|
Unprintable area when printing from a computer ................................................................................ |
7 |
|
Loading paper............................................................................................................................................ |
8 |
|
Loading paper and print media............................................................................................................ |
8 |
|
Loading paper in the standard paper tray............................................................................................ |
8 |
|
Loading paper in the Manual feed slot .............................................................................................. |
12 |
|
2-sided printing ........................................................................................................................................ |
20 |
|
Guidelines for printing on both sides of the paper ............................................................................. |
20 |
|
Automatic 2-sided printing ................................................................................................................. |
21 |
|
Manual 2-sided printing ..................................................................................................................... |
23 |
2 |
Driver and Software |
24 |
|
Printer driver ............................................................................................................................................ |
24 |
|
Printing a document........................................................................................................................... |
25 |
|
Printer driver settings......................................................................................................................... |
26 |
|
Windows® ................................................................................................................................................ |
27 |
|
Accessing the printer driver settings.................................................................................................. |
27 |
|
Features in the Windows® printer driver............................................................................................ |
28 |
|
Basic tab............................................................................................................................................ |
28 |
|
Advanced tab..................................................................................................................................... |
36 |
|
Print Profiles tab ................................................................................................................................ |
45 |
|
Device Settings tab............................................................................................................................ |
47 |
|
Support .............................................................................................................................................. |
48 |
|
Features in the BR-Script3 printer driver (PostScript® 3™ language emulation) ............................. |
50 |
|
Uninstalling the printer driver............................................................................................................. |
58 |
|
Status Monitor ................................................................................................................................... |
59 |
|
Macintosh ................................................................................................................................................ |
61 |
|
Features in the printer driver (Macintosh).......................................................................................... |
61 |
|
Choosing page setup options ............................................................................................................ |
61 |
|
Features in the BR-Script3 printer driver (PostScript® 3™ language emulation) ............................ |
72 |
|
Removing the printer driver ............................................................................................................... |
77 |
|
Status Monitor ................................................................................................................................... |
78 |
|
Software .................................................................................................................................................. |
80 |
|
Software for networks ....................................................................................................................... |
80 |
iii

3 |
General Information |
81 |
|
Control panel ........................................................................................................................................... |
81 |
|
Control panel overview ...................................................................................................................... |
81 |
|
LED indications.................................................................................................................................. |
83 |
|
Machine status messages ................................................................................................................. |
83 |
|
Menu table......................................................................................................................................... |
84 |
|
Reprinting documents.............................................................................................................................. |
98 |
|
Reprinting the last job........................................................................................................................ |
98 |
|
How to reprint the last job.................................................................................................................. |
98 |
|
Printing Secure data ................................................................................................................................ |
99 |
|
Secure data ....................................................................................................................................... |
99 |
|
How to print Secure data ................................................................................................................... |
99 |
|
Security features.................................................................................................................................... |
100 |
|
Secure Function Lock 2.0................................................................................................................ |
100 |
|
Setting Lock..................................................................................................................................... |
100 |
|
Ecology features.................................................................................................................................... |
102 |
|
Toner Save ...................................................................................................................................... |
102 |
|
Sleep Time ...................................................................................................................................... |
102 |
|
Deep Sleep mode............................................................................................................................ |
102 |
|
Auto Power Off ................................................................................................................................ |
103 |
|
Colour Correction................................................................................................................................... |
104 |
|
Frequency........................................................................................................................................ |
104 |
|
Colour Calibration............................................................................................................................ |
104 |
|
Auto Registration ............................................................................................................................. |
105 |
4 |
Routine Maintenance |
106 |
|
Replacing consumable items................................................................................................................. |
106 |
|
Replacing the toner cartridges......................................................................................................... |
110 |
|
Replacing the drum units................................................................................................................. |
119 |
|
Replacing the belt unit..................................................................................................................... |
128 |
|
Replacing the waste toner box ........................................................................................................ |
133 |
|
Cleaning and Checking the machine ..................................................................................................... |
140 |
|
Cleaning the outside of the machine ............................................................................................... |
140 |
|
Cleaning the LED head ................................................................................................................... |
142 |
|
Cleaning the corona wires ............................................................................................................... |
143 |
|
Cleaning the drum unit .................................................................................................................... |
147 |
|
Cleaning the paper pick-up roller..................................................................................................... |
153 |
|
Packing and shipping the machine ........................................................................................................ |
154 |
5 |
Troubleshooting |
157 |
|
Identifying your problem ........................................................................................................................ |
157 |
|
Error and maintenance messages......................................................................................................... |
158 |
|
Paper jams ...................................................................................................................................... |
163 |
|
If you are having difficulty with your machine ........................................................................................ |
173 |
|
Improving the print quality...................................................................................................................... |
177 |
|
Machine Information .............................................................................................................................. |
185 |
|
Checking the Serial Number............................................................................................................ |
185 |
|
Default settings................................................................................................................................ |
185 |
iv

A |
Appendix |
187 |
|
Machine specifications........................................................................................................................... |
187 |
|
General............................................................................................................................................ |
187 |
|
Print media ...................................................................................................................................... |
189 |
|
Printer .............................................................................................................................................. |
190 |
|
Interface........................................................................................................................................... |
190 |
|
Network (LAN) ................................................................................................................................. |
191 |
|
Computer requirements................................................................................................................... |
192 |
|
Important information for choosing your paper................................................................................ |
193 |
|
Consumable Items........................................................................................................................... |
194 |
|
Brother numbers.................................................................................................................................... |
196 |
B |
Index |
197 |
v
 1 Printing Methods
About this Machine |
|
1 |
|
|
|
||
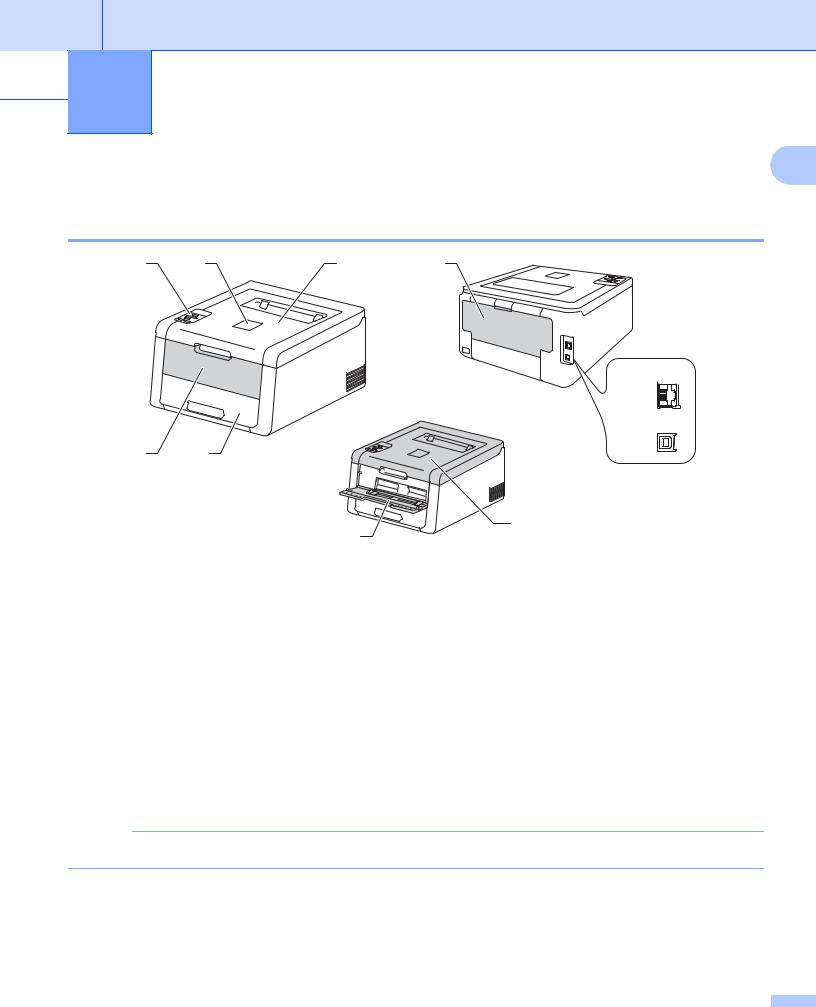
Front view and Back view |
|
|
|
2 |
1 |
5 |
8 |
9
10


11
3 4
7
6
1Face-down output tray support flap (support flap)
2Control panel with a Liquid Crystal Display (LCD)
3Manual feed slot cover
4Paper tray
5Face-down output tray
6Manual Feed Slot
7Top cover
8Back cover (Face-up output tray when open)
9AC power connector
1010BASE-T / 100BASE-TX
11USB port
NOTE
Most of the illustrations in this User’s Guide show the HL-3170CDW.
1

Printing Methods
Acceptable paper and other print media
Print quality may vary according to the type of paper you are using. |
1 |
You can use the following types of print media: plain paper, thin paper, thick paper, thicker paper, bond paper, recycled paper, labels, envelopes or Glossy paper (see Print media on page 189).
For best results, follow the instructions below:
DO NOT put different types of paper in the paper tray at the same time because it may cause paper jams or misfeeds.
For correct printing, you must choose the same paper size from your software application as the paper in the tray.
Avoid touching the printed surface of the paper immediately after printing.
Before you buy a lot of paper, test a small quantity to make sure that the paper is appropriate for the machine.
Type and size of paper
The machine feeds paper from the installed standard paper tray or the manual feed slot. The names for the paper trays in the printer driver and this Guide are as follows:
Tray |
Name |
Paper tray |
Tray 1 |
|
|
Manual feed slot |
Manual |
|
|
2

Printing Methods
Paper capacity of the paper trays
|
Paper size |
Paper types |
No. of sheets |
1 |
|
Paper Tray |
A4, Letter, Legal, B5 (JIS), |
Plain paper, Thin paper and |
up to 250 sheets |
||
|
|||||
(Tray 1) |
Executive, A5, |
Recycled paper |
(80 gsm) |
|
|
|
A5 (Long Edge), A6, Folio 1 |
|
|
||
|
|
|
|
||
Manual feed slot |
Width: |
Plain paper, Thin paper, |
1 sheet |
|
|
|
76.2 to 216 mm |
Thick paper, Thicker paper, |
1 Envelope |
|
|
|
Length: |
Bond paper, Recycled paper, |
|
||
|
Envelopes, Labels and |
|
|
||
|
116 to 355.6 mm |
|
|
||
|
Glossy Paper |
|
|
||
|
|
|
|
||
|
|
|
|
|
|
1 Folio size is 215.9 mm x 330.2 mm. |
|
|
|
||
Recommended paper specifications
The following paper specifications are appropriate for this machine.
Basis weight |
75-90 gsm |
|
|
Thickness |
80-110 μm |
|
|
Roughness |
Higher than 20 sec. |
|
|
Stiffness |
90-150 cm3/100 |
Grain direction |
Long grain |
|
|
Volume resistivity |
10e9-10e11 ohm |
Surface resistivity |
10e9-10e12 ohm-cm |
Filler |
CaCO3 (Neutral) |
Ash content |
Below 23 wt% |
|
|
Brightness |
Higher than 80% |
|
|
Opacity |
Higher than 85% |
|
|
Use plain paper that is suitable for laser/LED machines to make copies.
Use paper that is 75 to 90 gsm.
Use long grain paper with a neutral Ph value, and a moisture content of approx. 5%.
This machine can use recycled paper that meets DIN 19309 specifications.
(Before you put paper in this machine, see Important information for choosing your paper on page 193.)
3

Printing Methods
Handling and using special paper
The machine is designed to work well with most types of xerographic and bond paper. However, some paper 1 variables may have an effect on print quality or handling reliability. Always test samples of paper before purchasing to ensure desirable performance. Store paper in its original packaging and keep it sealed. Keep
the paper flat and away from moisture, direct sunlight and heat. Some important guidelines when selecting paper are:
DO NOT use inkjet paper because it may cause a paper jam or damage your machine.
Preprinted paper must use ink that can withstand the temperature of the machine’s fusing process 200 °C.
If you use bond paper, paper having a rough surface or paper that is wrinkled or creased, the paper may exhibit degraded performance.
Types of paper to avoid
IMPORTANT
Some types of paper may not perform well or may cause damage to your machine.
DO NOT use paper:
•that is highly textured
•that is extremely smooth or shiny
•that is curled or warped
1
1
1 A curl of 2 mm or greater may cause jams to occur.
•that is coated or has a chemical finish
•that is damaged, creased or folded
•that exceeds the recommended weight specification in this guide
•with tabs and staples
•with letterheads using low temperature dyes or thermography
•that is multipart or carbonless
•that is designed for inkjet printing
If you use any of the types of paper listed above, they may damage your machine. This damage is not covered under any Brother warranty or service agreement.
4
Printing Methods
Envelopes
Most envelopes can be used with your machine. However, some envelopes may have feed and print-quality problems because of the way they have been made. Envelopes should have edges with straight, 1 well-creased folds. Envelopes should lie flat and not be of baggy or flimsy construction. Use only quality envelopes from a supplier who understands that you will be using the envelopes in a laser machine.
We recommend that you print a test envelope to make sure the print results are what you want.
Types of envelopes to avoid
IMPORTANT
DO NOT use envelopes:
•that are damaged, curled, wrinkled or an unusual shape
•that are extremely shiny or textured
•with clasps, staples, snaps or tie strings
•with self-adhesive closures
•that are of a baggy construction
•that are not sharply creased
•that are embossed (have raised writing on them)
•that were previously printed by a laser/LED printer
•that are pre-printed on the inside
•that cannot be arranged neatly when stacked
•that are made of paper that weighs more than the paper weight specifications for the machine
•with edges that are not straight or consistently square
•with windows, holes, cut-outs or perforations
•with glue on surface as shown in figure below
•with double flaps as shown in figure below
•with sealing flaps that are not folded down when purchased
5

Printing Methods
• with each side folded as shown in figure below
1
If you use any of the types of envelopes listed above, they may damage your machine. This damage may not be covered under any Brother warranty or service agreement.
Labels
Most labels can be used with your machine. Labels should have an adhesive that is acrylic-based since this material is more stable at the high temperatures in the fuser unit. Adhesives should not come in contact with any part of the machine, because the label stock may stick to the drum units or rollers and cause jams and print quality problems. No adhesive should be exposed between the labels. Labels should be arranged so that they cover the entire length and width of the sheet. Using labels with spaces may result in labels peeling off and causing serious jams or print problems.
All labels used in this machine must be able to withstand a temperature of 200 °C for a period of 0.1 seconds.
Types of labels to avoid
Do not use labels that are damaged, curled, wrinkled or an unusual shape.
IMPORTANT
•DO NOT feed part used label sheets. The exposed carrier sheet will damage your machine.
•DO NOT reuse or insert labels that have previously been used or are missing a few labels on the sheet.
•Label sheets should not exceed the paper weight specifications described in this User’s Guide. Labels exceeding this specification may not feed or print correctly and may cause damage to your machine.
6

Printing Methods
Unprintable area when printing from a computer
The figures below show maximum unprintable areas. The unprintable areas may vary depending on the |
1 |
|||||||||||||
paper size or settings in the application you are using. |
|
|
|
|
||||||||||
|
|
|
|
|
|
|
|
|
|
|
|
|
|
|
|
|
1 |
|
|
|
Usage |
Document |
Top (1) |
Left (2) |
|
|
|||
|
|
|
|
|
|
|
Size |
Bottom (3) |
Right (4) |
|
|
|||
|
|
|
|
|
|
|
|
|
|
|
|
|||
|
|
|
|
|
|
|
|
|
|
|
|
|
||
|
|
|
|
|
|
|
|
Letter |
4.23 mm |
4.23 mm |
|
|
||
|
|
|
|
|
|
|
|
|
|
|||||
|
|
|
|
|
|
|
|
|
|
|||||
|
|
|
|
|
|
|
|
|
|
|
|
|
|
|
2 |
|
|
|
|
|
|
4 |
|
|
A4 |
4.23 mm |
4.23 mm |
|
|
|
|
|
|
|
|
|
|
|
|
|
|
|
||
|
|
|
|
|
|
|
|
|
|
|
|
|
|
|
|
|
|
|
|
|
|
|
|
|
Legal |
4.23 mm |
4.23 mm |
|
|
|
|
|
|
|
|
|
|
|
|
|
|
|
|
|
|
|
|
|
|
|
|
|
|
|
|
|
|
|
|
|
|
|
|
|
|
|
|
|
|
|
|
|
|
|
|
|
|
|
|
|
|
|
|
|
|
|
|
|
|
|
|
3 |
|
|
|
|
|
|
|
|
|
|
||
7
Printing Methods
Loading paper
1
Loading paper and print media
The machine can feed paper from the standard paper tray or the manual feed slot.
When you put paper into the paper tray, note the following:
If your application software supports paper size selection on the print menu, you can select it through the software. If your application software does not support it, you can set the paper size in the printer driver or by using the control panel keys.
Loading paper in the standard paper tray
Load up to 250 sheets of paper in the standard paper tray (Tray 1). Paper can be loaded up to the maximum paper mark (

 ) which is identified on the right side of the paper tray. (For the recommended paper to use, see Acceptable paper and other print media on page 2.)
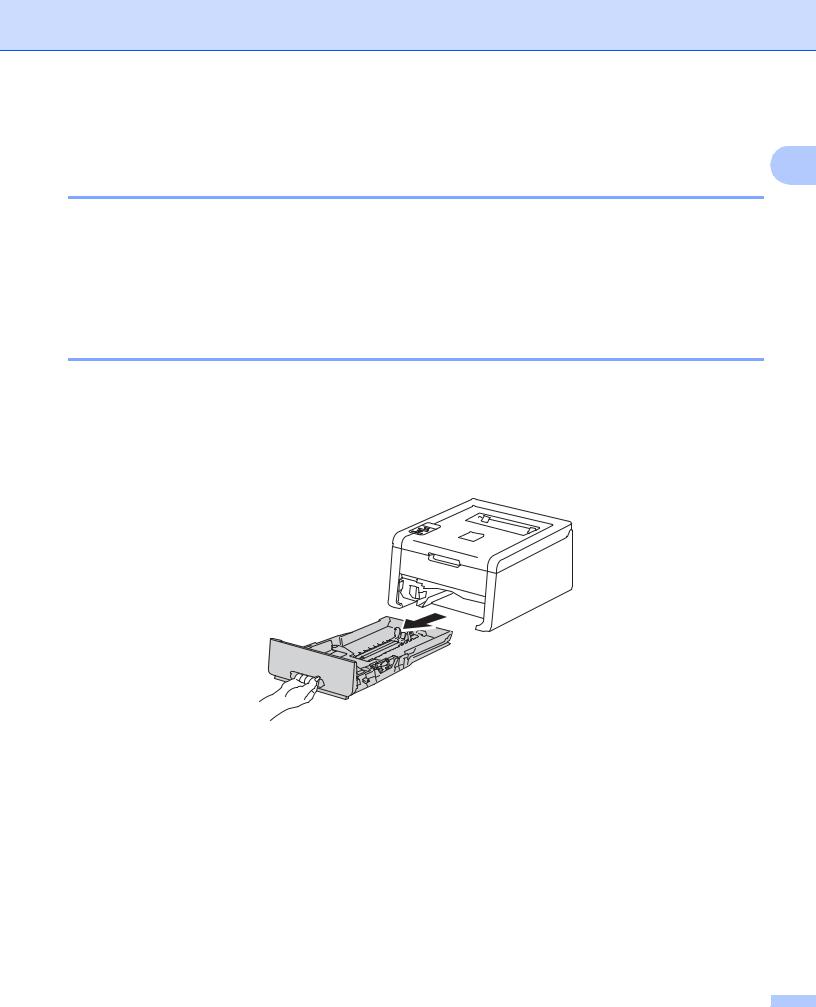
Printing on plain paper, thin paper or recycled paper from Tray 1
a Pull the paper tray completely out of the machine.
8
Printing Methods
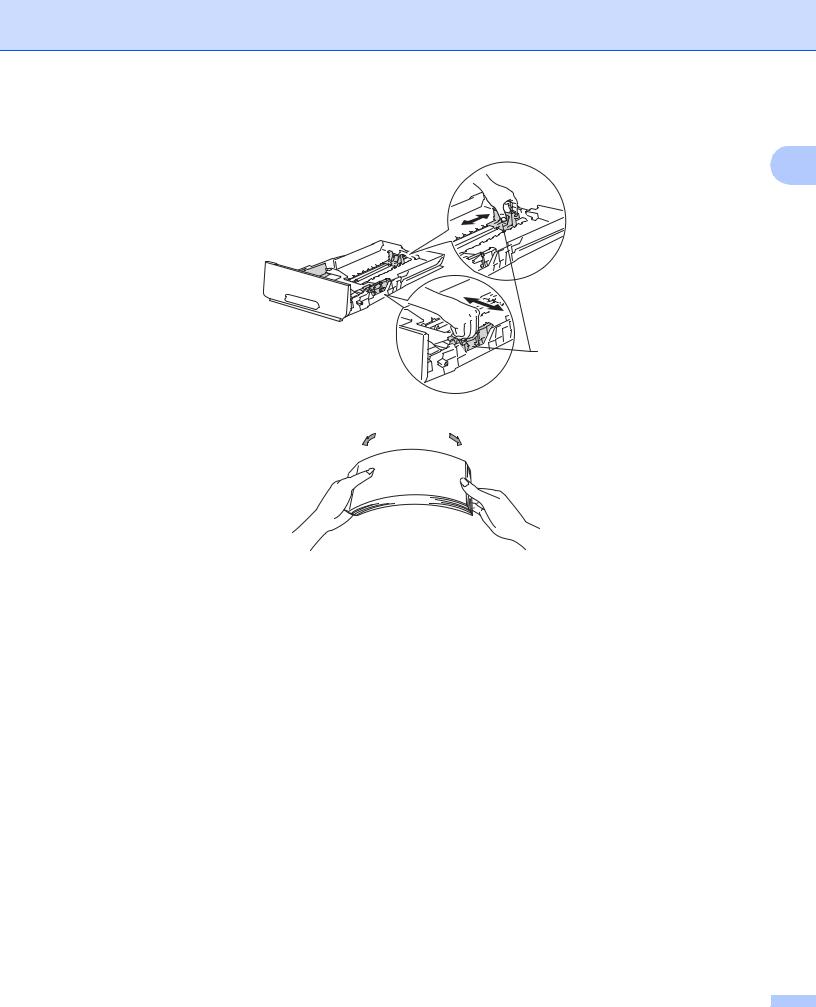
b While pressing the green paper-guide release levers (1), slide the paper guides to fit the paper you are loading in the tray. Make sure that the guides are firmly in the slots.
1
1
c Fan the stack of paper well to avoid paper jams and misfeeds.
9
|
|
|
Printing Methods |
|
|
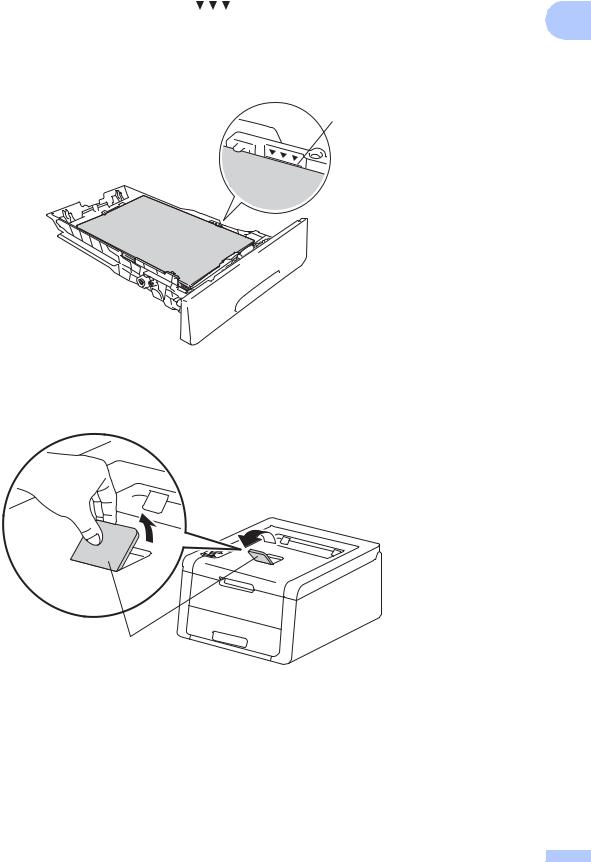
d Put paper in the tray and make sure: |
|
|
The paper is below the maximum paper mark ( |
) (1). |
1 |
Over filling the paper tray will cause paper jams. |
|
|
|
|
The side to be printed on is face down.
The paper guides touch the sides of the paper so it will feed correctly.
1
e Put the paper tray firmly back in the machine. Make sure that it is completely inserted into the machine.
f Lift up the support flap (1) to prevent paper from sliding off the face-down output tray, or remove each page as soon as it comes out of the machine.
1
10

Printing Methods
g Choose the following settings from each drop-down list of the printer driver.
Paper Size |
|
|
|
1 |
|
|
|
|
|
A4 |
Letter |
Legal |
Executive |
A5 |
B5 |
JIS B5 |
Folio |
A5 Long Edge |
A6 |
For the acceptable paper sizes, see Type and size of paper on page 2.
Media Type
Plain Paper |
Thin Paper |
Recycled Paper |
Paper Source
Tray1
For any other settings, see Driver and Software in Chapter 2.
NOTE
The name of options in the drop-down lists may vary depending on your operating system and its version.
h Send the print data to the machine.
11
Printing Methods
Loading paper in the Manual feed slot
(For the recommended paper to use, see Acceptable paper and other print media on page 2.) |
1 |
NOTE
The machine turns on the Manual Feed mode when you put paper in the manual feed slot.
Printing on plain paper, thin paper, recycled paper or bond paper from the Manual feed slot
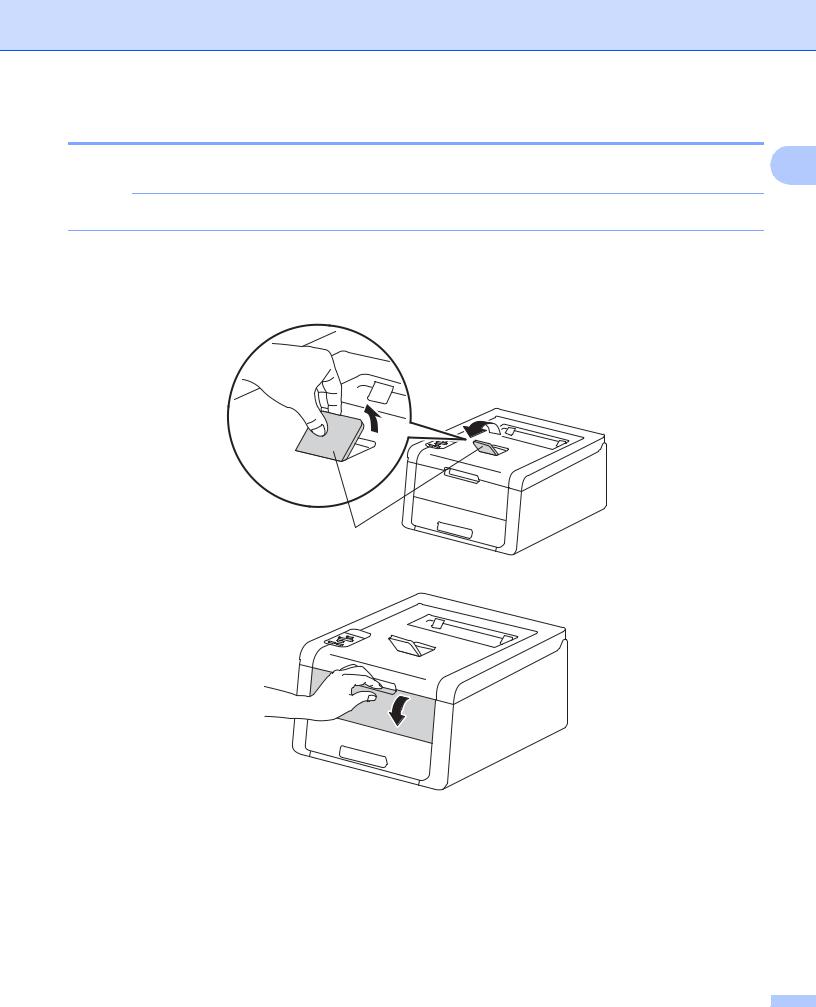
a Lift up the support flap (1) to prevent paper from sliding off the face-down output tray, or remove each page as soon as it comes out of the machine.
1
b Open the manual feed slot cover.
12
Printing Methods
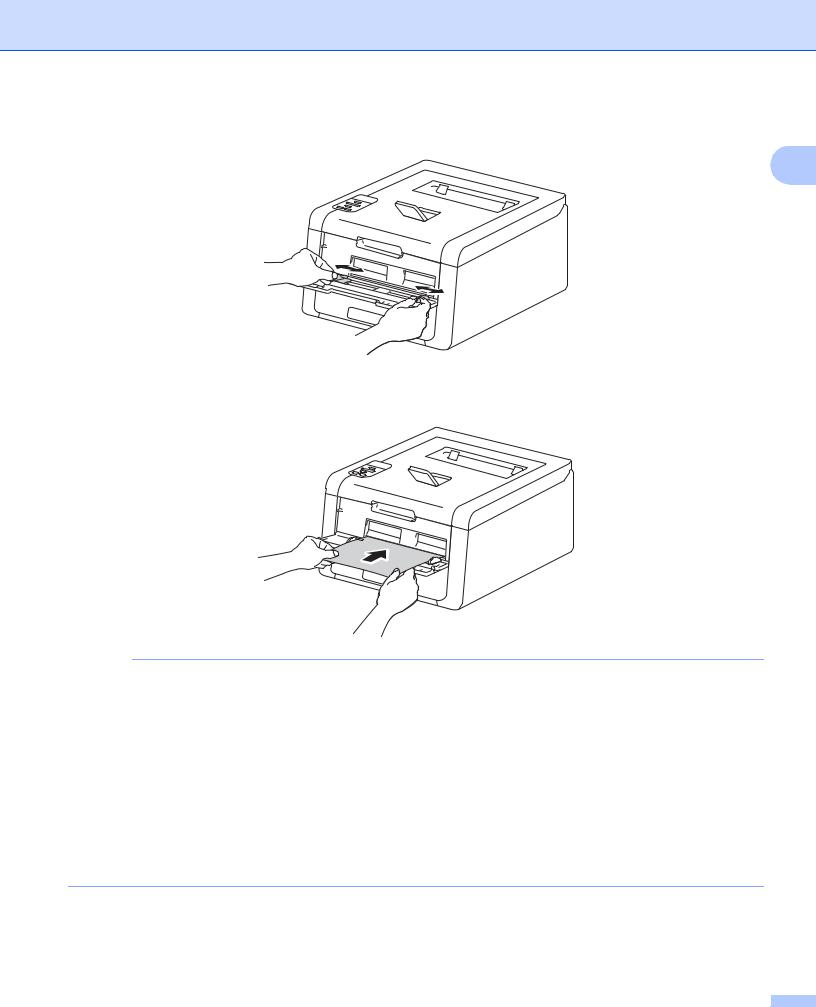
c Use both hands to slide the manual feed slot paper guides to the width of the paper that you are going to use.
1
d Use both hands to push one sheet of paper firmly into the manual feed slot until the top edge of the paper presses against the paper feed rollers. Continue pressing the paper against the rollers for about two seconds, or until the machine grabs the paper and pulls it in further.
NOTE
•If the error message Jam Inside appears on the LCD, the machine cannot grasp and pull the paper. Reset the machine by removing the paper and then pressing Cancel on the control panel. Reinsert the paper and be sure to press it firmly against the rollers.
•Put the paper into the manual feed slot with the side to be printed on face up.
•Make sure that the paper is straight and in the correct position on the manual feed slot. If it is not, the paper may not be fed correctly, resulting in a skewed printout or a paper jam.
•Pull the paper out completely when you retry putting the paper into the manual feed slot.
•Do not put more than one sheet of paper in the manual feed slot at any one time, as it may cause a jam.
•If you put paper or other print media in the manual feed slot before the machine is in the Ready mode, an error may occur and the machine will stop printing.
13

Printing Methods
e Choose the following settings from each drop-down list of the printer driver.
Paper Size
1
Width: 76.2 to 216 mm Length: 116 to 355.6 mm Customized paper size 1
1Define your original paper size by choosing User Defined... in Windows® printer driver, PostScript Custom Page Size in BR-Script printer driver for Windows®, or Manage Custom Sizes... in Macintosh printer drivers.
For the acceptable paper sizes, see Type and size of paper on page 2.
Media Type
Plain Paper |
Thin Paper |
Recycled Paper |
Bond Paper |
Paper Source
Manual
For any other settings, see Driver and Software in Chapter 2.
NOTE
The name of options in the drop-down lists may vary depending on your operating system and its version.
f Send the print data to the machine.
g After the LCD shows Manual Feed, return to step d to put in the next sheet of paper. Repeat for each page you want to print.
NOTE
The LCD will show Manual Feed until a sheet of paper is put in the manual feed slot.
14

Printing Methods
Printing on thick paper, labels, envelopes and glossy paper from the Manual feed slot
When the back cover (face-up output tray) is pulled down, the machine has a straight paper path from the manual feed slot through to the back of the machine. Use this paper feed and output method when you want 1 to print on thick paper, labels, envelopes or glossy paper. (For the recommended paper to use, see
Acceptable paper and other print media on page 2 and Envelopes on page 5.)
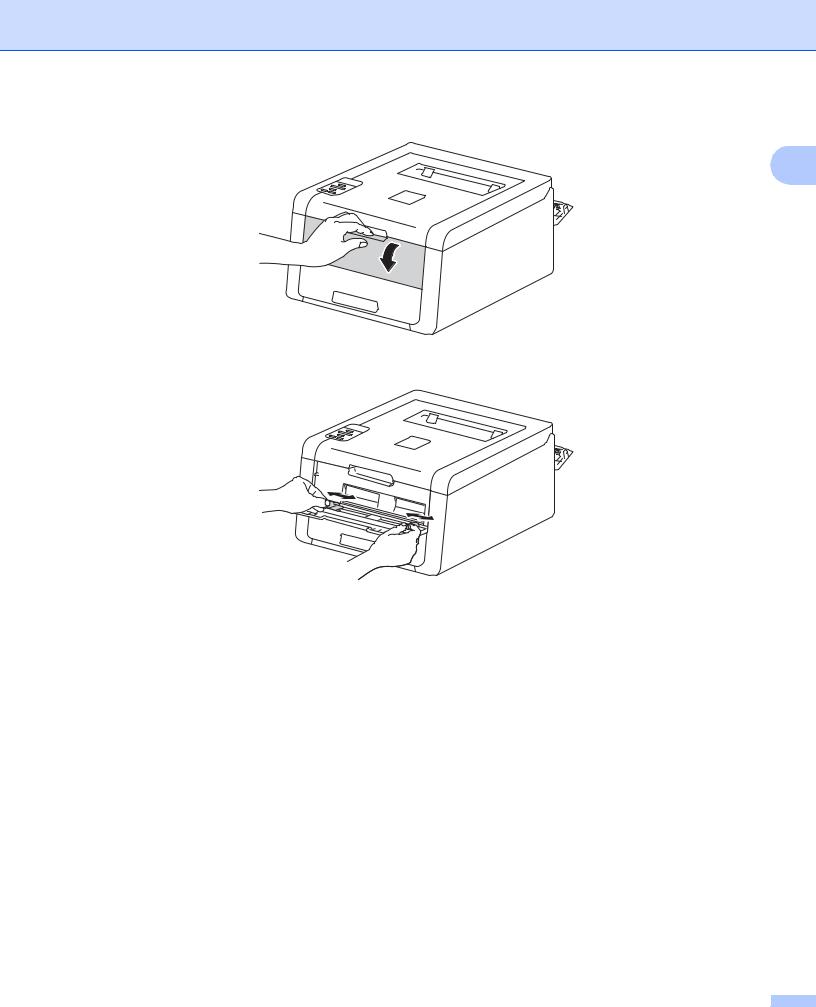
a Open the back cover (face-up output tray).
b (For printing envelopes only)
Pull down the two grey levers, one on the left side and one on the right side, toward you as shown in the illustration below.
15
Printing Methods
c Open the manual feed slot cover.
1
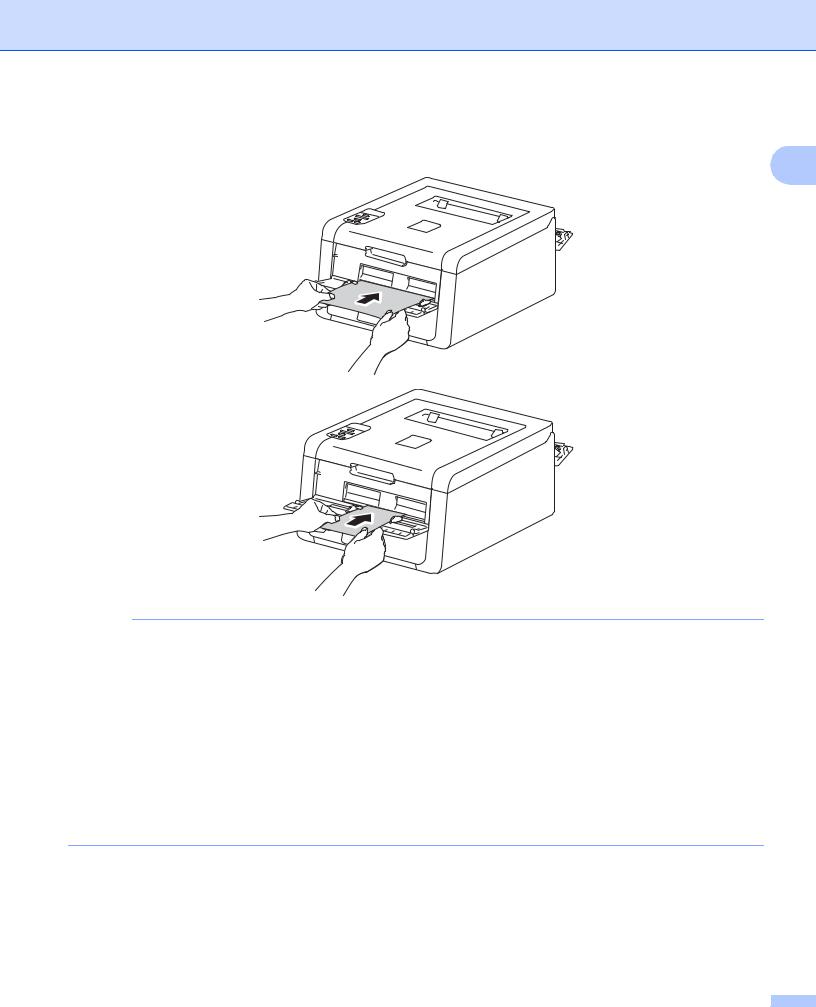
d Use both hands to slide the manual feed slot paper guides to the width of the paper that you are going to use.
16
Printing Methods |
|
e Use both hands to push one sheet of paper firmly into the manual feed slot until the top edge of the paper |
|
presses against the paper feed rollers. Continue pressing the paper against the rollers for about two |
1 |
seconds, or until the machine grabs the paper and pulls it in further. |
NOTE
•If the error message Jam Inside appears on the LCD, the machine cannot grasp and pull the paper. Reset the machine by removing the paper and then pressing Cancel on the control panel. Reinsert the paper and be sure to press it firmly against the rollers.
•Put the paper into the manual feed slot with the side to be printed on face up.
•Make sure that the paper is straight and in the correct position on the manual feed slot. If it is not, the paper may not be fed correctly, resulting in a skewed printout or a paper jam.
•Pull the paper out completely when you retry putting the paper into the manual feed slot.
•Do not put more than one sheet of paper in the manual feed slot at any one time, as it may cause a jam.
•If you put paper or other print media in the manual feed slot before the machine is in the Ready mode, an error may occur and the machine will stop printing.
17

Printing Methods
f Choose the following settings from each drop-down list of the printer driver.
Paper Size |
|
|
|
1 |
(For printing on thick paper, labels or glossy paper) |
|
|||
|
|
|||
A4 |
Letter |
Legal |
Executive |
A5 |
A5 Long Edge |
A6 |
B5 |
JIS B5 |
|
3 x 5 |
Folio |
Customized paper size 1 |
|
|
(For printing envelopes) |
|
|
|
|
Com-10 |
DL |
C5 |
Monarch |
|
Customized paper size 1 |
|
|
|
|
1Define your original paper size by choosing User Defined... in Windows® printer driver, PostScript Custom Page Size in BR-Script printer driver for Windows®, or Manage Custom Sizes... in Macintosh printer drivers.
For the acceptable paper sizes, see Type and size of paper on page 2.
Media Type
(For printing on thick paper, labels or glossy paper)
Thick Paper Thicker Paper Glossy Paper Label
(For printing envelopes)
Envelopes Env. Thin Env. Thick
Paper Source
Manual
For any other settings, see Driver and Software in Chapter 2.
NOTE
•The name of options in the drop-down lists may vary depending on your operating system and its version.
•When Label is selected in the printer driver, the machine will feed the paper from the manual feed slot, even if Manual is not selected as the paper source.
•When you use Envelope #10, choose Com-10 (for Windows®) or Envelope #10 (for Macintosh) from the Paper Size drop-down list.
•For other envelopes that are not listed in the printer driver, such as Envelope #9 or Envelope C6, choose User Defined... (for Windows® printer driver), PostScript Custom Page Size (for BR-Script printer driver for Windows®) or Manage Custom Sizes... (for Macintosh printer driver).
g Send the print data to the machine.
18

|
|
Printing Methods |
|
h After the LCD shows Manual Feed, return to step e to put in the next sheet of paper. |
|
i (For printing envelopes only) |
1 |
When you have finished printing, reset the two grey levers that you pulled down in step b back to their |
|
original positions.
j Close the back cover (face-up output tray).
NOTE
•The LCD will show Manual Feed until a sheet of paper or an envelope is put in the manual feed slot.
•Remove each page or envelope immediately after printing. Letting pages or envelopes become stacked may cause the paper to jam or curl.
19

Printing Methods
2-sided printing
The supplied printer drivers all enable 2-sided printing. (Windows® Users) For more information about how |
1 |
to choose the settings, see the Help text in the printer driver. |
|
Guidelines for printing on both sides of the paper
If the paper is thin, it may wrinkle.
If paper is curled, straighten it and put it back in the paper tray. If the paper continues to curl, replace the paper.
If the paper is not feeding correctly, it may be curled. Remove the paper and straighten it. If the paper continues to curl, replace the paper.
When you use the manual 2-sided function, it is possible that there may be paper jams or poor print quality. (If there is a paper jam, see Paper jams on page 163. If you have a print quality problem, see Improving the print quality on page 177.)
NOTE
Make sure that the paper tray is completely inserted in the machine.
20

Printing Methods
Automatic 2-sided printing
If you are using the Macintosh Printer Driver, see 2-sided Printing on page 71. |
1 |
Automatic 2-sided printing with the Windows® printer driver
a Choose the following settings from each menu of the printer driver.
Paper Size
A4
Media Type
Plain Paper |
Recycled Paper |
Thin Paper |
Paper Source
Tray1 Manual
2-sided / Booklet
2-sided
2-sided Type in 2-sided Settings
There are four options for each orientation (see 2-sided / Booklet on page 33).
Binding Offset in 2-sided Settings
Specify the offset for binding (see 2-sided / Booklet on page 33).
NOTE
•Do not use bond paper.
•The name of options in the drop-down lists may vary depending on your operating system and its version.
For any other settings, see Driver and Software in Chapter 2.
b Send the print data to the machine. The machine will print on both sides of the paper automatically.
21 

Printing Methods
Automatic 2-sided printing with the BR-Script printer driver for Windows®
a Choose the following settings from each menu of the printer driver. |
1 |
Paper Size
A4
Media Type
Plain Paper |
Recycled Paper |
Thin Paper |
Paper Source
Tray1 |
Manual Feed |
Print on Both Sides
Flip on Short Edge |
Flip on Long Edge |
Page Order
Front to Back |
Back to Front |
NOTE
•Do not use bond paper.
•The name of options in the drop-down lists may vary depending on your operating system and its version.
For any other settings, see Driver and Software in Chapter 2.
b Send the print data to the machine. The machine will print on both sides of the paper automatically.
22 

Printing Methods
Manual 2-sided printing
The BR-Script printer driver for Windows® does not support manual 2-sided printing. |
1 |
If you are using the Macintosh Printer Driver, see Manual 2–sided Printing on page 71. |
|
Manual 2-sided printing with the Windows® printer driver
a Choose the following settings from each drop-down list of the printer driver.
Paper Size
You can use all the paper sizes specified for the tray you are using.
Media Type
You can use all the media types that are specified for the tray you are using, except envelopes and labels, which have only one print side.
Paper Source
Tray1 |
Manual |
2-sided / Booklet
2-sided (Manual)
2-sided Type in 2-sided Settings
There are four options for each orientation (see 2-sided / Booklet on page 33).
Binding Offset in 2-sided Settings
Specify the offset for binding (see 2-sided / Booklet on page 33).
For any other settings, see Driver and Software in Chapter 2.
b Send the print data to the machine. The machine will print all the even-numbered pages on one side of the paper first. Then, the Windows® driver instructs you (with a pop-up message) to reinsert the paper to print the odd-numbered pages.
NOTE
Before reinserting the paper, straighten it well, or you may get a paper jam. Very thin or thick paper is not recommended.
23

|
|
|
|
|
|
|
2 |
Driver and Software |
|
|
|
|
||
|
|
|
|
|
|
Printer driver |
|
||
|
A printer driver is software that translates data from the format used by a computer to the format that a |
2 |
||
|
particular printer needs. Typically, this format is page description language (PDL). |
|
||
The printer drivers for the supported versions of Windows® and Macintosh are on the CD-ROM we have supplied or on the Brother Solutions Center website at http://solutions.brother.com/. Install the drivers by following the steps in the Quick Setup Guide. The latest printer drivers can be downloaded from the Brother Solutions Center website at:
http://solutions.brother.com/
For Windows®
Windows® printer driver (the recommended printer driver for this product)
BR-Script printer driver (PostScript® 3™ language emulation, for HL-3170CDW) 1
1 Install the driver using the Custom Install from the CD-ROM.
For Macintosh
Macintosh printer driver (the recommended printer driver for this product)
BR-Script printer driver (PostScript® 3™ language emulation, for HL-3170CDW) 1
1 For the installation instruction of the driver, visit us at http://solutions.brother.com/.
For Linux® 1 2
LPR printer driver
CUPS printer driver
1For more information and to download the printer driver for Linux please visit your model page at http://solutions.brother.com/ or use the link on the CD-ROM we have supplied.
2Depending on Linux distributions, the driver may not be available or it may be released after the initial release of your model.
24
Loading...