


HL-2135W

Brother Laser Printer
USER’S GUIDE
HL-2130
HL-2132
HL-2135W
HL-2220
HL-2230
HL-2240
HL-2240D
HL-2242D
For visually-impaired users
You can read this manual with Screen
Reader ‘text-to-speech’ software.
You must set up the hardware and install the driver before you can use the machine.
Please use the Quick Setup Guide to set up the machine. You can find a printed copy in the box.
Please read this User’s Guide thoroughly before you use the machine.
Please visit us at http://solutions.brother.com/
utilities, and answers to frequently asked questions (FAQs) and technical questions.
Note: Not all models are available in all countries.
where you can get product support, the latest driver updates and
HL-2250DN
HL-2270DW
Version C
UK/IRE
Using this guide
Symbols used in this guide
The following symbols and conventions are used throughout the documentation.
WARNING indicates a potentially hazardous situation which, if not avoided,
could result in death or serious injuries.
CAUTION indicates a potentially hazardous situation which, if not avoided,
may result in minor or moderate injuries.
IMPORTANT indicates a potentially hazardous situation which, if not
avoided, may result in damage to property or loss of product functionality.
Hot Surface icons warn you not to touch machine parts that are hot.
Notes tell you how you should respond to a situation that may arise or give
tips about how the operation works with other features.
i

Table of Contents
1 Printing Methods 1
About this machine ....................................................................................................................................1
Front view and Back view....................................................................................................................1
Acceptable paper and other print media....................................................................................................3
Recommended paper and print media ................................................................................................3
Type and size of paper ........................................................................................................................4
Handling and using special paper .......................................................................................................6
Unprintable area ..................................................................................................................................9
Printing methods......................................................................................................................................10
Printing on plain paper, recycled paper, bond paper, thin paper or thick paper ................................10
Printing on labels or envelopes .........................................................................................................15
Duplex printing.........................................................................................................................................20
Guidelines for printing on both sides of the paper .............................................................................20
Automatic duplex printing (HL-2240D / HL-2242D / HL-2250DN / HL-2270DW only).......................21
Manual duplex printing ......................................................................................................................22
2 Driver and Software 23
Printer driver ............................................................................................................................................23
Features in the printer driver (for Windows
Features in the printer driver (for Macintosh) ....................................................................................39
Uninstalling the printer driver...................................................................................................................51
Printer driver for Windows
Printer driver for Macintosh ...............................................................................................................51
Software ..................................................................................................................................................52
Software for networks (HL-2135W / HL-2250DN / HL-2270DW only) ...............................................52
Remote Printer Console (For Windows
®
...............................................................................................................51
®
) ....................................................................................25
®
only) ................................................................................52
3 Control Panel 53
LEDs (Light Emitting Diodes)...................................................................................................................53
Service call indications ............................................................................................................................58
Go button.................................................................................................................................................60
Print a test page ................................................................................................................................61
Print a Printer Settings page..............................................................................................................62
Print Fonts (HL-2250DN / HL-2270DW only) ....................................................................................63
Print a WLAN report (HL-2135W / HL-2270DW only) .......................................................................64
Default settings..................................................................................................................................64
4 Routine Maintenance 66
Replacing consumable items...................................................................................................................66
Consumables.....................................................................................................................................66
Before replacing the consumable items ............................................................................................67
Toner cartridge ..................................................................................................................................70
Drum unit ...........................................................................................................................................77
ii

Cleaning ..................................................................................................................................................83
Cleaning the outside of the machine .................................................................................................84
Cleaning the corona wire...................................................................................................................85
Cleaning the drum unit ......................................................................................................................87
Cleaning the paper pick-up roller.......................................................................................................94
Packing and shipping the machine ..........................................................................................................96
5 Troubleshooting 100
Identifying your problem ........................................................................................................................100
Error messages in the Status Monitor ...................................................................................................101
Paper handling ......................................................................................................................................103
Paper jams and how to clear them ........................................................................................................105
Improving the print quality......................................................................................................................112
Solving print problems ...........................................................................................................................119
Network problems (HL-2135W / HL-2250DN / HL-2270DW only) .........................................................120
Other problems......................................................................................................................................120
For Macintosh with USB ..................................................................................................................120
A Appendix 121
Machine specifications...........................................................................................................................121
Engine .............................................................................................................................................121
Controller .........................................................................................................................................122
Software ..........................................................................................................................................123
Control panel ...................................................................................................................................123
Paper handling ................................................................................................................................123
Media specifications ........................................................................................................................124
Supplies...........................................................................................................................................125
Dimensions / weights.......................................................................................................................125
Other................................................................................................................................................126
Computer requirements...................................................................................................................127
Important information for choosing your paper................................................................................128
Symbol and character sets (HL-2250DN / HL-2270DW only) ...............................................................131
How to use Web Based Management (Web browser) ....................................................................131
Symbol and character sets list.........................................................................................................132
Quick reference for bar code control commands
(HL-2250DN / HL-2270DW only)........................................................................................................134
Print bar codes or expanded characters..........................................................................................134
B Appendix (for Europe and Other Countries) 141
Brother numbers....................................................................................................................................141
C Appendix (for USA and Canada) 142
Brother numbers....................................................................................................................................142
D Index 145
iii
1
Note
Printing Methods 1
About this machine 1
Front view and Back view 1
1
2
11
3
10
9
4
5
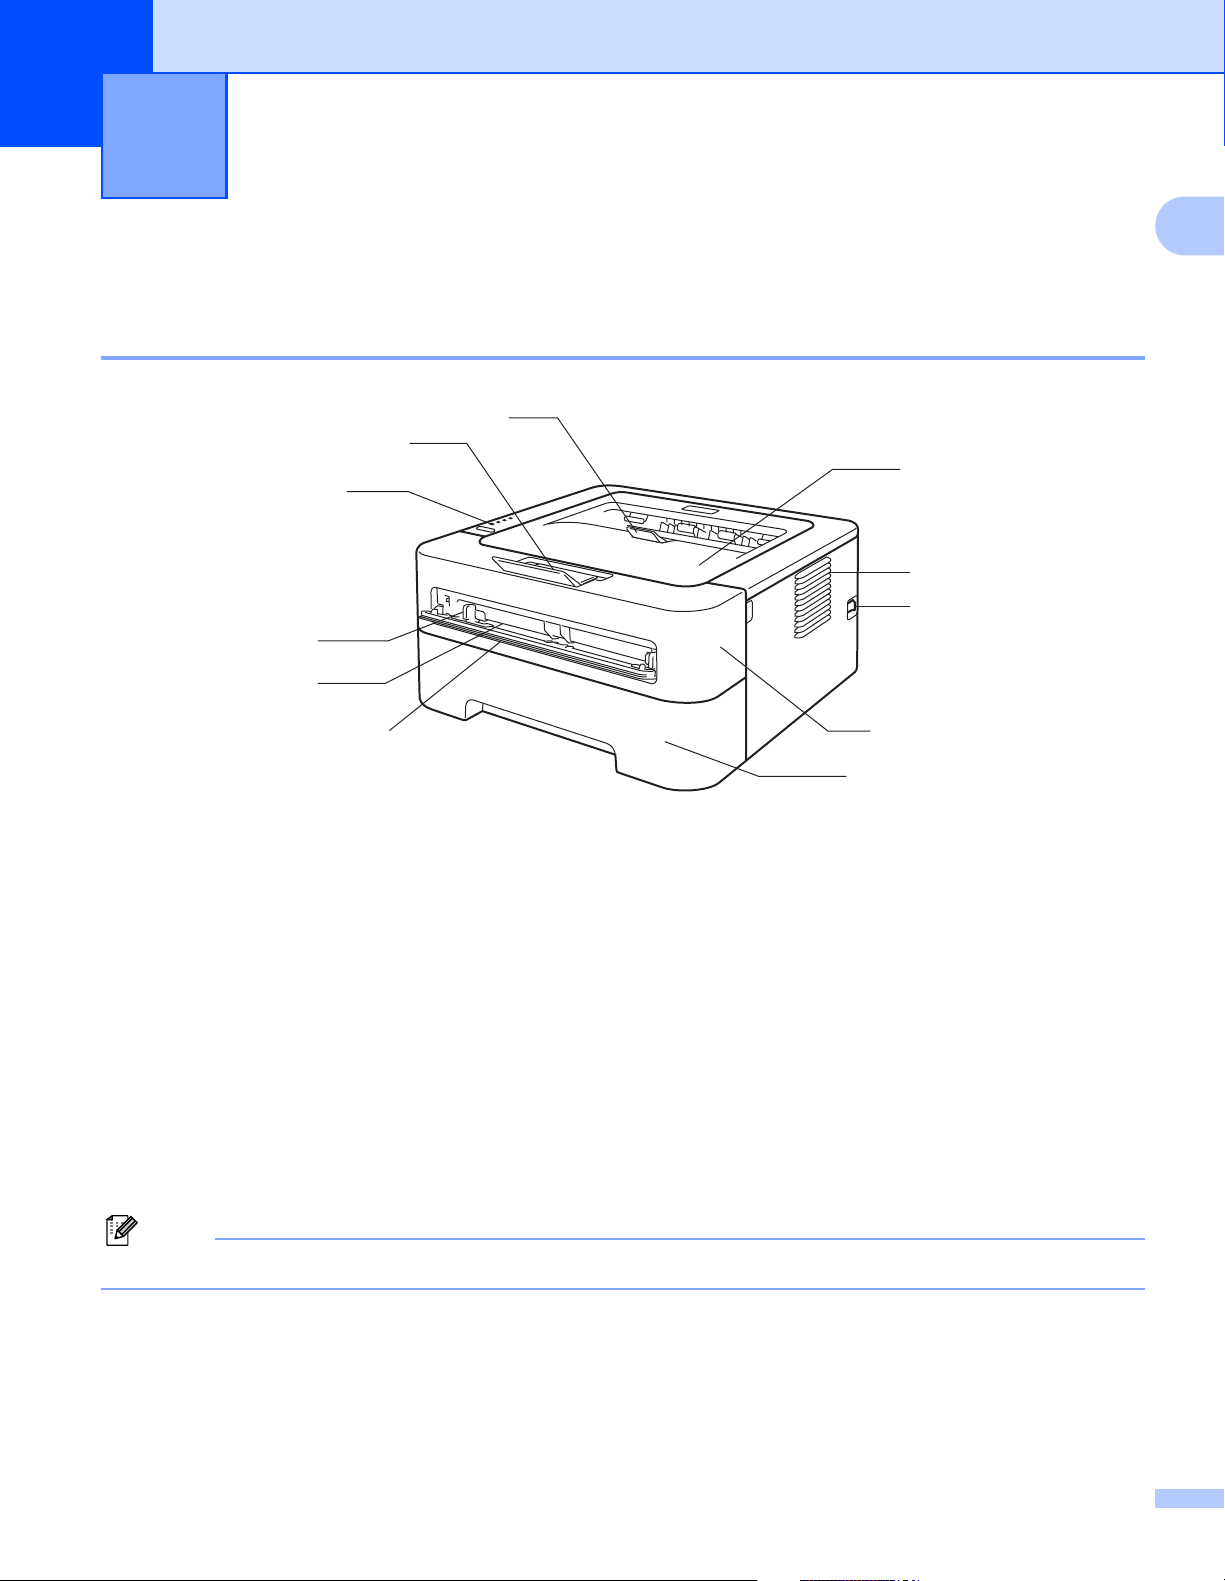
1
6
1 Face-down output tray support flap 2 (support flap 2)
2 Face-down output tray support flap 1 (support flap 1)
3 Control panel
4 Manual feed paper guide
5 Manual feed slot
6 Manual feed slot cover (Not available for HL-2130 / HL-2132 / HL-2135W / HL-2220)
7 Paper tray
8 Front cover
9 Power switch
10 Ventilation hole
11 Face-down output tray
The illustrations in this guide show the HL-2270DW.
8
7
1
Printing Methods
1
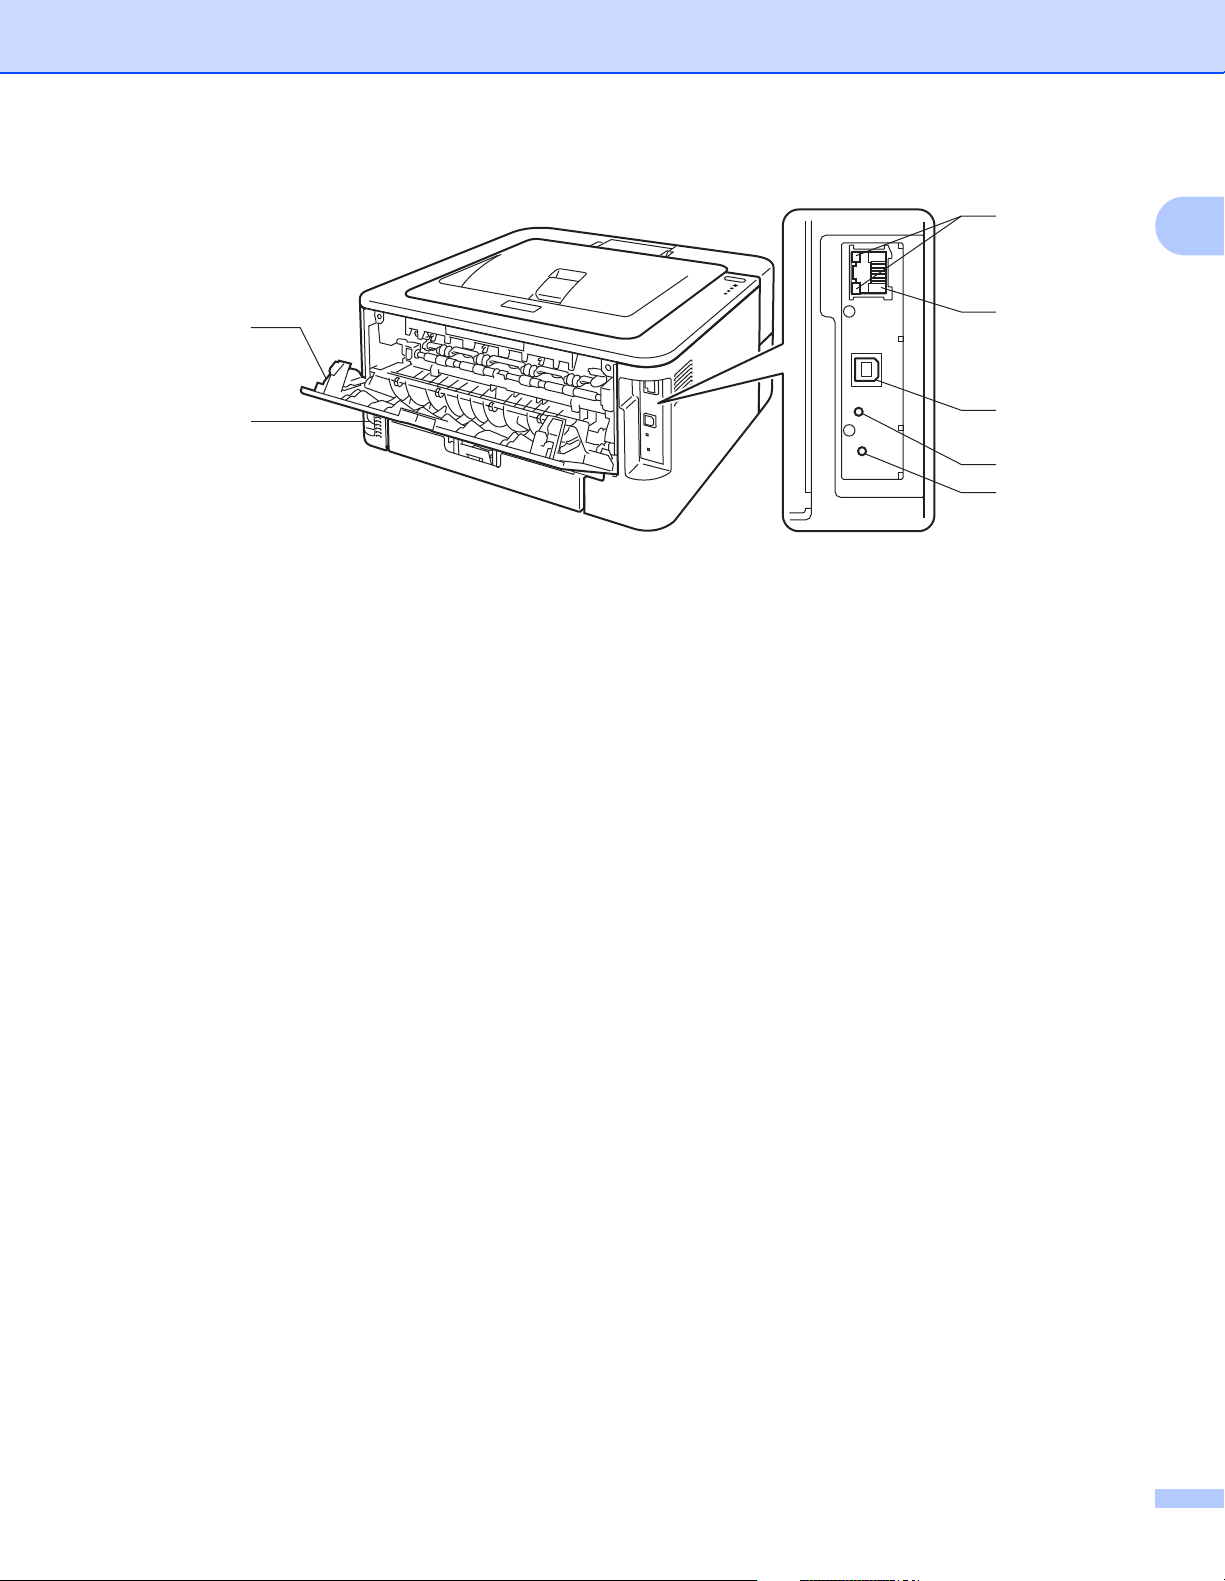
2
1 Back cover (Face-up output tray when open)
2 AC power connector
3 HL-2135W / HL-2270DW: Wireless setup button
4 HL-2135W / HL-2270DW: Wireless Activity LED
5 USB interface connector
6 HL-2250DN / HL-2270DW: 10BASE-T/100BASE-TX port
7 HL-2250DN / HL-2270DW: Network status LEDs
7
6
5
4
3
1
2
Printing Methods
Acceptable paper and other print media 1
Print quality may vary according to the type of paper you are using.
You can use the following types of print media: thin paper, plain paper, thick paper, bond paper, recycled
paper, labels or envelopes.
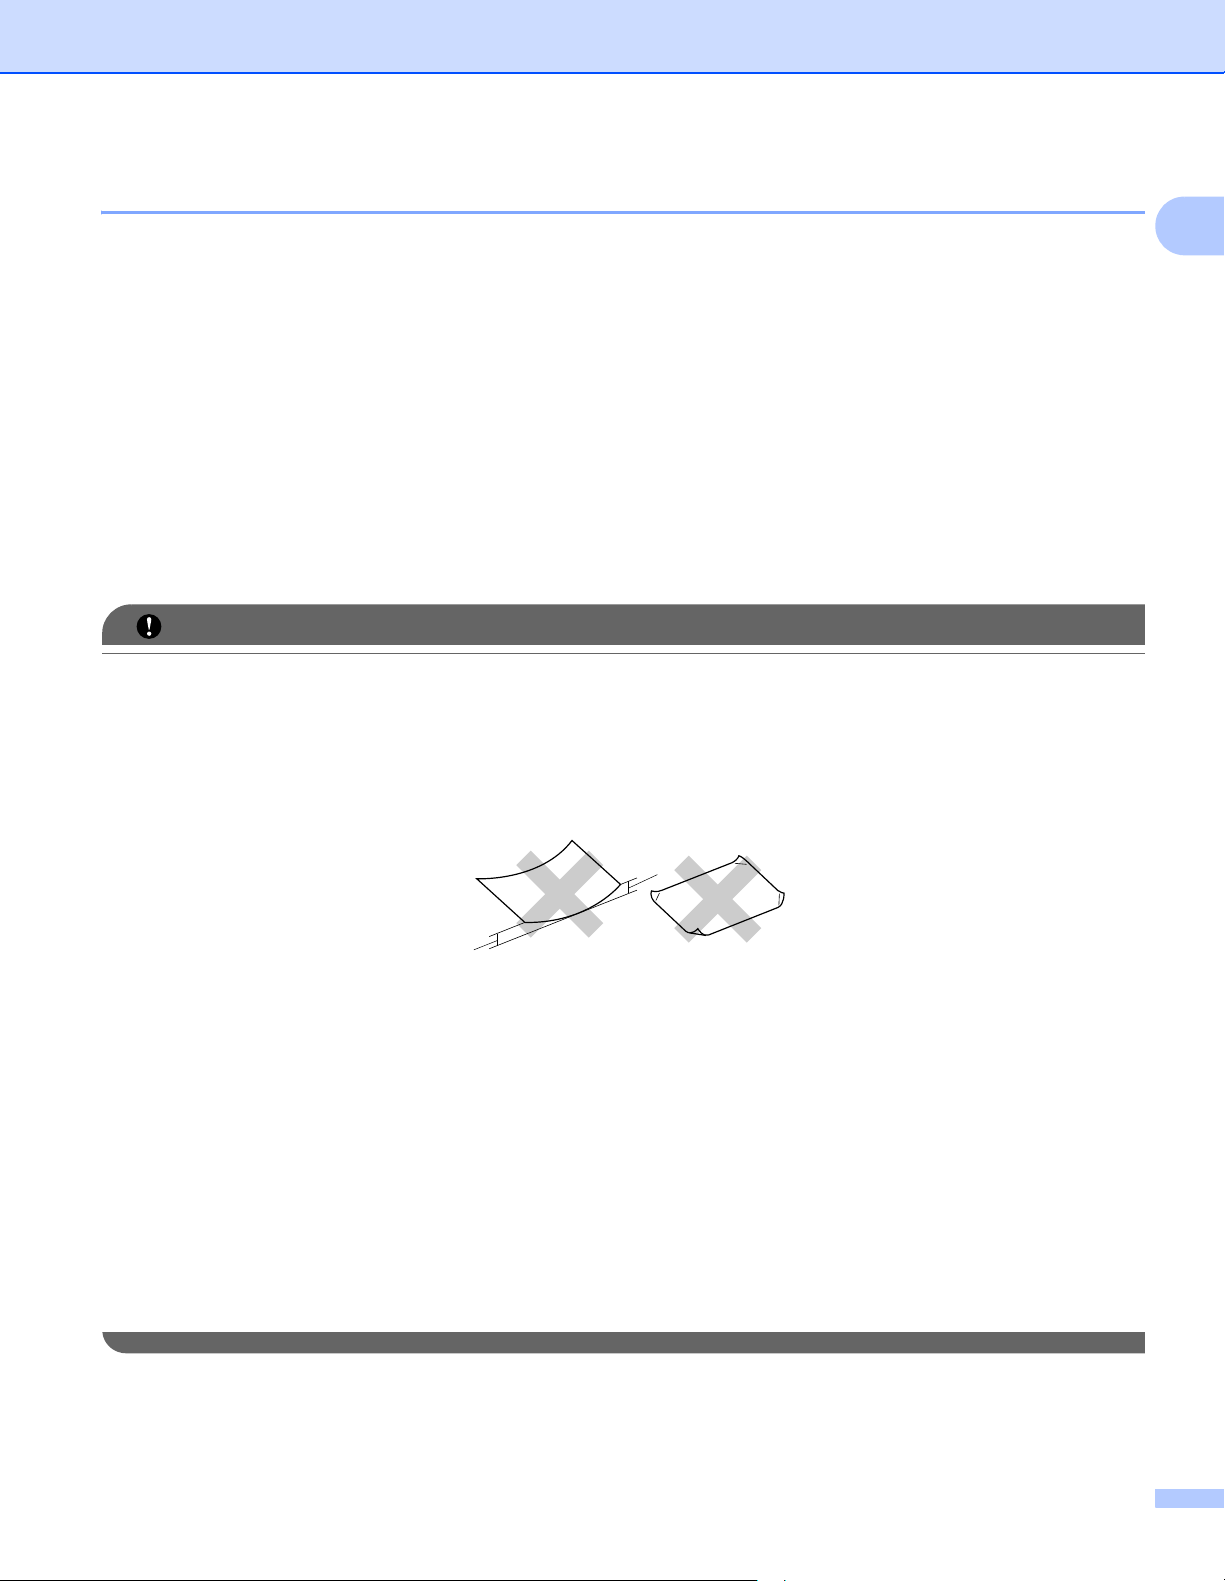
For best results, follow the instructions below:
DO NOT put different types of paper in the paper tray at the same time because it may cause paper jams
or misfeeds.
For proper printing, you must choose the same paper size from your software application as the paper in
the tray.
Avoid touching the printed surface of the paper immediately after printing.
Before you buy a lot of paper, test a small quantity to make sure that the paper is suitable.
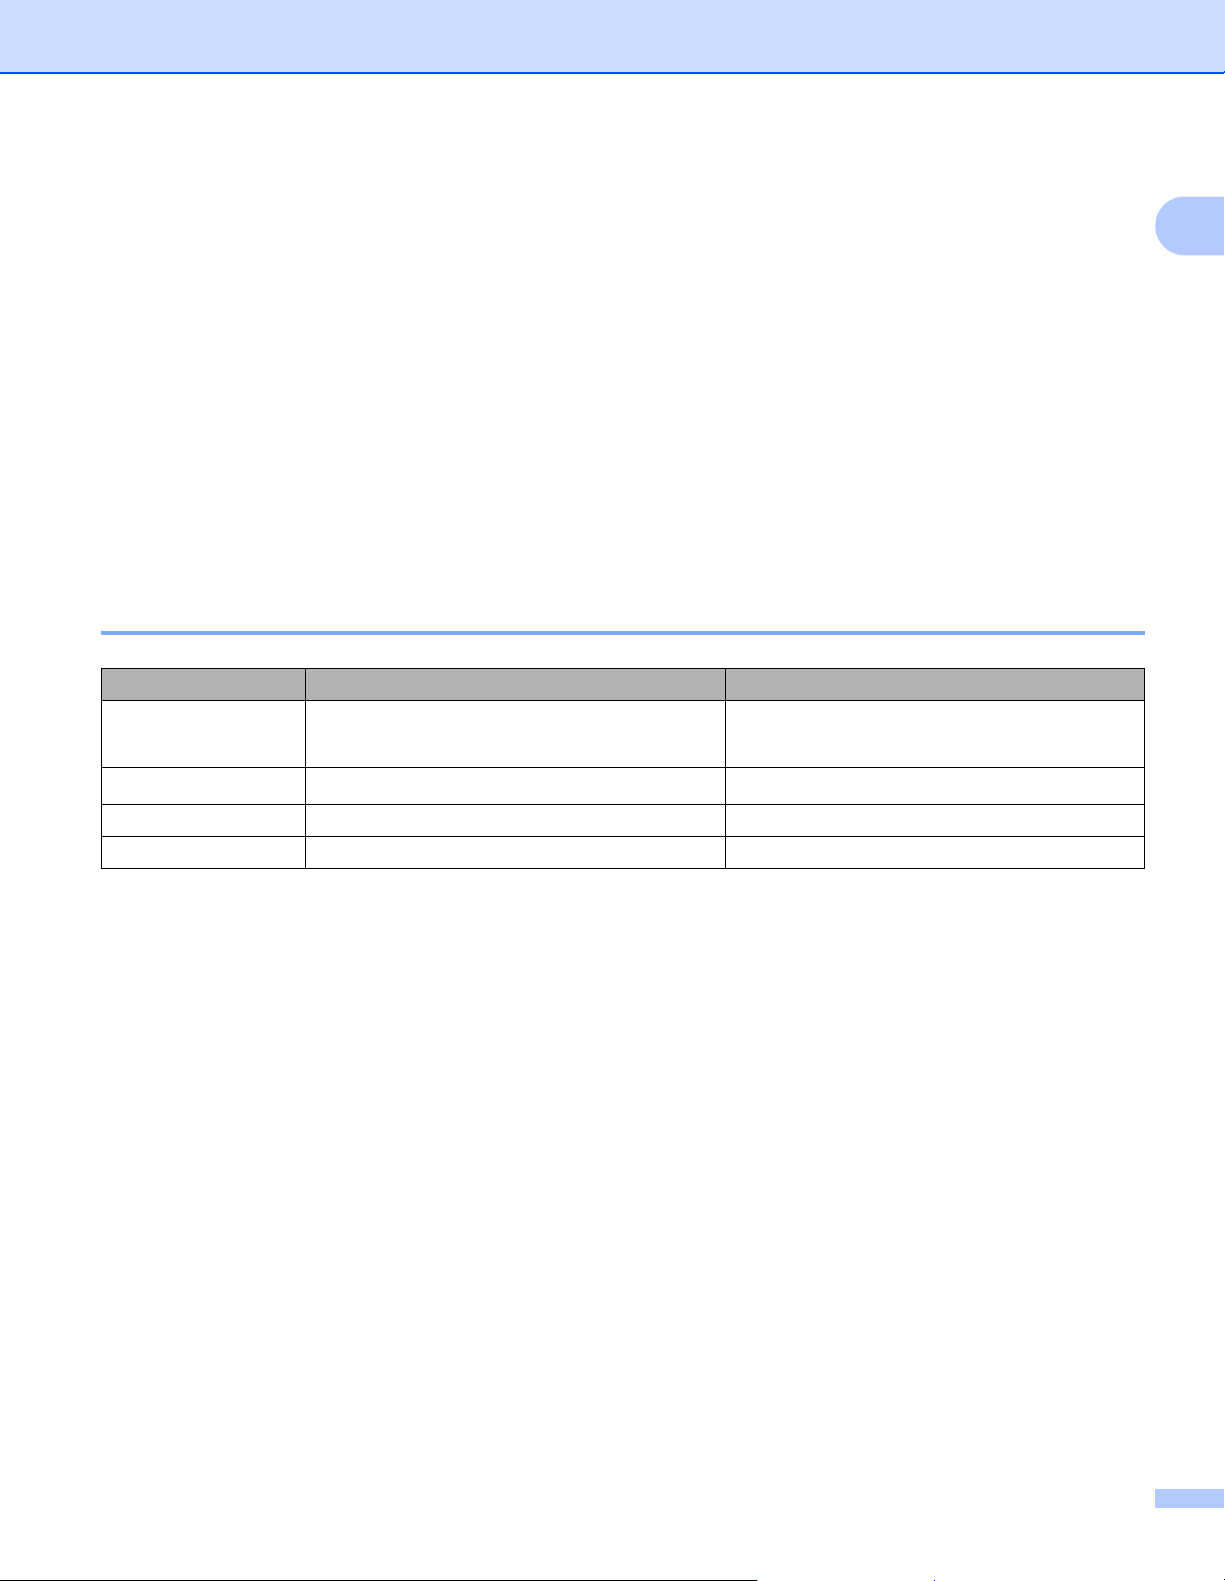
Recommended paper and print media 1
Europe USA
Plain paper
Recycled paper
Labels Avery laser label L7163 Avery laser labels white #5160
Envelopes Antalis River series (DL) (No specific brand recommended)
Xerox Premier TCF 80 g/m
Xerox Business 80 g/m
Xerox Recycled Supreme 80 g/m
2
2
2
Xerox 4200 20 lb
Hammermill Laser Print 24 lb (90g/m
(No specific brand recommended)
2
)
1
3
Printing Methods
Type and size of paper 1
The machine feeds paper from the installed paper tray or the manual feed slot.
The names for the paper trays in the printer driver and this guide are as follows:
Paper tray Tray 1
Manual feed slot Manual
Duplex tray for automatic duplex
printing (HL-2240D / HL-2242D /
HL-2250DN / HL-2270DW only)
When looking at this page, you can jump to the page for each printing method by clicking p in the table.
Media type Tray 1 Manual DX Choose the media type
Plain paper
75 to 105 g/m
Recycled paper pppRecycled Paper
Bond paper
Rough paper– 60 to 163 g/m
(16 to 43 lb)
Thin paper
60 to 75 g/m
Thick paper
105 to 163 g/m
Labels p
Envelopes
2
(20 to 28 lb)
2
(16 to 20 lb)
2
(28 to 43 lb)
2
DX
from the printer driver
Plain Paper
ppp
Bond Paper
p
Thin Paper
ppp
Thick Paper or Thicker
p
Paper
Label
A4 or Letter
Envelopes
p
Env. Thin
1
Tray 1 Manual DX
Paper size A4, Letter, B5 (ISO/JIS), A5, A5
(Long Edge), B6 (ISO), A6,
Executive
Number of sheets
(80 g/m
2
/ 20 lb)
250 sheets Single sheet
Env. Thick
Width: 76.2 to 216 mm (3 to 8.5 in.)
Length: 116 to 406.4 mm (4.6 to
16 in.)
A4
4
Printing Methods
Recommended paper specifications 1
The following paper specifications are suitable for this machine.
Basis weight
Thickness 80-110 m
Roughness Higher than 20 sec.
Stiffness
Grain direction Long grain
Volume resistivity
Surface resistivity
Filler CaCO
Ash content Below 23 wt%
Brightness Higher than 80%
Opacity Higher than 85%
75-90 g/m
90-150 cm
10e
10e
2
(20-24 lb)
3
/100
9
-10e11 ohm
9
-10e12 ohm-cm
(Neutral)
3
Use paper that is made for plain-paper copying.
2
Use paper that is 75 to 90 g/m
(20 to 24 lb).
Use long grain paper with a neutral Ph value, and a moisture content of approx. 5%.
This machine can use recycled paper that meets DIN 19309 specifications.
1
(To help you choose which paper to use with this machine, see Important information for choosing your paper
on page 128.)
5
Printing Methods
IMPORTANT
1
1
Handling and using special paper 1
The machine is designed to work well with most types of xerographic and bond paper. However, some paper
variables may have an effect on print quality or handling reliability. Always test samples of paper before
purchasing to ensure desirable performance. Store paper in its original packaging and keep it sealed. Keep
the paper flat and away from moisture, direct sunlight and heat.
Some important guidelines when selecting paper are:
DO NOT use inkjet paper because it may cause a paper jam or damage your machine.
Preprinted paper must use ink that can withstand the temperature of the machine’s fusing process 200
degrees centigrade (392 degrees Fahrenheit).
If you use bond paper, paper having a rough surface or paper that is wrinkled or creased, the paper may
exhibit degraded performance.
Types of paper to avoid 1
Some types of paper may not perform well or may cause damage to your machine.
1
DO NOT use paper:
• that is highly textured
• that is extremely smooth or shiny
• that is curled or warped
1 A curl of 2 mm (0.08 in.) or greater may cause jams to occur.
• that is coated or has a chemical finish
• that is damaged, creased or folded
• that exceeds the recommended weight specification in this guide
• with tabs and staples
• with letterheads using low temperature dyes or thermography
• that is multipart or carbonless
• that is designed for inkjet printing
If you use any of the types of paper listed above, they may damage your machine. This damage is not
covered under any Brother warranty or service agreement.
6
Printing Methods
IMPORTANT
Envelopes 1
Most envelopes designed for laser printers will be suitable for your machine. However, some envelopes may
have feed and print-quality problems because of the way they have been made. A suitable envelope should
have edges with straight, well-creased folds and the leading edge should not be thicker than two sheets of
paper. The envelope should lie flat and not be of baggy or flimsy construction. You should buy quality
envelopes from a supplier who understands that you will be using the envelopes in a laser machine.
We recommend that you print a test envelope to make sure the print results are what you want.
Types of envelopes to avoid 1
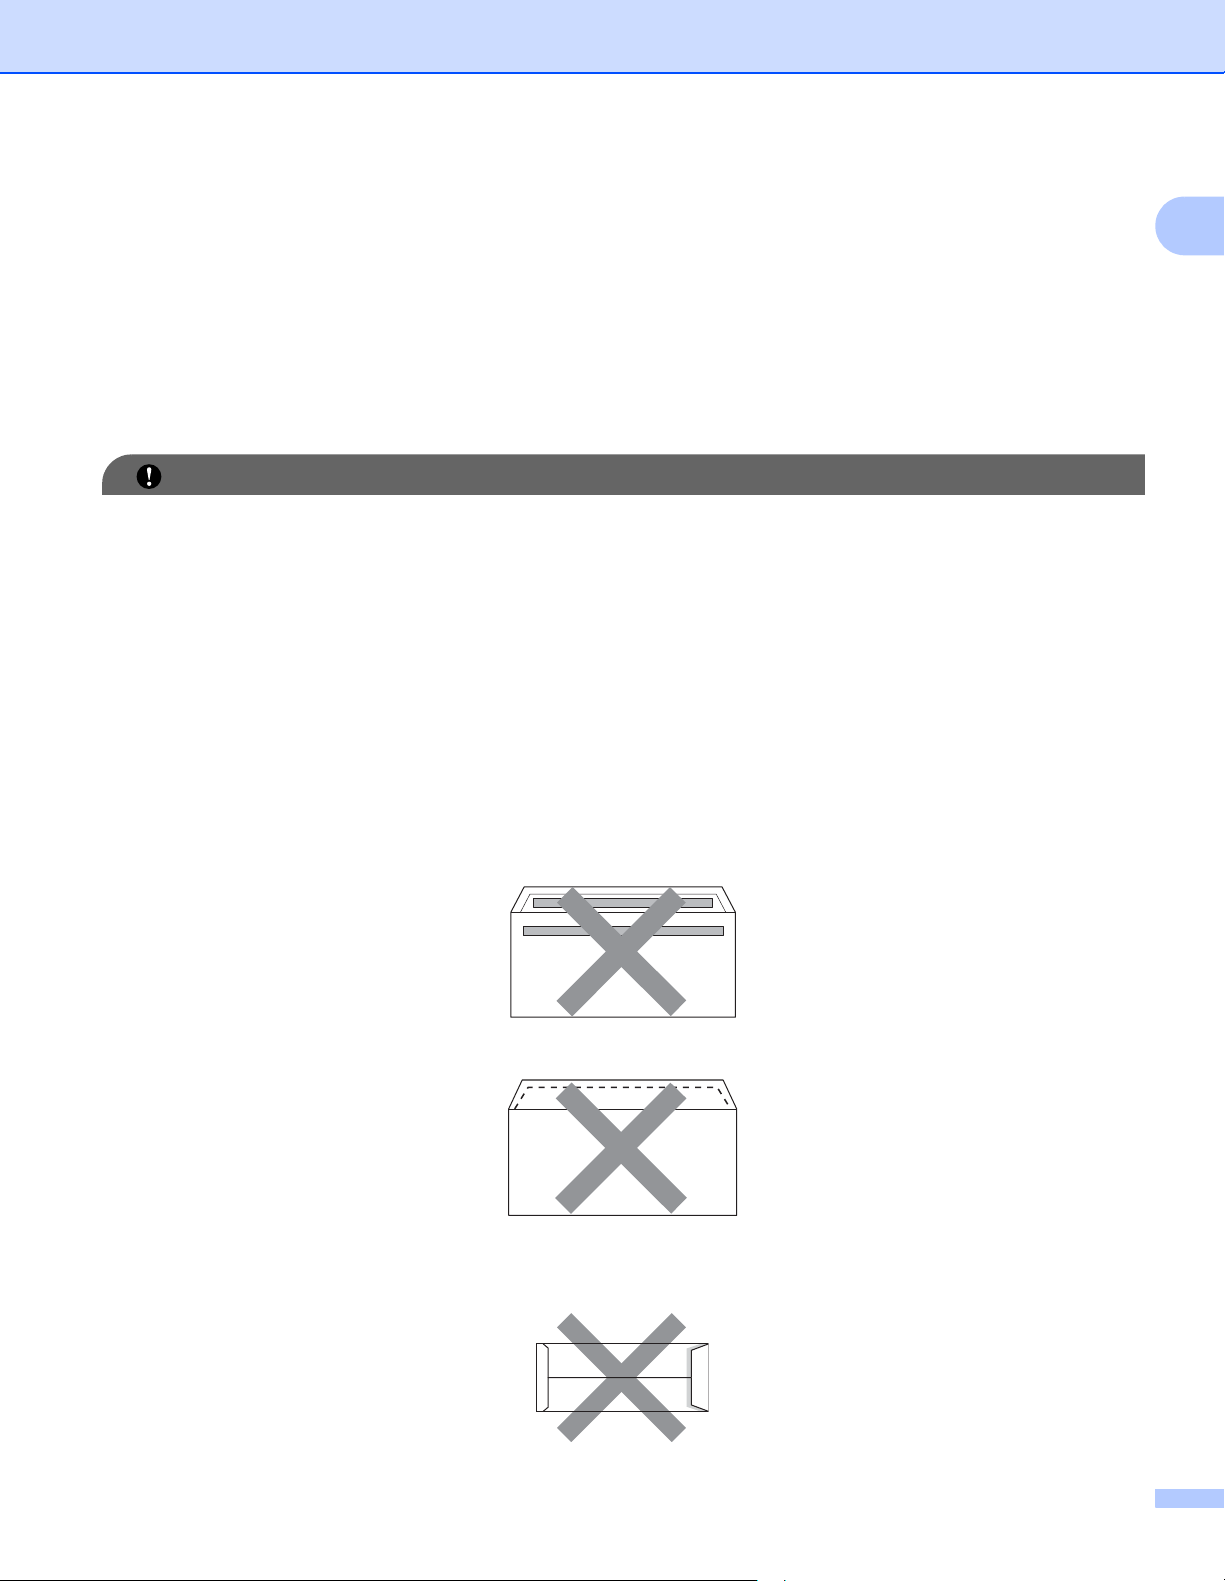
DO NOT use envelopes:
• that are damaged, curled, wrinkled, irregularly shaped, extremely shiny or textured envelopes.
• with clasps, staples, snaps, tie strings, self-adhesive components, windows, holes, cutouts or
perforations.
• that are of a baggy construction, not sharply creased, embossed (have raised writing on them) or
preprinted on the inside.
• that were previously printed by a laser / LED printer.
• that cannot be arranged when put in a pile.
• that are made of paper that weighs more than the paper weight specifications for the machine.
1
• with edges that are not straight or consistently square.
• with glue on surface as shown in figure below
• with double flaps as shown in figure below
• with sealing flaps that are not folded down when purchased
• with sealing flaps as shown in figure below
7
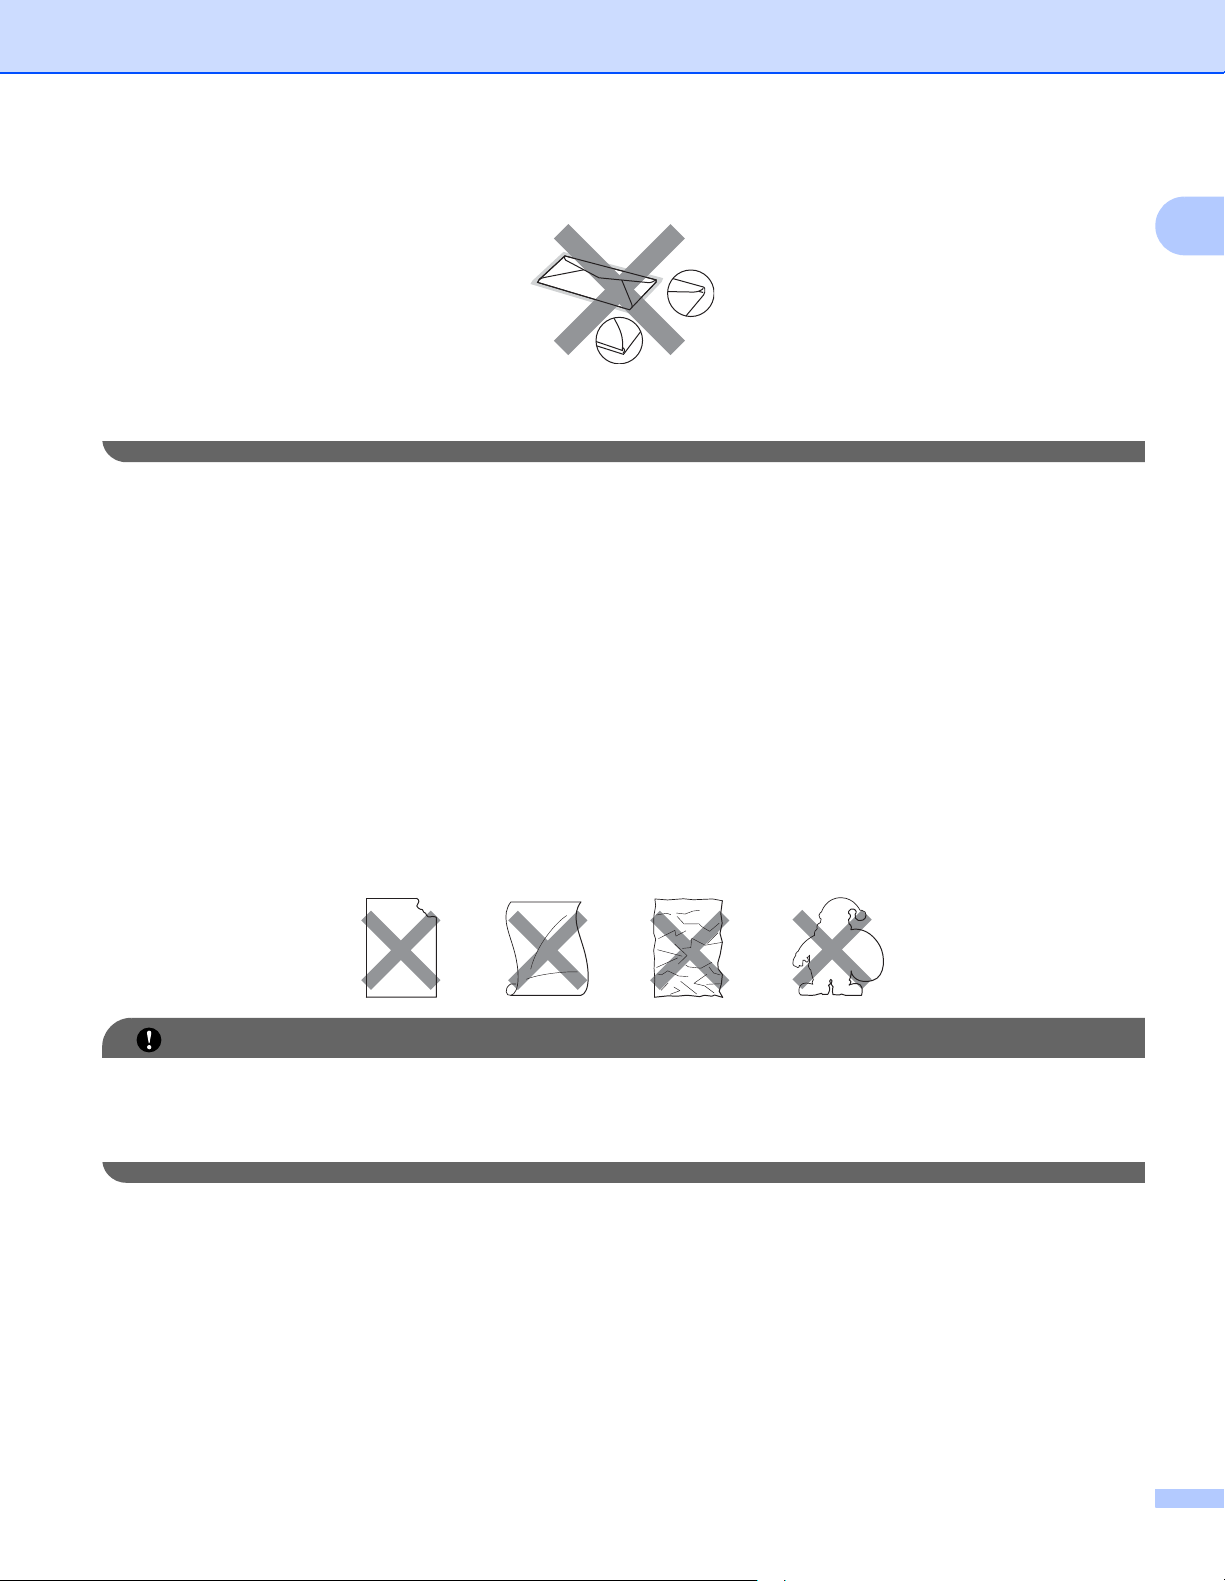
Printing Methods
IMPORTANT
• with each side folded as shown in figure below
If you use any of the types of envelopes listed above, they may damage your machine. This damage may
not be covered under any Brother warranty or service agreement.
Labels 1
The machine will print on most types of labels designed for use with a laser printer. Labels should have an
adhesive that is acrylic-based since this material is more stable at the high temperatures in the fuser unit.
Adhesives should not come in contact with any part of the machine, because the label stock may stick to the
drum unit or rollers and cause jams and print quality problems. No adhesive should be exposed between the
labels. Labels should be arranged so that they cover the entire length and width of the sheet. Using labels
with spaces may result in labels peeling off and causing serious jams or print problems.
1
All labels used in this machine must be able to withstand a temperature of 200 degrees centigrade (392
degrees Fahrenheit) for a period of 0.1 seconds.
Do not feed a label sheet through the machine more than one time.
Types of labels to avoid 1
Do not use labels that are damaged, curled, wrinkled or an unusual shape.
• Avoid feeding labels with the carrier sheet exposed because your machine will be damaged.
• Label sheets should not exceed the paper weight specifications described in this User’s Guide. Labels
exceeding this specification may not feed or print properly and may cause damage to your machine.
8
Printing Methods
Unprintable area 1
The area of the paper that cannot be printed on is shown in the table below:
Portrait
1
24
3
A4 Letter Legal B5 (ISO) Executive A5 A6 B6 (ISO)
1 4.23 mm
(0.16 in.)
2 6.01 mm
(0.24 in.)
3 4.23 mm
(0.16 in.)
4 6.01 mm
(0.24 in.)
4.23 mm
(0.16 in.)
6.35 mm
(0.25 in.)
4.23 mm
(0.16 in.)
6.35 mm
(0.25 in.)
4.23 mm
(0.16 in.)
6.35 mm
(0.25 in.)
4.23 mm
(0.16 in.)
6.35 mm
(0.25 in.)
4.23 mm
(0.16 in.)
6.01 mm
(0.24 in.)
4.23 mm
(0.16 in.)
6.01 mm
(0.24 in.)
4.23 mm
(0.16 in.)
6.35 mm
(0.25 in.)
4.23 mm
(0.16 in.)
6.35 mm
(0.25 in.)
4.23 mm
(0.16 in.)
6.01 mm
(0.24 in.)
4.23 mm
(0.16 in.)
6.01 mm
(0.24 in.)
4.23 mm
(0.16 in.)
6.01 mm
(0.24 in.)
4.23 mm
(0.16 in.)
6.01 mm
(0.24 in.)
4.23 mm
(0.16 in.)
6.01 mm
(0.24 in.)
4.23 mm
(0.16 in.)
6.01 mm
(0.24 in.)
1
Landscape
24
A4 Letter Legal B5 (ISO) Executive A5 A6 B6 (ISO)
1 4.23 mm
(0.16 in.)
2 5.0 mm
(0.19 in.)
3 4.23 mm
(0.16 in.)
4 5.0 mm
(0.19 in.)
4.23 mm
(0.16 in.)
5.08 mm
(0.2 in.)
4.23 mm
(0.16 in.)
5.08 mm
(0.2 in.)
4.23 mm
(0.16 in.)
5.08 mm
(0.2 in.)
4.23 mm
(0.16 in.)
5.08 mm
(0.2 in.)
4.23 mm
(0.16 in.)
5.0 mm
(0.19 in.)
4.23 mm
(0.16 in.)
5.0 mm
(0.19 in.)
1
3
4.23 mm
(0.16 in.)
5.08 mm
(0.2 in.)
4.23 mm
(0.16 in.)
5.08 mm
(0.2 in.)
4.23 mm
(0.16 in.)
5.0 mm
(0.19 in.)
4.23 mm
(0.16 in.)
5.0 mm
(0.19 in.)
4.23 mm
(0.16 in.)
5.0 mm
(0.19 in.)
4.23 mm
(0.16 in.)
5.0 mm
(0.19 in.)
4.23 mm
(0.16 in.)
5.0 mm
(0.19 in.)
4.23 mm
(0.16 in.)
5.0 mm
(0.19 in.)
9
Printing Methods
Printing methods 1
Printing on plain paper, recycled paper, bond paper, thin paper or thick paper 1
Printing from the paper tray (plain paper, recycled paper and thin paper only) 1
(For the recommended paper to use, see Type and size of paper on page 4.)
a Pull the paper tray completely out of the machine.
1
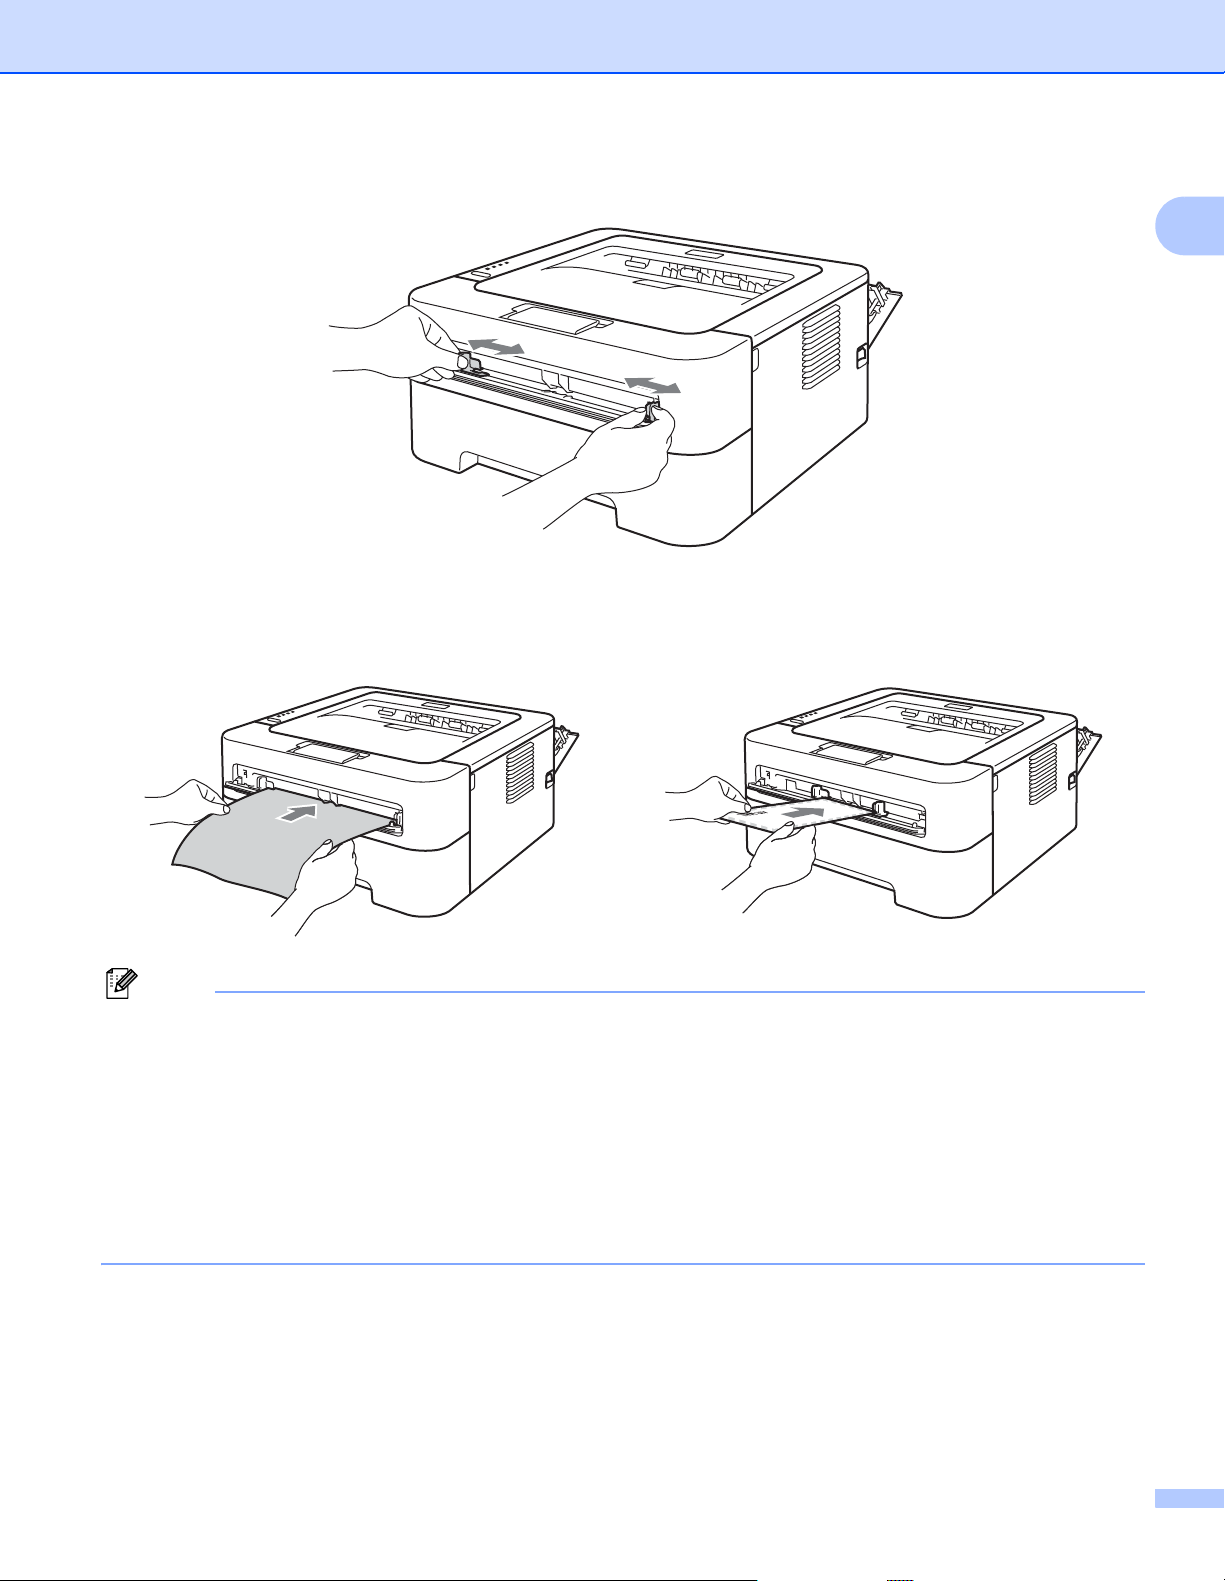
b While pressing the green paper-guide release lever, slide the paper guides to fit the paper size. Make
sure that the guides are firmly in the slots.
10
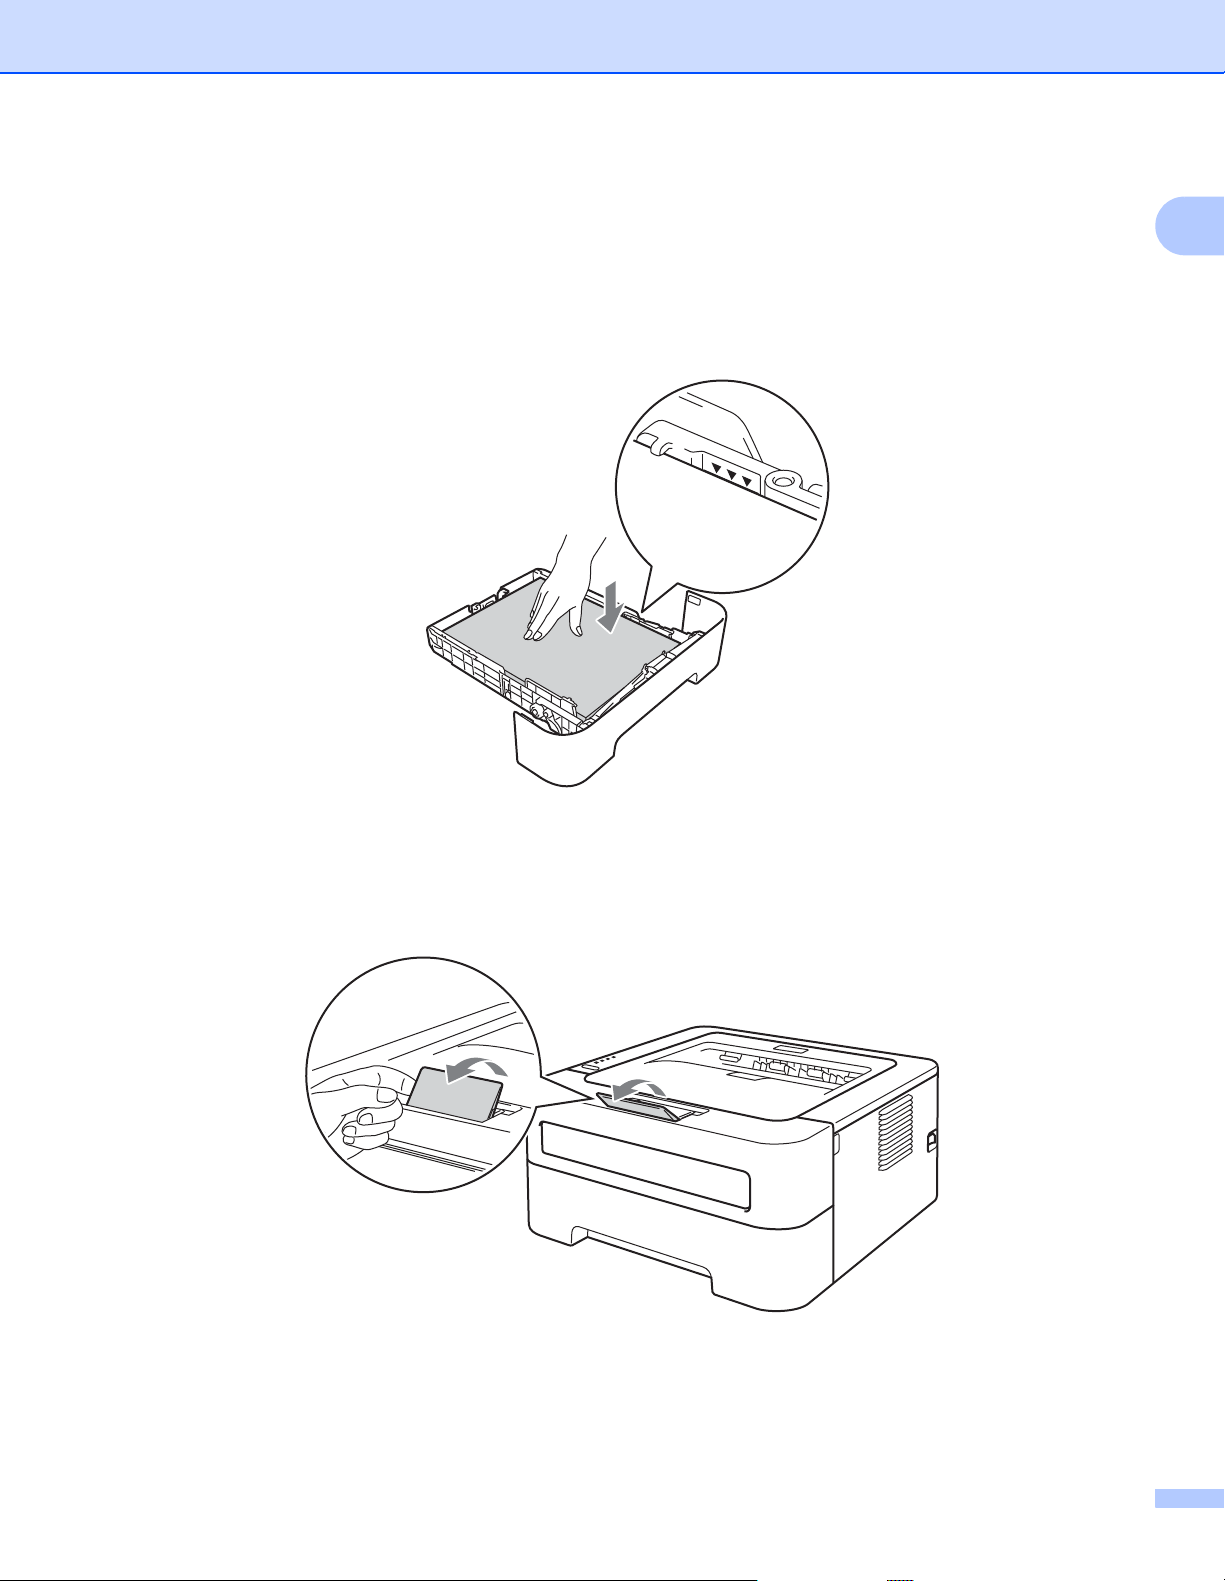
Printing Methods
c Put paper in the tray and make sure:
The paper is below the maximum paper mark (bbb).
Over filling the paper tray will cause paper jams.
The side to be printed on must be face down.
The paper guides touch the sides of the paper so it will feed properly.
1
d Put the paper tray firmly back in the machine. Make sure that it is completely inserted into the machine.
e Lift up the support flap 1 to prevent paper from sliding off the face-down output tray, or remove each page
as soon as it comes out of the machine.
11

Printing Methods
f Choose the following from each drop-down list of the printer driver.
Paper Size
A4 Letter Executive A5 B5 B6
A6 JIS B5 A5 Long Edge
Media Type
Plain Paper Thin Paper Recycled Paper
Paper Source
Tray 1
For any other settings, see Driver and Software in Chapter 2.
g Send the print data to the machine.
1
12
Printing Methods
Note
Printing from the Manual feed slot 1
(For the recommended paper to use, see Type and size of paper on page 4.)
The machine automatically turns on the Manual Feed mode when you put paper in the manual feed slot.
a Lift up the support flap 1 to prevent paper from sliding off the face-down output tray, or remove each page
as soon as it comes out of the machine.
1
b Open the manual feed slot cover. (Not available for HL-2130 / HL-2132 / HL-2135W / HL-2220)
13
Printing Methods
Note
c Using both hands, slide the manual feed paper guides to the width of the paper that you are going to use.
d Using both hands, put one piece of paper in the manual feed slot until the front edge of the paper touches
the paper feed roller. When you feel the machine pull in the paper, let go.
1
• Put the paper into the manual feed slot with the side to be printed face up.
• Make sure that the paper is straight and in the correct position on the manual feed slot. If it is not, the paper
may not be fed properly, resulting in a skewed printout or a paper jam.
• DO NOT put more than one piece of paper in the manual feed slot at any one time, as it may cause a jam.
• If you put any media in the manual feed slot before the machine is in Ready mode, the media may be
ejected without being printed on.
14
Printing Methods
Note
e Choose the following from each drop-down list of the printer driver.
Paper Size
Width: 76.2 to 216 mm (3 to 8.5 in.)
Length: 116 to 406.4 mm (4.6 to 16 in.)
You can use all paper sizes specified for the tray which you use.
Media Type
Plain Paper Thin Paper Thick Paper Thicker Paper Bond Paper Recycled Paper
Paper Source
Manual
For any other settings, see Driver and Software in Chapter 2.
f Send the print data to the machine.
g After the printed page comes out of the machine, put in the next sheet of paper as in Step d above.
Repeat for each page that you want to print.
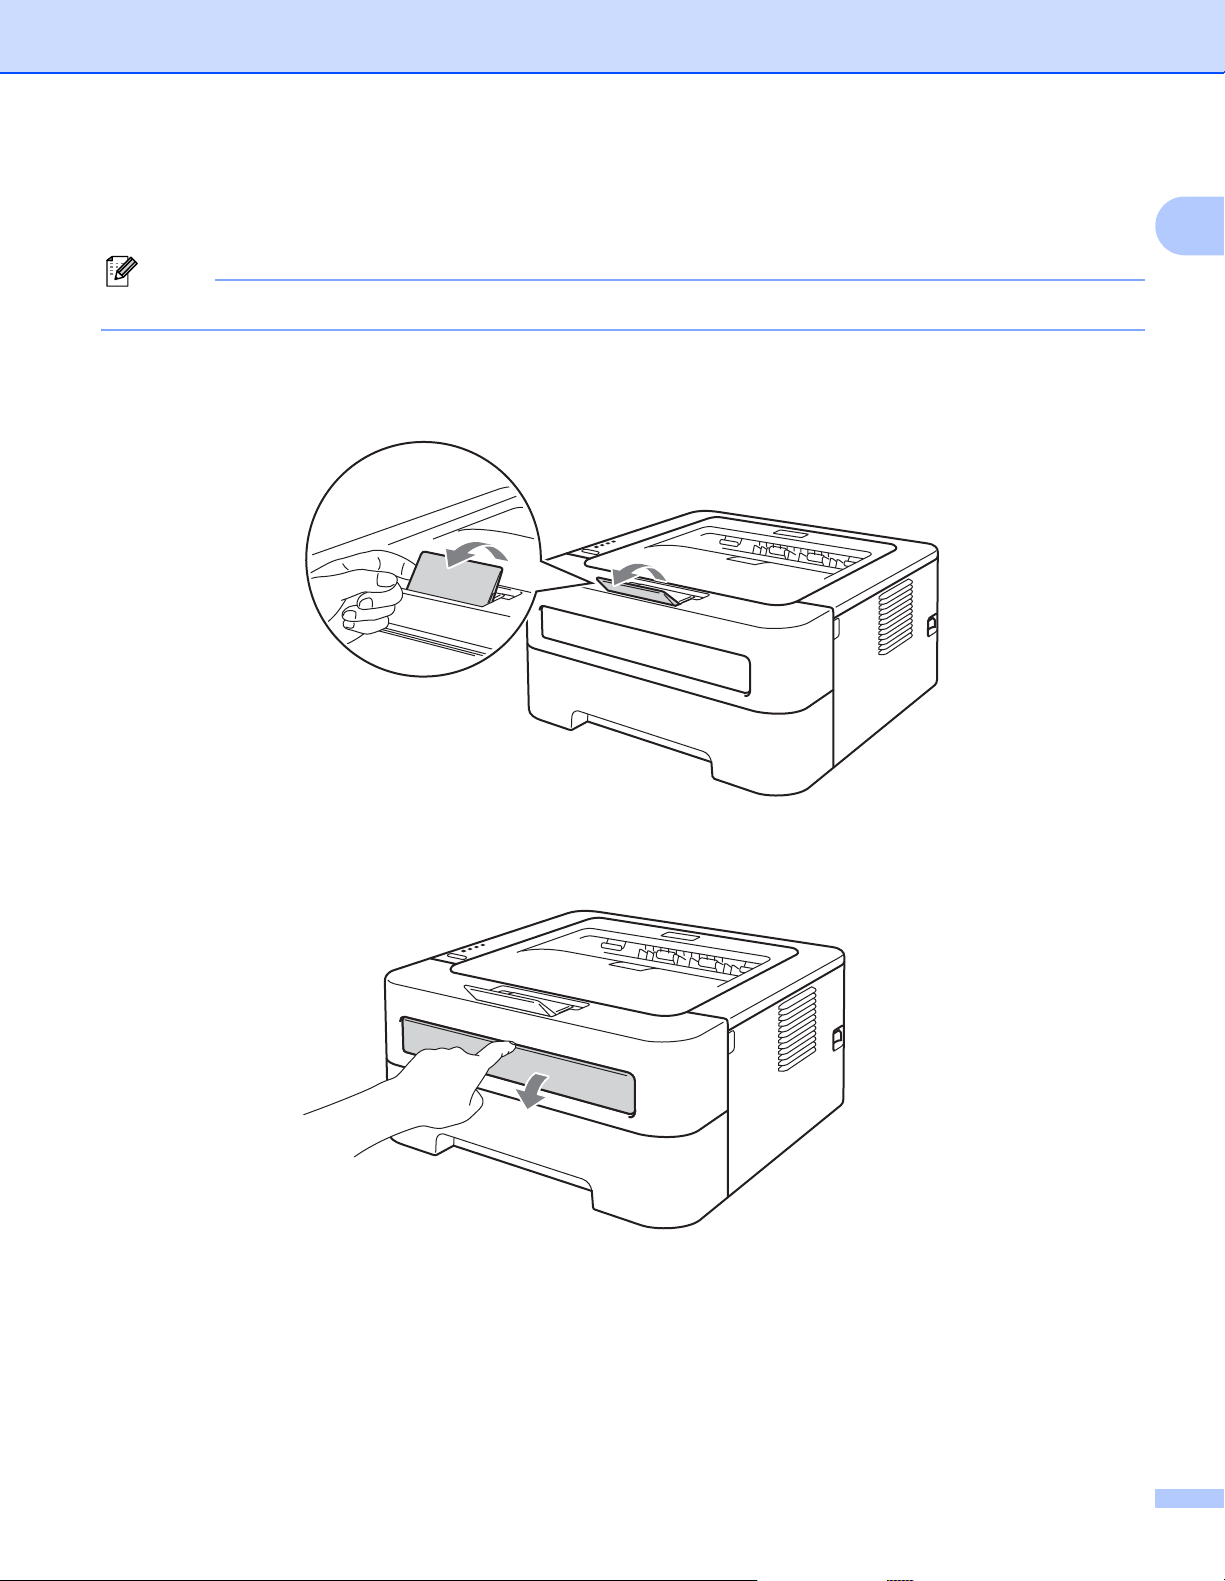
Printing on labels or envelopes 1
1
When the face-up output tray is pulled down, the machine has a straight paper path from the manual feed
slot through to the back of the machine. Use this paper feed and output method when you want to print on
labels or envelopes. (For the recommended paper to use, see Acceptable paper and other print media
on page 3 and Types of envelopes to avoid on page 7.)
The machine automatically turns on the Manual Feed mode when you put paper in the manual feed slot.
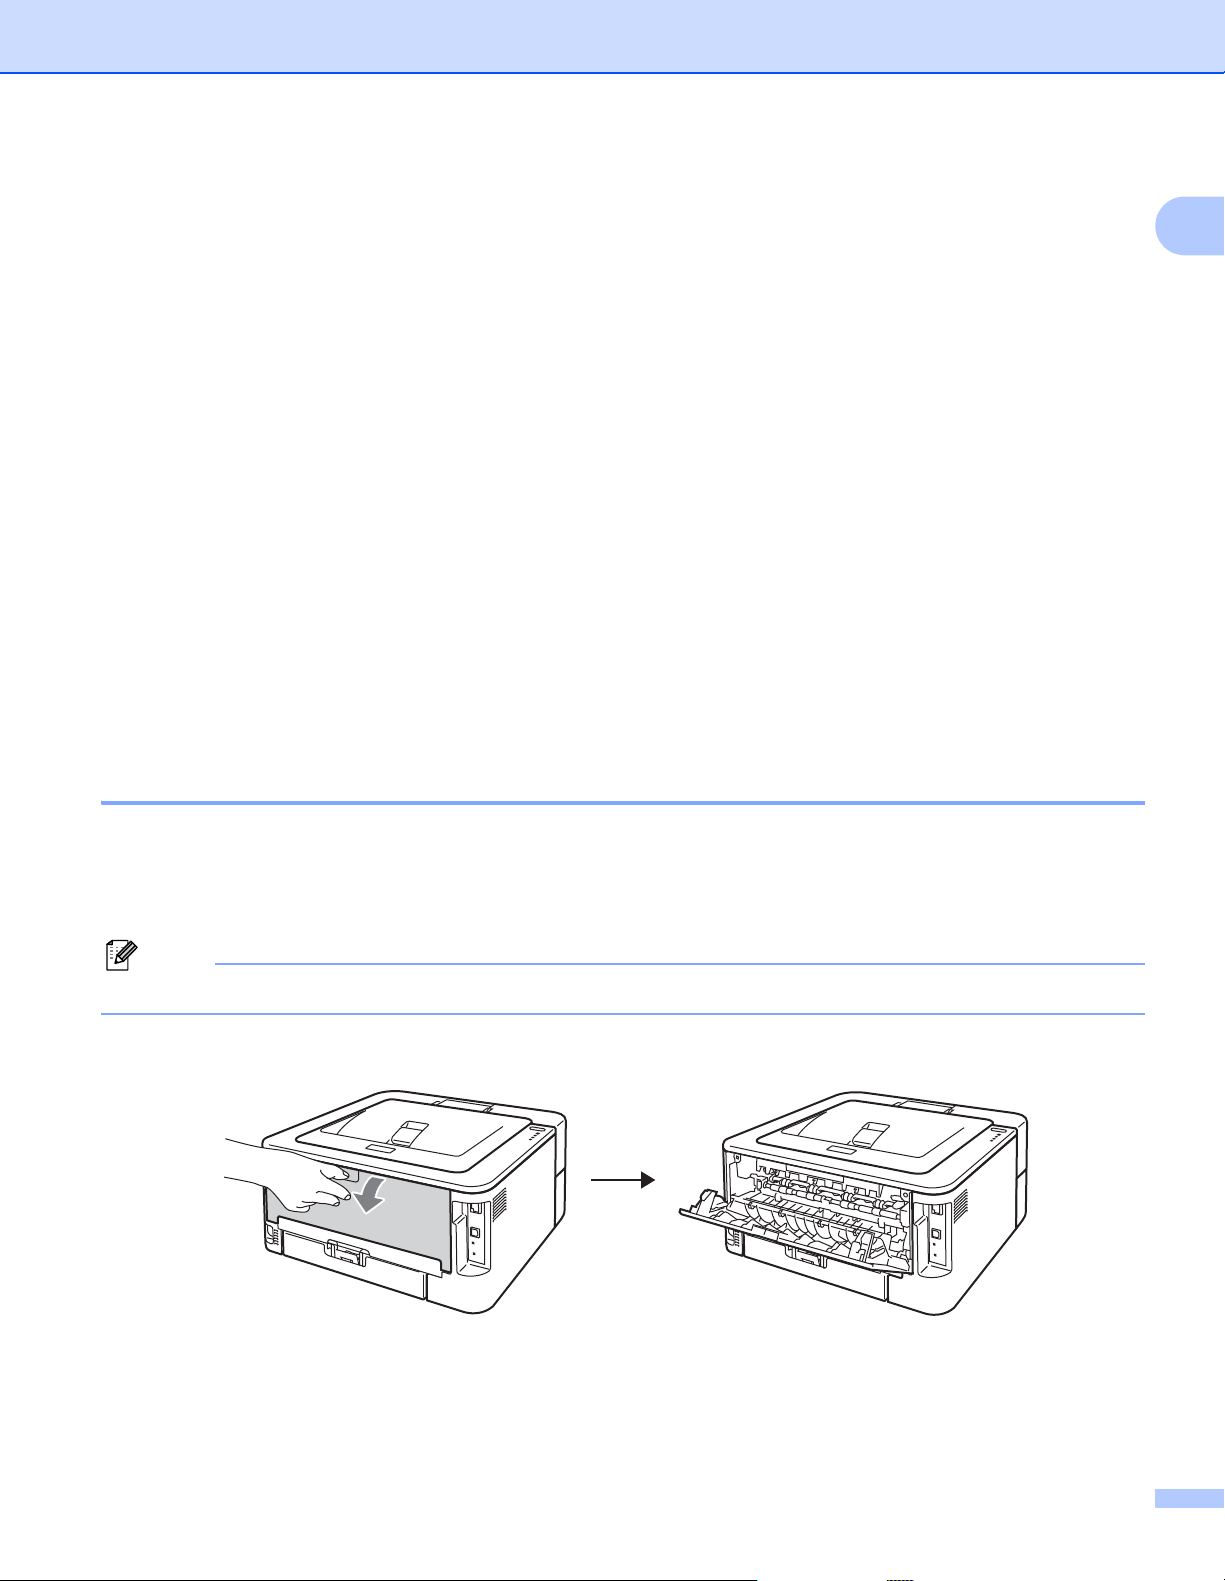
a Open the back cover (face-up output tray).
15
Printing Methods
b <For printing envelopes only> Pull down the two green levers, one on the left-hand side and one on the
right-hand side, as shown in the illustration below.
c Open the manual feed slot cover. (Not available for HL-2130 / HL-2132 / HL-2135W / HL-2220)
1
16
Printing Methods
Note
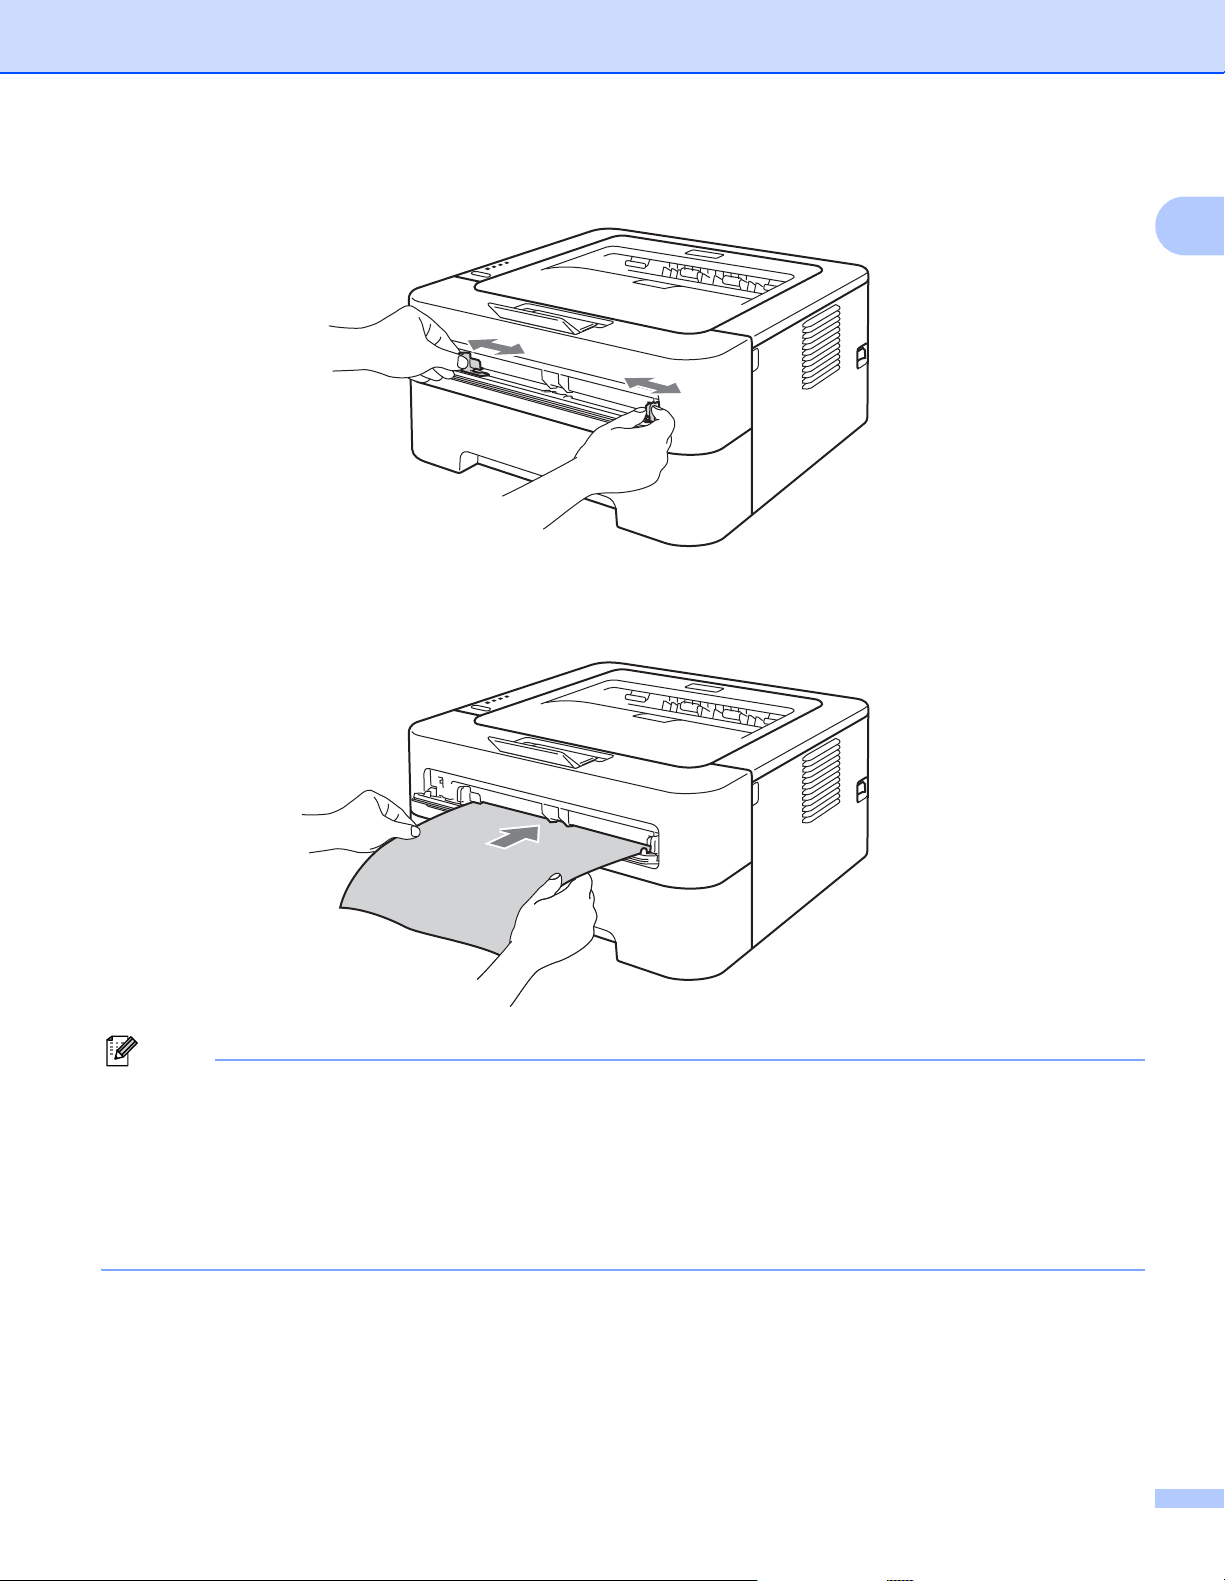
d Using both hands, slide the manual feed paper guides to the width of the paper that you are going to use.
e Using both hands, put one full sheet of labels or one envelope in the manual feed slot until the front edge
touches the paper feed roller. When you feel the machine pull it in, let go.
1
• Put one full sheet of labels or one envelope into the manual feed slot with the side to be printed face up.
• Make sure that the full sheet of labels or the envelope is straight and in the proper position on the manual
feed slot. If it is not, it may not be fed properly, resulting in a skewed printout or a paper jam.
• DO NOT put more than one full sheet of labels or one envelope in the manual feed slot at any one time,
as it may cause a jam.
• DO NOT insert a labels sheet that has previously been used or is missing any labels.
• If you put any Media (paper, envelope and so on) in the manual feed slot before the machine is in Ready
mode, the media may be ejected without being printed on.
17
Printing Methods
Note
f Choose the following from each drop-down list menu of the printer driver.
Paper Size
Envelopes
Com-10 DL C5 Monarch DL Long Edge
Customized paper size
1
You can define your original paper size by choosing User Defined... in Windows® printer driver or Manage Custom Sizes... in
Macintosh printer drivers.
1
Label
A4 Letter
Media Type
Envelopes Env. Thin Env. Thick Label
Paper Source
Manual
• When you use Envelope #10, choose Com-10 for the Paper Size.
1
• For other envelopes that are not listed in the printer driver, such as Envelope #9 or Envelope C6,
choose User Defined... (for Windows
®
printer driver) or Manage Custom Sizes... (for Macintosh
printer driver). For more information on envelope sizes, see Paper size on page 130.
g Send the print data to the machine.
h After the printed page comes out of the machine, put in the next full sheet of labels or envelope as shown
in Step e. Repeat for each page that you want to print.
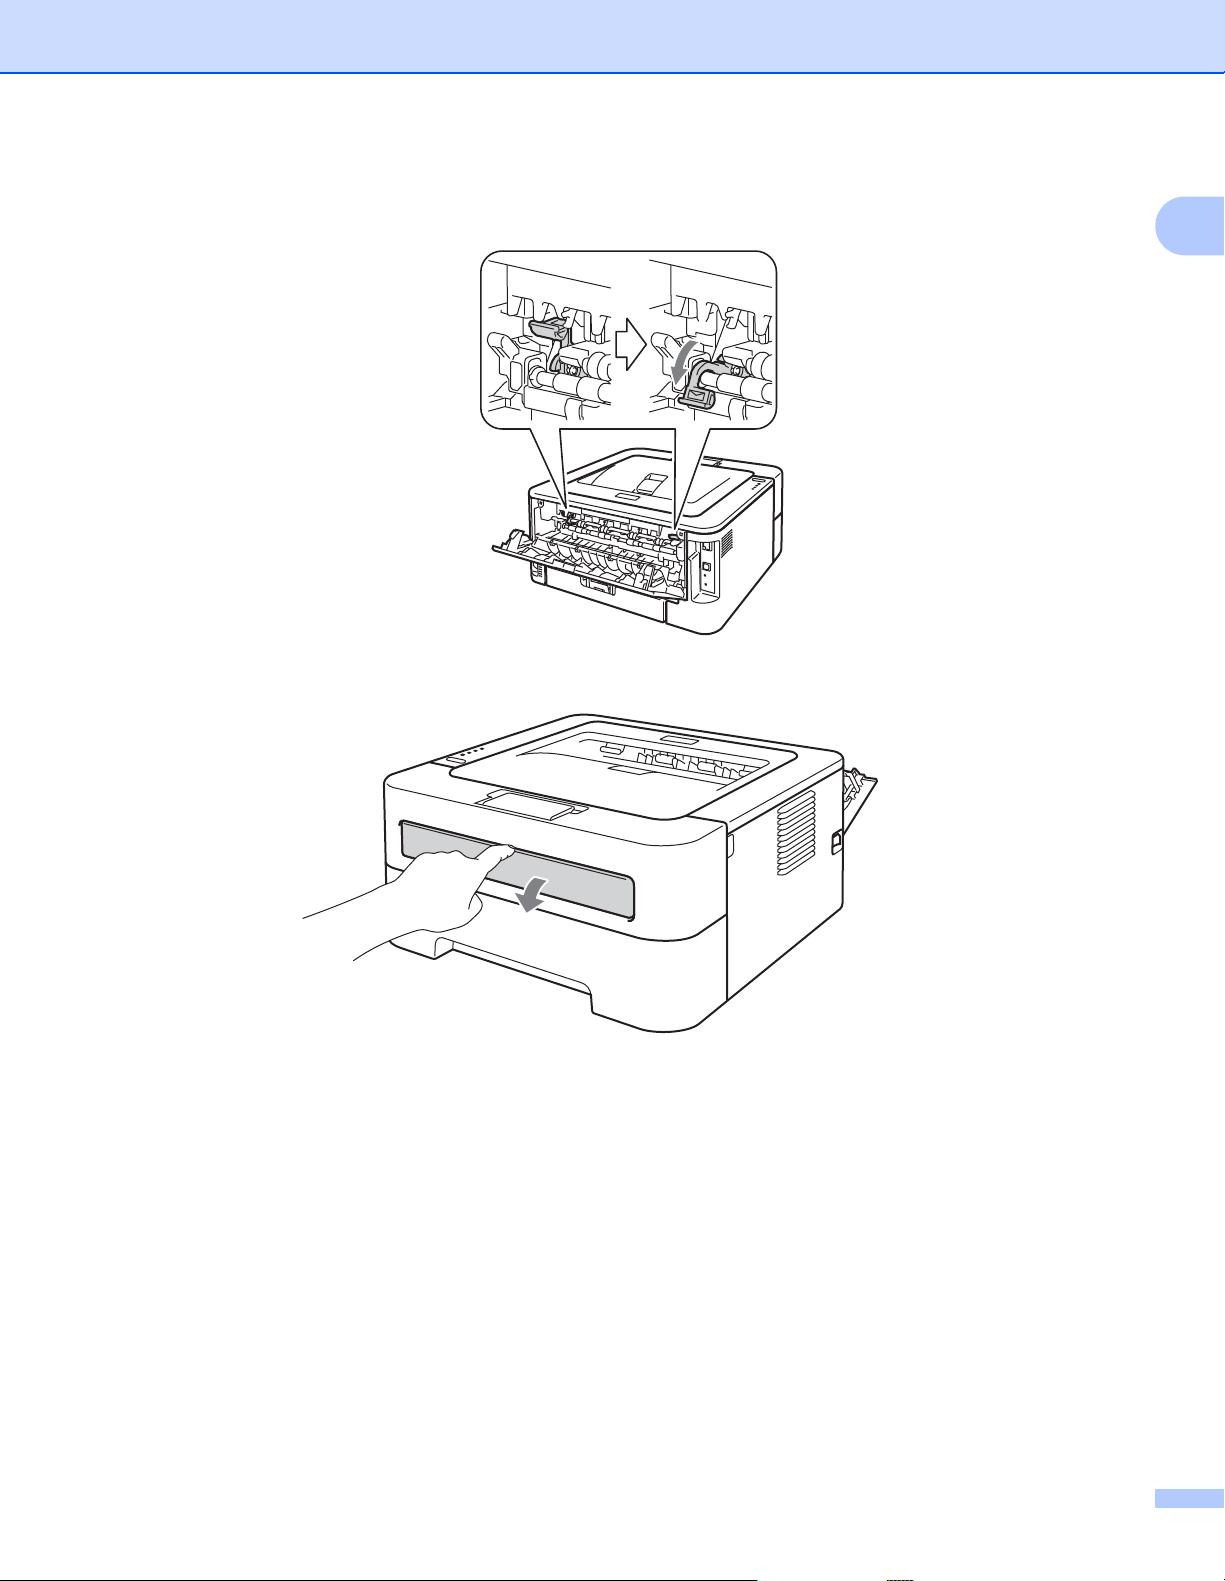
i <For printing envelopes only>When you have finished printing, reset the two green levers that were
pulled down in step b back to their original positions.
18

Printing Methods
Note
• Remove each sheet of labels or envelope as soon as it has been printed. Stacking them may cause the
paper to jam or curl.
• If an envelope is creased after they are printed, see Improving the print quality on page 112.
• If envelopes get smudged during printing set the Media Type to Env. Thick.
• (For Windows
®
users) If the DL size double flap envelopes are creased after printing, choose DL Long
Edge in Paper Size, from the Basic tab. Put a new DL size double-flap envelope in the manual feed slot
with the longest edge of the envelope in first, then print again.
• Envelope joints that are sealed by the manufacturer should be secure.
• All sides of the envelope should be properly folded without wrinkles or creases.
1
19
Printing Methods
Note
Duplex printing 1
The supplied printer drivers for Windows® 2000 or greater and Mac OS X 10.4.11 or greater all enable duplex
printing. For more information about how to choose the settings, see the Help text in the printer driver.
Guidelines for printing on both sides of the paper 1
If the paper is thin, it may wrinkle.
If paper is curled, straighten it and then put it back in the paper tray or the manual feed slot. If the paper
continues to curl, replace the paper.
If the paper is not feeding properly, it may be curled. Remove the paper and straighten it. If the paper
continues to curl, replace the paper.
When you use the manual duplex function, it is possible that there may be paper jams or poor print quality.
(If there is a paper jam, see Paper jams and how to clear them on page 105. If you have a print quality
problem, see Improving the print quality on page 112.)
• Make sure that the paper tray is completely inserted to the machine.
1
• You should use plain paper, recycled paper or thin paper. Do not use bond paper.
20

Printing Methods
Automatic duplex printing (HL-2240D / HL-2242D / HL-2250DN / HL-2270DW only) 1
If you are using the Macintosh Printer Driver, see Automatic Duplex Printing (HL-2240D / HL-2242D /
HL-2250DN / HL-2270DW only) on page 48.
a Choose the following settings from each menu of the printer driver.
Paper Size
A4
Media Type
Plain Paper Thin Paper Recycled Paper
Paper Source
Tray 1 Manual
Duplex / Booklet
1
Duplex
Duplex Type in Duplex Settings
There are four options for each orientation. (See Duplex / Booklet on page 28.)
Binding Offset in Duplex Settings
You can specify the offset for binding. (See Duplex / Booklet on page 28.)
For any other settings, see Driver and Software in Chapter 2.
b Send the print data to the machine. The machine will print on both sides of the paper automatically.
21
Printing Methods
Note
Manual duplex printing 1
If you are using the Macintosh Printer Driver, see Manual Duplex Printing on page 47.
a Choose the following settings from each drop-down list of the printer driver.
Paper Size
You can use all the paper sizes specified for the tray you are using.
Media Type
You can use all the media types specified for the tray you are using except media that has a specified
print side, such as envelopes and labels.
Paper Source
Tray 1 Manual
Duplex / Booklet
Duplex (Manual)
1
Duplex Type in Duplex Settings
There are four options for each orientation. (See Duplex / Booklet on page 28.)
Binding Offset in Duplex Settings
You can specify the offset for binding. (See Duplex / Booklet on page 28.)
For any other settings, see Driver and Software in Chapter 2.
b Send the print data to the machine. The machine will print all the even-numbered pages on one side of
the paper first. Then, the Windows
to print the odd-numbered pages.
Before reinserting the paper, straighten it well, or you may get a paper jam. Very thin or thick paper is not
recommended.
®
driver instructs you (with a pop-up message) to reinsert the paper
22

2
Note
Driver and Software 2
Printer driver 2
A printer driver is software that translates data from the format used by a computer to the format that a
particular machine needs. Typically, this format is page description language (PDL).
®
The printer drivers for the supported versions of Windows
supplied or on the Brother Solutions Center at http://solutions.brother.com/
Quick Setup Guide. The latest printer driver can be downloaded from the Brother Solutions Center at
http://solutions.brother.com/
.
(If you want to uninstall the printer driver, see Uninstalling the printer driver on page 51.)
and Macintosh are on the CD-ROM we have
. Install the drivers by following the
2
For Windows
®
2
Windows® printer driver
For Macintosh
Macintosh printer driver
For Linux
12
CUPS printer driver
LPD / LPRng printer driver
1
Download the printer driver for Linux from http://solutions.brother.com/ or a link on the supplied CD-ROM.
2
Depending on Linux distributions, the driver may not be available.
• For more information about Linux printer driver, visit us at http://solutions.brother.com/.
• The printer driver for Linux may be released after the initial release of this product.
2
2
23

Driver and Software
You can change the following printer settings when you print from your computer:
Paper Size
Orientation
Copies
Media Type
Resolution
Print Settings
Multiple Page
Duplex / Booklet
1
Paper Source
Scaling
Reverse Print
Use Watermark
Header-Footer Print
1
1
Toner Save Mode
Administrator
Use Reprint
1
1
Sleep Time
Macro
Density Adjustment
12
1
Error Message Printout
2
1
Improve Print Output
Skip Blank Page
Print Profiles
1
These settings are not available with the Macintosh printer driver.
2
These settings are only available for the HL-2250DN and HL-2270DW.
1
24
Driver and Software
Note
Features in the printer driver (for Windows®) 2
(For more information, see the Help text in the printer driver.)
• The screens in this section are from Windows® XP. The screens on your computer will vary depending on
your operating system.
• You can access the Printing Preferences dialog box by clicking Printing Preferences... in the General
tab of the Printer Properties dialog box.
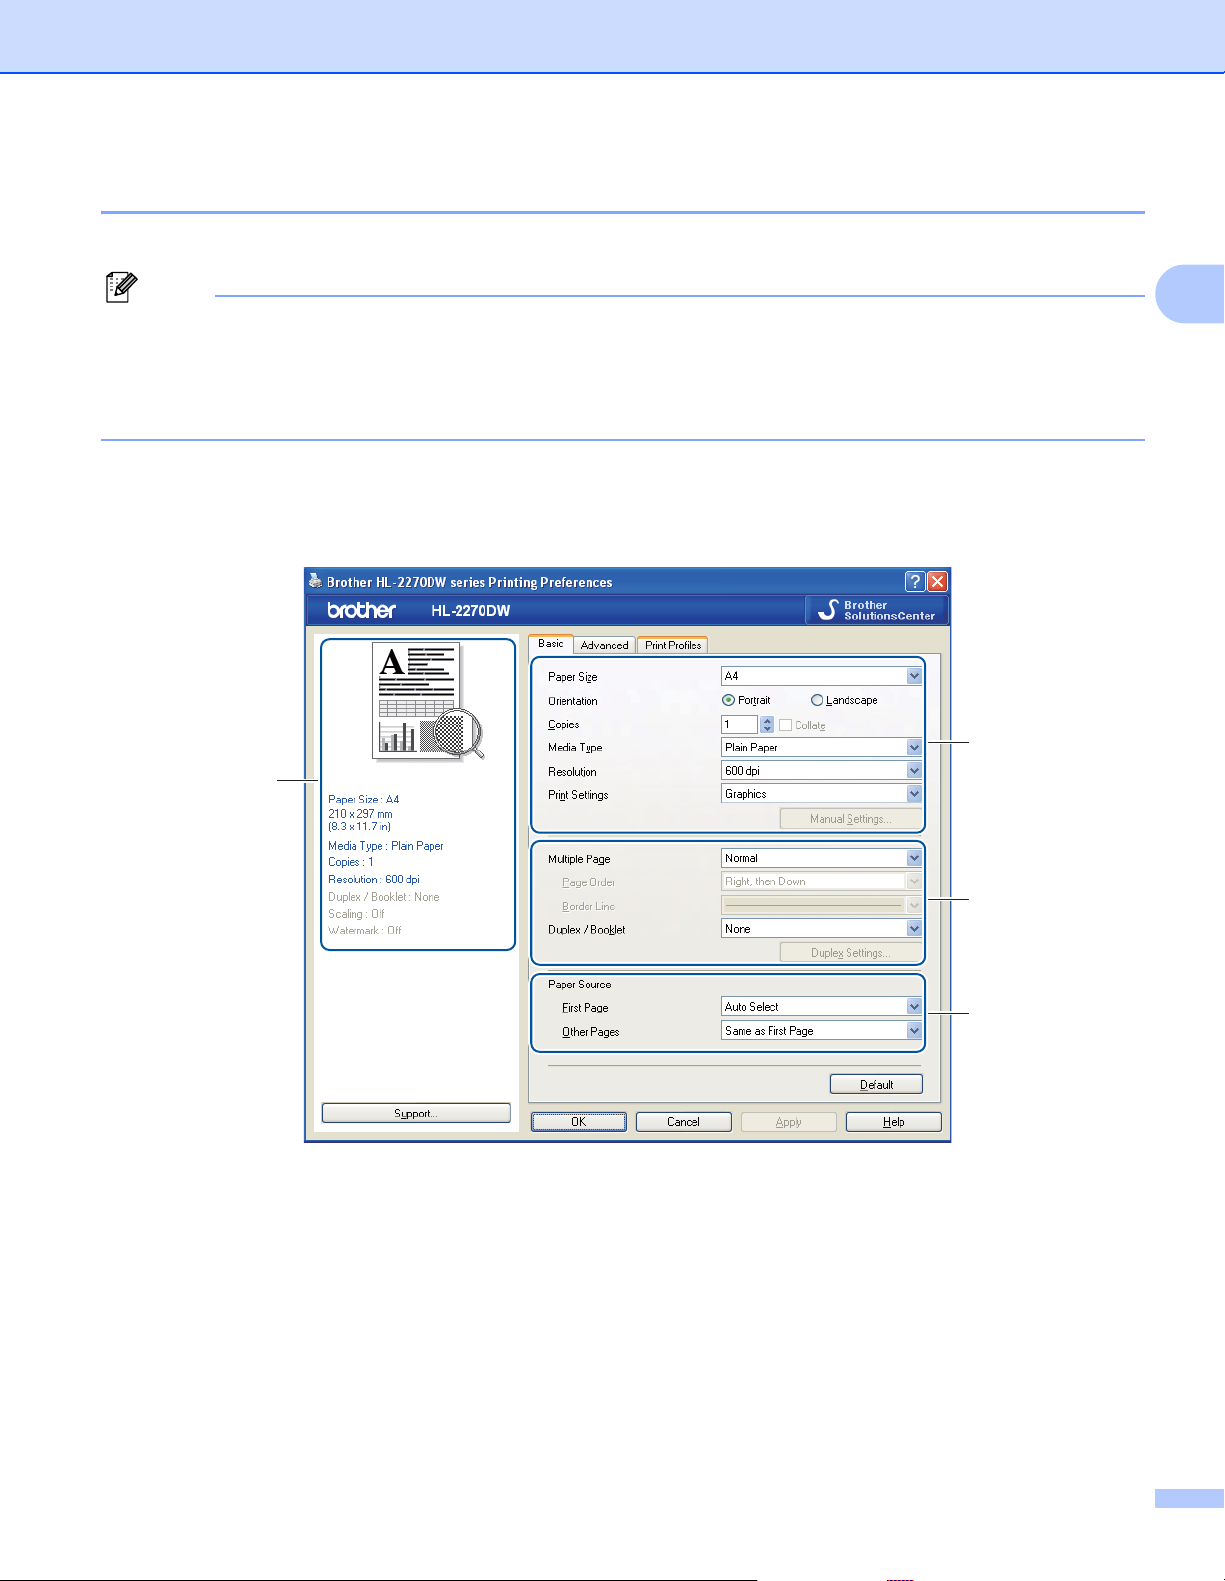
Basic tab 2
You can also change settings by clicking the illustration on the left side of the Basic tab.
2
1
4
2
3
a Choose Paper Size, Orientation, Copies, Media Type, Resolution and Print Settings (1).
b Choose Multiple Page and Duplex / Booklet setting (2).
c Choose Paper Source (3).
d Click OK to apply your chosen settings.
To return to the default settings, click Default, then OK.
25
Driver and Software
Note
This area (4) shows the current settings.
Paper Size 2
From the drop-down box choose the Paper Size you are using.
Orientation 2
Orientation selects the position of how your document will be printed (Portrait or Landscape).
Portrait
Landscape
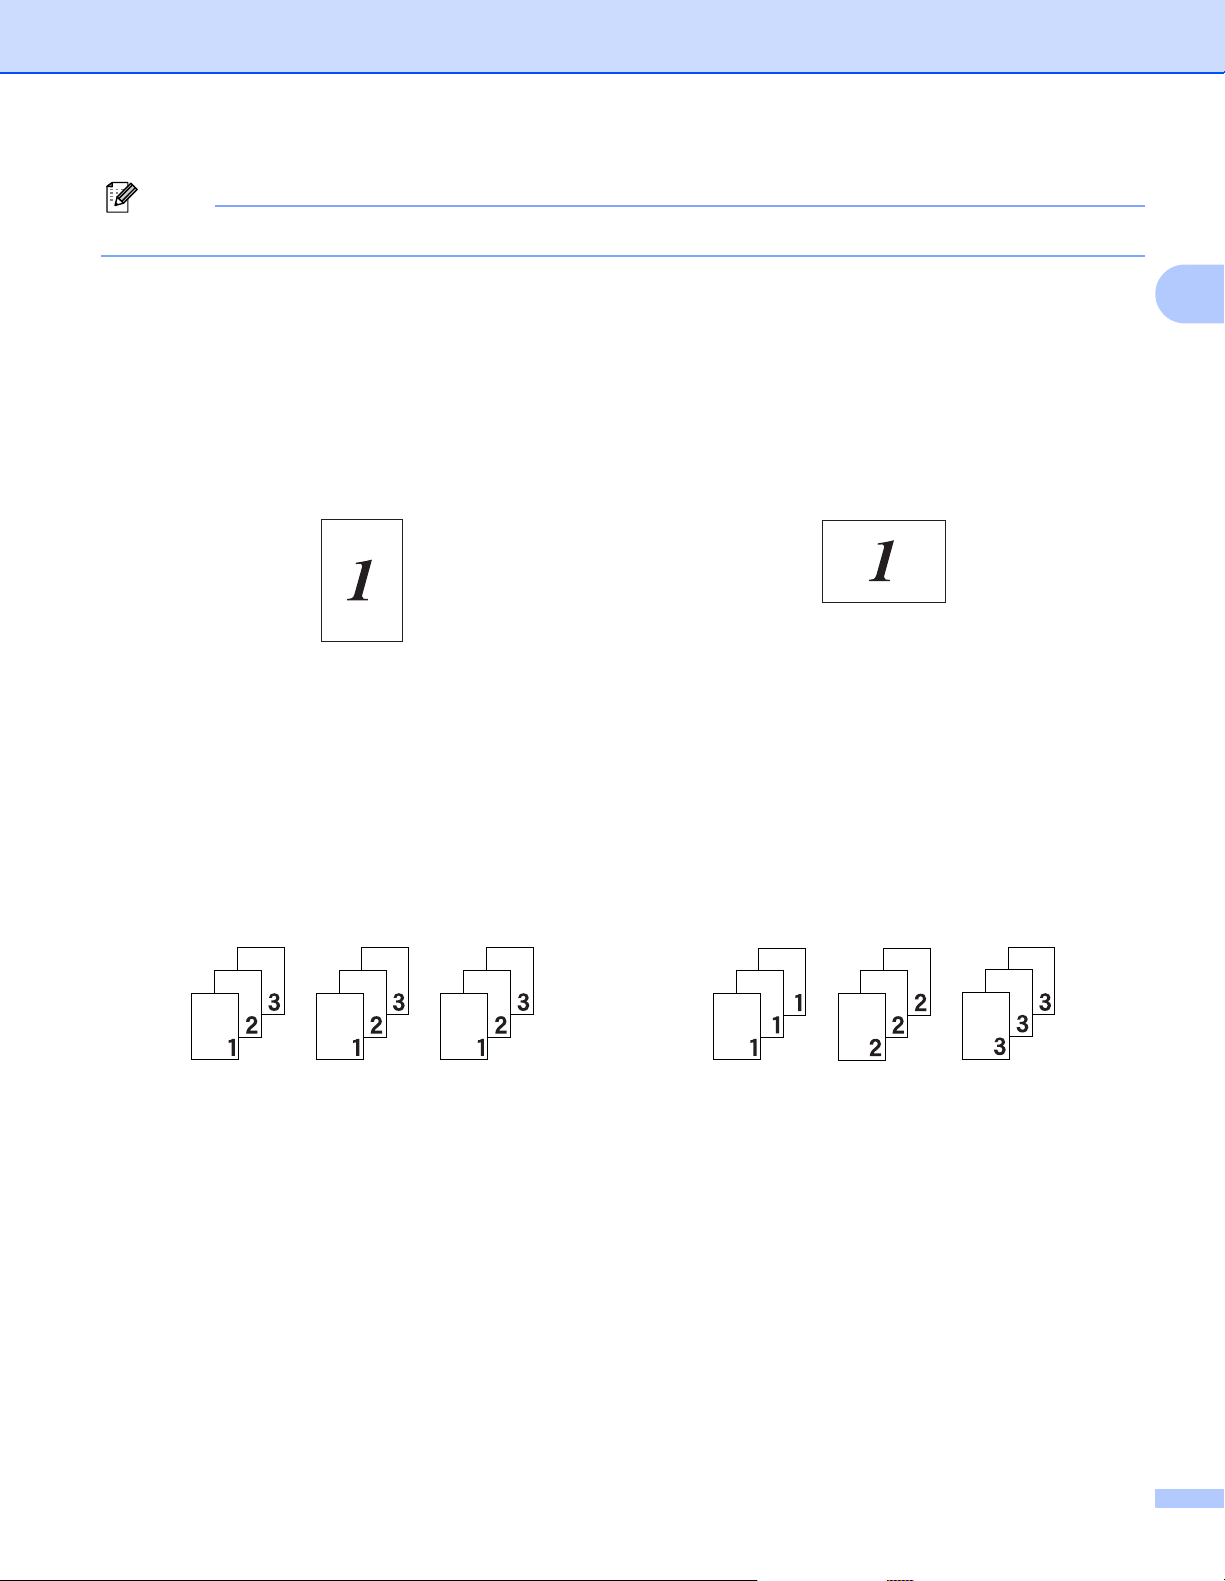
Copies 2
The copies selection sets the number of copies that will be printed.
Collate
With the Collate check box selected, one complete copy of your document will be printed and then will be
repeated for the number of copies you selected. If the Collate check box is not selected, then each page
will be printed for all the copies selected before the next page of the document is printed.
2
Collate checked
Collate non-checked
26
 Loading...