


Radio CC
Lexington C32
St. Louis C32
www.blaupunkt.com
7 642 180 110
7 642 180 112
Operating and installation instructions
Mode d’emploi et de montage
Instrucciones de manejo e instalación
Instruções de serviço e de montagem
Kullanım ve montaj kılavuzu
|
|
|
|
|
|
|
|
|
|
|
|
|
|
|
|
|
|
|
|
|
|
|
|
|
|
01_BA_LexStLouisC32_GB.indd Abs1:1 |
23.01.2007 12:19:16 Uhr |
|
|
|
|
|
|
|
|
|
|
|
|
|
|
|
|
|
|
|
|
|
|
|
|
|
|
|

1 |
2 |
3 |
4 |
5 |
6 |
7 |
8 |
9 |
14 |
13 |
12 |
11 |
10 |
2
01_BA_LexStLouisC32_GB.indd Abs1:2 |
23.01.2007 12:19:17 Uhr |

1
 button to release the control panel
2 Button to switch the unit on/off
3Volume control
4 Cassette eject
5 Cassette compartment
6 FR button, fast tape winding
7 FF button, fast tape winding
8Arrow buttons
MENU button, to open the basic settings menu
9SOURCE button, to select the CC, radio and CD changer sources
:AUDIO button, to adjust the bass, treble, balance and fader settings (Balance und Fader)
;Short press: EQ button, to select the sound presets Long press: X-BASS, X-Bass function
<Keys 1 - 6
=Short press: BAND button, to select the FM memory bank and the AM waveband, source selection to radio mode
Long press: TS, to start the Travelstore function.
> button, to display the time
CONTROLS
TÜRKÇE PORTUGUÊS ESPAÑOL FRANÇAIS ENGLISH
3
01_BA_LexStLouisC32_GB.indd Abs1:3 |
23.01.2007 12:19:18 Uhr |

CONTENTS
Notes and accessories.............. |
5 |
Road safety ..................................... |
5 |
Installation ....................................... |
5 |
Accessories..................................... |
5 |
Removable control panel .......... |
6 |
Theft protection ............................... |
6 |
Detaching the control panel ............. |
6 |
Attaching the control panel............... |
6 |
Switching on/off........................ |
7 |
Adjusting the volume ................ |
7 |
Setting the power-on volume............ |
7 |
Instantaneously reducing the |
|
volume (mute) .................................. |
7 |
Mute while telephoning .................... |
8 |
Radio mode ............................... |
8 |
Switching to radio mode .................. |
8 |
Selecting the frequency band / |
|
memory bank ................................... |
8 |
Tuning into a station ......................... |
9 |
Setting the sensitivity of station |
|
seek tuning ...................................... |
9 |
Storing station presets ..................... |
9 |
Storing stations automatically (Tra- |
|
velstore) ......................................... |
9 |
Listening to station presets .............. |
9 |
Cassette mode ........................ |
10 |
Cassette playback ......................... |
10 |
Switching over the playing side of |
|
the tape ......................................... |
10 |
Fast tape winding .......................... |
10 |
Cassette eject ............................... |
10 |
CD changer mode ................... |
11 |
Switching to CD changer mode ..... |
11 |
Selecting CDs ............................... |
11 |
Selecting tracks............................. |
11 |
Fast searching (audible)................. |
11 |
Repeating individual tracks or |
|
whole CDs (REPEAT) .................... |
11 |
Random track play (MIX)................ |
12 |
Scanning all tracks on all CDs |
|
(SCAN) ......................................... |
12 |
Pausing playback (PAUSE) ............ |
12 |
CLOCK - Time.......................... |
13 |
Displaying the time......................... |
13 |
Setting the clock............................ |
13 |
Selecting 12/24-hour clock mode .. |
13 |
Displaying the time when the unit |
|
is off and the ignition is on.............. |
13 |
Sound and volume |
|
distribution settings................. |
14 |
Adjusting the bass ......................... |
14 |
Adjusting the treble........................ |
14 |
Adjusting the balance settings........ |
14 |
Adjusting the fader settings............ |
14 |
Equalizer and X-BASS............. |
15 |
X-BASS ........................................ |
15 |
Selecting preset sound effect......... |
15 |
Specifications.......................... |
16 |
Amplifi er ........................................ |
16 |
Tuner ............................................. |
16 |
CC ................................................ |
16 |
Pre-Amp Out ................................. |
16 |
Installation instructions ........... |
72 |
4
01_BA_LexStLouisC32_GB.indd Abs1:4 |
23.01.2007 12:19:18 Uhr |

NOTES AND ACCESSORIES
Thank you for deciding to use a Blaupunkt product. We hope you enjoy using this new piece of equipment.
Please read these operating instructions before using the equipment for the first time. The Blaupunkt editors are constantly working on making the operating instructions clearer and easier to understand. However, if you still have any questions on how to operate the equipment, please contact your dealer or the telephone hotline for your country. You will find the hotline telephone numbers printed at the back of this booklet.
Road safety
 Road safety has absolute priority. Only operate your radio unit if the road and traffic conditions allow you to do so. Familiarize yourself with the unit before setting off on your journey.
You should always be able to hear police, fire and ambulance sirens from far. For this reason, set the volume of the program you are listening to at a reasonable level.
Installation
If you want to install your car radio by yourself, please read the installation and connection instructions that follow these operating instructions.
Accessories
Only use accessories approved by Blaupunkt.
Remote control
The RC 04 remote control is optionally available for the Lexington C32 unit.
The St. Louis C32 unit cannot be remotely controlled.
Amplifier
All Blaupunkt and Velocity amplifiers can be used.
CD changer
The Blaupunkt CD changer CDC A 01 (7607 700 022) can be connected to the Lexington C32 unit.
No CD changer can be connected to the St. Louis C32 unit.
5
TÜRKÇE PORTUGUÊS ESPAÑOL FRANÇAIS ENGLISH
01_BA_LexStLouisC32_GB.indd Abs1:5 |
23.01.2007 12:19:18 Uhr |
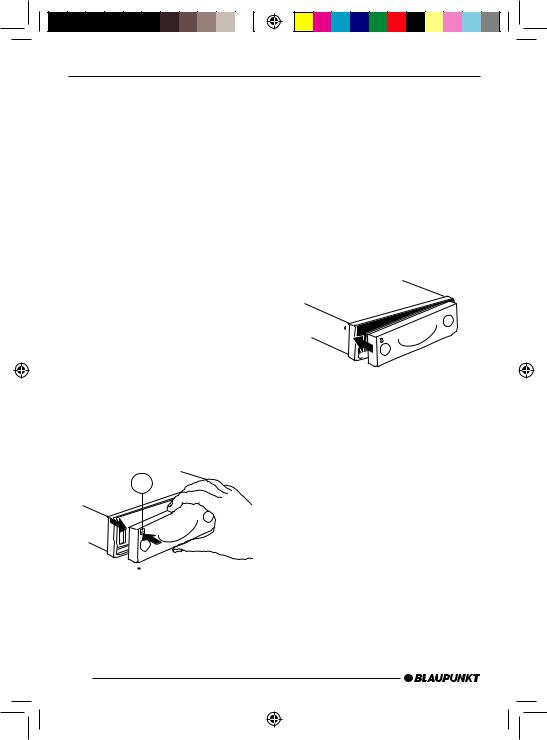
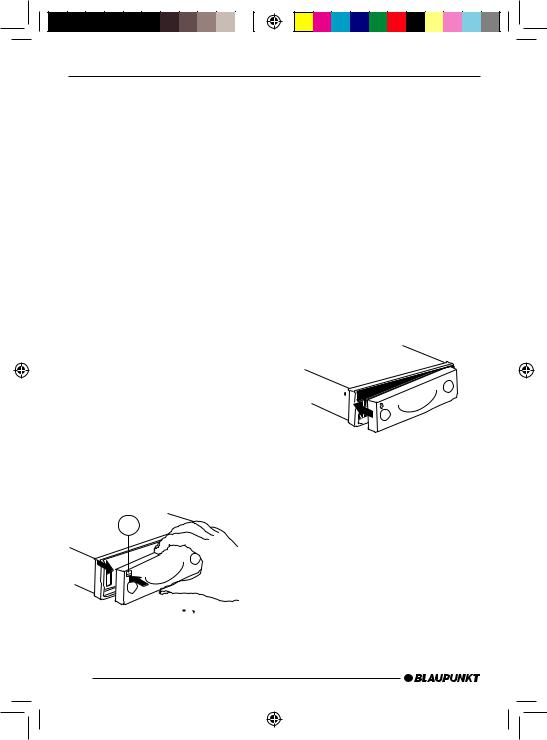
REMOVABLE CONTROL PANEL
Removable control panel
Theft protection
As a way of protecting your equipment against theft, the unit is equipped with a detachable control panel (release panel). Without this control panel, the car radio is worthless to a thief.
Protect your equipment against theft by taking the control panel with you every time you leave your vehicle. Do not leave the control panel in your vehicle - not even in a hiding place.
The control panel has been designed to be easily use.
Note:
●Never drop the control panel.
●Never expose the control panel to direct sunlight or other heat sources.
●Avoid making direct skin contact with the control panel’s contacts. If necessary, clean the contacts with a lint-free cloth and some alcohol.
Detaching the control panel
1
Press the 
 button 1.
The control panel locking mechanism opens.
First, pull the control panel straight off the unit and then out towards the left.
6
●The unit switches off after the control panel is removed.
●All current settings of the radio are saved.
●CD already inserted in the unit remains there.
Attaching the control panel
Slide the control panel from left to right into the unit’s guide.
Press the left-hand edge of the control panel into the unit until it clicks into place.
Note:
●When attaching the control panel, make sure you do not press on the display.
If the unit was still switched on when you removed the control panel, the unit will automatically switch back on with the last settings activated i.e. radio, CC or CD changer (CD changer only with the Lexington C32) when the panel is reinserted.
01_BA_LexStLouisC32_GB.indd Abs1:6 |
23.01.2007 12:19:18 Uhr |

|
|
|
|
|
|
|
|
|
|
|
|
|
|
|
|
|
|
|
SWITCHING ON/OFF |
|
ADJUSTING THE VOLUME |
||||||||||||||
|
|
|
|
|
|
|
|
|
|
|
|
|
|
|
|
|
|
Switching on/off
There are various ways of switching the unit on/off:
Switching on/off using the vehicle ignition
If the unit is correctly connected to the vehicle’s ignition and it was not switched off using button 2, it will switch on/off simultaneously with the ignition.
Switching on/off using the removable control panel
Remove the control panel. The unit switches off.
Attach the control panel again.
The unit switches on. The last settings i.e. radio, CC or CD changer (CD changer only with the Lexington C32) will be reactivated.
Switching on/off using button 2
To switch the unit on, press button
2.
The unit can only be switched on when the ignition is turned on.
To switch the unit off, press button 2for longer than two seconds.
The unit switches off.
Adjusting the volume
The system volume can be adjusted in steps from 0 (off) to 100 (maximum).
To increase the system volume,
turn the volume control 3clockwise.
To decrease the volume,
turn the volume control 3anticlockwise.
Setting the power-on volume
You can set the unit’s default power-on volume.
Press the MENU button 8.
Keep pressing the  or
or  button 8until “ON VOL” appears in the display.
Set the power-on volume using the  and
and  buttons 8.
To help you adjusting the volume more easily, the volume will be increased / decreased as you make your changes.
When you have finished making your changes,
press the MENU button 8twice.
Instantaneously reducing the volume (mute)
You can instantaneously reduce the volume (mute) to a level preset by you.
Briefly press button 2.
7
TÜRKÇE PORTUGUÊS ESPAÑOL FRANÇAIS ENGLISH
01_BA_LexStLouisC32_GB.indd Abs1:7 |
23.01.2007 12:19:18 Uhr |
|
|
|
|
|
|
|
|
|
|
|
|
|
|
|
|
|
|
|
|
ADJUSTING THE VOLUME |
|
|
|
|
RADIO MODE |
|
|||||||||||
|
|
|
|
|
|
|
|
|
|
|
|
|
|
|
|
|
|
|
“MUTE” appears in the display.
Setting the mute level
You can set the unit’s mute volume level.
Press the MENU button 8.
Keep pressing the  or
or  button 8until “MUTE LVL” appears in the display.
Set the mute level using the  and
and  buttons 8.
When you have finished making your changes,
press the MENU button 8twice.
Mute while telephoning
If your unit is connected to a mobile telephone, the car radio’s volume will be muted as soon as you “pick up” the telephone. “TEL CALL” flashes in the display.
This requires to the mobile telephone be connected to the car radio as described in the installation instructions.
The volume will be reduced to the configured mute volume level.
Radio mode
Switching to radio mode
If you are in CC or CD changer mode (CD changer only with the Lexington C32),
keep pressing the SOURCE 9 button until the radio mode appears in the display together with the memory bank and frequency.
Selecting the frequency band / memory bank
This unit can receive programs broadcast over the FM and AM frequency band. There are three preset memory bank for the FM range and one for the AM range. Six stations can be stored on each memory bank.
Selecting the FM memory bank
To switch between the FM memory bank FM1, FM2 and FMT,
press the BAND/TS button =.
Selecting the AM waveband
To select the AM waveband,
keep pressing the BAND/TS button =until AM appears in the display.
8
01_BA_LexStLouisC32_GB.indd Abs1:8 |
23.01.2007 12:19:19 Uhr |

RADIO MODE
Tuning into a station
There are various ways of tuning to a station.
Automatic seek tuning
Press the  or
or  button 8.
The unit tunes to the next receivable station.
Setting the sensitivity of station seek tuning
You can choose whether to tune only to strong reception stations or to also tune to those with a weak reception.
Press the MENU button 8.
Keep pressing the  or
or  button 8until “SENS HI” or “SENS LO” appears in the display
“SENS HI” means that the tuner is set high to sensitivity. “SENS LO” means it is set to the low sensitivity setting. If “SENS LO” is selected, “LOC” lights up in the display.
Set the required sensitivity using the  and
and  buttons 8.
When you have finished making your changes,
press the MENU button 8.
Tuning into stations manually
You can also tune into stations manually.
Press the  or
or  button 8.
Storing station presets
Storing stations manually
Select the required memory bank (FM1, FM2 or FMT) or the AM waveband.
Tune into the station.
Press one of the station buttons 1-6 <for longer than one second to store the station in that preset memory.
Storing stations automatically (Travelstore)
You can automatically store the six stations with the strongest reception in the region. The stations are stored in the FMT or AM memory depending on the selected frequency band.
Note:
●Any stations that were previously stored on this memory bank are deleted in the process.
Press and hold the BAND/TS button =until seek tuning begins.
The station storing procedure begins. Once the procedure finishes, all the stored stations are played briefly.
Listening to station presets
Select the memory bank on which the station was stored.
Press the preset station button 1-6 <of the station you want to listen to.
9
TÜRKÇE PORTUGUÊS ESPAÑOL FRANÇAIS ENGLISH
01_BA_LexStLouisC32_GB.indd Abs1:9 |
23.01.2007 12:19:19 Uhr |

CASSETTE MODE
Cassette mode
Cassette playback
●If there is no cassette inserted in the unit.
Insert the cassette with its open edge on the right and side A/1 fac-
ing up into the cassette compartment 5.
The side of the cassette that is facing up is then played first of all (side A/1). The cassette symbol appears in the display.
●If a cassette is already inserted in the unit.
Keep pressing the SOURCE button 9until “TAPE” appears in the display.
The cassette is played in the direction that was last set.
Switching over the playing side of the tape
Press the tape-winding buttons FR 6 and FF 7simultaneously.
The tape playing direction changes.
The direction of play is automatically switched over when the end of the tape is reached (autoreverse).
Fast tape winding
Fast-forwarding
● To fast forward side A/1,
press the FF tape-winding button 7so that it clicks into position.
● To fast forward side B/2,
press the FR tape-winding button 6so that it clicks into position.
“TAPE FF” appears in the display.
Fast-rewinding
● To fast rewind side A/1,
press the FR tape-winding button 6so that it clicks into position.
● To fast rewind side B/2,
press the FF tape-winding button 7so that it clicks into position.
“TAPE FR” appears in the display.
Stopping tape winding
Press the fast tape-winding button for the opposite direction.
Playback is resumed.
Cassette eject
Press the button 4to eject the cassette from the unit.
10
01_BA_LexStLouisC32_GB.indd Abs1:10 |
23.01.2007 12:19:19 Uhr |
CD CHANGER MODE
CD changer mode
You can connect a CD changer to the Lexington C32 unit. You can obtain further information on available CD changers from your dealer.
Note:
●Information on handling CDs, inserting CDs and operating the CD changer can be found in the operating instructions supplied with your CD changer.
Switching to CD changer mode
Keep pressing the SOURCE 9 button until the display shows, for instance, “CDC 1--1”.
The first digit in this display represents the CD number (in this case 1), and the second digit represents the track number (in this case 1).
Playback begins with the first CD that the CD changer detects.
Selecting CDs
To move up or down to another CD,
press the  or
or  button 8once or several times.
Selecting tracks
To move up or down to another track on the current CD,
press the  or
or  button 8once or several times.
Fast searching (audible)
To fast search backwards or forwards,
keep one of the 
 buttons 8 pressed until fast searching backwards / forwards begins.
Repeating individual tracks or whole CDs (REPEAT)
To repeat the current track,
briefly press button 3 (RPT) <.
“S--RPT” appears briefl y in the display.
To repeat the current CD,
keep the 3 (RPT) button < pressed for longer than two seconds.
“D--RPT” appears briefl y in the display.
Deactivating REPEAT
To stop the current track or current CD from being repeated,
press button 3 (RPT) <until “S--RPT” or “D--RPT” disappears and the standard CD changer display reappears.
11
TÜRKÇE PORTUGUÊS ESPAÑOL FRANÇAIS ENGLISH
01_BA_LexStLouisC32_GB.indd Abs1:11 |
23.01.2007 12:19:19 Uhr |

CD CHANGER MODE
Random track play (MIX)
To play the tracks on the current CD in random order,
briefly press button 4 (MIX) <.
“S--MIX” appears briefl y in the display.
To play the tracks on all inserted CDs in random order,
keep the 4 (MIX) button < pressed for longer than two seconds.
“D--MIX” appears briefl y in the display.
Canceling MIX
To stop the tracks from being played in random order,
press button 4 (MIX) <until “S--MIX” or “D--MIX” disappears and the standard CD changer display reappears.
Scanning all tracks on all CDs (SCAN)
Scanning tracks on the current CD
To briefly play all the tracks on the current CD in ascending order,
press button 2 (SCAN) <.
“S--SCN” appears in the display.
Scanning the first track on all CDs
You can briefly play the first track all CDs in the CD changer.
keep the 2 (SCAN) button < pressed for longer than two seconds.
“D--SCAN” appears in the display.
Stopping SCAN
To stop scanning,
briefly press the 2 (SCAN) button <again.
The currently scanned track will then continue to be played normally.
Note:
●You can set the scanning time (scantime). For further details, read the section entitled “Setting the scantime” in the “CD mode” chapter.
Pausing playback (PAUSE)
Press button 1 
 ) <. “S--PAUSE” appears in the display.
Canceling pause
Press button 2 
 ) <while in pause mode.
Playback is resumed.
12
01_BA_LexStLouisC32_GB.indd Abs1:12 |
23.01.2007 12:19:20 Uhr |
CLOCK - TIME
CLOCK - Time
Displaying the time
To display the time,
briefly press the button >.
Setting the clock
Press the MENU button 8.
Keep pressing the  or
or  button 8until “CLOCKSET” appears in the display.
Press the  button 8.
The time appears in the display. The minutes flash on and off and can be adjusted.
Adjust the minutes using the 
 buttons 8.
Once the minutes are set,
press the button 8. The hours flash on and off.
Adjust the hours using the  /
/ buttons 8.
When you have finished making your changes,
press the MENU button 8twice.
Selecting 12/24-hour clock mode
Press the MENU button 8.
Keep pressing the  or
or  button 8until “24 H MODE” or “12 H MODE” appears in the display.
Press the  or
or  button 8 to switch between the modes.
When you have finished making your changes,
press the MENU button 8.
Displaying the time when the unit is off and the ignition is on
To display the clock when the unit is off and the ignition is on,
press the MENU button 8.
Keep pressing the  or
or  button 8until “CLOCK OFF” or “CLOCK ON” appears in the display.
Press the  or
or  button 8 to switch between the displays.
When you have finished making your changes,
press the MENU button 8.
13
TÜRKÇE PORTUGUÊS ESPAÑOL FRANÇAIS ENGLISH
01_BA_LexStLouisC32_GB.indd Abs1:13 |
23.01.2007 12:19:20 Uhr |

SOUND AND VOLUME DISTRIBUTION SETTINGS
Sound and volume distribution settings
Adjusting the bass
To adjust the BASS,
press the AUDIO button :. “BAS” appears in the display. To increase the bass,
turn the volume control 3clockwise.
To decrease the bass,
turn the volume control 3anticlockwise.
When you have finished making your changes,
wait 8 seconds, the settings are saved and the audio source display appears.
Adjusting the treble
To adjust the TREBLE,
keep pressing the AUDIO : button until “TRE” appears in the display.
To increase the treble,
turn the volume control 3clockwise.
To decrease the treble,
turn the volume control 3anticlockwise.
When you have finished making your changes,
wait 8 seconds, the settings are saved and the audio source display appears.
Adjusting the balance settings
To adjust the left/right volume distribution (balance),
keep pressing the AUDIO : button until “BAL” appears in the display.
To move the volume distribution toward the right,
turn the volume control 3clockwise.
To move the volume distribution toward the left,
turn the volume control 3anticlockwise.
When you have finished making your changes,
wait 8 seconds, the settings are saved and the audio source display appears.
Adjusting the fader settings
To adjust the front/back volume distribution (fader),
keep pressing the AUDIO : button until “FAD” appears in the display.
To move the volume distribution toward the back,
turn the volume control 3clockwise.
To move the volume distribution toward the front,
turn the volume control 3anticlockwise.
14
01_BA_LexStLouisC32_GB.indd Abs1:14 |
23.01.2007 12:19:20 Uhr |

EQUALIZER AND X-BASS
When you have finished making your changes,
wait 8 seconds, the settings are saved and the audio source display appears.
Equalizer and X-BASS
X-BASS
The X-BASS feature can be used to boost the bass at low volume levels.
To activate X-BASS,
keep the EQ/X-BASS button ; pressed until “XBASS ON” appears in the display.
“X-BASS” appears in the display.
To deactivate X-BASS,
keep the EQ/X-BASS button ; pressed until “XBASS OFF” appears in the display.
“X-BASS” disappears.
Selecting preset sound effect
You can select preset sound effect for the following styles of music:
●CLASSIC
●POP M
●ROCK M
The settings for these music styles have already been programmed.
To select one of the sound presets,
keep pressing the EQ/X-BASS button ;until the required setting appears in the display.
If you want to deactivate the sound preset,
keep pressing the EQ/X-BASS button ;until “DSP OFF” appears in the display.
15
TÜRKÇE PORTUGUÊS ESPAÑOL FRANÇAIS ENGLISH
01_BA_LexStLouisC32_GB.indd Abs1:15 |
23.01.2007 12:19:20 Uhr |

SPECIFICATIONS
Specifications
Amplifier
Output power: |
|
St. Louis C32: |
4 x 22 watts sine |
|
in accordance |
|
with DIN 45 324 |
|
at 14.4 V 4 x 50 |
|
watts max. power |
Lexington C32: |
4 x 15 watts sine |
|
in accordance |
|
with DIN 45 324 |
|
at 14.4 V 4 x 40 |
|
watts max. power |
Tuner
Frequency ranges US:
FM: |
87.5 - 107.9 MHz |
AM: |
530 - 1710 kHz |
FM mono sensitivity:
15 dBf
FM frequency response:
35 - 16.000 Hz
CC
Frequency response:
30 - 18.000 Hz
Pre-Amp Out
(not applicable to St. Louis C32:) Output: 1.5 Vrms ± 2.5 dB
Subject to changes!
16
01_BA_LexStLouisC32_GB.indd Abs1:16 |
23.01.2007 12:19:20 Uhr |

ÉLÉMENTS DE COMMANDE
1Touche 
 , déverrouiller la façade détachable
2Touche, allumer / éteindre l’appareil
3Réglage du volume
4 Ejection de la cassette
5 Fente d’insertion de la cassette
6Touche FR, défi lement rapide de la bande
7Touche FF, défi lement rapide de la bande
8Pavé de touches fl èche
Touche MENU, affi cher le menu de confi guration
9Touche SOURCE, sélection du mode CC, Radio, Changeur CD
:Touche AUDIO, régler les graves, aigus et la répartition du volume (balance et fader)
;Presser brièvement: touche EQ, choisir l’ambiance sonore Presser longuement : X-BASS, fonction X-Bass
<Pavé de touches 1 - 6
= Presser brièvement : touche BAND, sélection des niveaux de mémoire FM et de la gamme d’ondes AM, du mode Radio Pression longuement : TS, démarrer la fonction Travelstore
>Touche  , affi chage de l’heure
17
PORTUGUÊS ESPAÑOL FRANÇAIS ENGLISH
02_BA_LexStLouisC32_FR.indd 17 |
23.01.2007 12:18:48 Uhr |

|
|
|
|
|
|
|
|
|
|
|
|
|
|
|
|
|
|
|
|
|
|
|
|
|
|
|
|
|
|
|
|
|
|
|
|
|
|
|
|
|
|
|
......Remarques et accessoires |
19 |
.................Mode Changeur CD |
25 |
|
|||||||||||||||
|
Sécurité routière ............................ |
19 |
Activer le mode Changeur CD ....... |
25 |
|
|||||||||||||||
|
Montage ........................................ |
19 |
Choisir un CD ............................... |
25 |
|
|||||||||||||||
|
Accessoires................................... |
19 |
Choisir une plage........................... |
25 |
|
|||||||||||||||
|
Façade détachable |
20 |
Recherche rapide (audible) ............ |
25 |
|
|||||||||||||||
|
Lecture répétée de plages ou de |
|
|
|||||||||||||||||
|
Système antivol |
20 |
|
|
||||||||||||||||
|
CD (REPEAT) |
25 |
|
|||||||||||||||||
|
Enlever la façade |
20 |
|
|||||||||||||||||
|
Lecture aléatoire de plages (MIX) |
26 |
|
|||||||||||||||||
|
Poser la façade |
20 |
|
|||||||||||||||||
|
Balayage de toutes les plages de |
|
|
|||||||||||||||||
|
Allumer / Eteindre |
21 |
|
|
||||||||||||||||
|
tous les CD (SCAN) ...................... |
26 |
|
|||||||||||||||||
|
Réglage du volume ................. |
21 |
Interrompre la lecture (PAUSE) ...... |
26 |
|
|||||||||||||||
|
Réglage du volume de mise en |
|
|
CLOCK - Heure........................ |
27 |
|
||||||||||||||
|
marche .......................................... |
21 |
Affi chage de l’heure....................... |
27 |
|
|||||||||||||||
|
Mise en sourdine (mute) ................ |
21 |
Réglage de l’heure......................... |
27 |
|
|||||||||||||||
|
Mise en sourdine du téléphone ...... |
22 |
Sélection du mode 12 / 24 heures . 27 |
|||||||||||||||||
|
Mode Radio ............................. |
22 |
Affi chage de l’heure, l’autoradio |
|
|
|||||||||||||||
|
Activer le mode Radio.................... |
22 |
étant éteint et le contact mis........... |
27 |
|
|||||||||||||||
|
Choisir une gamme d’ondes / un |
|
|
Son et répartition du volume .. |
28 |
|
||||||||||||||
|
niveau de mémoire......................... |
22 |
Régler les graves ........................... |
28 |
|
|||||||||||||||
|
Choisir une station......................... |
23 |
Régler les aigus ............................. |
28 |
|
|||||||||||||||
|
Régler la sensibilité de recherche |
|
|
Régler la balance ........................... |
28 |
|
||||||||||||||
|
de stations..................................... |
23 |
Régler le fader ............................... |
28 |
|
|||||||||||||||
|
Mémoriser une station.................... |
23 |
Égaliseur et X-BASS |
29 |
|
|||||||||||||||
|
Mémorisation automatique de |
|
|
|
||||||||||||||||
|
|
|
X-BASS |
29 |
|
|||||||||||||||
|
stations (Travelstore) |
23 |
|
|||||||||||||||||
|
Sélectionner une ambiance sonore 29 |
|||||||||||||||||||
|
Choisir une station mémorisée |
23 |
||||||||||||||||||
|
Caractéristiques techniques |
30 |
|
|||||||||||||||||
|
Mode Cassette |
24 |
|
|||||||||||||||||
|
Amplifi cateur |
30 |
|
|||||||||||||||||
|
Lecture de cassette |
24 |
|
|||||||||||||||||
|
Tuner |
30 |
|
|||||||||||||||||
|
Changement de face |
24 |
|
|||||||||||||||||
|
CC |
30 |
|
|||||||||||||||||
|
Défi lement rapide |
24 |
|
|||||||||||||||||
|
Sortie préampli |
30 |
|
|||||||||||||||||
|
Éjection de la cassette |
24 |
|
|||||||||||||||||
|
Notice de montage |
72 |
|
|||||||||||||||||
|
|
|
|
|
|
|
|
|
|
|||||||||||
18
02_BA_LexStLouisC32_FR.indd 18 |
23.01.2007 12:18:49 Uhr |
REMARQUES ET ACCESSOIRES
Nous vous remercions d’avoir opté pour ce produit Blaupunkt et nous vous souhaitons beaucoup de plaisir avec ce nouvel appareil.
Avant de mettre votre autoradio en service, lisez attentivement le présent mode d’emploi. Les rédacteurs de Blaupunkt s’efforcent constamment de rédiger les modes d’emploi de la manière la plus claire et la plus compréhensible. Si vous avez toutefois des questions concernant l’utilisation de l’appareil, n’hésitez pas à contacter votre revendeur ou le service d’assistance téléphonique de votre pays. Les numéros de téléphone figurent au dos de ce mode d’emploi.
Sécurité routière
 La sécurité routière est impérative ! Utilisez par conséquent votre autoradio en restant toujours maître de votre véhicule. Familiarisez-vous avec l’autoradio avant de prendre la route.
Assurez-vous de pouvoir toujours bien percevoir les signaux d’avertissement venant de l’extérieur du véhicule comme ceux de la police et des sapeurs-pompiers de façon à pouvoir toujours réagir à temps. Soyez toujours à l’écoute de l’autoradio à un volume modéré pendant vos déplacements.
Montage
Si vous voulez monter vous-même votre autoradio, lisez impérativement les consignes de montage et de branchement figurant à la fin du mode d’emploi.
Accessoires
Utilisez uniquement les accessoires autorisés par Blaupunkt.
Télécommande
La télécommande RC 04 est disponible en option pour le Lexington C32.
Le St. Louis C32 ne peut être télécommandé.
Amplificateurs
Tous les amplis Blaupunkt peuvent être utilisés.
Changeurs CD
Le changeur Blaupunkt CDC A 01 (7607 700 022) peut être raccordé au Lexington C32.
Le St. Louis C32 ne peut être branché sur un changeur CD.
19
PORTUGUÊS ESPAÑOL FRANÇAIS ENGLISH
02_BA_LexStLouisC32_FR.indd 19 |
23.01.2007 12:18:49 Uhr |
FAÇADE DÉTACHABLE
Façade détachable
Système antivol
Votre autoradio est équipé d’une façade détachable qui le protège contre le vol. Sans cette façade détachable, l’autoradio n’a aucune valeur pour le voleur.
Protégez votre autoradio contre le vol en enlevant la façade détachable à chaque fois que vous quittez votre véhicule. Ne laissez jamais la façade dans le véhicule, même en la cachant bien. La forme de la façade assure une manipulation simple.
Note:
●Ne pas laisser tomber la façade par terre.
●Ne pas l’exposer directement au soleil ou à d’autres sources de chaleur.
●La conserver dans l’étui fourni.
●Eviter que la peau touche directement les contacts de la façade. Nettoyer si nécessaire les contacts au moyen d’un chiffon non pelucheux, imprégné d’alcool.
Enlever la façade
1
La façade se déverrouille.
Enlevez la façade en la tirant d’abord tout droit et ensuite vers la gauche.
●Après avoir enlevé la façade, l’autoradio s’éteint.
●Le mode sélectionné est mémorisé.
●Un CD inséré reste dans l’appareil.
Poser la façade
Introduisez la façade de gauche à droite dans le guide de l’autoradio.
Poussez le côté gauche de la façade dans l’autoradio jusqu’à ce qu’elle s’enclenche.
Note:
●N’appuyez pas sur l’afficheur en posant la façade.
Si l’autoradio était allumé au moment où vous avez enlevé la façade, il se rallume automatiquement au dernier mode choisi, soit Radio, CC, Changeur CD (changeur CD uniquement pour le Lexington C32) , une fois la façade reposée.
Pressez la touche 
 1.
1.
20
02_BA_LexStLouisC32_FR.indd 20 |
23.01.2007 12:18:50 Uhr |
|
|
|
|
|
|
|
|
|
|
|
|
|
|
|
|
|
|
|
ALLUMER / ÉTEINDRE |
|
RÉGLAGE DU VOLUME |
||||||||||||||
|
|
|
|
|
|
|
|
|
|
|
|
|
|
|
|
|
|
Allumer / Eteindre
Pour allumer / éteindre l’autoradio, plusieurs possibilités vous sont offertes :
Allumer et Eteindre via le contact du véhicule
Si l’autoradio est relié correctement à l’allumage du véhicule et s’il n’a pas été éteint avec la touche 2, vous l’allumez ou l’éteignez en mettant ou coupant le contact.
Allumer et éteindre avec la façade détachable
Enlevez la façade. L’autoradio s’éteint.
Reposez la façade.
L’autoradio s’allume au dernier mode sélectionné : radio, CC, changeur CD (changeur CD uniquement avec Lexington C32).
Allumer / Eteindre avec la touche 2
Pour allumer, pressez la touche
2.
Vous ne pouvez allumer l’autoradio qu’après avoir mis le contact.
Pour éteindre, maintenez la touche 2 pendant plus de deux secondes.
L’autoradio s’éteint.
Réglage du volume
Le volume de l’autoradio est réglable de 0 (volume désactivé) à 100 (volume maximal).
Pour augmenter le volume,
tournez le bouton de réglage du volume 3 vers la droite.
Pour réduire le volume,
tournez le bouton de réglage du volume 3 vers la gauche.
Réglage du volume de mise en marche
Le volume auquel l’appareil se fait entendre à la mise en marche est réglable.
Pressez la touche MENU 8.
Pressez la touche  ou
ou  8 autant de fois que nécessaire jusqu’à ce que « ON VOL » apparaisse sur l’affi cheur.
Réglez le volume de mise en marche avec les touches 
 8.
8.
Pour vous faciliter la tâche, les changements de volume sont audibles pendant le réglage.
Une fois le réglage terminé,
pressez deux fois de suite la touche MENU 8.
Mise en sourdine (mute)
Vous pouvez réduire brusquement le volume à une valeur que vous avez choisie auparavant.
Pressez brièvement la touche 2.
« MUTE » apparaît sur l’affi cheur.
21
PORTUGUÊS ESPAÑOL FRANÇAIS ENGLISH
02_BA_LexStLouisC32_FR.indd 21 |
23.01.2007 12:18:50 Uhr |

MODE RADIO
Régler le volume de mise en sourdine
Le volume de mise en sourdine est réglable.
Pressez la touche MENU 8.
Pressez la touche  ou
ou  8 autant de fois que nécessaire jusqu’à ce que « MUTE LVL » apparaisse sur l’affi cheur.
Réglez le volume de mise en sourdine avec les touches 
 8.
8.
Une fois le réglage effectué,
pressez deux fois de suite la touche MENU 8.
Mise en sourdine du téléphone
Si votre autoradio est relié à un téléphone mobile, l’autoradio est mis en sourdine dès que vous décrochez. « TEL CALL » clignote sur l’affi cheur.
Pour cela, le téléphone mobile doit être raccordé à l’autoradio comme décrit dans les consignes de montage.
La mise en sourdine correspond au volume de mise en sourdine réglée (mute level).
Mode Radio
Activer le mode Radio
Si l’autoradio est en mode CC ou Changeur CD (changeur CD uniquement avec Lexington C32),
pressez la touche SOURCE 9 autant de fois que nécessaire jusqu’à ce que le mode Radio avec le niveau de mémoire et la fréquence apparaisse sur l’affi - cheur.
Choisir une gamme d’ondes / un niveau de mémoire
Cet autoradio permet d’écouter les émissions des gammes d’ondes FM et AM. La gamme d’ondes FM offre trois niveaux de mémoire, et la gamme d’ondes AM un niveau de mémoire. Six stations peuvent être mémorisées sur chacun des niveaux de mémoire.
Choisir le niveau de mémoire FM
Pour passer entre les niveaux de mémoire FM soit FM1, FM2 et FMT,
pressez la touche BAND/TS =.
Choisir la gamme d’ondes AM
Pour choisir la gamme d’ondes AM,
pressez la touche BAND/TS = autant de fois que nécessaire jusqu’à ce que « AM » apparaisse sur l’affi cheur.
22
02_BA_LexStLouisC32_FR.indd 22 |
23.01.2007 12:18:50 Uhr |

MODE RADIO
Choisir une station
Plusieurs possibilités vous sont offertes pour vous mettre à l’écoute d’une station.
Recherche automatique de stations
Pressez la touche  ou
ou  8.
8.
L’autoradio se règle sur la prochaine station qu’il peut capter.
Régler la sensibilité de recherche de stations
Vous avez la possibilité de choisir si la station recherchera uniquement les stations de forte réception ou de faible réception.
Pressez la touche MENU 8.
Pressez la touche  ou
ou  8 autant de fois que nécessaire jusqu’à ce que « SENS HI » ou « SENS LO » apparaisse sur l’affi cheur.
« SENS HI » correspond au niveau de sensibilité le plus élevé, « SENS LO » au niveau le plus faible. Si vous choisissez « SENS LO », « LOC » est allumé sur l’affi cheur.
Réglez le niveau de sensibilité au moyen des touches 
 8.
8.
Une fois le réglage terminé,
pressez la touche MENU 8.
Réglage manuel de stations
Vous avez la possibilité de régler les stations manuellement.
Pressez la touche  ou
ou  8.
8.
Mémoriser une station
Mémorisation manuelle de stations
Choisissez le niveau de mémoire FM 1, FM 2, FMT ou la gamme d’ondes AM.
Choisissez une station.
Pressez pendant plus d’une seconde l’une des touches 1-6 < sur laquelle vous voulez mémoriser la station.
Mémorisation automatique de stations (Travelstore)
Vous avez la possibilité de mémoriser automatiquement les six stations les plus puissantes de la région. La mémorisation s’effectue au niveau de mémoire FMT ou AM, en fonction de la gamme d’ondes choisie.
Note:
●Les stations déjà mémorisées sur ce niveau de mémoire seront effacées.
Maintenez la touche BAND/TS = jusqu’au lancement de la recherche.
La mémorisation commence. Une fois la mémorisation terminée, vous entendez successivement toutes les stations mémorisées pendant quelques secondes.
Choisir une station mémorisée
Choisissez le niveau de mémoire sur lequel la station a été mémorisée.
Pressez la touche de station 1-6 < de la station voulue.
23
PORTUGUÊS ESPAÑOL FRANÇAIS ENGLISH
02_BA_LexStLouisC32_FR.indd 23 |
23.01.2007 12:18:50 Uhr |

MODE CASSETTE
Mode Cassette
Lecture de cassette
●Quand l’appareil ne contient pas de cassette :
Introduire la cassette, le côté bande dirigé vers la droite et la
face A/1 vers le haut dans la fente d’insertion de cassette 5.
La lecture de la cassette commence par la face dirigée vers le haut (face A/1). Le symbole Cassette est allumé sur l’affi cheur.
●Quand l’appareil contient une cassette :
Presser la touche SOURCE 9 autant de fois que nécessaire jusqu’à ce que « TAPE » soit visible sur l’affi cheur.
La cassette est lu dans le dernier sens de lecture choisi.
Changement de face
Pressez en même temps les touches de défi lement FR 6 et FF
7.
Le sens de lecture change.
A la fin de la bande, la face permute automatiquement (autoreverse).
Défilement rapide
Avance rapide
●Pour faire avancer rapidement la bande (A/ 1),
pressez la touche de défi lement FF 7 jusqu’à ce qu’elle s’enclenche.
●Pour faire avancer rapidement la bande (B/ 2),
pressez la touche de défi lement FR 6 jusqu’à ce qu’elle s’enclenche.
Sur l’affi cheur apparaît « TAPE FF ».
Recul rapide
●Pour faire reculer rapidement la bande (A/ 1),
pressez la touche de défi lement FR 6 jusqu’à ce qu’elle s’enclenche.
●Pour faire avancer rapidement la bande (B/ 2),
pressez la touche de défi lement FF 7 jusqu’à ce qu’elle s’enclenche.
Sur l’affi cheur apparaît « TAPE FR ».
Stopper le défilement
Pressez la touche de défi lement opposée.
La lecture continue.
Éjection de la cassette
Pressez la touche  4 pour éjecter la cassette de l’appareil.
24
02_BA_LexStLouisC32_FR.indd 24 |
23.01.2007 12:18:50 Uhr |
 Loading...