


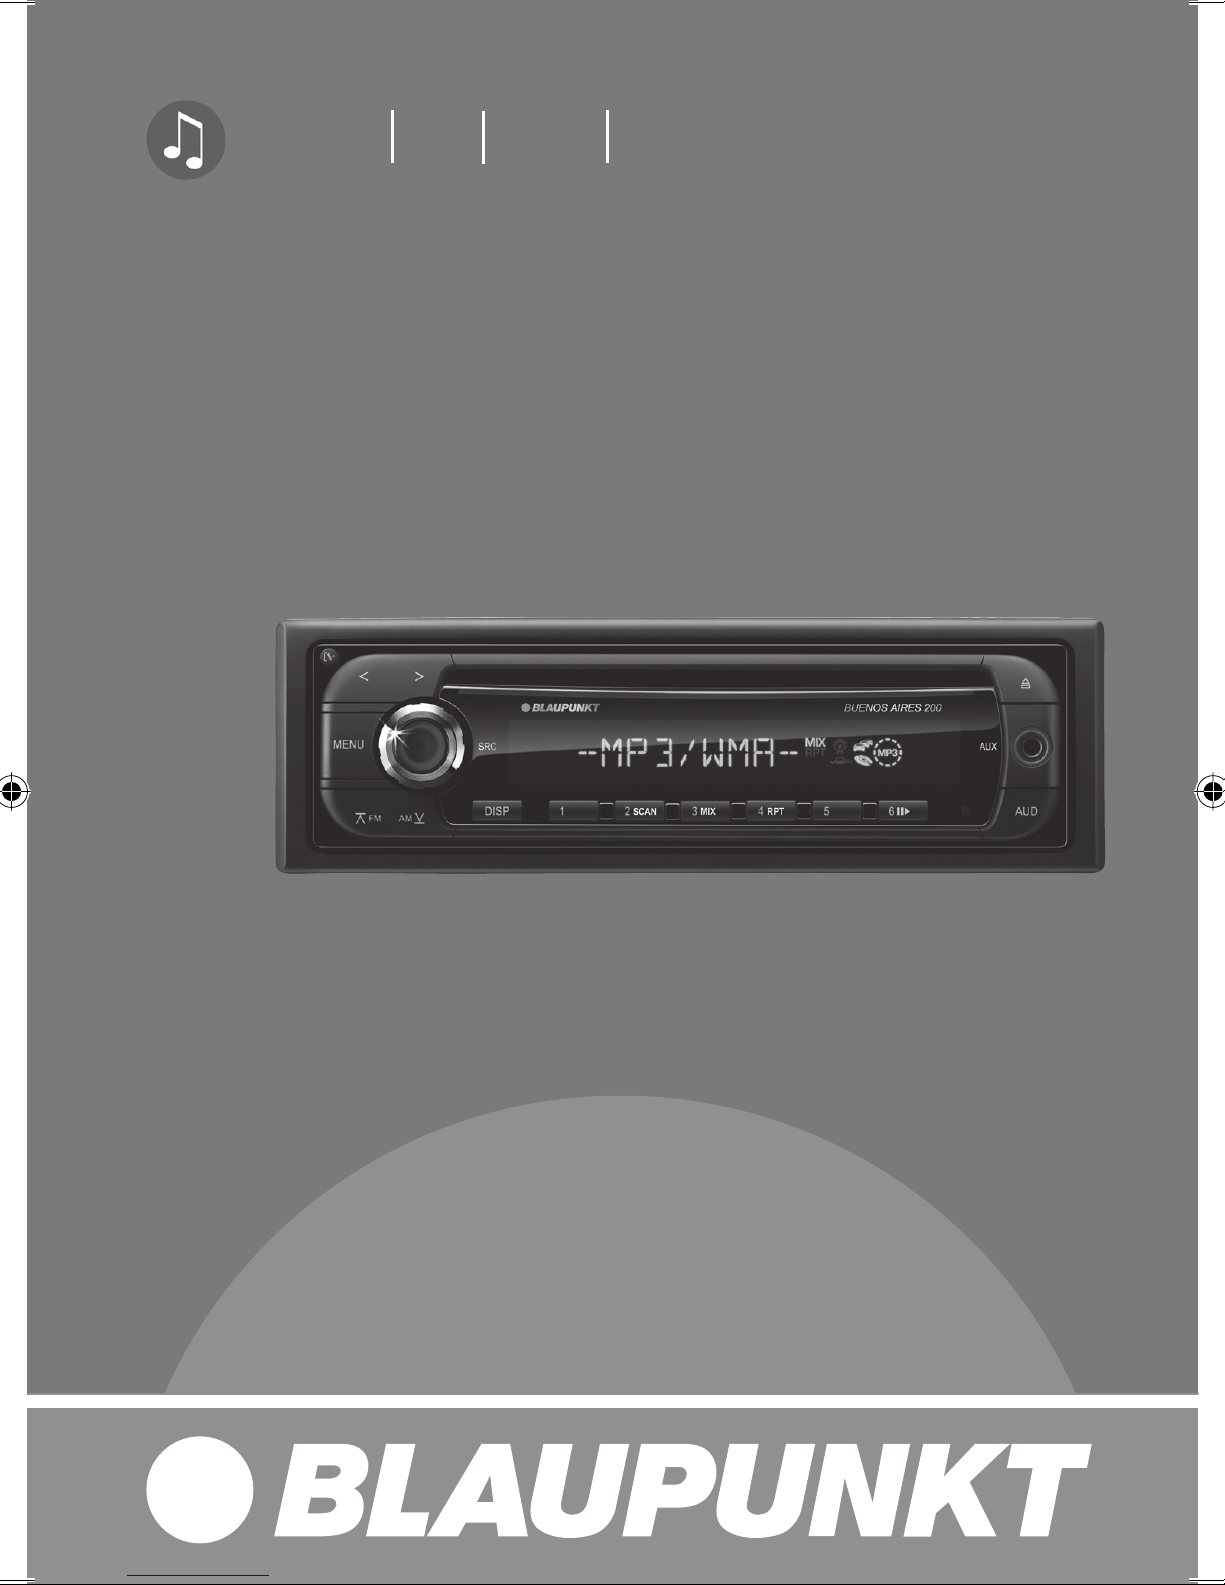
Buenos Aires 200
www.blaupunkt.com
Radio CD MP3 WMA
Buenos Aires 200 7 649 027 110
Operating and installation instructions
Mode d’emploi et de montage
Instrucciones de manejo e instalación
Instruções de serviço e de montagem
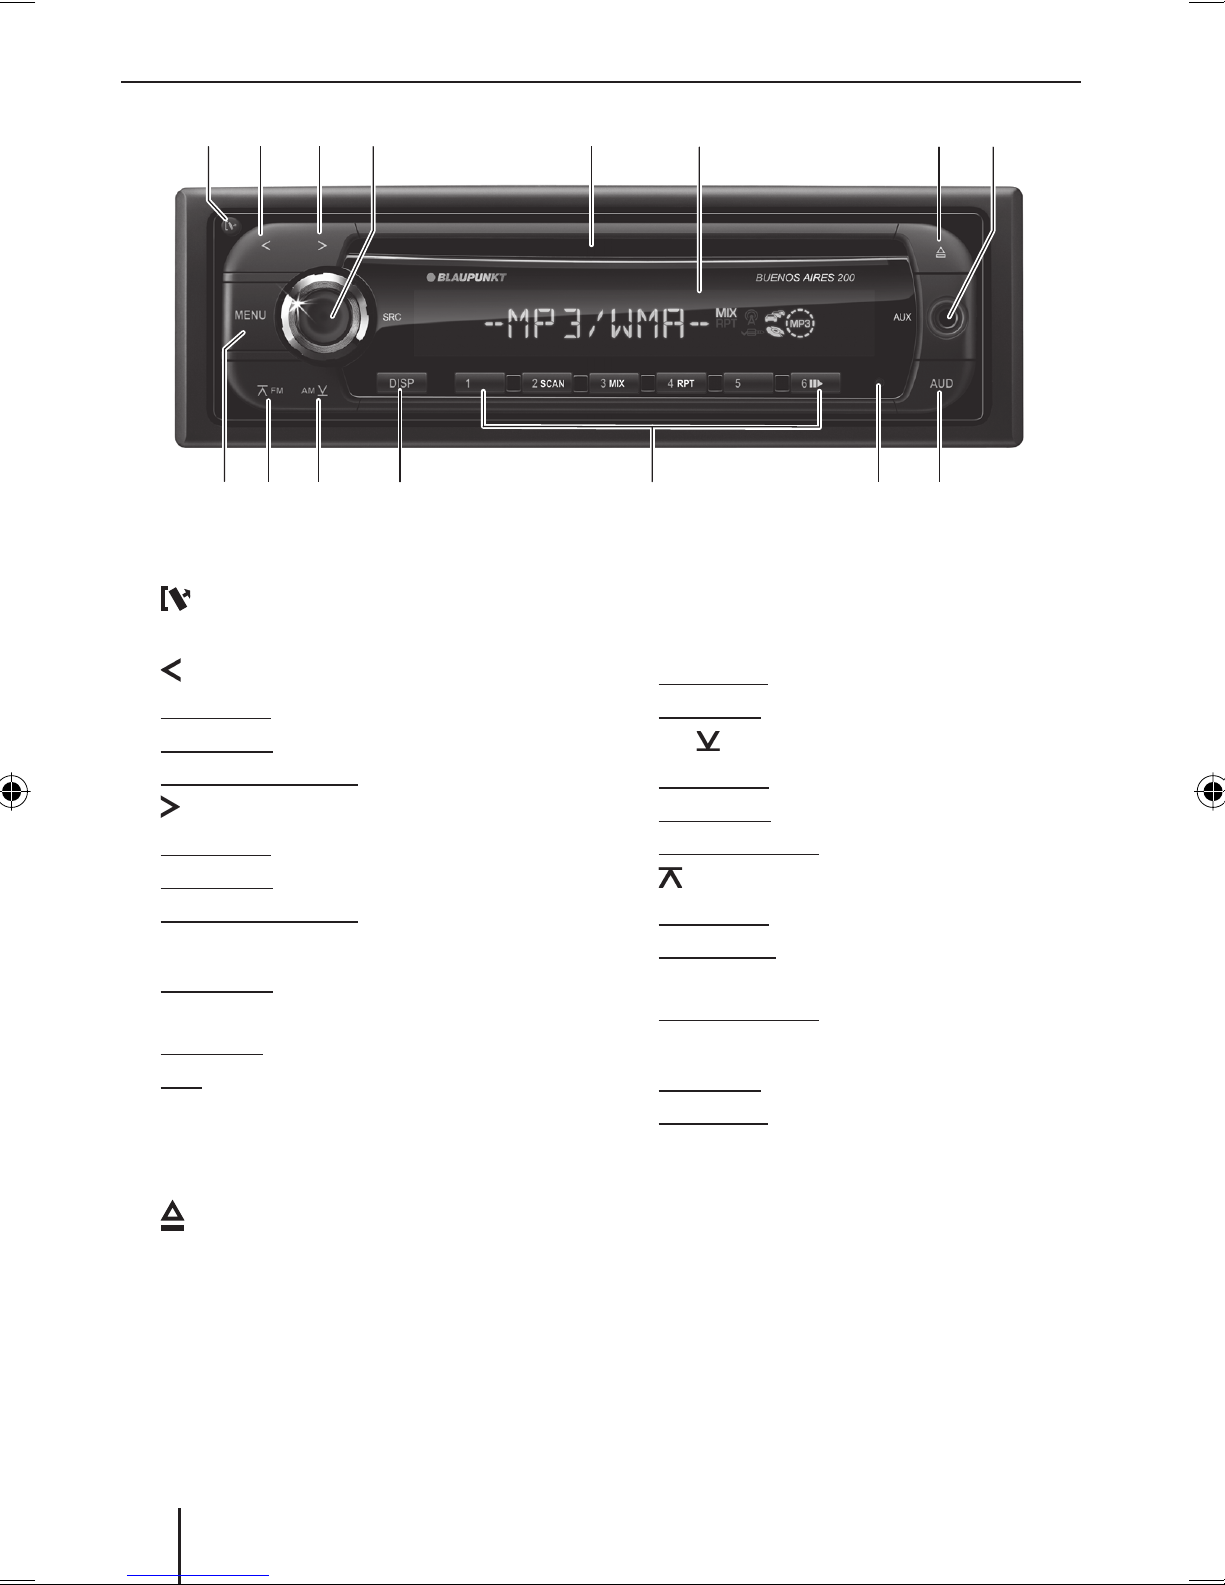
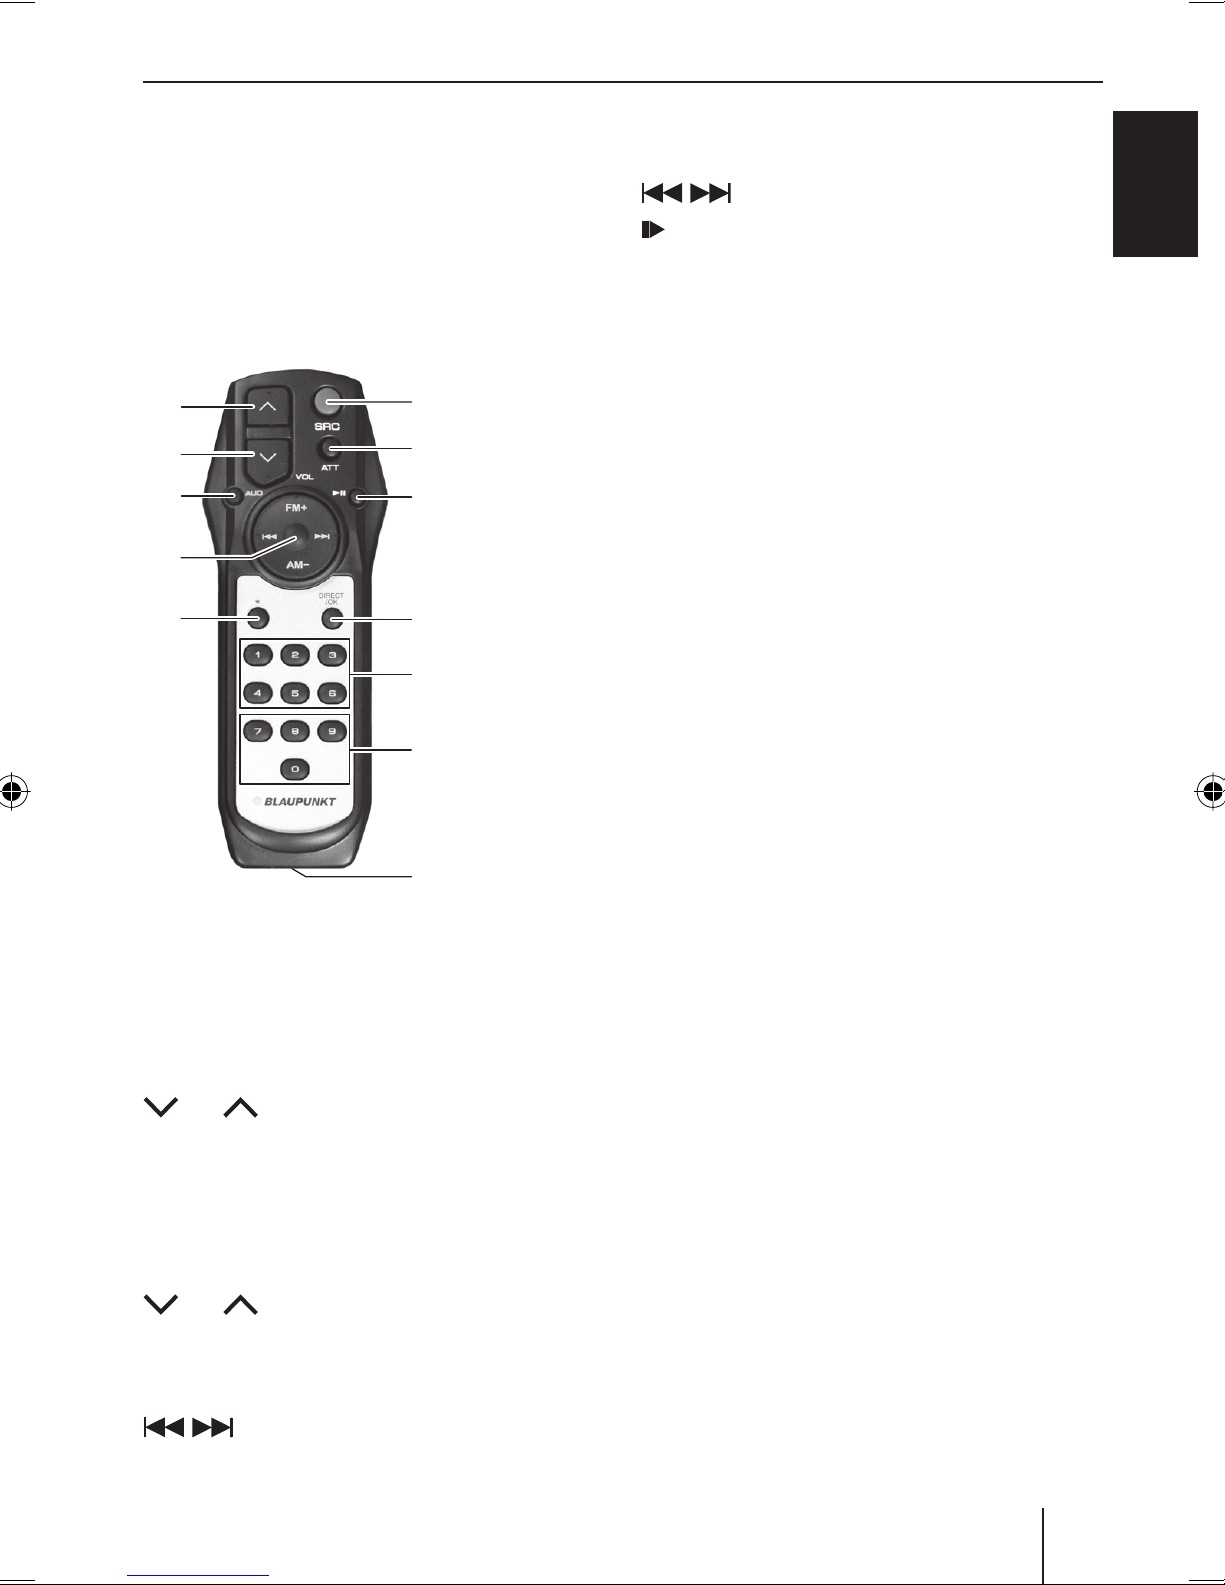
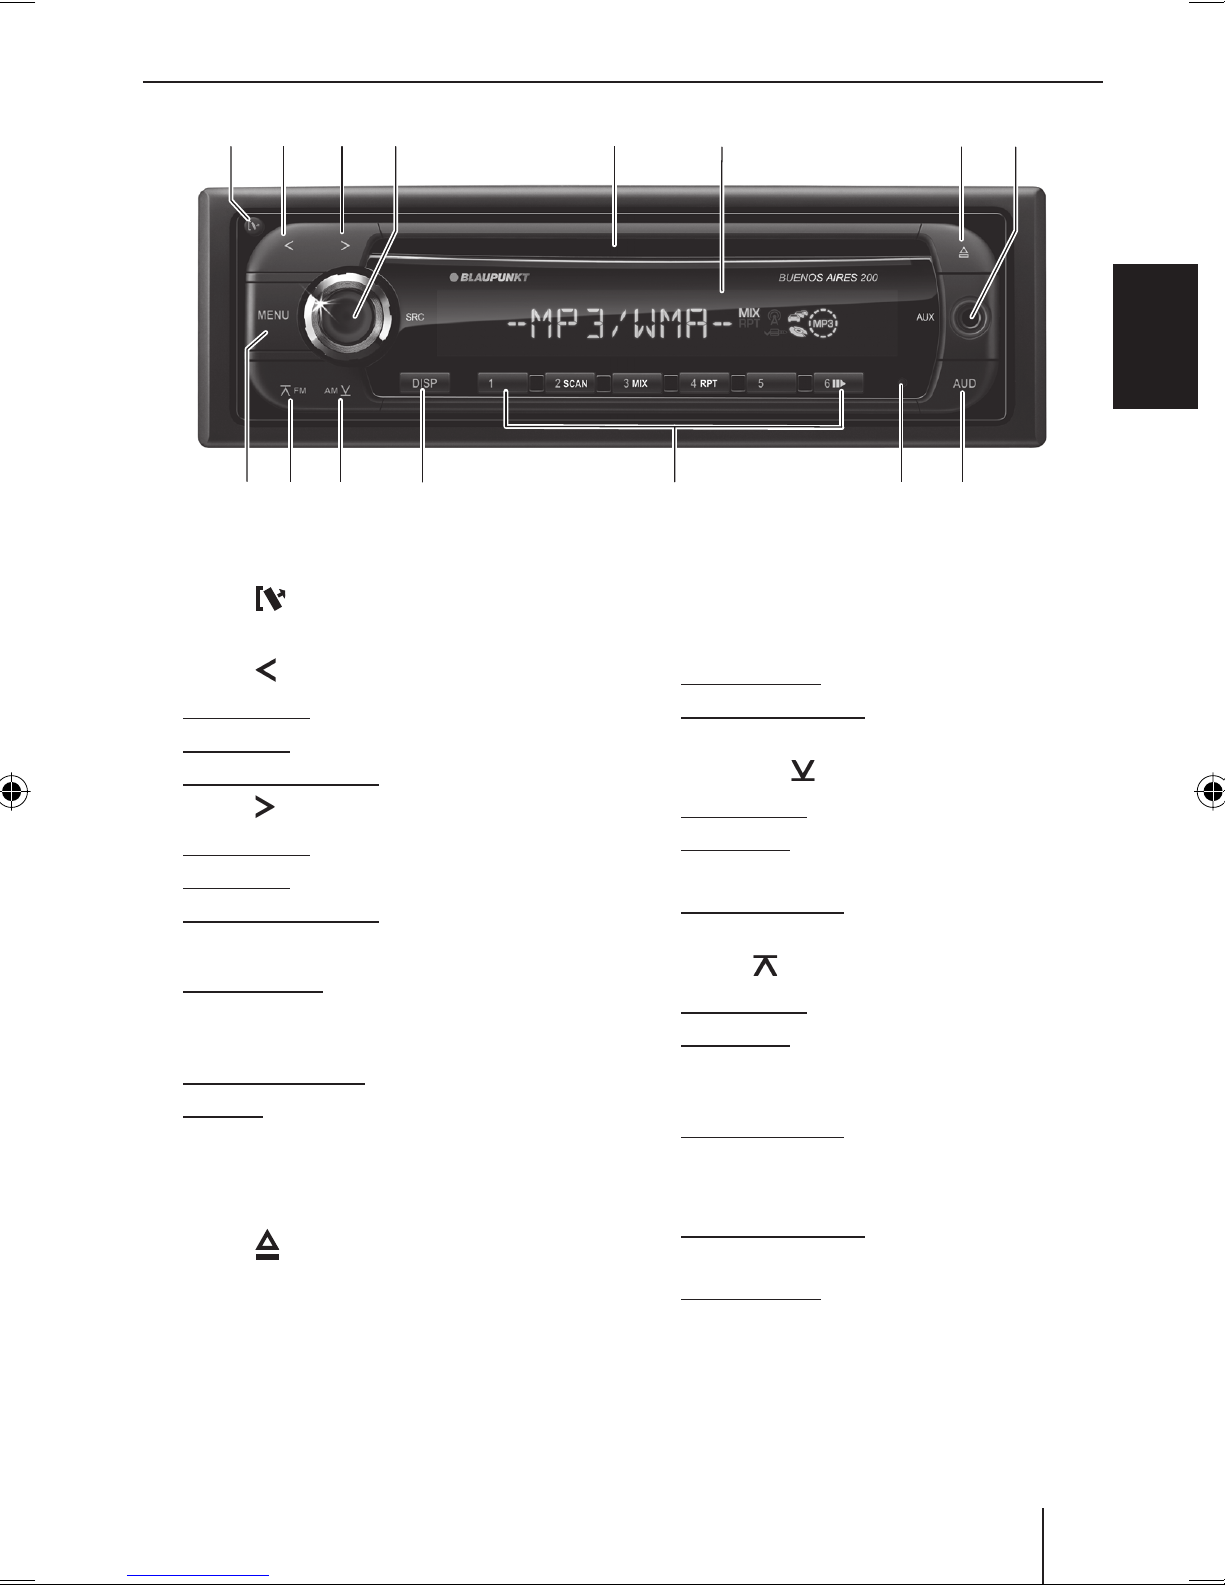
Controls
>
3
45
=
<
12
?
1
2 button
3 button
4 On/Off button
5 CD tray
button
Unlock the detachable control panel
In the menu: Change settings
Radio mode: Adjust the stations
CD/MP3/WMA mode: Track selection
In the menu: Change settings
Radio mode: Adjust the stations
CD/MP3/WMA mode: Track selection
Short press: Switch on switched off device,
select audio source/"NO SRC" mode
Long press: Switches the device off
Turn: Adjust volume, change settings in Audio
menu
6
;
; Keys 1 - 6
< DISP button
Short press: Switch display
Long press: Display text as scrolling text
= AM button
In the menu: Call up menu item
Radio mode: Select AM waveband
MP3/WMA mode: Change to previous folder
> FM button
In the menu: Call up menu item
Radio mode: Select FM waveband, change
between FM memory banks
MP3/WMA mode: Change to next folder
? MENU button
Long press: Call up user menu
Short press: Exit menus
:
78
9
6 Display
7
8 Front AUX-IN socket
9 AUD button
: Reset button
2
button (Eject)
Eject a CD
Call up the Audio menu
Reset the device to the factory settings

Contents
Important information ................................4
About these instructions ...........................4
For your safety .........................................4
Cleaning instructions ................................5
Disposal of old unit ...................................5
Scope of delivery .....................................5
Optional equipment
(not part of the scope of delivery) ...............5
Warranty .................................................5
Placing the device in operation ....................6
Detaching/attaching the control panel .........6
Switching on/off ......................................6
Adjusting the volume ................................6
"NO SRC" mode (muted) ...........................6
Preamplifi er output ..................................7
Radio mode ................................................7
Changing to radio mode ............................7
Selecting the memory bank
(FM1, FM2, FM3, AM) ..............................7
Tuning into a station ..................................7
Storing stations/calling stored stations: .......8
Storing stations automatically (Travelstore) ...8
Confi guring the display..............................8
Sound settings .........................................11
Calling and exiting the audio menu ............11
Performing settings in the audio menu .......11
Adjusting the level for an audio source .......11
Adjusting the low-pass fi lter for the
subwoofer .............................................12
Adjusting the loudspeaker type ................12
User settings ............................................12
Calling and exiting the user menu ..............12
Performing settings in the user menu ........12
Setting the time .....................................14
Additional functions .................................14
External audio sources ............................14
Restoring factory settings ........................14
Remote control .........................................15
Functions of the handheld remote control ... 15
Inserting the batteries .............................15
Technical data ..........................................16
Installation instructions ............................62
ENGLISH
CD/MP3/WMA mode ...................................8
Basic information .....................................8
Changing to CD/MP3/WMA mode ...............9
Inserting a CD ..........................................9
Ejecting a CD ...........................................9
Selecting tracks .......................................9
Selecting a folder (in MP3/WMA mode only) .... 9
Direct track search ...................................9
Fast searching ..........................................9
Interrupting playback ................................9
Scanning all tracks..................................10
Playing tracks in random order .................10
Repeatedly playing individual tracks
or directories .........................................10
Confi guring the display............................10
3
Important information
Important information
About these instructions
These instructions contain important information to easily and safely install and operate the
device.
•
Read these instructions carefully and completely before using the device.
•
Keep the instructions at a location so that they
are always accessible to all users.
•
Always pass on the device to third parties
together with these instructions.
In addition, observe the instructions of the devices used in conjunction with this device.
Symbols used
These instructions employ the following symbols:
CAUTION!
Warns about laser beam
Declaration of conformity
The Blaupunkt GmbH declares that the Buenos
Aires 200 device complies with the basic requirements and the other relevant regulations of the
directive 89/336/EWG.
For your safety
The device
state of the art and established safety guidelines.
Even so, dangers may occur if you do not observe
the safety notes in these instructions.
If you are installing device yourself
You may only install the device yourself if you are
experienced in installing car sound systems and
are very familiar with the electrical system of the
vehicle. For this purpose, observe the installation
instructions at the end of these instructions.
Observe the following!
was manufactured according to the
CAUTION!
CAUTION!
Warns about damaging the CD drive
The CE mark confi rms the compliance
with EU directives.
Identifi es a sequencing step
쏅
Identifi es a listing
•
Use as directed
This device is intended for installation and operation in a vehicle with 12 V vehicle system voltage
and must be installed in a DIN slot. Observe the
performance limits in the technical data. Repairs
and installation, if necessary, should be performed by a specialist.
The device contains a Class 1 laser
that can cause injuries to your eyes.
Do not open the device and do not perform any
modifi cations.
In operation:
•
Operate the device only if traffi c situation permits it! Stop at a suitable location to perform
more extensive operations.
•
Remove or attach the control panel only while
the vehicle is standing an.
•
Always listen at a moderate volume to protect
your hearing and to be able to hear acoustic
warning signals (e.g. police sirens). During
mute phases (e.g. when changing the audio
source), changing the volume is not audible.
Do not increase the volume during this mute
phase.
4
Important information
After operation:
•
The device is worthless to a thief without the
control panel. Always remove the control panel
whenever you leave the vehicle.
•
Transport the control panel so that it is protected against impacts and the contacts cannot become dirty.
Cleaning instructions
Solvents, cleaning and scouring agents as well as
dashboard spray and plastics care product may
contain ingredients that will damage the surface
of the device.
Use only a dry or slightly moistened cloth for
cleaning the device.
If necessary, clean the contacts of the control
panel regularly using a soft cloth moistened with
cleaning alcohol.
Disposal of old unit
Do not dispose of your old unit in the household trash!
Use the return and collection systems avail-
able to dispose of the old device.
Optional equipment
(not part of the scope of delivery)
Use only optional equipment approved by Blaupunkt, such as:
Blaupunkt or Velocity amplifi er
•
Information is available from your Blaupunkt spe-
cialised dealer or on the Internet under www.blaupunkt.com.
Warranty
We provide a manufacturer's warranty for products bought within the European Union. Devices
purchased outside the European Union are subject to the warranty terms published by our respective regional agency.
Service
In some countries, Blaupunkt offers a repair and
pick-up service.
Information about the availability of this service in
your country can be found at www.blaupunkt.com.
If you want to take advantage of this service, you
may request a pick-up service for your device via
the Internet.
ENGLISH
Do not discard depleted batteries of the remote control in the household trash, but
return it to the corresponding collection
centres.
Scope of delivery
The scope of delivery includes:
1 Car sound system
1 Handheld remote control
1 Operating instructions
1 Cloth case for the control panel
1 Support frame
1 Set of small parts
2 Disassembly tools
1 Connector cable
5

Placing the device in operation
Placing the device in operation
Detaching/attaching the control
panel
The device is equipped with a detachable control
panel (fl ip-release panel) as a way of protecting
your equipment against theft. Always take the
control panel with you when leaving the vehicle.
The device is worthless to a thief without this control panel.
Caution
Damage to the control panel
Never drop the control panel.
Do not expose the control panel to direct sunlight
or another heat source.
Avoid direct skin contact with the control panel’s
electrical contacts.
Removing the control panel
쏅
Press the
button
panel.
쏅
Grasp the control panel at the left side and
fi rst pull it straight out of the bracket and
then to the left.
Attaching the control panel
쏅
Push the control panel into the bracket at the
right edge of the device.
1 to unlock the control
Notes:
If the vehicle ignition is switched off, the
•
device cannot be switched on with the
On/Off button
The device is switched off and on again
•
with the vehicle ignition if it is connected
with the ignition (see the installation instructions).
4.
Adjusting the volume
You can adjust the volume in increments from
0 (off) to 66 (maximum).
Turn the On/Off button
쏅
volume.
Note:
If a telephone or navigation system is connected with the device as described in the
installation instructions, the device is muted
with every telephone call or a navigation
announcement. The display then shows
"PHONE".
4 to change the
"NO SRC" mode (muted)
Instead of an audio source, you can select the
"NO SRC" mode ("No Source": no audio source).
In "NO SRC" mode, no audio source is selected
and the device is muted.
Certain user settings can be performed only in the
"NO SRC" mode.
쏅
Push the control panel carefully into the left
bracket until it clicks into place.
Switching on/off
쏅
With the vehicle ignition switched on, briefl y
press the On/Off button
device.
- or -
쏅
Press the On/Off button
2 seconds to switch off the device.
The device remembers the audio source played
last for the next switch-on. Any CD already inserted in the device remains there.
6
4 to switch on the
4 for approx.
Changing to "NO SRC" mode
Press the On/Off button
쏅
"NO SRC" appears.
4 repeatedly until

Placing the device in operation Radio mode
Preamplifi er output
This device features a preamplifi er output.
Settings for the preamplifi er output:
Chapter "User settings", section "Perform-
•
ing settings in the user menu", menu item
"SWPRE"
Chapter "Sound settings", section "Adjusting
•
the low-pass fi lter for the subwoofer".
Radio mode
Changing to radio mode
Press the On/Off button 4 repeatedly until
쏅
"FM"/"AM" appears.
Selecting the memory bank
(FM1, FM2, FM3, AM)
Press the FM button > repeatedly until
쏅
the desired FM memory bank (FM1, FM2,
FM3) appears.
- or Press the AM
쏅
memory bank.
Note:
Up to six stations can be stored in each memory bank.
button = to select the AM
ENGLISH
Tuning into a station
The buttons 2 / 3 allows tuning into stations manually or by using automatic seek tuning
or changing between stored stations. First, adjust the desired function in the user menu (see
the chapter "User settings", section "Performing
settings in the user menu", menu item "AUTO1 /
AUTO2 / MANUAL").
Starting station seek tuning
(setting "AUTO1")
Press the button
쏅
into the next receivable station.
Adjusting stations manually
(setting "MANUAL")
Press the button
쏅
or several times to change the frequency in
increments.
Press and hold down the button
쏅
to quickly change the frequency.
2 / 3 briefl y to tune
2 / 3 briefl y once
2 / 3
7
Radio mode CD/MP3/WMA mode
Changing between stored stations
(setting "AUTO2")
쏅
Press the button
to the station at the next memory location.
2 / 3 briefl y to tune
Storing stations/calling stored
stations:
쏅
Select the desired memory bank.
쏅
If necessary, set the desired station.
쏅
Press the station button
1 - 6 ; for approx.
2 seconds to store the current station under
the button.
- or -
쏅
Briefl y press the station button
call up the stored station.
1 - 6 ; to
Storing stations automatically
(Travelstore)
Travelstore allows storing 6 stations each of the
region for the current memory bank on the station
buttons 1 - 6 ;. Any previously stored stations
in this memory bank are deleted in the process. In
FM mode, you can store additional stations after
changing to another memory bank if you start the
automatic station store again.
Press the
쏅
2 seconds to start the Travelstore function
("A-MEMORY").
FM button > for approx.
Confi guring the display
Press the DISP button < to change between
쏅
these displays:
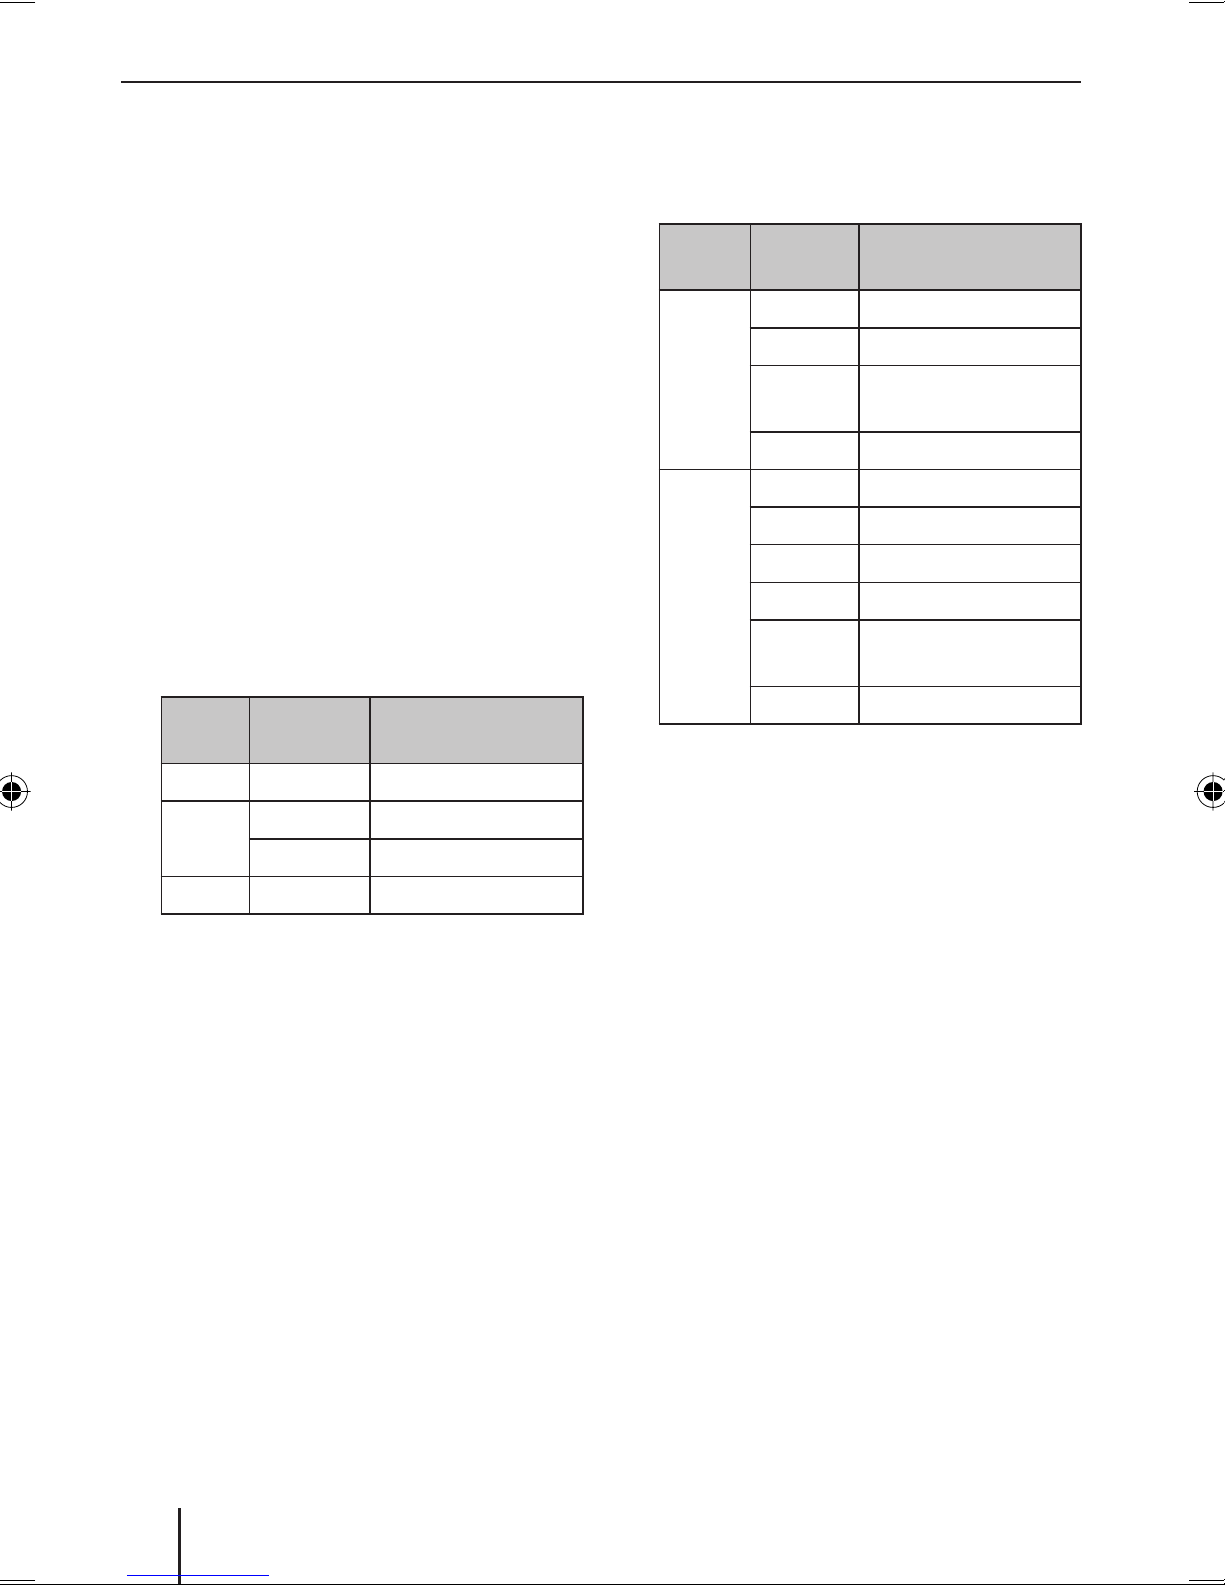
Display Meaning
FREQ
CLOCK
Frequency
Time
CD/MP3/WMA mode
Basic information
This car sound system can be used to play audio
CDs (CDDA) as well as CD-R/RWs with audio,
MP3 or WMA fi les.
Risk of damage to the CD drive!
Noncircular contoured CDs (shape CDs)
and CDs with a diameter of 8 cm (mini
CDs) must not be used.
We accept no responsibility for any damage to the
CD drive that may occur as a result of the use of
unsuitable CDs.
Notes:
•
To ensure proper functioning, use only CDs
with the Compact-Disc logo.
•
Blaupunkt cannot guarantee the fl awless
function of copy-protected CDs and all CD
blanks available on the market.
Note the following information when preparing an
MP3/WMA CD:
Naming of tracks and directories:
•
Max. 16 characters incl. the fi le extension
–
".mp3" or ".wma" (the use of more characters reduces the number of tracks and
folders that the device can recognise)
No umlauts or special characters
–
CD formats: Audio CD (CDDA), CD-R/RW,
•
Ø: 12 cm
CD data formats: ISO 9669 Level 1 and 2, Jo-
•
liet
CD burn speed: Max. 16x (recommended)
•
File extension of audio fi les:
•
.MP3 for MP3 fi les
–
.WMA for WMA fi les
–
WMA fi les only without Digital Rights Manage-
•
ment (DRM) and created with Windows Media
Player version 8 or later
MP3 ID3 tags: Version 1 and 2
•
8
•
Bitrate for creating audio fi les:
–
MP3: 32 to 320 kbps
–
WMA: 32 to 192 kbps
•
Max. number of tracks and folders: 999 tracks,
99 folders
Changing to CD/MP3/WMA mode
쏅
Press the On/Off button 4 repeatedly until
"CD" appears.
Note:
The CD/MP3/WMA mode can be selected
only if a corresponding CD is inserted.
Inserting a CD
Note:
You must not hinder or assist the drive as it
automatically draws in the CD.
CD/MP3/WMA mode
Selecting a folder
(in MP3/WMA mode only)
쏅
Press the button AM =/ FM > to
change to the previous/next folder.
Direct track search
You can also select a track directly without interrupting the current playback.
쏅
Briefl y press the MENU button
SEL" briefl y appears on the display.
In MP3/WMA mode, press the
쏅
to change from the current to the next higherlevel folder.
쏅
Press the button AM
or several times or turn the On/Off button
to select a track or, in MP3/WMA mode, a subfolder in the current folder.
=/ FM > once
?. "FLD
button 2
4
ENGLISH
쏅
Push the CD into the CD tray
a resistance.
The CD is automatically drawn in and playback starts. If a CD is inserted, the display
shows the CD symbol.
5 until you feel
Ejecting a CD
Notes:
•
If a CD is ejected and not removed, the
drive will automatically draw it back in
again after approx. 10 seconds.
•
You can also eject CDs whilst the device is
switched off or whilst another audio source
is activated.
쏅
Press the
CD.
button
7 to eject an inserted
Selecting tracks
Press the AUD button 9 to start the select-
쏅
ed track or open the subfolder.
Note:
Pressing the MENU button
rect selection without starting a new track.
? cancels the di-
Fast searching
쏅
Press and hold down the button 2 / 3
until the desired position has been reached.
Interrupting playback
Press the 6 button ; to interrupt the
쏅
playback ("PAUSE") or to continue it.
쏅
Briefl y press the button 2 / 3 to
change to the previous/next track.
Note:
Pressing
again.
2 once starts the current track
9
CD/MP3/WMA mode
Scanning all tracks
The Scan function scans every track of the CD for
approx. 10 seconds.
쏅
Press the 2 SCAN button ; to start the scan
("SCN TRCK") or to continue listening to the
currently scanned track ("SCN OFF").
Playing tracks in random order
쏅
Press the 3 MIX button ; to activate the
MIX function (audio CD: "MIX CD"; MP3: "MIX
FLDR") or to switch it off ("MIX OFF").
If the MIX function is active, the MIX symbol
appears on the display.
Repeatedly playing individual tracks
or directories
쏅
Press the 4 RPT button ; once or twice to
change between playback modes:
Operation
Display Meaning
Confi guring the display
쏅
Press the DISP button < once or several
times to change between these displays:
Operation
CD
MP3/
WMA
* Only if stored as ID3 tag
Display Meaning
D-TITLE
T-TITLE
P-TIME
CLOCK
TITLE
ALBUM
FOLDER
FILE
P-TIME
CLOCK
CD name
Track name
Playing time/track
number
Time
Track name*
Album name*
Folder name
File name
Playing time/track
number
Time
CD
MP3/
WMA
Gen.
If the RPT function is active, the RPT symbol
appears on the display.
RPT TRCK
RPT FILE
RPT FLDR
RPT OFF
Repeating tracks
Repeating tracks
Repeating folders
Regular playback
Press the
쏅
2 seconds to show the displayed text once as
scrolling text.
DISP button < for approx.
10

Sound settings
The settings in the audio menu and the adjustment of the level each apply to the current audio
source.
Turn the On/Off button
쏅
tween the settings.
BAS L
Bass level. Settings: -7 to +7.
Sound settings
4 to change be-
ENGLISH
Calling and exiting the audio menu
쏅
If necessary, press the On/Off button 4
repeatedly until the desired audio source is
selected.
쏅
Briefl y press the AUD button 9 to open the
audio menu.
쏅
Press the AUD button 9 repeatedly until the
desired menu item is selected.
쏅
Perform the setting (see the next section).
쏅
Briefl y press the MENU button ? to exit the
audio menu.
Performing settings in the audio
menu
SW L
Subwoofer level. Settings: -15 to +15.
쏅
Turn the On/Off button
setting.
X-BASS
Increase of bass at low volume. Settings: OFF, 1,
2 (highest increase).
4 to perform the
쏅
Turn the On/Off button
setting.
MID L
Middle level. Settings: -7 to +7.
쏅
Turn the On/Off button
setting.
TRE L
Treble. Settings: -7 to +7.
Turn the On/Off button
쏅
setting.
BAL
Left/right volume distribution (balance). Settings: L 9 (left) to R 9 (right).
쏅
Turn the On/Off button
setting.
FAD
Front/rear volume distribution (fader). Settings:
F 9 (front) to R 9 (rear).
Turn the On/Off button
쏅
setting.
4 to perform the
4 to perform the
4 to perform the
4 to perform the
4 to perform the
쏅
Turn the On/Off button
tween the settings.
NATURAL / ROCK / POPS / EASY / TOP40 /
JAZZ / GAME / USER
Equaliser presettings: NATURAL, ROCK, POPS,
EASY, TOP40, JAZZ, GAME.
"USER" is not an equaliser presetting and appears
as a menu item only if you manually adjusted the
bass, treble or middle level the last time. As soon
as you select an equaliser presetting, your manually performed settings are replaced by the presetting.
4 to change be-
Adjusting the level for an audio
source
You can separately adjust the level for any audio
source, e.g. to achieve a uniform playback level
for all audio sources. Settings: For AUX -8 to +8,
for all other audio sources -8 to 0.
If necessary, press the On/Off button
쏅
repeatedly until the desired audio source is
selected.
Press the AUD button 9 for approx. 2 sec-
쏅
onds.
4
11

Sound settings User settings
쏅
If necessary, briefl y press the AUD button 9
to select the "V-OFF" menu item.
User settings
쏅
Turn the On/Off button
setting.
쏅
Briefl y press the MENU button ? to exit the
menu.
4 to perform the
Adjusting the low-pass fi lter for the
subwoofer
This is possible only if the setting SWPRE SW is selected in the user menu. Settings: THRU (no lowpass fi lter), 80H (Hz), 120H (Hz), 160H (Hz).
Press the AUD button 9 for approx. 2 sec-
쏅
onds.
The "LPF" menu item is selected.
Turn the On/Off button
쏅
4 to perform the
setting.
쏅
Briefl y press the MENU button ? to exit the
menu.
Adjusting the loudspeaker type
Adjust the loudspeaker type connected to the
device to optimise the sound. Settings: SP OFF
(no type selected), SP 5/4 (loudspeaker with 4 or
5 inch diameter), SP 6*9/6 (loudspeaker with
6 or 6x9 inch diameter), SP OEM (original Blaupunkt loudspeaker).
If necessary, press the On/Off button
쏅
repeatedly until "NO SRC" is selected.
Briefl y press the AUD button 9.
쏅
Turn the On/Off button
쏅
tween the settings.
Briefl y press the AUD button 9 to exit the
쏅
menu.
4 to change be-
4
Calling and exiting the user menu
Press the MENU button ? for approx. 2 sec-
쏅
onds to open the menu.
Press the button AM
쏅
repeatedly until the desired menu item is
selected.
Perform the setting (see the next section).
쏅
Briefl y press the MENU button to exit the
쏅
menu.
=/ FM >
Performing settings in the user menu
AUTO1 / AUTO2 / MANUAL
Possible only in radio mode: Select the mode for
setting stations. Settings: AUTO1 (station seek
tuning), AUTO2 (changing between stored stations), MANUAL (adjusting the frequency manually).
Press the button
쏅
between the settings.
CRSC
Possible only in FM radio mode: Switch automatic
mono playback for radio stations on or off in case
of poor reception. Settings: ON, OFF.
Press the button
쏅
between the settings.
SCL
Switching automatic display of text as scrolling
text on or off. Settings: AUTO (On), MANU (Off).
Press the button
쏅
between the settings.
2 / 3 to change
2 / 3 to change
2 / 3 to change
12
DEMO
Switching demo mode on or off. Settings: ON,
OFF.
Press the AUD button 9 for approx. 2 sec-
쏅
onds to change between the settings.

User settings
DIM
Switching automatic adjustment of display brightness ti the ambient lighting on or off. Settings:
ON, OFF.
쏅
Press the button
2 / 3 to change
between the settings.
SPRM
Only possible in MP3 and WMA mode: Switching the Supreme function on or off. Settings: ON,
OFF.
쏅
Press the button
2 / 3 to change
between the settings.
The Supreme function results in a sound improvement for tracks coded at a low bitrate. The low
bitrate results in capping the upper frequency
range during the coding. For playback, the Supreme function recalculates the upper frequency
range and subsequently expands the sound spectrum. For tracks with high or variable bitrate or
with little salient upper frequency range, the Supreme function allows only minor sound improvement.
NAME SET
Possible only in AUX mode: Selecting names for
the AUX input. Settings: AUX, TV, VIDEO, GAME,
PORTABLE, DVD.
Press the AUD button 9 for approx. 2 sec-
쏅
onds.
Press the button
쏅
2 / 3 to change
between the settings.
Note:
The menu is automatically exited 10 seconds
after the last button press.
The AUX mode is selected under the defi ned
name.
SWPRE
Possible only if the "NO SRC" mode is selected:
Adjusting the preamplifi er output. Settings: R
(for external amplifi er), SW (for subwoofer).
쏅
Press the button
2 / 3 to change
between the settings.
With the setting "R", the full frequency spectrum
is available at the preamplifi er output. With the
setting "SW", you can adjust a low-pass fi lter for
a connected subwoofer (see the chapter "Sound
settings", section "Adjusting the low-pass fi lter for
the subwoofer").
AUX
Possible only if the "NO SRC" mode is selected:
Adjusting the AUX input. Settings: OFF (AUX
mode is not selectable), ON1 (AUX mode is selectable), ON2 (AUX mode is selectable, volume
reduction on; see below).
쏅
Press the button
2 / 3 to change
between the settings.
For the setting "ON2": If the device is switched off
in AUX mode, it is initially at low volume when it
is switched on again ("ATT ON", volume reduction
on). Turn the On/Off button
4 clockwise by one
increment to reactivate the previously adjusted
volume ("ATT OFF", volume reduction off).
CD READ
Possible only if the "NO SRC" mode is selected:
Adjusting the CD playback. Settings: 1 (for audio
CDs and MP3/WMA CDs), 2 (for audio CDs only).
쏅
Press the button 2 / 3 to change
between the settings.
With the setting "1", the device recognises audio
CDs as well as MP3/WMA CDs and plays them.
With this setting, copy-protected CDs can frequently not be played. With the setting "2", the
device recognises only audio CDs and does not
play any MP3/WMA CDs. With this setting, many
copy-protected CDs can also be played.
ENGLISH
13
User settings Additional functions
Setting the time
If necessary, press the DISP button <
쏅
repeatedly until the time is displayed.
Press the
쏅
onds.
Press the button AM
쏅
adjust the hours.
Press the button
쏅
minutes.
Briefl y press the
쏅
DISP button < for approx. 2 sec-
=/ FM > to
2 / 3 to adjust the
DISP button <.
Additional functions
External audio sources
Connecting external audio sources
You can connect external audio sources, such as
portable CD players, MiniDisc players, MP3 players, via the FRONT-AUX-IN socket
and play them back in AUX mode via the loudspeakers of the car sound system.
Changing to AUX mode
쏅
Press the On/Off button
"AUX" appears.
Notes:
You can switch off the AUX input if no other
•
external audio source is connected (see
the chapter "User settings", section "Performing settings in the user menu", menu
item "AUX").
8 (AUX input)
4 repeatedly until
You can select a different name for the AUX
•
input than "AUX" (see the chapter "User
settings", section "Performing settings in
the user menu", menu item "NAME SET").
Restoring factory settings
Press the reset button : with a pointed ob-
쏅
ject (e.g. a pin or the tip of a ball-point pen).
Factory settings in the user menu:
DIM OFF MONO OFF
SWPRE R SCL OFF
SPRM ON AUX ON1
DEMO OFF CD READ 1
14
Remote control
Remote control
The most frequently used functions can also be
controlled via the handheld remote control.
Note:
Switching the device on and off is not possible with the remote control.
D
C
B
A
@
E
F
G
H
I
In CD/MP3/WMA mode
FM+/AM
G Interrupt/continue playback
– A Select folder (MP3/WMA only)
/ A Select a track
Note:
The buttons
tion for this device.
@, H and J are without func-
Inserting the batteries
The battery compartment is located at the back of
the remote control.
쏅
Press the cover of the battery compart-
K slightly inward and push it down to
ment
remove it.
쏅
Insert two batteries size AA into the battery
compartment. Make sure that the battery
poles are positioned as shown in the battery
compartment.
ENGLISH
J
K
Functions of the handheld remote
control
General
C/ D Adjust volume
SRC
E Select audio source
F Mute device
AT T
In the Audio menu
B Select menu item
AUD
쏅
To close the battery compartment, place the
cover on the lateral guides of the battery compartment and push it up until it engages.
C/ D Perform a setting
In radio mode
FM+/AM
1 - 6
– A Select memory bank
/ A Tune into a station
I Call up stored station
15

Technical data
Technical data
Amplifi er
Output power: 4 x 30 watts sine in
accordance with
DIN 45324 at 14.4 V
at 4 ohms.
4 x 50 watts max.
power
Tuner
Wavebands:
FM: 87.9 - 107.9 MHz
AM: 530 - 1,700 kHz
FM frequency response:
30 - 15,000 Hz
CD
Frequency response:
20 - 20,000 Hz
Pre-amp out
2 channels: 2 V
Input sensitivity
AUX input: 1.2 V / 10 kΩ
Dimensions and weight
W x H x D (mm): 182 x 53 x 155
Weight: approx. 1.30 kg
Subject to changes
16
Eléments de commande
>
(Eject)
3
45
=
<
12
?
1 Touche
Déverrouillage de la face avant détachable
2 Touche
Dans le menu : modifi cation des réglages
Mode radio : réglage des stations
Mode CD/MP3/WMA : sélection du titre
3 Touche
Dans le menu : modifi cation des réglages
Mode radio : réglage des stations
Mode CD/MP3/WMA : sélection du titre
4 Touche marche/arrêt
Pression brève : mise en marche de l’appareil
arrêté, sélection de la source audio/mode
« NO SRC »
Pression prolongée : arrêt de l’appareil
Rotation : réglage du volume sonore, modifi -
cation des réglages dans le menu audio
5 Fente d’insertion du CD
6 Ecran
7 Touche
Ejection du CD
8 Prise AUX-IN frontale
6
;
; Bloc de touches 1 - 6
< Touche DISP
Pression brève : commutation de l’affi chage
Pression prolongée : défi lement du texte sur
l’écran
= Touche AM
Dans le menu : ouverture de l’option de menu
Mode radio : sélection de la gamme d’ondes
AM
Mode MP3/WMA : sélection du dossier pré-
cédent
> Touche FM
Dans le menu : ouverture de l’option de menu
Mode radio : sélection de la gamme d’ondes
FM, commutation entre les niveaux de mémoire FM
Mode MP3/WMA : sélection du dossier suivant
? Touche MENU
Pression prolongée : ouverture du menu utilisateur
Pression brève : sortie des menus
:
78
9
FRANÇAIS
9 Touche AUD
Ouverture du menu audio
: Touche Reset
Retour au réglages d’usine de l’appareil
17

Sommaire
Informations importantes .........................19
A propos de cette notice ..........................19
Pour votre sécurité .................................19
Instructions de nettoyage ........................20
Elimination des anciens appareils .............20
Composition de la fourniture ....................20
Accessoires spéciaux(non fournis) ............20
Garantie................................................20
Mise en service.........................................21
Retrait et mise en place de la face avant .....21
Mise en marche et arrêt ...........................21
Réglage du volume..................................21
Mode « NO SRC » (son coupé) ..................21
Sortie du préamplifi cateur .......................22
Mode radio ...............................................22
Passage dans le mode radio .....................22
Sélection du niveau de mémoire
(FM1, FM2, FM3, AM) ............................22
Sélection des stations .............................22
Mémorisation des stations/appel
des stations mémorisées .........................23
Mémorisation automatique de stations
(Travelstore) ..........................................23
Régler du mode d’affi chage ......................23
Réglages de tonalité .................................26
Ouverture et fermeture du menu audio ......26
Réglages dans le menu audio....................26
Adaptation du niveau d’une source audio ...26
Réglage du fi ltre passe-bas pour le
subwoofer .............................................27
Réglage du type de haut-parleur ...............27
Réglages utilisateur ..................................27
Ouverture et fermeture du menu
utilisateur ..............................................27
Réglages dans le menu utilisateur .............27
Réglage de l’heure ..................................29
Autres fonctions .......................................29
Sources audio externes ...........................29
Retour aux réglages d’usine ......................29
Télécommande .........................................30
Fonctions de la télécommande portable ....30
Insertion des piles ..................................30
Caractéristiques techniques ......................31
Notice de montage ....................................62
Mode CD/MP3/WMA .................................23
Informations de base ..............................23
Sélection du mode CD/MP3/WMA ............24
Introduction d’un CD ...............................24
Retrait du CD .........................................24
Sélection des titres .................................24
Sélection d’un dossier
(uniquement dans le mode MP3/WMA) .....24
Sélection directe des titres ......................24
Recherche rapide ...................................24
Arrêt de la lecture ...................................24
Balayage de tous les titres ........................25
Lecture des titres dans un ordre aléatoire .... 25
Répétition de la lecture d’un titre ou d’un
répertoire .............................................25
Régler du mode d’affi chage ......................25
18
Informations importantes
Informations importantes
A propos de cette notice
Cette notice contient des informations importantes pour un montage et une utilisation simples et
sûrs de l’appareil.
•
Lisez cette notice avec soin et intégralement
avant d’utiliser l’appareil.
•
Conservez cette notice de façon à ce qu’elle
soit accessible à tout moment à tous les utilisateurs.
•
Remettez toujours l’appareil à un tiers avec
cette notice.
Tenez également compte des notices jointes aux
appareils utilisés conjointement à celui-ci.
Symboles utilisés
Les symboles suivants sont utilisés dans cette
notice :
Déclaration de conformité
Blaupunkt GmbH certifi e que l’appareil Buenos
Aires 200 satisfait aux exigences de base et aux
exigences des autres dispositions applicables de
la directive 89/336/CEE.
Pour votre sécurité
L’appareil a été
des connaissances techniques et selon les règles
techniques de sécurité reconnues. Vous prenez cependant des risques si vous ne suivez pas les consignes de sécurité qui se trouvent dans cette notice.
Si vous montez vous-mêmes l’appareil
Vous n’êtes autorisé à monter l’appareil que si
vous possédez une expérience dans le montage
d’autoradios et disposez de bonnes connaissances en électricité automobile. Tenez compte pour
cela de la notice de montage qui se trouve à la fi n
de ce document.
fabriqué en fonction de l’état actuel
FRANÇAIS
ATTENTION !
Avertit de la présence d’un rayon laser
ATTENTION !
Avertit de la possibilité d’endommager
le lecteur de CD
Le sigle CE confi rme que les directives
UE sont respectées.
쏅
Identifi e une action
Identifi e une énumération
•
Utilisation conforme
Cet appareil est prévu pour le montage et le fonctionnement dans un véhicule disposant d’une tension de bord de 12 V et il doit être monté dans une
baie DIN. Tenez compte des limites de puissance
indiquées dans les caractéristiques techniques.
Confi ez les réparations, et éventuellement le
montage, à un spécialiste.
Ce que vous devez respecter !
ATTENTION !
L’appareil comporte un laser de
classe 1 qui est susceptible de
blesser vos yeux.
N’ouvrez pas l’appareil, n’entreprenez aucune
modifi cation sur celui-ci.
En fonctionnement :
•
Ne manipulez l’appareil que si les conditions de
circulation le permettent ! Pour effectuer des
manipulations importantes, arrêtez-vous dans
un endroit approprié.
•
Enlevez ou remettez en place la face avant uniquement lorsque le véhicule est à l’arrêt.
•
Réglez un volume sonore modéré de manière
à protéger votre ouïe et à pouvoir entendre les
signaux d’alerte (par ex. de la police). Si vous
modifi ez le volume sonore pendant une coupure momentanée du son (par ex. lors d’un changement de source audio), la différence ne sera
audible qu’une fois le son rétabli. N’augmentez pas le volume sonore pendant la coupure
momentanée du son.
19
Informations importantes
Après utilisation :
•
Sans face avant, l’appareil n’a aucune valeur
pour le voleur. Retirez toujours la face avant
lorsque vous quittez le véhicule.
•
Transportez la face avant de manière à ce qu’elle soit protégée des coups et que les contacts
ne puissent pas être encrassés.
Instructions de nettoyage
Les solvants, les produits de nettoyage, les abrasifs et les produits pour l’entretien du poste de
conduite et du plastique contiennent des substances susceptibles d’attaquer les surfaces de
l’appareil.
Pour nettoyer l’appareil, utilisez uniquement un
chiffon sec ou légèrement humide.
Nettoyez au besoin les contacts de la face avant
avec un chiffon doux imbibé d’alcool de nettoyage.
Elimination des anciens appareils
Accessoires spéciaux
(non fournis)
Utilisez uniquement les accessoires spéciaux
agréés par Blaupunkt, par exemple :
•
Les amplifi cateurs Blaupunkt et Velocity (Amplifi er)
Renseignez-vous auprès de votre revendeur
Blaupunkt ou sur Internet à l’adresse www.blaupunkt.com.
Garantie
Notre garantie constructeur s’étend à tous nos
produits achetés au sein de l’Union Européenne.
Pour les appareils vendus hors Union européenne, ce sont les conditions de garantie défi nies par
nos représentations nationales compétentes respectives, qui sont applicables.
Service
Dans certains pays, Blaupunkt propose un service
d’enlèvement et de réparation.
Ne jetez pas votre ancien appareil avec les
ordures ménagères !
Utilisez les systèmes de retour ou de collecte des anciens appareils en vue de leur élimination.
Ne jetez pas les piles usées dans les ordures
ménagères, mais déposez-les dans un cen-
tre de récupération approprié.
Composition de la fourniture
La fourniture comprend :
1 Autoradio
1 Télécommande portable
1 Notice d’utilisation
1 Etui en tissu pour la face avant
1 Cadre support
1 Petit matériel
Vous pouvez contrôler si ce service est disponible
dans votre pays à l’adresse www.blaupunkt.com.
Si vous souhaitez recourir à ce service, vous pouvez effectuer une demande d’enlèvement de votre
appareil par Internet.
2 Outils de démontage
1 Câble de raccordement
20
Mise en service
Mise en service
Retrait et mise en place de la face
avant
Votre autoradio est équipé d’une face avant détachable qui le protège contre le vol. Prenez toujours la face avant avec vous chaque fois que vous
quittez le véhicule. Sans cette face avant détachable, l’autoradio n’a aucune valeur pour le voleur.
Attention
Risque d’endommagement de la face avant
Ne laissez pas tomber la face avant par terre.
N’exposez pas la face avant directement à la lu-
mière du soleil ou à d’autres sources de chaleur.
Evitez que la peau ne touche directement les
contacts de la face avant.
L’appareil mémorise la source audio écoutée en
dernier pour la reprendre lors de la prochaine
mise en marche. Un CD inséré reste dans l’appareil.
Remarques :
•
Lorsque le contact du véhicule est coupé,
l’appareil ne peut pas être mis en marche
avec la touche marche/arrêt
Lorsque l’appareil est relié au contacteur
•
d’allumage du véhicule (voir notice de
montage), il est mis en marche ou arrêté au
moment où le contact est mis ou coupé.
4.
Réglage du volume
Le volume sonore est réglable de 0 (arrêt) à 66
(maximum).
쏅
Tournez la touche marche/arrêt
modifi er le volume sonore.
4 pour
FRANÇAIS
Retrait de la face avant
쏅
Appuyez sur la touche
1 pour déver-
rouiller la face avant.
쏅
Saisissez la face avant par le côté gauche et
tirez-la d’abord tout droit puis vers la gauche
pour l’extraire de sa fi xation.
Mise en place de la face avant
Poussez la face avant dans la fi xation qui se
쏅
trouve sur le bord droit du boîtier.
Appuyez avec précaution sur la face avant
쏅
jusqu’à ce qu’elle se verrouille dans la fi xation
qui se trouve à gauche.
Mise en marche et arrêt
쏅
Pour mettre l’appareil en marche, appuyez
brièvement sur la touche marche/arrêt
alors que le contact du véhicule est mis.
- ou -
쏅
Appuyez sur la touche marche/arrêt
dant 2 secondes environ pour arrêter l’appareil.
4
4 pen-
Remarque :
Si un téléphone ou un système de navigation est relié à l’appareil comme décrit dans
la notice de montage, le son de l’appareil est
coupé lors d’une communication téléphonique ou d’une instruction vocale du système
de navigation. « PHONE » apparaît alors sur
l’écran.
Mode « NO SRC » (son coupé)
Vous pouvez sélectionner le mode « NO SRC »
(« No Source » : aucune source audio) à la place
d’une source audio.
Dans le mode « NO SRC », aucune source audio
n’est sélectionnée et le son de l’appareil est coupé.
Vous pouvez effectuer certains réglages utilisateur uniquement dans le mode « NO SRC ».
Commutation dans le mode « NO SRC »
Appuyez sur la touche marche/arrêt
쏅
autant de fois qu’il est nécessaire pour faire
apparaître « NO SRC » sur l’écran.
4
21
Mise en service Mode radio
Sortie du préamplifi cateur
Cet appareil dispose d’une sortie préamplifi cateur.
Réglages pour la sortie préamplifi cateur :
Chapitre « Réglages utilisateur », section « Ré-
•
glages dans le menu utilisateur », option de
menu « SWPRE »
Chapitre « Réglages de tonalité », section « Ré-
•
glage du fi ltre passe-bas pour le subwoofer ».
Mode radio
Passage dans le mode radio
Appuyez sur la touche marche/arrêt 4
쏅
autant de fois qu’il est nécessaire pour faire
apparaître « FM »/« AM » sur l’écran.
Sélection du niveau de mémoire
(FM1, FM2, FM3, AM)
Appuyez sur la touche FM > autant de
쏅
fois qu’il est nécessaire pour faire apparaître
le niveau de mémoire souhaité (FM1, FM2,
FM3) sur l’écran.
- ou Appuyez sur la touche AM
쏅
tionner le niveau de mémoire AM.
Remarque :
Six stations au maximum peuvent être mémorisées sur chaque niveau de mémoire.
= pour sélec-
Sélection des stations
Les touches 2 / 3 vous permettent de
régler manuellement les stations, de commander la recherche automatique des stations ou de
passer d’une station mémorisée à l’autre. Réglez
d’abord la fonction souhaitée dans le menu utilisateur (voir chapitre « Réglages utilisateur », section « Réglages dans le menu utilisateur », option
de menu « AUTO1 / AUTO2 / MANUAL »).
Démarrage de la recherche des stations
(réglage « AUTO1 »)
Appuyez brièvement sur la touche
쏅
3 pour régler la prochaine station qui
peut être reçue.
Réglage manuel des stations
(réglage « MANUAL »)
Appuyez brièvement une ou plusieurs fois
쏅
sur la touche
fréquence pas à pas.
2 / 3 pour modifi er la
2 /
22
Maintenez la touche
쏅
pour modifi er rapidement la fréquence.
2 / 3 appuyée
 Loading...