


Washing Machine
Pralka automatyczna Plně automatická pračka Skalbimo mašina
WML 15105 D WML 15085 D WML 15065 D WML 15045 D
1 Warnings |
|
by classifying according to waste |
|
|
directives. |
General Safety |
|
|
|
Intended use |
|
• Never place your machine on a |
|
|
|
• This product has been designed for |
|
carpet covered floor. Otherwise, |
|
|
|
home use. |
|
lack of airflow from below of your |
|
|
|
• The appliance may only be used for |
|
machine may cause electrical parts to |
|
|
|
washing and rinsing of textiles that |
|
overheat. This may cause problems |
|
|
|
are marked accordingly. |
|
with your washing machine. |
|
|
|
Safety instructions |
|
• If the power cable or mains plug is |
|
|
damaged you must call Authorized |
|
• This appliance must be connected to |
Service for repair. |
|
an earthed outlet protected by a fuse |
• Fit the drain hose into the discharge |
|
of suitable capacity. |
housing securely to prevent any |
|
• The supply and draining hoses must |
water leakage and to allow machine |
|
always be securely fastened and |
to take in and discharge water as |
|
remain in an undamaged state. |
required. It is very important that the |
|
• Fit the draining hose to a washbasin |
water intake and drain hoses are not |
|
or bathtub securely before starting up |
folded, squeezed, or broken when |
|
your machine. There may be a risk of |
the appliance is pushed into place |
|
being scalded due to high washing |
after it is installed or cleaned. |
|
temperatures! |
• Your washing machine is designed to |
|
• Never open the loading door or |
continue operating when the power |
|
remove the filter while there is still |
restores after a power interruption. |
|
water in the drum. |
The machine will resume its program |
|
• Unplug the machine when it is not in |
when the power restores. Press the |
|
use. |
“Start/Pause/Cancel” button for 3 |
|
• Never wash down the appliance with |
seconds to cancel the program (See, |
|
a water hose! There is the risk of |
Canceling a Program) |
|
electric shock! |
• There may be some water in your |
|
• Never touch the plug with wet hands. |
machine when you receive it. This is |
|
Do not operate the machine if the |
from the quality control process and |
|
power cord or plug is damaged. |
is normal. It is not harmful to your |
|
• For malfunctions that cannot be |
machine. |
|
solved by information in the operating |
• Some problems you may encounter |
|
manual: |
may be caused by the infrastructure. |
|
• Turn off the machine, unplug it, |
Press “Start/Pause/Cancel” button |
|
turn off the water tap and contact |
for 3 seconds to cancel the program |
|
an authorized service agent. You |
set in your machine before calling the |
|
may refer to your local agent or |
authorized service. |
|
solid waste collection center in your |
First Use |
|
municipality to learn how to dispose |
• Carry out your first washing process |
|
of your machine. |
|
If there are children in your |
|
without loading your machine and |
|
|
with detergent under “Cottons 90°C” |
|
house... |
program. |
|
• Keep children away from the machine |
• Ensure that the cold and hot water |
|
when it is operating. Do not let them |
connections are made correctly when |
|
tamper with the machine. |
installing your machine. |
|
• Close the loading door when you |
• If the current fuse or circuit breaker is |
|
leave the area where the machine is |
less than 16 Amperes, please have |
|
located. |
a qualified electrician install a 16 |
|
|
Ampere fuse or circuit breaker. |
|
|
• While using with or without a |
|
|
transformer, do not neglect to have |
|
|
the grounding installation laid by a |
|
|
qualified electrician. Our company |
|
|
shall not be liable for any damages |
|
|
that may arise when the machine is |
|
|
used on a line without grounding. |
|
|
• Keep the packaging materials out |
|
|
of reach of children or dispose them |
|
|
|
2 - EN |
|

2 Installation
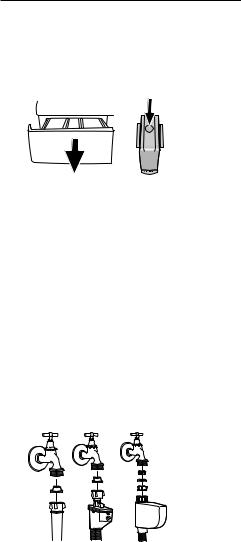
Removing packaging reinforcement
Tilt the machine to remove the packaging reinforcement. Remove the packaging reinforcement by pulling the ribbon.
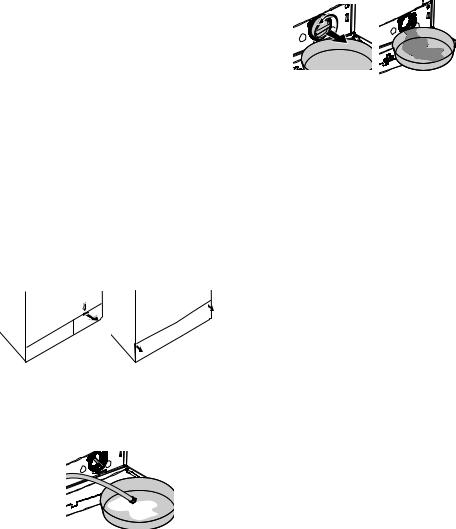
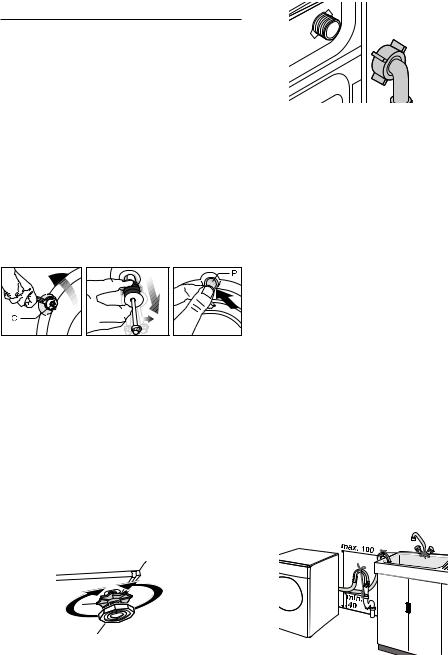
Opening the transportation locks
A Transportation safety bolts must be removed before operating the washing machine! Otherwise, the machine will be damaged!
1. Loosen all the bolts with a spanner until they rotate freely (“C”)
2. Remove transportation safety bolts by turning them gently.
3. Fit the covers (supplied in the bag with the Operation Manual) into the holes on the rear panel. (“P”)
C Keep the transportation safety bolts in a safe place to reuse when the washing machine needs to be moved again in the future.
C Never move the appliance without the transportation safety bolts properly fixed in place!
Adjusting the feet
A Do not use any tools to loosen the lock nuts. Otherwise, they can be damaged.
1. Manually (by hand) loosen the lock nuts on the feet.
2. Adjust them until the machine stands level and firmly.
3. Important: Tighten all lock nuts up again.
water-inlet unit, you must install the stopper*, supplied with your machine to the hot water valve.
• If you want to use both water inlets of the product, you can connect the hot water hose after removing the stopper and gasket group from the hot water valve.
* Applies for the products supplied with a blind stopper group.
• Models with a single water inlet should not be connected to the hot water tap.
When returning the appliance to its place after maintenance or cleaning, care should be taken not to fold, squeeze or block the hoses.
Connecting to the drain
The water discharge hose can be attached to the edge of a washbasin or bathtub. The drain hose should be firmly fitted into the drain as to not get out of its housing.
Important:
•The end of the drain hose must be directly connected to the wastewater drain or to the washbasin.
•The hose should be attached to a height of at least 40 cm, and 100 cm at most.
Connecting to the water supply.
Important:
•The water supply pressure required to run the machine must be 1-10 bar (0,1 – 1 MPa).
•Connect the special hoses supplied with the machine to the water intake valves on the machine.
•If you are going to use your double water-inlet machine as a single (cold)
•In case the hose is elevated after laying it on the floor level or close to the ground (less than 40 cm above the ground), water discharge becomes more difficult and the laundry may come out wet.
•The hose should be pushed into the drainage for more than 15 cm. If it is too long you may have it shortened.
•The maximum length of the
3 - EN

combined hoses must not be longer than 3.2 m.
Electrical connection
Connect the machine to an earthed outlet protected by a fuse of suitable capacity.
Important:
• Connection should comply with national regulations.
• The voltage and the allowed fuse protection are specified in the section “Technical Specifications”.
• The specified voltage must be equal to your mains voltage.
• Connection via extension cords or multi-plugs should not be made.
B A damaged power cable must be replaced by a qualified electrician.
B The appliance must not be operated unless it is repaired! There is the risk of electric shock!
Correct load capacity
C Please follow the information in the "Program Selection Table". Washing results will degrade when the machine is overloaded.
Loading door
The door locks during program operation and the Door Locked Symbol lights up. The door can be opened when the symbol fades out.
Detergents and softeners
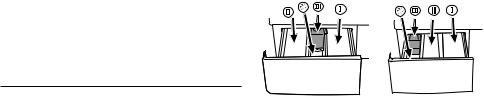
Detergent Drawer
The detergent drawer is composed of three compartments:
The detergent dispenser may be in two different types according to the model of your machine.
–(I) for prewash
–(II) for main wash - (III) siphon
–( ) for softener
3 Initial preparations for washing
Preparing clothes for washing
Laundry items with metal attachments such as, bras, belt buckles and metal buttons will damage the machine. Remove metal attachments or place the items in a clothing bag, pillow case, or something similar.
•Sort the laundry according to type of fabric, color, and degree of soiling and permissible water temperature. Always follow the advice on the garment labels.
•Place small items like infants’ socks and nylon stockings, etc. in a laundry bag, pillow case or something similar. This will also save your laundry from getting lost.
•Wash “machine washable” or “hand washable” labeled products only with an appropriate program.
•Do not wash colors and whites together. New, dark colored cottons may release a lot of dye. Wash them separately.
•Use only dyes/color changers and lime removers suitable for machine wash. Always follow the instructions on the packaging.
•Wash trousers and delicate clothes turned inside out.
Detergent, softener and other cleaning agents
Add detergent and softener before starting the washing program.
Never open the detergent dispenser drawer while the washing program is running!
When using a program without pre-wash, no detergent should be put into the prewash compartment (Compartment no. I).
Detergent quantity
The amount of washing detergent to be used depends on the amount of laundry, the degree of soiling and water hardness.
•Do not use amounts exceeding the quantities recommended on the package to avoid problems of
excessive foam, poor rinsing, financial savings and finally, environmental protection.
•Never exceed the (> max <) level marking; otherwise, the softener will be wasted without being used.
•Do not use liquid detergent if you want to wash using the time delay feature.
4 - EN

4 Selecting a program and operating your machine
Control panel
5 |
3 |
4 |
6 |
|
|
7 |
1 - Spin Speed Adjustment Knob * |
6 - |
On/Off Button |
2 - Temperature Adjustment Button * |
7 - |
Program Follow-up Indicators |
3 - Start/Pause/Cancel Button |
8 - Child-proof Lock Indicator * |
|
4 - Auxiliary Function Keys |
|
|
5 - Program Selection Knob |
* According to your machine’s model |
|
Turning the machine on
You can prepare the machine for program selection by pressing the “On/Off” button. When the “On/Off” button is pressed, the “Ready” light illuminates indicating that the door is ulocked. Press the “On/Off” button again to shut down the machine.
Program selection
Select the appropriate program from the program table and the following washing temperature table according to type, amount and degree of soiling of the laundry. Select the desired program with the program selection button.
C Each of these programs consist of a complete washing process, including wash, rinse and, if required, spin cycles.
90˚C |
Normally soiled, white |
|
cottons and linens. |
||
|
|
Normally soiled, fade proof |
|
60˚C |
colored linens, cottons or |
|
synthetic clothes and lightly |
||
|
||
|
soiled white linens |
|
40˚C- |
Blended clothes including |
|
30°C- |
synthetics and woolens as |
|
Cold |
well as delicate clothes. |
C Programs are limited with the highest spin speed appropriate for that particular type of cloth.
Main programs
Depending on the type of textile, the following main programs are available:
•Cottons
You can wash your durable clothes with this program. Your laundry will be washed with vigorous washing movements during a longer washing cycle.
•Synthetics
You can wash your less durable clothes on this program. Gentler washing movements and a shorter washing cycle is used
5 - EN
compared to the “Cottons” program. It is recommended for your synthetic clothes (such as shirts, blouses, synthetic/cotton blended garments, etc.). For curtains and lace, the “Synthetic 40” program with prewash and anti-creasing functions selected is recommended.
•Delicates
You can wash your delicate clothes on this program. It has more sensitive
washing movements and does not make intermediate spinning compared to “Synthetic” program.
•Woolens
You can wash your machine-washable woolen garments on this program. Wash by selecting the proper temperature according to the labels of your clothes. It is recommended to use appropriate detergents for woolens.
•Hand Wash
You can wash your woolen/delicate clothes that bear “not machinewashable” labels for which hand wash is recommended on this program. It washes the laundry with very tender washing movements without damaging your clothes.
Additional programs
For special cases, there are also extra programs available:
C Additional programs may differ according to the model of your machine.
• Super
This program washes for a longer period at 40°C and gives the same result as the “Cottons 60°C” program, thus it saves energy. It is suitable for clothes for which you cannot use the “Cotton 60°C” program.
• Mini
This program is used to quickly wash (30 minutes) a small amount of lightly soiled cotton garments.
Special programs
For specific applications, you can select any of the following programs:
• Rinse
This program is used when you want to rinse or starch separately.
• Pump + Spin
This program spins with maximum possible rpm in the default setting after the water drains from the machine.
C You should use a lower spin speed for delicate laundries.
Spin Speed selection
You can have your clothes spun at the maximum rpm selection on your machine by using the selection knob in models equipped with an rpm selection knob. In order to protect your clothes, your machine will not spin above 800 rpm on synthetic programs and 800 rpm on woolens program. Furthermore, if you want to skip the spin cycle and take your clothes out, turn the rpm selection knob to “no spin” position.
In machines not equipped with a spin speed selection knob, the machine will spin in the maximum possible rpm in the default setting of the selected program.
6 - EN
Program selection and consumption table
Programme |
|
(kg)LoadMax. |
DurationProgramme(~min) |
ConsumptionWater(l) |
ConsumptionEnergy(kWh) |
Prewash |
PlusRinse |
HoldRinse |
reductionspeedSpin |
SpinNo |
HeatNo |
|
|
|
|
|
|
|
|
|
|
|
|
|
|
|
|
|
|
|
|
|
|
|
|
Cottons |
90 |
5 |
133 |
45 |
1.65 |
• |
• |
• |
• |
• |
• |
|
|
|
|
|
|
|
|
|
|
|
|
Cottons |
60** |
5 |
145 |
49 |
0.95 |
• |
• |
• |
• |
• |
• |
|
|
|
|
|
|
|
|
|
|
|
|
Cottons |
40 |
5 |
142 |
49 |
0.69 |
• |
• |
• |
• |
• |
• |
|
|
|
|
|
|
|
|
|
|
|
|
Super |
40 |
5 |
165 |
45 |
0.78 |
|
|
|
• |
• |
• |
|
|
|
|
|
|
|
|
|
|
|
|
Synthetics |
60 |
2.5 |
113 |
52 |
0.92 |
• |
• |
• |
• |
• |
• |
|
|
|
|
|
|
|
|
|
|
|
|
Synthetics |
40 |
2.5 |
125 |
52 |
0.56 |
• |
• |
• |
• |
• |
• |
|
|
|
|
|
|
|
|
|
|
|
|
Synthetics |
30 |
2.5 |
95 |
52 |
0.30 |
• |
• |
• |
• |
• |
• |
|
|
|
|
|
|
|
|
|
|
|
|
Delicate |
30 |
2 |
65 |
45 |
0.36 |
|
• |
• |
• |
• |
• |
|
|
|
|
|
|
|
|
|
|
|
|
Woollens |
40 |
1.5 |
60 |
45 |
0.36 |
|
• |
• |
• |
• |
• |
|
|
|
|
|
|
|
|
|
|
|
|
Hand wash |
30 |
1 |
45 |
32 |
0.21 |
|
|
|
• |
• |
• |
|
|
|
|
|
|
|
|
|
|
|
|
Mini |
30 |
2.5 |
30 |
43 |
0.17 |
|
|
|
• |
• |
• |
|
|
|
|
|
|
|
|
|
|
|
|
• : Selectable
* : Automatically selected, not cancellable. **: Energy Label programme (EN 60456)
Water and power consumption and programme duration may differ from the table shown, subject to changes in water pressure, water hardness and temperature, ambient
temperature, type and amount of laundry, selection of auxiliary functions, and fluctuations in the supply voltage.
C The auxiliary functions in the table may differ according to the model of your machine.
7 - EN
Auxiliary functions
Auxiliary function selection keys
Select the required auxiliary functions before starting the program.
C Auxiliary function buttons may differ according to the model of your machine.
Auxiliary function selection
If an auxiliary function that should not be selected together with a previously selected function is chosen, the first selected function will be cancelled and the last auxiliary function selection will remain active.
For example: If you want to select pre-wash first and then quick wash, pre-wash will be cancelled and quick wash will remain active.
Auxiliary function that is not compatible with the program cannot be selected. (see “Program Selection Table”)
Pre-wash
A pre-wash is only worthwhile for heavily soiled laundry. Without pre-wash you save energy, water, detergent and time. Prewash without detergent is recommended for lace and curtains.
Rinse Plus
With this function, you can increase the number of current rinsing steps. Thus, sensitive skins’ risk of being affected by the remainder detergent on the clothes will be decreased.
Rinse hold
If you do not want to unload your clothes immediately after the cotton, synthetics, woolen and delicate fabrics program, you may release your clothes inside the machine in the last rinsing water by pressing the rinse hold button in order to prevent your clothes become wrinkled. After this process you may spin your laundry by pressing “Start/ Pause/Cancel” button or you may end the program by pressing “Start/Pause/Cancel” button for 3 sec.
•In the machines equipped with spin speed selection knob or button, you can spin by selecting the desired spin speed and press “Start/Pause/ Cancel” button.
•As for machines not equipped with a spin speed selection knob, you can end the program without a spin cycle by pressing the “Start/Pause/Cancel” button and draining the water. If you wish your clothes be spun, you can spin them by selecting “pump+spin” program.
Spin speed reduction
You may use the speed reduction button whenever you wish to spin your clothes below the maximum spin speed. When speed reduction button is pressed, spin speed will be at the minimum rpm given on the panel.
No spin
You may use this program if you do not want to spin your clothes at the end of cottons, synthetics, woolen or delicate programs.
No Heat
If you wish to wash your clothes in cold water, you can use this program.
Starting the Program
Press “Start/Pause/Cancel” button to start the program. “Start/Pause/Cancel” button will light up to indicate that the program has started. The door is locked and the “Lid” light fades.
Progressing a program
Progress of a running program is shown through the program follow-up indicator. At the beginning of every program step, the relevant indicator lamp will light up and light of the completed step will turn off.
C If the machine is not spinning, the program may be in rinse hold mode or the automatic spin correction system has been activated because of excessive unbalanced distribution of laundry in the machine.
Changing the selections after the program has started
You can use this feature after your machine has started to wash different textile groups in the same batch of clothes under higher or lower temperatures. You must cancel the ongoing program in order to change the washing program.
For example, press and hold the “Start/ Pause/Cancel” button for 3 seconds to “Cancel” the program in order to select “Cottons 40” program instead of “Cottons 60” program. Select the “Cottons 40” program by rotating the program knob. Press “Start/Pause/Cancel” button to start the program.
Switching the machine to standby
mode
Press “Start/Pause/Cancel” button momentarily to switch your machine to the standby mode. Auxiliary functions can be
8 - EN
cancelled or selected in accordance with the step the program is at. The door can be opened if the water level is suitable. Laundry may be added / taken out by opening the door.
Child-proof lock
You can protect the appliance from being tampered by children by means of the childproof lock. In this case, no change can be made in the running program.
The machine is switched to child-lock by pressing the 1st and 2nd auxiliary functions from the left for 3 sec. 1st auxiliary function light will flash continuously. To deactivate the child-proof lock, press the same buttons for 3 sec.
Ending the program through canceling
In order to cancel the selected program, press the “Start/Pause/Cancel” button for 3 seconds. The machine starts to discharge the water. “Wash” and “Program Finished” lights will light up. “Start/Pause/Cancel” and “Wash” lights will go off after discharging process is over and the “Lid” light will start flashing. “Lid” lamp will light up continuously when the door is unlocked.
If the program is cancelled in the middle of the process, “Wash” and “Program Finished” lights will light up. The machine can drain all the water or can take in water
for 3 times at most to cool down the clothes and complete draining process. When the water discharging process is completed, the “Wash” light will go off, the “Program Finished” light will light up and the “Lid” light will continuously flash until the door is unlocked.
End of program
The “Program Finished” lamp on the program follow-up indicator will light up when the program comes to an end. The lid is unlocked 2 minutes later, the “Program Finished” and “Lid” lamps will light up continuously. The machine is now ready for a second cycle.
If any key is pressed when the machine is at the end of the program or if the position of the selection knob is changed, the “Program Finished” light will go off and only the “Lid” lamp will remain as lit. If the door is still locked, the “Lid” light will continue flashing until the door is unlocked.
Press the “On/Off” button to shut down the machine.
5 Maintenance and cleaning
Detergent Drawer
Remove any powder residue buildup in the drawer. To do this;
1.Press the dotted point on the siphon in the softener compartment and pull towards you until the compartment is removed from the machine.
C If more than a normal amount of water and softener mixture starts to gather in the softener compartment, the siphon must be cleaned.
2. Wash the dispenser drawer and the siphon with plenty of lukewarm water in a washbasin.
3. Replace the drawer into its housing after cleaning. Check if the siphon is in its original location.
Inlet water filters
There is a filter at the end of each water intake valve at the back side of the machine and also at the end of each water intake hose where they are connected to the tap. These filters prevent the foreign substances and dirt in the water to enter into the machine. Filters should be cleaned as they get dirty.
•Close the taps.
•Remove the nuts of the water intake hoses to clean the surfaces of the filters on the water intake valves with an appropriate brush.
•If the filters are very dirty, you can pull them out by means of pliers and clean them.
•Take out the filters on the flat ends of the water intake hoses together with the gaskets and clean thoroughly under streaming water.
•Replace the gaskets and filters
9 - EN
carefully to their places and tighten the hose nuts by hand.
Draining any remaining water and cleaning the pump filter
Your product is equipped with a filter system which ensures a cleaner water discharge that extends pump life by preventing solid items such as buttons, coins and fabric fibers from clogging the pump propeller during discharge of the washing water.
• If your machine fails to drain the water, the pump filter may be clogged. You may have to clean it every 2 years or whenever it is
plugged. Water must be drained off to clean the pump filter.
In addition, water may have to be drained off completely in the following cases:
• before transporting the machine (e.g. when moving house)
• when there is the danger of frost In order to clean the dirty filter and discharge the water;
1- Unplug the machine to cut off the supply power.
AThere may be water at 90°C in the machine. Therefore, the filter must be cleaned only after the inside water is cooled down to avoid hazard of scalding.
2- Open the filter cap. The filter cap may be composed of one or two pieces according to the model of your machine.
If it is composed of two pieces, press the tab on the filter cap downwards and pull the piece out towards yourself.
If it is composed of one piece, hold it from both sides and open it by pulling out.
3- An emergency drain hose is supplied with some of our models. Others are not supplied with this item.
If your product is supplied with an emergency drain hose, do the following as shown in the figure below:
• Pull out the pump outlet hose from its housing.
• Place a large container at the end of the hose. Drain the water off into the container by pulling out the plug at the end of the hose. If the amount of water to be drained off is greater than the volume of the container, replace the plug, pour the water out, then resume the draining process.
• After draining process is completed, replace the plug into the end of the hose and fit the hose back into its place.
If your product is not supplied with an emergency drain hose, do the following as shown in the figure below:
• Place a large container in front of the filter to receive water flowing from the filter.
• Loosen pump filter (anticlockwise) until water starts to flow out of it. Direct the flowing water into the container you have placed in front of the filter. You can use a piece of cloth to absorb any spilled water.
• When there is no water left, turn the pump filter until it is completely loose and remove it.
• Clean any residues inside the filter as well as fibers, if any, around the propeller region.
• If your product has a water jet feature, be sure to fit the filter into its housing in the pump. Never force the filter while replacing it into its housing. Fit the filter fully into its housing; otherwise, water may leak from the filter cap.
4- Close the filter cap.
Close the two-piece filter cap of your product by pushing the tab on it.
Close the one-piece filter cap of your product by fitting the tabs on the bottom into their positions and pushing the upper part of it.
10 - EN
6 Solution suggestions for problems
|
|
|
|
Cause |
Explanation / Suggestion |
||
Program cannot be started or selected. |
|
|
|
• Machine may have switched to |
• Reset your machine by pressing “Start/ |
||
self protection mode due to an |
|||
Pause/Cancel” button for 3 seconds. |
|||
infrastructure problem (such as line |
|||
(see, Canceling a Program) |
|||
voltage, water pressure, etc.). |
|||
|
|
||
There is water coming from the bottom of the machine.
•There might be problems with hoses or the pump filter.
•Be sure the seals of the water inlet hoses are securely fitted.
•Tightly attach the drain hose to the tap.
•Make sure that the pump filter is completely closed.
Machine stopped shortly after the program started.
•Machine can stop temporarily due to low voltage.
•It will resume operating when the voltage is back to the normal level.
It continuously spins. Remaining time does not count down. (For models with a display)
•There may be an imbalance of laundry in the machine.
•The automatic spin correction system might have been activated due to the unbalanced distribution of the laundry in the drum.
•The laundry in the drum may be clustered (bundled laundry in a bag). Laundry should be rearranged and respun.
•No spinning is performed when the laundry is not evenly distributed in the drum to prevent any damage to the machine and to its environment.
It continuously washes. Remaining time does not count down. (For models with a display)
• |
In the case of a paused countdown while |
• |
The machine will wait until there is a sufficient |
|
taking in water: |
|
amount of water to avoid poor washing results |
• |
Timer will not countdown until the machine |
|
due to lack of water. Then the timer will start to |
|
is filled with the correct amount of water. |
|
count down. |
|
|
|
|
• In the case of a paused countdown |
|
|
|
|
at the heating step: |
|
|
• Time will not count down until |
|
|
|
|
the selected temperature for the |
|
|
|
program is reached |
|
|
|
|
• |
The automatic spin correction system might |
|
|
|
have been activated due to the unbalanced |
• In the case of a paused countdown |
|
distribution of the laundry in the drum. |
|
• |
The laundry in the drum may be clustered |
||
|
at the spinning step: |
|
(bundled laundry in a bag). Laundry should be |
• There may be an imbalance of |
|
rearranged and re-spun. |
|
|
laundry in the machine. |
• |
No spinning is performed when the laundry is |
|
|
|
not evenly distributed in the drum to prevent |
|
|
|
any damage to the machine and to its |
|
|
|
environment. |
There is foaming over the detergent drawer
• Too much detergent was used.
•Mix 1 tablespoonful softener and ½ liter water and pour into the main wash compartment of the detergent drawer.
11 - EN

7 Specifications
Models
Maximum dry laundry capacity (kg)
Height (cm)
Width (cm)
Depth (cm)
Net Weight (kg)
Electricity (V/Hz.)
Total Current (A)
Total Power (W)
Spinning cycle (rpm max.)
WML 15105 D |
WML 15085 D |
WML 15065 D |
WML 15045 D |
5 |
5 |
5 |
5 |
84 |
84 |
84 |
84 |
60 |
60 |
60 |
60 |
45 |
45 |
45 |
45 |
60 |
60 |
60 |
60 |
230 V / 50hz 230 V / 50hz |
230 V / 50hz |
230 V / 50hz |
|
10 |
10 |
10 |
10 |
2200 |
2200 |
2200 |
2200 |
1000 |
800 |
600 |
400 |
Specifications of this appliance may change without notice to improve the quality of the product. Figures in this manual are schematic and may not match your product exactly.
Values stated on the machine labels or in the documentation accompanying it are obtained in laboratory in accordance with the relevant standards. Depending on operational and environmental conditions of the appliance, values may vary.
This appliance’s packaging material is recyclable. Help recycle it and protect the environment by dropping it off in the municipal receptacles provided for this purpose. Your appliance also contains a great amount of recyclable material. It is marked with this label to indicate the used appliances that should not be mixed with other waste. This way, the appliance recycling organised by your manufacturer will be done under the best possible conditions, in compliance with European Directive 2002/96/EC on Waste Electrical and Electronic Equipment. Contact your town hall or your retailer for the used appliance collection points closest to your home. We thank you doing your part to protect the environment.


 8
8


On/Off |
|
Start |
|
Reset |
|
Cottons |
|
Synthetics |
|
Woollens |
|
Delicate |
Babycare Sport |
Shirt |
Hand |
Pet hair |
Daily |
|
|
Pause |
3 sec. |
|
|
|
|
|
|
|
|
|
|
wash |
removal |
Xpress |
|
Intensive |
Rinse |
Quick |
Quick |
Duvet |
Anti |
Rinse |
Time |
Temperature |
No |
Cold |
Cotton |
Darkcare |
|
hold |
wash |
wash |
|
creasing |
plus |
delay |
|
heat |
|
Economic |
|
|
|
|
|
|
|
|
|
|
|
|
|
|
|
|
|
|
|
|
|
|
|
|
|
|
|
|
|
|
|
|
|
|
|
|
|
|
|
|
|
|
|
|
|
|
|
|
|
|
|
|
|
|
|
|
|
|
|
|
|
|
|
|
|
|
|
|
|
|
|
|
|
|
|
|
|
|
|
|
Prewash |
|
Main |
|
Rinse |
Drain |
|
Spin |
No |
|
Door |
|
Wash |
|
End |
|
Child Conditioner |
Fasion |
|||||||
|
|
|
|
wash |
|
|
|
|
|
|
|
spin |
|
ready |
|
|
|
|
proof lock |
Care |
|||||
|
|
|
|
|
|
|
|
|
|
|
|
|
|
|
|
|
|||||||||
2820520215.EN/071210.1603
12 - EN
1 Ostrzeżenia |
|
upewnić się, że instalację uziemiającą |
|
|
wykonał wykwalifikowany elektryk. Nasza |
Wskazówki bezpieczeństwa |
|
|
|
firma nie ponosi odpowiedzialności za |
|
• Nie wolno ustawiać pralki na wykładzinie |
|
uszkodzenia powstałe w przypadku |
dywanowej. W przeciwnym wypadku |
|
eksploatacji pralki bez instalacji |
brak cyrkulacji powietrza pod spodem |
|
uziemiającej. |
pralki może spowodować przegrzanie |
|
• Opakowanie trzymać z dala od dzieci |
części elektrycznych. A to z kolei może |
|
lub zutylizować je zgodnie z wytycznymi |
prowadzić do wystąpienia usterek. |
|
dotyczącymi utylizacji odpadów. |
• W przypadku uszkodzenia kabla |
|
* Gdy w trakcie transportu pralka została |
zasilającego lub wtyczki, należy zgłosić |
|
narażona na działanie temperatury niższej |
się do autoryzowanego serwisu w celu |
|
niż 0C, użytkowanie można rozpocząć |
wykonania naprawy. |
|
po 8 godzinach od pozostawienia jej w |
• Dokładnie przymocować wąż spustowy |
|
temperaturze dodatniej. |
do obudowy, aby zapobiec ewentualnym |
|
Zamierzone użytkowanie |
wyciekom wody oraz zapewnić pobór |
|
• Pralka ta przeznaczona jest do użytku |
i odpływ wody zależnie od wymogów |
|
|
|
domowego. |
|
programu prania. Ważna wskazówka |
|
|
|
• Urządzenie wolno stosować tylko do |
|
– wąż dopływu wody oraz wąż spustowy |
|
|
|
prania i płukania tkanin posiadających |
|
nie może być zagięty, poskręcany |
|
|
|
właściwe oznaczenie. |
|
lub przerwany, gdy urządzenie jest |
|
|
|
Instrukcje bezpieczeństwa |
|
umieszczone na swoim miejscu po |
|
|
|
• Urządzenie to należy podłączyć do |
|
instalacji lub czyszczeniu. |
|
|
|
poprawnie zainstalowanego gniazdka |
|
• Pralka jest zaprojektowana w taki |
|
|
|
z uziemieniem, zabezpieczonego |
|
sposób, aby kontynuować pracę w |
|
|
|
bezpiecznikiem o odpowiedniej wartości. |
|
przypadku przerwy w zasilaniu energią |
|
|
|
• Wąż dopływu wody oraz wąż |
|
elektryczną. Po wznowieniu zasilania |
|
|
|
spustowy musi być zawsze poprawnie |
|
pralka będzie konynuować pranie |
|
|
|
przymocowany i nieuszkodzony. |
|
od momentu, w którym zakończyła |
|
|
|
• Przed włączeniem pralki należy |
|
przed awarią zasilania. Jeśli pranie |
|
|
|
poprawnie umieścić wąż spustowy |
|
zostało wyjęte w trakcie przerwy w |
|
|
|
w umywalce lub wannie. Istnieje |
|
zasilaniu należy zanulować program. |
|
|
|
ryzyko poparzenia na skutek wysokiej |
|
Należy nacisnąć przycisk Start/Pause/ |
|
|
|
temperatury prania! |
|
Cancel” [Start/Pauza/Kasowanie] na 3 |
|
|
|
• Nigdy nie otwierać drzwiczek pralki ani |
|
sekundy, aby skasować program (Patrz, |
|
|
|
nie wyjmować filtra, gdy w bębnie nadal |
|
Kasowanie programu) |
|
|
|
znajduje się woda. |
|
• W zakupionej pralce może znajdować się |
|
|
|
• Jeżeli urządzenie nie jest używane, należy |
|
niewielka ilość wody. To pozostałość po |
|
|
|
odłączyć je od zasilania. |
|
przeprowadzonym teście kontroli jakości |
|
|
|
• Nie wolno myć pralki wodą z węża! Grozi |
|
i jest to zjawisko normalne. Pralka nie |
|
|
|
to porażeniem elektrycznym! |
|
ulega przez to uszkodzeniu. |
|
|
|
• Nie wolno dotykać wtyczki wilgotnymi |
|
• Niektóre problemy, na które napotka |
|
|
|
dłońmi. Nie używać pralki, gdy kabel |
|
użytkownik, mogą być spowodowane |
|
|
|
zasilający lub wtyczka są uszkodzone. |
|
przez infrastrukturę. Należy nacisnąć |
|
|
|
• W razie awarii, z którymi nie można |
|
przycisk "Start/Pause/Cancel" na 3 |
|
|
|
sobie poradzić wykorzystując informacje |
|
sekundy, aby skasować ustawienia |
|
|
|
podane w tej instrukcji obsługi: |
|
programu w pralce przed telefonicznym |
|
|
|
• Należy wyłączyć pralkę, wyjąć wtyczkę |
|
zgłoszeniem usterki w autoryzowanym |
|
|
|
z gniazdka, zamknąć kran z wodą i |
|
serwisie. |
|
|
|
skontaktować się z autoryzowanym |
|
Pierwsze użycie |
|
|
|
serwisem. Należy zgłosić się do |
|
• Pierwsze pranie wykonać bez |
|
miejscowego agenta lub zakładu |
załadowania tkanin oraz detergentu w |
|
|
|
zajmującego się zbiórką odpadów, aby |
|
programie “Cottons 90°C” [Bawełna |
|
|
|
uzyskać informacje na temat utylizacji |
|
90°C]. |
|
|
|
posiadanej pralki. |
|
• Upewnić się, że podłączenia zimnej i |
|
|
|
Jeżeli w gospodarstwie domowym |
|
ciepłej wody są wykonane prawidłowo. |
|
|
• Jeżeli aktualnie użyty bezpiecznik lub |
|
są dzieci... |
wyłącznik zasilania ma wartość poniżej |
|
• Należy trzymać dzieci z dala od |
16 A, należy zlecić wykwalifikowanemu |
|
uruchomionej pralki. Nie wolno zezwalać |
elektrykowi instalację bezpiecznika lub |
|
dzieciom na manipulowanie przy pralce. |
wyłącznika zasilania 16 A. |
|
• Użytkownik musi zamknąć drzwiczki |
• Niezależnie od tego, czy korzysta się z |
|
pralki, gdy opuszcza obszar, w którym |
sieci z transformatorem, czy bez, należy |
|
umieszczona jest pralka. |
|
13 - PL |
|
2 Instalacja
Usuwanie wzmocnienia opakowania
Przechylić pralkę, aby usunąć wzmocnienie opakowania. Zdjąć wzmocnienia.
Usuwanie zabezpieczeń transportowych
APrzed uruchomieniem pralki należy koniecznie usunąć śruby zabezpieczające ją w transporcie!
W innym wypadku pralka ulegnie uszkodzeniu!
1.Poluzować wszystkie śruby za pomocą klucza, aż zaczną się swobodnie obracać (“C”)
2.Usunąć śruby zabezpieczające delikatnie je wykręcając.
3.Osłonami (dostarczonymi w torebce z Instrukcją obsługi) zaślepić otwory w tylnym panelu. (“P”)
CNależy zachować śruby zabezpieczające w bezpiecznym miejscu po to, aby ponownie ich użyć przy następnym
transporcie pralki.
CNie wolno transportować pralki bez śrub zabezpieczających umieszczonych we właściwych miejscach!
Nastawianie nóżek
ANie używać narzędzi do poluzowania nakrętek zabezpieczających. W innym wypadku mogą one ulec uszkodzeniu.
1.Ręcznie poluzować nakrętki zabezpieczające nóżek pralki.
2.Wyregulować nóżki, aż urządzenie stanie równo i stabilnie.
3.Uwaga: Ponownie dokręcić wszystkie nakrętki zabezpieczające.
•Aby zapobiec wyciekowi wody w punkcie przyłączenia należy użyć uszczelek gumowych (4 sztuki do modeli z podwójnym dopływem wody i 2 szt. do innych modeli) w wężach. Uszczelki należy zastosować w kranie i końcówkach węży podłączeniowych
przy urządzeniu. Prostą końcówkę węża wyposażoną w filtr należy podłączyć do kranu, a końcówkę z kolankiem do pralki. Dokładnie dokręcić ręką nakrętki węża; nigdy nie używać do tego celu klucza.
•Modeli z pojedynczym dopływem wody nie należy podłączać do kranu z ciepłą wodą.
Podczas odstawiania pralki na miejsce po wykonaniu konserwacji lub czyszczeniu należy zwrócić uwagę, aby
nie zagiąć, skręcić lub zablokować węży.
•Przy podłączaniu pralki należy używać tylko nowych węży. Użycie starego węża grozi pęknięciem
Przyłączenie do kanalizacji
Wąż spustowy wody można przymocować do bocznej ścianki umywalki lub wanny. Wąż
spustowy powinien być właściwie zamocowany w otworze spustowym i nie może wysuwać się z obudowy.
Uwaga:
•Końcówka węża spustowego musi być bezpośrednio podłączona do odpływu ścieków lub umywalki.
•Wąż ten należy zainstalować na wysokości od 40 cm do 100 cm.
Przyłączenie do zasilania wodą
Uwaga:
•W celu prawidłowej pracy pralki ciśnienie wody powinno wynosić od 1do 10 bar (0,1 – 1 MPa).
•Podłączyć węże dostarczone wraz z pralką do zaworów dopływu wody w pralce.
•Po uniesieniu węża z podłogi (poniżej 40 cm nad podłożem), odpływ wody będzie utrudniony i gotowe pranie może być bardzo mokre.
•Wąż należy umieścić w odpływie na głębokość powyżej 15 cm. Jeżeli wąż
14 - PL
będzie za długi, można go skrócić.
•Maksymalna długość połączonych węży nie może przekraczać 3,2 m.
•Przy podłączaniu pralki należy używać tylko nowych węży. Użycie starego węża grozi pęknięciem
Podłączenie zasilania elektrycznego
Podłączyć urządzenie do poprawnie zainstalowanego gniazdka z uziemieniem, zabezpieczonego bezpiecznikiem o odpowiedniej wartości.
Uwaga:
•Połączenie musi być wykonane zgodnie z obowiązującymi przepisami krajowymi.
•Napięcie oraz zatwierdzone bezpieczniki podane są w rozdziale “Dane techniczne”.
•Podane tam napięcie musi odpowiadać napięciu w sieci zasilającej.
•Nie wolno podłączać urządzenia za
pomocą przedłużaczy lub wielozłączek.
BUszkodzony przewód zasilający musi wymienić upoważniony i
wykwalifikowany elektryk.
BDo momentu naprawienia nie wolno używać pralki! Grozi to porażeniem elektrycznym!
Prawidłowy wsad
C Prosimy zwrócić uwagę na informacje podane w „Tabeli programów”. Efekt prania będzie mniejszy w przypadku przeładowania pralki.
Drzwiczki pralki
Drzwiczki blokują się w czasie trwania programu prania i wyświetla się symbol ‘Drzwiczki zablokowane’. Drzwiczki można otworzyć po zgaśnięciu symbolu.
Detergenty i płyny zmiękczające
Szuflada na detergent
Szuflada na detergent składa się z trzech komór:
Dozownik detergentu może występować w dwóch różnych typach, zależnie od modelu pralki.
–(I) pranie wstępne - (II) pranie główne, - (III) syfon
–( ) płyn zmiękczający
3 Wstępne przygotowanie prania
Przygotowanie odzieży do prania
Odzież z elementami metalowymi, jak np. |
Detergent, płyn zmiękczający i inne środki |
biustonosze, klamry pasków i metalowe guziki, |
|
uszkadza pralkę. Należy usunąć metalowe |
czyszczące |
elementy lub włożyć odzież do specjalnego |
Detergent i płyn zmiękczający umieścić przed |
worka na pranie, poszwy od poduszki itp. |
uruchomieniem programu piorącego. |
• Odzież przeznaczoną do prania należy |
Nigdy nie otwierać szuflady dozownika |
posortować według typu tkaniny, koloru i |
detergentu, gdy program piorący jest w toku! |
stopnia zabrudzenia oraz dopuszczalnej |
Jeżeli program prania wstępnego nie jest |
temperatury prania. Zawsze należy |
używany, nie należy wsypywać detergentu do |
postępować zgodnie z instrukcjami na |
komory prania wstępnego (komora nr I). |
naszywce odzieży. |
|
• Małe rzeczy, jak np. dziecięce skarpetki i |
Ilość detergentu |
nylonowe pończochy itp. należy wkładać |
|
do worka na pranie, poszwy od poduszki |
Konieczna ilość środka do prania zależy od |
itp. Pozwoli to na uniknięcie gubienia |
ilości prania, stopnia zabrudzenia oraz twardości |
części odzieży. |
wody. |
• Produkty z metkami “do prania w pralce” |
• Nie należy przekraczać ilości zalecanych |
lub “do prania ręcznego” prać tylko w |
przez producenta na opakowaniu |
odpowiednim programie. |
detergentu, aby uniknąć problemów |
• Nie prać rzeczy kolorowych z białymi. |
z nadmiarem piany, niedostatecznym |
Nowa odzież bawełniana w ciemnym |
stopniem wypłukania, kosztami, a także |
kolorze może mocno farbować. Należy ją |
ochroną środowiska. |
prać oddzielnie. |
• Nigdy nie przekraczać oznaczenia |
• Używać tylko barwników/odbarwiaczy |
(> max <); w przeciwnym razie, płyn |
oraz odkamieniaczy przeznaczonych do |
zmiękczający zostanie zmarnowany |
prania w pralkach. Zawsze przestrzegać |
zanim zostanie użyty. |
wskazówek na opakowaniu. |
• Nie należy stosować detergentu w |
• Spodnie i delikatne ubrania prać na lewej |
płynie, jeżeli użytkownik chce skorzystać |
stronie. |
z funkcji prania z opóźnieniem. |
15 - PL
 Loading...