


Asus RS724QA-E6/RS12, RS500A-X6/PS4, RS720QA-E6/RS12, KGNH-D16, KGPE-D16 User’s Manual
...SOFTWARE
RAID ON MOTHER BOARD
ROMB
USER MANUAL
Version 1.1

Software ROMB User Manual
Copyright
© 2010 Promise Technology, Inc. All Rights Reserved.
Copyright by Promise Technology, Inc. (Promise Technology). No part of this manual may be reproduced or transmitted in any form without the expressed, written permission of Promise Technology.
Trademarks
Promise and the Promise logo are registered in U.S. Patent and Trademark Office. All other product names mentioned herein may be trademarks or registered trademarks of their respective companies.
Important data protection information
You should back up all data before installing any drive controller or storage peripheral. Promise Technology is not responsible for any loss of data resulting from the use, disuse or misuse of this or any other Promise Technology product.
Notice
Although Promise Technology has attempted to ensure the accuracy of the content of this manual, it is possible that this document may contain technical inaccuracies, typographical, or other errors. Promise Technology assumes no liability for any error in this publication, and for damages, whether direct, indirect, incidental, consequential or otherwise, that may result from such error, including, but not limited to loss of data or profits.
Promise Technology provides this publication “as is” without warranty of any kind, either express or implied, including, but not limited to implied warranties of merchantability or fitness for a particular purpose.
The published information in the manual is subject to change without notice. Promise Technology reserves the right to make changes in the product design, layout, and driver revisions without notification to its users.
This version of the User Manual supersedes all previous versions.
Recommendations
The appearance in this manual of products made by other companies, including, but not limited to, software, servers, and physical (disk) drives, is for the purpose of illustration and explanation only. Promise Technology does not recommend, endorse, prefer, or support any product made by another manufacturer.
ii

Contents
Chapter 1: Introduction . . . . . . . . . . . . . . . . . . . . . . . . . . . . . . . . . . . . .1
About This Manual . . . . . . . . . . . . . . . . . . . . . . . . . . . . . . . . . . . . . .1
Product Overview . . . . . . . . . . . . . . . . . . . . . . . . . . . . . . . . . . . . . . .2
Feature Support . . . . . . . . . . . . . . . . . . . . . . . . . . . . . . . . . . . . . . . . .2
WebPAM Software . . . . . . . . . . . . . . . . . . . . . . . . . . . . . . . . . . . . . .3
Operating System Support . . . . . . . . . . . . . . . . . . . . . . . . . . . . . . . .3
Browser Support . . . . . . . . . . . . . . . . . . . . . . . . . . . . . . . . . . . . . . . .3
Virtualization Support . . . . . . . . . . . . . . . . . . . . . . . . . . . . . . . . . . . .3
Chapter 2: Installation . . . . . . . . . . . . . . . . . . . . . . . . . . . . . . . . . . . . . .5
Installing WebPAM . . . . . . . . . . . . . . . . . . . . . . . . . . . . . . . . . . . . . .5
Operating System Support . . . . . . . . . . . . . . . . . . . . . . . . . . . . .5
Browser Support . . . . . . . . . . . . . . . . . . . . . . . . . . . . . . . . . . . . .5
Installation . . . . . . . . . . . . . . . . . . . . . . . . . . . . . . . . . . . . . . . . . .6
Chapter 3: Installing Drivers . . . . . . . . . . . . . . . . . . . . . . . . . . . . . . . .13
ROMB Driver Diskette for Windows . . . . . . . . . . . . . . . . . . . . . . . .14
USB Memory Stick for Windows . . . . . . . . . . . . . . . . . . . . . . . . . . .14
ROMB Driver Medium for Linux . . . . . . . . . . . . . . . . . . . . . . . . . . . .15
Windows Server 2008 . . . . . . . . . . . . . . . . . . . . . . . . . . . . . . . . . . .16
New OS Installation . . . . . . . . . . . . . . . . . . . . . . . . . . . . . . . . .16
Existing System . . . . . . . . . . . . . . . . . . . . . . . . . . . . . . . . . . . .17
Confirming Driver Installation . . . . . . . . . . . . . . . . . . . . . . . . . .17
Windows Server 2003 . . . . . . . . . . . . . . . . . . . . . . . . . . . . . . . . . . .18
New OS Installation . . . . . . . . . . . . . . . . . . . . . . . . . . . . . . . . .18
Existing System . . . . . . . . . . . . . . . . . . . . . . . . . . . . . . . . . . . .19
Confirming Driver Installation . . . . . . . . . . . . . . . . . . . . . . . . . .19
Windows Home Server . . . . . . . . . . . . . . . . . . . . . . . . . . . . . . . . . .20
New OS Installation . . . . . . . . . . . . . . . . . . . . . . . . . . . . . . . . .20
Existing System . . . . . . . . . . . . . . . . . . . . . . . . . . . . . . . . . . . .20
Confirming Driver Installation . . . . . . . . . . . . . . . . . . . . . . . . . .20
Red Hat Linux Enterprise . . . . . . . . . . . . . . . . . . . . . . . . . . . . . . . .21
New OS Installation . . . . . . . . . . . . . . . . . . . . . . . . . . . . . . . . .21
Existing System . . . . . . . . . . . . . . . . . . . . . . . . . . . . . . . . . . . .21
SuSE Linux Enterprise Server . . . . . . . . . . . . . . . . . . . . . . . . . . . . .22
New OS Installation . . . . . . . . . . . . . . . . . . . . . . . . . . . . . . . . .22
Existing System . . . . . . . . . . . . . . . . . . . . . . . . . . . . . . . . . . . .22
iii

Software ROMB User Manual
Chapter 4: RAID Management Utility . . . . . . . . . . . . . . . . . . . . . . . . .23
Using the BIOS Screen . . . . . . . . . . . . . . . . . . . . . . . . . . . . . . . . . .23 Navigating the Main Menu . . . . . . . . . . . . . . . . . . . . . . . . . . . . . . . .25 Viewing Drive Assignments . . . . . . . . . . . . . . . . . . . . . . . . . . . . . . .26 Viewing Logical Drives . . . . . . . . . . . . . . . . . . . . . . . . . . . . . . . . . .28 JBOD Disks . . . . . . . . . . . . . . . . . . . . . . . . . . . . . . . . . . . . . . . .29 Creating Logical Drives . . . . . . . . . . . . . . . . . . . . . . . . . . . . . . . . . .30 One Logical Drive . . . . . . . . . . . . . . . . . . . . . . . . . . . . . . . . . . .30 Two Logical Drives . . . . . . . . . . . . . . . . . . . . . . . . . . . . . . . . . .33 Deleting a Logical Drive or JBOD Disk . . . . . . . . . . . . . . . . . . . . . .40 Logical Drives . . . . . . . . . . . . . . . . . . . . . . . . . . . . . . . . . . . . . .40 JBOD Disks . . . . . . . . . . . . . . . . . . . . . . . . . . . . . . . . . . . . . . . .41 Viewing the Controller Configuration . . . . . . . . . . . . . . . . . . . . . . . .43 Responding to Logical Drive Problems . . . . . . . . . . . . . . . . . . . . . .44 Finding a Failed Disk Drive in the RAID Management Utility . .44
Chapter 5: WebPAM . . . . . . . . . . . . . . . . . . . . . . . . . . . . . . . . . . . . . . .47
Logging into WebPAM . . . . . . . . . . . . . . . . . . . . . . . . . . . . . . . . . . .47
Logging out of WebPAM . . . . . . . . . . . . . . . . . . . . . . . . . . . . . . . . .49
Managing Users . . . . . . . . . . . . . . . . . . . . . . . . . . . . . . . . . . . . . . .50
Adding a User . . . . . . . . . . . . . . . . . . . . . . . . . . . . . . . . . . . . . .50
Setting Event Notification . . . . . . . . . . . . . . . . . . . . . . . . . . . . .51
Making User Settings . . . . . . . . . . . . . . . . . . . . . . . . . . . . . . . .54
Changing a User’s Access Rights . . . . . . . . . . . . . . . . . . . . . . .55
Deleting a User . . . . . . . . . . . . . . . . . . . . . . . . . . . . . . . . . . . . .56
Viewing Host Management . . . . . . . . . . . . . . . . . . . . . . . . . . . . . . .57
Making Utility Configuration Settings . . . . . . . . . . . . . . . . . . . . . . . .58
Managing the Controller . . . . . . . . . . . . . . . . . . . . . . . . . . . . . . . . .59
Viewing Controller Information . . . . . . . . . . . . . . . . . . . . . . . . .59
Making Controller Settings . . . . . . . . . . . . . . . . . . . . . . . . . . . .59
Viewing Scheduled Actions . . . . . . . . . . . . . . . . . . . . . . . . . . . .61
Deleting a Scheduled Action . . . . . . . . . . . . . . . . . . . . . . . . . . .61
Locking the Controller . . . . . . . . . . . . . . . . . . . . . . . . . . . . . . . .62
Restoring Default Settings . . . . . . . . . . . . . . . . . . . . . . . . . . . .63
Managing Physical Drives . . . . . . . . . . . . . . . . . . . . . . . . . . . . . . . .64
Viewing Physical Drives . . . . . . . . . . . . . . . . . . . . . . . . . . . . . .64
Viewing Physical Drive Information . . . . . . . . . . . . . . . . . . . . . .65
Making Physical Drive Settings . . . . . . . . . . . . . . . . . . . . . . . . .66
Running Media Patrol . . . . . . . . . . . . . . . . . . . . . . . . . . . . . . . .66
Checking the Bad Sector Log . . . . . . . . . . . . . . . . . . . . . . . . . .68
iv

|
Contents |
Chapter 5: WebPAM, cont. |
|
Managing Logical Drives . . . . . . . . . . . . . . . . . . . . . . . . . . . . . . . |
. .70 |
Viewing All Logical Drives . . . . . . . . . . . . . . . . . . . . . . . . . . . . |
.70 |
Creating a Logical Drive . . . . . . . . . . . . . . . . . . . . . . . . . . . . . |
.70 |
Creating a JBOD Disk . . . . . . . . . . . . . . . . . . . . . . . . . . . . . . . |
.74 |
Deleting a Logical Drive or JBOD Disk . . . . . . . . . . . . . . . . . . |
.78 |
Viewing Logical Drive Information . . . . . . . . . . . . . . . . . . . . . . |
.78 |
Making Logical Drive Settings . . . . . . . . . . . . . . . . . . . . . . . . . |
.79 |
Migrating a Logical Drive . . . . . . . . . . . . . . . . . . . . . . . . . . . . |
.80 |
Rebuilding a Logical Drive . . . . . . . . . . . . . . . . . . . . . . . . . . . |
.82 |
Synchronizing a Logical Drive . . . . . . . . . . . . . . . . . . . . . . . . . |
.86 |
Viewing Logical Drive Initialization . . . . . . . . . . . . . . . . . . . . . |
.89 |
Activating a Logical Drive . . . . . . . . . . . . . . . . . . . . . . . . . . . . |
.89 |
Responding to a Critical or Offline Logical Drive . . . . . . . . . . |
.91 |
Managing Spare Drives . . . . . . . . . . . . . . . . . . . . . . . . . . . . . . . . . |
.94 |
Viewing Spare Drives . . . . . . . . . . . . . . . . . . . . . . . . . . . . . . . |
.94 |
Creating a Spare Drive . . . . . . . . . . . . . . . . . . . . . . . . . . . . . . |
.94 |
Deleting a Spare Drive . . . . . . . . . . . . . . . . . . . . . . . . . . . . . . |
.95 |
Chapter 6: Technology . . . . . . . . . . . . . . . . . . . . . . . . . . . . . . . . . . . .97
Introduction to RAID . . . . . . . . . . . . . . . . . . . . . . . . . . . . . . . . . . . .97 RAID 0 – Stripe . . . . . . . . . . . . . . . . . . . . . . . . . . . . . . . . . . . . .98 RAID 1 – Mirror . . . . . . . . . . . . . . . . . . . . . . . . . . . . . . . . . . . . .99 RAID 5 – Block Striping with Distributed Parity . . . . . . . . . . . .100 RAID 10 – Stripe / Mirror . . . . . . . . . . . . . . . . . . . . . . . . . . . . .101 JBOD – Single Drive . . . . . . . . . . . . . . . . . . . . . . . . . . . . . . . .102 SPAN – Concatenated Drives . . . . . . . . . . . . . . . . . . . . . . . . .103
Choosing a RAID Level . . . . . . . . . . . . . . . . . . . . . . . . . . . . . . . . .104 RAID 0 . . . . . . . . . . . . . . . . . . . . . . . . . . . . . . . . . . . . . . . . . .104 RAID 1 . . . . . . . . . . . . . . . . . . . . . . . . . . . . . . . . . . . . . . . . . .104 RAID 5 . . . . . . . . . . . . . . . . . . . . . . . . . . . . . . . . . . . . . . . . . .105 RAID 10 . . . . . . . . . . . . . . . . . . . . . . . . . . . . . . . . . . . . . . . . .105 JBOD . . . . . . . . . . . . . . . . . . . . . . . . . . . . . . . . . . . . . . . . . . .105 SPAN . . . . . . . . . . . . . . . . . . . . . . . . . . . . . . . . . . . . . . . . . . .106
Other Logical Drive Features . . . . . . . . . . . . . . . . . . . . . . . . . . . . .106 Stripe Block Size . . . . . . . . . . . . . . . . . . . . . . . . . . . . . . . . . . .106 Initialization . . . . . . . . . . . . . . . . . . . . . . . . . . . . . . . . . . . . . . .106 Gigabyte Boundary . . . . . . . . . . . . . . . . . . . . . . . . . . . . . . . . .107 Hot Spare Drive . . . . . . . . . . . . . . . . . . . . . . . . . . . . . . . . . . .107
v

Software ROMB User Manual
Chapter 6: Technology, cont.
Other Logical Drive Features, cont.
Read Cache Setting . . . . . . . . . . . . . . . . . . . . . . . . . . . . . . . .108 Write Cache Setting . . . . . . . . . . . . . . . . . . . . . . . . . . . . . . . .108 Logical Drive Migration . . . . . . . . . . . . . . . . . . . . . . . . . . . . . .108
Chapter 7: Support . . . . . . . . . . . . . . . . . . . . . . . . . . . . . . . . . . . . . .111
Frequently Asked Questions . . . . . . . . . . . . . . . . . . . . . . . . . . . . .111
Pre-Installation . . . . . . . . . . . . . . . . . . . . . . . . . . . . . . . . . . . .111
Drive Issues . . . . . . . . . . . . . . . . . . . . . . . . . . . . . . . . . . . . . .111
Operating System-Related Issues . . . . . . . . . . . . . . . . . . . . .114
Performance Tips . . . . . . . . . . . . . . . . . . . . . . . . . . . . . . . . . .115
Contacting Technical Support . . . . . . . . . . . . . . . . . . . . . . . . . . . .116
Limited Warranty . . . . . . . . . . . . . . . . . . . . . . . . . . . . . . . . . . . . . .119
Return Product For Repair . . . . . . . . . . . . . . . . . . . . . . . . . . . . . .121
Appendix A: Partition and Format . . . . . . . . . . . . . . . . . . . . . . . . . .123
Appendix B: Upgrades . . . . . . . . . . . . . . . . . . . . . . . . . . . . . . . . . . .127
WebPAM Upgrade . . . . . . . . . . . . . . . . . . . . . . . . . . . . . . . . . . . . .127
Step 1: Download the WebPAM File . . . . . . . . . . . . . . . . . . . .127
Step 2: Install WebPAM . . . . . . . . . . . . . . . . . . . . . . . . . . . . .127
Software Driver Upgrade . . . . . . . . . . . . . . . . . . . . . . . . . . . . . . . .128
Step 1: Preparation . . . . . . . . . . . . . . . . . . . . . . . . . . . . . . . . .128
Step 2: Download Driver Files . . . . . . . . . . . . . . . . . . . . . . . .128
Step 3: Install the Software Drivers . . . . . . . . . . . . . . . . . . . . .129
Index. . . . . . . . . . . . . . . . . . . . . . . . . . . . . . . . . . . . . . . . . . . . . . . . . . .131
vi
Chapter 1: Introduction
•About This Manual, below
•Product Overview (page 2)
•Feature Support (page 2)
•WebPAM Software (page 3)
•Operating System Support (page 3)
•Browser Support (page 3)
•Virtualization Support (page 3)
Thank you for purchasing Promise Technology’s Software RAID On Mother Board (ROMB) system.
About This Manual
This User Manual describes how to setup, use and maintain your RAID system with the Software ROMB solution.
This manual includes a full table of contents, chapter task lists, numerous crossreferences, and an index to help you find the information you are looking for.
Also included are four levels of notices:
Note
A Note provides helpful information such as hints or alternative ways of doing a task.
Important
An Important calls attention to an essential step or point required to complete a task. Important items include things often missed.
Caution
A Caution informs you of possible equipment damage or loss of data and how to avoid them.
Warning
A Warning notifies you of probable equipment damage or loss of data, or the possibility of physical injury, and how to avoid them.
1

Software ROMB User Manual
Product Overview
Promise designed the Software ROMB as cost-effective, high performance RAID solution that increases PC and Server performance by reducing the CPU utilization rate.
The Software ROMB supports the following RAID levels:
•Stripe (RAID 0) – Identical drives can read and write data in parallel to increase performance.
•Mirror (RAID 1) – Mirror increases read performance through load balancing and elevator sorting while creating a complete backup of your files.
•Block Striping with Distributed Parity (RAID 5) – Organizes data and distributes parity across the physical drives to increase performance and provide fault tolerance to protect your data.
•Mirror/Stripe (RAID 10) – Combines RAID 0 and RAID 1 to increase performance by reading and writing data in parallel while protecting data with duplication.
•JBOD – A single, non-array drive. You can assign multiple drives as JBOD.
•SPAN – Concatenates the capacity of up to six physical drives into one logical drive.
Feature Support
The Software ROMB supports the following features:
• |
SATA devices |
• |
SSD devices |
• Multiple arrays per drive |
• |
Gigabyte rounding |
|
• 2 TB logical drives |
• |
Auto rebuilds |
|
• |
Background rebuilds |
• |
Online capacity expansion |
• |
RAID level migration |
• Disk drive hot swapping |
|
• |
Hot spare drives |
• |
SMART |
• |
Full erase |
• Drive roaming among channels |
|
• |
SNMP |
• |
Serial ATAPI |
• |
WebPAM software |
• Pass through I/O control |
|
• |
Virtualization |
• |
Non-volitile RAM* |
• |
SGPIO* |
• |
Cache battery backup* |
* Requires hardware support on the motherboard.
2

Chapter 1: Introduction
WebPAM Software
The Web-based Promise Array Management (WebPAM) RAID management software offers local management and monitoring of your logical drives. The browser-based GUI provides email notification of all major events or alarms, memory cache management, logging for Windows servers, logical drive maintenance, rebuild, and access to all related components (server, controller, data channels, physical drives, and backplane).
WebPAM also displays messages about critical events on the Host PC’s monitor screen even if your browser is closed.
For information on using WebPAM, refer to “Chapter 5: WebPAM” on page 47.
Operating System Support
On the Host PC where the Software ROMB is installed, Promise Technology recommends:
•Windows Server 2008 R2 (64 bit)
•Windows Server 2008 (32 or 64 bit)
•Windows Server 2003 SP2 (32 or 64 bit)
•Windows Home Server (32 bit)
•Red Hat Enterprise Linux 5.4 (32 or 64 bit)
•Red Hat Enterprise Linux 4.8 (32 or 64 bit)
•SuSE Linux Enterprise Server 11 (32 or 64 bit)
•SuSE Linux Enterprise Server 10 SP3 (32 or 64 bit)
Browser Support
On the Host PC where the Software ROMB is installed, Promise Technology recommends:
•Internet Explorer 6.0 or later
•Firefox 2.0 or later
Virtualization Support
On the Host PC where the Software ROMB is installed, Promise Technology recommends VMware 4.0 for virtualization.
3

Software ROMB User Manual
4
Chapter 2: Installation
•Installing WebPAM (page 5)
Installing WebPAM
WebPAM RAID management software is an integral part of the Software RAID On Mother Board (ROMB) system.
Before you proceed with installation, take a moment to verify that your operating system and browser support WebPAM.
Operating System Support
On the Host PC where the Software ROMB is installed, Promise Technology recommends:
•Windows Server 2008 R2 (64 bit)
•Windows Server 2008 (32 or 64 bit)
•Windows Server 2003 SP2 (32 or 64 bit)
•Windows Home Server (32 bit)
•Red Hat Enterprise Linux 5.4 (32 or 64 bit)
•Red Hat Enterprise Linux 4.8 (32 or 64 bit)
•SuSE Linux Enterprise Server 11 (32 or 64 bit)
•SuSE Linux Enterprise Server 10 SP3 (32 or 64 bit)
WebPAM supports these operating systems. Choose one of them to take full advantage of all the features of WebPAM.
Browser Support
On the Host PC where the Software ROMB is installed, Promise Technology recommends:
•Internet Explorer 6.0 or later
•Firefox 2.0 or later
If you do not have one of the above browsers, install the browser first and make it the default browser. Then install WebPAM.
5

Software ROMB User Manual
Installation
Windows
Follow these steps to install WebPAM on your Windows-based PC or Server.
1.Boot up the PC/server and launch Windows.
If the computer is already running, exit all programs.
2.Insert the software CD into your CD-ROM drive.
3.Double-click the Install CD's icon to open it.
4.Double-click the Installer icon to launch it (right).
The first WebPAM installation dialog box appears. Go to
“WebPAM Installation for Windows and Linux, continued” on page 7.
Linux
Follow these steps to install WebPAM on your Linux-based PC or Server.
1.Boot up the PC/server and launch the Linux GUI.
If the computer is already running, exit all programs.
2.Insert the software CD into your CD-ROM drive.
3.In the CD window, double-click the webpam...bin icon to begin installation (right).
4.When the Run or Display? dialog box appears, click Run in Terminal.
After several moments, the Terminal window closes and the first WebPAM installation dialog box appears. Go to “WebPAM Installation for Windows and Linux, continued” on page 7.
6

Chapter 2: Installation
WebPAM Installation for Windows and Linux, continued
The following screens are from a Windows installation. The Linux screens look different but they have the same choices and options.
5.When the Introduction screen appears, click the Next button
6.When the License Agreement appears, click the “I accept the terms of the license agreement” option. Then click the Next button.
7
Software ROMB User Manual
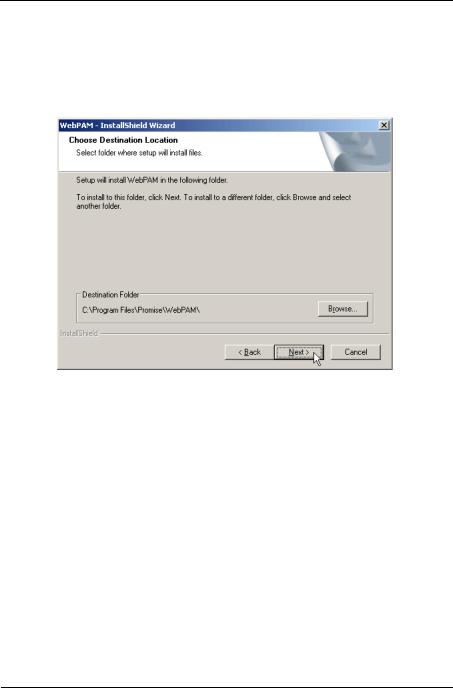
7.When the Choose Install Folder screen appears, make your selection of a folder for the WebPAM applications you are installing. The default folder is C:\Program Files\Promise\WebPAM\. If you want a different folder, type its location or click the Browse button and select a new location.
If you change your mind and want the default location, click the Back button, then the Next button.
8
Chapter 2: Installation
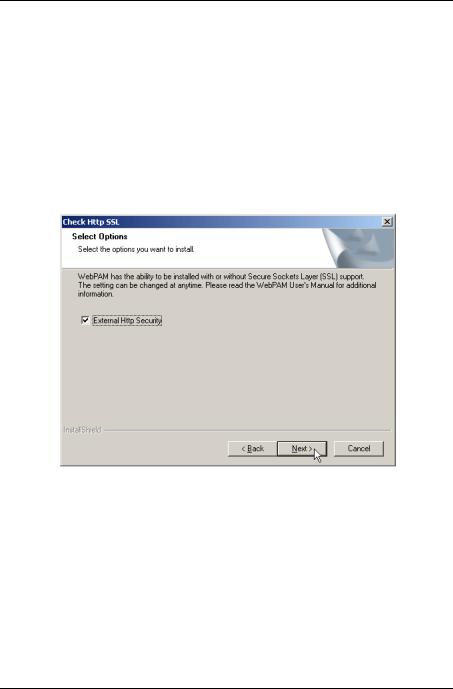
8.When the SSL Security Options screen appears (above), you can check External Security. An explanation follows.
External SSL Security – Applies security to all connections involving the Internet or outside your company firewall.
Security options are invisible to authorized users.
Promise Technology provides a default certificate for the server as well as for internal data communication. However, in some cases, it is better to install and verify your own certificate for the webserver. And, if possible, have your certificate verified by a certificate authority such as Verisign or Thwate. See your MIS Administrator for guidance.
Click the Next button when you have made your choice.
9
Software ROMB User Manual
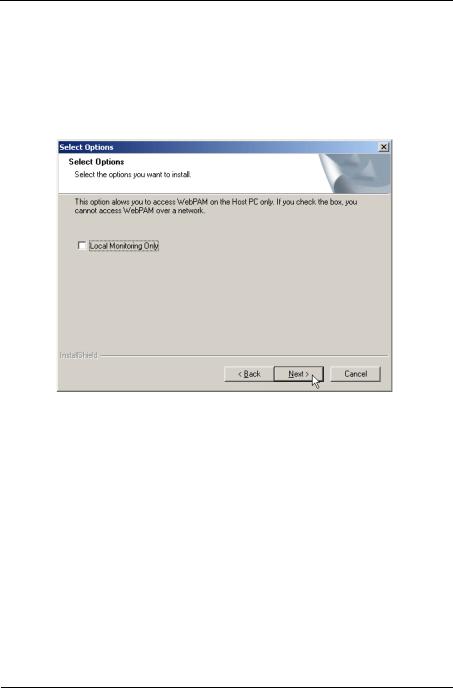
9.When the Select Options screen appears, you have the option of choosing
Local Monitoring Only.
•If you check this option, you can only log into WebPAM from the Host PC. You cannot log into WebPAM over a network.
•If you do not check this option, you can log into WebPAM from the Host PC or over a network.
To continue, click the Next button.
10
Chapter 2: Installation
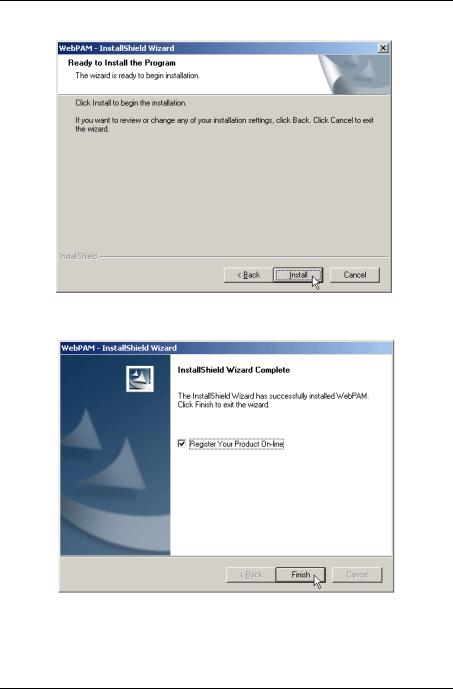
10. When the Ready to Install screen appears, click the Install button.
11.When the Install Complete screen appears, the installation process is finished. Click the Finish button to go to the Promise Registration website
11

Software ROMB User Manual
Important
Registration of WebPAM provides useful information that helps Promise Technologies to offer better products and support. Please take a few minutes to register. Thanks!
This completes WebPAM installation.
Go to “Chapter 3: Installing Drivers” on page 13 and install the appropriate driver for your system.
After driver installation, see “Chapter 5: WebPAM” on page 47 for a full description of the software.
12

Chapter 3: Installing Drivers
•ROMB Driver Diskette for Windows (page 14)
•USB Memory Stick for Windows (page 14)
•ROMB Driver Medium for Linux (page 15)
•Windows Server 2008
•New OS Installation (page 16)
•Existing System (page 17)
•Confirming Driver Installation (page 17)
•Windows Server 2003
•New OS Installation (page 18)
•Existing System (page 19)
•Confirming Driver Installation (page 19)
•Windows Home Server
•New OS Installation (page 20)
•Existing System (page 20)
•Confirming Driver Installation (page 20)
•Red Hat Linux Enterprise 5.0
•New OS Installation (page 21)
•Existing System (page 21)
•SuSE Linux Enterprise Server 10.0
•New OS Installation (page 22)
•Existing System (page 22)
Following are driver installation procedures for Promise Technology’s Software RAID On Mother Board (ROMB) system.
Windows drivers are included on the software CD.
Please download the Linux drivers from the Promise website at http://www.promise.com/support/support_eng.asp
Windows systems usually recognize the ROMB software, prompt you for the driver, and perform the driver installation automatically.
13

Software ROMB User Manual
ROMB Driver Diskette for Windows
If you have a Windows PC and plan to install the ROMB driver from a diskette, follow this procedure. This procedure requires one write-enabled blank 3.5-inch diskette.
1.Place your blank diskette in the appropriate drive.
2.Insert the Promise CD into your CD-ROM drive.
The display screen should open automatically.
If the display screen does not open, click MyComputer > CD Drive D: and double-click the Launch.exe icon.
3.Click the Windows Driver button. The Disk Copy Utility opens.
4.Click the Create button in the Utility. A confirmation box appears.
5.Click the Yes button in the confirmation box.
The utility prepares your driver diskette.
When the utility is finished, it displays a message.
6.In the message, click the OK button, then click the Exit button to close the Promise CD.
USB Memory Stick for Windows
If you have a Windows PC and plan to install the ROMB driver from a USB memory stick, follow this procedure. This procedure requires one write-enabled USB memory stick.
1.Attach your USB memory stick to the USB port.
2.Insert the Promise CD into your CD-ROM drive.
3.Click MyComputer > CD Drive D: go to the Windows Driver folder.
4.Manually copy the driver files to you USB memory stick.
14
Chapter 3: Installing Drivers
ROMB Driver Medium for Linux
Choose a medium that your PC supports: a blank diskette, a writable CD, or a USB memory stick.
To prepare a driver diskette, CD, or USB stick for Linux:
1.Go to the Promise website and locate the driver package for your system. http://www.promise.com/support/support_eng.asp
2.Manually copy the driver .tgz file to your PC’s hard drive.
3.Open a terminal window and untar the driver file. Below is an example: tar zxvf SLES-11-X86_64.tgz
4.Insert the diskette or CD, or attach the USB stick to your PC.
5.Copy the driver file to the diskette, CD, or USB stick.
6.Check the driver’s ReadMe file for important information.
15

Software ROMB User Manual
Windows Server 2008
The ROMBSTOR.zip file contains the drivers for Windows Server 2008.
New OS Installation
The following details the installation of the ROMB driver while installing Windows Server 2008.
1.Start the installation: Boot from the CD-ROM.
2.When the “Where do you want to install Windows?” dialog box appears, click
Load Driver.
3.Insert the ROMB driver diskette into drive A: or attach a USB memory stick with the ROMB driver to the USB port.
4.In the “Load Driver” dialog box, click the Browse button.
5.In the “Browse for Folder” dialog box, click the diskette or USB stick, then click the OK button.
6.In the “Select the driver to be installed” dialog box, highlight Promise ROMB Controller, then click the Next button.
7.When the “Where do you want to install Windows?” dialog box appears again, in the list of Disks, highlight the Disk representing your logical drive (the Disk with unallocated space), then click the Next button.
8.Continue the Windows installation.
16

Chapter 3: Installing Drivers
Existing System
After installing the ROMB software and rebooting your system, Windows Server 2008 setup will show a “Found New Hardware” dialog box.
1.Choose the Locate and install driver software option and click the Next button.
The “Found New Hardware – RAID Controller” dialog box displays the message: “Allow Windows to search online for driver software for your RAID Controller?”
2.Choose the Don’t search online option.
The “Found New Hardware – RAID Controller” dialog box displays the message: “Insert the disc that came with your RAID Controller.”
3.Insert the driver diskette into the floppy drive, or attach a USB memory stick with the ROMB driver to the USB port, and click the Next button.
Windows loads the driver and displays the “Found New Hardware” dialog box with message: “Windows has finished installing the driver software for this device Promise ROMB Controller.”
4.Click the Close button to finish driver installation.
Confirming Driver Installation
1.Right-click the My Computer icon and choose Manage from the popup menu.
2.From the left panel, choose Device Manager.
3.Click the + in front of Storage controllers. “Promise ROMB Controller” and “Promise Raid Console” should appear.
17

Software ROMB User Manual
Windows Server 2003
The ROMBMINI.zip file contains the drivers for Windows Server 2003.
New OS Installation
The following details the installation of the ROMB driver while installing Windows Server 2003.
1.Start the installation:
•Floppy Install: Boot the computer with the Windows Server 2003 installation diskettes.
•CD-ROM Install: Boot from the CD-ROM. Press F6 after the message “Press F6 if you need to install third party SCSI or RAID driver” appears.
2.When the Windows Server 2003 Setup window is generated, press S to specify an Additional Device(s).
3.Insert the ROMB driver diskette into drive A: and press Enter.
4.Choose Promise ROMB Controller from the list that appears on screen, and then press the Enter.
5.Press S to use the driver on the floppy disk and then press Enter to continue with installation.
6.The Windows Server 2003 Setup screen will appear again saying “Setup will load support for the following mass storage devices:” The list will include “Promise ROMB Controller”.
NOTE: If there are any additional devices to be installed, specify them now. When all devices are specified, continue to the next step.
7.From the Windows Server 2003 Setup screen, press the Enter. Setup will now load all device files and then continue the Windows Server 2003 installation.
18

Chapter 3: Installing Drivers
Existing System
After installing the ROMB software and rebooting your system, Windows Server 2003 setup will show a “Found New Hardware” dialog box. Under Windows 2003, “RAID Controller” will be displayed.
1.Insert the ROMB driver diskette into the A:\ drive.
2.Choose Install the software automatically and press the Enter key.
3.Choose Promise ROMB Controller from the list that appears on screen, and then press the Enter key.
4.If using a driver that has not been digitally signed by Microsoft, you will be asked if you want to continue the installation. Click Continue anyway.
5.When the New Hardware Wizard has finished installing the ROMB driver, click Finish.
Confirming Driver Installation
1.Right-click the My Computer icon and choose Manage from the popup menu.
2.From the left panel, choose Device Manager.
3.Click the + in front of SCSI and RAID controllers. “Promise ROMB Controller” and “Promise Raid Console” should appear.
19

Software ROMB User Manual
Windows Home Server
The ROMBMINI.zip file contains the drivers for Windows Home Server.
New OS Installation
The following details the installation of the ROMB driver while installing Windows Home Server.
1.Start the installation by booting from the CD-ROM.
2.In the “Hard drive capable of hosting Windows Home Server was not found. Would you like to load additional storage drivers?” dialog box, click the Yes button.
3.Insert the ROMB driver diskette into drive A:.
Or attach a USB memory stick with the ROMB driver to the USB port.
4.In the “Please select your driver’s INF file” dialog box, click ahci.sys in the diskette or USB stick, then click the Open button.
5.Continue with the Windows Home Server installation.
Existing System
After installing the ROMB software and rebooting your system, Windows Home Server setup will show a “Found New Hardware” dialog box. Under Windows 2003, “RAID Controller” will be displayed.
1.Insert the ROMB driver diskette into the A:\ drive.
2.Choose Install the software automatically and press the Enter key.
3.Choose Promise ROMB Controller from the list that appears on screen, and then press the Enter key.
4.If using a driver that has not been digitally signed by Microsoft, you will be asked if you want to continue the installation. Click Continue anyway.
5.When the New Hardware Wizard has finished installing the ROMB driver, click Finish.
Confirming Driver Installation
1.Right-click the My Computer icon and choose Manage from the popup menu.
2.From the left panel, choose Device Manager.
3.Click the + in front of SCSI and RAID controllers. “Promise ROMB Controller” and “Promise Raid Console” should appear.
20
Chapter 3: Installing Drivers
Red Hat Linux Enterprise
New OS Installation
1.Start the RedHat Linux Installation by booting from the install CD.
At the “Welcome to Red Hat Linux...” installation screen, a prompt labeled boot: will appear at the bottom of the screen.
2.Type linux dd acpi=off and press Enter.
3.When the Installer asks, “Do you have a driver disk?” click Yes.
4.At the “Insert your driver disk and press OK to continue,” insert the driver diskette into the floppy drive and click OK.
5.Continue with the installation normally.
Note
On first installation mode, do not choose the Virtualization option. ROMB does not support it.
Existing System
1.Insert ROMB driver diskette into the floppy drive.
2.Log in as root.
3.Type mount -r /dev/fd0 /media/floppy.
4.Type cd /media/floppy
5.Type sh ./install.
6.When the installer asks, “You are installing a driver on an existing OS. Is it true (y/n)?” type Y and press Enter.
7.Type cd.
8.Type umount /media/floppy.
9.Remove the ROMB driver diskette.
10.Type reboot to restart the system.
21

Software ROMB User Manual
SuSE Linux Enterprise Server
New OS Installation
1.Start the SuSE Linux Installation by booting from the install CD.
2.As the system boots, press F5 for the Driver Disk.
3.Move the cursor to the Installation – in boot option, type "brokenmodules=ahci apic=bigsmp acpi=off" and then press Enter.
4.When the installer displays, “Please insert the Driver Update floppy/ CDROM,” insert the ROMB driver disk, then press Enter.
5.When the Driver Update Menu pops up, click OK, then click Back to return to the installer.
6.Follow the on-screen prompts to complete the installation.
7.Please type "acpi=on" in boot option for every succeeds booting or add it into /boot/grub/menu.lst.
8.Please do read readme document in driver package before install OS.
Existing System
1. Insert the ROMB driver diskette into the floppy drive. 2. Log in as root.
3. Type mount /dev/fd0 /media/floppy.
4. Type cd /media/floppy
.
5.Type ./install
6. Type cd. |
. |
|
7.Type umount /media/floppy
8.Remove the ROMB driver diskette.
9.Type reboot to restart the system.
22
Chapter 4: RAID Management Utility
•Using the BIOS Screen (below)
•Navigating the Main Menu (page 25)
•Viewing Drive Assignments (page 26)
•Viewing Logical Drives (page 28)
•Creating Logical Drives (page 30)
•Two Logical Drives (page 33)
•Deleting a Logical Drive or JBOD Disk (page 40)
•Viewing the Controller Configuration (page 43)
•Responding to Logical Drive Problems (page 44)
Using the BIOS Screen
The BIOS screen is a built-in component of the Software RAID On Mother Board (ROMB) solution.
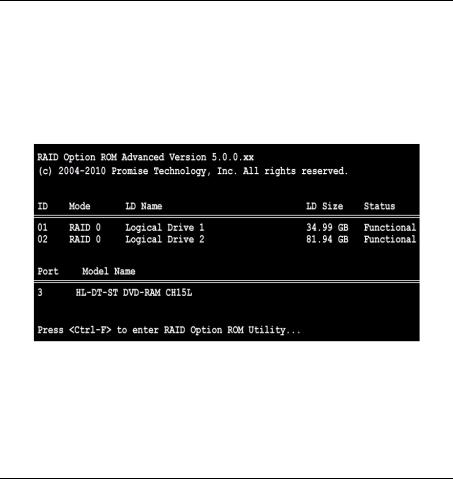
When the BIOS loads during bootup, it displays pertinent information about the RAID logical drives that it finds. At this point, press Ctrl-F to enter the RAID Management Utility.
The BIOS screen displays the following information for Logical Drives:
ID – An identification number assigned to each logical drive by the BIOS.
Mode – The RAID mode (level) of the logical drive
LD Name – The name of the logical drive
LD Size – The data capacity of the logical drive in GB (Gigabytes).
23

Software ROMB User Manual
Status – Shows the logical drive’s condition:
Functional – The logical drive is fully operational, and no problems are present.
Critical – The logical drive is operational, but has lost its fault tolerance. For RAID 1, 5, or 10, the logical drive contains a failed drive. You must identify and replace the failed physical (disk) drive.
Offline – The logical drive is no longer operational and the RAID Management Utility cannot rebuild it. You must identify and replace the failed drives. Then you can create a new logical drive and copy your data to it from your backup device.
Migrating – The logical drive is in the process of changing RAID levels and/ or adding one or more physical drives.
Synchronizing – The logical drive is in the process of checking and correcting data and parity.
Rebuilding – The logical drive is in the process of repairing itself by reconstructing the data on a failed or removed physical drive.
Initializing – A new logical drive is synchronizing its physical drives and creating redundant data or parity data.
The BIOS screen displays the following information for JBOD Disks and Serial ATAPI devices:
Port – SATA port to which the physical drive or Serial ATAPI device is connected.
Model Name – Manufacturer name and model of the drive or device
24
 Loading...