


RPN12
Quick Start Guide
RP-N12
Wireless-N300 Range Extender
NA10206 / First Edition / May 2015
na10206_rp-n12_qsg.indb 1 2015/5/8 12:03:09

2
English ..................................................................................................................................................................................................................................................................................... 3
Français ................................................................................................................................................................................................................................................................................... 9
Português .............................................................................................................................................................................................................................................................................15
Español ..................................................................................................................................................................................................................................................................................21
na10206_rp-n12_qsg.indb 2 2015/5/8 12:03:09
English
3
Package contents
Range Extender Quick Start Guide
Warrenty Card
NOTE: If any of the items is damaged or missing, please contact your retailer.
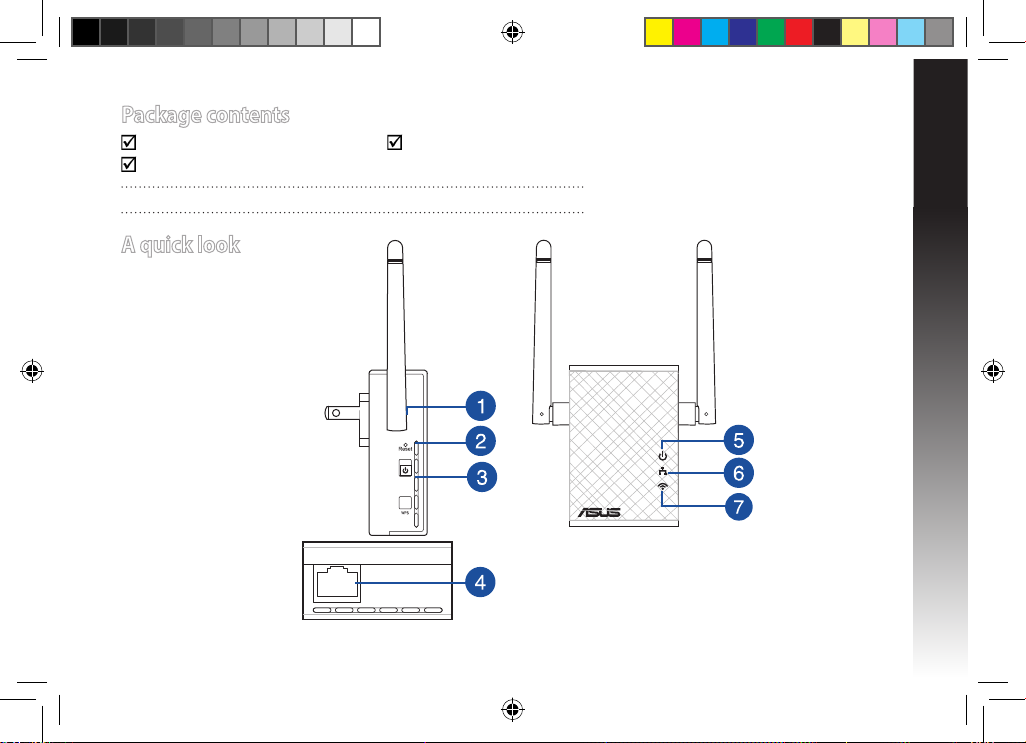
A quick look
1) Reset button
2) Power On/O button
3) WPS button
4) Ethernet port
5) Power LED
On: RP-N12 is on.
O: RP-N12 is o.
6) Ethernet LED
On: Device is connected to
the Ethernet port.
O: Device is not connect-
ed to the Ethernet port.
7) Wi-Fi LED
Green: RP-N12
provides the best
Wi-Fi extender
performance.
Red: RP-N12
provides poor
Wi-Fi extender
performance.
O: RP-N12 is not
connected to a
router/AP.
na10206_rp-n12_qsg.indb 3 2015/5/8 12:03:20
English
4
Turning the Range Extender on
1. Place RP-N12 near your Router/AP.
2. Plug RP-N12 to a power outlet, wait for one (1) minute until
the Wi-Fi LED starts to blink.
Setting up the Range Extender
Connecting to a network
Select one of the following ways to connect the Range Extender
to a network.
Option A: Connecting through GUI
1. Use a Wi-Fi enabled device, such as your desktop PC/note-
book/tablet, to nd and connect to ASUS_RPN12 wireless
network.
2. Launch a web browser and enter http://repeater.asus.com in
the address bar to access the Range Extender.
3. Enter the default login name and password, which are admin/
admin.
4. Follow the Quick Internet Setup steps below to set up the
Range Extender:
• Connect to a Wi-Fi network and when prompted, enter the
security key. If your Wi-Fi network is hidden, click Manual
setting.
• You can either tick “Use default setting” or enter the SSID
and security key/password for your extended network. When
done, click Next.
NOTE: The Range Extender’s wireless network name (SSID)
changes to your existing Wi-Fi network name, ending with _RPT
and shares your router/AP’s Wireless Password.
• Connect your wireless devices to the new Extender network.
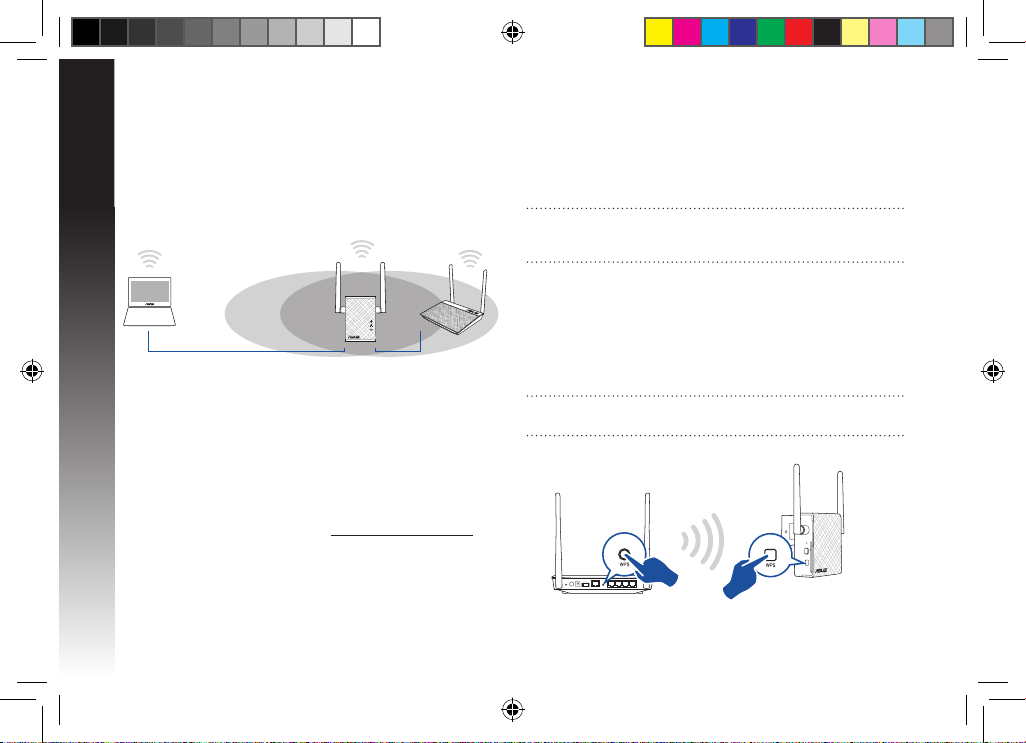
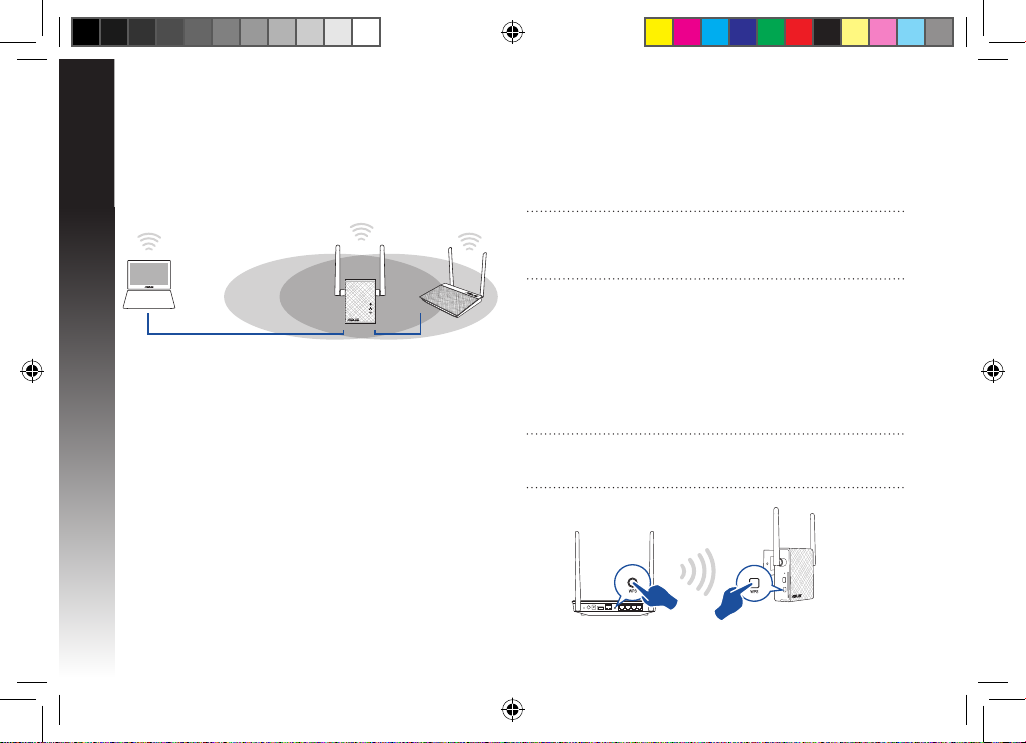
Option B: Using WPS (Wi-Fi Protected Setup)
1. Press the WPS button on the router/AP.
2. Press the WPS button on the side of the RP-N12 for more than
two (2) seconds, until the Wi-Fi LED starts to blink.
NOTE: Refer to the router’s manual for the location of the WPS
button.
na10206_rp-n12_qsg.indb 4 2015/5/8 12:03:20
English
5
3. Check if RP-N12’s Wi-Fi indicator turns solid light, which indi-
cates that the Range Extender has connected to the wireless
network successfully. The Range Extender’s wireless network
name (SSID) changes to your existing Wi-Fi network name,
ending with _RPT. For example:
Existing Wi-Fi network name: existing NetworkName
New Extender network name: existing NetworkName_RPT
To connect an additional Wi-Fi device to your Extender net-
work, use the same network password as that of your existing
wireless router.
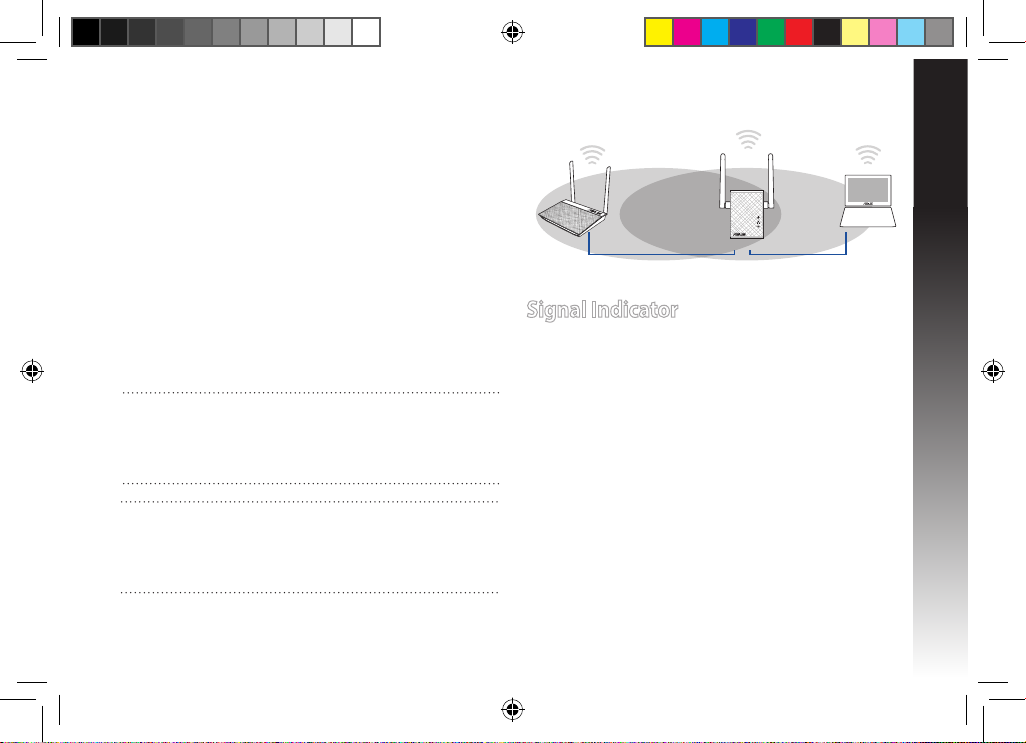
Move the Range Extender
When the connection is complete, locate the Range Extender
between the router/AP and the wireless device to get better per-
formance. After placing your RP-N12 in an ideal location, RP-N12
connects to your router/AP in about one (1) minute.
Signal Indicator
• To get the best performance, place the Range Extender
between your router/AP and wireless device.
• The Wi-Fi signal indicator indicates the connection perfor-
mance from the Range Extender to the router/AP. Refer to the
Wi-Fi LED indicator in section A Quick Look.
NOTES:
• Place your RP-N12 between your router/AP and wireless
device to get the best extender performance.
• Place your RP-N12 in a location where you can get green Wi-Fi
LED.
IMPORTANT!
• To minimize interference, keep RP-N12 away from devices like
cordless phones, Bluetooth devices and microwave ovens.
• We recommend that you place your RP-N12 in open or
spacious location.
na10206_rp-n12_qsg.indb 5 2015/5/8 12:03:20
English
6
Frequently Asked Questions
Q1: What should I do if my router does not support WPS?
• You can use Option A to set up RP-N12.
Q2: Why is that the Wi-Fi LED does not light up after completing Method Two?
• You may have entered the wrong router SSID and password. Reset your RP-N12, double check your router SSID/password, and set
up RP-N12 again.
Q3: Why is it that I cannot see the login page after entering http://repeater.asus.com in the browser?
• Ensure that your computer is connected to the extender network only, and set your computer to Obtain an IP address auto-
matically.
Q4: My router security is WEP, and I entered a wrong passphrase or security key on the extender. Now I
cannot access the Extender any more. What can I do?
• The Range Extender cannot check whether the WEP passphrase is correct or not. When entered a wrong passphrase, your wire-
less device cannot get the correct IP address from the Range Extender. Please reset the Range Extender to its factory defaults to
get the IP address back.
Q5: How do I reset RP-N12?
• Using a pin, press the RESET button for about two (2) seconds. Wait for about ve (5) seconds until the Wi-Fi LED ashes red.
na10206_rp-n12_qsg.indb 6 2015/5/8 12:03:20
English
7
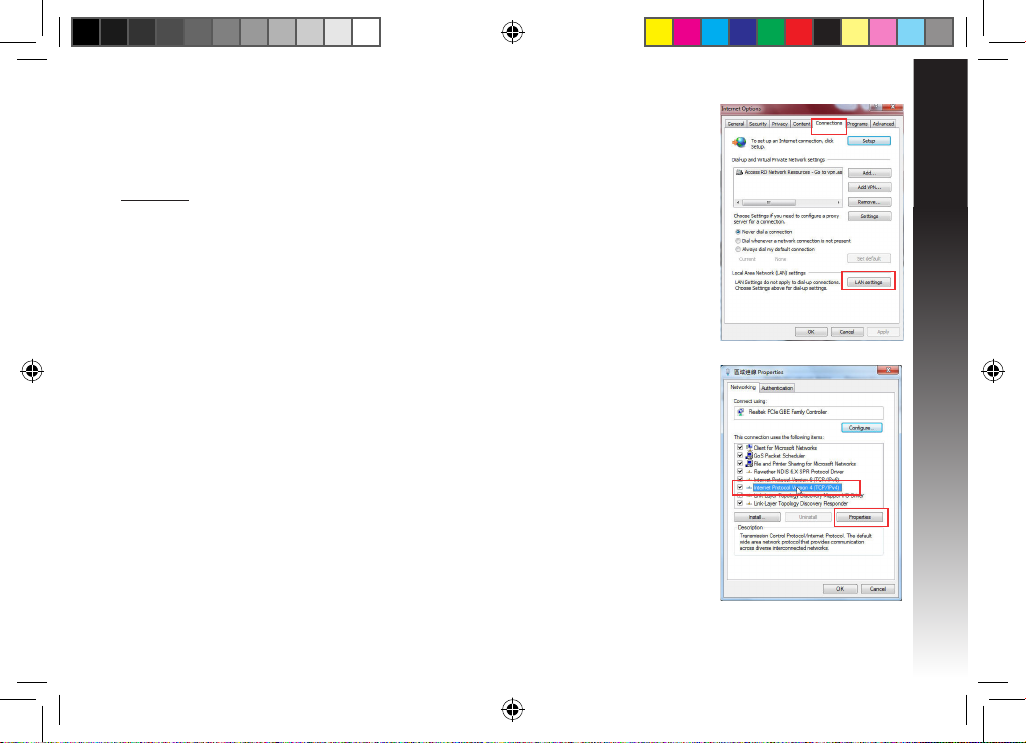
Q6: I cannot access the web GUI to congure the RP-N12 settings.
• Close all running web browsers and launch again.
• Follow the steps below to congure your computer settings based on its
operating system.
Windows 7
A. Disable the proxy server, if enabled.
1. Click Start > Internet Explorer to launch the web browser.
2. Click Tools > Internet options > Connections tab > LAN settings.
3. From the Local Area Network (LAN) Settings screen, untick Use a proxy server for your LAN.
4. Click OK when done.
B. Set the TCP/IP settings to automatically obtain an IP address.
1. Click Start > Control Panel > Network and Internet > Network and Sharing Center > Manage
network connections.
2. Select Internet Protocol Version 4 (TCP/IPv4), then click Properties.
3. Tick Obtain an IP address automatically.
4. Click OK when done.
na10206_rp-n12_qsg.indb 7 2015/5/8 12:03:20
English
8
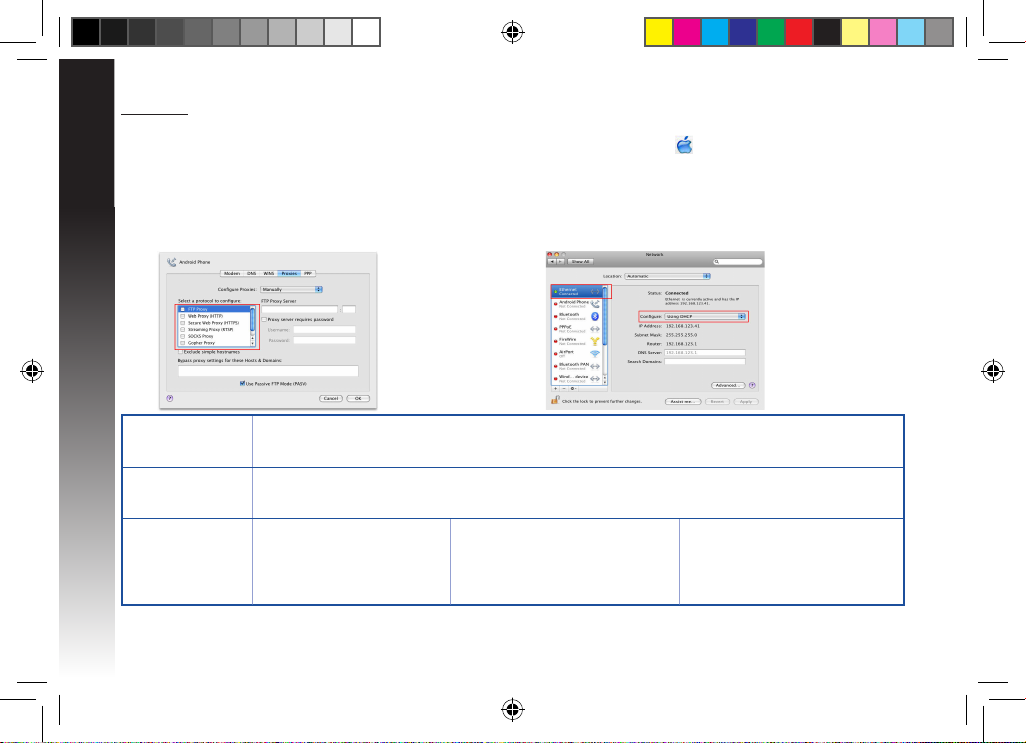
Mac 10.5.8
A. Disable the proxy server, if enabled.
1. From the menu bar, click Safari > Preferences... > Advanced tab.
2. Click Change Settings... in the Proxies eld.
3. From the list of protocols, deselect FTP Proxy and Web Proxy
(HTTP).
4. Click OK when done.
B. Set the TCP/IP settings to automatically obtain an IP
address.
1. Click the Apple icon
> System Preferences > Network.
2. Select Ethernet and select Using DHCP in the Congure
eld.
3. Click Apply when done.
Manufacturer ASUSTeK Computer Inc.
Tel: +886-2-2894-3447
Address: No. 150, LI-TE RD., PEITOU, TAIPEI 112, TAIWAN
Authorised
representative in
Europe
ASUS Computer GmbH
Address: HARKORT STR. 21-23, 40880 RATINGEN, GERMANY
Authorised
distributors in Turkey
BOGAZICI BIL GISAYAR SAN. VE
TIC. A.S.
Tel: +90 212 3311000
Address: AYAZAGA MAH.
KEMERBURGAZ CAD. NO.10
AYAZAGA/ISTANBUL
CIZGI Elektronik San. Tic. Ltd. Sti.
Tel: +90 212 3567070
Address: CEMAL SURURI CD. HALIM
MERIC IS MERKEZI
No: 15/C D:5-6 34394 MECIDIYEKOY/
ISTANBUL
KOYUNCU ELEKTRONiK BiLGi iSLEM
SiST. SAN. VE DIS TIC. A.S.
Tel : +90 216 5288888
Address: EMEK MAH.ORDU CAD. NO:18,
SARIGAZi, SANCAKTEPE ISTANBUL
AEEE Yönetmeliğine Uygundur.
na10206_rp-n12_qsg.indb 8 2015/5/8 12:03:20
Français
9
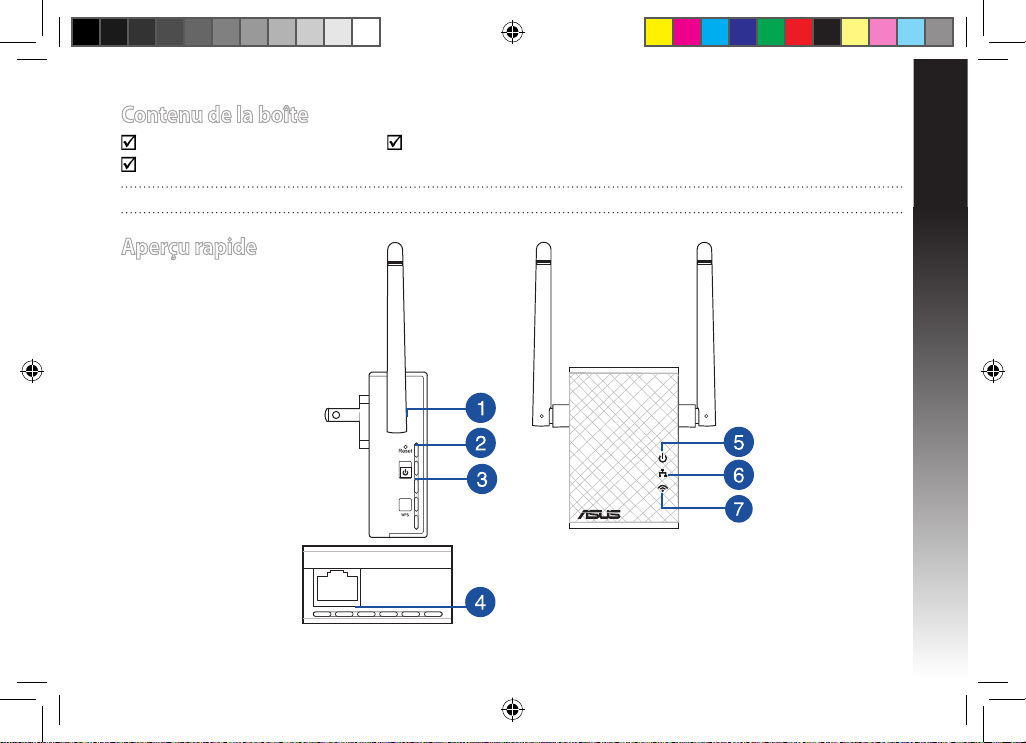
Contenu de la boîte
Répéteur Guide de démarrage rapide
Carte de garantie
REMARQUE : Contactez votre revendeur si l’un des éléments est manquant ou endommagé.
Aperçu rapide
1) Bouton de réinitialisation
2) Bouton Marche/Arrêt
3) Bouton WPS
4) Port Ethernet
5) Témoin d’alimentation
Allumé : RP-N12 prêt.
Éteint : RP-N12 éteint.
6) Témoin Ethernet
Allumé : appareil
connecté à un réseau
Ethernet.
Éteint : appareil non
connecté à un réseau
Ethernet.
7) Témoin Wi-Fi
Vert : signal sans
optimal.
Rouge : mauvais
signal sans l.
Éteint : appareil
non connecté à un
routeur ou point
d’accès.
na10206_rp-n12_qsg.indb 9 2015/5/8 12:03:21
Français
10
Allumer le répéteur
1. Placez le répéteur à proximité de votre routeur.
2. Branchez le répéteur à une prise électrique. Patientez une
minute jusqu’à ce que le témoin Wi-Fi clignote.
Congurer le répéteur
Connexion à un réseau
Utilisez l’une des méthodes de connexion suivantes pour établir
une connexion au réseau.
Option A : connexion via l’interface de gestion
1. Utilisez un dispositif doté d’un module Wi-Fi (ex : ordinateur,
tablette ou smartphone) pour localiser et vous connecter au
réseau sans l nommé ASUS_RPN12.
2. Ouvrez votre navigateur Internet et entrez http://repeater.
asus.com dans la barre d’adresse pour ouvrir l’interface de
gestion du répéteur.
3. Entrez le nom d’utilisateur et le mot de passe
par défaut
suivants : admin / admin.
4. Suivez les instructions apparaissant à l’écran pour congurer
le répéteur.
• Sélectionnez le réseau Wi-Fi dont vous souhaitez étendre la
couverture, puis entrez sa clé de sécurité. Si le réseau Wi-Fi est
masqué, réglez les paramètres manuellement.
• Connectez vos appareils sans l à se nouveau réseau.
• Conservez les paramètres par défaut ou spéciez le nom du
réseau étendu et une clé de sécurité. Une fois terminé, cliquez
sur Suivant..
Option B : utilisation de la fonction WPS
1. Appuyez sur le bouton WPS situé sur le côté du routeur /
point d’accès sans l.
2. Appuyez sur le bouton WPS situé sur le côté du répéteur
pendant plus de deux secondes, et ce jusqu’à ce que le
témoin Wi-Fi clignote.
REMARQUE : Consultez le mode d’emploi de votre routeur /
point d’accès sans l pour localiser l’emplacement du bouton
WPS..
REMARQUE : Le nom de réseau (SSID) du répéteur est modié
pour partager le même nom que celui de votre réseau sans l
existant suivi du suxe _RPT et partage le mot de passe de
votre routeur ou point d’accès sans l.
na10206_rp-n12_qsg.indb 10 2015/5/8 12:03:21
Français
11
3. Vériez que le témoin Wi-Fi du répéteur est allumé, indiquant
que la connexion a été établie. Le SSID du répéteur est
remplacé par celui du réseau Wi-Fi existant, et nissant par
_RPT. Par exemple :
Nom (SSID) du réseau sans l Wi-Fi existant : “mon réseau
Wi-Fi”
Nouveau nom (SSID) du réseau sans l : “mon réseau Wi-
Fi_RPT”
Pour connecter un appareil sans l additionnel au réseau
du répéteur, utilisez le même mot de passe que celui
normalement utilisé lors de la connexion au routeur.
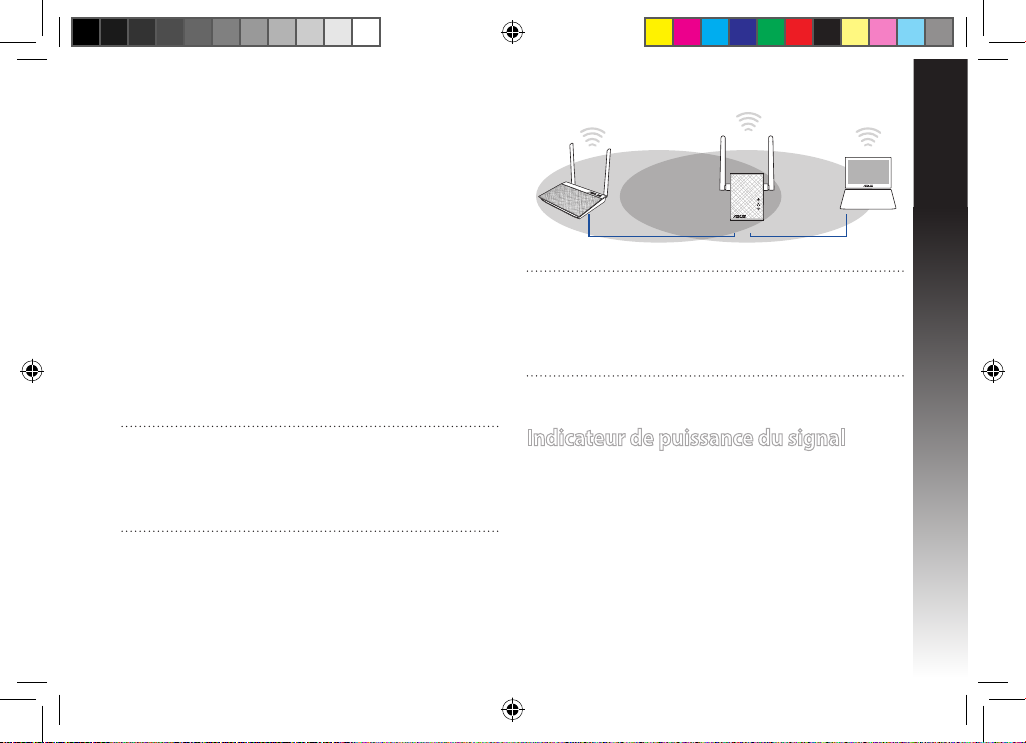
Déplacement du répéteur
Une fois la connexion établie, placez le répéteur entre le routeur
/ point d’accès sans l et les appareils connectés pour obtenir de
meilleures performances. Après avoir placé le répéteur dans un
emplacement idéal, celui-ci se connecte à votre routeur ou point
d’accès sans l en environ 1 minute.
Indicateur de puissance du signal
• Placez le répéteur entre le routeur / point d’accès sans l et les
appareils connectés pour obtenir de meilleures performances.
• Le témoin Wi-Fi indique la qualité du signal entre le répéteur
et le routeur / point d’accès sans l. Consultez la section
Aperçu rapide pour plus de détails sur ce témoin.
REMARQUES :
• Placez le répéteur entre le routeur / point d’accès sans l et les
appareils connectés pour obtenir de meilleures performances.
• Placez le répéteur dans un emplacement ou le témoin Wi-Fi
s’allume de couleur verte, indiquant une qualité de signal
optimale.
IMPORTANT !
• Pour réduire les interférences, ne placez pas le répéteur
à proximité d'appareils tels qu'un téléphone sans l, un
dispositif Bluetooth ou un four à micro-ondes.
• Il est recommandé de placer le répéteur en dans endroit
ouvert et spacieux.
na10206_rp-n12_qsg.indb 11 2015/5/8 12:03:21
 Loading...