


Operating instructions
OT8601S

Electric oven
Dear customer!
Instructions for connection
Rating plate
We sincerely thank you for your purchase. We believe you will soon find ample evidence that you can really rely on our products. To make the use of the appliance
easier, we attach these comprehensive instruction manual.
The instructions should aid you in getting familiar with your new appliance. Please, read them carefully before using the appliance for the first time.
In any case, please make sure the appliance was supplied to you undamaged. Should you identify and transport damage, contact your sales representative or the regional warehouse from where the product was delivered. You will find the telephone number on the receipt or delivery report. We wish you a lot of pleasure with your new household appliance.
The connection should be carried out in compliance with the instructions in the section “Connection to the power mains”, and the relevant effective regulations and standards. This should only be performed by a qualified technician.
The rating plate indicating the basic information on the appliance is attached to the edge of the oven and it is visible when you open the oven door.
Important - Read before using the appliance |
..............4 |
Appliance description.................................................... |
6 |
The oven.......................................................................... |
7 |
Food preparation.......................................................... |
20 |
Cleaning and maintenance.......................................... |
31 |
Special warnings and error reporting......................... |
37 |
Instructions for installation and connection.............. |
38 |
Technical characteristics............................................. |
41 |
418671
3

Important - Read before using the appliance
Safety percautions
•This appliance can be used by children aged from 8 years and above and persons with reduced physical, sensory or metal capabilities or lack of experience and knowledge if they have been given supervision or instruction concerning use of the appliance in a safe way and understand the hazards involved.
Children shall not play with the appliance. Cleaning and user maintenance shall not be made by children without supervision.
•WARNING: The appliance and its accessible parts become hot during use. Care should be taken to avoid touching heating elements. Children less than 8 years of age shall be kept away unless continuously supervised.
•Only use the temperature probe recommended for this oven.
•WARNING: Ensure that the appliance is switched off before replacing lamp to avoid the possibility of electric shock.
•Do not use harsh abrasive cleaners or sharp metal scrapers to clean the oven door glass since they can scratch the surface, which may result in shattering of the glass.
•Do not use steam cleaners or high-pressure cleaners to clean the cooking hob, as this may result in an electric shock.
•Before activating automatic cleaning with pyrolysis, wipe any spilt liquid from the oven and remove the grid, the grease filter, the spit roasting kit, glass baking strays, meat probe, and any other cookware that is not a part of the oven equipment.
•During automatic cleaning process with pyrolysis, the oven will become very hot on the outside as well; therefore, keep the children away from the oven during this time. Risk of burning.
•The appliance is not intended to be controlled by external timers or special control systems.
|
|
Warnings |
|
|
|
|
|
• The appliance may only be connected to the power mains by an authorized service technician or |
|
|
expert. |
|
|
• Tampering with the appliance or non-professional repair thereof may result in risk of severe injury |
418671 |
|
or damage to the product. Any repairs may only be carried out by an authorized service technician |
|
or expert. |
|
4

•If the power cords of appliances located near this appliance are caught in the oven door, they can be damaged, which may in turn result in a short circuit. Therefore, keep the power cords of other appliances at a safe distance.
•The appliance is intended solely for cooking. Do not use it for any other purpose, e.g. for room heating. Do not place empty cookware on the cooking zones.
•Be particularly careful when cooking food in the oven. Due to high temperatures, baking trays, baking sheets, the grid and the oven interior walls become very hot. Always use oven mitts.
•Do not line the oven walls with aluminium foil and do not place baking trays or other cookware on the oven bottom. Aluminium foil would prevent air circulation in the oven, hinder the cooking process, and ruin the enamel coating.
•Oven door become very hot during operation. A third glass is installed or additional protection to reduce the temperature of the outside surface (only with some models).
•Oven door hinges may be damaged if overloaded. Do not place heavy cookware on the open oven door and do not lean against the door while cleaning the oven. Before cleaning the oven, remove the oven door (see chapter »Removing and re-installing the oven door«). Do not stand or sit on the open oven door (children!).
•Before activating automatic cleaning with the pyrolysis procedure, carefully read and follow the instructions in the chapter Cleaning and maintenance where correct and safe use of this function is described.
•Never hang combustible (ignitable) objects on the oven handle (e.g. dish cloths). Danger of fire!
•The gasket on the oven door is not removable. The manufacturer shall not be responsible for any damage resulting from an attempt to remove it.
•Make sure no impurities enter the door guide lock opening, which could prevent automatic locking of oven door during the pyrolytic cleaning procedure.
•Do not place anything directly onto the oven cavity bottom.
•Pieces of food, grease, and roast juice can ignite during the automatic pyrolytic cleaning process.
•Always insert the metal protective cap of the meat probe socket (only with some models) before using the oven. Otherwise, the oven will not heat up.
•As a result of the pyrolytic cleaning, the oven cavity and oven equipment cleaned in such way may discolour and loose its shine.
•Breaking of the inner door glass will result in large sharp pieces of glass. Danger of cuts!
The symbol on the product or on its packaging indicates that this product may not be treated as household waste. Instead it shall be handed over to the applicable collection point for the recycling of electrical and electronic equipment. By ensuring
this product is disposed of correctly, you will help prevent potential negative consequences for the environment and human health, which could otherwise be caused by inappropriate waste handling of thisproduct. For more detailed information about recycling of this product, please contact your local city office, your household waste disposal service or the shop where you purchased the product.
Appliance purpose |
The appliance is intended for conventional preparation of food |
|
in households and should not be used for any other purpose. |
|
Individual options of use are comprehensively described in this |
|
instruction manual. |
418671
5
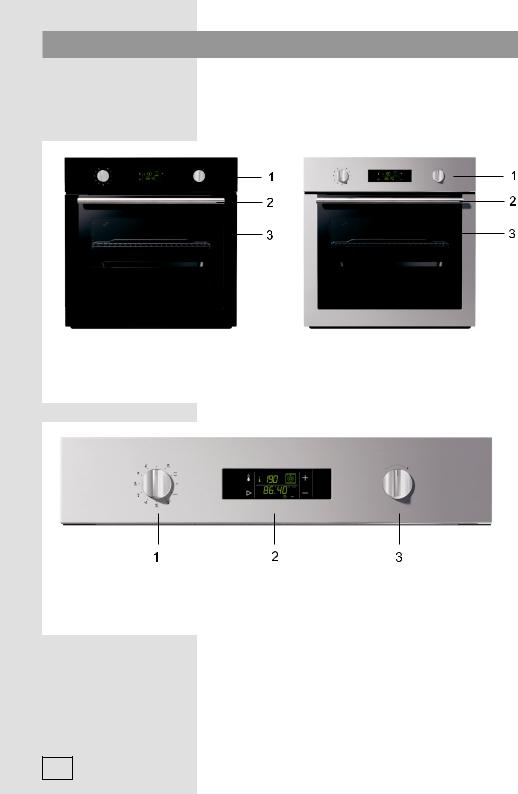
Appliance description
The figure represents one of the appliance models. Since a group of appliances to which these instructions apply, have different features, the instruction manual may describe functions and equipment that may not be available in your appliance.
1.Control panel
2.Oven door handle
3.Oven door
1 On/Off knob and oven operation mode |
3 Temperature selection knob / dial |
selection knob |
|
2Electronic program digital timer with temperature and operation mode display
418671
6

Oven door switch
Cooling fan
Extended operation of the cooling fan
Control lamps
The switch will turn off the oven heating and the fan when door is opened during oven operation; when the door is closed again, the heating is resumed.
The appliance features a built-in cooling fan which cools the appliance housing and control panel.
After the oven is switched off, the cooling fan continues to operate for a while in order to additionally cool down the appliance.
Yellow lamp
The lamp is lit when any of the appliance functions are activated.
Backlit knob dials
(only with some models)
The dial of an activated knob is lit when a function is selected. Appliances with this feature do not have the yellow control lamp.
The oven
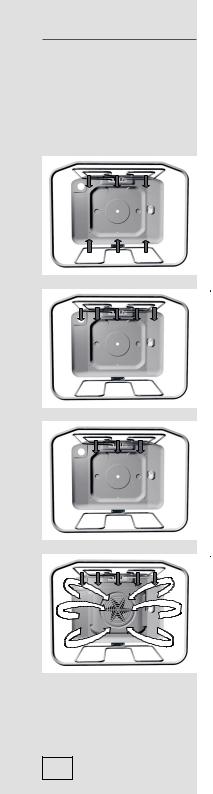
Before using the oven |
• Remove all accessories from the oven and clean them with |
for the first time |
warm water and a conventional detergent. Do not use abrasive |
|
cleaning aids. |
|
• When the oven is heated up for the first time, a specific odor of |
|
a “new appliance” will be discharged; therefore, ventilate the |
|
room thoroughly while the oven heats up. |
|
|
Important warnings |
• Use dark, black silicon coated or enamel coated baking trays, |
|
as these transmit the heat particularly well. |
|
• Only preheat the oven if specifically stated in the recipe or in |
|
the instruction tables herein. |
|
• Heating up an empty oven uses a lot of energy; therefore, |
|
a lot of power is saved if several types of pastry are cooked |
|
consecutively, as the oven is already heated up. |
|
• Approximately ten minutes before the anticipated end of the |
|
cooking process, the oven may be turned off. This way, you |
|
will save some power and make use of the accumulated heat. |
|
• Note: When cooking is completed, the cooling fan will stop |
|
operating. If you leave the dish in the oven, steam could |
|
evaporate from it and condense on the front panel and the |
|
oven door. In order to prevent condensation, set the program |
|
selector switch to the »light« position. Thus, the cooling fan |
|
will continue to operate and cool the oven, preventing the |
|
accumulation of condensate. |
418671
7

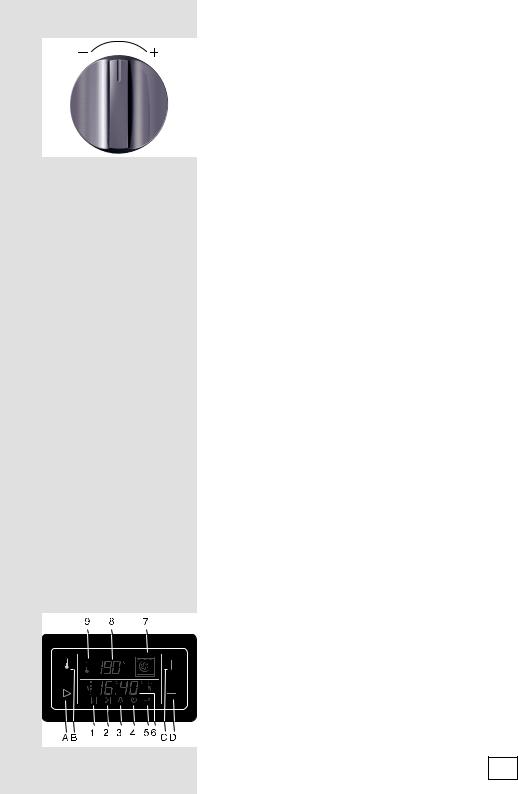
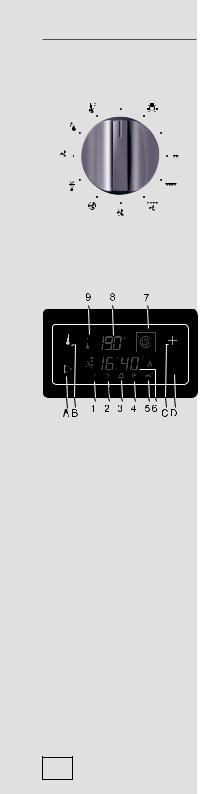
Electronic program digital timer with temperature and operation mode display
Sensor keys:
A Settings selection and confirmation sensor key
B Temperature setting sensor key
C Value increase (plus) sensor key
D Value decrease (minus) sensor key
Display:
1 Oven operation duration
2 Oven operation stop time
3 Countdown alarm timer
4 Time of day
5 Child lock
6 Clock – time display / meat probe temperature display
7 Operation mode display
8 Temperature display
9 Heater operation symbol
• When the appliance is connected to the power supply or after a power failure, the word “META” or “GLAS” is first displayed for a short while; then, the display flashes for some time. In order to enable the operation of the oven, use the (C) and (D) sensor keys to set the time of day.
• Each press / activation of a sensor key is acknowledged by a beep.
• Select the type of setting you wish to make by pressing the (A) sensor key. The selected symbol on the display flashes quickly, indicating the function that you can set or change. After five seconds, the symbol starts flashing more slowly and the time set is displayed. The symbols that are lit are selected, but not currently shown on the display (6). The most recent setting made is always displayed.
•If one of the value settings sensor keys (C) or (D) is touched and kept pressed, the rate at which the value being set is changing will increase.
•In case of a power failure which lasts less than two minutes, all settings remain active.
 To improve the response of the sensor keys, touch them with a larger surface of your finger.
418671
8
•Temperature and other settings may also be set using a special knob that replaces touching the program timer sensor keys.
Setting the time of day (clock)
•Set the clock to the current time of day by pressing the settings selection sensor key (A). Then, select the symbol (4).
•Use the (C) and (D) sensor key to set the exact time of day.
•Confirm the setting by pressing the (A) sensor key again; if the (A) key is not pressed, the setting is automatically confirmed after a few seconds.
Setting the timer functions
In addition to setting the temperature, the electronic program timer can also be used to set the timer functions. Both settings are
indicated on the same display. Require display is set by pressing the relevant sensor key (A) or (B).
The program timer can be used to program the oven operation in three ways:
•Cooking time setting - immediate start of oven operation; after a set period of time, the oven is turned off automatically.
•Cooking end time setting - the time at which oven operation is to end is set.
•Delayed start setting - automatic start and end of oven operation
at a selected time.
Setting the cooking time
With this program mode, the duration of oven operation is set (cooking time). Maximum setting allowed is 10 hours.
•Press the (A) sensor key to select the symbol (1). Use the (C) and
(D) sensor keys to set the duration / cooking time.
•Turn on the oven (set the selector knob and cooking temperature).
After the expiration of the set time, the oven will automatically stop operating (end of cooking time). An intermittent beep will sound, which can be stopped by pressing any key; if no key is pressed, the beep stops after one minute.
•The symbol (1) and the sign (_:_ _) will flash. If you wish to resume cooking, press the (A) sensor key and set a new duration if necessary.
Setting the cooking end time |
|
This mode allows you to set the time at which the oven should |
|
stop operating. Maximum setting allowed is 10 hours relative to the |
|
current time of day. |
|
• Make sure the current time of day is set correctly. |
|
• Use the (A) sensor key and select the symbol (2). The current time |
|
of day is indicated on the display. Press the (C) and (D) sensor |
|
keys to set the cooking end time. |
418671 |
• Turn on the oven (set the selector knob and cooking temperature). |
9

418671
The oven starts to operate immediately and stops operation at the set time. An intermittent beep will sound, which can be stopped by pressing any key; if no key is pressed, the beep stops after one minute.
•The symbol (1) and the sign (_:_ _) will flash. If you wish to resume cooking, press the (A) sensor key and set a new duration if necessary.
Setting the oven delayed start
With this operation mode, two settings have to be made: cooking time (duration of oven operation) and cooking end time (tie at which the operation should stop).
Cooking end time can be delayed by a maximum of 24 hours relative to the current time of day.
•Make sure the current time of day is set correctly.
•First, set the cooking time: Press the (A) sensor key to select the symbol (1). Use the (C) and (D) sensor keys to set the duration / cooking time.
•Then, set the cooking end time: Use the (A) sensor key and select the symbol (2). (A sum of the current time of day and the oven operation time is automatically shown on the display). Press the
(C) and (D) sensor keys to set the cooking end time.
•The timer will wait for the start of the cooking – both symbols (1 and 2) are lit.
•Turn on the oven (set the selector knob and cooking temperature). At the corresponding time, the oven starts operating automatically (the symbol (2) goes off upon the start of operation), and switches off when the set cooking time has elapsed. An intermittent beep will sound, which can be stopped by pressing any key; if no key is pressed, the beep stops after one minute.
•The symbol (1) and the sign (_:_ _) will flash. If you wish to resume cooking, press the (A) sensor key and set a new duration if necessary.
Setting the alarm timer
The clock can also be used independently of the oven operation, as an alarm timer that sounds an alarm after the expiration of a preset time.
•Use the (A) sensor key to select the symbol (3). Then, use the
(C) and (D) sensor keys to set the time before the alarm sounds. Maximum setting allowed is 10 hours.
•When the set time has elapsed, an intermittent beep will sound, which can be stopped by pressing any key; if no key is pressed, the beep stops after one minute. The symbol (3) will go off.
The last minute of the timer countdown is displayed in second intervals.
10
For safety reasons, the oven will automatically go off after a certain period of time:
- after 10 hours, if the cooking temperature is above 120°C;
- after 24 hours, if the temperature set is lower than 120°C.
|
|
|
|
|
|
|
|
|
|
|
Setting the beep volume (loudness) |
|
|
|
|
|
|
|
|
|
|
|
The alarm volume can be set when no timer function is activated |
|
|
|
|
|
|
|
|
|
|
|
(only current time of day is displayed). |
|
|
|
|
|
|
|
|
|
|
||
|
|
|
|
|
|
|
|
|
|
|
• Press the (D) sensor key and hold it approximately three seconds; |
|
|
|
|
|
|
|
|
|
|
|
a volume indicator will appear, and the corresponding sample |
|
|
|
|
|
|
|
|
|
|
||
|
|
|
|
|
|
|
|
|
|
|
sound will sound. “oooo” indicates maximum volume, and “o” |
|
|
|
|
|
|
|
|
|
|
||
|
|
|
|
|
|
|
|
|
|
|
indicates minimum volume. Use the (D) sensor key to select |
|
|
|
|
|
|
|
|
|
|
|
among the four loudness levels. |
|
|
|
|
|
|
|
|
|
|
|
• Confirm the selected volume level by pressing the (A) sensor key; |
|
|
|
|
|
|
|
|
|
|
||
|
|
|
|
|
|
|
|
|
|
|
if the (A) sensor key is not pressed the setting will be confirmed |
|
|
|
|
|
|
|
|
|
|
|
and stored automatically after a few seconds. |
|
|
|
|||||||||
Setting the child lock |
|
Activation: Press the (A) sensor key to select the symbol (5). Use |
|||||||||
|
|
|
|
|
|
|
|
|
|
|
the (B) and (C) sensor keys to activate the child lock; the display will |
|
|
|
|
|
|
|
|
|
|
|
read “ON”. Confirm the setting by pressing the (A) sensor key. |
|
|
|
|
|
|
|
|
|
|
|
Deactivation: Press the (C) or (D) sensor to deactivate the child |
|
|
|
|
|
|
|
|
|
|
|
lock; “OFF” is displayed. |
|
|
|
|
|
|
|
|
|
|
|
The setting must be confirmed by pressing the (A) sensor key. |
|
|
|
|
|
|
|
|
|
|
|
- If the timer is locked when no timer function is set (only the |
|
|
|
|
|
|
|
|
|
|
|
current time of day is displayed), the oven will not operate and no |
|
|
|
|
|
|
|
|
|
|
|
changes to any setting will be allowed. |
|
|
|
|
|
|
|
|
|
|
|
- If the timer is locked after one of the timer functions has been |
|
|
|
|
|
|
|
|
|
|
|
set, the oven will operate as usually; however, no changes to the |
|
|
|
|
|
|
|
|
|
|
|
settings will be possible. |
|
|
|
|
|
|
|
|
|
|
|
Display dimmer |
|
|
|
|
|
|
|
|
|
|
|
One minute after the appliance is turned off, the display will be |
|
|
|
|
|
|
|
|
|
|
|
dimmed. |
Deleting the timer settings
-All timer settings can be deleted any time by pressing the (C) and (D) sensor keys simultaneously and holding them for three seconds. The set programs are automatically interrupted and the timer switches to display of the current time of day.
-Any timer setting can also be deleted in the following way: selecting it using the (A) sensor key, then press the (B) and (C) sensor keys simultaneously. Another way to delete a setting is by setting the timer value to “0.00”.
418671
11
Operating the oven |
The oven is controlled by the on/off and operation mode |
|||||||
|
|
|
|
|
|
|
|
selection knob and the electronic program timer with temperature |
|
|
|
|
|
|
|
|
display. |
|
|
|
|
|
|
|
|
The on/off and operation mode selection knob |
|
|
|
|
|
|
|
|
|
|
|
|
|
|
|
|
|
Rotate the selection knob to the desired cooking mode. The |
|
|
|
|
|
|
|
|
|
|
|
|
|
|
|
|
|
|
|
|
|
|
|
|
|
|
operation mode and the preset temperature will appear on the |
|
|
|
|
|
|
|
|
|
|
|
|
|
|
|
|
|
timer display. The oven starts to operate. |
|
|
|
|
|
|
|
|
|
|
|
|
|
|
|
|
|
|
|
|
|
|
|
|
|
|
|
|
|
|
|
|
|
|
|
|
Setting the oven |
Use the electronic program timer to set the cooking temperature |
|||||||||
temperature |
and timer functions: |
|||||||||
|
|
|
|
|
|
|
|
|
|
• As soon as the selector knob (operation mode selection |
|
|
|
|
|
|
|
|
|
|
|
|
|
|
|
|
|
|
|
|
|
knob) is turned, the relevant cooking mode and the preset |
|
|
|
|
|
|
|
|
|
|
temperature are displayed; the symbol “°C” will flash for a few |
|
|
|
|
|
|
|
|
|
|
seconds. |
|
|
|
|
|
|
|
|
|
|
|
|
|
|
|
|
|
|
|
|
|
• As long as the symbol “°C” is flashing, the sensor keys (C) |
|
|
|
|
|
|
|
|
|
|
and (D) can be used to set the required temperature in the |
|
|
|
|
|
|
|
|
|
|
|
|
|
|
|
|
|
|
|
|
|
interval from 30-275 °C, in 5°C steps. Maximum temperature is |
|
|
|
|
|
|
|
|
|
|
|
|
|
|
|
|
|
|
|
|
|
limited in some operation modes. Each time the sensor key is |
|
|
|
|
|
|
|
|
|
|
pressed, the temperature is changed by one step (5 °C); if the |
|
|
|
|
|
|
|
|
|
|
sensor key is pressed and held, the rate at which the value is |
|
|
|
|
|
|
|
|
|
|
|
|
|
|
|
|
|
|
|
|
|
changing will increase. |
•Rising actual oven temperature is indicated on the display, in 5°C steps. As long as the oven temperature is less than
30°C, “---°C” will be displayed. Symbol (9) is also displayed, indicating the operation of the heaters.
•When the set temperature is reached, the symbol (9) will go off, and a short beep will sound.
•During cooking, the temperature is maintained by occasional activation of the heaters; each time this happens, the symbol
(9) appears.
•Cooking temperature may be changed any time by touching the
(B) sensor key, which makes the “°C” symbol flash for a while, and changing the value using the sensor keys (C) and (D).
418671
12
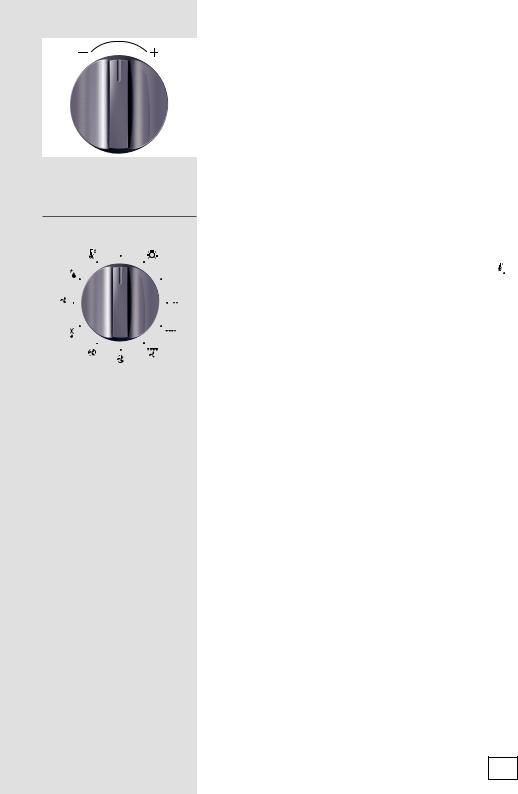
Setting the temperature using a special knob (only with some models)
Temperature and other settings can also be adjusted using a special button which replaces touching the program timer sensor keys.
•Rotate the temperature selection knob (dial) to the right or to the left (clockwise or counterclockwise). The currently set temperature is displayed, and the symbol “°C” will flash.
•By rotating the knob or holding it in the position to the right or to the left, the temperature is changed in 5°C steps.
Rapid oven preheating |
Use this system if you wish to quickly preheat the oven to the |
|||||||
|
|
|
|
|
|
|
|
desired temperature. This mode is not appropriate for cooking |
|
|
|
|
|
|
|
|
|
|
|
|
|
|
|
|
|
food. |
|
|
|
|
|
|
|
|
• Select the operation mode with the relevant selector knob . |
|
|
|
|
|
|
|
|
|
|
|
|
|
|
|
|
|
• The oven starts heating up. |
|
|
|
|
|
|
|
|
|
|
|
|
|
|
|
|
|
• If required, change the preset temperature. |
|
|
|
|
|
|
|
|
|
|
|
|
|
|
|
|
|
|
|
|
|
|
|
|
|
|
• When the oven has heated to the preset temperature, the |
|
|
|
|
|
|
|
|
heating stops, and an intermittent beep sounds which can be |
|
|
|
|
|
|
|
|
deactivated by pressing any sensor key or rotating the selector |
|
|
|
|
|
|
|
|
knob; if non of this is done, the beep stops automatically after |
|
|
|
|
|
|
|
|
one minute. |
|
|
|
|
|
|
|
|
|
|
|
|
|
|
|
|
|
• The oven is now ready for further cooking. |
418671
13
The oven may be operated in the following modes
418671
 Oven lighting
With some models, there are two interior lighting lamps: one on the upper part of the back wall, and the other, additional lamp on middle of the right side wall. Oven lighting can be selected independently, without selecting another function. With all other modes of operation, the oven lighting is turned on automatically when the operation mode is selected.

 Upper / lower heater
The heaters on the upper and lower side of the oven radiate heat uniformly and evenly into the oven interior. Pastry and meat can be cooked on one shelf level only.
 Large grill
With this operation mode, the upper heater and the infra heater are activated simultaneously. The infra heater installed on the oven interior ceiling radiates heat directly. To boost the heating effect or to make optimal use of the entire area of the oven grid, the upper heater is also activated. This operation mode is appropriate for cooking smaller chunks of meat, such as steaks, roasts, chops, ribs, etc.

 Grill
Grill
Only the infra heater is activated (which also operates, along with the upper heater, in the Large grill mode). This mode is appropriate for grilling smaller quantities of toasted sandwiches, grill sausages, or simply for toasting bread.
 Grill & fan
With this operation mode, the infra heater and the fan are activated simultaneously. It is appropriate for grilling meat and large chunks of meat or poultry on one shelf level. Also appropriate for cooking food au gratin or browning.
14
 Loading...