

Page 1

Dear ASKO Customer,
Thank you for choosing this quality pr oduct from Scandinavia,
which was made in Sweden.
We want you to feel assured that the inside of your new ma-
chine is just as good as the outside and that the ethics and
standards that went into the production of this machine are
just as high as the quality and performance that you will receive from it. We hope that this product will give you many
years of pleasure.
To ensur e that you g et the most out of your ne w machine, we
recommend that you read the operating instructions before
using the machine. The operating instructions also contain
information on how to avoid damaging the environment.
Operating Instructions
Washing Machine
Save these instructions for future reference
ASKO W6022
Page 2

4
Before using your machine for
the first time
4Transport protection
4Packing material
4Washer door
4Checking water hardness
5Important safety instructions
5Grounding instructions
6Installation
6Overflow guard function
6Transport/Winter storage
6Disposal
7Child safety
7Keep an eye on children!
7Automatic Door Opening
8Parts of the washing machine
9Detergent compartment
9Control Button Definitions
10Front panel
10Options button
11Advice and tips before washing
11Sorting your laundry
11Clothing
11Laundry labels
11Laundry label symbols
13Colored cotton
13Delicates
13Wool and silk
13Artificial fibers and synthetic fibers
13Reducing allergic reactions
13Save time and energy
13Economy and efficiency
13Detergents
14Dyeing fabrics
14Liquid detergents
15Detergents
15
Recommended powder
detergents
16
Detergent Amounts Based on
Water Hardness
16Amount of detergent to use
16
Recommended detergent
amounts based on water hardness
17Operating instructions
17Sort your laundry.
17Turn on the main power switch.
17
Open the washer door and load
the laundry
17
Add detergent and fabric softener,
as required
19Select the program
20Select options
20
Close the door and press the
Start/Stop button
20Once the program has finished
Customer Care Center2
1-800-898-1879
www.askousa.com
Contents
Page 3

21
Care and maintenance
instructions
21Checking the filter and drain pump
21
Cleaning the detergent
compartment
21
Cleaning the outside of the
machine
22
Cleaning the inside of the machine
to avoid unpleasant smells
23Rinse holes under the paddle
23If you have hard water
24Troubleshooting
24The washer door will not open
24The machine will not start
25Error messages
26Technical information
26Technical data
27Transport protection
28Installation instructions
28Leveling the machine
28Water supply connection
29Drain outlet connection
29Electrical Connections
29Grounding instructions
29Freestanding installation
29Stacked installation
30Built-in installation
30
Program plate in multiple
languages
31Service and guarantee
32Warranty
32
How to contact the ASKO
Appliances Inc.
36Quick guide
36Washing
36Load the laundry
36Detergent compartment
36Select the program
36Program finished
3Customer Care Center
1-800-898-1879
www.askousa.com
Contents
Page 4

Do you need this Use&Care Guide in spanish? Log onto www.askousa.com/customercare to
download.
¿Necesita esta Instrucciones de uso y cuidado en español? Entre en
www.askousa.com/customercare y descárguesela.
Transport protection
Has the transport protection been removed?
If not, see the "Transport protection" chapter.
Packing material
Please sort waste materials in accordance
with local guidelines.
Washer door
•
The washer door cannot be opened until
the machine is connected to the electricity
supply.
•
To open the door manually, see the "The
door will not open" section in the "Troubleshooting" chapter.
•
It is not possible to start the machine with
the door open.
•
To open the washer door while a program
is running, see the "Close the door and
press the Start/Stop button" section.
Checking water hardness
The quantity of detergent needed depends,
among other things, on water hardness.
Phone your local water company to check the
water hardness in your area.
Note!
Each machine is tested before leaving the
factory. A small amount of water may remain
in the drain pump, though this does not affect
quality or damage the machine.
See the Quick guide on the last page.
Customer Care Center4
1-800-898-1879
www.askousa.com
Before using your machine for the first time
Page 5

Save these instructions for future reference
WARNING - To reduce the risk of fire, electric
shock, or injury to persons when using your
appliance, follow basic precautions, including
the following:
•
Read all instructions before using the appliance.
•
Do not run appliance while you are out of
the home.
•
Do not wash or dry articles that have been
previously cleaned in, washed in, soaked
in, or spotted with gasoline, dry-cleaning
solvents, cooking oils, or other flammable
or explosive substances because they give
off vapors that could ignite or explode.
•
Do not allow children to play on or in the
appliance. Close supervision of children is
necessary when the appliance is used near
children.
•
Before the appliance is removed from service or discarded, remove the door to the
washing compartment.
•
Do not reach into the appliance if the drum
is moving.
•
Do not install or store this appliance where
it will be exposed to the weather.
•
Do not tamper with controls.
•
Do not repair or replace any part of the
appliance or attempt any servicing unless
specifically recommended in the user-repair instructions or in published user-repair
instructions that you understand and have
the skills to carry out.
•
Do not add gasoline, dry-cleaning solvents,
or other flammable or explosive substances to the wash water. These substances give off vapors that could ignite or
explode.
•
Under certain conditions, hydrogen gas
may be produced in a hot water system
that has not been used for 2 weeks or
more. HYDROGEN GAS IS EXPLOSIVE.
If the hot water system has not been used
for such a period, before using a washing
machine or combination washer-dryer, turn
on all water faucets and let the water flow
from each for several minutes. This will release any accumulated hydrogen gas. As
the gas is flammable, do not smoke or use
an open flame during this time.
Warning!
This appliance must be properly grounded.
This manual does not cover every possible
condition and situation that may occur. Use
common sense and caution when installing,
operating, and maintaining any appliance.
Grounding instructions
A) Grounding instructions for a grounded,
cord-connected appliance:
In the event of malfunction or breakdown,
grounding will reduce the risk of electric shock
by providing a path of least resistance for
electric current. This appliance is equipped
with a cord having an equipment-grounding
conductor and a grounding plug. The plug
must be plugged into an appropriate outlet
that is properly installed and grounded in accordance with all local codes and ordinances.
Warning!
Improper connection of the equipmentgrounding conductor can result in a risk of
electric shock. Check with a qualified electrician or service representative or personnel if
you are in doubt as to whether the appliance
is properly grounded.
Do not modify the plug provided with the appliance. If it will not fit the outlet, have a proper
outlet installed by a qualified electrician.
5Customer Care Center
1-800-898-1879
www.askousa.com
Important safety instructions
Page 6

B) Grounding instructions for a
permanently connected appliance:
This appliance must be connected to a
grounded metal, permanent wiring system,
or an equipment-grounding conductor must
be run with the circuit conductors and connected to the equipment-grounding terminal or
lead on the appliance.
Note
This manual does not cover every possible
condition and situation that may occur. Use
common sense and caution when installing,
operating, and maintaining any appliance.
Installation
See the "Installation" chapter.
Overflow guard function
If the machine’s water level rises above the
normal level, the overflow guard function begins to pump water out and shuts off the water
intake. If the water level has not dropped
within 60 seconds, the program is terminated.
Transport/Winter storage
If the machine is to be transported or stored
in unheated premises where the temperature
can fall below freezing, do as follows:
•
Empty the filter and drain pump (see the
"Care and Cleaning" chapter).
•
Shut off the water to the washing machine,
loosen the supply hose to the intake valve,
and let the water run out from the valve and
hose.
•
After emptying the pump, a small amount
of water may remain in the machine. This
does not affect quality or damage the machine.
Disposal
When the machine has reached the end of
its service life and is to be disposed of, it
should immediately be made unusable by
removing the door to the washing compartment. Contact your local authorities for information about where your machine should be
disposed of and recycled in the proper way.
The machine is manufactured and labeled for
recycling.
Save these instructions for future reference
Customer Care Center6
1-800-898-1879
www.askousa.com
Important safety instructions
Page 7

Keep an eye on children!
Watch out for children!
•
Laundry detergents are corrosive, so always keep them out of reach of children.
•
Should a child swallow detergent, give
plenty to drink immediately, i.e., one or two
glasses of milk or water. Do not try to induce vomiting. Seek medical advice immediately: The National Poison center phone
number is 1-800-222-1222.
•
Always close the door and start the appliance as soon as you put in the detergent.
•
Always turn the power off to the machine
when it is not in use.
•
Always keep small children away from the
machine when it is open. There may be
some detergent residue left inside the machine.
•
If laundry detergent gets in someone’s
eyes, rinse them with plenty of water for at
least 15 minutes.
Automatic Door Opening
The machine comes with an automatic door
opening function, which means the door
opens automatically once the program has
finished.
If you wish to prevent small children or pets
from climbing into the machine, you can deactivate the automatic door opening function.
1.
Turn off the machine using the main power
switch.
2.
Press the Door Opening button while simultaneously pressing the main power switch.
Release the buttons.
3.
Press the Key button and the red field goes
out. Automatic Door Opening is now deactivated.
4.
Press the Start/Stop button to save the
setting.
If you want to reactivate the function, follow
the instructions above. When you press the
button with the key symbol (step 3), the red
fields light up. Save the setting by pressing
the Start/stop button.
7Customer Care Center
1-800-898-1879
www.askousa.com
Child safety
Page 8
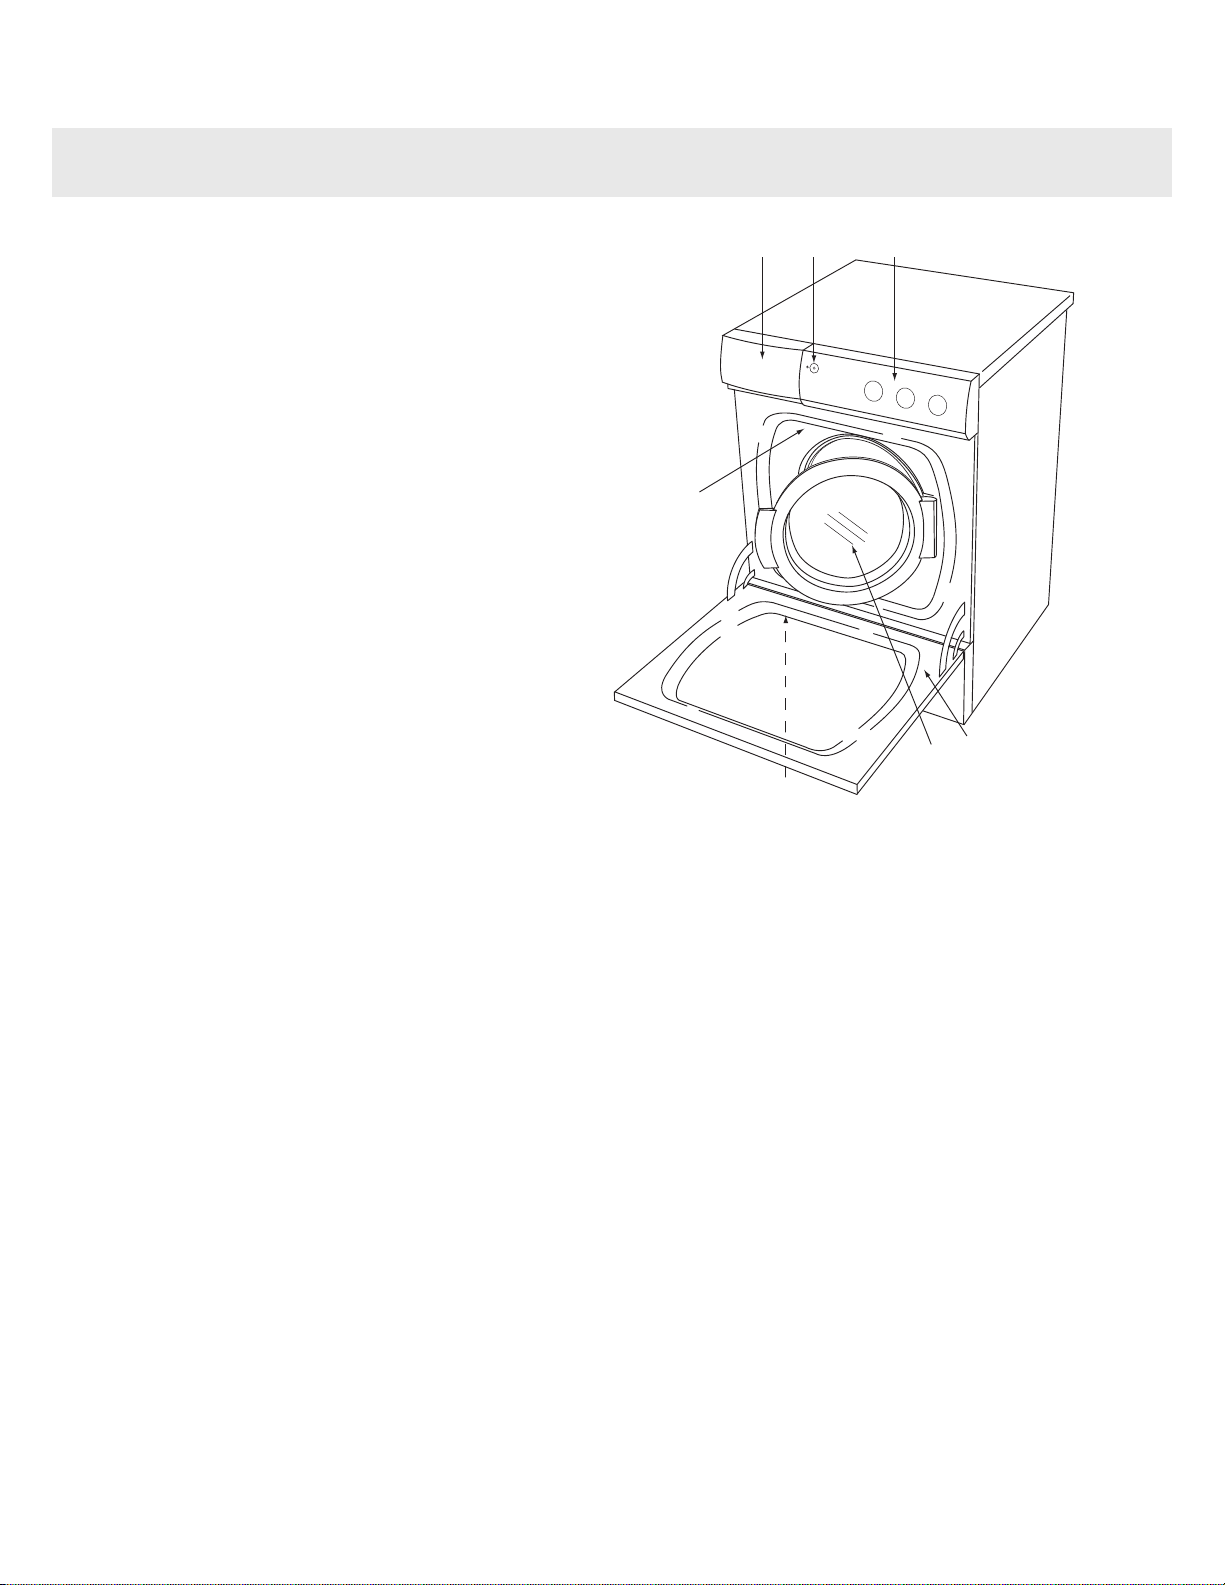
1
2 3
4
8
7
5,6
1.
Detergent compartment
2.
Main power switch
3.
Program panel
4.
Serial number tag and rating plate
5.
Hatch - drainage pump
6.
Drain pump (behind hatch)
7.
Washer door
8.
Outer door (not all models)
Customer Care Center8
1-800-898-1879
www.askousa.com
Parts of the washing machine
Page 9
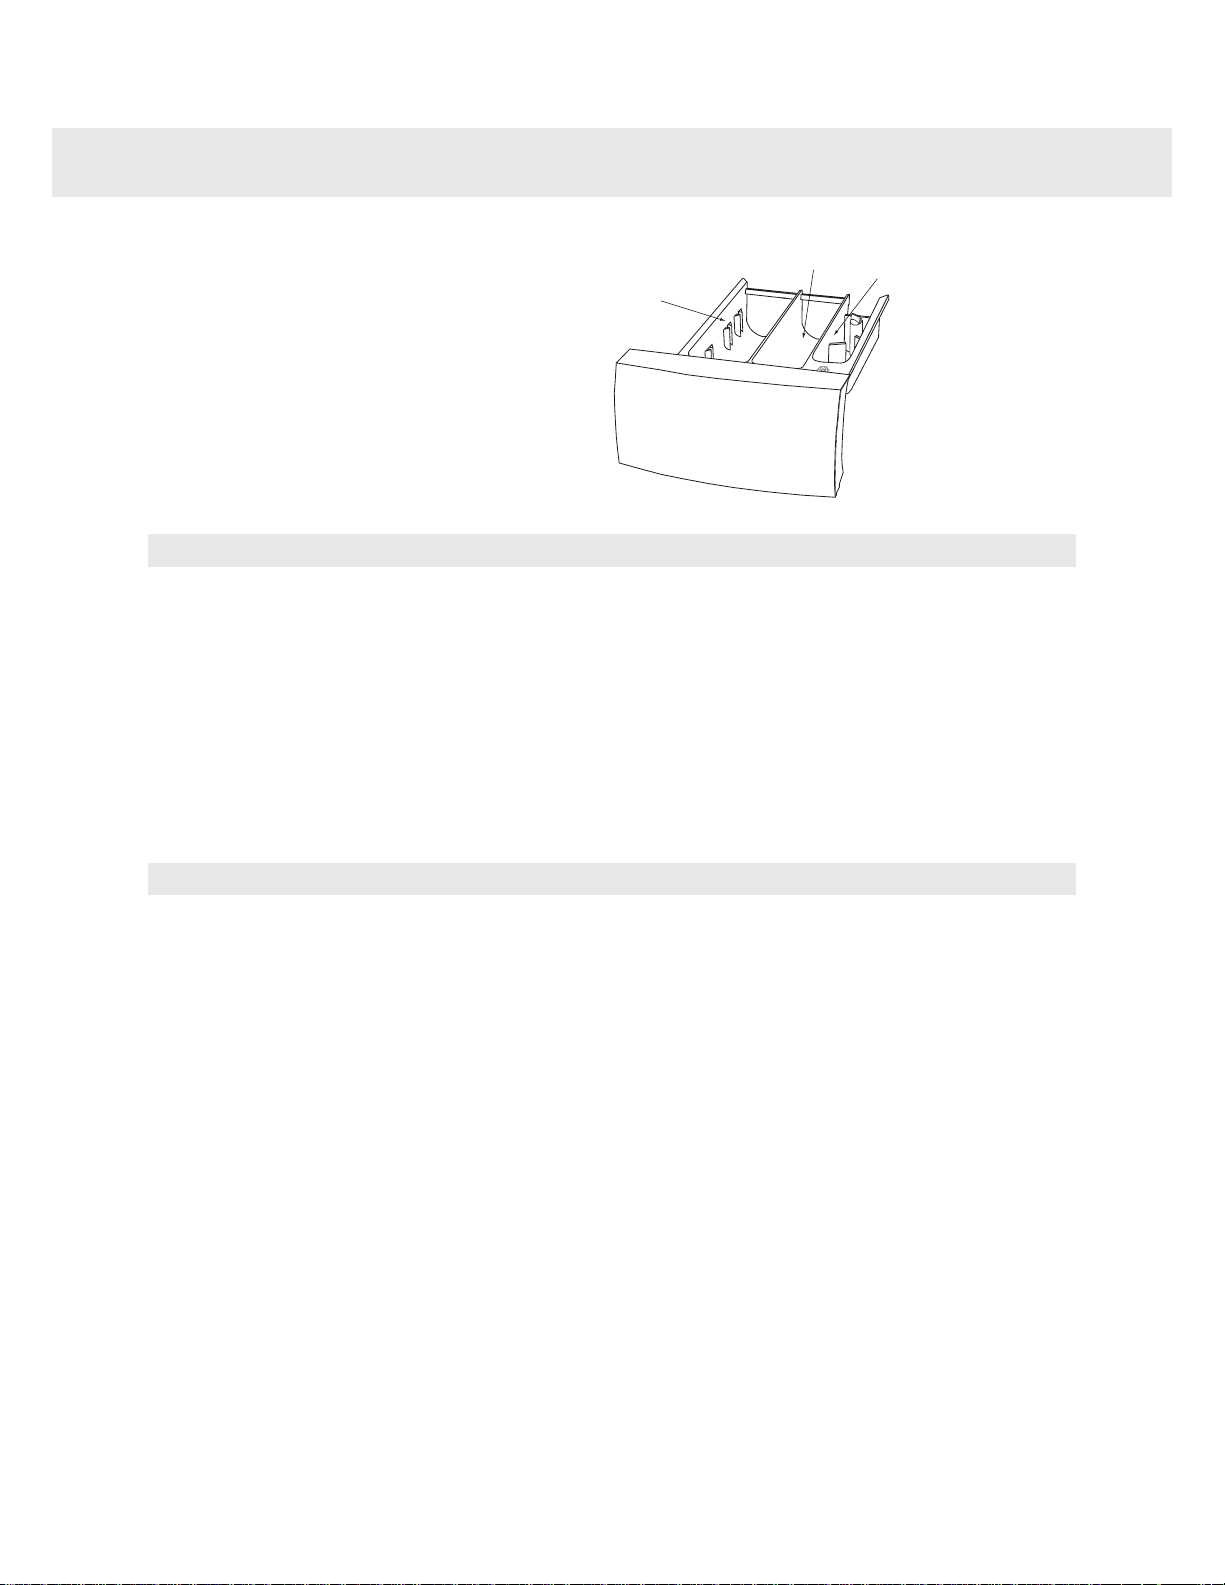
1
3
2
1.
Detergent compartment - pre-wash
2.
Detergent compartment - main wash
3.
Fabric softener compartment
Note!
In the plastic bag containing these instructions and other things, you will find a plastic divider.
Place the divider in the detergent compartment if you use liquid detergent.
The detergent drawer automatically dispenses the detergent and fabric softener at the appropriate
times. Simply pour the measured amounts of detergent and softener into the proper compartments
(as illustrated) and close the drawer.
Control Button Definitions
Inside the detergent drawer is a plate that illustrates the buttons on the control panel and defines
each button. Refer to the “Operating Instructions” in this guide for your specific model for more
details regarding the control buttons
Note
To avoid oversudsing, do not put detergent in the prewash compartment unless you are using
one of the Heavy wash programs which has a prewash cycle.
9Customer Care Center
1-800-898-1879
www.askousa.com
Detergent compartment
Page 10
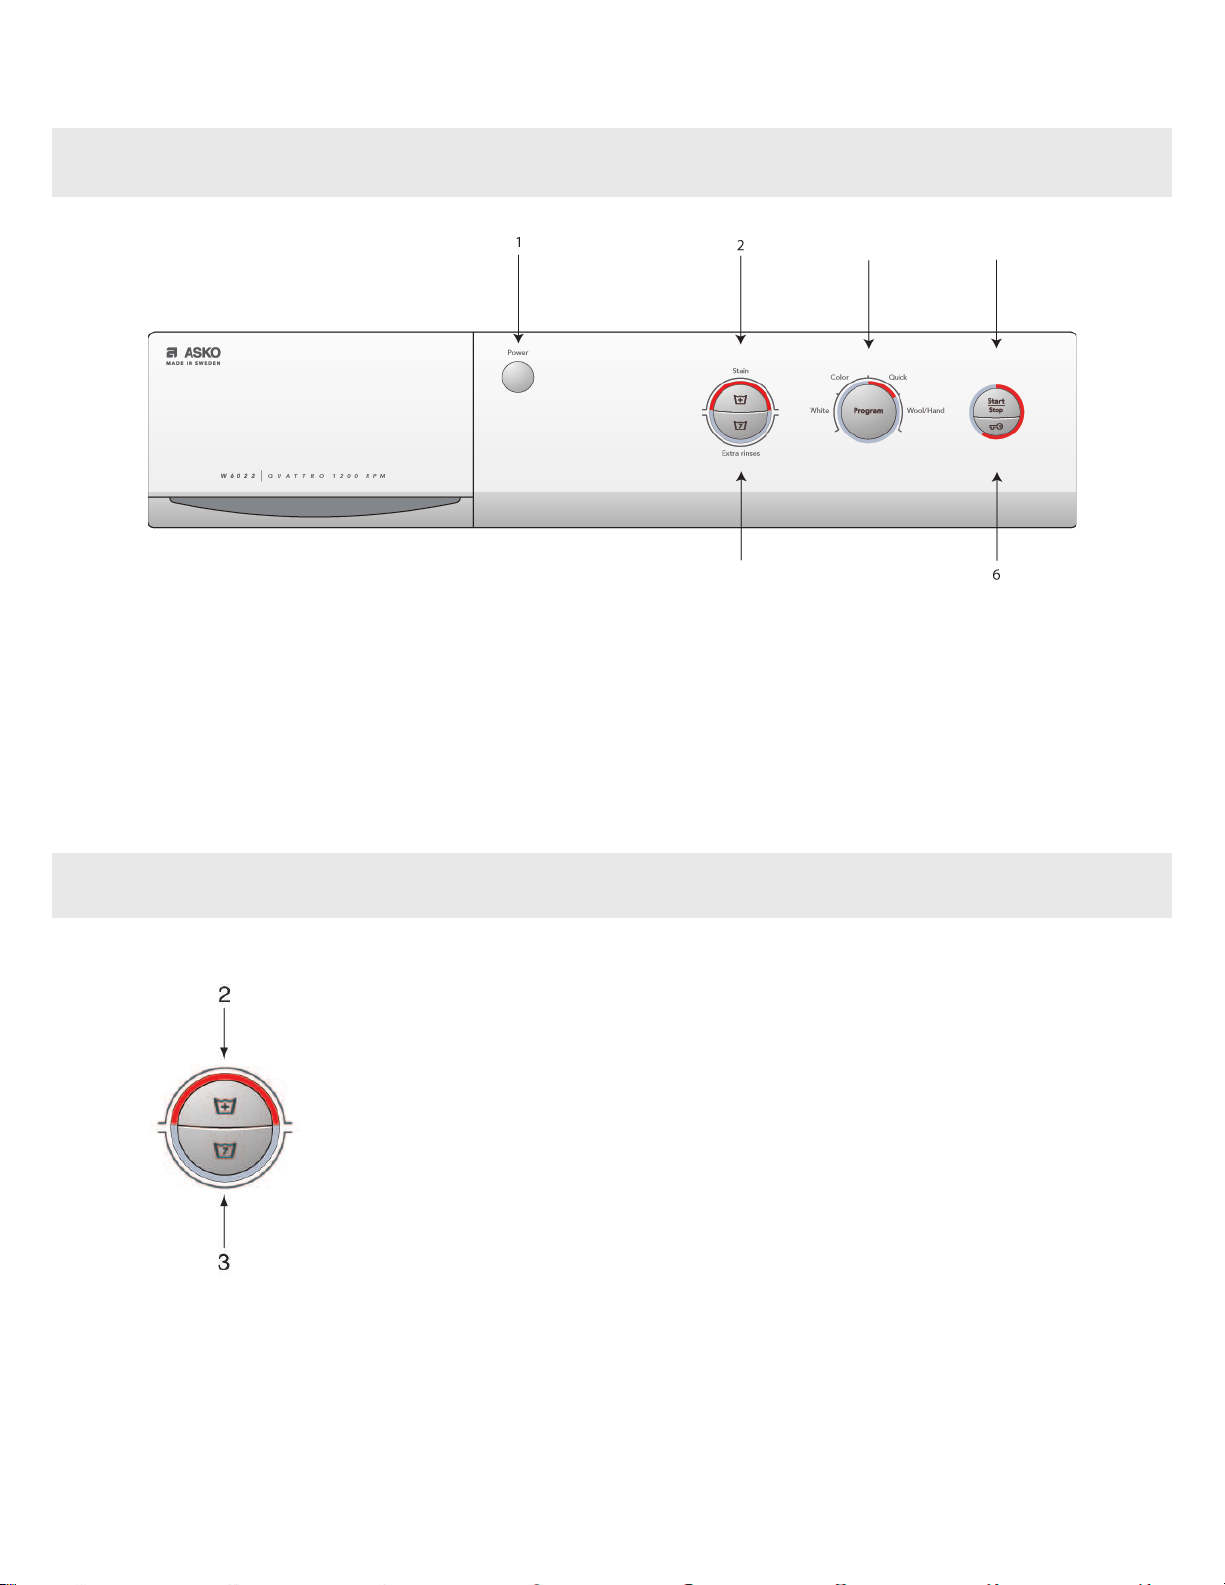
3
4
5
Start/Stop5.Main power switch1.
Door opening6.Options buttons2-3.
Program selector4.
Options button
Button for selecting Stain2.
Button for selecting Super Rinse3.
Customer Care Center10
1-800-898-1879
www.askousa.com
Front panel
Page 11
Here are some tips that may help you before
washing.
Sorting your laundry
Sort items according to:
•
how soiled they are
•
color
•
material
Clothing
•
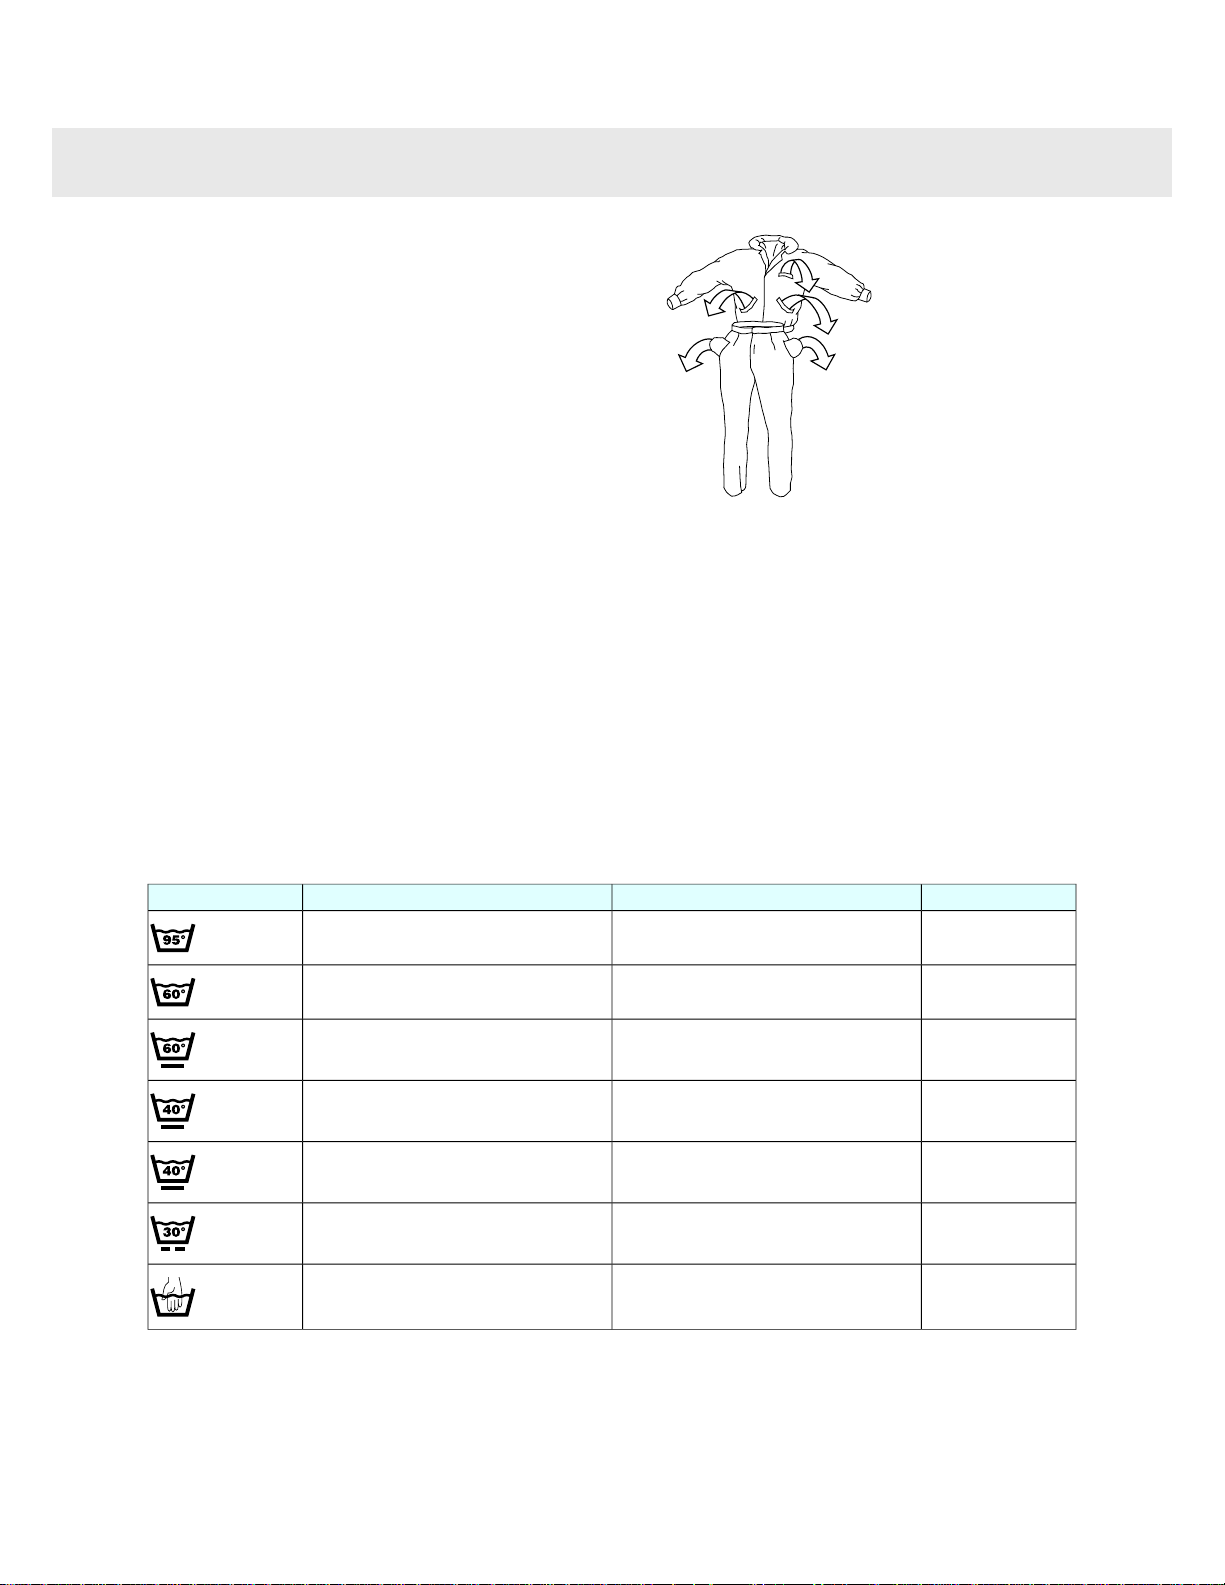
Close zippers so that they don’t harm fabrics.
•
New colored items may contain excess
dye and should therefore be washed separately the first few times.
•
Turn delicate items inside out. This reduces the risk of burling and fading.
•
Empty pockets and wash them inside out
if possible!
Laundry labels
Look at the item’s laundry label. The table
below shows suitable wash programs for different materials and wash loads. Using modern washing machines and detergents, such
as compact detergents, you can usually wash
at lower temperatures. It is a good idea to use
trial and error to find out what produces the
best results.
Laundry label symbols
LoadProgramMaterialLaundry labels
1/1 drumStain - Color 140°F (60°C) to 203°F (95°C)Cotton, linen, white, and light-colored
items.
1/1 drumColor 140°F (60°C)Cotton, linen. Dark-colored items.
1/2 drumPermaPress 140°F (60°C)Polyester, cotton/polyester, nylon. White
items.
1/2 drumPermaPress 104°F (40°C)Rayon, acetate, acrylic. Non-colorfast
items.
1/2 drumPermaPress 104°F (40°C)Polyester, cotton/polyester, nylon. Colored
items.
1/3 drumPermaPress 86°F (30°C)Silk and very delicate items
1/3 drumWool/Hand 104°F (40°C)Items labeled with the IWS or Superwash
mark
11Customer Care Center
1-800-898-1879
www.askousa.com
Advice and tips before washing
Page 12
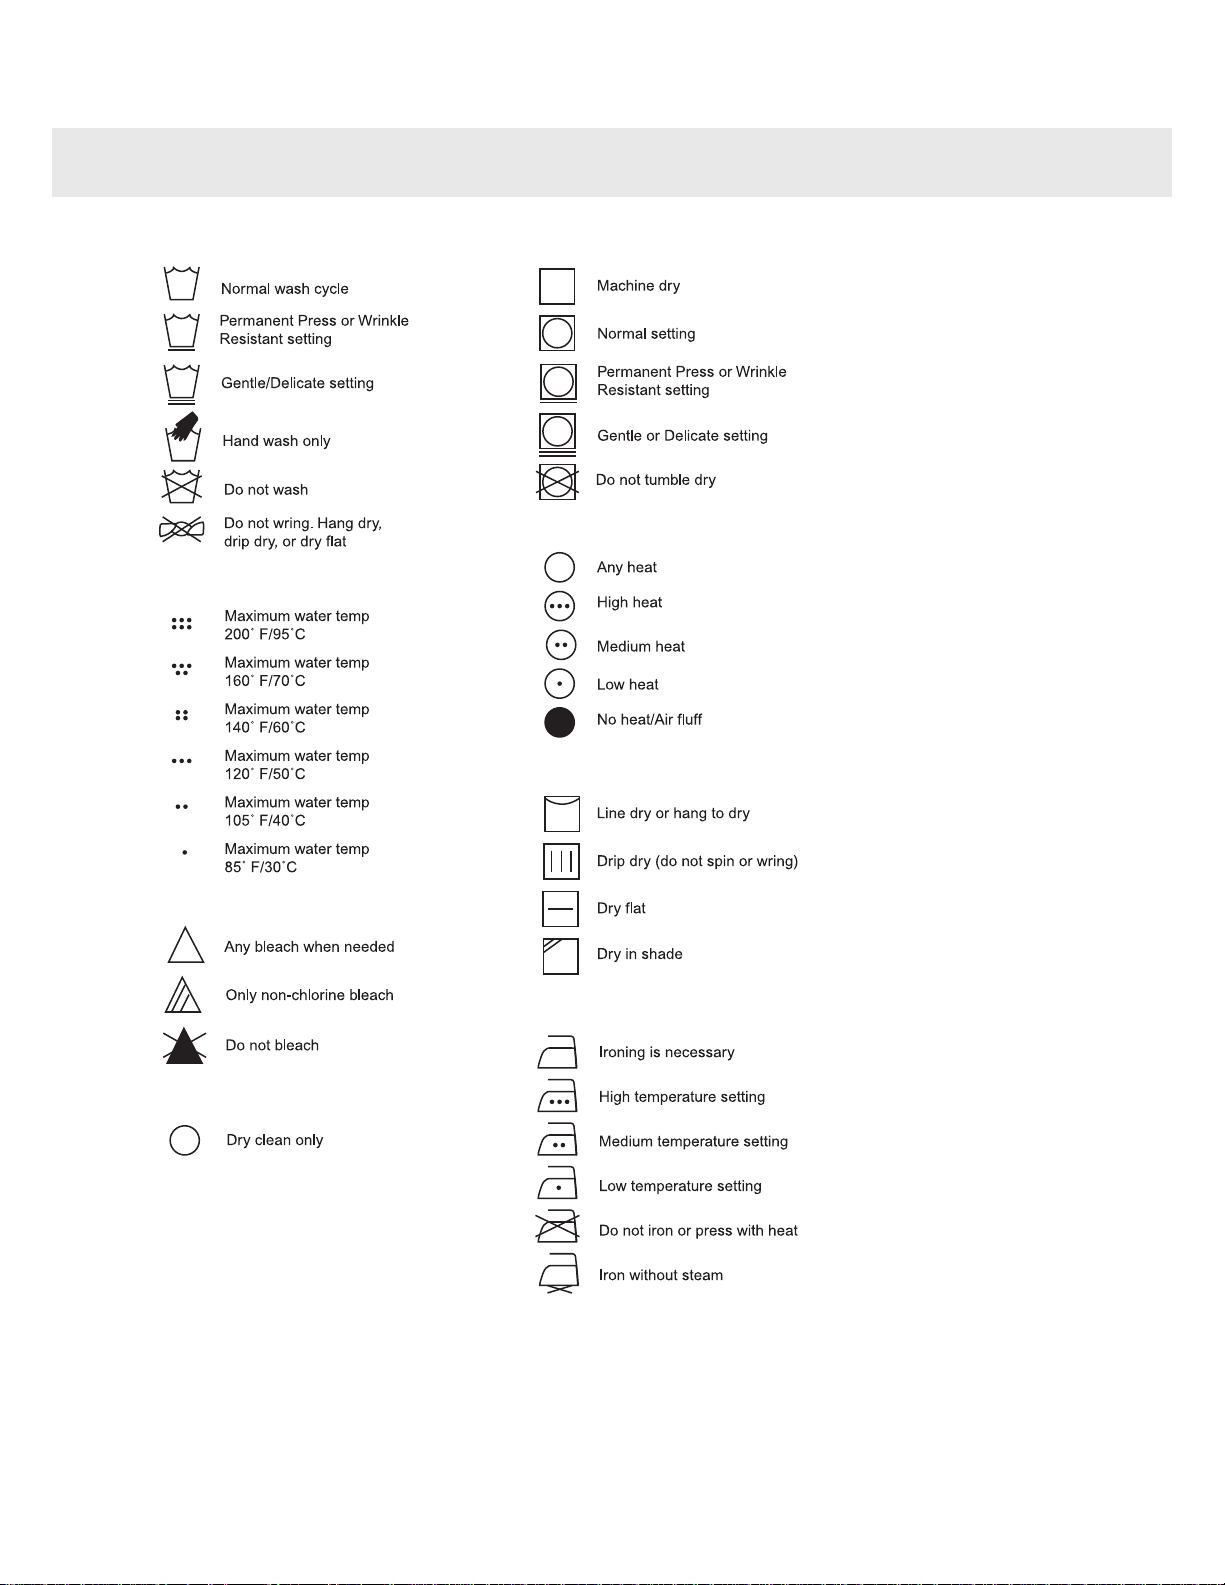
Ironing instructions
Special drying instructions
Tumble dry heat setting
Tumble dry cycle
Dry clean symbol
Bleach instructions
Wash water temperature
Wash cycle
Customer Care Center12
1-800-898-1879
www.askousa.com
Advice and tips before washing
Page 13

Colored cotton
Colored cotton items labeled 140°F (60°C)
should be washed at 140°F (60°C) the first
time in order to remove any excess dye. If you
do not do so, there is a risk that the color will
run. Use detergent without bleach in order to
preserve the color of the fabric.
Delicates
Unbleached linen
Unbleached linen fabrics should be washed
at 140°F (60°C), using detergent containing
no bleach or optical whiteners. Heavily-soiled
linen can occasionally be washed at higher
temperatures, but not too often as the heat
can destroy the linen’s sheen and strength.
Wool and silk
These fabrics are sometimes labeled as machine washable and sometimes as hand
wash. The machine’s Wool/hand program is
just as gentle as washing by hand.
Wool is especially sensitive to processes such
as washing.
If you do not wish to spin dry, you can
squeeze out the water using terrycloth towels.
In this case select No spin.
To find out how to select this setting, see the
Washing chapter. However, most garments
can withstand a short spin. Choose a short
spin by selecting a spin speed of 800 rpm or
less.
Artificial fibers and synthetic fibers
These materials require plenty of room to
prevent them from getting wrinkled. Only fill
half the drum when washing artificial or synthetic fibers. Choose a short spin by selecting
a spin speed of 800 rpm or less.
Note!
Viscose and acetates are fragile when wet.
Reducing allergic reactions
The washing machine has a Super Rinse option. Use this for people with sensitive skin,
such as those with allergies and small children.
Save time and energy
Use the White program to save time and energy. This program has a shorter main wash
than Normal, but is often sufficient for lightly
soiled laundry.
Economy and efficiency
You can save a lot of energy by not using
higher temperature programs than necessary.
•
Select Quick if you just need to freshen up
shirts or exercise clothes, for example. This
will save both water and energy.
•
If you select a fast spin speed, this reduces
energy consumption when drying in a
tumble dryer or drying cabinet.
•
Always wash with a full load when using
the Sani, Stain - Color, Color, and White
programs!
•
Avoid washing with pre-wash. Modern
machines and detergents clean without
pre-wash. Only very heavily soiled laundry,
such as overalls and similar garments, are
likely to need a pre-wash.
Detergents
Eco-labeled detergents are less harmful to
the environment.
Detergent overdosing does not give better
washing results; it merely causes a greater
impact on the environment.
Try to use less detergent, and increase only
if you are not satisfied with the results.
13Customer Care Center
1-800-898-1879
www.askousa.com
Advice and tips before washing
Page 14
Dyeing fabrics
If you want to dye fabrics in the machine, select the Normal program with the Super Rinse
option On. Select temperature according to
the dye manufacturer’s recommendations.
Choose a low spin speed if the fabric to be
dyed is a blended material such as
polyester/cotton.
Note!
Add the dye directly to the washing drum –
not to the detergent compartment. After dyeing, you should run the machine empty using
the same program. Use the normal amount
of detergent.
Note!
Due to environmental concerns, we discourage the use of strong chemicals.
When using agents for bleaching or stain removal, there is a risk of rust (corrosion) and
discoloration of the machine.
Liquid detergents
We don’t recommend liquid detergents because they tend to produce more suds than
powder detergents when used in water temperatures of 150° F or higher. If you should
try a liquid detergent, start with a very small
amount, such as 1 to 2 tablespoons. Also,
liquid detergent can be used for all programs
without prewash, so add it into the main wash
compartment.Should you prefer to use a liquid
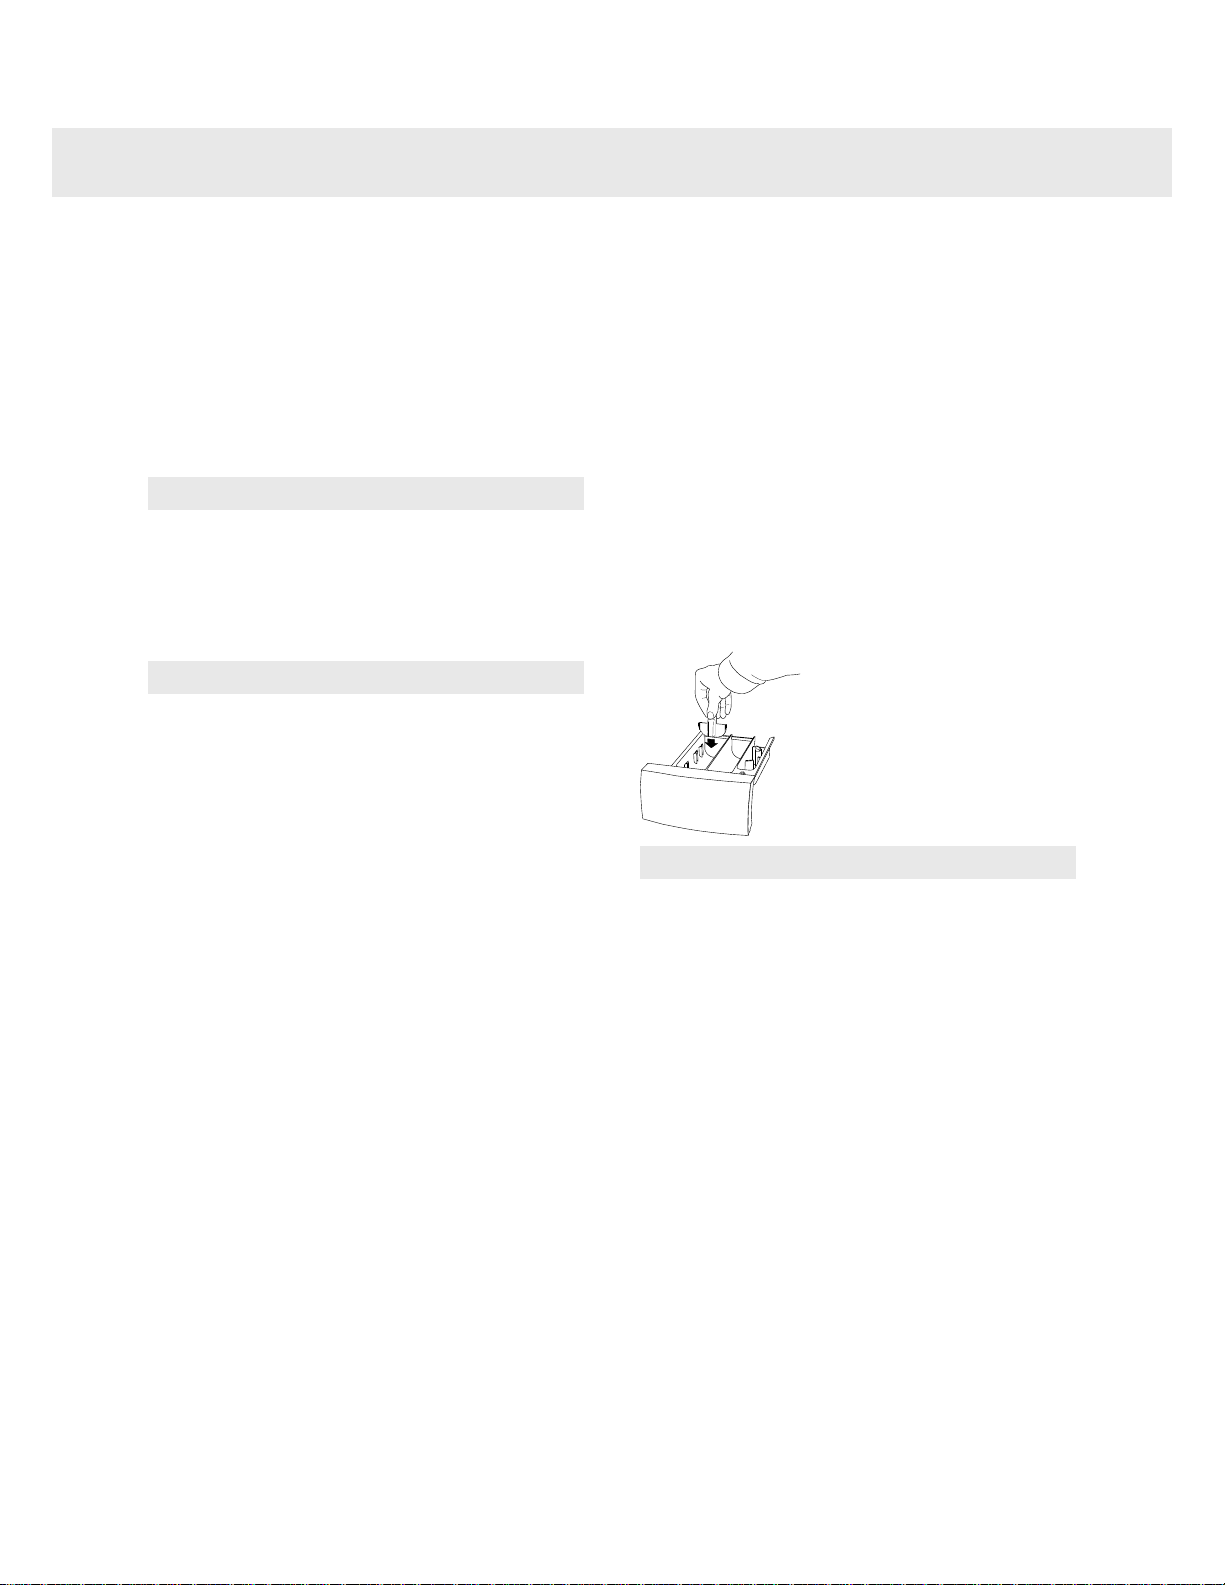
detergent, we have provided a partition piece
with the detergent drawer specifically for use
with liquid detergents. Insert the partition in
the slot at the back of the main wash compartment before you pour in the liquid detergent.
Note
The partition piece is packaged in the Document set supplied with the machine
Customer Care Center14
1-800-898-1879
www.askousa.com
Advice and tips before washing
Page 15

Detergents
Laundry detergents are available in low-,
normal- and high-sudsing formulas. A detergent´s ability to clean is not relative to the
amount of suds it produces. Excess suds in
a front-loading washer actually interfere with
the cleaning because they cushion the tumbling action. Also, high-sudsing detergents
are more difficult to completely rinse out.The
use of anything other than a low-sudsing detergent can cause severe oversudsing, which
could cause suds to backup through the detergent compartment and run down the front
of the washer onto the floor. If oversudsing
occurs, run the wash through one or more
rinse programs until all items are thoroughly
rinsed. Remove the laundry then run the
washer through a Normal wash program to
get rid of any remaining detergent.We recommend that you don’t use bleach in your ASKO
washer. The tumbling wash action, temperature control options, extended wash times
and proper amount of detergent are sufficient
to remove most stains.
Recommended powder detergents
ASKO washers use 50% to 75% less detergent than most other washers. This is because of their low water consumption and the
fact that all the wash water is repeatedly circulated through the laundry, ensuring that all
the detergent is fully utilized. We recommend
that you use powder detergents made
specifically for front-loading washers. These
are sometimes called HE (High-Efficiency)
detergents. Listed below are some lowsudsing powder detergents that have been
successfully tested in ASKO washers:
•
Fab
•
All
•
Tide HE
•
Amway SA8
•
Fresh Start
•
Wisk HE
We recommend that you do not use any
powder detergent that doesn’t wash completely out of the detergent drawer.
15Customer Care Center
1-800-898-1879
www.askousa.com
Advice and tips before washing
Page 16
Detergent Amounts Based on Water
Hardness
The amount of detergent needed can vary
due to differences in water hardness. To determine the water hardness in your area,
contact your local water utility or area water
softening company. The harder the water, the
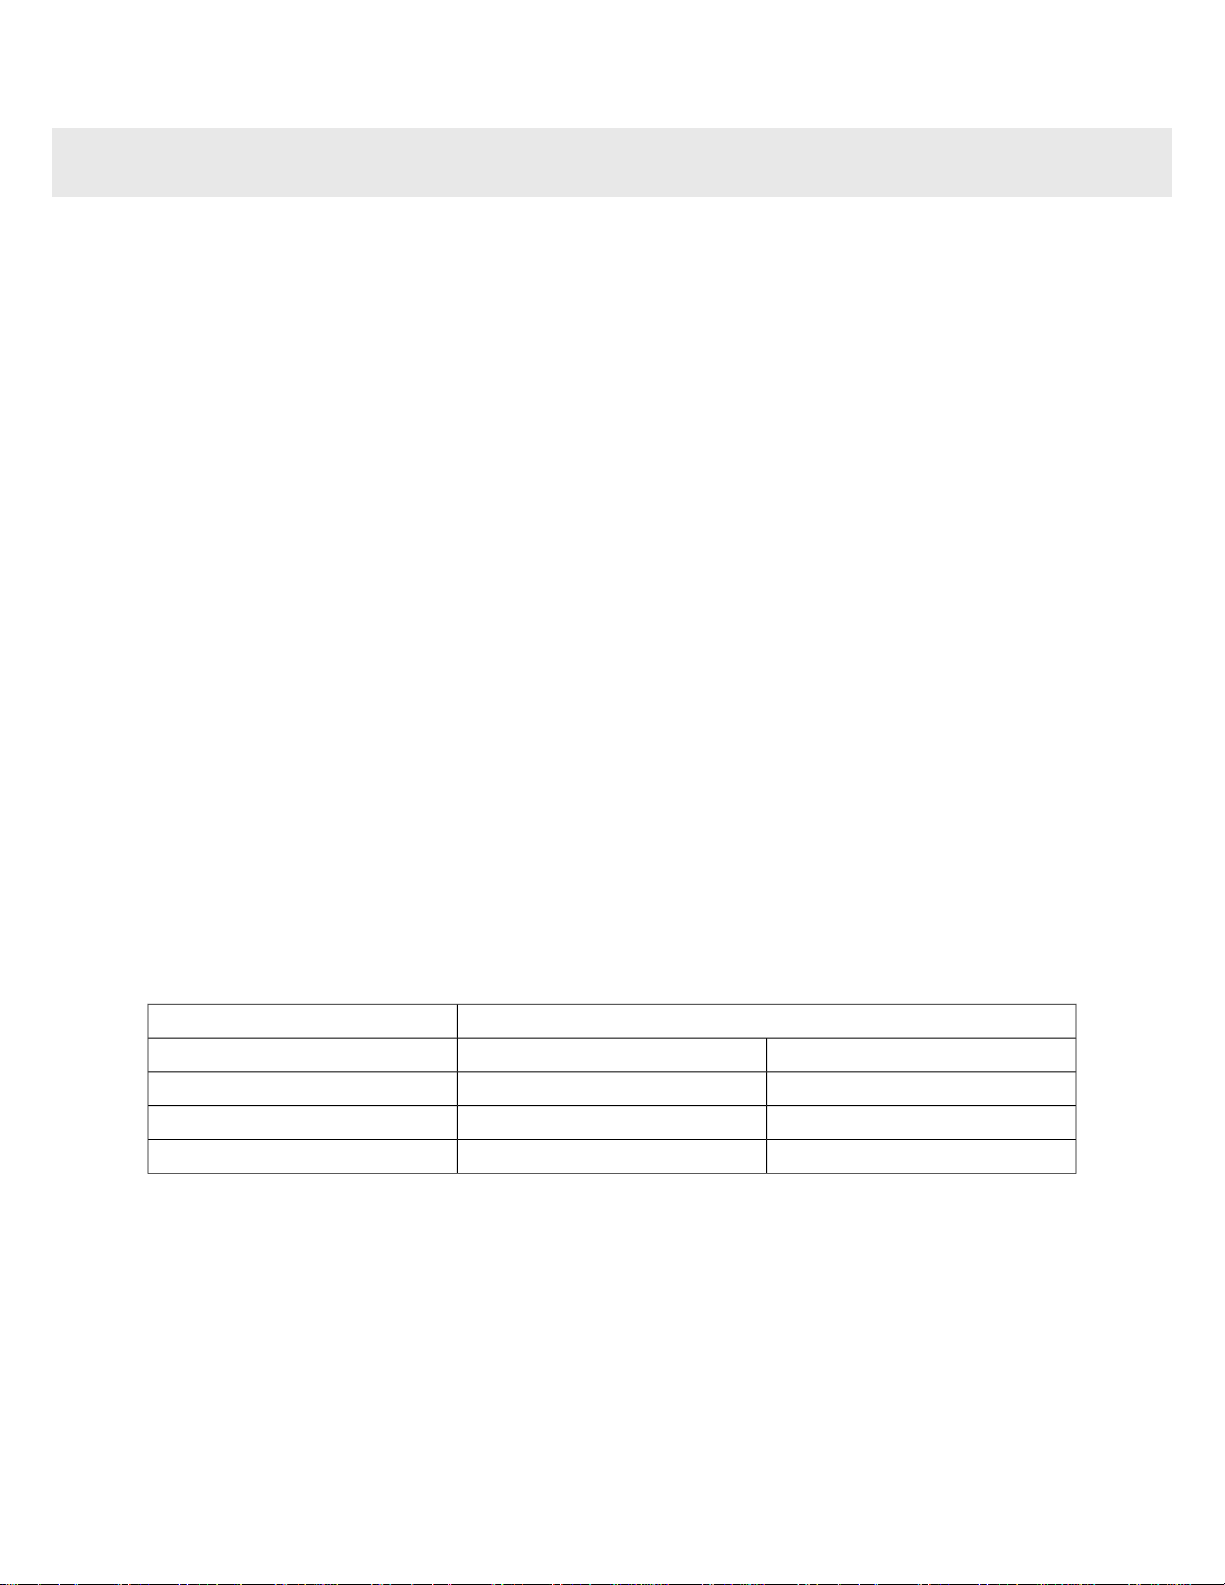
more detergent you may need. Refer to the
chart below for the recommended detergent
amounts based on water hardness. Remember, you should adjust the amount of detergent you use by small amounts until you find
the correct amount.Note that 12 grains and
higher is extremely hard water and detergent
alone may not be enough. You may need to
use a water softener to maximize the performance of your washer. Also, in areas with
extremely hard water (9+) you may need to
wash at lower temperatures to prevent hard
water deposits from forming in the tank and
wash system.Different brands of detergent
have different amounts of phosphorous for
softening water. If you have hard water and
use a detergent with less than 8.7% phosphorous content, you may need to use more detergent or use a detergent with a higher
phosphorous content.
Amount of detergent to use
The amount of detergent needed varies
among the different brands, but for most detergents, you need only one or two tablespoons. Using too much detergent can result
in detergent residue being left in your clothes,
which can cause them to appear gray or
dingy. You should start with a small amount
of detergent and increase it only if the cleaning results are unsatisfactory.Additionally, you
should never put detergent in the prewash
compartment unless you are using a wash
program that has a prewash cycle. This could
cause excess foaming, which could damage
the machine.The amount of detergent needed
can also depend on the hardness of the water
in your area. See the “Detergent Amounts
Based on Water Hardness” section on the
next page for more details.
Recommended detergent amounts based on water hardness
Detergent amounts
Main WashPre WashWater hardness
1 to 1-1/2 tablespoons1 teaspoonSoft (0-3 grains per gal.)
1 to 2 tablespoons1 teaspoonMedium (4-8 grains per gal.)
2 to 3 tablespoons1 teaspoonHard (9+ grains per gal.)
Customer Care Center16
1-800-898-1879
www.askousa.com
Advice and tips before washing
Page 17
WARNING - To reduce the risk of fire, electric
shock, or injury to persons, read the IMPORTANT SAFETY INSTRUCTIONS before operating this applience.
1
Sort your laundry.
See the "Advice and Tips" section before washing.
Note!
Place underwired bras in a laundry net.
Note!
Empty pockets. Coins, nails, and the like can
cause damage to the machine and fabrics.
See the "Advice and Tips" section before
washing.
2
Turn on the main power switch.
3
Open the washer door and load
the laundry
If the door is closed, press the Door
Opening button (key symbol). The red field
lights up and the door opens after a few seconds. Load the laundry. The laundry program
chart shows how much laundry can be
washed with each program.
4
Add detergent and fabric
softener, as required
The detergent packaging will have recommendations for how much detergent you
should use. The machine holds 13lb (6kg) of
laundry. If you only have a small amount of
laundry in the machine, you can reduce the
amount of detergent used. The accompanying
plastic divider may only be used for liquid
detergent.
Powder detergent
Pour the powder into the main wash compartment, and pre-wash compartment as well if
desired.
Main Wash
Pre Wash
Fabric softener
Liquid detergent
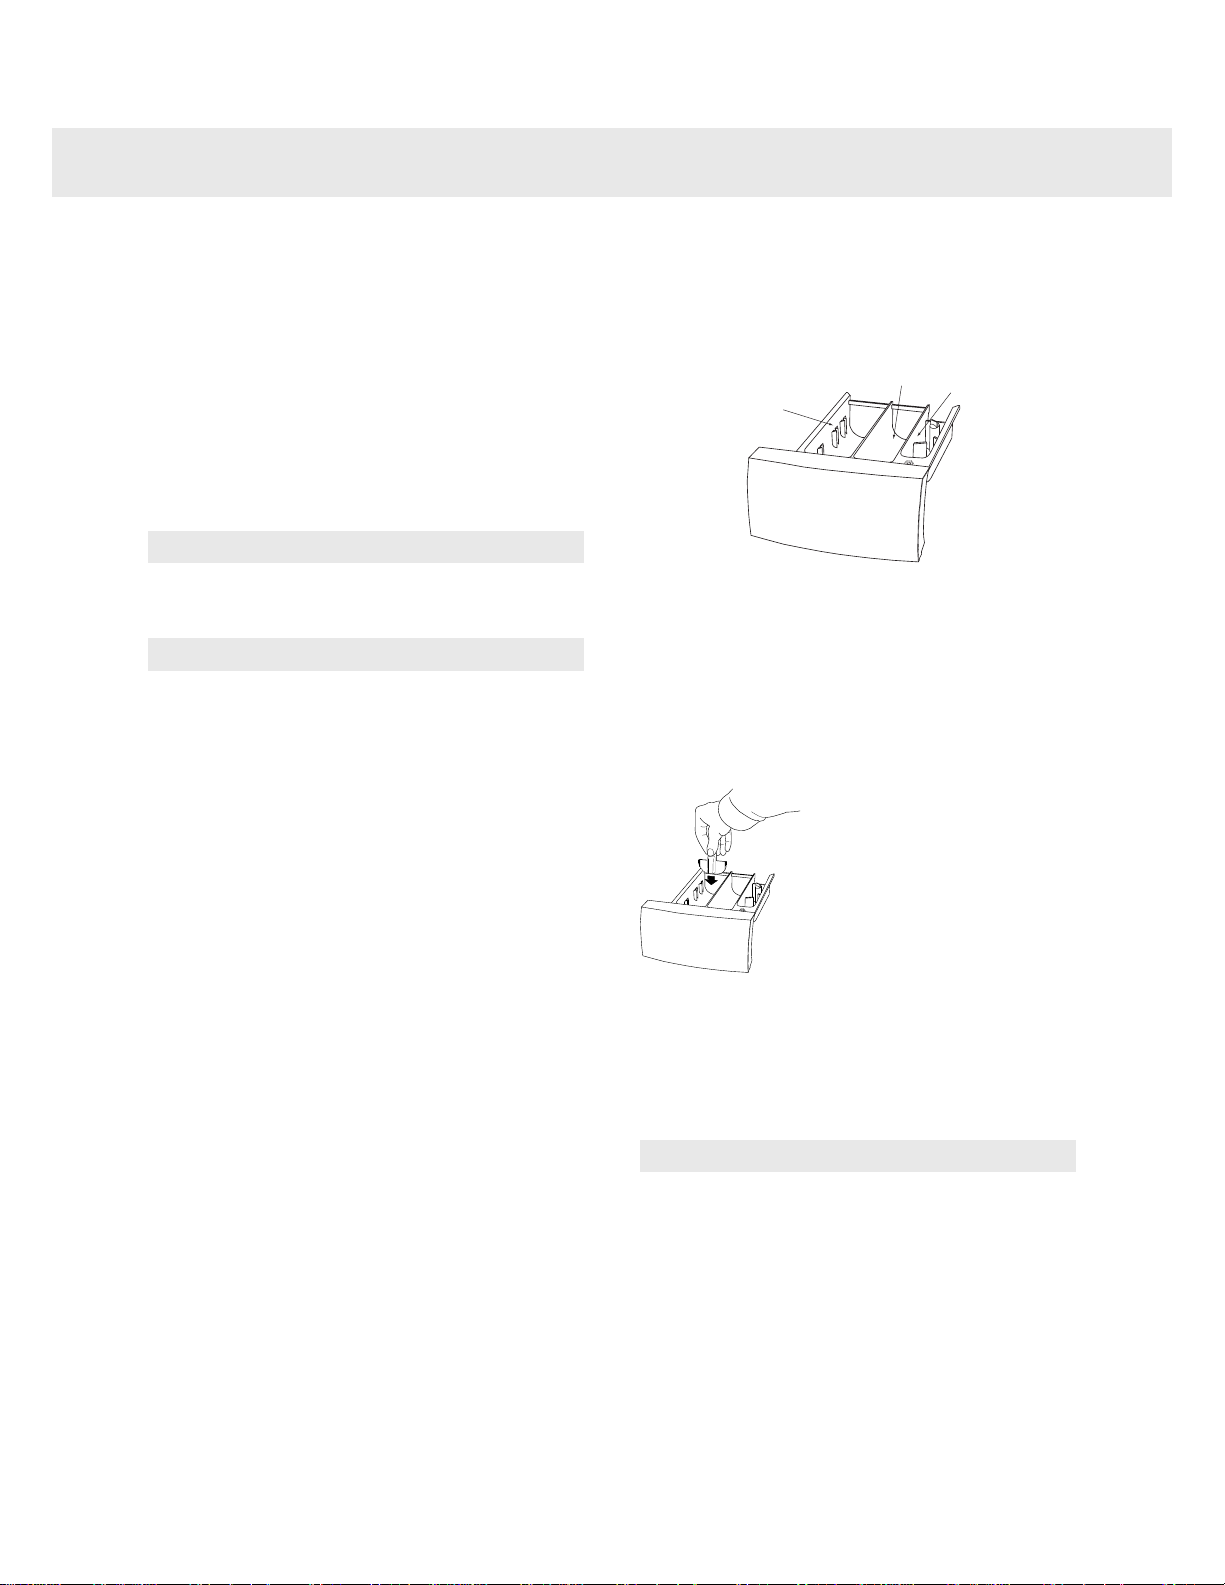
In the accompanying Use and Care package
there is a divider for liquid detergent. Place
this in the slit at the back of the detergent
compartment as shown in the illustration. Pour
the detergent directly into the compartment
for the main wash.
Wash ball or net
If you use a wash ball or net, place it directly
in the drum and select a program without prewash.
Note!
Detergent overdosing does not give better
washing results; it merely causes a greater
impact on the environment.
Try using less detergent, and increase only if
you are not satisfied with the results.
17Customer Care Center
1-800-898-1879
www.askousa.com
Operating instructions
Page 18

Fabric softener
Pour the fabric softener into the compartment
with the symbol. Follow the recommendations on the fabric softener packaging.
Note!
Do not fill above the compartment’s maximum
fill level. Otherwise fabric softener will be dispensed too early, which impairs the washing
effect.
Customer Care Center18
1-800-898-1879
www.askousa.com
Operating instructions
Page 19
5
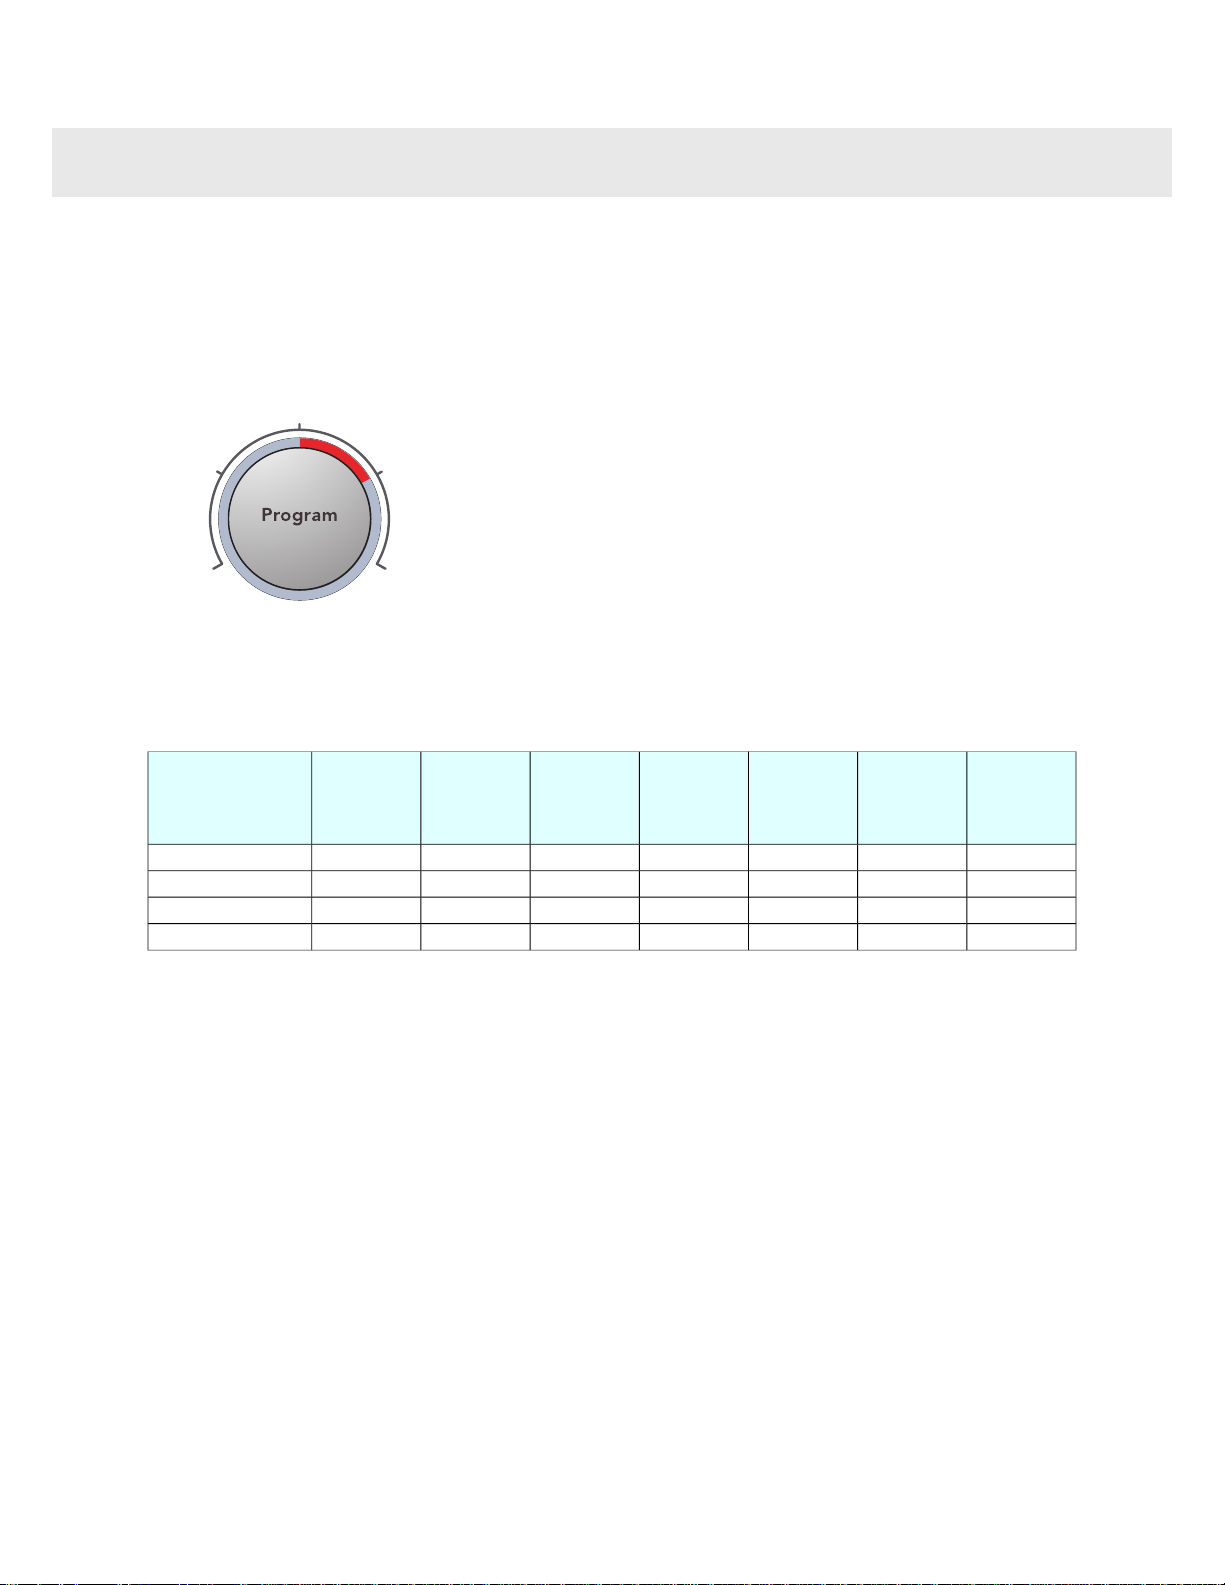
Select the program
You can select a program by turning the
program selector. A red field lights up
beside the selected program. Start by pressing the Start/Stop button, or selecting an option.
Color Quick
Wool/Hand
White
White 140°F (60°C) 1200 rpm
Used for normally soiled sheets, pillowcases,
and sheets.
Color 104°F (40°C) 1200 rpm
Lightly-soiled laundry can be washed at 104°F
(40°C). Most detergents today clean even at
104°F (40°C).
Quick 104°F (40°C) 800 rpm
Lightly soiled laundry that just needs freshening up. You can choose the inlet water temperature (the machine does not warm the water)
or 104°F (40°C).
Wool/Hand 86°F (30°C) 800 rpm
This program is used for Wool clothing
marked as handwash only. The program has
a short spin.
Program chart
Program time
(approx. min)
Energy consumption
(approx.
kWh)
Water consumption
(approx. gallon)Max. loadMax. RPM
Rinses (number)Temp. °FProgram
901.0018.51/112003140White
700.5011.91/112003104Color
650.3010.61/28003104Quick
400.3021.11/2800386Wool/Hand
19Customer Care Center
1-800-898-1879
www.askousa.com
Operating instructions
Page 20

6
Select options
Stain
The Stain option raises the temperature
and lengthens the time of the main wash cycle. When the red field by the button lights up,
the higher temperature is activated.
White: 60°C (140°F)/ 77°C (170°F) + approx.
40 min.
Color: 40°C (105°F) 49°C (120°F) + approx.
40 min.
Quick: 40°C (105°F) 49°C (120°F) + approx.
15 min.
Extra Rinses
Use the Extra Rinses option if you want to increase the number of rinses. The maximum
number of rinses is seven and varies depending on the selected program. This option
cannot be selected with Wool/Hand, Rinse,
Spin, or Drain.
The machine remembers this setting and uses
it the next time you select the same program.
To deactivate Extra Rinses, press the
Start/Stop button for 3 seconds. The red field
will go out.
A lighted red field around the button indicates
that the option has been activated.
7
Close the door and press the
Start/Stop button
To add or remove laundry after the
program starts
If you want to add or remove items after the
program has started, you can stop the program by pressing and holding the Door
Opening button (key symbol) for three seconds. The red field will flash. When you restart
the machine, add any extra detergent needed
and close the door. The machine continues
automatically from the point where the program was interrupted.
Stopping or changing a program
You can also stop a program by pressing the
Start/Stop button for three seconds. To restart
the machine, select a new program, add any
extra detergent needed, and press the
Start/Stop button.
8
Once the program has finished
The door opens automatically once the
program has finished. If you want to
deactivate Automatic Door Opening, see the
"Child safety" chapter.
•
Remove the laundry.
•
Turn off the main power switch and
you will save energy.
If you have small children or pets at home,
close the washer door once you have removed the laundry.
Customer Care Center20
1-800-898-1879
www.askousa.com
Operating instructions
Page 21
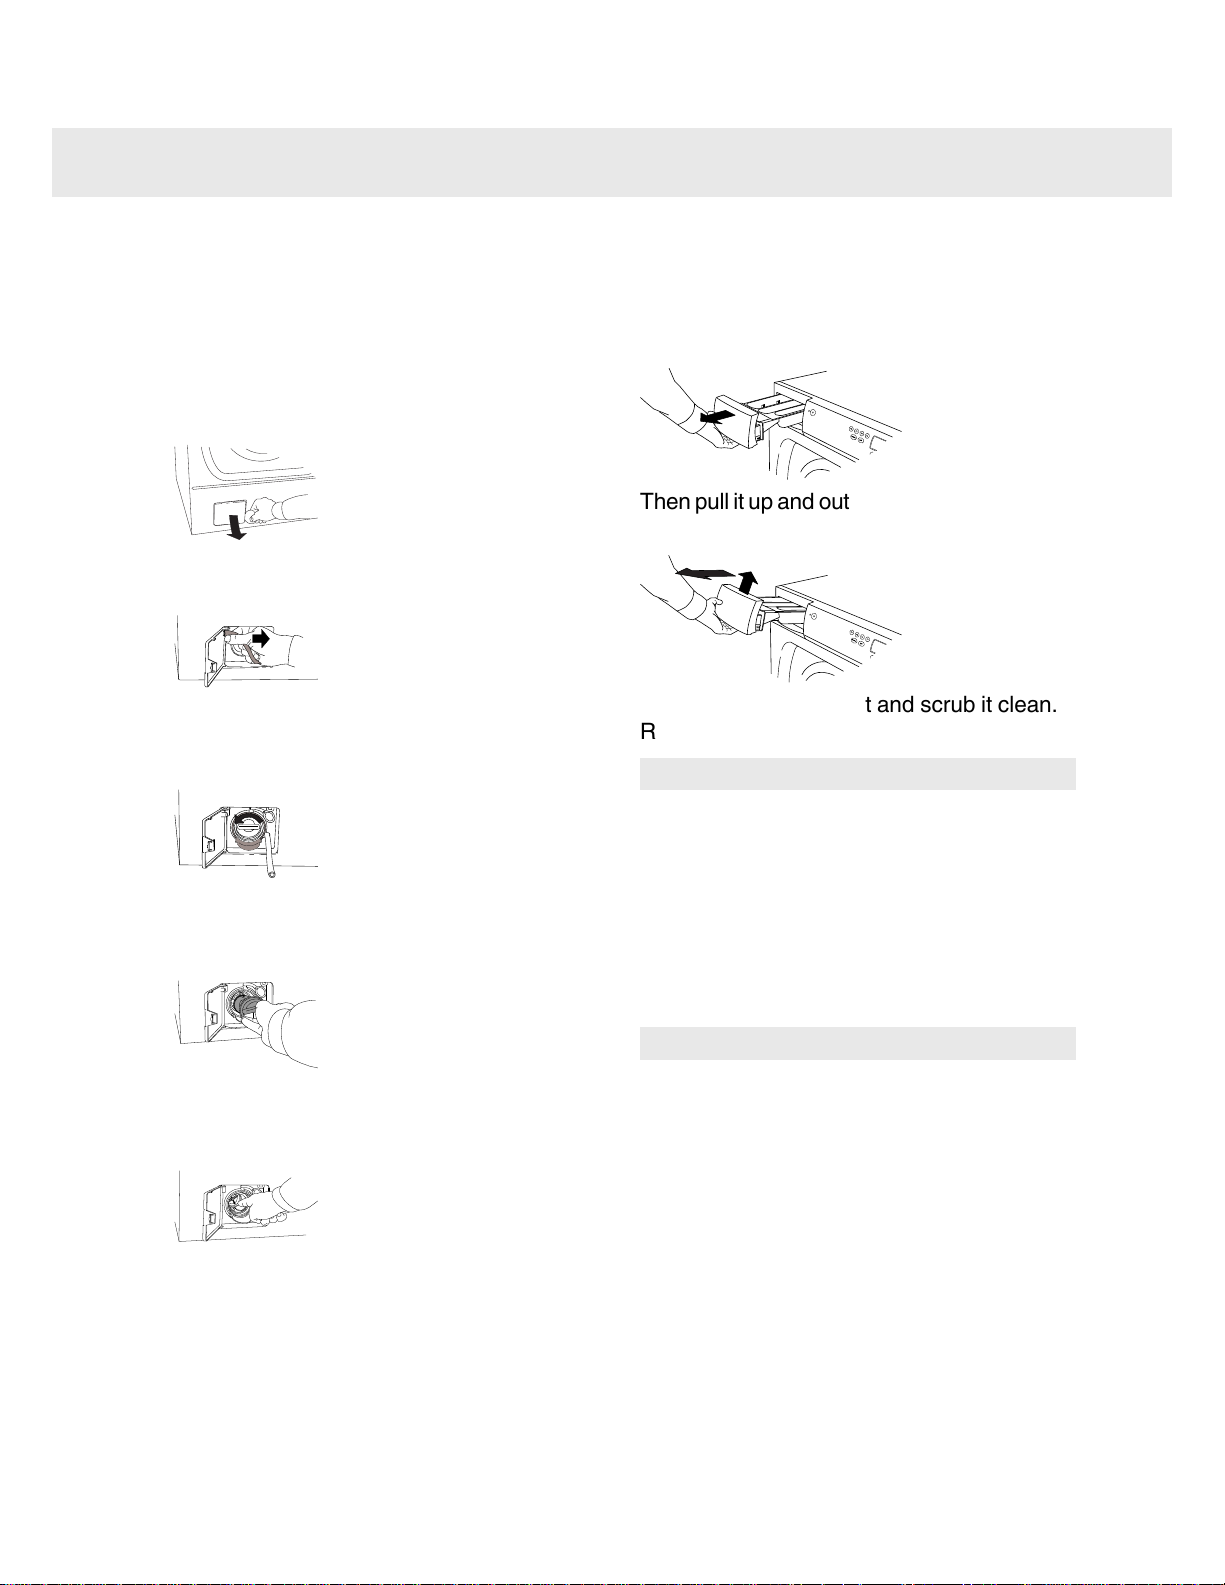
Checking the filter and drain pump
The washing machine has a filter, where
coins, hairpins, and the like can get caught.
To clean the filter and drain pump:
1.
Make sure the machine is empty of water
and that it is switched off at the main power
switch.
2.
Open the hatch for the drain pump as
shown in the illustration.
3.
Drain out the water, into a bowl, for example, by unhooking the drainage hose from
the pin inside the hatch.
4.
Open the pump by unscrewing the cover
counterclockwise. Remove the cover with
the filter.
5.
Remove any objects or debris from the
pump housing. Check to see that the pump
impellers at the back will rotate.
6.
Screw on the cover, replace the drainage
hose on the hatch pin, and close the hatch.
Cleaning the detergent
compartment
Pull the detergent compartment out as far as
it will go.
Start/Stop
P3
P1
P2
P4
Then pull it up and out as shown in the illustration.
Start/Stop
P3
P1
P2
P4
Rinse the compartment and scrub it clean.
Replace the compartment.
Note!
Do not run the detergent compartment
through a dishwasher!
Cleaning the outside of the machine
Clean the outside of the machine and the
program panel with a mild cleaner. Do not use
any solvents, as these can damage the machine.
Note!
Do not hose down or spray the machine with
water.
21Customer Care Center
1-800-898-1879
www.askousa.com
Care and maintenance instructions
Page 22

Cleaning the inside of the machine
to avoid unpleasant smells
Modern detergents often allow laundry to be
washed at low temperatures. This means that
small deposits can build up in the machine.
These, in turn, may lead to unpleasant odors
developing.
To avoid this, we recommend running a 203°F
(95°C) wash program once a month. When
you do this, use a small quantity of detergent.
It is not necessary to put any laundry in the
machine.
Customer Care Center22
1-800-898-1879
www.askousa.com
Care and maintenance instructions
Page 23
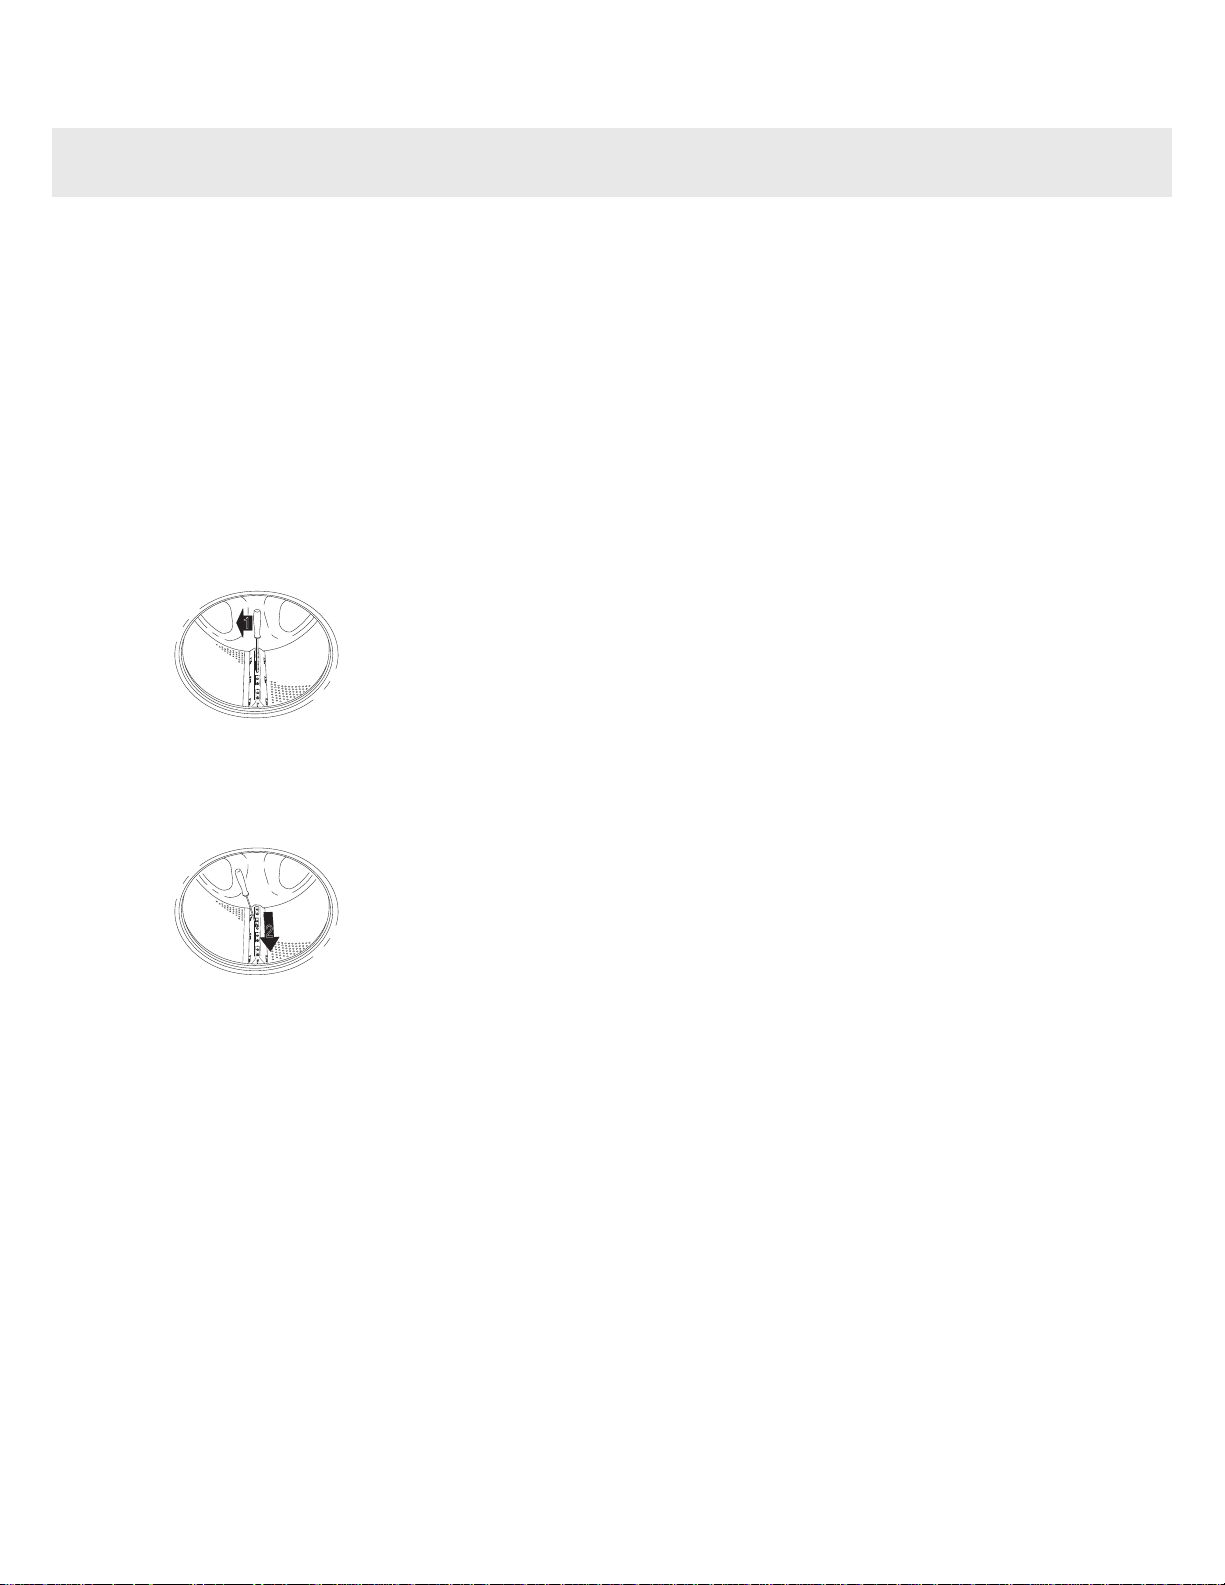
Rinse holes under the paddle
If you think that an object, such as a nail or a
paper clip, may have fallen through the wash
drum, you should check the container under
the paddle. Objects of this kind can rust and
cause spots on clothing. Nails and other sharp
objects can make holes in fabric.
Do as follows:
1.
Use a screwdriver or similar tool.
2.
Insert the screwdriver into the center hole
on the paddle and turn the screwdriver
handle gently to the left.
1
3.
With your other hand, hold the paddle and
pull it toward you as shown in the illustration.
4.
Lift the paddle.
2
5.
Remove any objects.
6.
Place the paddle in the mounting hole with
the F-mark toward you. Ensure that all the
paddle fasteners are in their holes in the
drum. Push it away from you until it catches.
If you have hard water
If you live in an area with hard water
(limescale), the washer drum may develop a
grayish-white coating. To remove this, empty
a sachet of citric acid, approx. 20gram
(1ounce), into the washer drum and run the
Stain - Color program at 203°F (95°C). Repeat if necessary.
23Customer Care Center
1-800-898-1879
www.askousa.com
Care and maintenance instructions
Page 24
The washer door will not open
1.
Check that the main power switch is on.
2.
Has the power supply been cut off? Check
the house fuses (circuit breakers). The
washer door cannot be opened using the
button with the key symbol if the power
supply has been cut off.
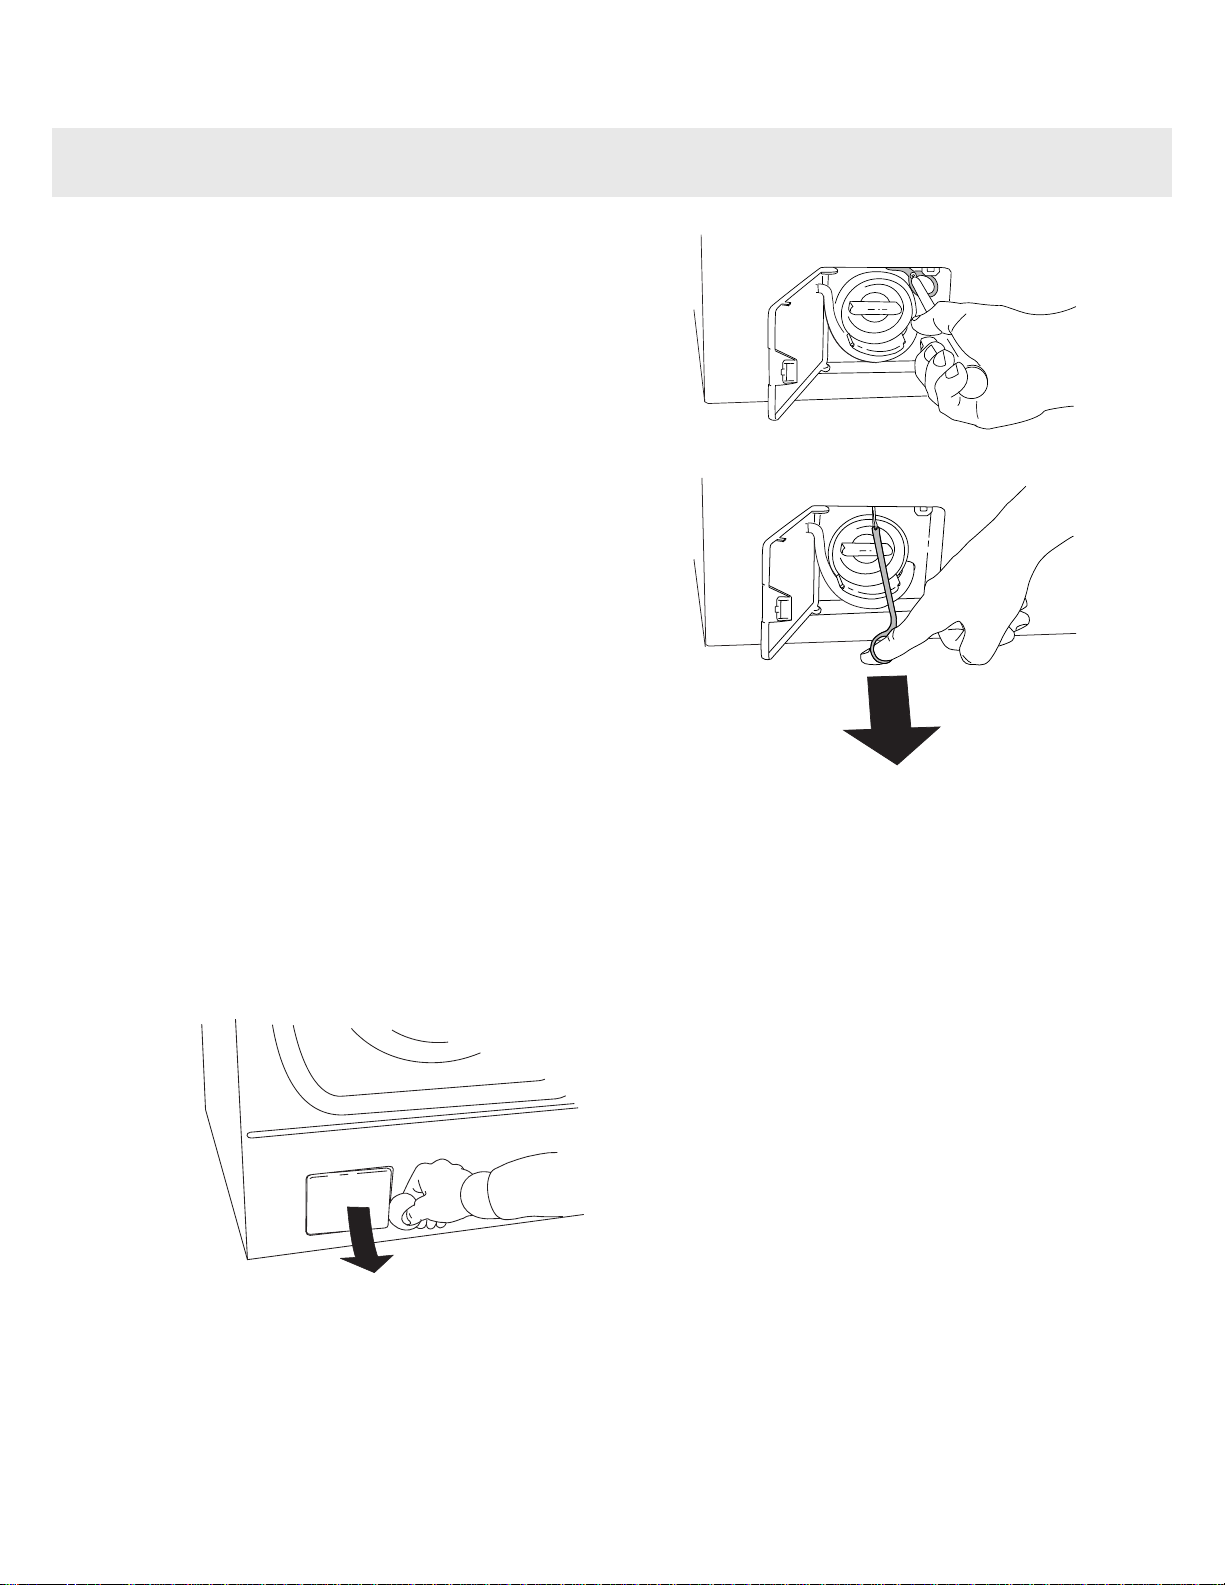
If nothing else works, the washer door
can be opened as follows:
•
This must only be done in an emergency
if the machine's glass door does not
open automatically when the program
has finished.
•
First check that there is no water left in
the machine. If there is any water left
and you are unable to run the Drain
program, empty the machine by detaching the drainage hose. This is described
under the heading "Checking the filter
and drain pump", in chapter 11, "Care
and cleaning".
•
Make sure that the main power switch
is off and that the plug has been removed from the wall socket.
•
Open the hatch to the drain pump from
the bottom left, as shown in the illustration.
•
Remove the screws holding the red
plastic handle in place.
•
Pull the handle and the door opens.
•
Insert the handle back into its slot and
screw it tight. Close the hatch to the
drain pump.
If the machine's glass door does not open the
next time a washing program finishes, call the
Customer Care Center at the number at the
bottom of this page.
The machine will not start
1.
Is the washer door properly closed? Push
it firmly.
2.
Is there power? Check the house fuses.
Customer Care Center24
1-800-898-1879
www.askousa.com
Troubleshooting
Page 25

Error messages
If an error occurs while a program is running,
the red fields around the buttons flash in
slightly different ways. After taking the measures described below, turn off the machine
to exit error message mode.
L1
L2
L3L4
L5
L6
The error messages that may be shown are:
The door is not closed
If L1 is flashing, you tried to start a program
with the washer door open. Close the door
and the program will start.
Over filling
If all the red fields around the Start/Stop and
Door Open (key symbol) buttons are flashing,
there is too much water in the machine.
1.
Shut off the water tap.
2.
Contact the Customer Care Center at the
number listed at the bottom of this page!
Drainage error
If L3 is flashing, there is a drainage problem.
Check:
•
that no objects are stuck in the drainage
hose outlet.
•
that the drain pump is not blocked by foreign objects. Clean the pump (see the
"Care and cleaning" chapter).
•
that there are no kinks in the drainage
hose.
After taking the necessary action, run the
Drain program or press the Door Opening
button (key symbol) to empty the machine. If
the problem persists, contact the Customer
Care Center at the number listed at the bottom of this page!
Water intake error
Fault with water supply. Check:
If L4 is flashing, there is a drainage problem.
Check:
•
that the tap on the water pipe is open.
•
that the filter in the machine’s water intake
is not blocked.
1.
Shut off the water tap.
2.
Unscrew the hose.
3.
Clean the filter in the intake valve on the
machine.
4.
Screw the hose back on.
5.
Turn on the tap.
6.
Run the program again to check whether
the error has been fixed.
7.
If the problem persists, contact the Customer Care Center at the number listed at
the bottom of this page!
Door opening error
If L6 is flashing. Call the Customer Care
Center. Contact the Customer Care Center
at the number listed at the bottom of this
page!
25Customer Care Center
1-800-898-1879
www.askousa.com
Troubleshooting
Page 26

Technical data
33 1/2'' (850mm)Height:
23 7/16'' (595mm)Width:
23.0" (585mm)Depth:
161 (172)lb (with outer door)Weight:
13.2gal (50l)Cylinder volume:
13lb (6kg)Max. laundry capacity:
800 - 1200Spin speed (rpm)
See serial number tag and rating plate.Rated power:
See serial number tag and rating plate.Heater output:
14-145 psiWater pressure:
Stainless steelWash drum and liquid compartment material:
Powder-coated and hot-galvanized sheet steel
or stainless steel.
Outer casing material:
59" (1.5m) pex pipeWater connection:
67" (1.7m) polypropylene hoseDrain:
Customer Care Center26
1-800-898-1879
www.askousa.com
Technical information
Page 27
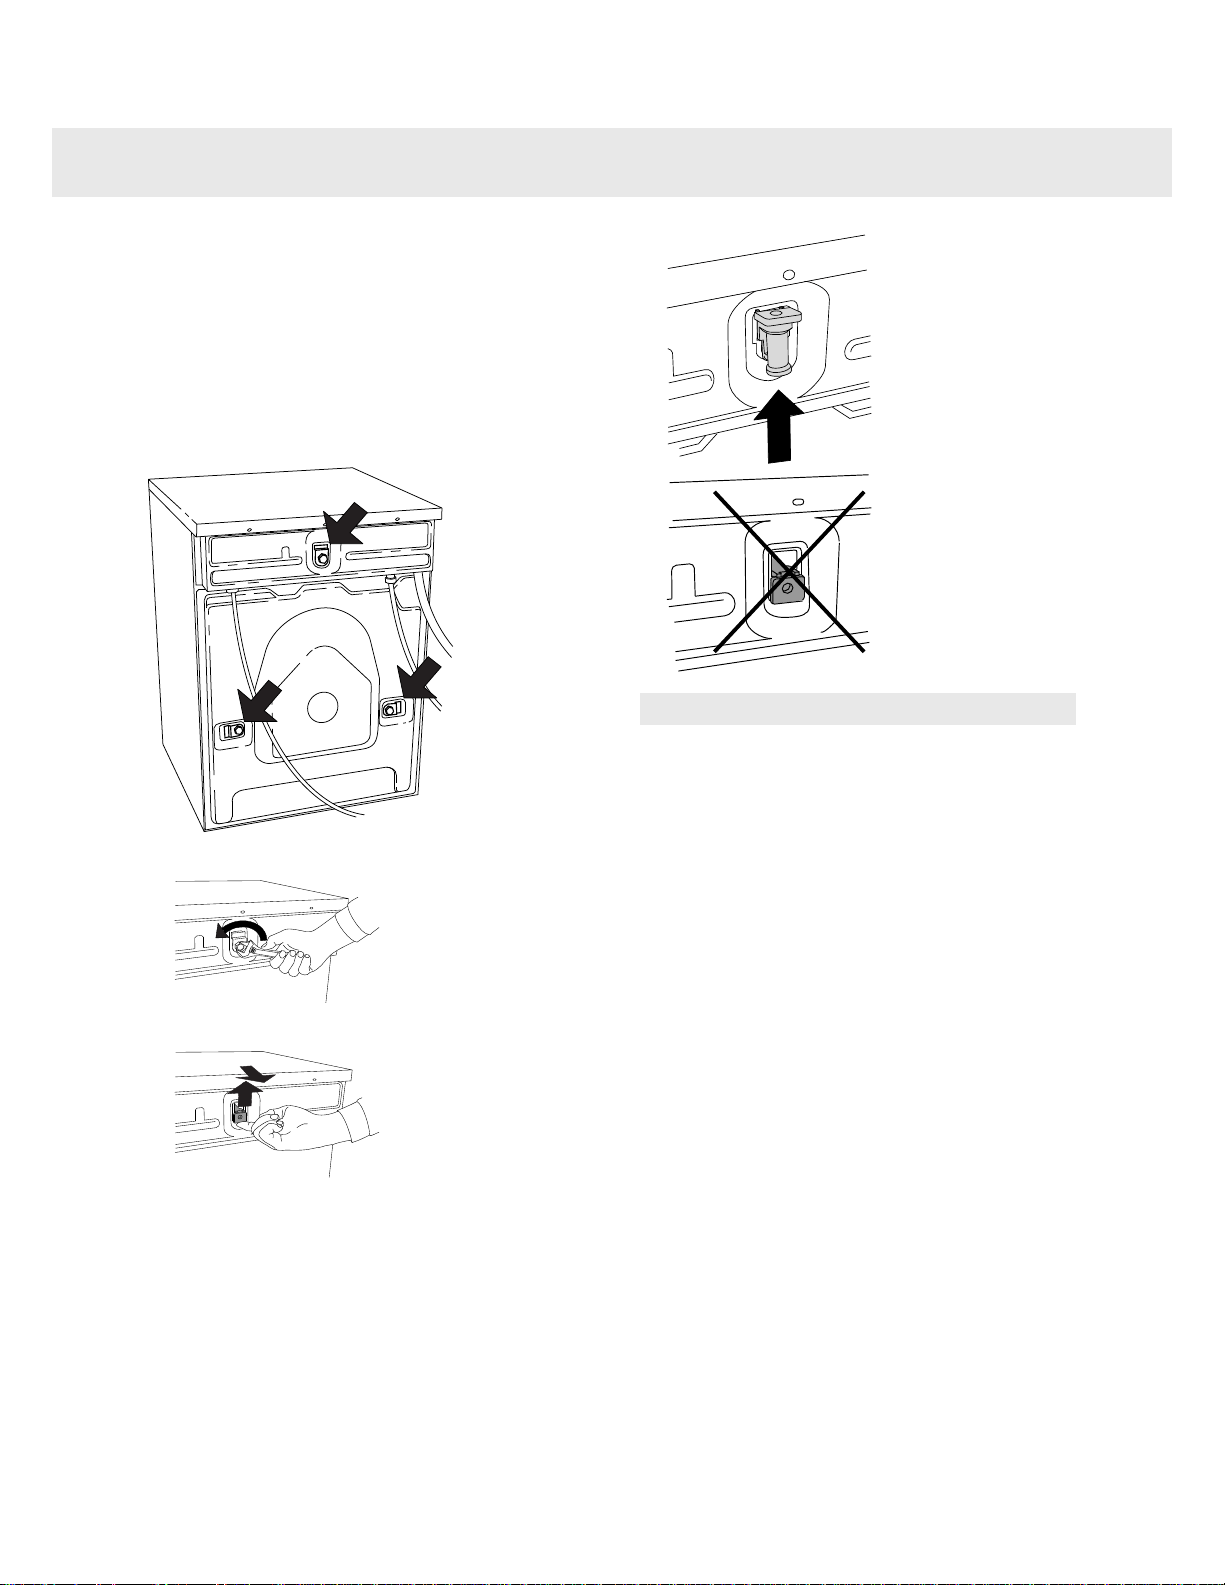
Before the machine is used, the three transport protection devices should be removed
as shown below.
Each transport protection device consists of
a screw, a washer, and a rubber spacer. After
the protection device has been removed, the
rubber spacer acts as a plug for the holes for
the device and also as a damper.
•
First remove the screws and the washers.
•
Then remove the rubber spacers.
2
1
•
Finally, the rubber spacers should be
turned over and replaced in the transport
protection device holes.
Important!
In order to prevent the machine from being
damaged when transported, use the transport
protection device, which locks the entire inner
compartment in place. If the transport protection device is missing, you can order one from
your retailer.
Item number:
8064206-UL Rubber spacer
8901037 Bolt
8061767 Washer
Order three of each item!
27Customer Care Center
1-800-898-1879
www.askousa.com
Transport protection
Page 28
Read these instructions carefully and completely before you install the machine. The
installation should be carried out by a qualified
person who is familiar with all local codes and
ordinances for electrical and plumbing connections.
Cosmetic damage must be reported to your
dealer within five days from the date of purchase. After unpacking the washer, thoroughly check the unit for cosmetic damage.
Leveling the machine
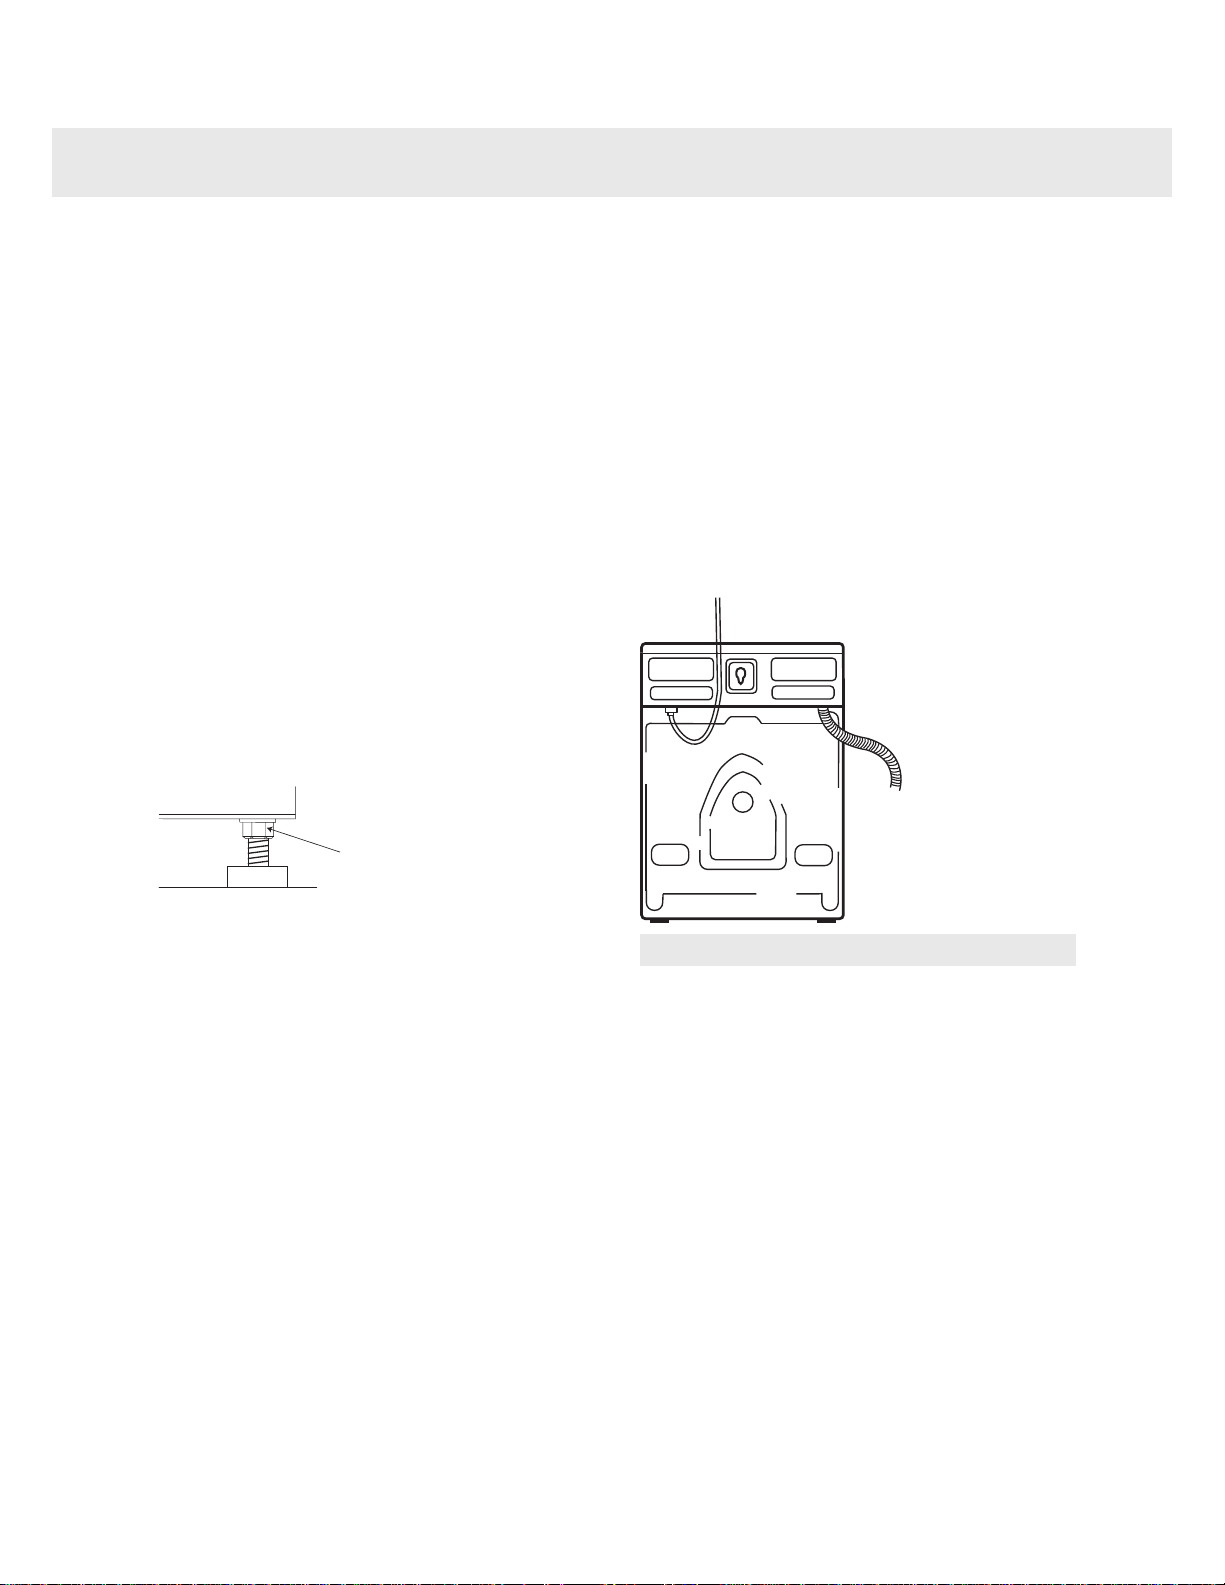
It is important that the machine is level to
prevent excessive vibrations during spin cycles. Each foot of the washer is adjustable,
so you can level the washer on any surface.
Once it is level, securely tighten the lock nuts
on the feet to prevent excessive vibration
during spin cycles.
Be sure to tighten the
lock nuts securely when
you level the machine.
Water supply connection
Since ASKO washers have a built-in heating
element, you only need a cold water inlet. The
connection should be made by someone who
is sufficiently skilled. Use the hose supplied
with the washer. (The inlet hose is marked for
correct connection.) The water pressure must
be in the range 15–146 PSI. A tap should be
fitted on the water supply pipe. If a new supply
pipe has been installed for the washer, it
should be flushed thoroughly to remove any
foreign particles that might clog the filter in
the water inlet.
Note!
If the unit is installed on a second storey, follow local building codes. We recommend installing a drip pan.
Customer Care Center28
1-800-898-1879
www.askousa.com
Installation instructions
Page 29
Drain outlet connection
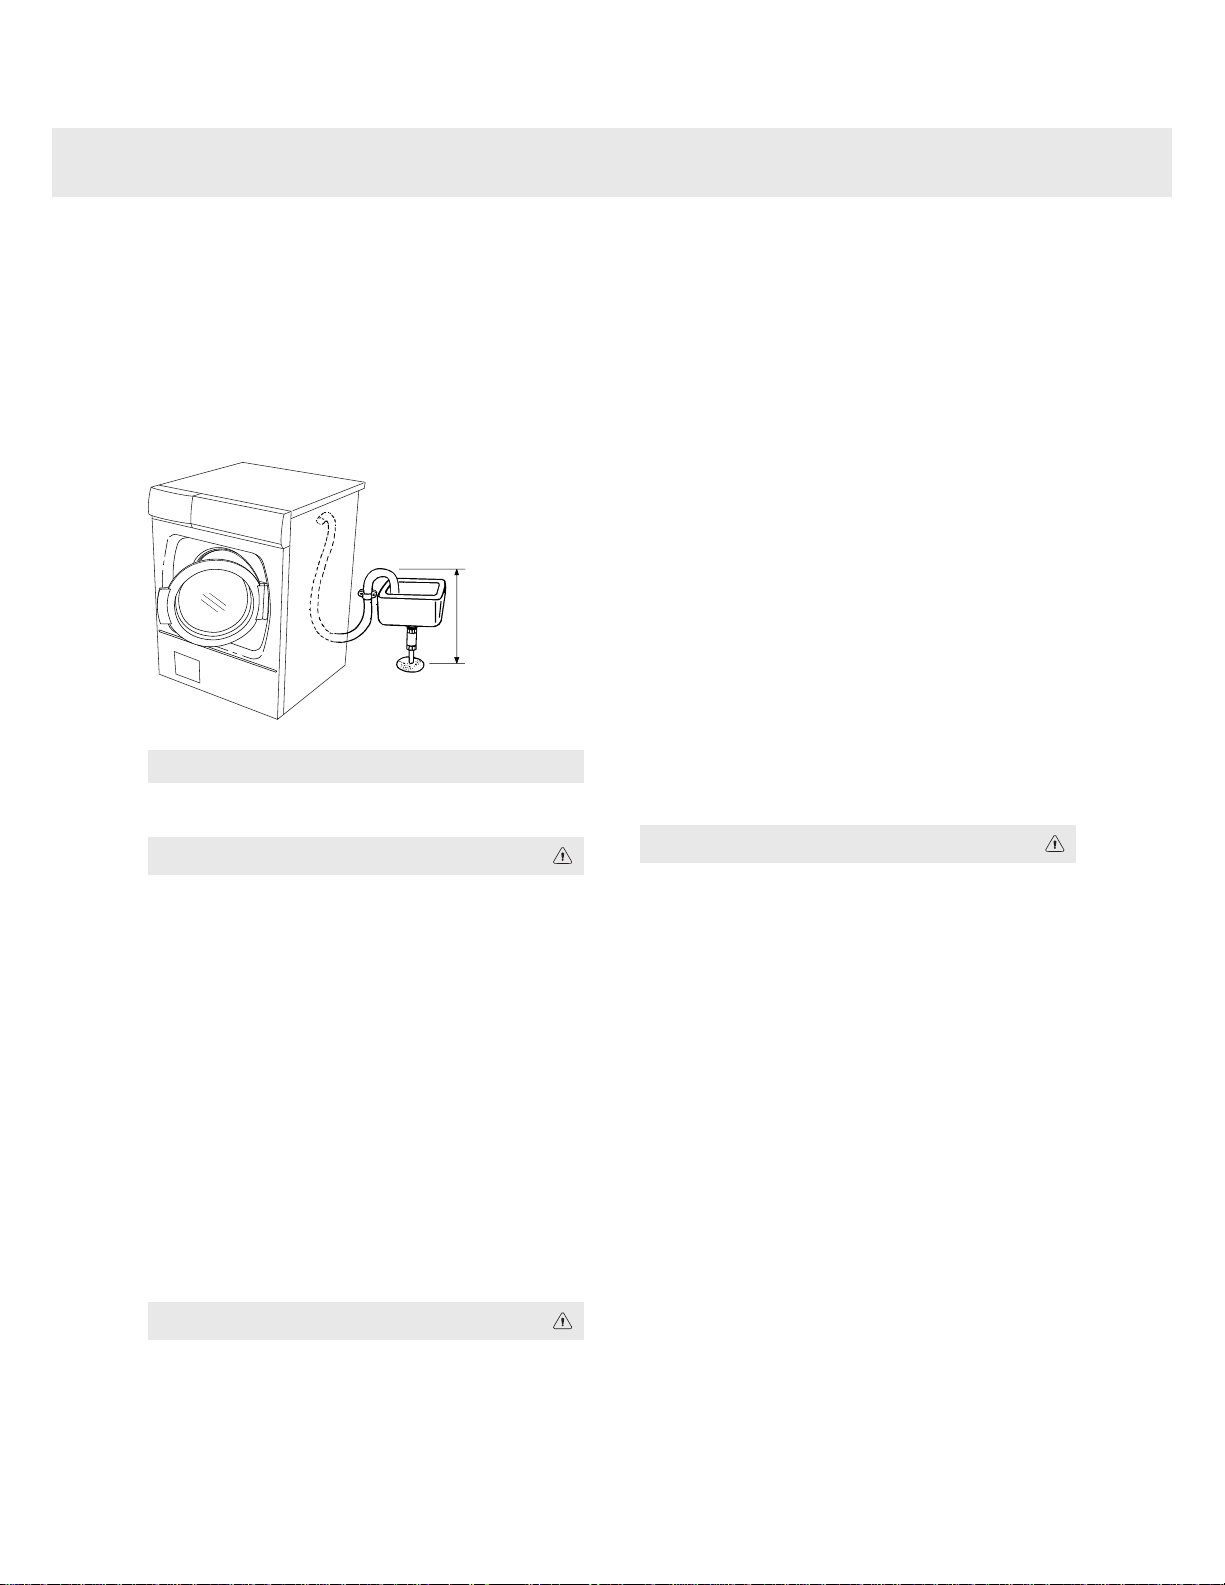
The machine is supplied with the outlet hose
already attached. The hose should be extended over a suitable sink edge or drain pipe at
a height of 24" to 36" (610 mm to 914 mm)
above the bottom of the unit. (The lower
height is preferable.) Make sure the hose is
not kinked.
24" to 36"
61 to 91 cm
Note!
If the hose is extended, the internal diameter
of the coupling must not be less than ½".
Warning!
Do not extend the drain hose higher than 36"
(914 mm) from the bottom of the unit.
Electrical Connections
The machine is delivered ready-fitted with a
plug and is intended for connection to an
ASKO Dryer, which is equipped with a
matching receptacle. The plug supplied with
the washer can only be used with an ASKO
Dryer. If the washer is used separately or with
another dryer, it must be on a separate 220
V single-phase circuit.If the machine is to be
used in a wet area, the supply must be protected by a residual current device.As supplied:
230 V, 60 Hz, 2000 W heating element,15 A
fuse required.
Warning!
Connection to a permanently wired supply
point must be made only by a qualified electrician
Grounding instructions
This appliance must be grounded. In the
event of malfunction or breakdown, grounding
will reduce the risk of electric shock by providing a path of least resistance for electric current. This appliance is equipped with a cord
having an equipment-grounding conductor
and a grounding plug. The plug must be
plugged into an appropriate outlet that is
properly installed and grounded in accordance with all local codes and ordinances.
Freestanding installation
The washer can be placed next to the dryer.
It is essential that the machine is leveled and
the locknuts are tightened to prevent excessive vibration during spin cycles. Also be sure
to leave a minimum of ½" of space between
the washer and the dryer. The height adjustment for the washer is 33½" to 34½" (850 mm
to 876 mm). Do not raise it higher than 34½"
(876 mm).
Warning!
Improper connection of the equipmentgrounding conductor can result in a risk of
electric shock. Check with a qualified electrician or serviceman if you are in doubt as to
whether the appliance is properly grounded.Do not modify the plug provided with the
appliance. If it will not fit the outlet, have a
proper outlet installed by a qualified electrician.
Stacked installation
ASKO washers should never be stacked on
a counter or a dryer. You can, however, stack
an ASKO dryer on an ASKO washer. Refer
to your Dryer Use and Care Guide for instructions on how to do this.
29Customer Care Center
1-800-898-1879
www.askousa.com
Installation instructions
Page 30
Built-in installation
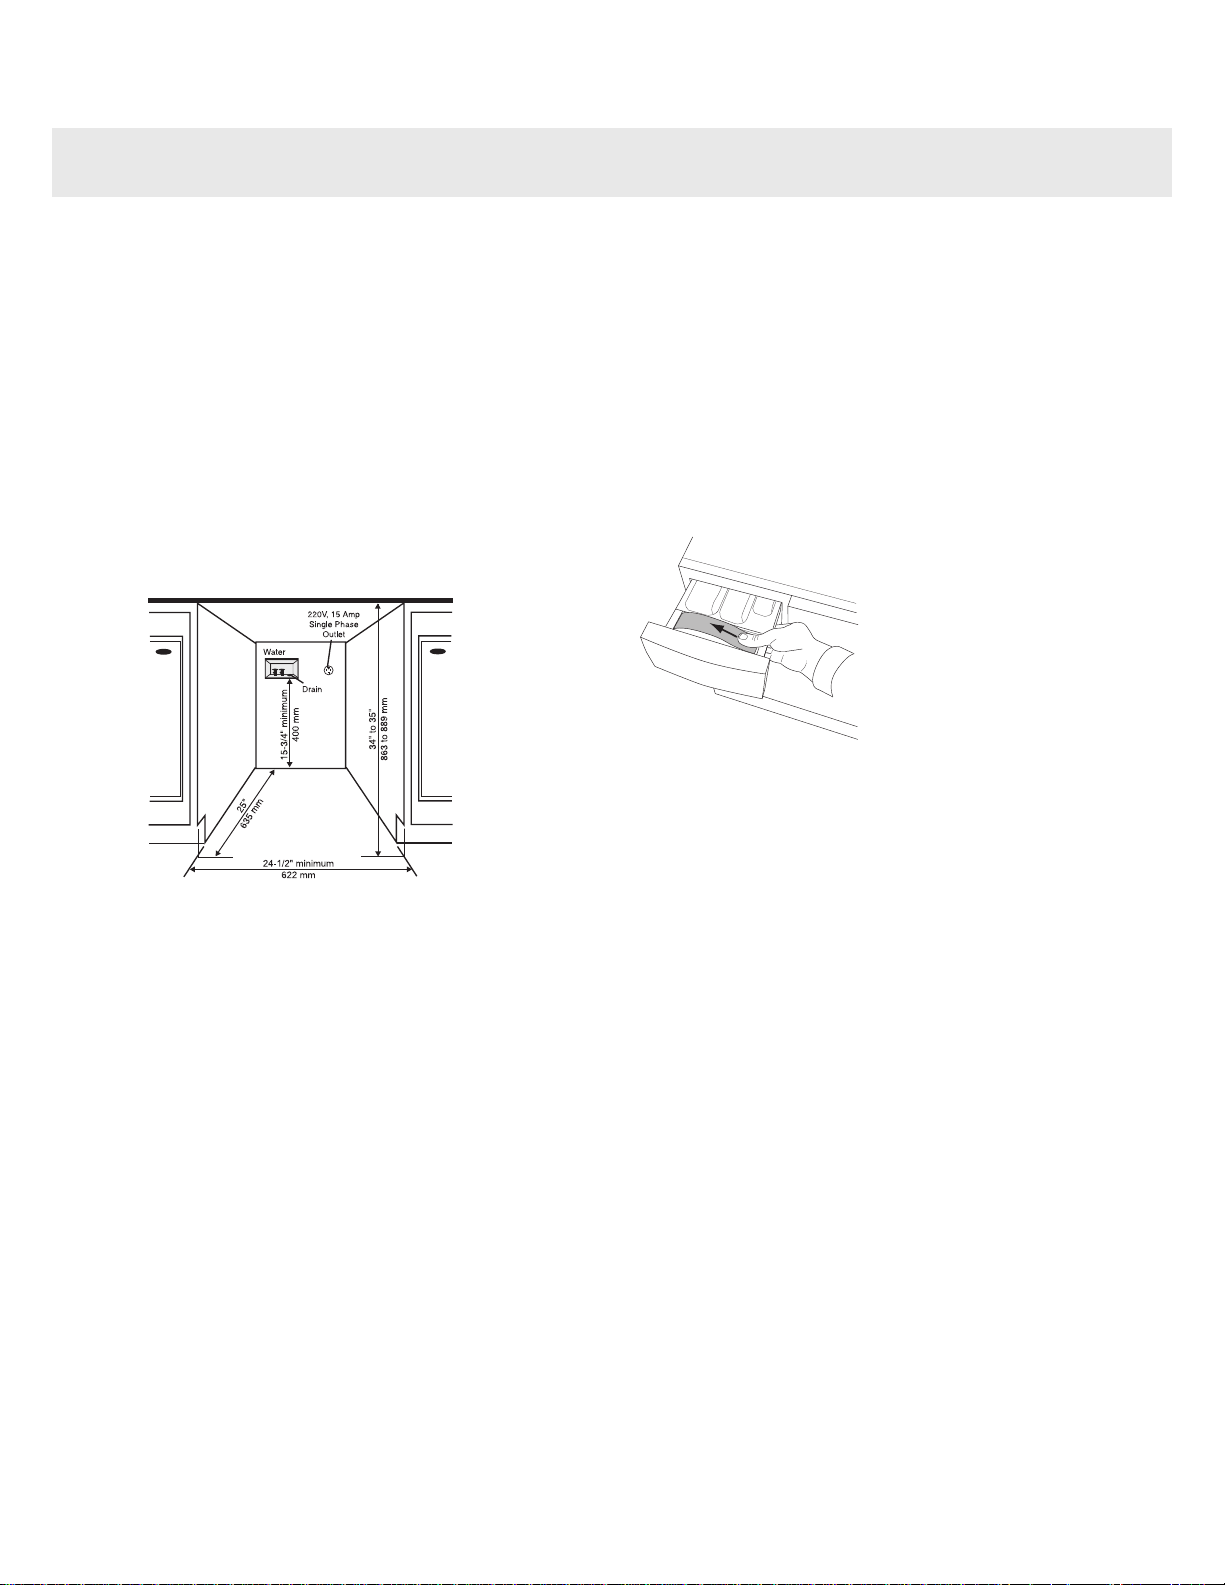
ASKO washers can be installed beneath a
cabinet or worktop with a height of 34½" (876
mm) or in a closet. There must be a gap of
about ½" (12 mm) all around the machine,
including between the rear edge of the machine's top panel and the back wall. The
opening width must be at least 24½" (622
mm). Space must also be available for the
inlet and drain hoses. See the illustration below for measurements and positions. If the
washer is installed in a closet the door shall
be opend while the washer is running.
If the drain outlet is higher than 24"(610 mm),
the connections will need to be recessed.
Program plate in multiple languages
Certain machines include double-sided program plates in different languages (see the
detergent compartment and the bag with the
user handbook that comes with the machine).
You can replace or reverse the card to show
the language most appropriate for you.
To remove the card from its holder in the detergent compartment, press the card with your
thumb and push it sideways (see illustration).
The card will then bend slightly and you can
easily remove it. To fit the card, bend it
slightly in order to easily insert it into the
holder in the detergent compartment.
Customer Care Center30
1-800-898-1879
www.askousa.com
Installation instructions
Page 31

It is important to register your product warranty by logging onto www.askousa.com/customercare/registration and filling out all required fields within 90 days from the date of purchase. After
doing so, you will be e-mailed a certificate that will extend the original warranty for one additional
year. If you do not have access to the internet, complete the warranty card included with the
product and mail it to the address on the warranty card within 90 days of the date of purchase.
Cosmetic damage must be reported to your dealer within five days from the date of purchase.
After unpacking the washer, thoroughly check the unit for cosmetic damage.
ASKO Appliances Inc. will pay for:For residential installations only
ASKO replacement parts and/or repair labor to
correct defect in materials or workmanship.
Service must be provided by an authorized
ASKO service agent.
Length of warranty Two-Year Full
From date of purchase.
ASKO replacement parts and/or repair labor to
correct defect in materials or workmanship.
Service must be performed by an authorized
ASKO service agent.
Third Year Full
Complete your product warranty registration
online at www.askousa.com/customercare/registration within 90 days from the date of purchase to extend the original warranty one additional year. If you do not have access to the internet, complete the warranty card included with
the product and mail it to the address on the
warranty card within 90 days of the date of purchase.
ASKO replacement parts (labor cost not included) for the stainless steel tank if it exhibits a
manufacturing defect such as cracking or rusting
through. Service must be provided by an authorized ASKO service agent.
Lifetime
ASKO replacement parts and/or repair labor to
correct defect in materials or workmanship.
Service must be provided by an authorized
ASKO service agent.
For non-residential installations One-year
Full Warranty
From date of purchase.
31Customer Care Center
1-800-898-1879
www.askousa.com
Service and guarantee
Page 32

Warranty
ASKO Appliances Inc. will not pay for:
Service calls to:
1.
Correct the installation of the appliance.
2.
Repair damage due to shipment, delivery,
installation, misuse or abuse.
3.
Instruct how to use the appliance.
4.
Replace house fuses or correct house
wiring.
5.
Correct house plumbing, including
drainage problems related to improper installation.
6.
Clean or service air device in drain line.
•
Repair and/or replacement parts for failure
of product if appliance is used for other
than home/residential use.
•
Damage resulting from accident, fire,
floods, acts of God, alteration, misuse,
abuse, improper installation, or installation
not in accordance with local electrical or
plumbing codes.
•
Any shipping costs for parts during the
limited warranty period.
•
Replacement parts or repair labor costs for
units operated outside the continental
United States.
•
Pickup and delivery. ASKO washers are
designed to be repaired in the home.
In no event shall ASKO Appliances Inc.
be responsible for any incidental or consequential damages.
Some states will not allow the exclusion or
limitation of incidental or consequential damages, so this exclusion or limitation may not
apply to you. This warranty gives you specific
legal rights and you may also have other
rights which vary from state to state.
For warranty service, contact our Customer Care Center at the number listed
below.
Before calling for service or contacting ASKO
Appliances Inc. regarding a warranty issue,
make a note of the model, type name, and
serial number.
How to contact the ASKO Appliances Inc.
Write to us at:
ASKO Appliances Inc.P. O. Box
851805Richardson, Texas 750851805www.askousa.com
Or contact our
Customer Care Center at1-800-8981879www.askousa.com
Customer Care Center32
1-800-898-1879
www.askousa.com
Service and guarantee
Page 33

33Customer Care Center
1-800-898-1879
www.askousa.com
Notes
Page 34

Customer Care Center34
1-800-898-1879
www.askousa.com
Notes
Page 35

35Customer Care Center
1-800-898-1879
www.askousa.com
Notes
Page 36

1
Washing
•
Empty pockets and close zippers.
•
Read the item’s laundry label.
•
Sorting laundry.
Note!
Place underwired bras in a laundry net.
2
Load the laundry
•
Pressing the main power switch.
•
If the door is closed, press the Door
Opening button (key symbol). The
red field lights up and the door opens
after a few seconds.
•
Load the laundry and close the door.
3
Detergent compartment
•
Pour detergent into the main wash
compartment, and pre-wash compartment as well if required. Pour fabric
softener into the compartment on the
right with the symbol.
•
If you use liquid detergent, follow the
detergent manufacturer’s recommendations.
•
If you use liquid detergent, use the
accompanying divider. Place it in the
filter at the back of the detergent
compartment. Pour detergent directly
into the main wash compartment.
4
Select the program
•
Select a program by turning the program selector.
•
Select options
•
Press the Start/Stop button.
5
Program finished
•
The washer door opens automatically
once the program has finished.
•
Remove the laundry.
•
Turn off the main power switch.
If you have small children or pets at home,
close the washer door once you have removed the laundry.
Item No.: 80 822 65. Rev. 04. We reser ve the right to make changes.
Printed on environmentally-friendly paper that meets the requirements of MIljöförbundet and Naturskyddsföreningen.
Customer Care Center36
1-800-898-1879
www.askousa.com
Quick guide
 Loading...