


INSTRUCTIONS FOR USE |
Tumble dryer |
TD75.B1 |
T208V.W.U |
|
Carefully read the instructions for use before using the dryer.

Dear Customer,
We thank you for purchasing this quality ASKO product.
We hope it meets all your expectations. Scandinavian design combines pure lines, everyday functionality, and high quality. These are the key characteristics of all our products, and the reason why they are highly appreciated across the globe.
We kindly recommend you to read these instructions before using the appliance for the first time. The instruction manual also includes information on how you can help protect the environment.
TABLE OF CONTENTS
Important safety instructions |
3 |
Dryer description |
7 |
Before using the appliance for the first time |
8 |
Installation and connection |
9 |
Tips before drying |
17 |
Drying process, step by step (1 – 7) |
20 |
System settings |
28 |
Cleaning and maintenance |
31 |
Errors – what to do? |
34 |
Service and guarantee |
38 |
Technical information |
41 |
Program table |
42 |
Disposal |
43 |
Quick guide |
44 |
The following symbols are used throughout the manual and they have the following meanings:
Information, advice, tip, or recommendation |
Warning – danger of hot surface |
Warning – general danger |
Warning – danger of fire |
Warning – danger of electric shock |
|
Original instructions |
See Quick guide on the last page. |
2 |
Customer Care Center, 1-800-898-1879, www.askousa.com |

IMPORTANT SAFETY INSTRUCTIONS
GENERAL
 SAVE THESE INSTRUCTIONS FOR FUTURE REFERENCE!
 WARNING - To reduce the risk of fire, electric shock, or injury to persons when using your appliance, follow basic precautions, including the following:
1.Read all instructions before using the appliance.
2. WARNING! - Only use the dryer to dry laundry that was washed with water. Do not dry any laundry that was washed or cleaned with flammable cleaners or substances (such as gasoline, trichloroethylene etc.) as this may result in an explosion.
3.Do not wash or dry articles that have been previously cleaned in, washed in, soaked in, or spotted with gasoline, dry-cleaning solvents, cooking oils, other flammable or explosive substances as they give o vapors that could ignite or explode.
4.Instructions for use are available on our website at www.askousa.com.
5.Your dryer is intended solely for household use.
6.Do not allow children to play on or in the appliance. Children should be closely supervised when near the appliance.
7.Before the appliance is removed from service or discarded, remove the door to the drying compartment.
8.Do not reach into the appliance if the drum is moving.
9.Do not install or store this appliance where it will be exposed to the weather.
10.Do not tamper with controls.
11.Do not attempt to repair or replace any part of the appliance or perform any servicing unless specifically recommended in this guide.
12.Do not use fabric softeners or dryer sheets unless the manufacturer gives written assurance that the product will not damage a tumble dryer.
13. WARNING! - Do not heat dry items containing vinyl, plastic, foam rubber or similarly textured rubberlike materials, fiberglass, or wool unless the label specifies “washable”.
14.Clean the lint filter before or after each load.
15.Keep the area around the exhaust opening and adjacent surrounding areas free from the accumulation of lint, dust and dirt.
16.The interior of the machine should be cleaned periodically by an authorized ASKO service agent.
17.Do not place items exposed to cooking oils in your dryer. Items contaminated with cooking oils may contribute to a chemical reaction that could cause a load to catch fire. To reduce the risk of fire due to
Customer Care Center, 1-800-898-1879, www.askousa.com |
3 |

contaminated loads, the final part of a tumble dryer cycle occurs without heat (cool down period). Avoid stopping a tumble dryer before the end of the drying cycle unless all items are quickly removed and spread out so that the heat is dissipated.
18.Clothes dryer installation must be performed by a qualified installer.
19.Do not install a clothes dryer with flexible plastic venting materials. If flexible metal (foil type) duct is installed, it must be of a specific type identified by the appliance manufacturer as suitable for use with clothes dryers. Flexible venting materials are known to collapse, be easily crushed, and trap lint. These conditions will obstruct clothes dryer airflow and increase the risk of fire.
20.As this is an evacuation dryer, it does not have a condensate tank. The handle has solely a decorative purpose and it fixed; it is not intended for opening. If excessive force is applied, the handle may break.
21.To reduce the risk of severe injury or death, follow all installation instructions.
22.Electrical installation, if required, must be done by a licensed electrician.
23.Do not operate appliance while away from the home.
24.Do not heat dry items that have been dry-cleaned.
25.The dryer is made and marked to facilitate recycling. When it is no longer useful, contact your local refuse collection service for advice on how to properly dispose of the dryer for purposes of recycling.
26.Damaged power cables should only be replaced by a certified professional.
27.Provide su cient ventilation, otherwise smoke from open fires or fumes from equipment burning other fuels can be drawn into the room.
28. CAUTION! - During the program, the back of the dryer will get very hot. Let the machine cool completely before touching the back.
29. WARNING! - This appliance must be properly grounded.
a) For a grounded, cord-connected appliance:
GROUNDING INSTRUCTIONS This appliance must be grounded.
In the event of malfunction or breakdown, grounding will reduce the risk of electric shock by providing a path of least resistance for electric current. This appliance (Canadian market only) is equipped with a cord having an equipment-grounding conductor and a grounding plug. The plug must be plugged into an appropriate outlet that is properly installed and grounded in accordance with all local codes and ordinances.
4 |
Customer Care Center, 1-800-898-1879, www.askousa.com |

 WARNING! - Improper connection of the equipment-grounding conductor can result in a risk of electric shock. Check with a qualified electrician or service representative or personnel if you are in doubt as to whether the appliance is properly grounded. Do not modify the plug provided with the appliance (Canadian market only). If it will not fit the outlet, have a proper outlet installed by a qualified electrician.
Use copper conductors only, if the terminal is acceptable only for connection to copper.
To reduce the risk of electric shock, disconnect this appliance from the power supply before attempting any user maintenance other than cleaning the
lint trap. Turning the controls to the OFF position does not disconnect this appliance from the power supply.
To reduce the risk of fire, this appliance must be exhausted outdoors or the equivalent. Do not exhaust into a chimney, wall, ceiling or concealed space in a building.
b) For a grounded, permanently connected appliance:
GROUNDING INSTRUCTIONS
This appliance must be connected to a grounded metal, permanent wiring system, or an equipment-grounding conductor must be run with the circuit conductors and connected to the equipment-grounding terminal or lead on the appliance.

 This manual does not cover every possible condition and situation that may occur. Use common sense and caution when installing, operating, and maintaining any appliance.
Customer Care Center, 1-800-898-1879, www.askousa.com |
5 |

KIDSAFE™ CHILD SAFETY
• WARNING! - Do not allow the children to play with the dryer.
•Prevent your children and pets to enter the dryer drum.
•Before closing the dryer door and running the program, make sure there is nothing except laundry in the drum (e.g. if a child climbed into the dryer drum and closed the door from the inside).
•Activate the child lock.
See chapter "SYSTEM SETTINGS", section Child Lock.
•Do not let children younger than three years to come near the dryer, unless they are under constant supervision.
•The dryer is made in compliance with all relevant safety standards. This dryer may be used by children aged 8 years and above and by persons with reduced physical, sensory or mental capabilities or lack of experience and knowledge, but only if they are supervised during the use of the appliance, if they have been provided relevant instructions regarding safe use of the dryer, and if they understand the hazards of inappropriate use. Make sure children do not play with the appliance. Make sure the children do not clean the dryer or perform any maintenance tasks without supervision.
SAVE THESE INSTRUCTIONS FOR FUTURE REFERENCE!
6 |
Customer Care Center, 1-800-898-1879, www.askousa.com |
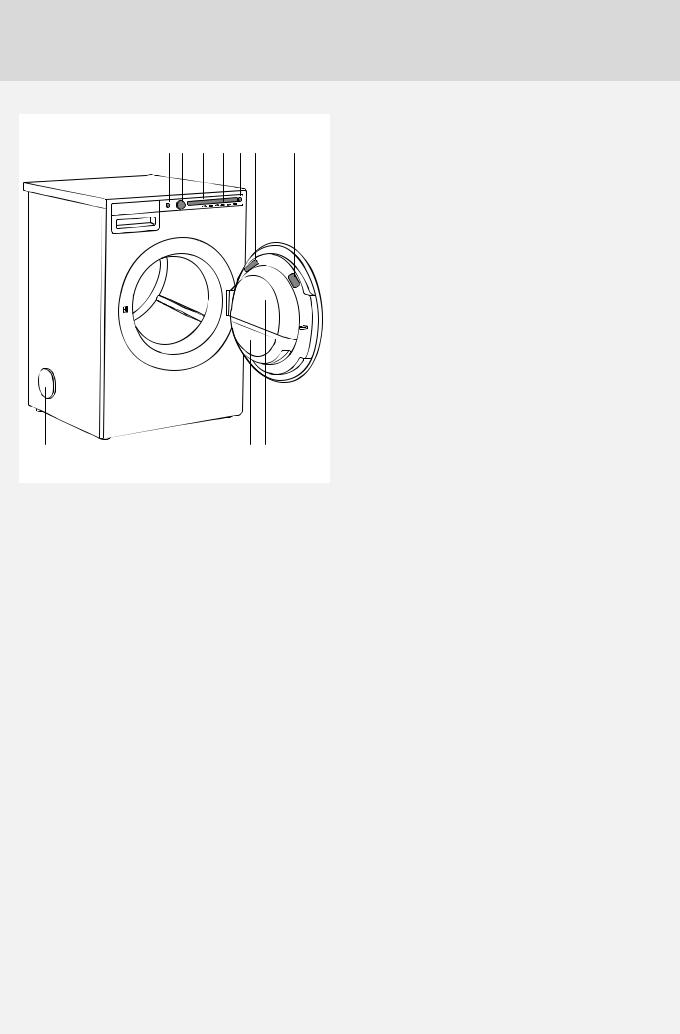
DRYER DESCRIPTION
1 2 3 4 5 6 |
7 |
1. |
Main switch (ON/OFF) |
|
2. |
Program selector knob |
|||
|
|
|
3. |
Display unit |
|
|
|
4. |
Program selector buttons |
|
|
|
5. |
Button (start/pause/stop) |
|
|
|
6. |
Rating plate with information about the dryer (on |
|
|
|
7. |
the inside of the dryer door) |
|
|
|
QR and AUID code (on the inside of the dryer |
|
|
|
|
8. |
door) |
|
|
|
Dryer door |
|
|
|
|
9. |
Net filter |
|
|
|
10. |
Air exhaust hose opening |
|
|
|
|
|
|
|
|
|
|
10 |
9 8 |
Customer Care Center, 1-800-898-1879, www.askousa.com |
7 |

BEFORE USING THE APPLIANCE FOR THE FIRST TIME
PACKAGING
Remove all packaging.
Please sort the materials in compliance with local recommendations (see chapter "DISPOSAL").
CLEANING
Disconnect the dryer from the power mains and open the door towards you. Clean the dryer drum with a damp cloth and a mild detergent.

 No program can be started while the door is open.
CHOOSING THE LANGUAGE
When the dryer is connected (see chapter "INSTALLATION AND CONNECTION") and switched on for the first time, choose the preferred language:
1.Press the button 2 or the program selector button to scroll the list of languages. Confirm your selection by pressing the OK button.
2.Press the "Finalize" button to confirm your selection.

 When you run the dryer for the first time, or if the dryer has been out of use for a long time, slight hitting noise may appear. This is normal and it will disappear after a few drying cycles.
8 |
Customer Care Center, 1-800-898-1879, www.askousa.com |

INSTALLATION AND CONNECTION
DRYER PLACEMENT
The dryer can be either free standing or installed onto a washing machine.
The dryer emits heat. Therefore, do not place it in a very small room, as the drying process may be longer due to limited amount of available air.

 Do not place the dryer in a room where temperature can drop below 0 °C, as the machine may not operate correctly at such low temperatures, or freeze, which in turn can result in damage to the machine.
Install the dryer in a room with adequate ventilation and a temperature between 15 °C and 25 °C.

 Do not place the dryer behind lockable or sliding door, or door with a hinge on the opposite side of the dryer door hinge. Install the dryer in such way that the door can always be freely opened.

 As this is an evacuation dryer, it does not have a condensate tank. The handle has solely a decorative purpose and it fixed; it is not intended for opening. If excessive force is applied, the handle may break.

 Never block the air exhaust (evacuation opening).

 At least two persons are required to install the tumble dryer on top of a washing machine.

 Do not place the dryer on a carpet with long fibres as this may impede air circulation.

 The appliance may not be in contact with a wall or adjacent furniture. For optimum dryer operation, observe the clearance from the wall as shown in Fig.
Free-standing appliance
The dryer may be placed adjacent to a washing machine.
If the friction between the dryer feet and the floor is not su cient, the dryer may move during operation. To prevent the dryer from sliding around, use a non-slip support or pad.
Clearance between the dryer and the wall
100 mm 
50 mm
100 mm
Opening the dryer door (top view)
480 mm |
1074 mm |
176°
Customer Care Center, 1-800-898-1879, www.askousa.com |
9 |
Stacking on top of a washing machine
To stack the dryer on top of a washing machine, use the extra vacuum feet and the tipping guard (A+B), supplied in the cardboard box in the dryer drum. Tipping guard part B is designed to fit on ASKO washing machines and it may be hard or impossible to mount on appliances of other brands. If the washing machine and dryer are not of matching dimensions or if you have installed a hidden helper between the two appliances, then binding plates are available as optional accessories at the service unit (… available only for HH and TD75 stacked on top of WM80 or WM85; not intended for any other combinations).
A
B
All ASKO washing machines can bear the weight of the dryer.

 Washing machine on which you wish to install the dryer must be able to bear the weight of the dryer (see washing machine’s rating plate or technical information).
10 |
Customer Care Center, 1-800-898-1879, www.askousa.com |

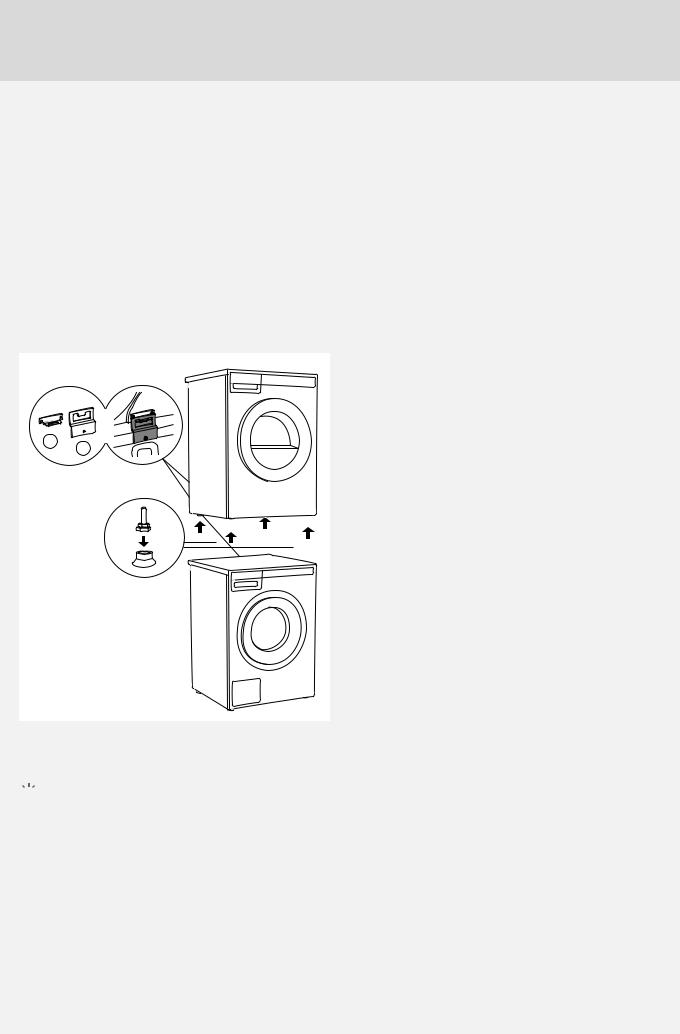
How to stack a dryer onto the washing machine (ASKO):
There is a cardboard box in the dryer drum, containing the vacuum feet and the tipping guard.
A B
1
2
3
1 The tipping guard consists of two metal parts (A + B).
Use two screws to attach the A part to the back of the dryer.
2 Undo the screw on the back side of the washing machine.
3 Use the screw to attach the tipping guard (B part) to the back of the washing machine.
4 Level the washing machine so that it is stable.
1.Level the washing machine in longitudinal and traverse direction by rotating the adjustable feet using a No. 32 spanner.
The feet allow levelling by +/- 1 cm.
2.After adjusting the height of the feet, firmly tighten the jam nuts (counter nuts) using a
spanner No 17, by turning them towards the bottom of the washing machine  .
.
3.Tighten the jam nuts (counter nuts).
1 |
5 |
Set the dryer feet: |
|
1. Tighten the front two feet all the way in. |
2.Undo the back feet by 3.5 turns or 5 mm; then, fasten the jam nuts towards the bottom of the
2 |
appliance . |
5 mm
1 |
3 |
2
6 Place the dryer onto the washing machine:
1.Lift the front part of the dryer by 5 to 10 cm.
2.Attach the vacuum feet onto the front feet of the dryer.
3.Push the dryer into the tipping guard (so that the B part is inserted into the A part) and release it (See figure on previous page).

 Make sure the tipping guard is "locked"!
Customer Care Center, 1-800-898-1879, www.askousa.com |
11 |

CHANGING THE DOOR OPENING DIRECTION
To change the direction of door opening, proceed as follows.
1 Open the door fully.
2 Undo the screws and remove the door.
3 Use the screwdriver to remove the door lock cover and undo the screw on the door lock.
4 Push the door lock upwards and remove it. Move it to the other side and push it downwards.
5 Fasten the screw on the door lock. Replace the door lock cover.
12 |
Customer Care Center, 1-800-898-1879, www.askousa.com |
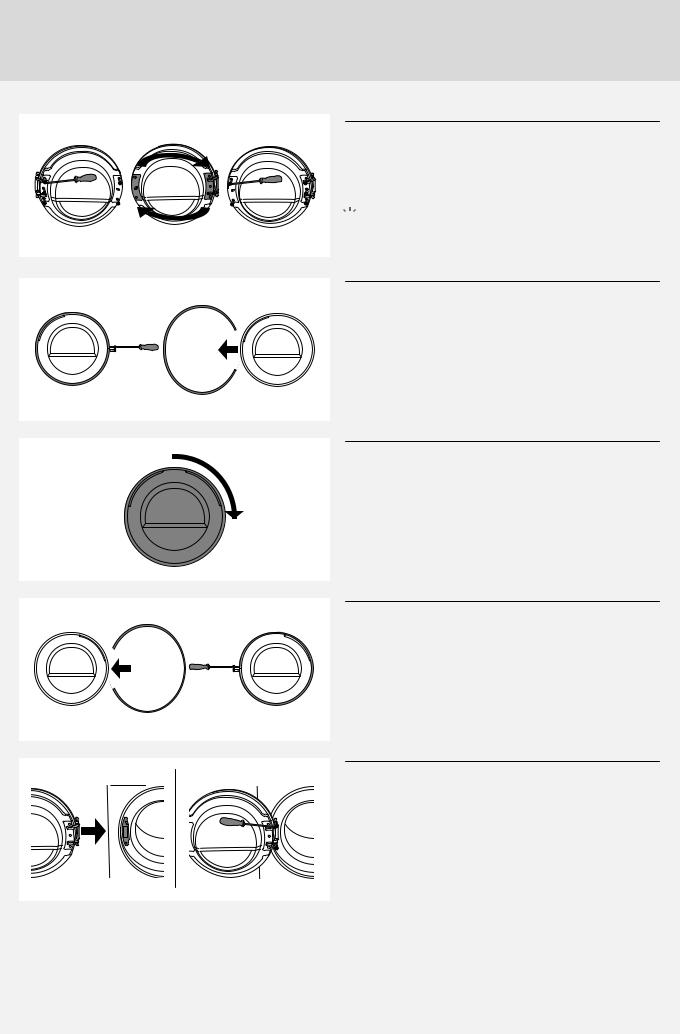
6 Undo the door hinge assembly (left) and the door latch assembly (right), switch their positions, and replace the screws (door hinge assembly to the righthand side, door latch assembly to the left-hand side).

 Use the screwdriver to remove the plastic part more easily.
7 Undo the door ring and remove it temporarily.
8 Rotate the door glass cover by 90°so that the sign indicating the opening of the door is on the other
side.
9 Rotate the door ring by 180°, install it onto the door, and fasten it with screws.
10 Replace the door on the door hinge and fasten the screws.
Customer Care Center, 1-800-898-1879, www.askousa.com |
13 |
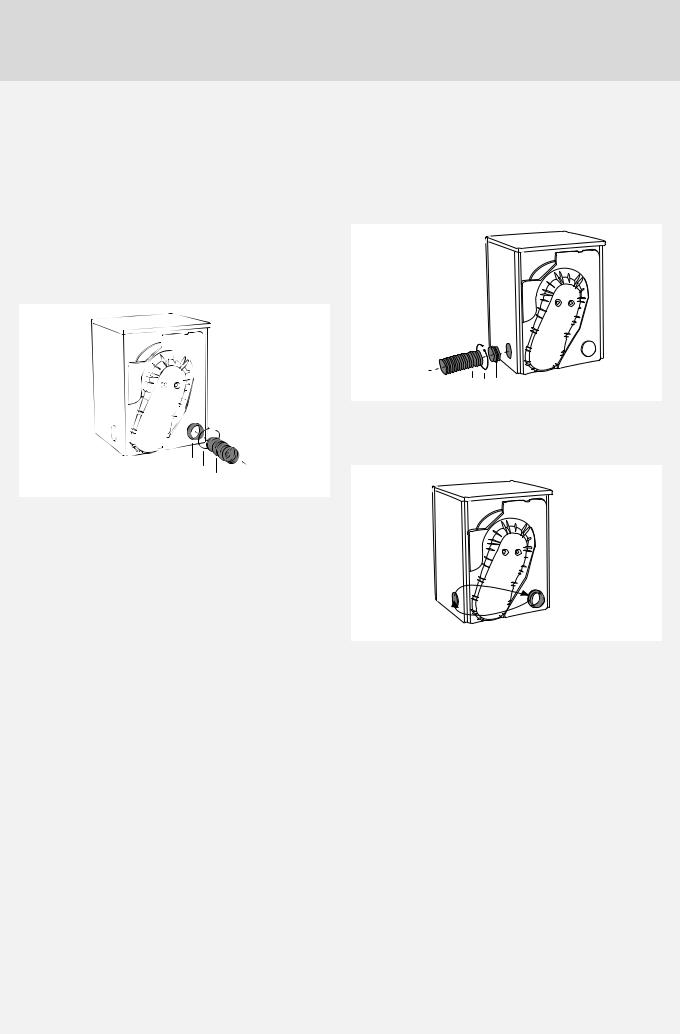
EVACUATION OF HUMID AIR
Use the supplied air exhaust hose to convey the humid air from the dryer is through an opening (ventilation system, window etc.).
Connecting the air exhaust hose to the dryer
The dryer allows three possibilities for air evacuation: on the rear, on the right, and on the left side. Upon delivery, the opening on the back is open and a connection fitting is installed on it (1).
1
2 3
Side openings are covered with two caps.
The machine comes supplied with an air exhaust hose (3) and two clamps (2).
Installation
Slip the exhaust hose (3) over the connection fitting
(1) and fasten it with a clamp (2).
Fitting the air exhaust hose to another opening
Instead of on the rear opening, the air exhaust hose can be fitted on one of the side openings.
•Move the connection fitting from the rear opening
(1) to the side opening. Then, connect the air exhaust hose and secure it with a clamp (2).
32 1
•Use a cap to close the opening on the back of the dryer.
14 |
Customer Care Center, 1-800-898-1879, www.askousa.com |

Connecting the air exhaust hose to a ventilation duct
The air exhaust hose should be routed in shortest and straightest possible way to the ventilation system opening (air evacuation duct). Use a clamp to attach the air exhaust hose to the ventilation opening. If the air exhaust hose is too long, cut it to length. The distance between the dryer and the air evacuation opening (ventilation opening, window) may not exceed 3 metres. Otherwise, moisture could accumulate in the air exhaust hose. All elbows should be at an angle that is equal to or smaller than 90°.

 Do not evacuate the air from the dryer through channels used for appliances or devices that use natural gas or other fuels for their operation.
Selecting the room
Place the appliance in a thoroughly ventilated room with a window or ventilation fan. If possible, connect the air exhaust hose so that it has no inclination, upwards (A) or downwards (C), but rather straight
(B).
 A
A
 B
B
 C
C
Extra equipment
If the air exhaust hose is connected to an opening in the wall, influx of cool air may be prevented by installing a ventilation grille.
If there is only one ventilation opening in the room, an air lock should be installed.
Air lock
This extra equipment can be purchased from your seller.

 Please avoid:
•excessively long ventilation systems,
•multiple elbows or turns of the air exhaust hose,
•sharp elbows or turns of the air exhaust hose, All three may reduce the ventilation system e ciency, extend the drying time, and increase power consumption.
 Risk of Fire.
A clothes dryer produces combustible lint. The dryer must be connected to an exhaust to the outdoors. Regularly inspect the outdoor exhaust opening and remove any accumulation of lint around the outdoor exhaust opening and in the surrounding area.
Customer Care Center, 1-800-898-1879, www.askousa.com |
15 |
 Loading...