


INSTRUCTIONS FOR USE |
Washing machine |
WM75.B |
W2084.W.U |
|
Carefully read the instructions for use before using the dryer.

Dear Customer,
We thank you for purchasing this quality ASKO product.
We hope it meets all your expectations. Scandinavian design combines pure lines, everyday functionality, and high quality. These are the key characteristics of all our products, and the reason why they are highly appreciated across the globe.
We kindly recommend you to read these instructions before using the appliance for the first time. The instruction manual also includes information on how you can help protect the environment.
TABLE OF CONTENTS
Important safety instructions |
3 |
Washing machine description |
7 |
Dispenser tray |
7 |
Before using the appliance for the first time |
8 |
Installation and connection |
10 |
Tips before washing |
15 |
Washing process, step by step (1 – 8) |
18 |
System settings |
30 |
Cleaning and maintenance |
33 |
Errors – what to do? |
37 |
Service |
42 |
Technical information |
45 |
Program table |
46 |
Disposal |
48 |
Quick guide |
51 |
The following symbols are used throughout the manual and they have the following meanings:
Information, advice, tip, or recommendation |
Warning – danger of hot surface |
Warning – general danger |
Warning – danger of fire |
Warning – danger of electric shock |
|
Original instructions |
See Quick guide on the last page. |
2 |
Customer Care Center, 1-800-898-1879, www.askousa.com |

IMPORTANT SAFETY INSTRUCTIONS
GENERAL
 SAVE THESE INSTRUCTIONS FOR FUTURE REFERENCE!
 To reduce the risk of fire, electric shock, or injury to persons when using your appliance, follow basic precautions, including the following:
•Read all instructions before using the appliance.
•Do not run appliance while you are out of the home.
•The appliance is intended exclusively for use in households.
• Do not wash or dry articles that have been previously cleaned in, washed in, soaked in, or spotted with gasoline, dry-cleaning solvents, cooking oils, or other flammable or explosive substances because they give o vapors that could ignite or explode.
•Use only detergents and softeners for machine wash. Manufacturer may not assume responsibility for any damage and eventual discolouring of gaskets and plastic components as a consequence of incorrect use of bleach and/or colouring agents.
• Never use detergents containing solvents, since there is a danger of creating toxic gasses which may damage the machine and result in ignition or explosion.
•Do not allow children to play on or in the appliance. Close supervision of children is necessary when the appliance is used near children.
•Before the appliance is removed from service or discarded, remove the door to the washing compartment.
•Do not reach into the appliance if the drum is moving.
•Do not install or store this appliance where it will be exposed to the weather.
•Do not tamper with controls.
•Do not repair or replace any part of the appliance or attempt any servicing unless specifically recommended in the user-repair instructions or in published user-repair instructions that you understand and have the skills to carry out.
•Do not add gasoline, dry-cleaning solvents, or other flammable or explosive substances to the wash water. These substances give o vapors that could ignite or explode.
• Under certain conditions, hydrogen gas may be produced in a hot water system that has not been used for 2 weeks or more. HYDROGEN GAS IS EXPLOSIVE. If the hot water system has not been used for such a period, before using a washing machine or combination washer-dryer, turn on all water faucets and let the water flow from each for several minutes. This will release any accumulated hydrogen gas. As the gas is flammable, do not smoke or use an open flame during this time.
Customer Care Center, 1-800-898-1879, www.askousa.com |
3 |

 This appliance must be properly grounded. This manual does not cover every possible condition and situation that may occur. Use common sense and caution when installing, operating, and maintaining any appliance.
GROUNDING INSTRUCTIONS
A) Grounding instructions for a grounded, cord-connected appliance:
In the event of malfunction or breakdown, grounding will reduce the risk of electric shock by providing a path of least resistance for electric current. This appliance is equipped with a cord having an equipment-grounding conductor and a grounding plug. The plug must be plugged into an appropriate outlet that is properly installed and grounded in accordance with all local codes and ordinances.
 Improper connection of the equipment-grounding conductor can result in a risk of electric shock. Check with a qualified electrician or service representative or personnel if you are in doubt as to whether the appliance is properly grounded.
 Do not modify the plug provided with the appliance.
 If it will not fit the outlet, have a proper outlet installed by a qualified electrician.
B) Grounding instructions for a permanently connected appliance:
This appliance must be connected to a grounded metal, permanent wiring system, or an equipment-grounding conductor must be run with the circuit conductors and connected to the equipment-grounding terminal or lead on the appliance.


 This manual does not cover every possible condition and situation that may occur. Use common sense and caution when installing, operating, and maintaining any appliance.
4 |
Customer Care Center, 1-800-898-1879, www.askousa.com |

KIDSAFE™ CHILD SAFETY
Keep an eye on children!
• Laundry detergents are corrosive, so always keep them out of reach of children.
• Should a child swallow detergent, give plenty to drink immediately, i.e., one or two glasses of milk or water. Do not try to induce vomiting. Seek medical advice immediately: The National Poison center phone number is 1-800-222-1222.
• Always close the door and start the appliance as soon as you put in the detergent.
• Always turn the power o to the machine when it is not in use.
• Always keep small children away from the machine when it is open. There may be some detergent residue left inside the machine.
• If laundry detergent gets in someone’s eyes, rinse them with plenty of water for at least 15 minutes.
•Do not allow small children to play with the washing machine.
•Before closing the washing machine door and running the program, make sure there is nothing except laundry in the drum (e.g. if a child climbed into the washing machine drum and closed the door from the inside).
•Keep the detergent and conditioner out of reach of children.
•Activate the child lock. See chapter "SYSTEM SETTINGS, section Child Lock".
•Do not let children younger than three years to come near the appliance, unless they are under constant supervision.
•The washing machine is made in compliance with all relevant safety standards. This washing machine may be used by children aged 8 years and above and by persons with reduced physical, sensory or mental capabilities or lack of experience and knowledge, but only if they are supervised during the use of the appliance, if they have been provided relevant instructions regarding safe use of the washing machine, and if they understand the hazards of inappropriate use. Make sure children do not play with the appliance. Make sure the children do not clean the washing machine or perform any maintenance tasks without supervision.
DANGER OF HOT SURFACE 
•At higher washing temperatures, the door glass will heat up. Be careful to avoid burns. Make sure children do not play near the door glass.
Customer Care Center, 1-800-898-1879, www.askousa.com |
5 |

WATER OVERFLOW PROTECTION 
•If the water level in the appliance rises above the normal level, then the excessive water level protection will be activated. It will shut o the water supply and start pumping out the water. If the water level does not decrease in 60 seconds, the program will be interrupted (see chapter "ERRORS – WHAT TO DO?").
TRANSPORTING / STORAGE DURING THE WINTER
If you transport or store the appliance in vehicles or rooms that are not heated and where the temperature could drop to below freezing point, please do the following:
•Clean the drain pump filter. See chapter "CLEANING AND MAINTENANCE".
•Close the water supply to the washing machine, undo the water supply hose from the water supply tap, and wait until the water flows out of the tap and the hose.
•After the drain pump filter is emptied, there can still be a small amount of water in the machine. This, however, does not a ect the quality and will not damage the appliance.
•If the washing machine is to be transported, transport protection has to be re-installed before transport (See chapter BEFORE USING THE APPLIANCE FOR THE FIRST TIME).
SAVE THESE INSTRUCTIONS FOR FUTURE REFERENCE!
6 |
Customer Care Center, 1-800-898-1879, www.askousa.com |
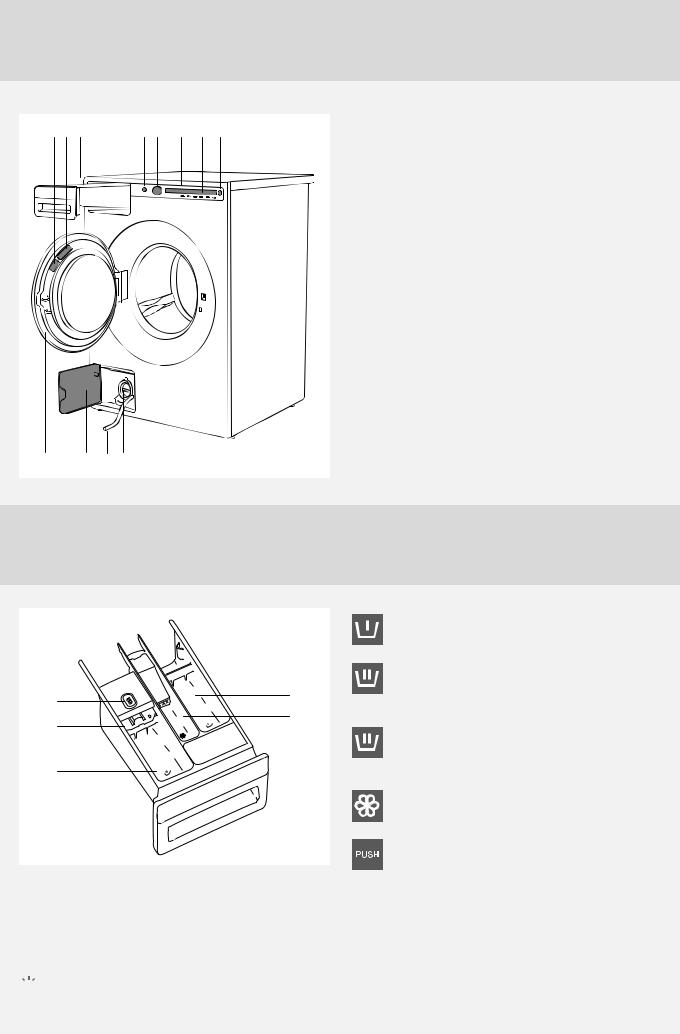
WASHING MACHINE DESCRIPTION
8 7 6 |
1 2 3 4 5 |
1. |
Main switch (ON/OFF) |
|
|
2. |
Program selector knob |
|
|
3. |
Display unit |
|
|
4. |
Program settings buttons |
|
|
5. |
Button (start/pause/stop) |
|
|
6. |
Dispenser tray |
|
|
7. |
Rating plate with information about the washing |
|
|
|
machine (on the inside of the washing machine |
|
|
8. |
door) |
|
|
QR and AUID code (on the inside of the washing |
|
|
|
9. |
machine door) |
|
|
Washing machine door |
|
|
|
10. |
Drain filter cover |
|
|
11. |
Water release hose |
|
|
12. |
Drain filter pump (installed behind the drain |
|
|
|
pump filter) |
9 10 11 12
DISPENSER TRAY
|
1. |
Prewash compartment |
|
|
2. |
Compartment for main wash liquid |
|
5 |
1 |
detergent. |
|
Use the barrier (3). |
|||
3 |
4 |
Compartment for main wash powder |
|
2. |
|||
|
|
detergent. |
|
2 |
|
Do not use the barrier (3). |
|
4. |
Softener / conditioner compartment |
||
|
|||
|
5. |
Tab for dispenser tray removal |
The detergent drawer automatically dispenses the detergent and fabric softener at the appropriate times. Simply pour the measured amounts of detergent and softener into the proper compartments (as illustrated) and close the drawer.

 To avoid oversudsing, do not put detergent in the prewash compartment unless you are using one of the Heavy wash programs which has a prewash cycle.
Customer Care Center, 1-800-898-1879, www.askousa.com |
7 |

BEFORE USING THE APPLIANCE FOR THE FIRST TIME
PACKAGING
Remove all packaging.
Please sort the materials in compliance with local recommendations (see chapter ”DISPOSAL”).
TRANSPORT PROTECTION
Before using the appliance, remove the three transport bolts and plastic plugs which protect the appliance during transport.
1 Release and remove the bolts as shown in the figures.
2 To remove the plastic plugs holding the bolts, squeeze them and then pull them out.
1 |
2 |
3 |
Remove the caps from the plastic plugs. Push |
3 the caps over the three holes in which the plastic |
plugs were inserted. Save the plastic plugs if you have to transport your washing machine in the future.

 If you wish to transport the washing machine, reinstall the bolts and plastic caps to lock the machine. This will prevent any damage to the machine due to vibrations during transport. If you have lost the transport bolts or plastic caps, replacements can be ordered at your dealer.
Art. No. |
ID: |
270698 |
Bolt |
551188 |
Plastic cap (transport lock) |
Please order three pieces of each item!
8 |
Customer Care Center, 1-800-898-1879, www.askousa.com |
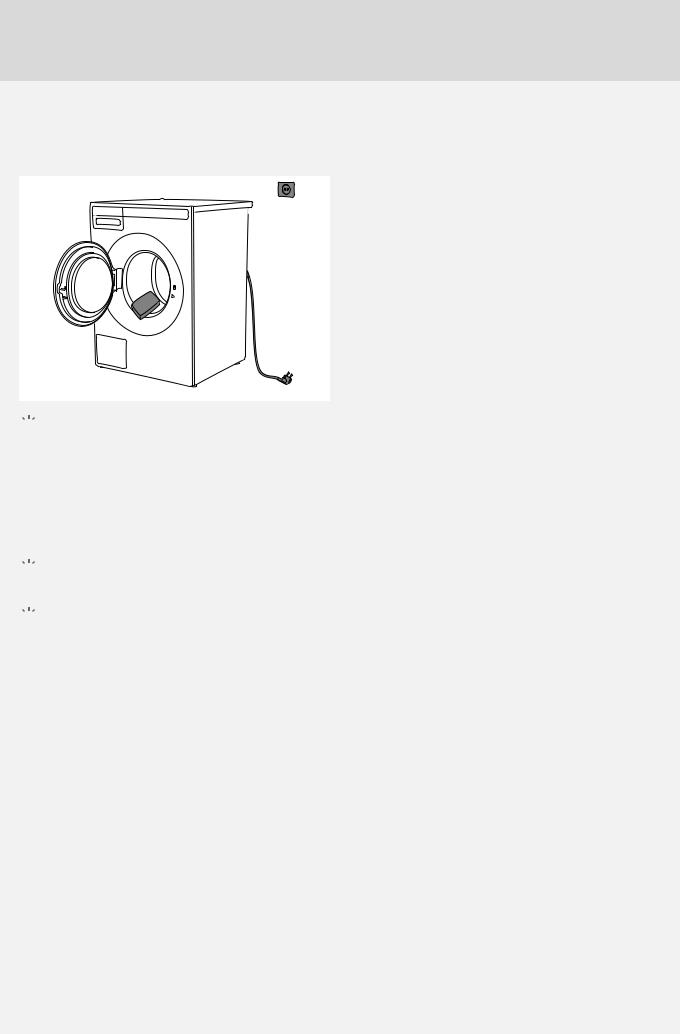
CLEANING
Disconnect the washing machine from the power mains and open the door. Clean the washing machine drum with a damp cloth and a mild detergent.

 No program can be started while the door is open.
SETTINGS BEFORE FIRST USE
After connecting the washing machine and running it for the first time, choose the following:
Language selection
Press the button 2 or the program selector knob to scroll the list of languages. Confirm your selection by pressing the OK button.

 The amount of detergent depends on the hardness of water. For details, see the detergent packaging. Please contact your local water supply company to check the water hardness in your area.

 Before it dispatched from the factory, every appliance is tested.
As a result, there may be some residual water left in the drain pump filter. This, however, does not a ect the quality and will not damage the appliance.
Customer Care Center, 1-800-898-1879, www.askousa.com |
9 |
INSTALLATION AND CONNECTION
POSITIONING THE WASHING MACHINE
Read these instructions carefully and completely before you install the machine. The installation should be carried out by a qualified person who is familiar with all local codes and ordinances for electrical and plumbing connections.
Cosmetic damage must be reported to your dealer within five days from the date of purchase. After unpacking the washer, thoroughly check the unit for cosmetic damage.
The washing machine can be installed as a builtin (integrated) or a free-standing unit. Place the machine on a level surface so that the power outlet on the wall is accessible.

 Before connecting the washing machine to the power mains, wait for at least 2 hours until it reaches room temperature.
Grounding instructions
This appliance must be grounded. In the event of malfunction or breakdown, grounding will reduce the risk of electric shock by providing a path of least resistance for electric current. This appliance is equipped with a cord having an equipment-
grounding conductor and a grounding plug. The plug must be plugged into an appropriate outlet that is properly installed and grounded in accordance with all local codes and ordinances.
Freestanding installation
The washer can be placed next to the dryer. It is essential that the machine is leveled and the
locknuts are tightened to prevent excessive vibration during spin cycles. Also be sure to leave a minimum of ½" of space between the washer and the dryer.
The height adjustment for the washer is 35½" to 37½" (900 mm to 950 mm). Do not raise it higher than 34½" (876 mm).
 Improper connection of the equipmentgrounding conductor can result in a risk of electric shock. Check with a qualified electrician or serviceman if you are in doubt as to whether the appliance is properly grounded.
Do not modify the plug provided with the appliance. If it will not fit the outlet, have a proper outlet installed by a qualified electrician.
Clearances around the washing machine
 min. 50 mm
min. 50 mm
min. 50 mm
Opening the washing machine door (top view)
978mm |
480mm |
|
110° |
Stacked installation
ASKO washers should never be stacked on a counter or a dryer. You can, however, stack an ASKO dryer on an ASKO washer. Refer to your Dryer Use and Care Guide for instructions on how to do this.
Stacking an ASKO dryer on top of an ASKO washing machine
To stack an ASKO dryer on top of a washing machine, use the extra vacuum feet and the tipping guard (A+B), supplied in the cardboard box in the ASKO dryer drum. If the washing machine and dryer are not of matching dimensions or if you
10 |
Customer Care Center, 1-800-898-1879, www.askousa.com |

have installed a hidden helper between the two appliances, then binding plates are available as optional accessories at the service unit.
A B
Built-in installation
ASKO washers can be installed beneath a cabinet or worktop with a height of 34” to 35” (863 to 889 mm) or in a closet. There must be a gap of about ½” (12 mm) all around the machine, including between the rear edge of the machine’s top panel and the back wall. The opening width must be at least 24½” (622 mm). Space must also be available for the fi ll and drain hoses. See the illustration below for measurements and positions. If the washer is
installed in a closet the door must be left open while the washer is running.
ADJUSTING THE FEET
Place the washing machine so that it is stable.
It is important that the machine is level to prevent excessive vibrations during spin cycles. Each foot of the washer is adjustable, so you can level the washer on any surface. Once it is level, securely tighten the lock nuts on the feet to prevent excessive vibration during spin cycles.
1.Level the washing machine in longitudinal and traverse direction by rotating the adjustable feet. The feet allow levelling by +/- 1 cm.
2.When the appropriate height of feet is set, use the
wrench No. 17 to firmly fasten the counter-nuts towards the bottom of the appliance  .
.
3.Tighten the jam nuts (counter nuts) to the end position.
This will reduce washing machine noise to minimum.
1
2
3
622 mm
If the drain outlet is higher than 24"(610 mm), the connections will need to be recessed.
Customer Care Center, 1-800-898-1879, www.askousa.com |
11 |
CONNECTING TO WATER SUPPLY

 The machine has to be connected to water supply by an adequately trained person.
Since ASKO washers have a built-in heating element, you only need a cold water inlet. The connection should be made by someone who is su ciently skilled. Use the hose supplied with the washer. (The inlet hose is marked for correct connection.) The water pressure must be in the range 15–146 PSI. A valve should be fitted on the water supply pipe. If a new supply pipe has been installed for the washer, it should be flushed
thoroughly to remove any foreign particles that might clog the filter in the fill valve.
The water intake hose has to be fastened firmly enough for the hose to have a good seal.
After connecting the hose, the seal must be checked for any leaks.
Only use the water supply hose supplied with the appliance. Do not use any used or other hoses.

 If the unit is installed on a second storey, follow local building codes. We recommend installing a drip pan.
CONNECTING TO HOT/COLD WATER SUPPLY
(Only in some models)
If your appliance has connections for both hot and cold water, then connect one hose to the cold water connection and the other hose to the hot water connection, as indicated on the back of the appliance:
COLD = cold and HOT = hot.
Hot water is supplied for programs operating at WARM or more.

 Connecting to both hot and cold water will save time and electric energy when washing.
If your washing machine model has connections for both hot and cold water, and you only wish to
connect cold water, then the protective cap has to be (or remain) attached to toe hot water connection.
Hot water connection
(Depending on model)
A few seconds after you start a program, the washing machine will begin to fill with water from the hot and cold supplies. If for some reason no hot water is available, the machine waits for one minute and then fills with cold water only. The wash drum does not start to rotate until it begins to fill with water. Read these instructions carefully and completely before you install the machine. The installation should be carried out by a qualified person who
is familiar with all local codes and ordinances for electrical and plumbing connections.
Cosmetic damage must be reported to your dealer within five days from the date of purchase. After unpacking the washer, thoroughly check the unit for cosmetic damage.
12 |
Customer Care Center, 1-800-898-1879, www.askousa.com |

|
|
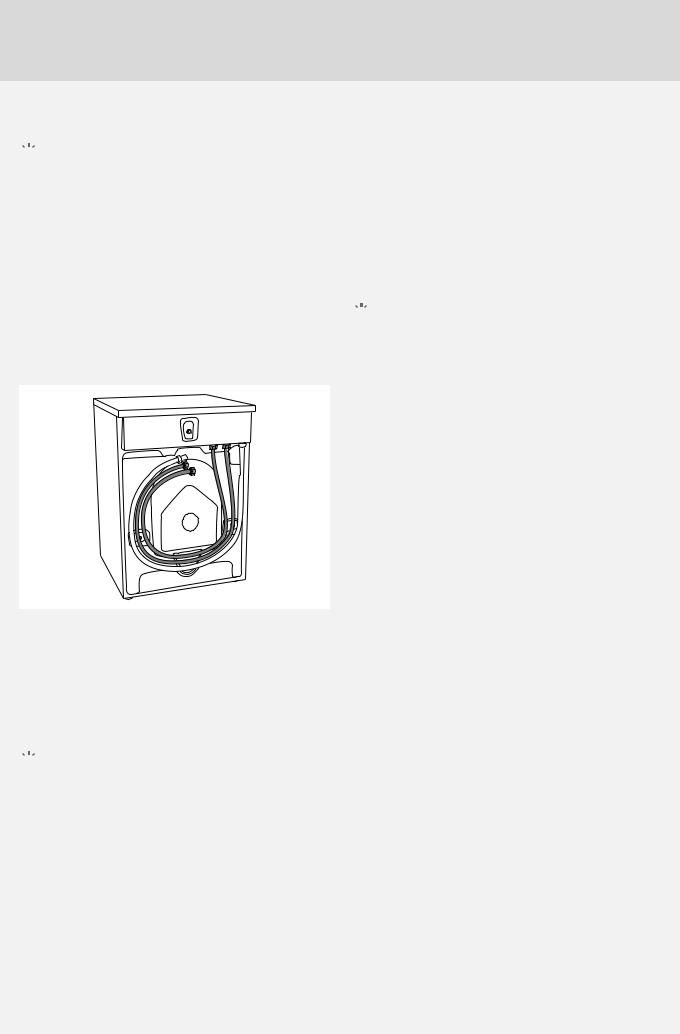
INSTALLING THE DRAIN HOSE |
Drain hose can also be connected directly to the |
|
washbasin drain via a siphon. In this case, the hose, |
|
too, should be 24" to 36" mm above the floor. Internal |
|
hose diameter should be at least 18 mm. |
|
See figure. |
At least 18 mm
The machine is supplied with the outlet hose already attached. The hose should be extended over a suitable sink edge or drain pipe at a height of 24"
to 36" (610 mm to 914 mm) above the bottom of the unit. (The lower height is preferable.) Make sure the hose is not kinked.
 If the hose is extended, the internal diameter of the coupling must not be less than ½".
 Do not extend the drain hose higher than 36” (914 mm) from the bottom of the unit.
A
C
B
24" to 36" |
24" to 36" |
24" to 36" |
Customer Care Center, 1-800-898-1879, www.askousa.com |
13 |

CONNECTING TO THE POWER MAINS
 After installation, the washing machine should stand still for two hours before it is connected to the power mains.
Connect the appliance to an earthed power outlet. After installation, the wall outlet should be freely accessible. The outlet should be fitted with an earth contact (in compliance with the relevant regulations).
Electrical Connections
The machine is delivered ready-fi tted with a plug and is intended for connection to an ASKO Dryer, which is equipped with a matching receptacle. The plug supplied with the washer can only be used with an ASKO Dryer. If the washer is used separately or with another dryer, it must be on a separate 208-240 V single-phase circuit.
If the machine is to be used in a wet area, the supply must be protected by a residual current device.
As supplied: 208-240 V, 60 Hz, 2000W heating element, 15A fuse required.
 Connection to a permanently wired supply point must be made only by a qualifi ed electrician.
Connection upon delivery
TYPE: WMXX.XXXXX MODEL: XXXXXX.X
Art.No.: XXXXXX/XX Ser.No.: XXXXXXXX
X kg
XXX-XXX V ~ XXXX W  XXA
XXA
IPX4 XX Hz 
 XX-X MPa
Information about your washing machine is indicated on the rating (type) plate.
Use the type A di erential current protection switch.
 We recommend using over-voltage protection to protect the appliance in case of a lightning strike.
 The washing machine may not be connected to the power mains using an extension cord.


 Do not connect the washing machine to an electrical outlet intended for an electric shaver or hair dryer.


 Any repair and maintenance pertaining to safety or performance should be done by trained experts.

 To reduce the risk of fire, electric shock, or injury to persons, read the chapter "IMPORTANT SAFETY INSTRUCTIONS" before operating this appliance.
14 |
Customer Care Center, 1-800-898-1879, www.askousa.com |
TIPS BEFORE WASHING
This chapter includes several tips on how to prepare the laundry for washing.
LAUNDRY SORTING
Sort the laundry according to:
•how soiled it is,
•color,
•material.
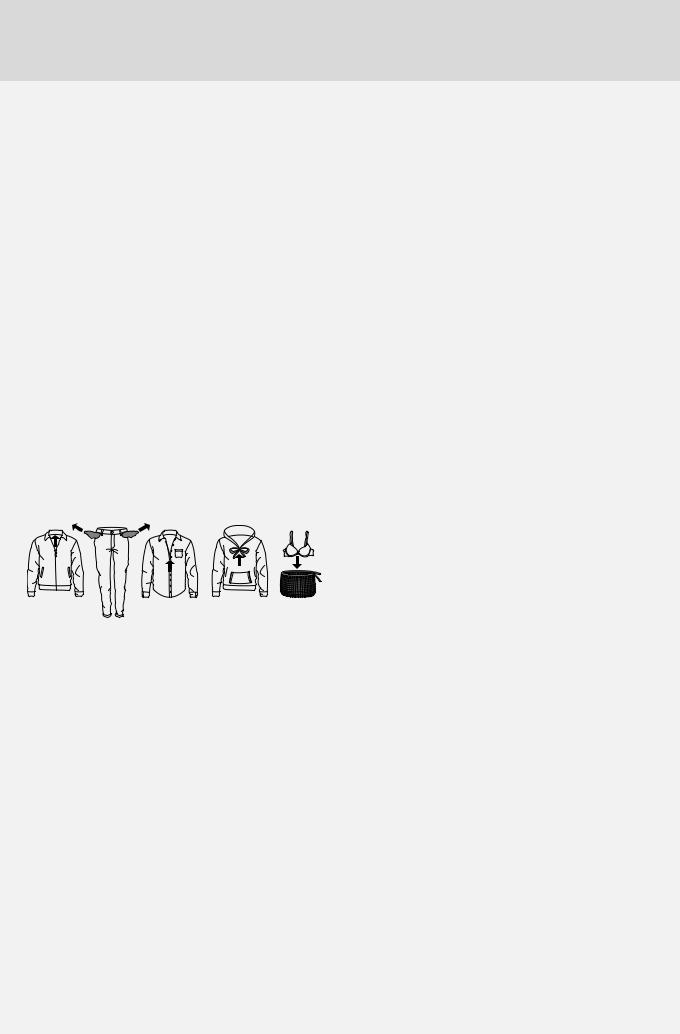
CLOTHING
1.Close the zips and hook-and-loop fasteners so that they do not damage the fabric.
2.New dyed items may contain excess dye; therefore, they have to be washed separately several times.
3.Turn delicate items inside out. This will decrease the risk of tear and color fading.
4.Place very sensitive clothes and small items in a special-purpose laundry washing bag.
(The special purpose laundry bag is available as an optional accessory.)
5.Empty the pockets and turn them inside out.
|
|
|
|
15 |
|
|
|
|
|
|
|
|
|
|
|
|
|
|
|
|
|
|
|
|
Customer Care Center, 1-800-898-1879, www.askousa.com |
||||

LAUNDRY SYMBOLS
Observe the laundry symbols.
Wash cycle
Normal wash cycle
Permanent Press or Wrinkle
Resistant setting
Gentle/Delicate setting
Hand wash only
Do not wash
Do not wring. Hang dry, drip dry, or dry flat
Wash water temperature
Maximum water temp
205° F/95° C (EXTRA HOT)
Maximum water temp
160° F/70° C (EXTRA HOT)
Maximum water temp 140° F/60° C (HOT)
Maximum water temp 120° F/50° C (HOT)
Maximum water temp 105° F/40° C (WARM)
Maximum water temp 85° F/30° C (WARM)
Bleach instructions
Any bleach when needed
Only non-chlorine bleach
Do not bleach
Dry clean symbol
Dry clean only
Tumble dry cycle
Machine dry
Normal setting
Permanent Press or Wrinkle
Resistant setting
Gentle or Delicate setting
Do not tumble dry
Tumble dry heat setting
Any heat
High heat
Medium heat
Low heat
No heat/Air fluff
Special drying instructions
Line dry or hang to dry
Drip dry (do not spin or wring)
Dry flat
Dry in shade
Ironing instructions
Ironing is necessary
High temperature setting
Medium temperature setting
Low temperature setting
Do not iron or press with heat
Iron without steam
16 |
Customer Care Center, 1-800-898-1879, www.askousa.com |
 Loading...