


Operation instructions Wall-mounted Cooker Hood
Gebruiksaanwijzing Wandgemonteerde afzuigkap
Инструкция по эксплуатации Настенная вытяжка
EN
NL
RU

Operating Instructions
Wall-mounted Cooker Hood
Dear Customer,
Thank you for choosing this quality product from ASKO. We hope it will meet your expectations and fulfil your needs for many years to come. Scandinavian design combines clean lines, everyday functionality and high quality. These are key characteristics of all our products and the reason they are greatly appreciated throughout the world.
ASKO CW4611
ASKO CW4631
ASKO CW4651
ASKO CW4671
ASKO CW4911
ASKO CW4951
ASKO CW4971
ASKO CW4931

CONTENTS
SAFETY INFORMATION |
4 |
General |
4 |
Recycling |
4 |
Electrical safety |
4 |
DESCRIPTION OF THE CONTROLS |
5 |
DESCRIPTION OF THE DISPLAY |
5 |
USING THE EXTRACTOR FAN |
6 |
Starting and stopping the fan |
6 |
Activating Turbo mode |
6 |
Setting the clock |
6 |
Auto off |
6 |
Activating the egg timer |
6 |
Light |
6 |
Energy saving mode for the display |
6 |
CARE AND CLEANING |
7 |
General |
7 |
Cleaning the grease filter |
7 |
Replacing the charcoal filter (standard hood) |
7 |
Replacing the charcoal filter (for hood with sloping surface) |
7 |
Emptying and cleaning the fat collector |
8 |
Replacing the bulbs |
8 |
TROUBLESHOOTING |
9 |
ELECTRICAL CONNECTION |
26 |
INSTALLATION ALTERNATIVES |
29 |
INSTALLATION |
31 |
Unpacking |
32 |
Fixing to the wall |
32 |
Mounting the extensible cover plate |
33 |
High ceiling? |
33 |
3
SAFETY INFORMATION
General
These operating instructions contain important information on installation and maintenance that ought to be read very carefully. Keep these operating instructions for future reference.
•Never inspect the grease or charcoal filters when the extractor fan is in use.
•Do not touch the halogen lamps or nearby surfaces when the lamps have been on for some time. Risk of burn injury!
•Do not flambé food under the cooker hood.
•When frying, the pan must not be left unwatched. Overheated oil can pose a fire risk.
•Always unplug the appliance before performing maintenance.
•The cooker hood must not be used by children.
•If the cooker hood is used with a gas hob, there must be sufficient ventilation in the room to prevent a pressure drop, which can otherwise extinguish the gas flame.
Recycling
This appliance complies with European Community directive 2002/96/ EC,Waste Electrical and Electronic Equipment (WEEE). By ensuring that this product is recycled responsibly, the user helps prevent possible negative impact on the environment.
NB:
Dispose of this product responsibly. Irresponsible disposal can result in negative environmental impact or personal injury.
Under no circumstances may this extractor fan be disposed of as household waste. It must be taken to a recycling centre for electrical and electronic equipment.
This product must be disposed of in accordance with local legislation.
For more information on disposal, recycling and reuse of this product, contact your local authority, your household waste collection service or the store where you purchased the product.
•This appliance is not intended for use by children, the elderly or infirm or persons with reduced physical sensory or mental capabilities unless supervised by a person responsible for their safety.
Electrical safety
Check the type plate (found inside the cooker hood) to ensure that the rated voltage and current matches the power supply and that the plug matches the socket. Consult a qualified electrician if in any doubt.
• Young children should be supervised to ensure |
Installation |
|
See the INSTALLATION chapter for information. |
||
that they do not play with the appliance |
||
|
4

DESCRIPTION OFTHE CONTROLS
1 |
2 |
3 |
4 |
5 |
6 |
7 |
1Filter cleaning indicator/clock activation button
2Timer activation button
3Reduce speed/hour setting button
4Display
5Increase speed/minute setting button
6Egg timer setting button
7Light button
DESCRIPTION OFTHE DISPLAY
1 |
Light indicator |
|
|
|
1 |
|
|
2 |
3 |
|
|||
|
|
|
|
|
|
|
|
|
|
|
|
||
2 |
Auto off indicator |
|
|
|
|
|
|
|
|
|
|
|
|
|
|
|
|
|
|
|
|
|
|
|
|
||
3 |
Auto off time display |
|
|
|
|
|
|
|
|
|
|
|
|
4 |
Alarm time display |
|
|
|
|
|
|
|
|
|
|
|
|
5 |
Alarm indicator |
|
|
|
|
|
|
|
|
|
|
|
|
|
|
|
|
|
|
|
|
|
|
|
|
|
|
6 |
Clock/time display |
9 |
8 |
7 |
6 |
5 |
4 |
||||||
7 |
Grease filter cleaning indicator (Deacti- |
|
|
|
|
|
|
|
|
|
|
||
|
vate by pressing |
on the control |
|
|
|
|
|
|
|
|
|
|
|
|
panel). |
|
|
|
|
|
|
|
|
|
|
|
|
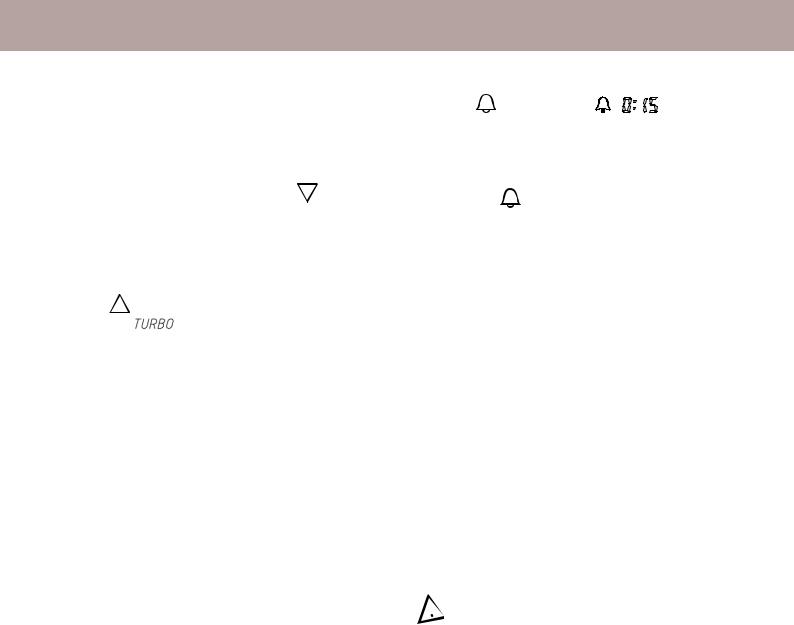
8Turbo mode indicator
9Fan speed indicator
5
USINGTHE EXTRACTOR FAN
Starting and stopping the fan
Press or
or  to start the fan. Use the same buttons to stop the fan.
Example:
If using the lowest power setting, press once to stop the fan.
If using the highest power setting, use  to stop the fan.
Activating Turbo mode
Press |
one or more times.When Turbo mode is |
activated |
is displayed. After two minutes in |
T u r b o |
mode, the fan automatically switch- |
es to speed three.
Setting the clock
Set the clock as follows:
1.Press and hold  for 3 seconds.The figures in the display will start to flash.
2.Use  to switch between hours and minutes.
3.Use  to decrease and
  to increase the time.
1. Press |
.The lamp and |
flash. |
2.Use  to switch between hours and minutes.
3.Use  to decrease and
  to increase the time.
4.Press  to turn off the alarm.
Press and hold for 3 seconds to deactivate the alarm before it sounds.
Light
Press  to switch the lamp on or off.
Energy saving mode for the display
The display automatically enters energy saving mode if no buttons are pressed within a certain time.To reactivate the display, simply press any button once.
Auto off
Switch on the fan's auto off function as follows:
1.Start the fan.
2.Press  .The lamp lights and
  flashes.
3.Use  to switch between hours and minutes.
4.Use  to decrease and
  to increase the time.
Press and hold  for 3 seconds to deactivate auto off.
|
|
REMEMBER!be |
|
|
- |
||||||||||||||||
|
|
|
|
|
|
|
|
|
|
|
|
|
|
|
|
|
before |
cook |
|||
|
|
|
|
|
|
|
|
|
|
|
|
|
started |
|
and |
||||||
|
|
|
|
|
|
|
|
|
|
should |
|
|
|
|
|||||||
|
|
|
|
|
|
|
|
fan |
eliminate |
allsteam |
|
||||||||||
|
|
extractor |
|
|
|
|
|
left |
running |
||||||||||||
|
|
|
|
|
|
|
|
|
|||||||||||||
The |
|
|
|
|
|
|
|
be |
|
|
|
||||||||||
|
|
|
.To |
completely |
|
|
. |
|
|
||||||||||||
|
|
|
|
|
|
|
|
|
|
fanshould |
|
|
|
|
|
||||||
ing |
begins |
extractor |
|
|
isfinished |
|
|
|
|||||||||||||
|
|
|
|
the |
|
|
|
|
|
||||||||||||
odours, |
|
|
|
after |
cooking |
|
|
|
|
|
|
|
|
||||||||
|
|
|
|
|
|
|
|
|
|
|
|
||||||||||
for |
15 |
minutes |
|
|
|
|
|
|
|
|
|
|
|
|
|
||||||
|
|
|
|
|
|
|
|
|
|
|
|
|
|
|
|
|
|
||||
|
|
|
|
|
|
|
|
|
|
|
|
|
|
|
|
|
|
|
|||
Activating the egg timer
Use the alarm for cooking reminders. Set the alarm time as follows:
6
CARE AND CLEANING
General
Regular maintenance is required to ensure that the cooker hood functions properly.This is especially true of the grease and charcoal filters.
Clean the fan and other surfaces of the cooker hood regularly with a cloth dipped in denatured alcohol or a non-abrasive liquid cleaner.
The charcoal filter cleans the circulating air in the room. Such filters cannot be cleaned or recycled and must be replaced at least every four months.The speed at which the charcoal filter becomes saturated depends on how often the fan is used, the type of food that is cooked and how often the grease filter is cleaned.
To prevent the risk of fire and to ensure that the cooker hood functions properly, the grease filter must always be cleaned as instructed below when the display indicates the need or at least every two months.
REMEMBER!be |
|
|
every |
||||||||||||||||
|
|
|
|
|
|
|
|
|
|
replaced |
atleast |
|
|
||||||
|
|
|
|
|
|
|
must |
|
|
|
|
|
|
||||||
|
|
|
|
|
filter |
|
|
|
. |
|
|
|
|
|
display |
||||
Thecharcoal |
|
normal |
fanuse |
|
|
the |
|||||||||||||
during |
|
|
when |
. |
|||||||||||||||
|
|
|
|
|
|||||||||||||||
four |
months |
|
be |
cleaned |
|
|
two |
months |
|||||||||||
|
|
|
|
|
|
every |
|
|
|
||||||||||
|
grease |
filtermust |
|
|
|
|
|
|
|
|
|||||||||
The |
|
|
need |
oratleast |
|
|
|
|
|
|
|
|
|||||||
|
the |
|
|
|
|
|
|
|
|
|
|
|
|
||||||
indicates |
|
|
|
|
|
|
|
|
|
|
|
|
|
|
|||||
|
|
|
|
|
|
|
|
|
|
|
|
|
|
|
|
|
|||
Cleaning the grease filter
Remove the filter from the cooker hood and clean it in a solution of water and neutral cleaning liquid. Leave the filter to soak in the solution for a while.
-Rinse thoroughly with hot water and leave the filter to dry.
-The filter can also be cleaned in a dishwasher.
The colour of the grease filter may change after a few washes.This is normal.
NB:
If you clean the grease filter in the dishwasher: load only the grease filter and no other items as food particles from dishes can fasten in the filter.
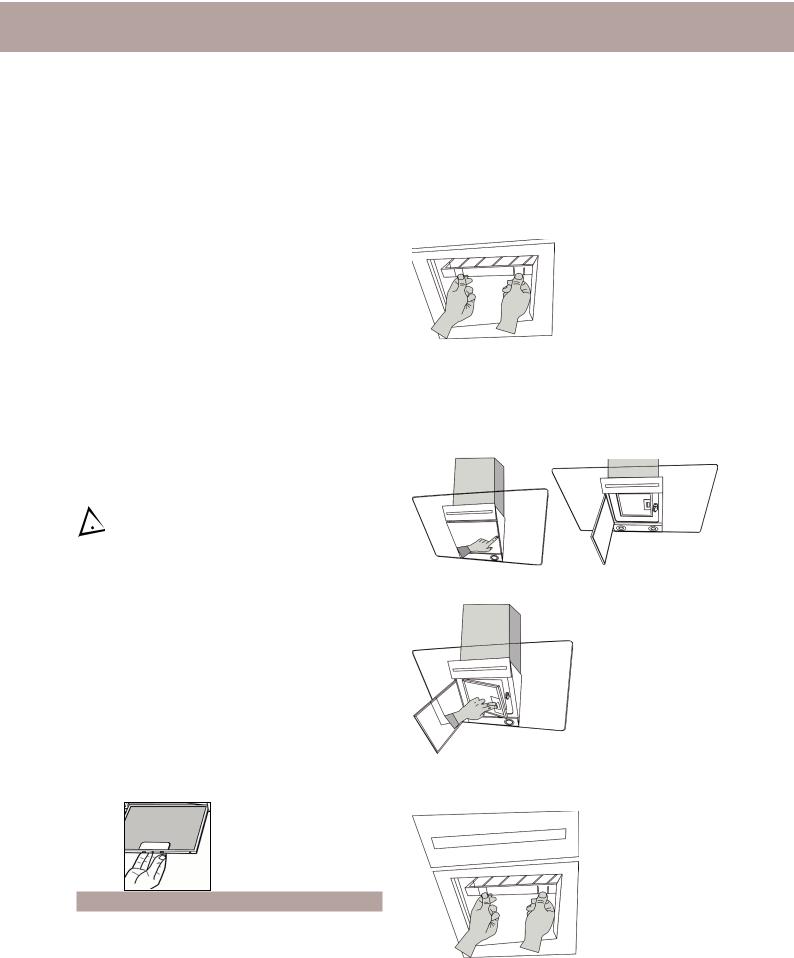
Replacing the charcoal filter (standard hood)
Replace the charcoal filter (standard hood) as follows:
1.Remove the grease filter.
2.Squeeze the clips on the charcoal filter and pull the charcoal filter back to remove it.
|
(CW4951, |
||
31264003 |
|
||
No: |
|
(CW4971, |
|
Art |
|
||
CW4651) |
|
CW4611) |
|
31264002 |
|||
|
|||
No: |
CW4911, |
||
Art |
|
|
|
CW4671, |
|
||
Replacing the charcoal filter (for hood with sloping surface)
1.Press the middle of the right edge of the glass cover to open it.
2.Remove the grease filter.
3.Squeeze the clips on the charcoal filter and pull the charcoal filter back to remove it.
7

CARE AND CLEANING
Emptying and cleaning the fat collector
The fan is fitted with a fat collector that collects fat from the fan blades and fan housing.
1.Remove the grease filter and the charcoal filter (if fitted).
2.Remove the fat collector and clean it in warm water with washing up liquid. It can also be cleaned in a dishwasher.
Replacing the bulbs
Replace the bulbs as follows:
1.Lift up and remove the light fitting with a screwdriver or other suitable tool.
2.Remove the blown halogen bulb (if the fan has 4 bulbs = 10W, 2 bulbs = 20W). Remember that the bulb can be hot!
3.Insert the new halogen bulb.
If you touch the halogen bulb with your bare hands this may reduce its service life. Always use a glove or a cloth to avoid direct contact.
NB:
The light is only meant for use during cooking and not for illuminating the surroundings for longer periods. If the light is used for longer periods, this will considerably shorten the burn time of the bulbs.
8

TROUBLESHOOTING
Problem |
Possible cause |
Solution |
Cooker hood does not work |
No power supply |
Check that the plug is |
|
|
connected |
|
|
|
Poor air flow |
Aluminium grease filter blocked |
Clean grease filter and |
|
|
replace once dry |
|
Charcoal filter blocked |
Replace charcoal filter |
|
|
|
Motor running, but no air flow |
Butterfly valve jamming |
Call the service division |
|
|
|
Motor stops after a few minutes |
Overheating cut-out activated |
The kitchen is insufficient- |
|
|
ly ventilated |
|
|
|
|
The cooker hood has been installed |
The hood must be at |
|
too close to the hob |
least 65 cm from the hob |
|
|
|
Strong smell of cooking |
No charcoal filter fitted |
For circulation use (instal- |
|
|
lation alternative A), the |
|
|
charcoal filter must be |
|
|
fitted |
|
|
|
Oil drops onto the hob |
Fat collector missing or not fitted |
Remove the aluminium |
|
|
grease filter and fit the fat |
|
|
collector |
|
Aluminium grease filter saturated |
Clean filter |
Humming sound |
Something touching the fan blades |
Call the service division |
|
|
|
|
|
|
|
|
|
|
|
|
|
|
|
SERVICE |
|
|
|
|
|
|
|
|
AND |
chapter |
|||
|
|
|
|
|
|
|
|
see |
||||
|
|
|
|
|
|
|
|
|
TROUBLESHOOTING |
|||
GUARANTEE |
|
|
|
conditions, |
||||||||
|
|
guarantee |
||||||||||
|
|
|
|
|
|
|
|
the |
and |
|||
|
|
|
|
|
|
read |
|
|
|
|||
|
|
|
|
|
|
call, |
on |
service |
|
|
|
|
|
|
|
|
a |
service |
. |
|
|
|
|
||
|
|
|
|
|
information |
|
|
|
|
|
||
|
booking |
|
|
|
|
|
|
|
|
|||
|
|
|
information |
|
|
|
|
|||||
|
|
more |
|
|
|
|
|
|
|
|||
Before For |
separate |
|
|
|
|
|
|
|||||
|
. |
|
|
|
|
|
|
|
||||
above |
|
|
|
|
|
|
|
|
|
|
|
|
the |
enclosed |
|
|
|
|
|
|
|
|
|
|
|
|
|
|
|
|
|
|
|
|
|
|
|
|
9

Gebruiksaanwijzing
Wand afzuigkap
Geachte klant,
Bedankt dat u voor dit kwaliteitsproduct van ASKO hebt gekozen. Wij hopen dat het product jarenlang aan uw wensen en verwachtingen zal voldoen. Scandinavisch design is een combinatie van heldere lijnen, alledaagse functionaliteit en hoogstaande kwaliteit. Dit zijn de hoofdkenmerken van al onze producten en de reden dat onze producten wereldwijd zo geliefd zijn.
ASKO CW4611
ASKO CW4631
ASKO CW4651
ASKO CW4671
ASKO CW4911
ASKO CW4951
ASKO CW4971
ASKO CW4931
INHOUD
VEILIGHEIDSINFORMATIE |
12 |
Algemeen |
12 |
Recycling |
12 |
Elektrische veiligheid |
12 |
BESCHRIJVING VAN HET BEDIENINGSPANEEL |
13 |
BESCHRIJVING VAN HET DISPLAY |
13 |
DE AFZUIGKAP GEBRUIKEN |
14 |
De motor starten en stoppen |
14 |
Turbo-modus activeren |
14 |
De klok instellen |
14 |
Automatische uitschakeling |
14 |
De timer activeren |
14 |
Verlichting |
14 |
Energiebesparende modus voor de display |
14 |
ONDERHOUD EN REINIGING |
15 |
Algemeen |
15 |
Het vetfilter reinigen |
15 |
Het koolfilter vervangen (standaardkap) |
15 |
Het koolfilter vervangen (voor kap met schuin oppervlak) |
15 |
De vetopvangbak legen en reinigen |
16 |
De lampen vervangen |
16 |
PROBLEMEN VERHELPEN |
17 |
ELEKTRISCHE AANSLUITING |
26 |
INSTALLATIEMOGELIJKHEDEN |
29 |
INSTALLATIE |
31 |
Uitpakken |
34 |
Bevestiging aan de wand |
34 |
De verlengbare afdekplaat monteren |
35 |
Hoog plafond? |
35 |
11
VEILIGHEIDSINFORMATIE
Algemeen
Deze gebruiksaanwijzing bevat belangrijke informatie over de installatie en het onderhoud die zorgvuldig doorgelezen moet worden. Bewaar deze gebruiksaanwijzing voor toekomstig gebruik.
•Inspecteer de vetof koolfilters nooit wanneer de afzuigkap aan staat.
•Raak de halogeenlampen of nabijgelegen oppervlakken niet aan wanneer de lampen al enige tijd branden. Kans op brandwonden!
•Flambeer geen eten onder de afzuigkap.
•Houd tijdens frituren de pan altijd in de gaten. Oververhitte olie kan brand veroorzaken.
•Ontkoppel het apparaat altijd van de stroom voordat u onderhoud verricht.
•De afzuigkap mag niet door kinderen worden gebruikt.
•Indien u de afzuigkap in combinatie met een gasfornuis gebruikt, moet de kamer voldoende geventileerd worden om een drukval te voorkomen, die de gasvlam zou kunnen doven.
Recycling
Dit apparaat voldoet aan richtlijn 2002/96/EG van het Europese parlement, Afgedankte Elektrische en Elektronische apparatuur (AEEA). Door dit product op de juiste manier te recyclen, helpt u negatieve gevolgen voor het milieu te voorkomen.
N.B.!
Dank dit product op verantwoorde wijze af. Onverantwoord afdanken kan resulteren in negatieve gevolgen voor het milieu of in persoonlijk letsel.
Deze afzuigkap mag onder geen enkele voorwaarde worden afgedankt als huishoudelijk afval. De afzuigkap moet naar een recyclecentrum voor elektrische en elektronische apparatuur worden gebracht.
Dit product moet worden afgedankt in overeenstemming met de lokale wetgeving.
Neem voor meer informatie over het afdanken, recyclen en hergebruiken van dit product contact op met de lokale autoriteiten, het afvalbedrijf voor huishoudelijk afval of de winkel waar u dit product hebt gekocht.
Elektrische veiligheid
Controleer op het typeplaatje (aan de binnenkant van de afzuigkap) of de nominale spanning en stroom overeenkomt met de stroomtoevoer en of de stekker in het stopcontact past. Raadpleeg bij twijfel een erkende elektriciën.
Installatie
Zie het hoofdstuk INSTALLATIE voor meer informatie.
12
 Loading...