


Instructions for use
OVEN
OCS8487S / BO4CS2F3-42 OCS8487A / BO4CS2F3-42 OCS8687S / BO6SA2F3-42 OCS8687A / BO6SA2F3-42

EN Manual |
EN 3 - EN 51 |
Pictograms used
Important information
Tip

YOUR OVEN
Your oven
|
Introduction |
4 |
|
||
|
Control panel |
5 |
|
Description |
6 |
|
Guide rails/Telescopic guide rails |
6 |
|
Accessories |
7 |
|
Door |
8 |
|
Cooling fan |
8 |
|
Main functions |
8 |
|
Keys |
10 |
|
Navigation |
11 |
|
What to do first |
13 |
Initial use |
|
|
Operation |
|
|
|
Selecting your function |
16 |
|
||
|
Functions settings mode |
16 |
|
Progress mode |
18 |
|
Finish display |
18 |
|
Changing settings during the progress |
19 |
Use |
|
|
|
Functions table |
20 |
|
||
|
Steam function |
25 |
|
Steam tables |
28 |
|
Culisensor |
31 |
|
Settings menu |
33 |
|
Plus menu |
34 |
|
Cooking information |
36 |
|
Fast preheat |
36 |
|
Delayed start |
37 |
|
Gratin |
37 |
|
Stage cooking |
37 |
|
Go to manual cooking |
38 |
|
Programs and Favourites |
38 |
|
Egg timer |
39 |
|
Child lock |
39 |
|
Warming |
40 |
|
Defrost |
40 |
Cleaning |
|
|
|
Cleaning the appliance |
41 |
|
||
|
Steam clean |
41 |
|
Cleaning the Water Tank Filter |
42 |
|
Descaling |
42 |
|
Removing and cleaning the guide rails |
43 |
|
Replacing the oven light bulb |
43 |
|
Removing the oven door |
44 |
|
Removing the oven door glass |
45 |
Solving problems |
|
|
|
General |
47 |
|
||
Your oven and the environment |
|
|
|
Disposing of the appliance and the packaging |
49 |
|
||
Cooking test |
|
|
|
Food tested in compliance with the EN 60350-1 standard |
50 |
|
||
EN 3

YOUR OVEN
Introduction
Congratulations on choosing this ASKO steam oven.
This product is designed to offer simple operation and optimum user-friendliness. The oven has a wide range of settings, enabling you to select the correct cooking method every time.
This manual shows how you can best use this oven. In addition to information about operating the oven, you will also find background information that may be useful when using the appliance.
Please read the separate safety instructions carefully before using the appliance!
Read this manual before using the appliance and keep it in a safe place for future use.
Installation instructions are supplied separately.
EN 4
YOUR OVEN
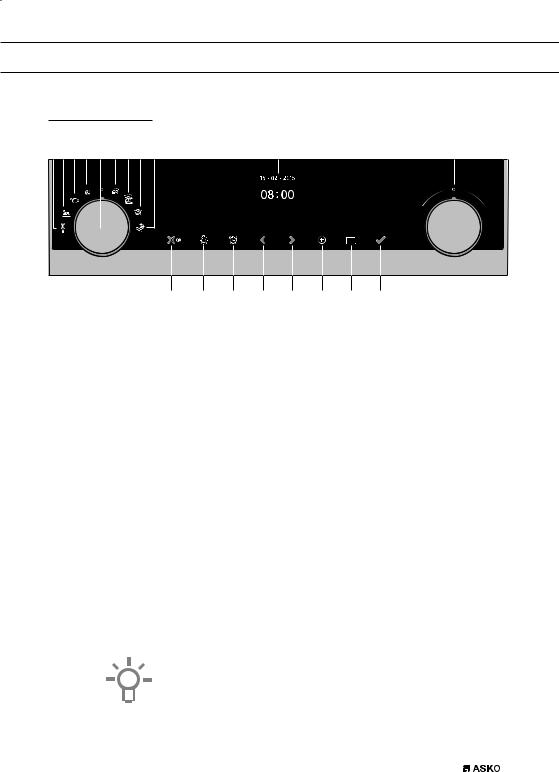
Control panel
2 3 4 |
5 |
1 |
6 |
7 8 |
9 |
10 |
|
11 |
|||||||||||||||
|
|
|
|
|
|
|
|
|
|
|
|
|
|
|
|
|
|
|
|
|
|
|
|
|
|
|
|
|
|
|
|
|
|
|
|
|
|
|
|
|
|
|
|
|
|
|
|
|
|
|
|
|
|
|
|
|
|
|
|
|
|
|
|
|
|
|
|
|
|
|
|
|
|
|
|
|
|
|
|
|
|
|
|
|
|
|
|
|
|
|
|
|
|
|
|
|
|
|
|
|
|
|
|
|
|
|
|
|
|
|
|
|
|
|
|
|
|
|
|
|
|
|
|
|
|
|
|
|
|
|
|
|
|
|
|
|
|
|
|
|
|
|
|
|
|
|
|
|
|
|
|
|
|
|
|
|
|
|
|
|
|
|
|
|
|
|
|
|
|
|
|
|
|
|
|
|
|
|
|
|
|
|
|
|
|
|
|
|
|
|
|
|
|
|
|
|
|
|
|
|
|
|
|
|
|
|
|
|
|
|
|
|
|
|
|
12 |
13 |
14 |
15 |
16 |
17 |
18 |
19 |
1.Function knob (in ‘Off’ position)
2.Defrost
3.Programs & Favourites
4.Fast preheat
5.Oven
6.Steam
7.Combi steam
8.Warming
9.Steam clean
10.Display
11.Selection knob
12.On/off key and stop key (cancel)
13.Light key
14.Timer key
15.Navigation key left*
16.Navigation key right*
17.Plus key
18.Water reservoir key
19.Confirm key
* pressing 15+16 activates Child lock
Note:
The keys respond best if you touch them with a large area of your fingertip. Every time you press a key during use, a short acoustic signal will sound.
EN 5
YOUR OVEN
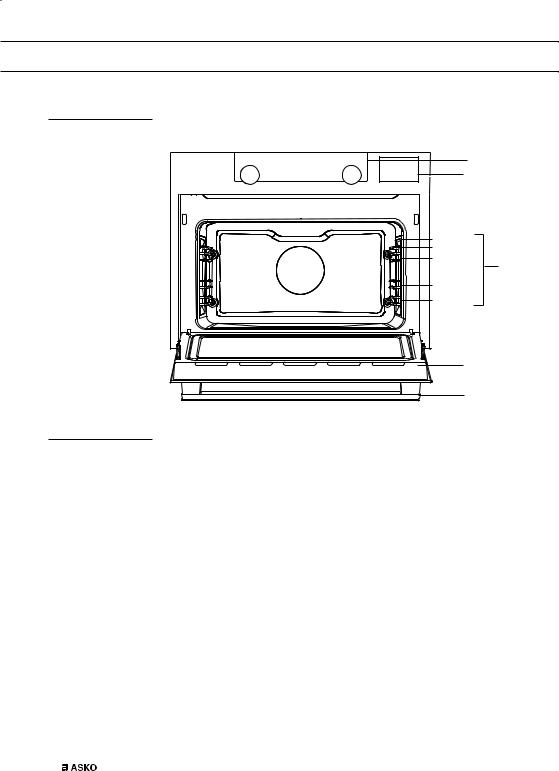
Description
1. |
Control panel |
1 |
|
|
|
2. |
Water reservoir cover |
2 |
2.Oven levels
3.Oven door
4.Door handle
Level 5
Level 4
Level 3
3
Level 2
Level 1
4
5
Guide rails/Telescopic guide rails
•The oven has four or five guide rails (Level 1 to 4/5), depending on the model. Level 1 is mainly used in combination with bottom heat. The two upper levels are mainly used for the grill function.
•Place the oven rack, baking tray or steam dish in the gap between the guide rail sliders.
•A number of shelf levels can have fully-retractable telescopic guide rails, depending on the model.
Pull the telescopic guide rails out of the oven cavity completely and place the oven rack / baking tray / steam dish on them. Then slide the oven rack / baking tray / steam dish on the telescopic guide rails, back into the oven cavity.
Only close the oven door when the telescopic guide rails have been returned completely back into the oven cavity.
EN 6

YOUR OVEN
Accessories
Your appliance is accompanied by a range of accessories, depending on the model. Only use original accessories; they are specially suited to your appliance.
Note: not all accessories are suitable/available for every appliance (it may also differ by country). When purchasing, always provide the exact identification number of your appliance. Please see the sales
brochures or check online for more details about optional accessories.
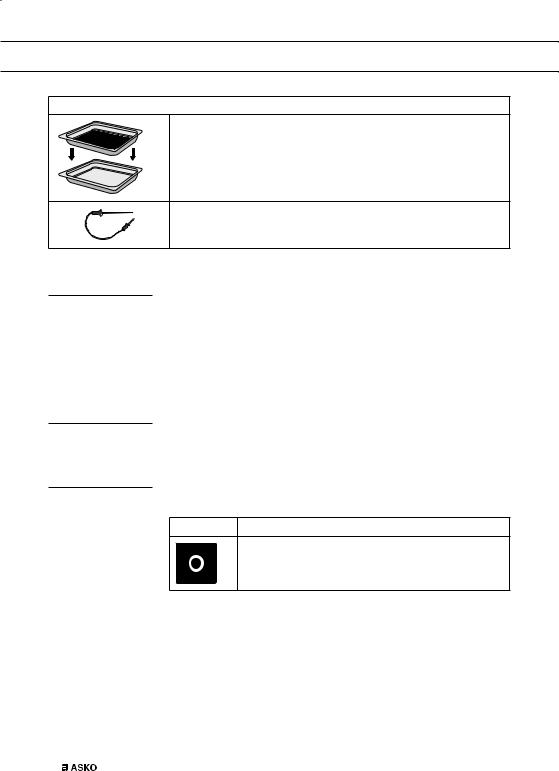
Accessories that can be supplied with your appliance (depending on the model)
Enamelled baking tray; to be used for pastries and cakes.
• Do not use the enamelled baking tray for microwave functions!
• Suitable for pyrolysis cleaning.
Oven rack; mainly used for grilling. A steam dish or pan with food can also be placed on the oven rack.
• The oven rack is equipped with a safety peg. Lift the rack slightly at the front to slide it out of the oven.
• Do not use the oven rack for microwave functions!
Deep enamelled baking tray; to be used for roasting meat and baking moist pastry. It can also be used as a drip tray. Place the deep baking tray into the first level for use as a drip tray during grilling.
•Do not use the deep enamelled baking tray for microwave functions!
•Suitable for pyrolysis cleaning.
Glass baking tray; for microwave and oven use.
• NOT suitable for pyrolysis cleaning.
Non-perforated steam dish; 40 mm deep (useful for collecting moisture during steaming).
•Note: discolouration may occur at temperatures above 180 °C! This will not influence the proper function of the oven.
Perforated steam dish; 40 mm deep (useful for steam settings).
• Note: discolouration may occur at temperatures above 180 °C! This will not influence the proper function of the oven.
Perforated steam dish; 1/3GN. Perforated steam dish; 1/2GN.
• Note: discolouration may occur at temperatures above 180 °C! This will not influence the proper function of the oven.
EN 7
YOUR OVEN
Accessories that can be supplied with your appliance (depending on the model)
• The steam dishes can be used simultaneously on two levels
(i.e., the non-perforated steam dish on Level 1 and the perforated steam dish on Level 2).
• For steaming you can place the perforated steam dish in the nonperforated steam dish. They can only be used together on a level with telescopic guide rails.
Culisensor; can be used to measure the core temperature of the dish. When the desired temperature is reached, the cooking process will be stopped automatically.
Door
•The door switches interrupt the operation of the steam oven when the door is opened during use. The oven continues operating when the door is closed.
•This oven has a ‘Soft close door system’. When closing the oven door, this system dampens the movement, from a certain angle, and silently closes the oven door.
Cooling fan
The appliance is equipped with a cooling fan that cools the casing and control panel.
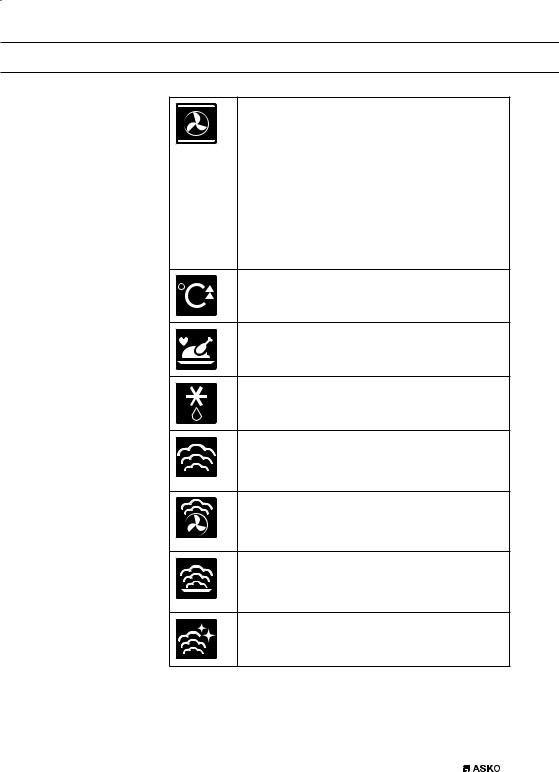
Main functions
With the function knob you can select the main functions of your oven.
Setting Description
Off/standby mode
EN 8
YOUR OVEN
Oven
Hot air
Hot air + bottom heat Bottom + top heat Large grill
Grill
Large grill + fan Upper heat Bottom heat Bottom heat + fan Pro roasting
Eco hot air
Fast preheat
Programs and favourites
Favourites
Programs
Defrost
Manual defrost
Steam
Steam
Low temperature
Sous vide
Combi steam
Hot air + steam density 1 Hot air + steam density 2 Hot air + steam density 3
Warming
Regenerate
Plate warming
Keep warm
Steam clean
EN 9
YOUR OVEN
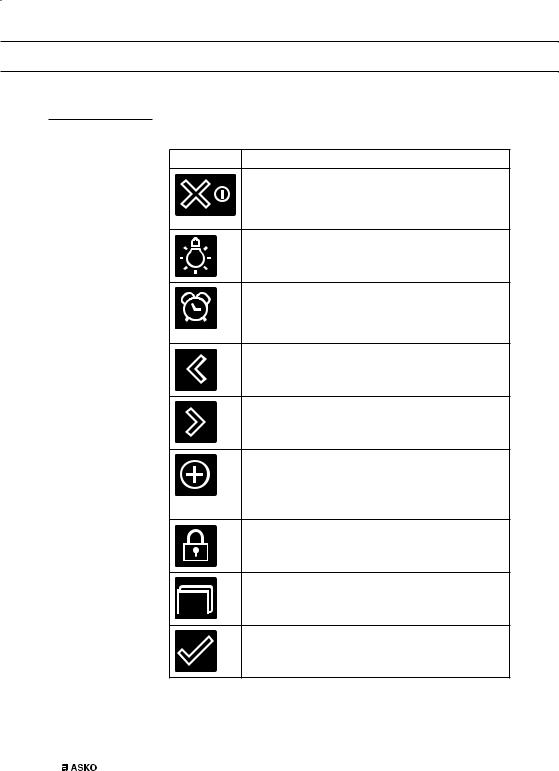
Keys
In the table below you can find the discription of the different keys.
Keys |
Description of the keys |
Stop key:
-Press short: cancel operation or go one step back in the menu.
-Press long: turn the appliance off or on.
Light key:
- To turn the cavity light on or off.
Egg timer
-The egg timer can be used independent of the oven function.
-The longest possible timer setting is 23:59.
Navigation key left
- To move the active area to the left.
Navigation key right
- To move the active area to the right.
Plus key
-To open or exit the settings menu (in standbymode).
-To open or exit the plus menu with the extra options possible at that moment (in on-mode).
Child lock
-Press and hold the left navigation key and right navigation key simultaniously to lock the appliance.
Water reservoir key
- To open the water reservoir hatch.
Confirm key
-To confirm all the white settings/elements in the screen.
EN 10
YOUR OVEN
Navigation
active area
|
|
|
|
|
|
|
|
|
|
|
|
|
|
|
|
|
|
|
|
|
|
|
|
|
|
|
|
|
|
|
|
|
|
|
|
|
|
|
|
|
|
|
|
|
|
|
|
|
|
|
|
|
|
|
|
|
|
|
|
|
|
|
|
|
|
|
|
|
|
|
|
|
|
|
|
|
|
|
|
|
|
|
|
|
|
|
|
|
|
|
|
|
|
|
|
|
|
|
|
|
|
|
|
|
|
|
|
|
|
|
|
|
|
|
|
|
|
|
|
|
|
|
|
|
|
|
|
|
|
|
|
|
|
|
|
|
|
|
|
|
|
|
|
|
|
|
|
|
|
|
|
|
|
|
|
|
|
|
|
|
|
|
|
|
|
|
|
|
|
|
|
|
|
|
|
|
|
|
|
|
|
|
|
|
|
|
|
|
|
|
|
|
|
|
|
|
|
|
|
|
|
|
|
|
|
|
|
|
|
|
|
|
|
|
|
|
|
|
|
|
|
|
|
|
|
|
|
|
|
|
|
|
|
|
|
|
|
|
|
|
|
|
|
|
|
|
|
|
|
|
|
|
|
|
|
|
|
|
|
|
|
|
|
|
|
|
|
|
|
|
|
|
|
|
|
|
|
|
|
|
|
|
|
|
|
|
|
|
|
|
|
|
|
|
|
|
|
|
|
|
|
|
|
|
|
|
|
|
|
|
|
|
|
|
|
|
|
|
|
|
|
|
|
|
|
|
|
|
|
|
|
|
|
|
|
|
|
|
|
|
|
|
|
|
|
|
|
|
|
|
|
|
|
|
|
|
|
|
|
|
|
|
|
|
|
|
|
|
|
|
|
|
|
|
|
|
|
|
|
|
|
|
|
|
|
|
|
|
|
|
|
|
|
|
|
|
|
|
|
|
|
|
|
|
|
|
|
|
|
|
|
|
|
|
|
|
|
|
|
|
|
|
|
|
|
|
|
|
|
|
|
|
|
|
|
|
|
|
|
|
|
|
|
|
|
|
|
|
|
|
|
|
|
|
|
|
|
|
|
|
|
|
|
|
|
|
|
function knob stop key |
|
|
|
|
navigation keys |
|
|
|
confirm key selection knob |
|||||||||||||||||||||||||||||
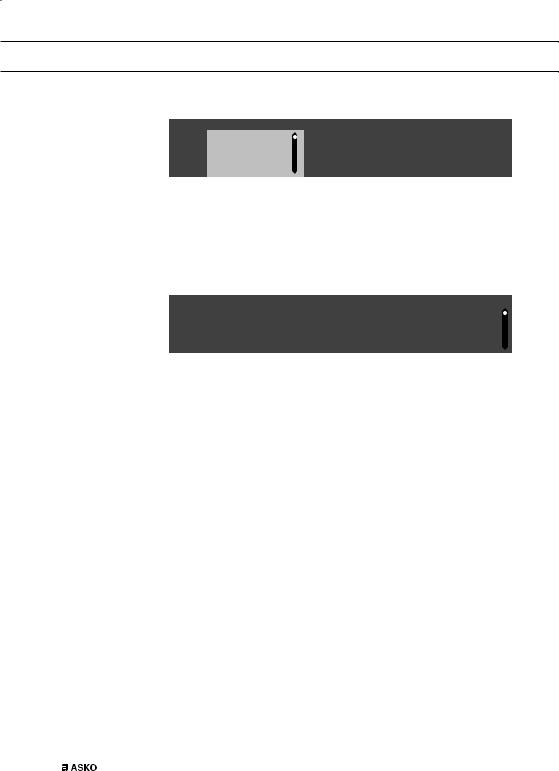
By turning the function knob away from the 0-position, the icon of the chosen main function is lit. The display will show the icon and name of the activated function for about 1,5 seconds. Next you will see the chosen main function and sub-function at the top of the display in the feedback bar. Also the function settings mode will become active (grey background). In this activated area you can select your settings using the selection knob.
OVEN l HOT AIR |
14:30 |
180 °C
Within every menu the navigation is as follows:
•Use the navigation keys or press the selection knob to move the active area (grey background).
•The setting in the active area can be changed by turning the selection knob (left = decrease, right = increase). The setting will be saved automaticallly.
•When all elements in the screen are set, then confirm these settings by pressing the confirm key (this key will start blinking when it is possible to start the program).
•Press the stop key to go one step back in the menu.
EN 11

YOUR OVEN
At the top of the display is a feedback bar. This bar shows where you are in the menu and what setting you are changing. Functions / settings are separated with a vertical line.
SETTINGS l GENERAL l SOUND l KEY SOUND
EN 12

INITIAL USE
What to do first
•Clean the oven interior and accessories with hot water and washing-up liquid. Do not use aggressive cleaning agents, abrasive sponges and similar.
•The oven will emit a particular odor when it is used for the first time; this is normal. Make sure that there is good ventilation during initial use.
When the appliance is plugged in for the first time or after the appliance was disconnected from the mains for a longer period of time, you have to set ‘Language’, ‘Date’, ‘Time’ and ‘Water hardness’.
Setting the language
LANGUAGE
English
Deutsch
In case you are not comfortable with the language on the display, you can select another language. The default setting is ‘English’.
1.Turn the selection knob and select your preferred language from the displayed list.
2.Confirm the setting by pressing the confirm key.
The next screen will be displayed.
Setting the date
DATE l DAY
01 |
01 |
2015 |
02 |
|
|
1.Turn the selection knob and change the first setting (Day).
2.Confirm this setting by pressing the right navigation key or by pressing the selection knob.
3.Turn the selection knob and change the next setting (Month).
4.Confirm this setting by pressing the right navigation key or by pressing the selection knob.
5.Turn the selection knob and change the last setting (Year).
6.Confirm this setting by pressing the confirm key.
The next screen will be displayed.
EN 13
INITIAL USE
Setting the time
TIME l HOUR
11 |
: |
00 |
12 |
||
13 |
|
|
1.Turn the selection knob and change the hours.
2.Confirm this setting by pressing the right navigation key or by pressing the selection knob.
3.Turn the selection knob and change the minutes.
4.Confirm this setting by pressing the confirm key.
Setting the water hardness
WATER HARDNESS
|
|
|
|
|
|
|
|
|
1 red |
Soft water |
|
|
|
|
|
|
|
|
|
The water hardness must be set prior to initial use.
If the water is softer or harder than the default setting, you can alter the set hardness level.
Checking the water hardness
You can measure water hardness using the ‘paper test strip’ supplied with your appliance. For information about water hardness in your region please contact your local water board.
Using the ‘paper test strip’
Dip the test strip in water for 1 second. Wait 1 minute and read the number of bars on the paper strip. Check the table for the correct water hardness setting.
Setting the water hardness
1.Compare the test strip with the image on the display.
2.Turn the selection knob until the bars on the screen correspond with those on the test strip.
3.Press the confirm button to save the set water hardness.
The equipment has now been programmed so that the descaling notification will appear in accordance with the actual water hardness.
EN 14

INITIAL USE
|
Test strip |
|
|
French |
German |
|||
Display |
number/colour |
Type |
PPM |
|||||
hardness (°df) |
hardness (°dH) |
|||||||
|
of the bars |
|
|
|||||
|
|
|
|
|
|
|
||
|
|
|
|
|
|
|
|
|
1 |
4 green bars |
Very soft water |
0 - 90 |
0 |
- 9 |
0 |
- 5 |
|
|
|
|
|
|
|
|||
2 |
1 red bar |
Soft water |
90 -178 |
9 - 18 |
5 - 10 |
|||
|
|
|
|
|
|
|
|
|
3 |
2 red bars |
Rather hard water |
178 - 267 |
18 |
- 26 |
10 |
- 15 |
|
|
|
|
|
|
|
|
|
|
4 |
3 red bars |
Hard water |
267 - 356 |
26 |
- 35 |
15 |
- 20 |
|
|
|
|
|
|
|
|||
5 |
4 red bars |
Very hard water |
> 356 |
> 35 |
> 20 |
|||
|
|
|
|
|
|
|
|
|
All the start-up settings are now set and the display will show the standby screen. The appliance is now ready for use.
The language, time, date and water hardness can be adjusted in the settings menu (see ‘Settings menu’ chapter). The settings menu can be opened from the start display via the ‘Plus’ menu.
Standby display
The standby display will show the time, date, cavity temperature (if this is higher than 80 °C) and the timer (if set). The appliance goes to standby mode after:
•Turning the function knob to 0 (‘off’ position).
•Pressing the stop key multiple times (deeper in the menu).
03 • 05 • 2015
12 : 00
Off mode
•Default the appliance will shut down after no action for a set time of 30 minutes.
•Press and hold the stop key to shut down the appliance manually.
Switching on the appliance
•Press and hold the stop key to switch on the appliance.
•The appliance can also be switched on by turning the function knob to a function.
EN 15

OPERATION
Selecting your function
Select a function appropriate for the meal you are cooking. Consult the table in chapter ‘Functions table’ to see which functions are available.
•Go directly to the progress mode by pressing the confirm key (this key is blinking if it is possible to start the program).
After you have chosen a main function, the function settings mode is active (grey background). In this activated area, it is now possible to change the settings in this funtion.
Function settings mode
Example (Oven/Hot air + bottom heat/40 minutes)
1. Choose a main function by turning the function knob.
The first sub-function setting becomes active.
OVEN l HOT AIR |
14:30 |
180 °C
Now the settings can be changed as desired. There is the possibility to set:
•The function (consult the table in chapter ‘Functions table’).
•The temperature.
•The time.
2. Turn the selection knob and change the setting.
OVEN l HOT AIR + BOTTOM HEAT |
14:30 |
200 °C
3.Confirm the setting by pressing the right navigation key or by pressing the selection knob.
The next sub-function setting becomes active.
OVEN l TEMPERATURE |
|
|
14:30 |
||
|
|
|
195 |
|
|
|
|
|
2002 0°C°C |
|
|
|
|
|
205 |
|
|
|
|
|
|
|
|
4. Turn the selection knob and change the setting. |
|
||||
|
|
||||
OVEN l TEMPERATURE |
14:30 |
||||
205
2102 0°C°C
215
EN 16
 Loading...