


Asko D5434XXL W, D5434XLS, D5434XXLB, D5434XXLS, D5624XXLS Installation Guide
...


 DISHWASHER INSTALLATION INSTRUCTIONS
IMPORTANT!instructions |
before |
installing |
||
|
||||
|
|
|||
Read |
all of these |
|
|
|
. |
|
|
||
the |
dishwasher |
|
|
|
|
|
|
|
|
AUTOMATIC HIGH LOOP
The drain hose is fastened to the back of the machine at the best height. To eliminate potential drain problems, leave this hose in place.
CONTENTS
INTRODUCTION |
2 |
WHAT YOU NEED |
2 |
XXL DISHWASHERS |
3 |
UNIT DIMENSIONS |
3 |
PREPARING THE LOCATION |
3 |
ADA AND XL DISHWASHERS |
4 |
UNIT DIMENSIONS |
4 |
PREPARING THE LOCATION |
4 |
CORNER INSTALLATION |
5 |
EASYINSTALL CONNECTIONS |
5 |
WATER SUPPLY |
6 |
DRAIN CONNECTIONS |
7 |
ELECTRICAL CONNECTIONS |
8 |
PREPARING THE DISHWASHER FOR INSTALLATION |
9 |
MOVING THE MACHINE INTO PLACE |
9 |
CONNECTING THE ELECTRIC CABLE |
11 |
CONNECTING THE WATER SUPPLY |
11 |
FASTENING THE DISHWASHER TO THE CABINET |
12 |
INSTALLING THE TOE KICK |
12 |
INSTALLATION CHECKLIST |
16 |
SAVE THESE INSTRUCTIONS FOR FUTURE REFERENCE

INTRODUCTION
Read these instructions carefully and completely before you install the machine. The installation should be carried out by a qualified person who is familiar with all local codes and ordinances for electrical and plumbing connections.
If a dishwasher is being installed in this area for the first time, most of the cabinet work, plumbing, and electrical has to be done before you move the machine into place.
If you are replacing an old dishwasher, you must check the plumbing connection and wiring before you move the new dishwasher into place.
NOTE:
Cosmetic damage must be reported to the ASKO dealer within five days from the date of purchase. As soon as you unpack the dishwasher, thoroughly check it for cosmetic damage.
WHAT YOU NEED
TOOLS
1)Phillips No. 2 screwdriver
2)Flat blade screwdriver
3)Torx screwdriver size T 20
4)Adjustable wrenches (if you use copper fittings)
5)Open-ended wrench
(1/2˝ [12 mm], 5/8˝ [16 mm] and 1˝ [24 mm])
6)Tape measure
7)Spirit level
8)Electric drill with 1-1/2˝ drill bit
9)Keyhole saw
MATERIALS SUPPLIED
5
4
* 3
* |
2 |
2x |
|
1" |
|
|
|
(25 mm) |
1
* Only select models.
MATERIALS
•Minimum 3/8˝ OD copper tubing of sufficient length for your installation
•Shut-off valve and fittings for water supply line
The dishwasher is shipped with the high loop drain hose, inlet hose and electrical cord attached and ready to be connected. Please do not remove the high loop connection for the drain line.
Tip Guards (optional)
When it is not possible to attach the dishwasher to the cabinet or the underside of the counter top, you should install tip guards to prevent the machine from tipping when you open the door. Sold individually.
Tip Guards (P/N 8070851)
Page 2
Customer Care Center
1-800-898-1879 www.askona.com
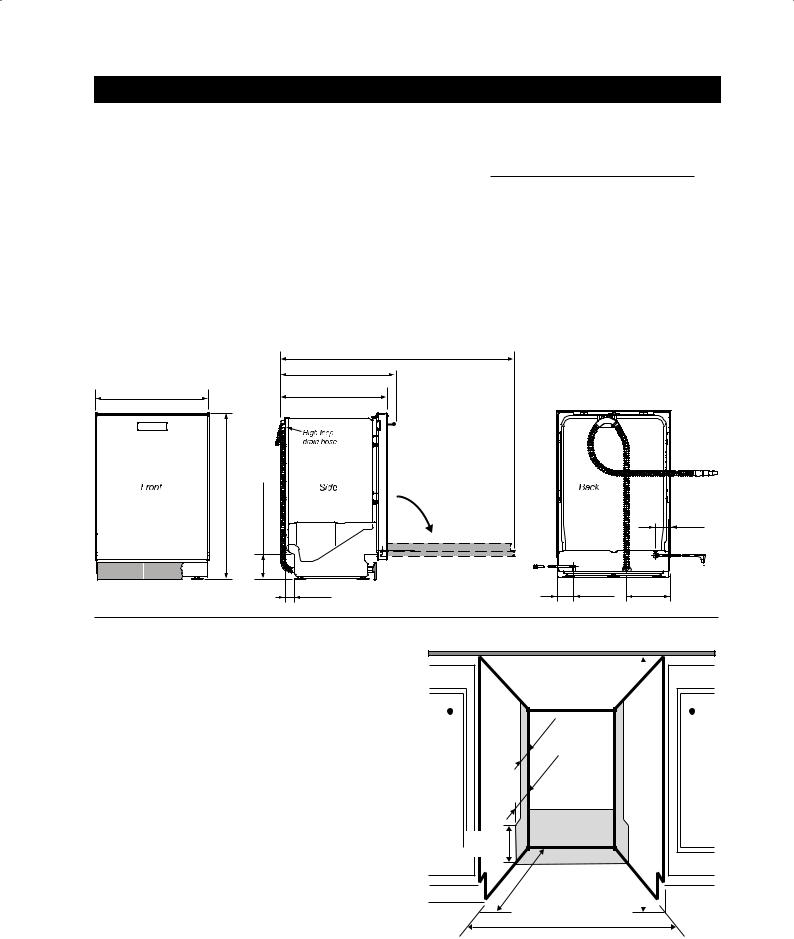
XXL DISHWASHERS
D5434XXL W/B/S, D5624XXLS, D5634XXLHS, D5654XXLHS, D5894XXLHS, D5894AXXLHS
UNIT DIMENSIONS
|
U.S. |
Metric |
|
|
|
Height (Adjustable)* |
34-3/8˝ to 36-1/2˝ |
873 mm to 927 mm |
|
|
|
Width |
24˝ |
610 mm |
|
|
|
Depth (Includes high loop) |
22-7/8˝ |
581 mm |
|
|
|
DepthW/handle |
24-7/8˝ |
632 mm |
(D5634XXLHS, D5654XXLHS, |
|
|
D5894XXLHS) |
|
|
|
|
|
Depth W/Door Open |
49-1/2˝ |
1257 mm |
|
|
|
Weight |
110 Ib |
50 kg |
|
|
|
Technical Data
Electricity |
120V, 60Hz, 15 amp |
|
|
Water pressure |
4.2 - 140 psi, |
|
0.03-1.0 MPa, |
|
0.3-10 Bar |
|
|
Heating element |
1200 watt |
|
|
Max loading |
1300 watt |
|
|
* Total height can be reduced by 1/2˝ (13 mm) by removing upper trim, and lowering side trim (2).
|
24-7/8"; 632 mm |
|
D5634XXLHS, D5654XXLHS, D5894XXLHS |
24" |
22-7/8" |
610 mm |
581 mm |
| <![if ! IE]> <![endif]>*34-3/8" to 36-1/2" *873 mm to 927 mm |
<![if ! IE]> <![endif]>5-3/8" to 7-3/8" 137 mm to 187 mm |
|
2" |
|
50 mm |
49-1/2"
1257 mm
Door
3-3/8"
86 mm
2-7/8"
73 mm
9"
229 mm
PREPARING THE LOCATION
Cutout Dimensions
|
U.S. |
Metric |
|
|
|
Height |
34-3/8˝ to 36-1/2˝ |
873 to 927 mm |
|
|
|
Width |
24˝ |
610 mm |
|
|
|
Depth |
24˝ |
610 mm |
|
|
|
The best place for your dishwasher is in the kitchen near the sink. This makes it easier to connect the water and drain supply lines.
A built-in dishwasher must be enclosed on the top, both sides and the back.
The power-supply receptacle for the appliance shall be installed in a cabinet or on a wall adjacent to the undercounter space in whitch the appliance is to be installed.
The electrical and water supplies should enter through the area indicated by the shading on the illustration at right. Preferably, they should come through the right side of the machine. The access hole must be round and smooth and no bigger than 1-1/2˝ (38 mm) in diameter. If the partition is metal, it needs to be covered with an edge protector. Use caution when the appliance is installed or removed, to reduce the likelihood of damage to the power-supply cord.
2" |
mm |
|
51 |
|
|
4" |
|
mm |
102 |
|
|
5-3/8"  136 mm
24" |
mm |
610 |
|
24"
610 mm
| <![if ! IE]> <![endif]>3/8" to 36-1/2" minimum |
<![if ! IE]> <![endif]>873-927 mm |
| <![if ! IE]> <![endif]>34- |
|
|
|
Customer Care Center |
Page 3 |
1-800-898-1879 www.askona.com
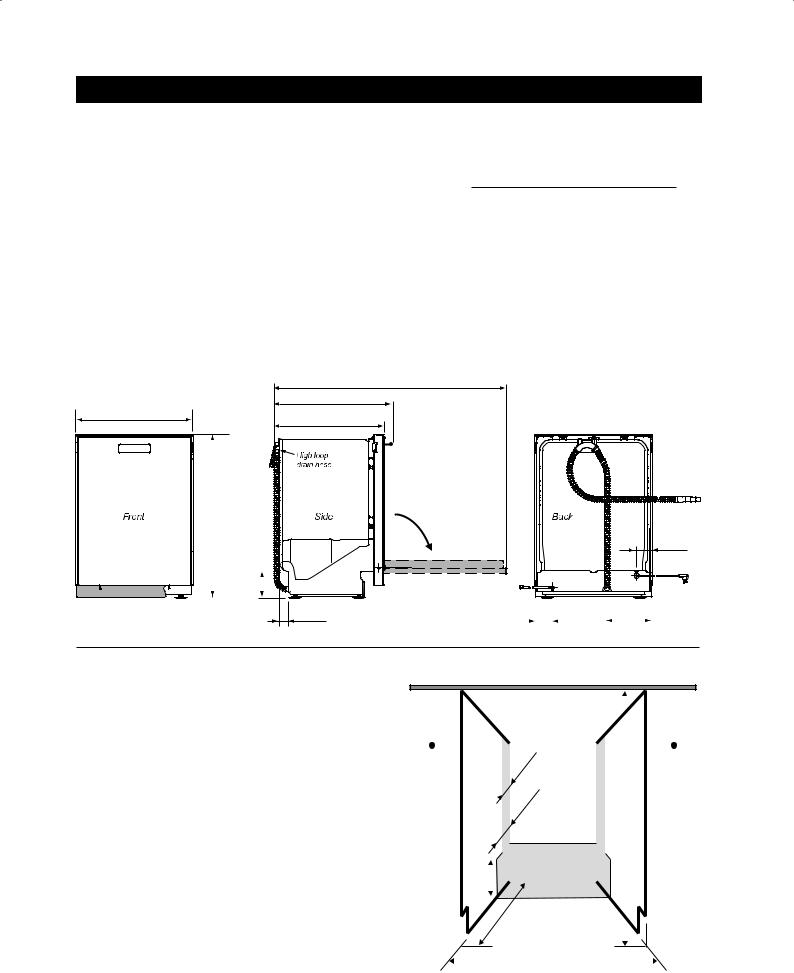
ADA AND XL DISHWASHERS
D5424ADA W/B/S, D5634ADAHS, D5424XL W/B/S, D5624XLCS, D5434XL W/B/S, D5454XL S, D5634XLHS, D5638XLHS, D5644XLCS
UNIT DIMENSIONS
|
U.S. |
Metric |
|
|
|
Height (Adjustable)* |
32-1/4˝ to 34˝ |
819 mm to 864 mm |
|
|
|
Width |
24˝ |
610 mm |
|
|
|
Depth (Includes high loop) |
22-7/8˝ |
581 mm |
|
|
|
DepthW/handle |
24-7/8˝ |
632 mm |
(D5634ADAHS, D5624XLCS, |
|
|
D5634XLHS, D5638XLHS, |
|
|
D5644XLCS) |
|
|
|
|
|
Depth W/Door Open |
48-3/8˝ |
1229 mm |
|
|
|
Weight |
108 Ib |
49 kg |
|
|
|
* 32-1/4˝ (819 mm) height requires removal of top trim, and lowering side trim (2).
Technical Data
Electricity |
120V, 60Hz, 15 amp |
|
|
Water pressure |
4.2 - 140 psi, |
|
0.03-1.0 MPa, |
|
0.3-10 Bar |
|
|
Heating element |
1200 watt |
|
|
Max loading |
1300 watt |
|
|
24"
610 mm
24-7/8"; 632 mm
DepthW/handle
22-7/8"; 581 mm
| <![if ! IE]> <![endif]>32-1/4"* to 34" |
<![if ! IE]> <![endif]>819* mm to 864 mm |
<![if ! IE]> <![endif]>5-3/8" to 8-1/8" |
|
<![if ! IE]> <![endif]>137 mm to 206 mm |
|
|
|||||
|
|
|
|
|
|
|
|
|
|
|
|
|
|
|
|
|
|
2"
50 mm
48-3/8"
1229 mm
Door
|
|
|
|
|
|
|
|
|
|
3-3/8" |
|
|
9" |
|
|
|
|
|
|
|
|||
|
|
86 mm |
|
|
|
229 mm |
|
2-7/8"
73 mm
PREPARING THE LOCATION
Cutout Dimensions
|
U.S. |
Metric |
|
|
|
Height |
*32-1/4˝ to 34˝ |
819 to 864 mm |
|
|
|
Width |
24˝ |
610 mm |
|
|
|
Depth |
24˝ |
610 mm |
|
|
|
The best place for your dishwasher is in the kitchen near the sink. This makes it easier to connect the water and drain supply lines.
A built-in dishwasher must be enclosed on the top, both sides and the back.
The power-supply receptacle for the appliance shall be installed in a cabinet or on a wall adjacent to the undercounter space in whitch the appliance is to be installed.
The electrical and water supplies should enter through the area indicated by the shading on the illustration at right. Preferably, they should come through the right side of the machine. The access hole must be round and smooth and no bigger than 1-1/2˝ (38 mm) in diameter. If the partition is metal, it needs to be covered with an edge protector. Use caution when the appliance is installed or removed, to reduce the likelihood of damage to the
power-supply cord.
Page 4
|
|
|
|
|
|
|
|
|
|
|
|
|
|
|
<![if ! IE]> <![endif]>minimum34"to1/4" |
|
|
|
|
|
|
|
|
|
|
|
|
|
|
|
|
|
|
|
|
|
|
|
|
|
|
|
|
|
|
|
|
|
|
|
|
|
|
|
|
|
|
|
|
|
|
|
|
|
|
|
|
|
|
|
|
|
|
|
|
|
|
|
|
|
|
|
|
|
|
|
|
|
|
|
|
|
|
|
|
|
|
|
|
|
|
|
|
|
|
|
|
|
|
|
|
|
|
|
|
|
|
|
|
|
|
2" |
mm |
|
<![if ! IE]> <![endif]>mm864-*819 |
|
|
|
|
||
|
|
|
|
|
|
|
|
|
|
|
|
51 |
|
|
|
|
|
|
|
|
|
|
|
|
|
|
|
|
|
|
|
|
|
4" |
mm |
|
|
|
|
|
|
|
|
|
|
|
|
|
|
|
|
|
|
|
|
102 |
|
|
|
|
|
|
|
|
|
|
|
|
|
|
|
|
|
|
|
|
|
|
|
|
|
|
|
|
|
|
|
|
|
|
|
|
|
|
|
|
|
|
|
|
|
<![if ! IE]> <![endif]>- |
|
|
|
|
|
|
|
|
|
|
|
|
|
|
|
|
|
|
|
|
|
|
|
|
|
|
|
||
|
|
5-3/8" |
|
|
|
|
|
|
|
|
|
|
|
|
|||||||
|
|
136 mm |
|
|
|
|
|
|
<![if ! IE]> <![endif]>*32 |
|
|
|
|
|
|
||||||
|
mm |
|
|
|
|
|
|
|
|||||||||||||
|
|
|
|
|
|
|
|
|
|
|
|
|
|||||||||
|
|
|
|
|
|
|
|
|
|
|
|
|
|
|
|
|
|
|
|
|
|
|
|
|
|
24" |
|
|
|
|
|
|
|
|
|
|
|||||||
|
|
|
|
|
|
|
|
|
|
|
|
||||||||||
|
|
|
|
|
|
|
|
|
|
|
|
|
|
||||||||
|
610 |
|
24" |
|
|
|
|
|
|
|
|
||||||||||
|
|
|
|
|
|
|
|
|
|
||||||||||||
|
|
|
|
|
|
|
|
|
|
|
|
|
|
|
|
|
|
|
|
|
|
|
|
|
|
|
|
|
|
|
|
|
|
|
|
|
|
|
|
|
|
|
|
|
|
|
|
|
|
|
|
|
|
|
|
|
610 mm |
|
|
|
|
|
|
||
* 32-1/4˝ (819 mm) height requires removal of top trim, and lowering side trim (2).
CORNER INSTALLATION
If the dishwasher is installed in a corner, there must be a minimum clearance of 2˝ (50 mm) from the side wall so the door can open.
2˝ clearance
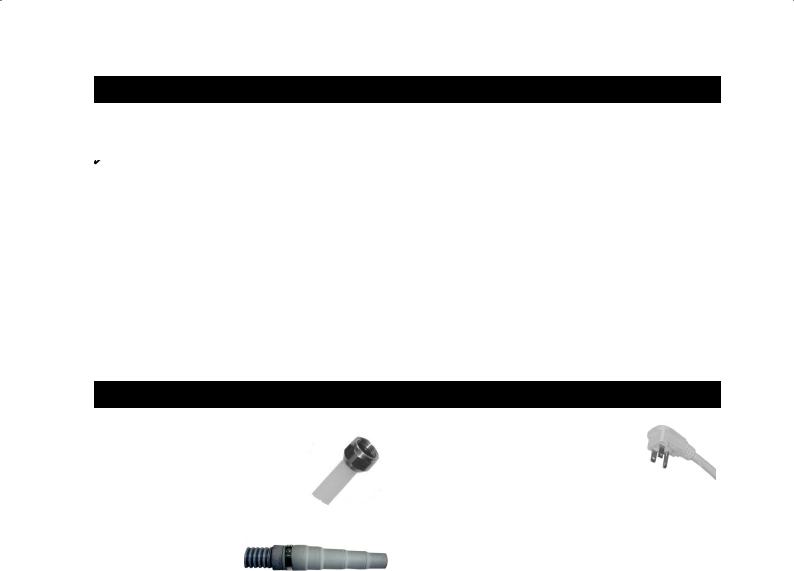
EASYINSTALL CONNECTIONS
PEX tubing with 3/8˝ compression fitting |
Electrical cord |
|
PEX tubing has a 95-year spec life. |
120 volts, 15 amp cord is supplied with |
|
Fits American dishwasher water |
the dishwasher. |
|
supply valves. Be sure to install the |
|
|
O-Ring which is attached to the PEX |
|
|
tubing in a plastic bag. |
|
|
WARNING! |
||
|
||
Drain hose boot |
Do not use an extension cord for this appliance. |
|
|
||
Ready to be cut to desired |
|
|
drain connection. Only |
|
|
one clamp required. |
|
Customer Care Center |
Page 5 |
1-800-898-1879 www.askona.com
 Loading...