


FO 98 P.1
FC 98 P.1
FD 98 P.1
GB |
Multifunction oven with self-cleaning by fast clean |
|
Instruction for installation and use |
26 |
|

Congratulations on choosing an Ariston appliance, which you will find is dependable and easy to use. We recommend that you read the instructions in this owner's manual carefully before use for the best performance and to extend the life of your appliance, as it will provide you with all the instructions you require to ensure its safe installation, use and maintenance. Always keep this owner's manual close to hand since you may need to refer to it in the future. Thank you.
Close-up view
A 
 H
H
G 
 F
F
|
C |
250 |
|
200 |
|
|
|
150 |
|
|
100 |
|
|
40 |
|
P I Z Z A |
|
B |
D |
C |
12 |
6 |
13 |
|
9 |
10 |
|
|
|
C |
250 |
|
|
|
|
200 |
|
|
|
|
|
|
|
|
14 |
|
|
|
150 |
|
|
|
|
100 |
|
|
|
|
|
|
40 |
|
8 |
P I Z Z A |
7 
1 |
2 |
5 |
11 |
3 |
4 |
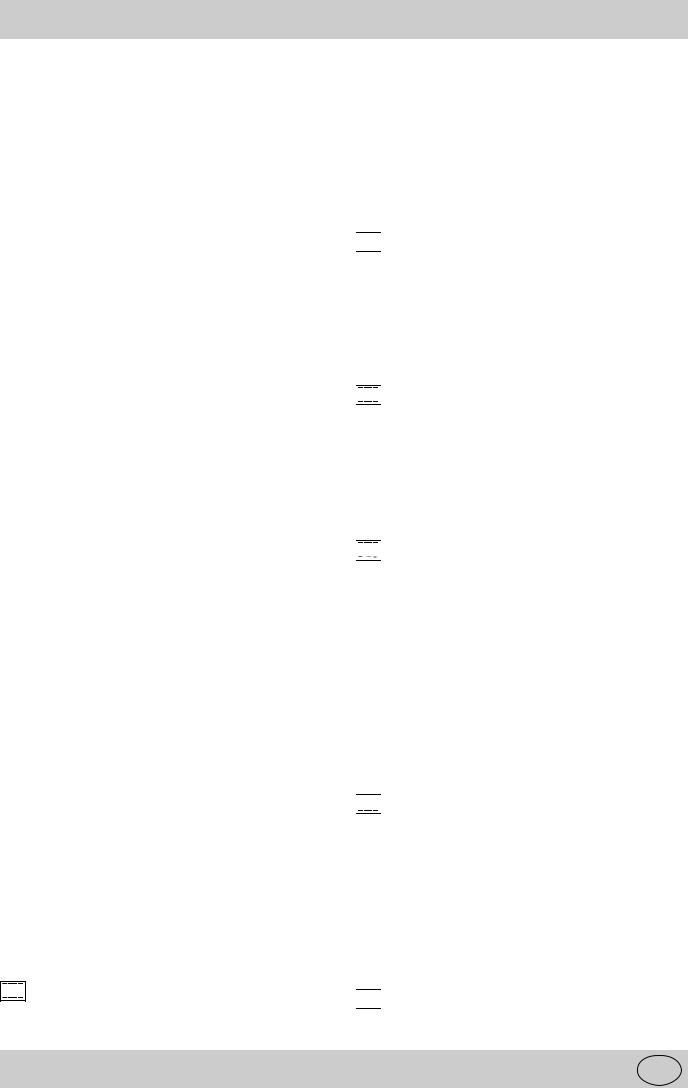
A.Control Panel
B.Cooking mode selection knob
C.Cooking temperature / time selection knob
D.Electronic programmer
F.Dripping Pan or Baking Sheet
G.Oven Rack
H.Guides for sliding the racks or dripping pan in and out
1.End cooking time setting/ clock/ date
2.Control panel lock / timer / cooking time setting
3.Language setting
4.Start cooking / stop cooking / oven light / display brightness
5.Mode description
6.Mode number
7.Cooking time
8.End cooking time
9.Graduated temperature scale
10.Energy level for grill modes
11.Time or temperature / Energy percentage
12.Electric elements in use
13.Clock display
14.Programmed cooking indicator
27 |
GB |

How to use your oven
The 7 Cuochi oven combines the advantages of traditional convection ovens with those of the more modern fan assisted models in a single appliance.
It is an extremely versatile appliance that allows you to choose easily and safely between different cooking modes. The various features offered by the oven are selected by means of selector knob "B" situated on the control panel.
Setting the clock
The clock can only be set if the oven is turned off.
After the appliance has been connected to the power supply, or following a power failure, the clock displays a flashing 12:00 or the last time memorised.
Any adjustments to the time setting can be made by pressing button 1 and resetting the clock using knob "C", which you can modify until the scrolling writing disappears completely from the display.
Setting the date
To update the date, press button 1 until the word "YEAR" comes up on the display. Update the year by turning knob "C" and then press button 1 to set the month, again using knob "C". Press button 1 again to set the day using knob "C". Press button 1 to memorise the date set.
Timer Feature
The timer can only operate when the oven is turned off. Please remember that the timer does not control the starting or stopping of the oven, it merely sounds a buzzer when the time is up and can be interrupted at any time just by pressing a button.
To set the timer, press button 2, and then make the necessary adjustment using knob "C".
Press button 4 to start the timer.
At all times during the timer operation, you may:
•adjust its duration using knob "C";
•stop the countdown by pressing button 4 for approximately 3 seconds or turning knob "B" anticlockwise;
•enable/disable the control panel lock, by pressing button 2 for at least 3 seconds (see the paragraph entitled "Locking and Unlocking the Control Panel").
Selecting the language
Press button 3 for a few seconds with the oven turned off. The languages available appear in sequence on the display panel. Press button 3 again to select the desired language.
Selecting the display panel brightness
To update the date, press button 4 until the word "BRIGHTNESS" comes up on the display.
Turn knob "C" clockwise/anticlockwise to increase/ decrease the brightness of the display panel. A few seconds after this selection, the oven will be ready for further instructions.
Locking and Unlocking the Control Panel
This option enables the user to lock all the buttons and knobs. We especially advise you to use this option if there are children present.To enable the control panel lock, press button 2 for a few seconds. The word "LOCKED" comes up on the display. To restore the usual commands to the appliance, just press button 2 again for a few seconds. The word "UNLOCKED" will come up on the display.
The oven light
At any time, including during pre-heating and cooking, you can turn the oven light on or off by pressing button 4. When the oven is turned off, the light turns off automatically 10 minutes after the last instructions were entered onto the control panel.
Cooling ventilation
In order to reduce the external temperature of the oven, this appliance has been equipped with a cooling fan. During cooking, the fan is always on and a normal flow of air can be heard exiting between the oven door and the control panel.
In order to raise the temperature inside the oven more quickly during pre-heating, the speed of the air outlet is approximately half the speed of air outlet during cooking. If there is a hob above the oven, the cooling fan may switch itself on automatically to protect the electronic components, even if the appliance has been switched off.
Note: When cooking is done, the fan stays on until the oven cools down sufficiently.
How To Use Your Oven
Turn knob "B" clockwise to choose from the default cooking modes or among the pre-entered recipes available (see Ariston recipe book).
For each cooking mode, the display will indicate the following:
•the cooking mode name (or that of the recipe);
•the cooking mode number (or that of the recipe);
•the default temperature;
•the heat sources;
Should the recommended temperature not be to your liking, you can always adjust it using knob "C".
Each cooking mode is also associated with a recommended cooking time, which you can modify, from one minute to 10 hours, by pressing button 2 and then turning knob "C" to set it to the desired value. The cooking time can be adjusted until the scrolling wording disappears completely from the display panel. The selected cooking time does not include the time required for preheating the oven.
To start cooking, press cooking start button 4.
With the exception of the "Fast cooking" and "Grill" modes, the oven will now begin the pre-heating stage, during which you may still:
•change the temperature by turning knob "C";
•change the cooking time by pressing button 2 and then turning knob "C";
•enable/disable the control panel lock, by pressing button 2 for at least 3 seconds (see the paragraph entitled "Locking and Unlocking the Control Panel");
•stop cooking and turn the oven off by turning knob "B" anti-clockwise.
Note: pre-heating is performed automatically by the appliance, which sets the pre-heating time according to the temperature selected by the user. The display panel will feature how long the oven will take to preheat before cooking starts.
Once the temperature set has been reached, the oven starts the cooking stage in itself, during which you may
GB |
28 |
still:
•change the temperature by turning knob "C"; if you increase it by more than 25°C, the oven returns to the pre-heating mode;
•change the cooking time by pressing button 2 and then turning knob "C";
•enable/disable the control panel lock, by pressing button 2 for at least 3 seconds (see the paragraph entitled "Locking and Unlocking the Control Panel");
•stop cooking and turn the oven off by turning knob "B" anti-clockwise.
Once cooking is done, the wording "END-READY" will come up on the display, and a buzzer will sound, which will stop after 1 minute, after you press a button or after you turn one of the two knobs.
Notice: The first time you use your appliance, we recommend that you set the thermostat to the highest setting and leave the oven on for about half an hour with nothing in it. Then, open the oven door and let the room air. The odour that is often detected during this initial use is due to the evaporation of substances used to protect the oven during storage and until it is installed.
Notice: Place the dripping pan provided on the bottom shelf of the oven to prevent any sauce and/or grease from dripping onto the bottom of the oven only when grilling food or when using the rotisserie (only available on certain models). For all other types of cooking, never use the bottom shelf and never place anything on the bottom of the oven when it is in operation because this could damage the enamel. Always place your cookware (dishes, aluminium foil, etc. etc.) on the grid provided with the appliance inserted especially along the oven guides.
Notice: the appliance is fitted with a diagnosis system which detects any malfunctions. The user is informed of the latter by messages such as:
•"F nn" (nn = a number comprising two digits): in these cases, you need to call for technical assistance as the oven is faulty;
•"W nn" (nn = number comprising two digits): in these cases, it is best to call for technical assistance as the oven has detected a malfunction, although it continues to operate.
Cooking mode description
The cooking modes are selected by turning knob "B". ance. Excellent results can be attained when cooking veg- etable-based side dishes like courgettes, aubergines, peppers, etc.
Desserts: this mode is also perfect for baking leavened cakes.
The "Multi-cooking" mode can also be used to thaw red or white meat and bread, by setting the temperature to 80 °C. To thaw more delicate foods, set the thermostat to 60°C.
: "Traditional"
This is the oldest cooking mode suitable for cooking individual dishes. Two heating elements (one at the top of the oven and the other at the bottom) work together.
The air heats up upon contact with these heat sources, and circulates around the inside of the oven to provide uniform heat, as the hot, lighter air tends to rise. This is caused by natural convection. This cooking mode is especially recommended when cooking simmered recipes using covered casserole dishes (hotpots, tripe, etc.) or for Bain Marie cooking (crème caramel, terrines, etc.). In this case, use the dripping pan as a dish support and place it on the 2nd rack from the oven bottom.
We recommend you pre-heat the oven before placing your dishes in it.


 : "Pastry"
Only the circular heating element and the fan come on to provide delicate heat, suitable for baking cakes and pastries such as brioches, chocolate cake, fruitcake, sponge cake, mini cup cakes, meringues, etc.
In this case, use the dripping pan as a dish support and place it on the 2nd rack from the oven bottom.
We recommend you pre-heat the oven before placing your dishes in it.


 : "Fast cooking"
The combination of all the heating elements together with the fan guarantees a uniform distribution of heat throughout the oven.
This particular cooking mode is ideal for fast cooking (not requiring any pre-heating) and for cooked dishes (frozen, pre-cooked food).
In this case, use the dripping pan as a dish support and place it on the 2nd rack from the oven bottom.


 : "Multicooking"
The combination of all the heating elements together with the fan guarantees a uniform distribution of heat throughout the oven.
This cooking mode is recommended for cooking several dishes on more than one rack.
Even if the dishes vary in nature, their respective flavours are maintained during cooking.
When using this cooking mode, all the dishes should require the same cooking temperature (you just need to take them out gradually as each one is ready). When cooking on two racks, for example, use the dripping pan as a dish support on the first oven rack from the bottom and the grid on the third rack from the bottom.
We recommend you pre-heat the oven before placing your dishes in it.


 : "Pizza"
The heating elements (bottom and circular) are turned on to heat the oven up quickly.
Your pizzas and tarts will benefit from a greater amount of heat from below, thus guaranteeing the rapid baking of the dough during cooking. As for the fan, the latter browns the surface as necessary, making the food even more appetising.
Use the dripping pan as a dish support and place it on the 1st rack from the oven bottom.
We recommend you pre-heat the oven before placing your dishes in it.


 : "Grill"
The top heating element comes on: the grill goes red and emits infrared rays just like those contained in sunlight.
29 |
GB |
 Loading...