


FM 51 IX GB
Multifunction Oven
Instructions for installation and use

Congratulations on choosing an Ariston appliance, which you will find is dependable and easy to use. We recommend that you read this manual for best performance and to extend the life of your appliance. Thank you.
Close-up View
A.Control Panel
B.Knob for selecting the cooking features.
C.Knob for adjusting the cooking temperature.
D.Timer Knob (only on certain models)
E.Oven Light (only on certain models) - When the light is on, it indicates that the oven is heating. It will turn off when the temperature setting has been reached.
F.Drip pan
G.Oven Racks
H.Guides for sliding the racks or drip pan in and out.
A
G
45 |
15 |
max |
60 |
|
|
220 |
|
|
|
|
100 |
|
|
|
180 |
|
30 |
|
140 |
 H
H
 F
F
E
45 |
15 |
max |
60 |
|
|
220 |
|
|
|
|
100 |
|
|
|
180 |
|
30 |
|
140 |
B |
D |
C |
How To Use Your Appliance
The Multifunction oven combines in a single appliance the advantages of traditional convection ovens with those of modern forced air ventilation ovens.
It is an extremely versatile appliance that allows you to easily and safely choose between 5 different cooking modes. The various features are selected by means of the selector knob (B) and the thermostat knob (C) on the control panel.
Attention: The first time you use the oven we recommend that you set the thermostat on the hightest setting and leave the oven on for about a half of an hour with nothing in it. Then, open the oven door and let the room air. The odour that is often detected during this initial use is due to the evaporation of substances used to protect the oven during storage and until it is installed.
Convection Mode 
Set the termostat knob (C) between 60°C and Max. The outer heating elements at both the top and the bottom of the oven will come on. The heat is distributed uniformly from the top to the bottom. The convection mode is recommended for preparing meat-based dishes featuring beef or veal which require slow cooking with the addition of liquids. It still remains the best cooking mode for dry pastries and fruit in general. When cooking in convection mode, only use one drip pan or cooking rack at a time, otherwise the the heat distribution with be uneven. Select from among the various rack heights based on the whether the dish needs more or less heat from the top or bottom.
Ventilation Mode 


Set the thermostat knob (C) between 60°C and Max. Both the heating elements and the fan will come on. Since the heat remains constant and uniform throughout the oven, the air cooks and browns food uniformly over its entire surface. With this mode, you can also cook various dishes at the same time, as long as their respective cooking temperatures are the same. A maximum of 2 rack levels can be used at the same time, following the instructions in the section entitled, "Cooking On More Than One Rack".
This cooking mode is ideal for au gratin dishes or those which require an extended cooking time.
Moreover, the excellent heat distribution makes it possible to use lower temperatures when cooking roasts. This results in less loss of juices, meat which is more tender and a decrease in the loss of weight for the roast.
The ventilated mode is especially suited for cooking fish, which can be prepared with the addition of a limited amount of condiments, thus maintaining their flavor and appearance.
The ventilated mode can also be used to thaw white or red meat, fish and bread by setting the temperature to 80°-100°C.To thaw more delicate foods, set the termostat to 60°C or use only the cold air circulation feature by setting the thermostat to 0°C.
2
Grill 
Set the thermostat to “C”: Max.
The central heating element of the grill will come on. The incandescent heating element cooks food by means of thermal radiation directed downward.The extremely high and direct temperature of the grill makes it possible to brown the surface of meats and roasts while locking in the juices to keep them tender.
Double Grill 
Set the thermostat to “C”: Max.
Both of the grill elements are activated. This oversized grill has a completely new design, increasing cooking efficiency by 50%.The double grill also eliminates pockets of unheated air in the corners of the oven.
Ventilated Double Grill 
Set the thermostat to “C”: between 60°C and 200°C.
Both of the heating elements of the grill are activated, as well as the fan. This combination of features increases the effectiveness of the unidirectional thermal radiation of the heating elements through forced air circulation of the air throughout the oven.This helps prevents foods from burning on the surface, allowing the heat to penetrate into the food.
Timer (D)
To use the timer, it must be wound using the "D" knob. Turn the knob almost one full turn in the clockwise direction  .
.
Then, turn the knob back  , and set the time by positioning the number (minutes) on the knob dial beneath the mark on the control panel.
Oven Light
The light comes on when the "B" knob is turned to the  setting.The light illuminates the oven and remains on when any of the heating elements is turned on.
Forced AirVentilation
In order to reduce the external temperature of the oven, some models have been equipped with a cooling fan which comes on when the "B" knob is turned to a cooking setting. The fan remains on during the cooking process and a flow of air can be heard exiting between the oven door and the control panel. After you have finished cooking, it a good idea to keep the fan on for a few minutes by setting the thermostat knob to "•" in order to allow the oven to cool down rapidly.
3rd Oven Glass
This appliance conforms to all relevant European Standards regarding surface temperatures, however, in order to further decrease the temperature of the oven door and reduce energy consumption, a supplementary kit has been made available as an optional extra. The fitting of this kit should be considered, if energy saving is desirable or if young children may be present. To purchase the supplementary kit code 053413 contact your nearest Merloni Service Centre.
Warning
Only use the bottom shelf of the oven when using the rotisserie to cook (where present). For all other types of cooking, never use the bottom shelf and never place anything on the bottom of the oven when it is in operation because this could damage the enamel. Always place your cookware (dishes, aluminium foil, etc. etc.) on the grate provided with the appliance inserted especially along the oven guides.
How to Keep Your Oven in Shape
Before cleaning your oven, or performing maintenance, disconnect it from the power supply.
To extend the life of your oven, it must be cleaned frequently, keeping in mind that:
•The self-cleaning panels (if present) and the enameled parts should be washed with warm water - abrasive powders and corrosive substances should be avoided;
•The inside of the oven should be cleaned immediately after use with warm water and soap; the soap should be rinsed away and the interior dried thoroughly;
•Stainless steel can be stained if it remains in contact with agressive detergents (containing phosphorus) or water with a high lime content. We recommend that you rinse these parts thoroughly and dry them well after cleaning. It is also a good idea to dry any water spills;
•Never line the bottom of the oven with aluminium foil because the buildup of heat will not only impede the cooking process, but could also damage the enamel.
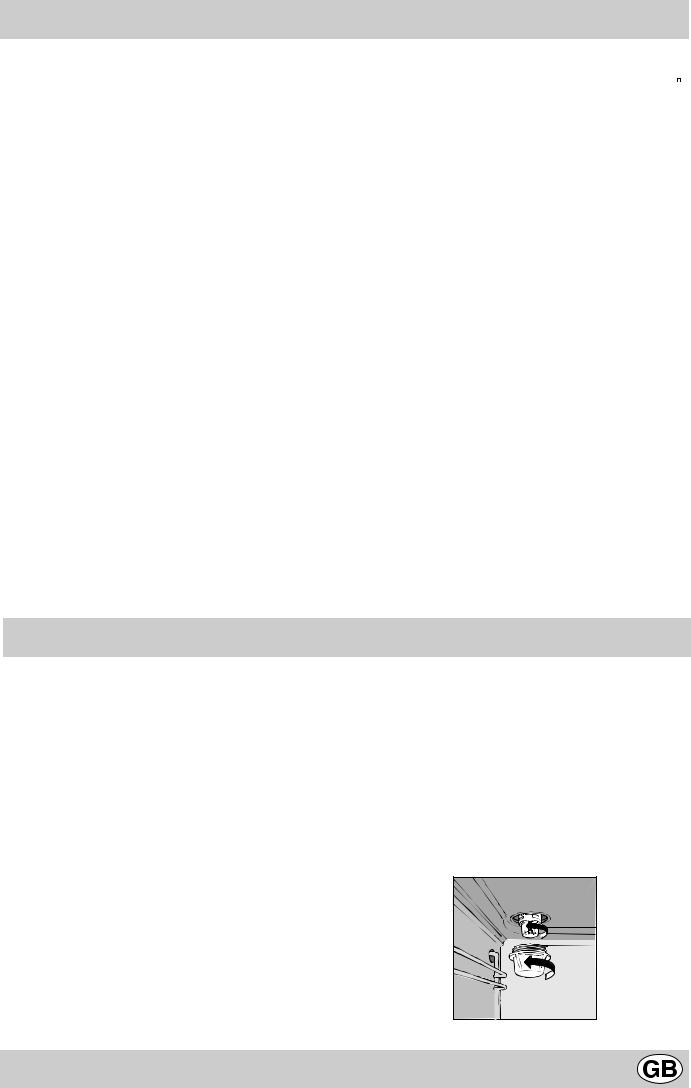
Replacing the Lamp in the Oven
•Cutoff the supply of power to the oven by turning off the omni-polar switch connecting it to the mains, or by removing the plug if it is accessible;
•Unscrew the glass cover attached to the lamp holder;
•Unscrew the lamp and replace it with another high-tem- perature lamp (300°C) with the following characteristics:
-Voltage: 230/240 V
-Wattage: 25W
-Socket: E14
•Remount the glass cover and reconnect the appliance to the power supply.
3
 Loading...