

Soundtrack
User Manual

K
Apple Computer, Inc.
© 2006 Apple Computer, Inc. All rights reserved.
Under the copyright laws, this manual may not be
copied, in whole or in part, without the written consent
of Apple. Your rights to the software are governed by
the accompanying software license agreement.
The Apple logo is a trademark of Apple Computer, Inc.,
registered in the U.S. and other countries. Use of the
“keyboard” Apple logo (Option-Shift-K) for commercial
purposes without the prior written consent of Apple
may constitute trademark infringement and unfair
competition in violation of federal and state laws.
Every effort has been made to ensure that the
information in this manual is accurate. Apple Computer,
Inc. is not responsible for printing or clerical errors.
Apple Computer, Inc.
1 Infinite Loop
Cupertino, CA 95014-2084
408-996-1010
www.apple.com
Apple, the Apple logo, Final Cut, FireWire, iTunes, Logic,
Mac, Mac OS, Macintosh, QuickTime, and Soundtrack are
trademarks of Apple Computer, Inc., registered in the
U.S. and other countries.
Finder is a trademark of Apple Computer, Inc.
AppleCare is a service mark of Apple Computer, Inc.,
registered in the U.S. and other countries.
Production stills from the films “Koffee House Mayhem”
and “A Sus Ordenes” provided courtesy of Refuge Films.
“Koffee House Mayhem”
“A Sus Ordenes”
http://www.refugefilms.com
Other company and product names mentioned herein
are trademarks of their respective companies. Mention
of third-party products is for informational purposes
only and constitutes neither an endorsement nor a
recommendation. Apple assumes no responsibility with
regard to the performance or use of these products.
© 2005 Jean-Paul Bonjour;
© 2005 Eric Escobar.

1
Contents
Preface 7 An Introduction to Soundtrack
7
What Is Soundtrack?
9
Creating Music with Soundtrack
10
Resources for Learning About Soundtrack
11
Soundtrack Onscreen User Manual
11
Apple Websites
Chapter 1 13 Audio and Music Basics
13
Basic Audio Concepts
18
Basic Music Concepts
Chapter 2 21 Setting Up Your System
21
System Considerations
23
Connecting Audio Equipment
27
Example Hardware Setups
Chapter 3 31 The Soundtrack Interface
32
Project Window
37
Media and Effects Manager
42
Utility Window
Chapter 4 47 Getting Started with Soundtrack
47
Overview
48
Setting Up Your Workspace
51
Playing Projects
57
Locating and Adding Audio Files
66
Previewing Audio Files
69
Using Undo and Redo
70
Using Snap
72
Reconnecting Media Files
73
Setting Soundtrack Preferences
3

Chapter 5 77 Working with Projects
77
Creating and Opening Projects
78
Closing Projects
78
Setting Project Properties
82
Setting the Project Length
82
Saving Projects
83
Adding Audio Files to a Project
85
Viewing and Editing Clip Properties
86
Tracks, Busses, and Outputs
Chapter 6 89 Working in the Timeline
89
Moving Around in the Timeline
94
Working with Tracks, Busses, and Outputs
101
Editing Audio Clips
111
Working with Markers
Chapter 7 115 Working with Video in Soundtrack
11 5
Supported Video File Formats
11 6
Adding a Video to a Project
117
Playing the Video
11 9
Viewing Video Details
12 0
Working with a Video’s Audio
12 0
Using the Time Display and Time Ruler with Video
121
Using Markers with Video
12 4
Removing a Video from a Project
Chapter 8 125 Working with Audio Effects
12 6
Audio Effects Included with Soundtrack
13 4
Working with Effects
141
Working with Effect Presets
Chapter 9 143 Working with Automation
14 3
Working with Envelopes
151
Recording Automation Data
15 3
Working with Timeslices
Chapter 10 159 Recording Audio in Soundtrack
15 9
Getting Ready to Record
15 9
Recording Audio in the Timeline
163
Saving Recorded Clips
4
Contents

Chapter 11 165 Distributing Soundtrack Projects
166
Exporting a Project Mix
167
Exporting Selected Tracks, Busses, and Outputs
168
Exporting to QuickTime
168
Roundtrips Between Final Cut Express and Soundtrack
17 0
Exporting Audio to Final Cut Express
17 0
Distributing a Project and Its Media Files Together
Appendix A 173 Using Apple Loops Utility
17 3
What Is Apple Loops Utility?
174
The Apple Loops Utility Interface
17 9
Opening Files in Apple Loops Utility
18 0
Tagging Files in Apple Loops Utility
181
Working with Transients
183
Saving Changes to Files
18 4
Removing Files from the Assets Drawer
18 4
Apple Loops Utility Preferences
185
Apple Loops Utility Keyboard Shortcuts
Appendix B 189 Soundtrack Keyboard Shortcuts
18 9
General and File
18 9
Windows, Tabs, and Layouts
19 0
Project Playback and Setting the Playhead
191
General Editing
191
Editing Audio Clips in the Timeline
19 2
Adjusting Audio Clips in the Timeline
19 2
Navigating in the Timeline
19 3
Tracks and Markers
Recording
19 4
Appendix C 195 Solutions to Common Problems and Customer Support
19 5
Solutions to Common Problems
19 7
Calling AppleCare Support
Index 19 9
Contents
5


An Introduction to Soundtrack
Soundtrack gives you the tools you need to create
high-quality soundtracks for your video productions.
Music projects that until recently would have required an array of professional studio
equipment can now be completed in a home or project studio, using a personal
computer and readily available resources. A computer with a fast processor and
enough RAM can serve as a workstation for recording, arranging, mixing, and
producing complete music projects that can be played back on the computer, burned
on a CD or DVD, or distributed over the Internet.
For digital video editors, this development allows unprecedented opportunities for
increasing creative control over the music for video projects. Currently, most video
projects either use stock music clips from music libraries or rely on outside music
production houses to create original scores. Now, using digital music tools and
applications, video editors, including those with no musical training or experience, can
create high-quality soundtracks for their video projects with the same computer they
used to assemble and edit their video.
Preface
What Is Soundtrack?
Soundtrack is a music application built specifically for Mac OS X. Using Soundtrack,
even non-musicians can create professional-sounding, royalty-free soundtracks for
Final Cut Express video projects.
Soundtrack lets you build musical arrangements using prerecorded audio files called
loops.
Loops contain rhythmic patterns that you can extend to fill any amount of time.
In a Soundtrack project, you can combine and arrange loops and non-looping audio
files, add professional-quality effects, mix your music in stereo, and export the final mix
to a standard audio file that can be played on any multimedia-equipped computer or
imported into Final Cut Express.
7

Soundtrack includes the following features:
Â
Work in real time:
You can work on Soundtrack projects in real time, adding and editing
audio while the project is playing, and hear the results of your changes immediately.
Â
Use existing loop libraries:
Soundtrack includes a large collection of Apple Loops and
is compatible with a wide variety of existing loop libraries, including those created
for use with Sonic Foundry’s ACID.
Â
Mix loops recorded at different tempos and keys:
Soundtrack automatically matches
loops to the project tempo and key, allowing you to freely combine loops from
different sources in a single project.
Â
Locate and preview files easily:
The Media and Effects Manager, a part of the Soundtrack
interface, provides powerful file browsing and search features, making it easy to locate
loops and one-shots by instrument, genre, mood, or other search criteria.
Â
Add professional-quality effects:
Soundtrack includes high-quality effects plug-ins that
you can use in your projects. You can also install third-party effects in the Audio Units
plug-in format.
Â
Use Final Cut Express scoring markers:
When using Soundtrack to score a video that
includes Final Cut Express scoring markers, Soundtrack recognizes and displays the
scoring markers in the Timeline. You can also add time markers and use them as cue
points to precisely synchronize the music to the action.
Â
Edit nondestructively:
All of the edits you make in Soundtrack are nondestructive,
allowing you to freely try out changes to audio files without altering the original file
and to use the same file in multiple projects.
Â
Record and edit automation:
You can record movements to sliders and other
onscreen controls, play back the automation, and edit it in the Timeline.
Â
Audio recording capability:
You can record audio directly in tracks in the Soundtrack
Timeline, including recording multiple takes.
8 Preface
An Introduction to Soundtrack
Creating Music with Soundtrack
Making use of the advanced digital audio capabilities of Macintosh computers and
Mac OS X, Soundtrack gives you a simple way to create music: After preparing the
video in Final Cut Express, you add media (audio and video files) to tracks in the
Soundtrack Timeline, edit and adjust your audio, and then add effects and automation
to create a final mix that you can export and distribute.
To create your Soundtrack projects, you use prerecorded loops and other audio files.
You can choose the style, tempo, and instrumentation of your music, and arrange
musical events in time, even with no musical experience or training. In short,
Soundtrack gives you greater creative control over the sound of your music than you
would get using stock music libraries or relying on an outside music production facility.
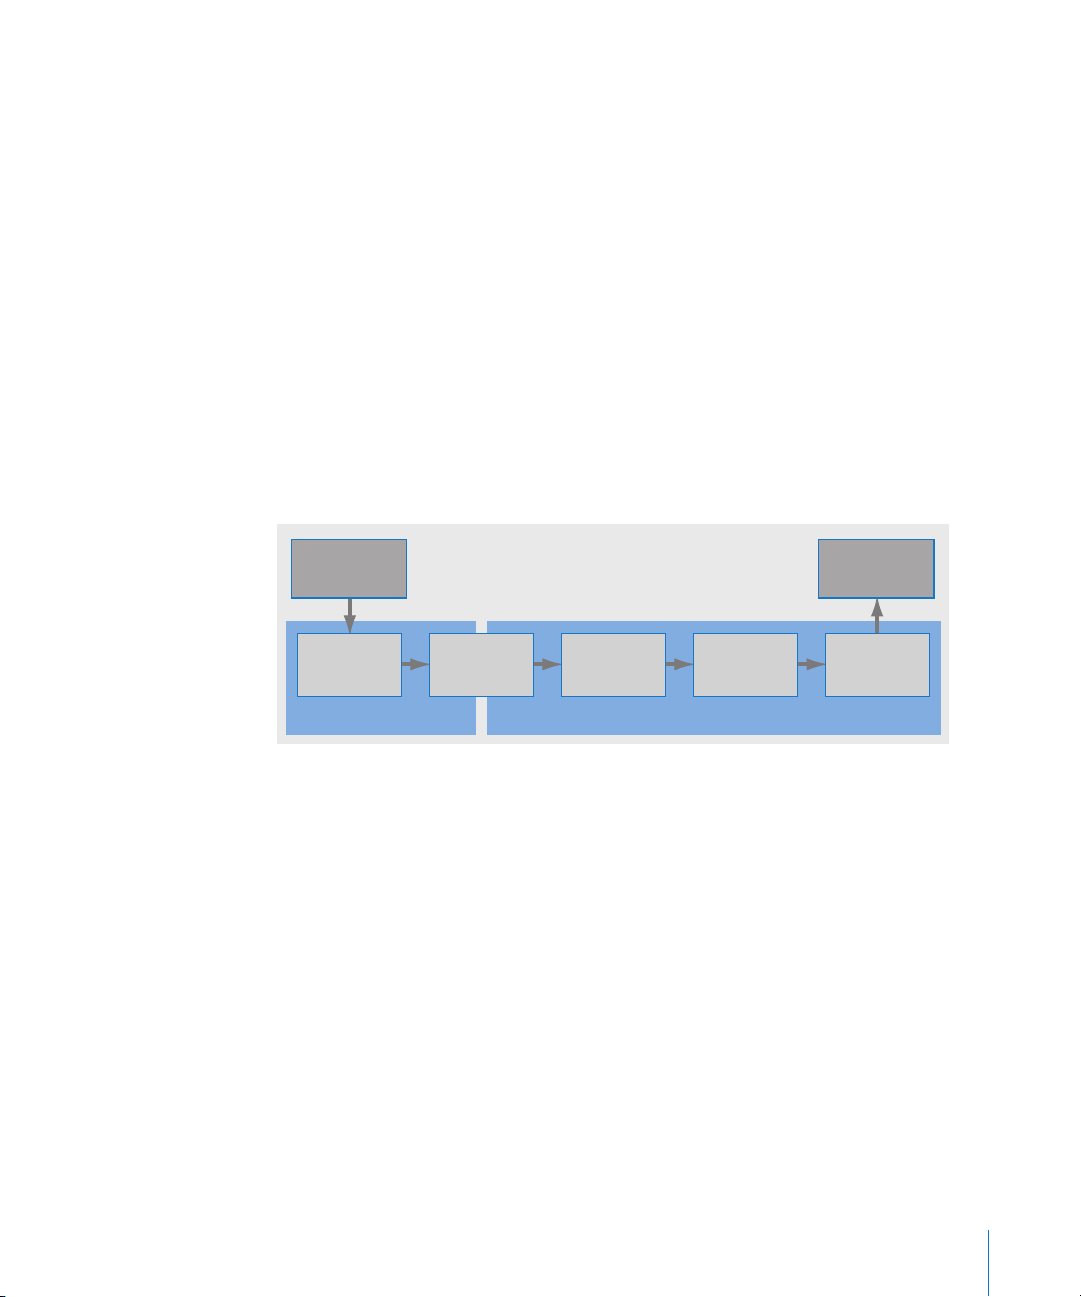
The following steps outline a typical Soundtrack work session. You won’t always
proceed in a strict linear order, and you may choose to overlap some steps. For
example, you may add more audio after starting to build your arrangement in the
Timeline, or you may make changes to the arrangement after you begin mixing.
Prepare
media
Locate and
preview media
Media Manager Project workspace
Creating Music with Soundtrack
Add
media
Build
arrangement
Mix Export
Import to
Final Cut Express
Step 1: Prepare the video
If you’re scoring a video, you’ll want to determine the length of the scenes to be scored,
what mood and style of music are appropriate for the video, and how the music will be
synchronized with the action at specific points. You can prepare the video in
Final Cut Express by adding scoring markers, which appear when you import the video
into Soundtrack.
Step 2: Add media
Once you’re ready, you begin by selecting the audio files you want to use in your
project. You can preview audio files in the Media and Effects Manager, and then add
them to the project Timeline. If you’re scoring a video, you import the video file into
the project so that you can view it as you create your score, and synchronize the music
with the video.
Preface
An Introduction to Soundtrack
9

Step 3: Build the arrangement
You build the arrangement by continuing to add audio clips to the Timeline, moving
and resizing them to create rhythmic patterns and define sections, and editing them in
a variety of ways. You can build drum and rhythm tracks to lay out the form and set the
basic mood, and then layer additional parts over the rhythm tracks to fill out the
arrangement. You can alter the mood and add interest to your music by changing the
instrumentation, changing tempo and key, and adding lead parts or sound effects to
create moments of tension and release.
Step 4: Mix
Once the arrangement is complete, you mix the project. Mixing involves shaping the
overall sound, balancing different parts of the music, and bringing focus to the key
moments in your project. You can further shape the sound of the project by adding
effects (such as EQ, reverb, delay, chorus, and distortion) and using automation to
create dynamic changes. When you finish mixing, you have one or more final mixes
that you can export and distribute.
Step 5: Export and distribute
When your project is complete, you export the final mix as a stereo audio file, which
can be played back on any multimedia-equipped computer. You can also export
individual tracks as audio files. Your exported audio files can be imported into
Final Cut Express or into another audio application such as Logic, burned on a CD or
DVD, and distributed in a variety of ways. You can also export a project containing a
video file as a QuickTime movie file.
Resources for Learning About Soundtrack
This manual describes the Soundtrack interface, commands, and menus, and gives stepby-step instructions for creating Soundtrack projects and for accomplishing specific tasks.
It also includes information on setting up your system and on audio basics. It is designed
to provide the information you need to get up to speed quickly so you can take full
advantage of the intuitive interface and powerful features of Soundtrack.
If you want to start by learning how to set up audio hardware to use with Soundtrack,
read Chapter 2, “Setting Up Your System,” on page 21. If you want to learn about the
features and controls in the Soundtrack interface, read Chapter 3, “The Soundtrack
Interface,” on page 31. If you want to jump right in and start using the application, skip
ahead to Chapter 4, “Getting Started with Soundtrack,” on page 47.
In addition to this manual, Soundtrack provides other sources of support.
10 Preface An Introduction to Soundtrack

Soundtrack Onscreen User Manual
The Soundtrack onscreen user manual allows you to access information directly
onscreen while you’re working in Soundtrack. To view this information, choose Help >
Soundtrack User Manual. The Soundtrack onscreen user manual is a fully hyperlinked
version of the Soundtrack User Manual, enhanced with many features that make
locating information quick and easy.
 The homepage provides quick access to various features, including Late-Breaking
News, the index, and the Soundtrack website.
 A comprehensive bookmark list allows you to quickly choose what you want to see
and takes you there as soon as you click the link.
In addition to these navigational tools, the Soundtrack onscreen user manual gives you
other means to locate information quickly:
 All cross-references in the text are linked. You can click any cross-reference and jump
immediately to that location. Then, you can use the Preview Back button to return to
where you were before you clicked the cross-reference.
 The table of contents and index are also linked. If you click an entry in either of these
sections, you jump directly to that section of the user manual.
 You can also use the Find dialog to search the text for specific words or a phrase.
Apple Websites
There are a variety of Apple websites that you can visit to find additional information.
Soundtrack Website
For general information and updates, as well as the latest news on Soundtrack, go to:
 http://www.apple.com/finalcutexpress/soundtrack.html
Apple Service and Support Website
For software updates and answers to the most frequently asked questions for all Apple
products, including Soundtrack, go to:
 http://www.apple.com/support/soundtrack
You’ll also have access to product specifications, reference documentation, and Apple
and third-party product technical articles.
Preface An Introduction to Soundtrack 11

Other Apple Websites
Start at the Apple homepage to find the latest and greatest information about
Apple products:
Â
http://www.apple.com
QuickTime is industry-standard technology for handling video, sound, animation,
graphics, text, music, and 360-degree virtual reality (VR) scenes. QuickTime provides a
high level of performance, compatibility, and quality for delivering digital video. Go to
the QuickTime website for information on the types of media supported, a tour of the
QuickTime interface, specifications, and more:
Â
http://www.apple.com/quicktime
FireWire is one of the fastest peripheral standards ever developed, which makes it great
for use with multimedia peripherals, such as video camcorders and the latest highspeed hard disk drives. Visit this website for information about FireWire technology and
available third-party FireWire products:
Â
http://www.apple.com/firewire
For information about seminars, events, and third-party tools used in web publishing,
design and print, music and audio, desktop movies, digital imaging, and the media
arts, go to:
Â
http://www.apple.com/pro
For resources, stories, and information about projects developed by users in education
using Apple software, including Soundtrack, go to:
Â
http://www.apple.com/education
Go to the Apple Store to buy software, hardware, and accessories direct from Apple
and to find special promotions and deals that include third-party hardware and
software products:
Â
http://www.apple.com/store
12 Preface
An Introduction to Soundtrack
1
Audio and Music Basics
1
You can create professional-sounding music projects in
Soundtrack without any background or training in music.
This chapter describes the basic audio and music concepts
you need to know to get started.
Basic Audio Concepts
In order to understand how you can work with audio files and use the controls, effects,
and envelopes included in Soundtrack, it’s helpful to know some basic terms and
concepts about audio.
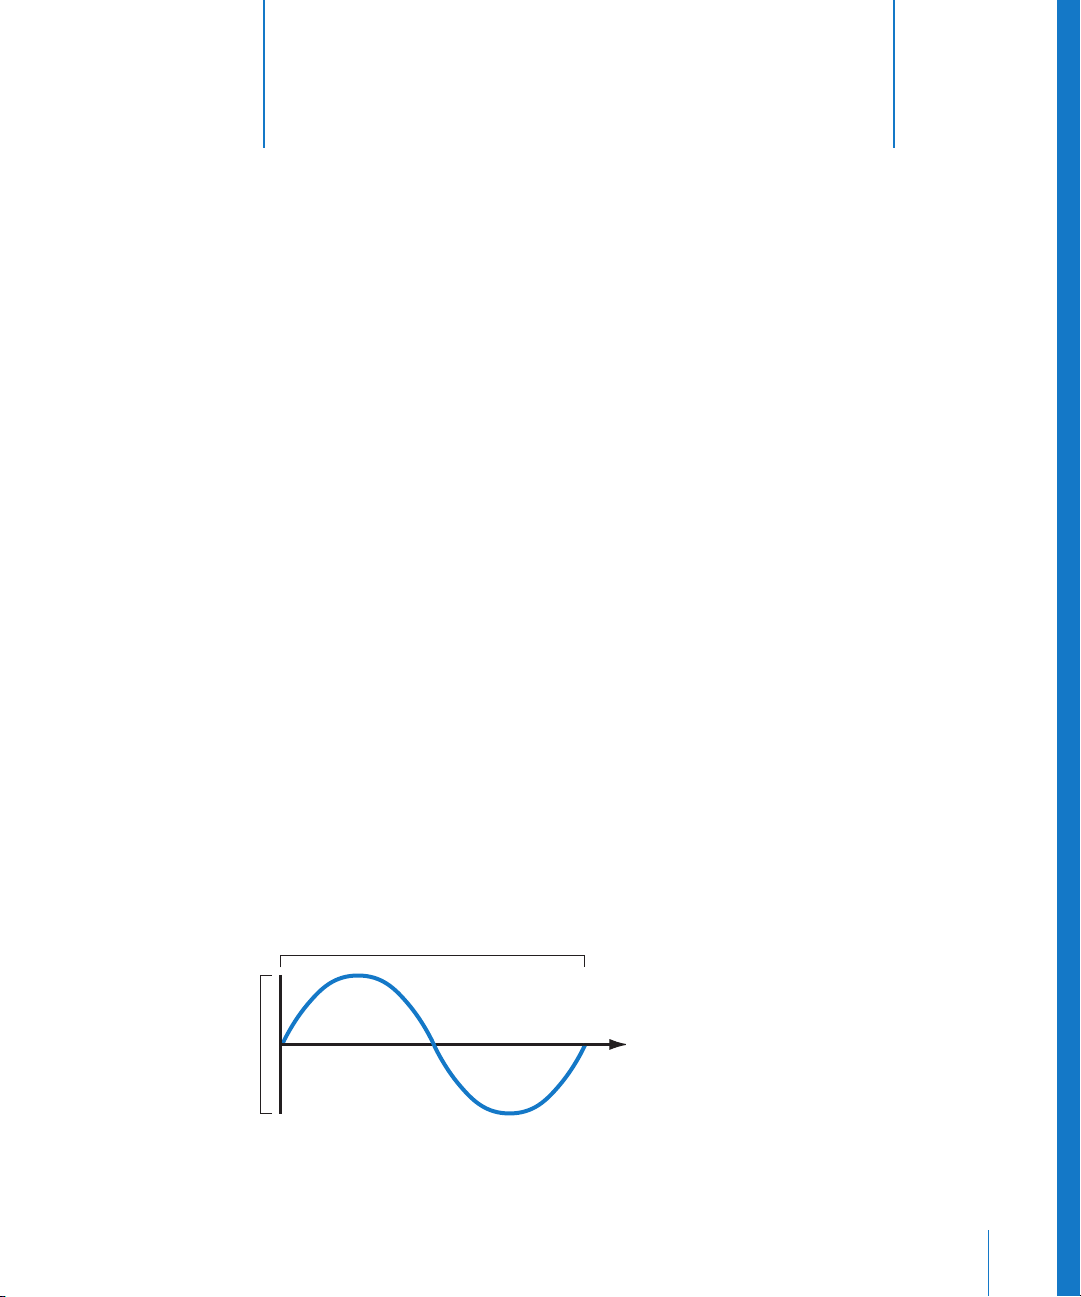
Sound Waves
What we hear as sounds are vibrations traveling through the air as
waves move through the air like ripples in a pond, radiating outward from the sound’s
source in a regular pattern of compression and rarefaction.
sound waves.
Sound
Amplitude
Frequency and Amplitude
The rate at which a sound wave repeats (the time between two peaks of the wave) is
called its
a sound’s frequency as being relatively high (like a flute, a child’s voice, or a train
whistle) or low (like a bass guitar, a man’s voice, or the rumble of a train on the tracks).
The range of frequencies audible to human beings is roughly 20 Hz–20 kilohertz (kHz).
frequency.
Frequency
Frequency is expressed in cycles per second, or Hertz (Hz). We hear
Time
13
The depth or intensity of a sound is called its amplitude, and is expressed in decibels
(dB). We hear amplitude as the volume or loudness of a sound. The range of audible
loudness is roughly 0–130 dB. Higher decibel levels are painful to human hearing.
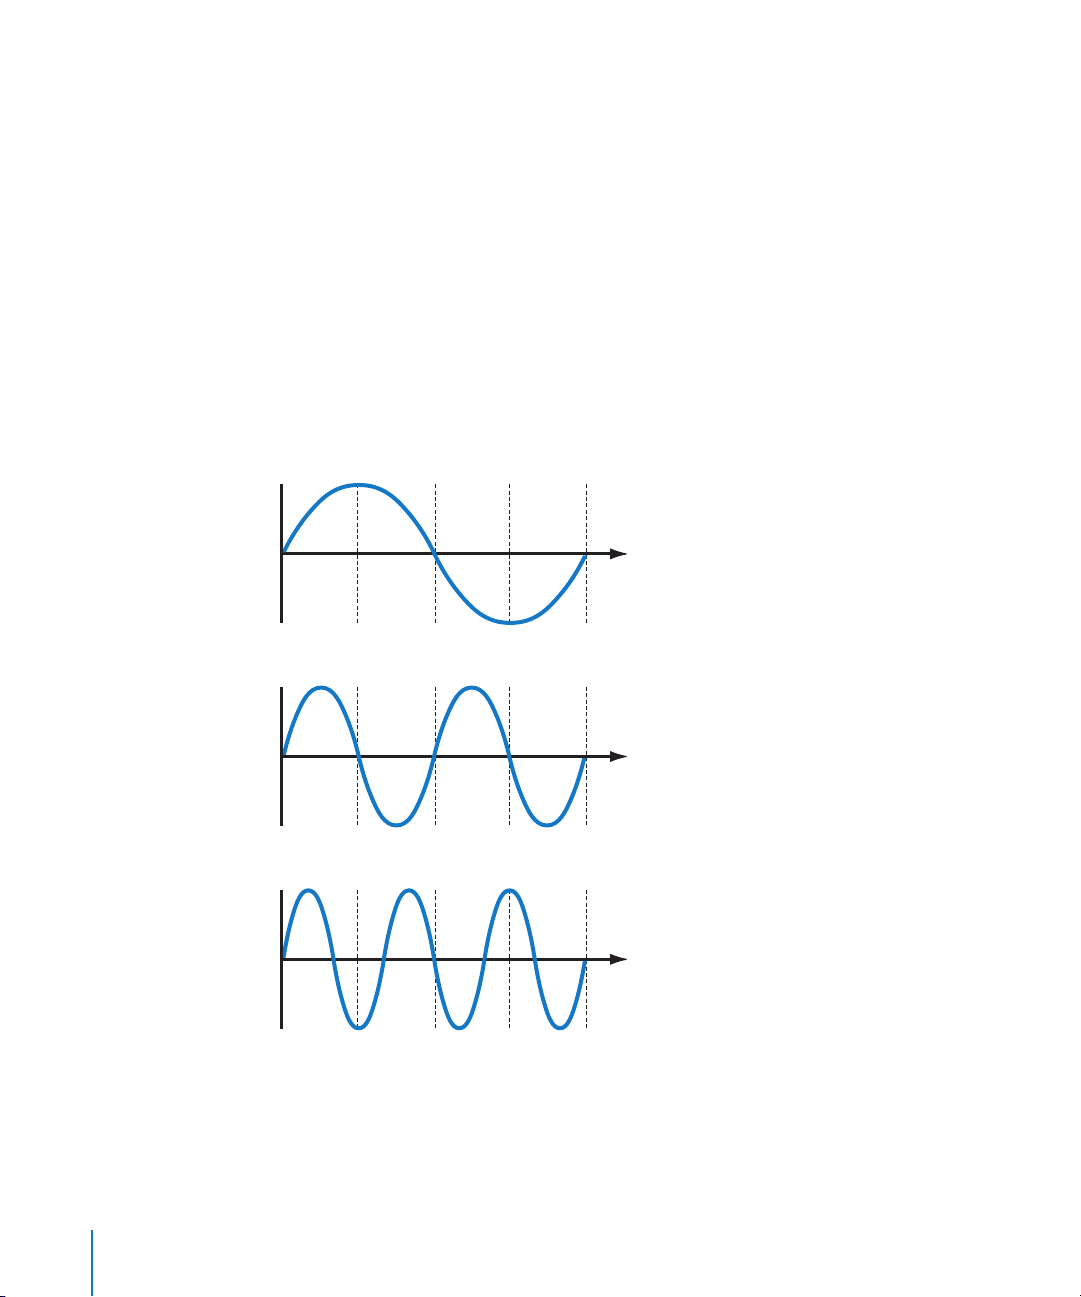
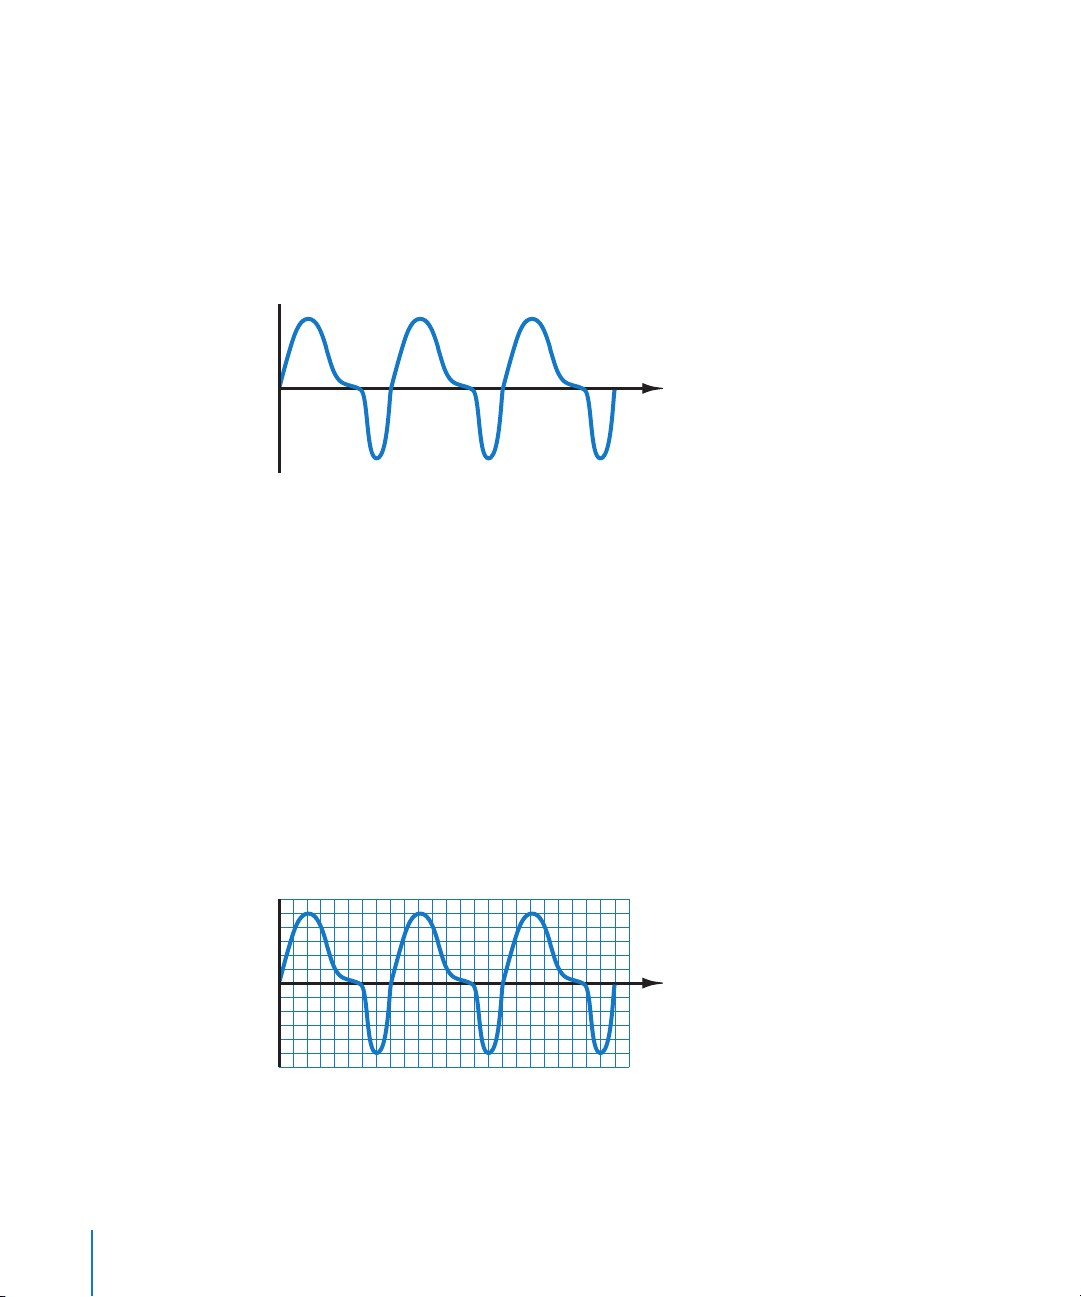
Musical Sounds
Musical sounds typically have a regular frequency, which we hear as the sound’s pitch.
Pitch is expressed using musical notes, such as C, Eb, and F#. What we hear as the pitch
is only the lowest, strongest part of the sound wave, called the fundamental. Every
musical sound also has higher, softer parts called overtones or harmonics, which occur
at regular multiples of the fundamental frequency. We don’t hear the harmonics as
distinct pitches, but rather as the tone color (also called the timbre) of the sound, which
lets us distinguish one instrument or voice from another, even when both are playing
the same pitch. When you turn up the treble on your stereo, or adjust an EQ effect, you
raise the volume of some of the harmonics in the music, but don’t change the
fundamental frequencies.
Time
Fundamental
First harmonic
Second harmonic
Time
Time
14 Chapter 1 Audio and Music Basics
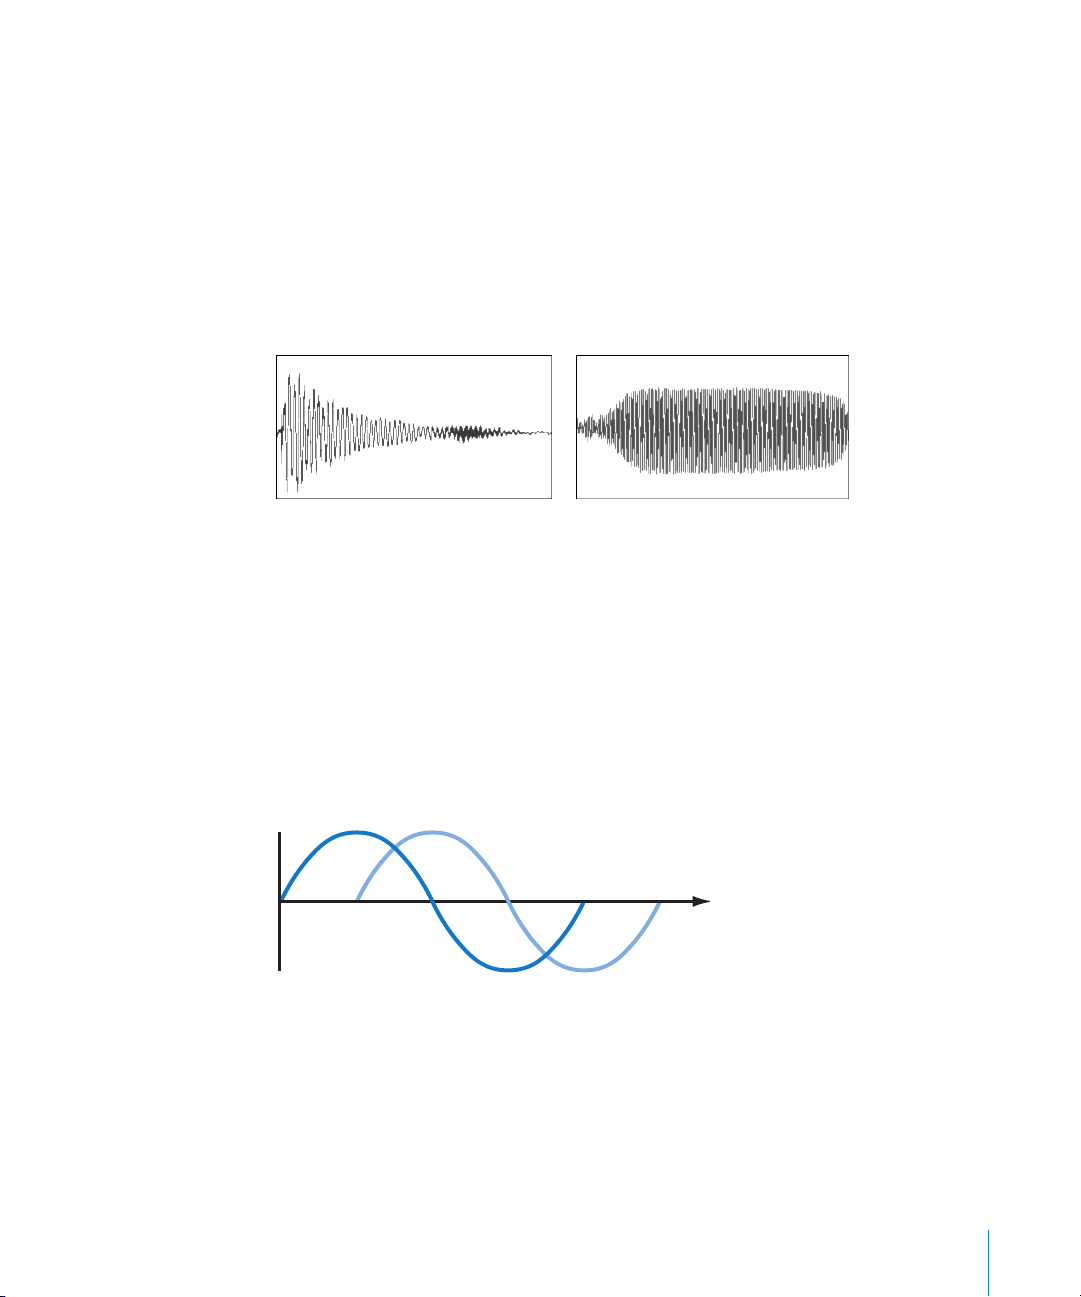
Envelopes
Another aspect of sound that helps us to distinguish between instruments and voices
playing the same pitch is a sound’s envelope. Every note played on a musical
instrument has a distinct curve of rising and falling volume over time. Sounds
produced by some instruments, particularly drums and other percussion, start at a high
volume level but quickly decrease to a much lower level, and die away to silence
quickly. Sounds produced by other instruments, for example, a violin or a trumpet, can
be sustained at the same volume level, and can be raised or lowered in volume while
being sustained. This volume curve is called the sound’s envelope, and acts like a
signature to help our ears recognize what instrument is producing the sound.
Sustained envelopePercussive envelope
Phase Relationships
When two instruments or voices are playing the same pitch, the sound waves may
have the exact same frequency and amplitude, but the peaks and troughs of the wave
reach our ears, or a microphone recording the sound, at slightly different times. This is
referred to as a difference in the phase of the sound waves. When two sound waves are
completely in phase, the volume of the sound is doubled. When two sound waves are
completely out of phase, they cancel each other out and we hear silence. Certain
effects, such as phase shifters, make use of these properties of phase relationships to
alter the sound of an audio signal.
Time
Recording Sound
When a sound is recorded, the sound waves traveling through the air are converted to
an electrical signal, using a device called a transducer. Sound can be recorded using
either analog or digital recording technology.
Chapter 1 Audio and Music Basics 15
Analog Recording
When a sound is recorded using analog technology, the sound waves are recorded as a
continuous electrical signal. Typically, the vibrations in the air contact the diaphragm of
a microphone, setting the diaphragm in motion. A transducer in the microphone
converts the diaphragm’s motion into an electric signal. The compressed parts of the
sound wave are recorded as positive electrical voltages, and the rarefied parts of the
wave are recorded as negative voltages. The voltage of the recorded signal is an analog
of the wave’s frequencies and their relative amplitudes at any point in time.
Time
Analog recording technology was originally developed using mechanical means to
etch the sound signal directly onto wax cylinders or lacquer disks. Its simplicity, and the
rapid development of electronics during the twentieth century, led to its widespread
use for recording music and for adding sound to motion pictures.
However, analog audio recording is subject to several problems in achieving high-fidelity
reproduction of sound. These include noise, distortion, and loss of quality each time the
audio signal is copied or reproduced.
Digital Recording
When a sound is digitally recorded, the sound waves are recorded as a series of samples
onto a hard disk or other digital storage medium. A sample stores the voltages
corresponding to the wave’s frequencies and their relative amplitudes as a series of
binary numbers, or bits. Each sample is like a snapshot of the sound at a particular
instant in time.
Time
16 Chapter 1 Audio and Music Basics
Digital recording technology offers several advantages over analog technology for
recording sound, including lower noise, wider frequency response, and less distortion
(if the sound is recorded at the proper level). In addition, digital recordings can be
reproduced any number of times without any loss of audio quality. These advantages,
combined with the popularity of personal computers, have led to the rapid
development of digital audio as a leading technology for music production.
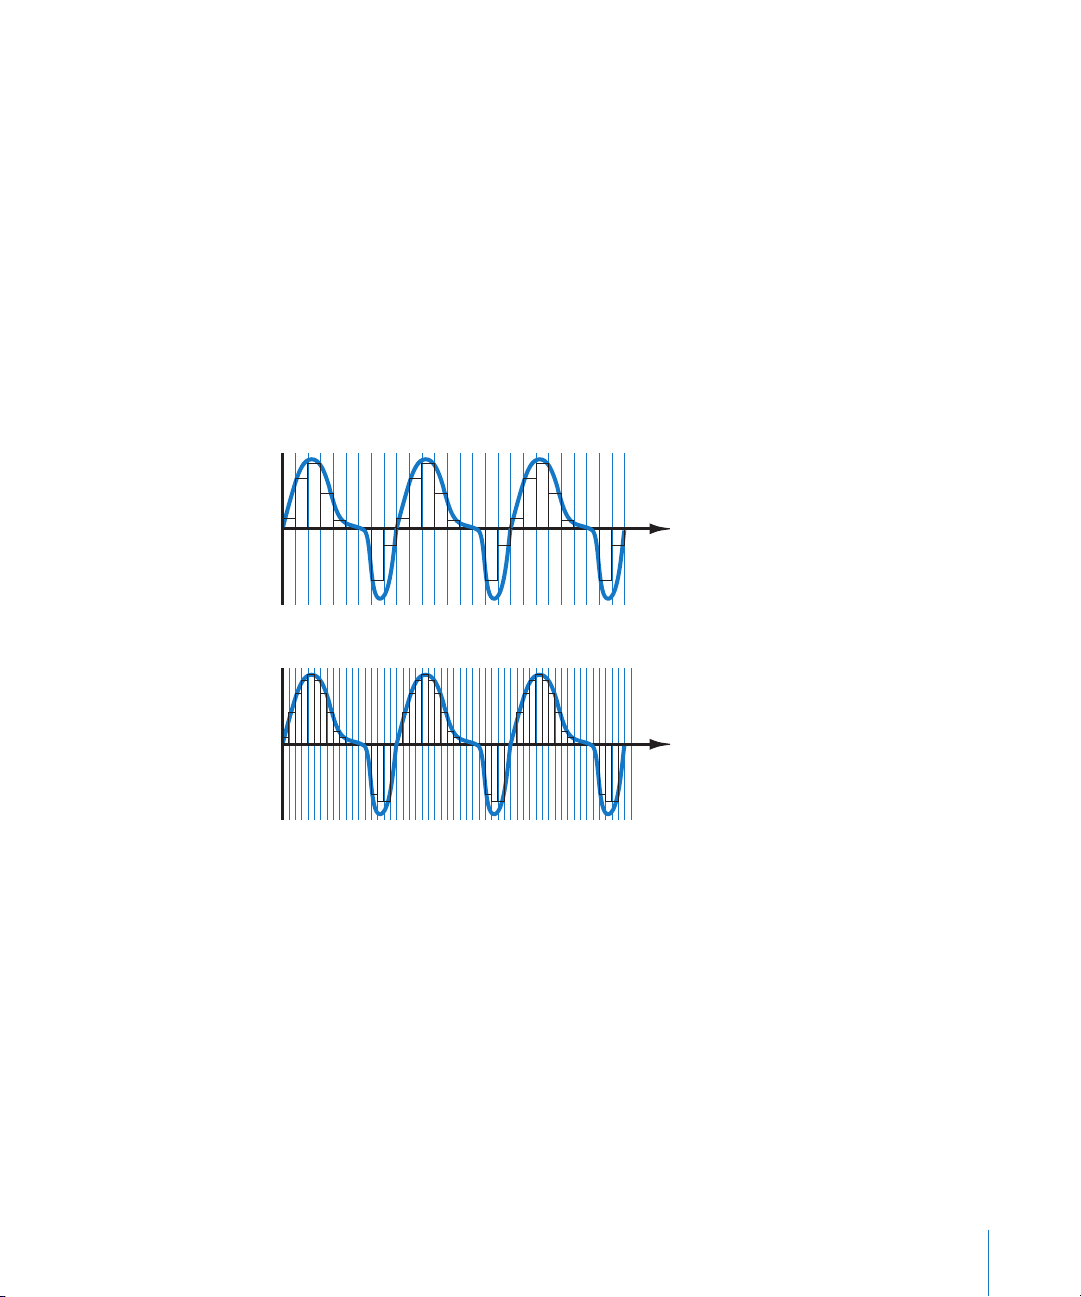
Sample Rate and Bit Depth
The audio quality of any digital recording depends on two factors: the sample rate and
the bit depth used to record the signal. The sample rate is the number of samples
recorded per second. The bit depth is the number of digital bits each sample contains.
Together, these two factors determine the amount of information contained in a digital
audio recording. The higher the sample rate and bit depth of a recording, the more
accurately the recording reproduces the original sound.
Time
Low sample rate
Time
High sample rate
Recording music digitally requires a very high sample rate and bit depth to reproduce
the nuances in the music satisfactorily. The Nyquist theorem states that sounds must be
recorded at no less than double the rate of the highest frequency being sampled to
accurately reproduce the original sound. Audio CDs are recorded at a sample rate of
44.1 kHz and a bit depth of 16 bits (some CDs use a higher 20- or 24-bit depth). Audio
for DVDs is often recorded using a slightly higher sample rate of 48 kHz. Soundtrack
lets you record and play back digital audio files at sample rates of up to 96 kHz, and at
bit depths of up to 24 bits.
Chapter 1 Audio and Music Basics 17
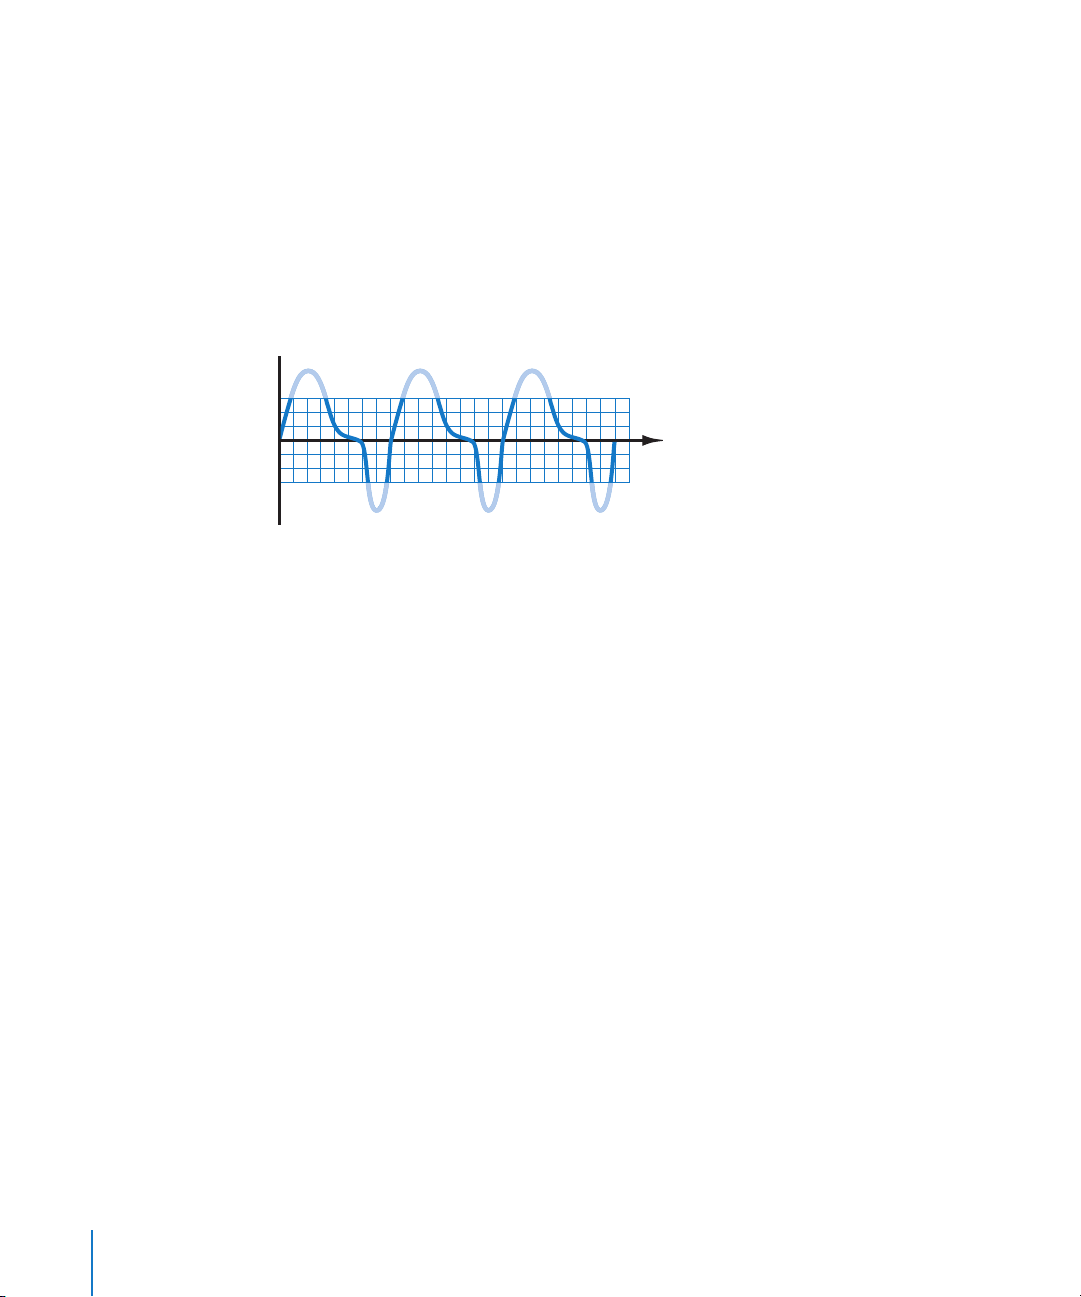
Digital Distortion
To record sound with the widest possible dynamic range, the input level must be set
high enough to capture the complete audio signal. When the input level of the signal is
set too high, however, the signal exceeds the maximum level that can be sampled or
reproduced accurately, resulting in digital distortion. Digital distortion is defined for
most digital audio applications, including Soundtrack, as any time the signal rises
above 0 dB. Even a single sample above 0 dB can produce noticeable distortion, which
you hear as a sharp crackling sound in the audio output. Digital distortion is nearly
always undesirable, and Soundtrack includes audio meters and other controls so that
you can identify and remove distortion from your projects.
Time
Basic Music Concepts
You can create professional-sounding music projects in Soundtrack without any
background or training in music. In order to understand how the different elements in
a piece of music work together, and how you can use them to plan and create projects
in Soundtrack, it’s helpful to know some basic concepts about music.
Rhythm and Tempo
Rhythm is the most essential of all elements of music. People respond to rhythm
unconsciously by tapping their feet or moving their bodies in time to the rhythm.
When the rhythm in a piece of music changes, most people feel a difference in the
character or mood of the music right away.
Rhythm defines the sense of time in music by creating a recurring pulse. The feeling of
rhythmic pulse in music can be subtle (for example, in classical music and some
electronic music), or it can dominate all other elements of the music (as in tribal
drumming or in dance music).
There are usually several layers of rhythm occurring simultaneously in a piece of music.
The strongest rhythmic layer occurs in regular units called measures. Falling within each
measure are a number of softer pulses called beats. The beat that coincides with the
beginning of the measure is called the downbeat. There can also be more subtle pulses
between beats. In the Soundtrack interface, the Beat ruler and Beat display show the
division of musical time into measures, beats, and beat divisions.
18 Chapter 1 Audio and Music Basics

Musicians use the concept of time signature to express the relationship between measures
and beats. The first, or upper, number of the time signature indicates the number of beats
in each measure, and the second, or lower, number indicates the basic beat value.
The rate at which beats occur in a piece of music is called its tempo. Tempo is measured
in beats per minute (bpm). Music with an active or upbeat feeling tends to use a faster
tempo, while music with a more relaxed or inward feeling tends to use a slower tempo.
You can control the tempo of a Soundtrack project, and change the tempo during the
course of a project.
Melody
Melody is often the most recognizable or memorable part of a piece of music. It’s the
part of the music you walk away singing, whistling, or humming, and the part you
usually think of when trying to identify the music or tell someone about it.
A melody is an arrangement of musical notes in a specific rhythmic pattern. Melodies
establish the character of a piece of music, and immediately evoke a feeling or mood.
In Soundtrack projects, you work with prerecorded loops, some of which contain
melodies or melodic phrases. If you sing or play an instrument, you can also record
original melodies in Soundtrack. Whether you use existing loops or your own
recordings, the most important thing to consider is whether a melody you want to use
is appropriate for the style and feeling of a particular project.
Harmony and Key
Harmony occurs when several musical notes are played simultaneously, typically in
groups of three or more notes called chords. The harmony of a piece of music is often
played by rhythm or accompanying instruments, and works with the rhythm and
melody to help establish the feeling of the music. As a piece of music progresses, the
harmony changes, often at the beginning of a measure or on a strong beat, creating
chord progressions that help give the music a sense of forward motion.
Most music makes use of groups of related notes called musical scales as the basis for
both melody and harmony. The most common scales are the major scale and the minor
scale. A scale centered around a particular musical pitch is called the key of a piece, and
the central note is called the root note or tonic of that key. You can set the key of a
Soundtrack project, and add key changes over the course of a project.
Some loops and one-shots you’ll use in your projects contain recordings with
harmonies and chords. Soundtrack automatically matches the key of each audio file
you add to a project to the project’s key. You can also transpose individual loops to
create chord progressions and achieve other harmonic effects.
Chapter 1 Audio and Music Basics 19

Instrumentation
The instruments used in any piece of music help define the style and the character of
the music. Because each instrument adds its own particular range of musical
expression to the piece, the choice of instrumentation is a crucial one in creating your
projects. If you’re working in a particular style, you should always consider whether an
instrument fits the sound of that style. If you’re going for something original, you can
try combining instruments in a unique or unusual way.
The art of arranging involves choosing the right instrumentation, and using changes in
the instrumentation over the course of the piece to create musical interest and drama.
The arrangement becomes an integral part of the character and expression of the music.
Musical Patterns and Form
Most styles of music engage their audience by building up repeating patterns, then
breaking or changing them after a number of repetitions. Larger musical compositions
are created out of a series of related patterns.
Musical patterns typically occur in groups of two or four, and changes from one pattern
to another typically occur at multiples of four. The form of a popular song provides a
simple example: Many pop songs consist of a short introduction followed by two main
sections, the verse and the chorus. The verse and chorus alternate several times, with
the melody either sung or played by the lead instruments.
The introduction typically lasts 8 or 16 measures; each verse lasts 16 or 32 measures,
and the chorus lasts for another 16 or 32 measures. In both the verse and chorus, the
harmony may change at the beginning of every measure, or every two or four
measures. Often the last chorus is repeated several times for a coda or “outro.”
Most styles of contemporary music are based to some degree on song form. You can
easily create projects based on this form, using loops with drum beats and rhythmic
patterns to define each section of the form. Each repetition of the verse and chorus
sections can be set off using loops with vocals, or with varying lead or solo parts. You
can scale the length of the piece to fill a specific amount of time, such as the length of
a movie you want to score, by either adjusting the tempo or changing the number of
times the final section repeats.
Another typical feature of song-based music is that there is often a signal at the end of
each pattern that tells the audience that the pattern is about to change. Often this
occurs in the drums or rhythm section parts. For example, the drums may repeat the
same pattern for seven measures, but introduce slight changes in the eighth measure
that energize the music and signal that a new pattern is about to start. Musicians call
these signals fills, and loop libraries often contain several fills meant to be used with a
looped drum pattern.
20 Chapter 1 Audio and Music Basics

2 Setting Up Your System
2
The way you set up your system depends on the audio
equipment you plan to use.
You can use your computer’s speaker or headphone jack to monitor the audio output
from Soundtrack. For better results, you may want to connect external monitors or
speakers to your system, so that you can monitor the audio output at a higher level of
quality. You may want to connect other external audio equipment such as an audio
interface or a mixer, particularly if you plan to record your own audio in Soundtrack.
 For information on system and hardware requirements, see the Read Before You
Install document on the installation DVD.
 For information on installing the software, see the Installing Your Software booklet.
System Considerations
To achieve the most effective results, you should consider the following issues when
setting up your system.
Processor Speed and RAM
Digital audio files require intensive processing by your computer. If you plan to work on
longer or more complex projects, or use multiple effects plug-ins in your projects, a
computer with a faster processor can facilitate your productivity.
Soundtrack is optimized for use with computers that have a multiprocessor
architecture. Working with Soundtrack projects on a multiprocessor-equipped
computer can make your workflow more efficient, especially when creating longer or
more complex projects.
If you plan to work on large projects, it’s useful to have extra random-access memory,
or RAM, installed in your computer. Additional RAM allows you to play back more files
simultaneously, use a greater number of effects plug-ins, and keep several multimedia
applications open at the same time.
21

Hard Disk Space
It’s also a good idea to have a large hard disk with plenty of available space to store the
media (audio and video) files you use with Soundtrack. As you work with the
application, you’ll likely want to acquire a large collection of sounds to use in your
Soundtrack projects. You can use audio files stored on a CD-ROM disc or other external
media, but playback performance may not be as good as when the audio files are
installed on a local hard disk, especially when using a large number of files.
If you store media files on an external hard disk, make sure the disk has a fast enough
seek time and a high enough sustained data transfer rate for use with multimedia files.
Consult the manufacturer’s specifications.
Dedicated Hard Disk
If you plan to record your own audio in Soundtrack, remember that every minute of
stereo digital audio (recorded using a 44.1 kHz sample rate and 16-bit depth) requires
roughly 10 MB of hard disk space. If you plan to record large amounts of audio, you
may want to record to a dedicated hard disk.
Setting the Audio Input and Output
By default, Soundtrack uses the input and output devices set in your computer’s
System Preferences for audio input and output. You can set the default input and
output (for monitoring) devices for Soundtrack in the Recording pane of the
Soundtrack Preferences window, and change them for individual recording sessions in
the Recording tab. For information on changing the default input and output devices
Soundtrack uses, see “Setting Soundtrack Preferences” on page 73.
Adding Audio Units Plug-Ins to Your Computer
Soundtrack includes an extensive set of professional-quality effects plug-ins. Soundtrack
uses effects in the Audio Units plug-in format, the native plug-in format of Mac OS X.
Audio Units plug-ins are also available from third-party manufacturers. When adding
third-party effects to your computer, be sure to read the documentation, including any
Read Me and installation files, that came with the plug-in. Supported Audio Units
effects plug-ins appear in the Effects window under the manufacturer’s name.
Soundtrack does not support VST, ASIO, MAS, or RTAS effects plug-ins.
22 Chapter 2 Setting Up Your System

Connecting Audio Equipment
You can use a variety of audio equipment with Soundtrack for both recording and
playback. For information on connecting a specific piece of equipment to your
computer, read the documentation that came with the equipment.
When using external audio devices, it’s a good idea to connect them before
opening Soundtrack.
Soundtrack does not support video input from devices such as camcorders or
videocassette decks.
Audio Interfaces
You can connect an audio interface to your computer, and then connect microphones and
musical instruments to the audio interface for recording. You can also connect output
devices, such as monitors or speakers, a mixer, or an amplifier to the audio interface.
When choosing an audio interface, check the manufacturer’s specifications to make
sure the interface is compatible with Mac OS X v10.4 (Tiger). Some audio interfaces
require driver software, while others are supported without the need for a driver. If the
device requires a driver, make sure an up-to-date driver is included with the device, or
is available from the manufacturer.
All digital audio interfaces can be susceptible to latency, a noticeable delay between
the time the audio signal is produced and the time you hear it. When connecting an
audio interface, you should connect the interface directly to the computer, rather than
connecting it through a hub or daisy-chaining it through another device. Connecting
an audio interface through a hub or an intermediary device can cause an unacceptable
amount of latency, particularly with slower protocols such as USB.
Soundtrack supports input from digital audio interfaces up to a maximum sample rate of
96 kHz and a maximum bit depth of 24 bits. If you connect an interface that uses sample
rates or bit depths outside the range supported by Soundtrack, an alert message appears,
telling you that data from the audio interface is not compatible with the application.
Chapter 2 Setting Up Your System 23
FireWire (IEEE 1394)
FireWire is a professional and consumer standard for both audio and video equipment.
The combination of fast data-transfer rates, high storage capacities, and plug-and-play
connection makes FireWire an attractive choice for working with digital audio files.
FireWire is included on all current Macintosh computers, and a number of FireWire
audio interfaces are available.
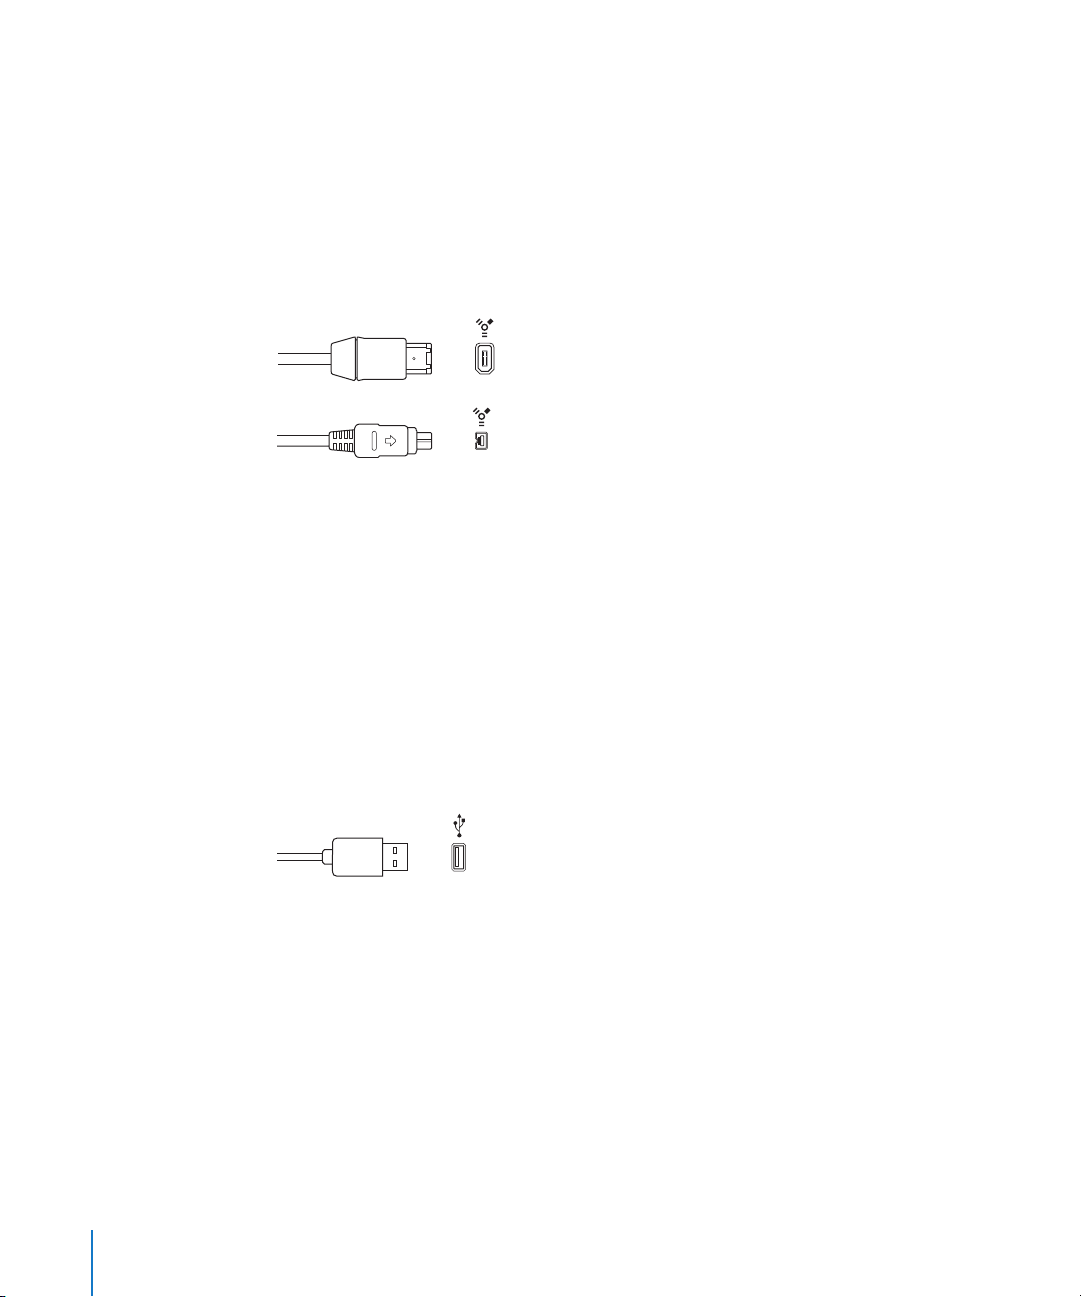
There are two kinds of FireWire connectors: a 4-pin connector (typically found on
video equipment) and a 6-pin connector (used for computer and audio equipment).
FireWire 400 (6-pin)
(Sometimes labeled iLINK)
FireWire 400 (4-pin)
USB (Universal Serial Bus)
USB is a consumer standard used on computer peripherals and other devices. USB
offers a lower data-transfer rate than FireWire, but supports plug-and-play operation
and the ability to connect several devices in sequence (daisy-chaining). Some USB
devices draw their power over the USB cable, while others require a separate power
connection. USB is included on all current Macintosh computers.
There are two kinds of USB connectors: an A connector, typically used to connect a
device to a USB hub, and a B connector, typically used to connect devices together, and
also to connect a device to a computer. USB audio interfaces should always be directly
connected to your computer, not connected via a hub or to the computer’s display,
keyboard, or another peripheral.
USB (Universal Serial Bus)
PCI (Peripheral Connect Interface)
PCI interfaces, unlike FireWire and USB interfaces, require that you install a dedicated
sound card in your computer. PCI provides high bandwidth and fast data-transfer rates,
allowing you to record and play back large numbers of files at the highest possible
sample rates and bit depths.
24 Chapter 2 Setting Up Your System
PCMCIA
PCMCIA is a consumer standard for connecting devices to a laptop computer. PCMCIA
provides a lower data-transfer rate than FireWire or USB, but provides a compact,
affordable solution for connecting an audio interface to your computer, while keeping
your USB and FireWire ports available for other devices. Most current Macintosh laptop
computers support PCMCIA connections via a built-in card slot.
Audio Cabling
There are several types of audio cables and connectors used on professional and
consumer audio equipment, at a range of prices and levels of quality. When connecting
microphones and musical instruments to an audio interface or a mixer, make sure the
interface has the proper input jacks for the type of connectors and cables you plan to use.
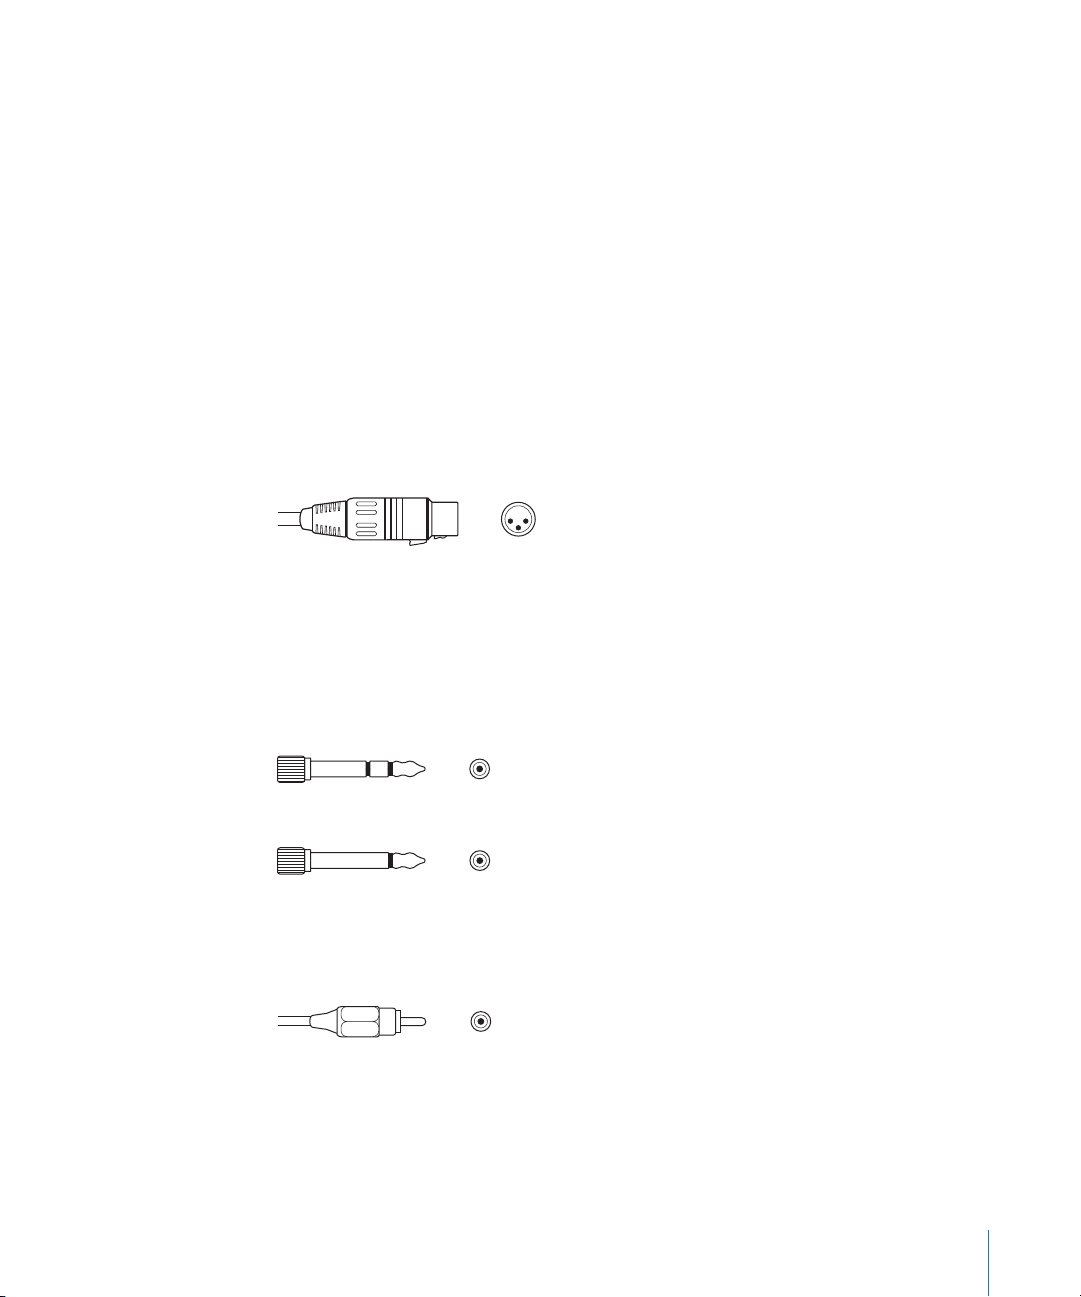
XLR
XLR cables and connectors are used on professional-quality microphones, monitors, and
other musical equipment. They provide a high-quality, balanced signal at +4 dB level.
XLR connector (balanced)
1/4-Inch Audio
1/4-inch connectors (sometimes called “phone plugs”) are used on a wide variety of
professional and consumer musical equipment, including musical instruments and
amplifiers, speakers, and external effects devices. They can be either balanced (+4 dB)
or unbalanced (–10 dB). Some devices require Tip-Ring-Sleeve (TRS) connectors to
transfer the audio signal.
1/4-inch Tip-Ring Sleeve (TRS) connector
1/4-inch Tip-Ring (TR) connector
RCA
RCA connectors are used on consumer audio equipment such as home stereo systems
and videocassette recorders.
RCA connector (unbalanced)
Chapter 2 Setting Up Your System 25

Optical Digital (AES-EBU and S/PDIF)
AES-EBU and S/PDIF are both used to provide an optical digital connection to
professional and consumer audio equipment, including audio interfaces, DAT (digital
audio tape) machines, and hardware samplers. Both carry a stereo digital signal. AESEBU is balanced, and has an operating level of 5 volts, while S/PDIF is unbalanced and
has an operating level of roughly 1/2 volt. There are adapter cables available to convert
between the two protocols. S/PDIF carries additional information with the audio signal,
including SCMS copy-protection information.
S/PIDF optical digital connector
1/8-Inch Miniplug
Miniplug connectors are used for audio input and output to computers and on some
consumer electronic devices, particularly portable ones.
Stereo miniplug connector (unbalanced)
Audio Output
Being able to monitor the audio output of your projects at a high level of quality is
crucial to achieving professional results. In general, you should use the best output
equipment your budget allows.
Speakers and Monitors
You can play back audio through your computer’s speakers or headphone jack, but the
audio output may not be high enough for you to evaluate your music at a professional
level of quality. Connecting external speakers or monitors to your system allows you to
hear the audio output with greater fidelity and a wider dynamic range. In general, you
should use the highest-quality speakers or monitors you can afford in order to hear
your projects at the highest level of audio quality.
For detailed information about connecting external speakers to your audio interface,
see the documentation that came with the speakers.
26 Chapter 2 Setting Up Your System
Amplifiers
If you are recording audio from microphones, and are not running the microphone’s
signal through a mixer with a microphone pre-amplifier, you need to connect an
amplifier to boost the microphone’s signal before sending it to the computer. If you are
connecting monitors or speakers that are not self-powered, you also need to connect
them through an amplifier.
Mixers
Connecting a mixer to your system allows you to record audio from multiple
microphones or instruments simultaneously, to play back the output from your
computer through connected monitors or speakers, and to control the volume levels of
both the audio input and output. Professional-quality mixers have a number of
additional features, including equalization (EQ) controls, auxiliary sends and returns for
adding external effects, and separate monitor and mix level controls. Mixers may also
include inboard pre-amplification for microphones, making the use of a separate
amplifier unnecessary.
Example Hardware Setups
The following sections provide several examples of different hardware setups.
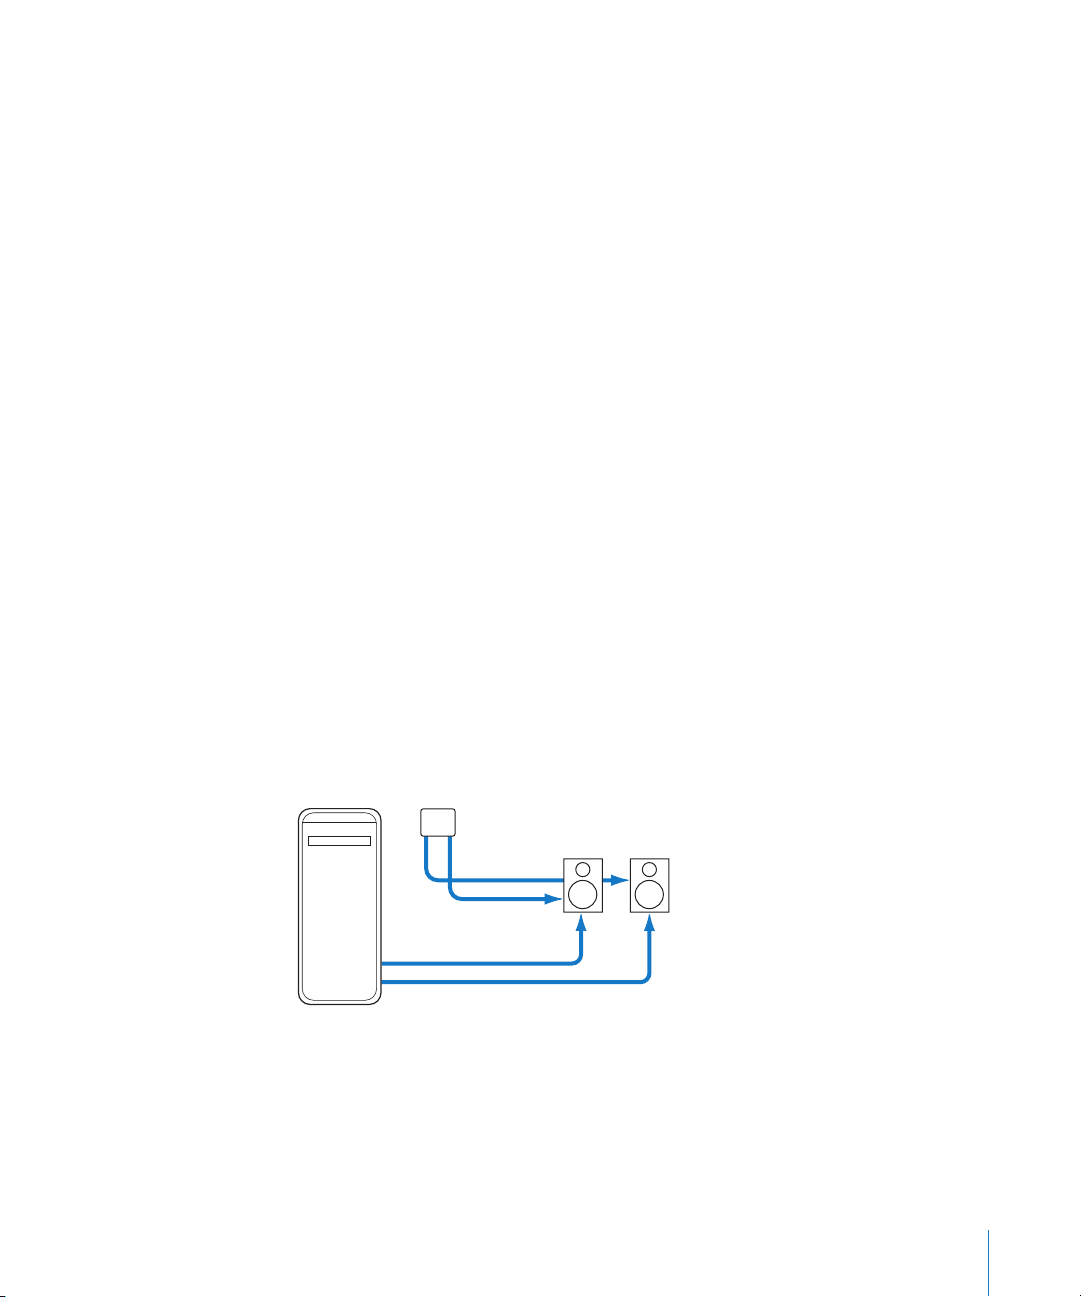
Setting Up a System Using Powered Speakers
With this setup, you can monitor the audio output through a set of connected
powered speakers.
This setup uses the following equipment:
 Your computer and display
 A set of powered speakers, including speaker wire and a power adaptor
Speakers
Power cables
Speaker cables
Computer
Chapter 2 Setting Up Your System 27
Setting Up a System Using a USB Audio Interface
With this setup, you can record audio input from microphones and musical
instruments, and monitor audio output, through a USB audio interface.
This setup uses the following equipment:
 Your computer and display
 USB audio interface (from 2 to 8 channels) with USB cable to connect to your computer
 Microphone
 Musical instruments (guitar, bass, and keyboard)
 Cables to connect microphones and instruments to the audio interface
 Set of monitors or speakers
Monitors
Microphone
Speaker
Computer
USB
cable
cables
Computer
Audio interface
Instrument
28 Chapter 2 Setting Up Your System
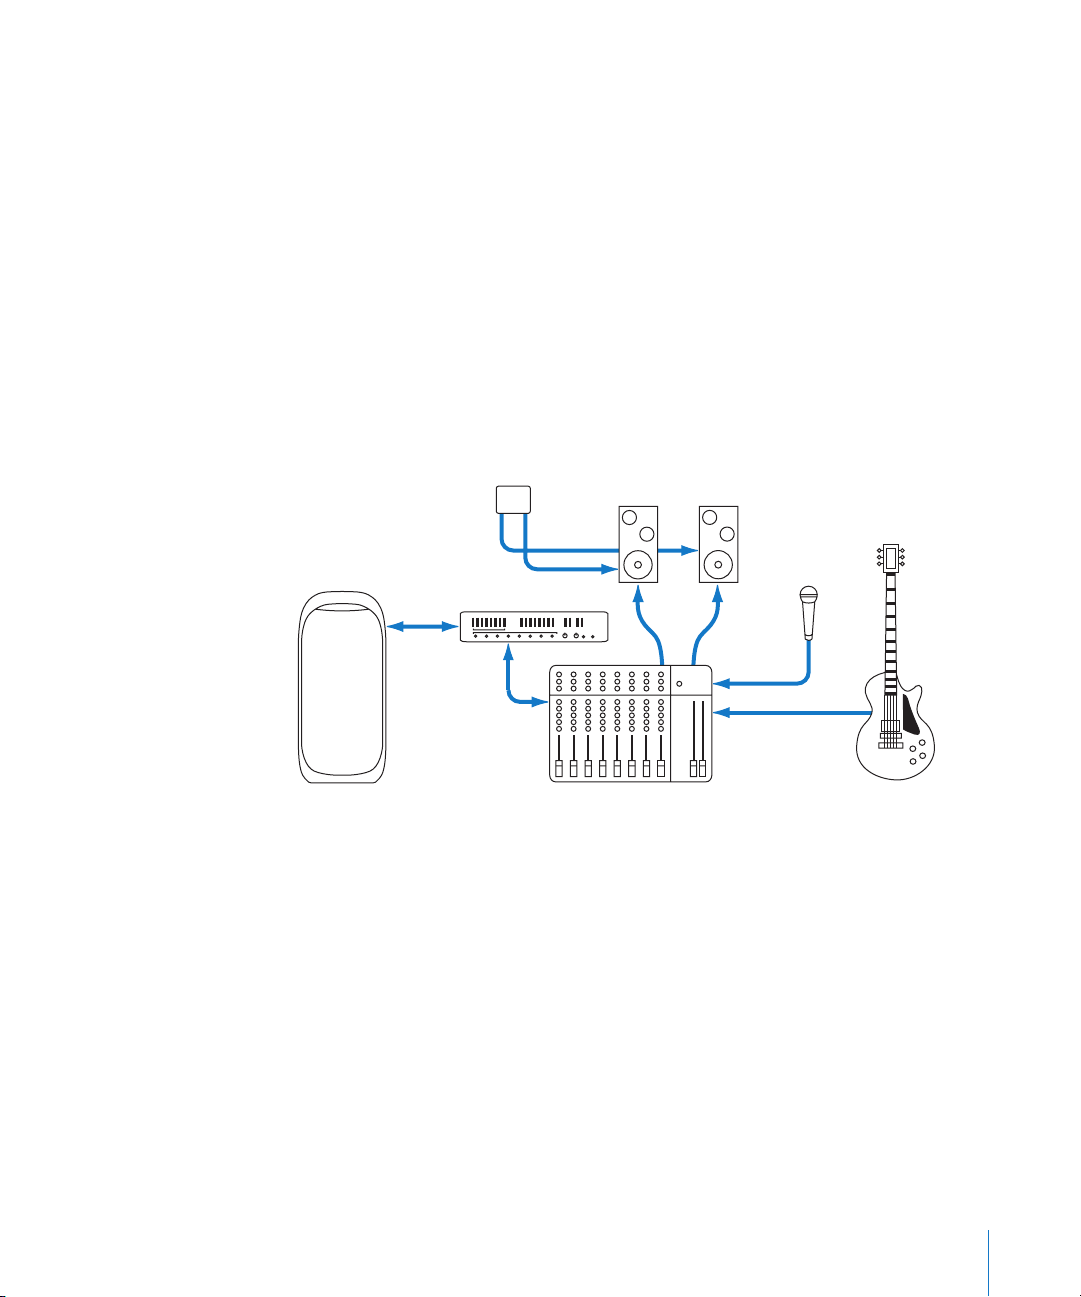
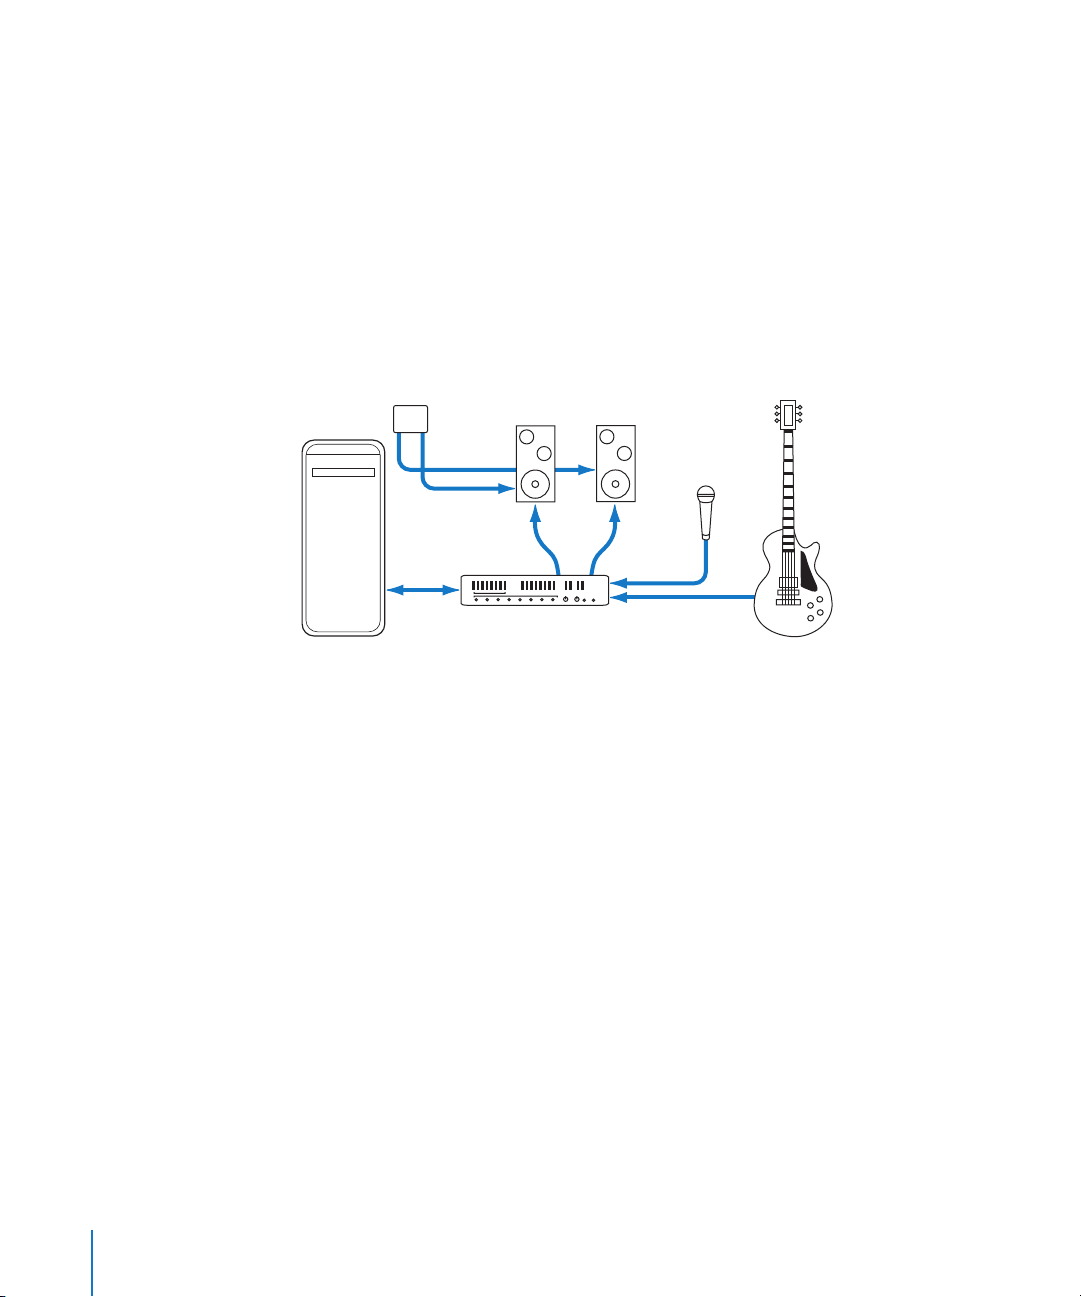
Setting Up a System Using a FireWire Audio Interface
With this setup, you can record audio input from several sources simultaneously, and
monitor audio output channels independently, through a mixer connected to a
FireWire audio interface.
This setup uses the following equipment:
 Your computer and display
 FireWire audio interface with FireWire cable to connect to your computer
 Mixer (8 channels) with built-in pre-amplifier
 Microphones
 Musical instruments (guitars, bass, keyboards, and outboard effects units)
 Set of powered monitors or speakers
 Cables to connect microphones and instruments to the mixer and audio interface
 Speaker cables
Monitors
Microphone
Audio interface
FireWire
cable
Computer
Speaker
cables
Mixer
Chapter 2 Setting Up Your System 29
Instrument


Utility window
3 The Soundtrack Interface
3
In Soundtrack, you work in three main windows:
the Project window, the Media and Effects Manager,
and the Utility window.
Project window
Media and Effects
Manager
 The Project window includes the Timeline, where you arrange audio clips.
 The Media and Effects Manager is where you locate and preview audio and video
files to add to your project, and also where you add and adjust realtime effects.
 The Utility window has tabs where you can add and view a video in a project, see the
master level meters, get details on clips and other items, and set up recording.
31

Project Window
The Project window is the “canvas” where you work on your projects. The Timeline is
where you arrange and edit audio clips.
Tabs
Mono Mix button
Master volume slider
Playhead Position
value slider
Toolbar
Transport
controls
Selection Length
value slider
 Toolbar: Includes tools for common functions. You can customize which tools appear
in the Toolbar.
 Tabs: You can switch between any projects open in the Timeline.
 Transport controls: Control playback and the position of the playhead, and turn
recording on or off. (For more information, see “Transport Controls” on page 33.)
 Master volume slider: Adjusts the overall volume when you play the project. The
volume level defaults to 0 dB when you create a project. Adjusting the master
volume slider does not affect export volume.
 Mono Mix button: Click to listen to a temporary mono mix of the project.
 Playhead Position value slider: Displays the current playhead position. You can move
the playhead by clicking the arrows, dragging, or typing a value.
 Selection Length value slider: Displays the length of the current Timeslice in the
Timeline. You can change the Timeslice or selection length by clicking the arrows,
dragging, or typing a value.
32 Chapter 3 The Soundtrack Interface

Toolbar
The Toolbar is located at the top of the Project window. When you first open
Soundtrack, the Toolbar includes buttons for creating a new project, managing layouts,
displaying the Utility window, adding markers, and other common functions. You can
customize the Toolbar, adding buttons for functions you want to access frequently. For
information about customizing the Toolbar, see “Customizing the Toolbar” on page 50.
Transport Controls
You use the transport controls to control playback, set the position of the playhead,
start recording, and activate the playback region.
Go to End
Cycle
MIDI Sync
Play from Beginning
Record
Go to Beginning
Play/Pause
 Record button: Starts and stops the recording process.
 Play from Beginning button: Starts playback from the beginning of the project.
 Go to Beginning button: Moves the playhead to the beginning of the project, or to
the beginning of the playback region if it is active.
 Play/Pause button: Starts playback at the current playhead position. If the project is
playing, stops playback.
 Go to End button: Moves the playhead to the end of the project, or to the end of the
playback region if it is active.
 Cycle button: Activates the playback region, if one is set in the Time ruler.
 MIDI Sync button: Synchronizes playback with incoming MIDI Clock and MIDI
Timecode (MTC) signals.
For information on using the transport controls, see “Controlling Playback with the
Transport Controls” on page 56.
Chapter 3 The Soundtrack Interface 33

Timeline
The Timeline gives you a visual representation of a project, showing the position of
clips, the playhead, and other items in time. The Timeline is organized into three groups
of horizontal rows called tracks, busses, and outputs. You can add and arrange audio
clips in tracks, use busses to create submixes, and send audio to physical output
channels using outputs. You can control the sound of each track, bus, and output using
the controls in its header.
Timeline editing tools
Time display
Audio tracks
Automation Mode
pop-up menu
Timeline controls
Project
controls
Global Timeline view
Level meters
Time ruler
Track area
Scroll bar
 Timeline editing tools: Select items using the Selection (arrow) tool, or split audio
clips using the Split (razor) tool.
 Automation Mode pop-up menu: Choose the mode for recording automation using
the onscreen controls.
 Project controls: Set the project’s time signature, tempo, key, sample rate, time
format, and other properties using these controls.
 Show pop-up menu: Choose whether the video track, audio tracks, busses, outputs,
and master envelopes are visible in the Timeline.
 Global Timeline view: Shows a miniature view of the entire Timeline and the playhead
position, and lets you move quickly to different parts of a project.
34 Chapter 3 The Soundtrack Interface

 Time display: Shows the current playhead position in both Time-based and
Beats-based formats. You can set the playhead by typing a new playhead position
in the time display.
 Level meters: As the project plays, the level meters show the volume level of the first
output (Output 1).
 Time ruler: You can precisely position clips, the playhead, and other items to a specific
point in time (minutes, seconds, frames) or to a musical beat using the Time ruler.
 Track area: Includes horizontal rows for tracks, busses, and outputs. Also includes the
playhead, envelopes, and markers.
 Headers: Each track, bus, and output has a header with an icon, name, volume slider,
and other controls. (For more information, see “Headers” on page 35.)
 Timeline controls: Includes controls to show the master envelopes, turn snap on or
off, set the track height, and zoom in or out. (For more information, see “Timeline
Controls” on page 36.)
 Scroll bar: Moves the Timeline horizontally so you can see different parts of the project.
Headers
Each track, bus, and output in the Timeline has a header that includes the track name,
track icon, and a set of track controls.
Envelopes
disclosure triangle
Drag handle
Name field
Record Enable button
Volume sliderIcon
Effects button
Mute button
Solo button
Output
pop-up menu
Pan slider
 Drag handle: Click to select the track, bus, or output and drag to reorder it in the Timeline.
 Icon: You can choose an icon for the track, bus, or output, making it easy to quickly
distinguish them in a large project.
 Name field: You can type a new name for the track, bus, or output in the name field.
 Record Enable button: Enables (or disables) the track for recording when you click the
Record button. Only tracks have Record Enable buttons, not busses or outputs.
 Mute button: Mutes (or unmutes) the track, bus, or output.
 Solo button: Solos (or unsolos) the track, bus, or output. Soundtrack supports both
multiple solo and exclusive solo.
 Effects button: Displays the Effects tab of the Media and Effects Manager with the
track, bus, or output effects settings.
Chapter 3 The Soundtrack Interface 35

 Envelopes disclosure triangle: Shows the track, bus, or output envelopes in the area
directly below the track.
 Volume slider: Sets the track, bus, or output relative volume in the overall mix.
 Output pop-up menu: Choose an output for the track or bus, or choose the physical
output channels for the output from the menu.
 Pan slider: Sets the pan position of the track or bus. Appears in track and bus
headers only, not in output headers.
For detailed information about using the track controls, see “Using the Track Controls”
on page 96.
Timeline Controls
The lower-left corner of the Timeline contains controls for various aspects of Timeline
display and operation.
Master Envelopes button
Snap button
Track Height control
Snap To Value
pop-up menu
Zoom control
 Master Envelopes button: Shows or hides the master envelopes.
 Snap button: Turns snap on or off.
 Snap To Value pop-up menu: Sets the value to which items in the Timeline snap.
 Track Height control: Sets the height of tracks, busses, and outputs to one of four
settings, from Reduced to Large.
 Zoom control: Click the control or drag the slider to change the zoom level. You can
zoom in to edit clips precisely, or zoom out to display more of the Timeline.
For information about using master envelopes, see “Master Envelopes” on page 144. For
information about snap, see “Using Snap” on page 70. For information about using the
Track Height control and zoom control, see “Moving Around in the Timeline” on page 89.
36 Chapter 3 The Soundtrack Interface

Media and Effects Manager
The Media and Effects Manager is where you locate and preview media (audio and video)
to add to your project. It has five tabs: The Browser, Favorites, and Search tabs give you
three different ways to find media files; the Bin gives you quick access to media files for
the current project; and the Effects tab is where you add and adjust effects.
Browser Tab
The Browser tab displays the disks connected to your computer in a view similar to
the Finder’s list view. You can also preview files in the Browser tab, and drag them to
the Timeline.
Tabs
Back and Forward
buttons
File list
Preview controls
Computer and
Home buttons
Path pop-up menu
Media pop-up menu
 Back and Forward buttons: Move through previously viewed levels of the folder hierarchy.
 Computer button: Displays your computer’s hard disk and other storage media
connected to your computer.
 Home button: Displays the contents of your home directory.
 Path pop-up menu: Displays the levels of the file path to the current location, letting
you move back to a previous level.
 File list: Displays the files and folders at the current location.
 Preview controls: Include Play and Mute buttons and a volume slider. For information
about using the Preview controls, see “Using the Preview Controls” on page 67.
 Media pop-up menu: Choose menu items to add a Favorite, add a file to the Bin, and
perform other functions.
Chapter 3 The Soundtrack Interface 37

Favorites Tab
You can store frequently used items in Favorites so that you can easily access them
directly. You can also preview files in Favorites, and drag them to the Timeline.
Favorites list
Preview controls
Media pop-up menu
 Back and Forward buttons: Move through previously viewed levels of the folder hierarchy.
 Path pop-up menu: Displays the levels of the file path to the current location, letting
you move back to a previous level.
 Favorites list: Displays the files and folders at the current location.
 Preview controls: Include Play and Mute buttons and a volume slider. For information
about using the Preview controls, see “Using the Preview Controls” on page 67.
 Media pop-up menu: Choose menu items to remove a Favorite, add a file to the Bin,
and perform other functions.
38 Chapter 3 The Soundtrack Interface

Search Tab
The Search tab lets you locate audio and video files using a variety of criteria. You can
perform text searches and search for Apple Loops and other tagged file formats using
keywords for instrument, genre, mood descriptors, and other categories. Matching files
are displayed in the Search Results list. Once you locate the files you want to use, you
can preview them in the Search Results list or drag them to the Timeline.
Category pop-up menu
Button and Column
View buttons
Keywords list
Time Signature
pop-up menu
Search Text field
Search Results list
Preview controls
Setup button
Matches list
Scale Type pop-up menu
Nearby Keys button
File Type pop-up menu
Media pop-up menu
The Search tab has two views, Column view and Button view. Column view features a
Keywords list containing keywords, and a Matches list with subcategories you can use
to refine your searches. Button view displays a matrix of keyword buttons you can click
to see matching files.
Keyword buttons
Chapter 3 The Soundtrack Interface 39

 Button and Column View buttons: Change the view to either Button or Column view.
 Category pop-up menu: Restricts the available keywords to a particular category.
 Setup button: Displays the Search Setup dialog, from which you add items to the
Search database.
 Time Signature pop-up menu: Restricts search results to files with the selected
time signature.
 File Type pop-up menu: Choose whether to display all files, or only looping or
non-looping files.
 Scale Type pop-up menu: Restricts search results to audio files using the selected scale.
 Keyword buttons (Button view only): Displays files matching the keyword in the
Results list.
 Keywords list (Column view only): Displays files matching the keyword in the Results
list and displays subcategories in the Matches list.
 Matches list (Column view only): Displays subcategories of the selected keywords.
 Search Text field: Type text in the field to display matching files whose filename or
path contains the search text.
 Nearby Keys button: Restricts search results to keys within two semitones above or
below the project key.
 Search Results list: Displays the files matching the selected search criteria, in
alphabetical order. Includes columns displaying the tempo, key, and number of beats
of each file. You can click files to preview them.
 Preview controls: Include Play and Mute buttons and a volume slider. For information
on using the Preview controls, see “Using the Preview Controls” on page 67.
 Media pop-up menu: Choose menu items to add a Favorite, add a file to the Bin, and
perform other functions.
40 Chapter 3 The Soundtrack Interface

Bin Tab
The Bin tab lists the media files added to the project. You can drag files from the Bin
tab to the Timeline. You can also add files to the Bin for easy access in a project. Files
not currently added to the project appear dimmed, and offline files appear in red text.
File list
Preview controls
Category list
Show pop-up menu
Effect Parameters area
Media pop-up menu
 File list: Displays the media files in the current project.
 Preview controls: Include Play and Mute buttons and a volume slider. For information
about using the Preview controls, see “Using the Preview Controls” on page 67.
 Media pop-up menu: Choose menu items to add a Favorite, add a file to the Bin, and
perform other functions.
Effects Tab
You add effects and sends to your project and adjust effect parameters in the Effects
tab. When you click the Effects button on a track, bus, or output, the Effects tab appears
showing the item’s current effects settings and sends.
Effect list
Add Effect button
Remove Effect button
Add Send button
Reset Effect button
Chapter 3 The Soundtrack Interface 41

 Category list: Lists the categories of available effects, which are categorized by
manufacturer. Click a category to see the effects for that category in the Effect list.
 Effect list: Lists the effects in the selected category. Double-click an effect to add it to
the track, bus, or output.
 Show pop-up menu: Choose an item (a track, bus, or output) from the Show pop-up
menu to display its effects settings.
 Add Effect (+) button: Adds the selected effect to the current effects chain.
 Remove Effect (–) button: Removes the selected effect from the current effects chain.
 Effect Parameters area: Displays the parameters for effects in the current effects
chain. Click an effect’s disclosure triangle to see its parameters. You can adjust effect
parameters using the controls in the Effect Parameters area.
 Add Send button: Adds a send to the end of the current effects chain for the track.
You can add sends only to tracks, not to busses or outputs.
 Reset Effect button: Resets the selected parameter or group of parameters to its
default value (or values).
Utility Window
The Utility window features tabs for viewing a video in a project, observing project
levels, viewing details, and setting up recording.
Video Playback
value slider
Video Tab
The Video tab is where you add a video to a project, view the video, and control
video playback.
Video Scale
pop-up menu
Video viewing area
Video transport controls
42 Chapter 3 The Soundtrack Interface

 Video Playback value slider: Move the video to a specific frame by dragging, clicking
the left or right arrow, or double-clicking and typing a value in the value slider.
 Video Scale pop-up menu: Choose the scale of the video in the Video tab from the
pop-up menu.
 Video viewing area: Add a video by dragging it into the viewing area, and watch it
play in the viewing area.
 Video transport controls: Control playback of the video with the project using the Play
from Beginning, Previous Frame, Play/Pause, Next Frame, and Cycle buttons.
Recording Tab
The Recording tab is where you edit a track’s recording settings. When you click a
track’s Record Enable button, the Recording tab appears, displaying the track’s current
recording settings.
Peak indicator
Level meters
Input pop-up menu
Gain slider and field
Stereo checkbox
Monitor pop-up menu
Mute Project checkbox
Disk space indicator
 Peak indicator: Shows the highest level reached by the recording input signal. If the
level rises above 0 dB, the peak indicator becomes red to indicate clipping.
 Level meters: Show the input volume for the selected track during recording.
 Input pop-up menu: Choose the input device and input channel (or channels)
for recording.
 Gain slider and field: Drag the slider or type a number in the field to set the input
gain for recording.
 Stereo checkbox: Select to record to a stereo file, or deselect to record to a mono file.
 Monitor pop-up menu: Choose the output device and output channel (or channels)
for monitoring during recording.
 Mute Project checkbox: Select to mute the project during recording, so you hear only
the sound being recorded.
 Disk space indicator: Shows the available disk space on the recording sessions
location set in Recording Preferences.
Chapter 3 The Soundtrack Interface 43

Meters Tab
The Meters tab displays stereo level meters that you can use to observe the volume of
the first output in a project.
Peak indicator
Level meters
Reset button
Go to Peak buttons
Peak Value and
Location display
 Peak indicator: Shows the highest level reached as the project plays. If the level rises
above 0 dB, the peak indicator becomes red to indicate clipping.
 Level meters: Show the output volume of the overall project as the project plays.
 Peak Value and Location display: For each channel, displays the highest (peak) value
played, and its location.
 Go to Peak buttons: Move the playhead to the channel’s peak.
 Reset button: Resets the Peak Value and Location display and the peak indicator to
their default values.
44 Chapter 3 The Soundtrack Interface

Details Tab
The Details tab shows information about the currently selected media file, clip, marker,
or envelope point, and gives you a way to edit clip, marker, and envelope point details.
File Details
Clip Details
Audio File Details
When you select an audio file, the Details tab displays information about the file,
including the file icon, hints, tags for Apple Loops and other tagged audio files, sample
rate, bit depth, file size, and whether the file is a looping or non-looping file.
Video File Details
When you select a video file, the Details tab displays information about the file,
including the dimensions of the video, file size, length in seconds, frame rate, and other
information. You can preview the video file in the Details window by clicking the Play
button in the Media and Effects Manager preview controls.
Chapter 3 The Soundtrack Interface 45

Clip Details
 Clip display: Displays the waveform of the selected clip.
 Playback buttons: Set the clip playback mode to looping or non-looping.
 Measure in pop-up menu: Sets the units shown in the Position, Duration, and Offset
value sliders.
 Position value slider: Set the position (start point) of the selected clip.
 Duration value slider: Set the duration (length) of the selected clip.
 Offset value slider: Set the offset of the selected clip.
 Transpose pop-up menu: Choose the number of semitones to transpose a looping
clip from the pop-up menu.
 Clip Speed pop-up menu: Choose the clip playback speed for a looping clip from the
pop-up menu.
Marker Details
 Type buttons: Select whether the marker is a Beat marker or a Time marker.
 Name field: Type a name for the marker.
 Position value slider: Set the time position of the selected marker.
 Measure in pop-up menu: Choose the units for setting the marker position.
Envelope Point Details
 Position value slider: Set the time position of the selected envelope point.
 Value value slider: Set the value of the selected envelope point.
 Measure in pop-up menu: Set the units shown in the Position value slider.
 Copy from Previous Point button: Set the value of the selected envelope point to the
value of the preceding one in the envelope.
 Copy from Next Point button: Set the value of the selected envelope point to the
value of the next one in the envelope.
46 Chapter 3 The Soundtrack Interface

4 Getting Started with Soundtrack
4
This chapter describes what projects you can create in
Soundtrack, and how to work with windows, use layouts,
play projects, and set Soundtrack preferences.
Overview
In Soundtrack, you create and work with multitrack projects. Multitrack projects let you
arrange audio clips in tracks in the Timeline and synchronize them to a video clip. You
add clips to the Timeline from the Media and Effects Manager or from the Finder, and
can also record audio directly into tracks. Each track has controls you can use to adjust
volume and pan, mute or solo the track, add effects, and adjust effect parameters. The
Timeline also includes busses and outputs with similar controls. You can mix a project
in the Timeline, and automate volume, pan, and other controls using envelopes in the
Timeline.
You can export a project mix to an audio file, which you can import into
Final Cut Express or another application. You can also export selected tracks, busses,
and outputs or export a project to a QuickTime movie.
For information about creating, saving, and working with projects, see Chapter 5,
“Working with Projects,” on page 77.
Note: The audio files used in a project are not stored as part of the project file. The
project file only saves references (pointers) to their location on disk. This keeps the size
of the project file relatively small, and lets you use an audio file in multiple projects.
47

Setting Up Your Workspace
There are several ways you can set up the Soundtrack workspace to suit your display
size and workflow. You can arrange windows, reorder and detach tabs in the Utility
window and the Media and Effects Manager, and add and reorder buttons in the
Toolbar. You can create layouts for different tasks and switch between them.
Basic Window Controls
You can move, resize, or minimize a project’s windows. Most windows feature tabs,
which give you flexibility in arranging the visual elements of a project.
To move a window:
m Drag the window by its title bar to a new location.
To resize a window, do one of the following:
m Drag the Size control in the lower-right corner of the window until the window is the
desired size.
m Hold the pointer near the edge of a window until it becomes a Resize Window pointer,
then drag the window edge left or right to resize adjacent windows together.
To minimize a window to the Dock:
m Click the minimize button in the window’s title bar.
To close a window:
m Click the window’s close button (or press Command-W with the window active).
Using Tabs
Soundtrack uses tabbed windows so you can quickly access different project views and
controls. You can switch between projects and between different controls in the Media
and Effects Manager and the Utility window. Clicking the tab you want makes it active
and brings it to the front. You can reorder the tabs in a window to easily access the tabs
you use frequently.
To reorder tabs:
m Drag a tab left or right in the window’s tab area.
You can also detach a tab from its docked position in the Utility window or the Media
and Effects Manager, which creates a separate draggable, resizeable window for the
tab. For example, you can drag the Bin tab to a new location so that you can easily
move items from the Browser tab to the Bin tab.
48 Chapter 4 Getting Started with Soundtrack

To detach a tab from the Utility window or the Media and Effects Manager:
m Drag the tab out of its docked position in the window to create a separate window for
the tab.
To reattach a tab:
m Drag the tab back to its original location at the top of its originating window.
Using Project Layouts
Soundtrack lets you save and recall preset window arrangements called layouts, so that
you can optimize your workspace for different tasks and different display sizes. You can
show, hide, and resize windows, then save each window arrangement as a layout.
To save a project layout:
1 Arrange the application windows as you want them to appear.
2 Choose Window > Save Layout.
3 In the Save dialog, type a name for the layout, then click Save.
The layout is saved, and appears in the Layouts submenu.
To switch to a saved project layout:
m Choose Window > Layouts, then choose the layout you want to use from the submenu.
To delete a saved layout:
1 Choose Window > Manage Layouts.
2 In the Manage Layouts dialog, select the layout you want to delete.
3 Click the – (minus) button to delete the layout, then click Done.
Chapter 4 Getting Started with Soundtrack 49

Customizing the Toolbar
The Toolbar at the top of the Project window contains buttons for frequently used
commands. You can customize the Toolbar, adding buttons for the actions you use
most often, and can return to the default set later.
The default set of Toolbar buttons includes buttons for creating new projects, opening
project windows and tabs, adding markers, and other common commands. You can
customize the Toolbar with additional buttons for other commands. You can also hide
the Toolbar to maximize available screen space. You customize the Toolbar by dragging
items from the Customize dialog to the Toolbar.
To show the Customize dialog, do one of the following:
m Choose View > Customize Toolbar.
m Control-click the Toolbar, then choose Customize Toolbar from the shortcut menu.
The Customize dialog appears, and spaces between buttons in the Toolbar are
outlined in gray.
To add a button to the Toolbar:
m Drag a button from the Customize dialog to the Toolbar.
If you drag a button between two existing buttons, the buttons move to make room
for the new button.
To move a button in the Toolbar:
m Command-drag the button to a new location on the Toolbar.
You can also rearrange the Toolbar using set-width spaces, flexible spaces, and separators.
To add space or a separator to the Toolbar:
m Drag a space, flexible space, or separator from the Customize dialog to the Toolbar.
To return the Toolbar to the default set of buttons:
m Drag the default button set, located at the bottom of the Customize dialog, to the Toolbar.
You can also change the Toolbar so that it shows only icons or only text.
To show only icons in the Toolbar, do one of the following:
m Control-click the Toolbar, then choose Icon Only from the shortcut menu.
m In the Customize dialog, choose Icon Only from the Show pop-up menu.
50 Chapter 4 Getting Started with Soundtrack

To show only text in the Toolbar, do one of the following:
m Control-click the Toolbar, then choose Text Only from the shortcut menu.
m In the Customize dialog, choose Text Only from the Show pop-up menu.
To show both icons and text in the Toolbar, do one of the following:
m Control-click the Toolbar, then choose Icon & Text from the shortcut menu.
m In the Customize dialog, choose Icon & Text from the Show pop-up menu.
To close the Customize dialog:
m When you are finished customizing the Toolbar, click Done.
To hide the Toolbar:
m Choose View > Hide Toolbar. When the Toolbar is hidden, the menu item becomes
Show Toolbar.
Playing Projects
You can play projects as you work, so you can hear the audio in the project along with
the changes you’ve made.
To play the project:
m Click the Play button in the transport controls (or press the Space bar). Click the Play
button (or press the Space bar) again to stop playback.
As the project plays, the playhead shows the point in the project currently playing.
Soundtrack lets you set the playhead and control playback of your projects in several
different ways. You can use the transport controls or keyboard commands to start and
stop playback and set the playhead to different points in time. You can also set a
playback region to repeat playback of a specific part of the project.
Setting the Playhead
The playhead appears as a thin black line running vertically through the Timeline in
projects. Where it crosses the Time ruler, the top of the playhead has a triangular
handle that makes it easier to see its position onscreen and drag the playhead.
To set the playhead, do one of the following:
m Click anywhere in the Time ruler to set the playhead to that position.
m Drag the triangular handle at the top of the playhead to the position you want to set it.
As you drag the playhead, you hear the audio at the current playhead position.
Chapter 4 Getting Started with Soundtrack 51

By default, clicking anywhere in the Timeline moves the playhead to that position. You
can change the default behavior so that only clicking in the Time ruler moves the
playhead. For more information, see “General Preferences” on page 73.
Drag the playhead where you
want it or click in the Timeline.
When you set the playhead, it snaps to the nearest Snap To position if snap is turned
on. For information on setting the Snap To value, see “Using Snap” on page 70. You
can also set the playhead using the transport controls or using the Playhead Position
value slider.
Setting the Playhead Using the Time Display
When a project is playing, the Time display constantly updates to show the current
position of the playhead in both Time-based and Beats-based formats. You can also set
the playhead to a new position by entering the position in the Time display.
The arrangement of the Time-based and Beats-based positions in the Time display
changes depending on the time format of the project. The position matching the time
format of the project appears in large, white numerals in the upper part of the Time
display, and the other position appears below it in smaller, gray numerals. Each position
is labeled for quick visual recognition.
For information on setting the project time format, see “Setting Project Properties” on
page 78.
52 Chapter 4 Getting Started with Soundtrack

To set the playhead using the Time display:
m Select either the Time or Beats position in the Time display, then enter a new position.
You can select the entire position or part of the position.
Enter a time position
in the Time area.
Enter a beat position
in the Beats area.
Entering Time-Based Units
When you set the playhead by entering a Time-based position in the Time display, you
don’t need to enter all of the punctuation. Soundtrack automatically adds the correct
punctuation for the format of the Time display.
For example:
 If you enter 01234321, and the Time ruler units are set to seconds, Soundtrack interprets
it as 01:23:43:21. This stands for 1 hour, 23 minutes, 43 seconds, and 21/100 of a second.
If you enter a partial number, Soundtrack formats it with the rightmost pair of numbers
as fractions of a second (or frames if a timecode format is selected), and with each
successive pair of numbers to the left as seconds, minutes, and hours. Numbers
omitted from a complete time position are interpreted as zeros. For best results, always
enter delimiters to separate each division of time.
For example:
 If you enter 01.23, and the Time ruler units are set to seconds, Soundtrack interprets it
as 00:00:01.23. This stands for 1 second and 23/100 of a second.
 If you enter 0.12.34, Soundtrack interprets it as 00:00:12.34. This stands for 12 seconds
and 34/100 of a second.
You can select only part of the position in the Time display and enter a new number for
that position. For example, you can select only seconds, or minutes and seconds. The
other categories keep their present values. You can enter a time position in timecode
format, in a way similar to the way you enter timecode in Final Cut Express.
Chapter 4 Getting Started with Soundtrack 53

Entering Beats-Based Units
When you set the playhead by entering a Beats-based position in the Time display, you
enter periods between numbers to separate measures, beats, and beat divisions.
Soundtrack fills out the digits in the beat division category with zeros.
For example:
 If you enter 123, Soundtrack interprets it as 123.1.000. This stands for the 123rd
measure, 1st beat, with no added beat divisions.
 If you enter 12.3, Soundtrack interprets it as 12.3.000. This stands for the 12th
measure, the 3rd beat, with no added beat divisions.
 If you enter 1.2.3, Soundtrack interprets it as 1.2.300. This stands for the 1st measure, the
2nd beat, and 300/1000ths of a beat (because each beat division is 1/1000 of a beat).
You can select only part of the position in the Time display and enter a new number for
that position. For example, you can select only measures, or measures and beats. The
other categories keep their present values.
Setting the Playhead Using the Playhead Position Value Slider
Below and to the left of the transport controls is the Playhead Position value slider.
When a project is playing, the Playhead Position value slider constantly updates to
show the current position of the playhead. You can set the playhead by entering a new
position in the Playhead Position value slider.
The units shown in the Playhead Position value slider depend on the project time
format. For projects set to Time-based time format, the units appear as timecode, using
the currently selected Time ruler units. For projects set to Beats-based format, the units
appear as measures, beats, and beat divisions at the current tempo.
You can change the value in a value slider in one of several ways: You can enter a new
value, change the value incrementally using the Decrement and Increment arrows, or
drag the slider left or right.
54 Chapter 4 Getting Started with Soundtrack

To change the playhead position by entering a value:
1 Double-click the value slider.
The value slider becomes a value field, with the current value selected.
2 Type a new value into the field, using appropriate punctuation.
3 Press Tab or Enter to confirm the new value.
To change the playhead position in increments:
m Click the Decrement arrow to move the playhead left (earlier in time) in increments, or
click the Increment arrow to move the playhead right (later in time) in increments.
To change the playhead position by dragging:
m Click in the center area of the value slider (where the numbers are), then drag left to
move the playhead left (earlier in time) or drag right to move it right (later in time).
For projects set to Time-based time format, the Decrement and Increment arrows move
the playhead in seconds. For projects using Beats-based time format, the arrows move
the playhead in beats.
Scrubbing a Project
You can scrub a project in the Timeline. Scrubbing the project lets you hear the audio at
the playhead position as you drag the playhead, so you can find a particular sound or
event in the audio file.
To scrub a project:
m In the Timeline, drag the playhead left or right at the speed you want to scrub the audio file.
Chapter 4 Getting Started with Soundtrack 55

Controlling Playback with the Transport Controls
You use the transport controls to control playback of your project. The transport
controls let you set the playhead to various points in time, start and stop playback,
activate the playback region, and start a recording session to record your own audio.
Play from Beginning
Record
Play
Go to
Beginning
Go to End
Cycle
MIDI Sync
 Record: Starts recording at the playhead position on the track you have enabled for
recording. If no track is enabled, a new track is created when recording starts.
 Play from Beginning: Starts playback from the beginning of the project. Playback
begins immediately, whether the project is playing or is stopped when you click the
button.
 Go to Beginning: Sets the playhead to the beginning of the project. If the playback
region is active, and the playhead is after the beginning of the playback region in
time, the playhead is set to the beginning of the playback region.
 Play: Starts playing back the project from the current playhead position. Clicking the
Play button again stops playback at the current playhead position.
 Go to End: Sets the playhead to the end of the project. If the playback region is
active, and the playhead is before the end of the playback region in time, the
playhead is set to the end of the playback region.
 Cycle: If a playback region is set, clicking the Cycle button toggles whether the
playback region is active or inactive. If no playback region is set, clicking the Cycle
button sets the project to repeat from the beginning when the playhead reaches the
end of the project. For information on setting the playback region, see “Working with
the Playback Region” on page 93.
 MIDI Sync: Synchronizes playback with incoming MIDI Clock and MIDI Timecode
(MTC) signals.
56 Chapter 4 Getting Started with Soundtrack

Controlling Playback Using Keyboard Shortcuts
There are a number of keyboard shortcuts you can use to control playback of your
project. To use keyboard shortcuts, the pointer cannot be in a text field.
 Space bar: Plays back the project from the current playhead position. If the project is
playing, pressing the Space bar sets the playhead back to the point from which the
project started playing. This is equivalent to clicking the Play button.
 Return: Sets the playhead to the beginning of the project. If the playback region is
active, pressing Return sets the playhead to the beginning of the playback region.
This is equivalent to clicking the Go to Beginning button.
 Shift-Return: Sets the playhead to the beginning of the project, and starts playback if
it is stopped. This is equivalent to clicking the Start from Beginning button.
For a complete list of Soundtrack keyboard shortcuts, see Appendix B, “Soundtrack
Keyboard Shortcuts,” on page 189.
Locating and Adding Audio Files
You can locate media files to use in a project using the Media and Effects Manager, or
drag files from the Finder. The Media and Effects Manager gives you three ways to
locate audio files: the Browser, Favorites, and Search tabs. You can also store media files
for a project in the Bin for easy access in a project.
Supported Audio File Formats
You can add AIFF, WAV, MP3, and AAC (except protected AAC) files to a project. You can
also add QuickTime (.mov) audio files and STAP (Soundtrack Pro Audio Project) files. You
can import audio files with any combination of the following sample rates and bit depths:
Sample Rates
 Any sample rate from 8 kHz to 192 kHz
Bit Depths
 8 bit
 16 bit
 24 bit
 32 bit (both integer and floating point)
Note: Files with lower bit depths or sample rates do not have the same playback
quality as do higher-rate formats.
Chapter 4 Getting Started with Soundtrack 57

Looping and Non-Looping Files
Soundtrack supports two types of audio files: looping and non-looping files. Most audio
files are non-looping files unless they contain tags for tempo, key, and other information.
Many of the Apple Loops that come with Soundtrack, as well as other tagged audio
files, can be looping files. Looping files may contain music, rhythmic sounds, or other
repeating patterns. You can resize a looping file to fill any amount of time. Looping files
adjust to the project tempo and key, letting you use loops recorded in different keys
and at different tempos in the same project.
Non-looping files do not adjust to the project tempo and key. You can shorten or
lengthen a non-looping file, but lengthening it beyond the size of the original file adds
only silence to the lengthened part. You can search for non-looping files in the Search
tab using the Search text field.
Both looping and non-looping files can contain tags with information about the file,
including mood, genre, and musical instrument. Soundtrack recognizes tags in audio
files intended for use with loop-based music applications. You can open an audio file in
Apple Loops Utility and add tags, and can convert a looping file to a non-looping file,
or convert a non-looping file to a looping file. For information about tagging audio files
using Apple Loops Utility, see Appendix A, “Using Apple Loops Utility,” on page 173.
Using the Browser to Locate Files
The Browser tab shows the hard disks and other storage media connected to your
computer, and lets you browse through the file hierarchy to find audio files located on disk.
To locate audio files using the Browser:
m Double-click a volume or folder in the Browser to view its contents.
m You can move back through the previous locations in the Browser using the Forward and
Back buttons, or through the levels of the file hierarchy using the Path pop-up menu.
58 Chapter 4 Getting Started with Soundtrack

Using Favorites to Locate Files
Favorites let you store frequently used file locations, so that you can access them
directly. You can add and remove Favorites from the Media pop-up menu at the lowerright corner of the Media and Effects Manager.
To locate audio files in Favorites:
m Double-click the disk or folder you want to open.
Double-click an
item to open it.
You can move back through the previous locations in the Favorites tab using the
Forward and Back buttons, or through the levels of the file hierarchy using the Path
pop-up menu.
Using Search to Locate Files
Using Search, you can search for media files to add to your project. Search has two
views: Column view and Button view. You choose which view to display by clicking the
Column View or Button View button in the upper-left area of the window. In both
views, the files matching your search criteria appear in the Search Results area, along
with columns displaying additional information for tagged files. You can sort these
columns by clicking the heading on top of each column. You can also perform text
searches in both views, and refine your searches.
If you use Apple Loops or other tagged audio files in a project, you can search based
on a variety of criteria, including musical instrument, genre, time signature, mood
descriptor, and scale type. You can also search using specific keywords.
To display the Search tab:
m Click Search in the Media and Effects Manager.
Chapter 4 Getting Started with Soundtrack 59

Searching for Files in Column View
In Column view, the upper area of the Media and Effects Manager displays two
columns: Keywords shows the categories of files that meet the search criteria, and
Matches shows the total number of matching files and any subcategories containing
matching files, with the number of matching files in each.
Clicking a keyword displays the files matching that keyword in the Search Results area.
You can refine your search results by narrowing the criteria using the subcategories in
the Matches column.
To search for files in Column view:
1 Choose the type of keywords to display in the Keywords list from the Keywords
pop-up menu.
You can use the Time Signature and Scale Type pop-up menus to restrict matches by
those categories.
2 Select a keyword in the Keywords list to display matching files in the Search Results area.
Select a keyword
to display the
matching files in the
Search Results area.
The hints, tempo, key, and number of beats for each matching file are also displayed.
You can also perform text searches, which can be especially helpful for non-tagged
files. When you type text in the Search Text field, any files with the text in their file path
or filename appear in the Search Results list. The number of files appears in the
Matches column under “No Category.”
To search using the Search Text field:
m Enter text in the Search Text field.
As you type, files matching the characters you type appear in the Search Results field.
60 Chapter 4 Getting Started with Soundtrack

Refining a Search in Column View
There are several ways you can refine your searches in Column view. You can select
items in the Matches column to add the matching files for each category to the search
results, and you can enter text in the Search Text field to narrow your search to files
that include the text in their file path. Selecting multiple keywords in the Keywords list
narrows the search results to files matching all the selected keywords.
To refine your search using the Matches column:
m Click to select a match category, or Command-click to select multiple match categories.
Click match categories
to refine your search.
These are files that
match the categories
selected above.
To refine your search by selecting multiple keywords:
m Shift-click to select adjacent keywords, or Command-click to select nonadjacent keywords.
Searching for Files in Button View
In Button view, the upper area of the Media and Effects Manager displays a grid of
buttons, each of which is labeled with a keyword. The keywords displayed are
determined by the Keywords pop-up menu; the choices are Best Mix, Instruments,
Genre, Descriptors, and Custom. The keywords for each choice are fixed, and appear
whether or not matching files for the keyword exist. Keywords for which no matching
files exist are dimmed.
Chapter 4 Getting Started with Soundtrack 61

To search for files in Button view:
1 Choose the type of keywords to display on the keyword buttons from the Keywords
pop-up menu.
2 You can optionally use the File Type, Time Signature, and Scale Type pop-up menus to
restrict matches by those categories.
3 Click a keyword button to display matching files in the Search Results area.
Click a button to display
the matching files in the
Search Results area.
You can also perform text searches, which can be especially helpful for non-tagged
files. When you type text in the Search Text field, any files with the text in their file path
or filename appear in the Search Results list.
To search by file path or filename:
m Enter text in the Search Text field.
As you type, files matching the characters you type appear in the Search Results field.
62 Chapter 4 Getting Started with Soundtrack

Refining a Search in Button View
There are several ways you can refine your searches in Button view. You can select
multiple keyword buttons to narrow your search results to files matching all the
selected keywords, and you can enter text in the Search Text field to narrow your
search to files that include the text in their file path.
To refine your search using multiple keywords:
m Command-click multiple keyword buttons.
Select additional
keywords to refine
your search.
These are files that match
both of the keywords
selected above.
Adding Custom Keywords
You can add custom keywords, which appear in the Keywords list in Column view
and on the keyword buttons in Button view. Custom keywords can be added only in
Button view.
To add a custom keyword:
1 Choose Custom from the Keyword Type pop-up menu.
2 Control-click one of the buttons in the grid, then choose a custom keyword from the
shortcut menu.
Chapter 4 Getting Started with Soundtrack 63

Click the Add Directory
button, then select a
directory to add.
Click here to index
the directory.
Adding a Directory to the Search Database
Search looks through all indexed directories (volumes and folders) for files that match
your search criteria. Before a file can appear in Search, you must add the directory
containing the file to the Search database and index the directory.
Note: The Search database does not update automatically. If you add files to an
indexed directory, you must index the directory again before the files will appear in the
Media and Effects Manager.
To add a directory to the Search database:
1 Click the Setup button at the top of the Search tab.
2 In the Setup dialog, click the Add Directory (+) button.
3 In the file dialog, navigate to the directory you want to add, then click Open.
The directory appears in the list in the Setup dialog. You can resize the dialog if you
need to see more items in the list.
4 Select the directory in the list, then click the Index Now button.
Note: Indexing a large collection of files may take several minutes. The bottom of the
Add Directory dialog displays the progress of the directory being indexed. If you need
to interrupt the indexing process, click the Stop Indexing button. You can re-index the
directory later. You can deselect items you do not wish to re-index.
5 When Soundtrack is finished indexing the directory, click Done to return to the Media
and Effects Manager.
64 Chapter 4 Getting Started with Soundtrack

Click the Remove
Directory button to
remove the selected
Removing a Directory from the Search Database
If you move or change your collection of audio files, you can remove a folder from the
Search database. Removing unneeded folders from the database can shorten search
times and eliminate extraneous results.
To remove a folder from the Search database:
1 Click the Setup button at the top of the Search tab.
2 In the Setup dialog, select the directory you want to remove, then click the Remove
Directory (-) button.
directory.
3 Click Done to return to the Media and Effects Manager.
Once you have added the folders containing your audio files to the Search database
and indexed them, you can use Search to find the files. In both Column view and
Button view, the audio files that match the search criteria appear in the Search Results
area in alphabetical order. You can preview files in the File list and drag them to the
Timeline. You can also add a folder to your Favorites from the Search tab.
Storing Files in the Bin
The Bin shows all of the clips added to the project. You can add audio files to the Bin
for easy access to files you may want to add to the current project. Audio files appear in
the Bin in alphabetical order.
To add a file to the Bin, do one of the following:
m Drag the file from the Finder to the Bin.
m Drag the file from the Browser, Favorites, or Search tab to the Bin.
Files added to the Bin but not included in the project appear dimmed in the Bin.
Chapter 4 Getting Started with Soundtrack 65

Previewing Audio Files
Once you locate an audio file you want to use in your project, you can preview the file
in the Media and Effects Manager. When you preview files, Soundtrack matches the
sample rate of the file to the project sample rate. When you preview looping files,
Soundtrack matches their tempo and key to the project tempo and key.
To preview an audio file:
m Select the file in the Media and Effects Manager.
The selected file starts playing. If the project is playing when you preview a file,
Soundtrack starts playback of the previewed file on the downbeat of the next measure
of the project. You can turn preview playback on and off by holding down Option and
pressing the Space bar.
Select an audio file in the
Media and Effects Manager
to preview it.
Audio files tagged as loops play back repeatedly when previewed. You can control the
playback of the file being previewed using the preview controls. You can only preview
one audio file at a time.
You can also preview video files. When you double-click a video file in the Media and
Effects Manager, the video appears in a small window in the Details tab.
To preview a video file:
1 Click the Details tab in the Utility window to make the tab active.
2 Select the video file in the Media and Effects Manager.
3 Click the Play button in the preview controls at the bottom of the Media and Effects
Manager. To stop playback, click the Play button again.
For more information on working with video files, see Chapter 7, “Working with Video
in Soundtrack,” on page 115.
66 Chapter 4 Getting Started with Soundtrack

Using the Preview Controls
The Preview area at the bottom of the Media and Effects Manager contains controls
you can use when previewing audio files.
Play button
Media pop-up menu
Volume slider
 Play button: Starts playback of the preview file. If the file is playing, stops playback.
 Mute button: Mutes playback of the preview file without stopping project playback.
Clicking the button again unmutes the preview file.
 Volume slider: Sets the playback volume of the preview file.
 Media pop-up menu: Choose whether to add the file to Favorites, open it in
Apple Loops Utility, or reveal it in the Finder.
To preview an audio file with a project:
1 Click the Play button in the transport controls to play the project.
2 When the project reaches the point in time where you want to hear the preview file,
select the file in the Media and Effects Manager.
To preview a file without the project (solo):
1 If the project is playing, click the Stop button in the transport controls to stop playback
of the project.
2 Select the file in the Media and Effects Manager to preview the file.
You can also preview a video file using the preview controls. For information about
previewing a video file, see “Playing the Video” on page 117.
Chapter 4 Getting Started with Soundtrack 67

Viewing Audio File Information
You can view information about an audio file in the Media and Effects Manager or the
Timeline in the Details tab of the Utility window.
When you select an audio file in the Media and Effects Manager, the Details tab
displays the file path and other information about the file. The following information
is displayed in the File tab of the Details tab:
 Name: The name of the file
 Hints: The hints provided for the file. Hints are file tags that are used to search for
files or for tempo and key matching.
 Instrument: The instrument or instrument category to which the file belongs
 Author: The author of the file
 Copyright: The copyright information for the file
 Path: The path to the file’s location on disk
 Tempo: The original tempo of the file
 Time Signature: The time signature of the file
 Beats: The number of beats recorded in the file. For non-looping files, this field
shows the duration (length) of the file in seconds.
 Key: The original key of the file
 Sample Rate: The sample rate at which the file was recorded
 Bit Depth: The bit depth at which the file was recorded
 Channels: The number of audio channels the file contains
 Size: The file size in kilobytes
 Genre: The musical category to which the file belongs
 Length: The duration of the file in seconds
 Looping file: Indicates whether the file is a looping file (Yes) or a non-looping file (No).
68 Chapter 4 Getting Started with Soundtrack

Note: The information that is displayed depends on whether or not the file is tagged.
Untagged files may not display information for all categories. For more information on
file tags, see Appendix A, “Using Apple Loops Utility,” on page 173.
You can also view and edit audio clip properties in the Details tab. For information about
viewing and editing clip properties, see “Viewing and Editing Clip Properties” on
page 85.
Using Undo and Redo
As you edit clips and perform other operations in projects, you might need to use the
Undo and Redo commands. For example, if you don’t like the last change you’ve made
to a project, it can usually be undone. Then, if you decide you prefer to keep the
change you just undid, you can redo the command immediately after using Undo.
You can also use the Undo and Redo commands as a quick way of trying out changes
to your project. You can make changes to any aspect of the project, then use Undo to
step back through changes you don’t like to the project’s previous state. If you change
your mind after undoing a change or set of changes, you can always use Redo to
recover the changes. At any point, you can save a new version of the project using the
File > Save As command.
You can use the Undo command repeatedly to undo every change made since the
project was last saved.
To undo the last change:
m Choose Edit > Undo [item] (or press Command-Z).
The [item] in the menu changes to show the last command or operation.
You can use the Redo command repeatedly to redo every undone change since the
project was last saved.
To redo the last change:
m Choose Edit > Redo [item] (or press Command-Shift-Z).
The [item] in the menu changes to show the last command or operation.
Chapter 4 Getting Started with Soundtrack 69

Using Snap
When you move and resize clips in the Timeline, you usually want them to start and end
at a specific point in time. To synchronize clips with a video, you may want to position
them in line with a specific frame. In a music-based project, you may want to align clips
with measures and beats. Soundtrack includes a snap feature that causes clips, the
playhead, and other items in the Timeline to “snap” to the nearest Snap To position.
Snap applies to the following operations:
 Dragging audio clips to the Timeline
 Moving audio clips
 Resizing audio clips
 Setting the playhead
 Setting the playback region
 Inserting markers
 Moving markers
 Selecting Timeslices
 Adding envelope points
 Moving envelope points
 Moving crossfade edges
You can use snap to ensure that audio clips are synchronized to a measure or beat, that
they begin playing back at a precise point in time, and that they are precisely aligned
with other clips in the Timeline.
When you turn on snap, the item you are moving snaps to the nearest Snap To position
in the Timeline. The available Snap To values depend on the time format of the project.
For projects set to Time-based format, the available Snap To values are:
 Ruler ticks
 Seconds
 Frames
 Adjacent Tracks
 Markers
70 Chapter 4 Getting Started with Soundtrack

For projects set to Beats-based format, the available Snap To values are:
 Ruler ticks
 1/4 notes
 1/8 notes
 1/16 notes
 1/32 notes
 1/64 notes
 Markers
 Clips on Adjacent Tracks
To turn snap on:
m Choose View > Snap (or press N).
A checkmark next to the menu item indicates that snap is turned on. Choose View >
Snap again to turn snap off.
To set the Snap To value:
m Choose View > Snap To, then choose a value from the submenu.
You can temporarily defeat snap while you work in the Timeline. When you defeat snap,
you reverse the current snap state.
To defeat snap:
m Select the item in the Timeline, then hold down the Command key as you drag the item.
If snap is turned on, Command-dragging lets you move the item without having it
snap to the nearest Snap To position. If snap is turned off, the item snaps to the nearest
Snap To position. When you release the Command key, items moved in the Timeline
follow the normal snap state.
Chapter 4 Getting Started with Soundtrack 71

Reconnecting Media Files
Because Soundtrack projects contain references to media files, and not the files
themselves, a project cannot play back if the media files it uses are erased or moved.
When you open a project in Soundtrack, the application checks to see if the media files
it uses exist in the same location as they did when the project was last opened. If the
media files are not in the expected location, Soundtrack displays a Can’t Find File
dialog, with three choices.
 Skip File: Opens the project without reconnecting the missing file.
 Cancel: Cancels the Open command.
 Find File: Presents a dialog that lets you locate the missing file and reconnect it to
the project.
If you choose to open the project without reconnecting its files, you can reconnect
individual audio files from the Bin tab, and reconnect a video file in the video track in
the Timeline.
To reconnect an audio file:
1 Do one of the following:
 Control-click the audio file in the Bin tab, then choose Reconnect [filename] from the
shortcut menu.
 Select the clip in the Bin tab, then choose Reconnect [filename] from the Media
pop-up menu.
 Select the clip in the Timeline, then choose Clip > Reconnect.
 Control-click the clip in the Timeline, then choose Reconnect from the shortcut menu.
2 In the dialog that appears, locate the audio file you want to reconnect.
3 Click Open to reconnect the file.
To reconnect a video file:
1 Control-click the video clip in the video track, then choose “Reconnect offline source”
from the shortcut menu.
2 In the dialog that appears, locate the video file.
3 Click Open to reconnect the file.
72 Chapter 4 Getting Started with Soundtrack

Setting Soundtrack Preferences
You set preferences for various aspects of Soundtrack that affect both the appearance
and operation of the application in the Preferences window. Some preferences apply to
the current project, and some apply to new projects you create. You may want to
specify some preferences before you begin working in Soundtrack.
To open the Preferences window:
m Choose File > Preferences.
General Preferences
The General preferences include program startup behavior, Media and Effects Manager
options, and Timeline defaults for new projects.
Startup
These preferences let you set the startup behavior when you open Soundtrack.
 Open Last Project button: Reopens the last project on startup.
 Open New Project button: Creates a new, blank project on startup. This is the
default behavior.
 Switch Hardware Sample Rate to match Document checkbox: When selected, the
sample rate of any connected audio device switches to match the project sample
rate when you open Soundtrack or change the active project. The checkbox is
selected by default.
Chapter 4 Getting Started with Soundtrack 73

Timeline
These preferences let you set the default Snap To value, default track height, and other
aspects of the Timeline.
 Use ellipses (...) in clip names checkbox: When selected, clips in the Timeline with long
names are center-truncated with an ellipsis. “Use ellipses (...) in clip names” is
deselected by default.
Note: Selecting “Use ellipses in clip names” can impact the speed at which the screen
is redrawn during playback.
 Scrollwheel pop-up menu: Choose whether an attached mouse with a scrollwheel
scrolls the Timeline or zooms in or out at the playhead position.
 Automation Recording Sensitivity slider: Drag to set the level of sensitivity with which
onscreen movements are recorded. Setting the slider to High results in all
movements being recorded.
Alerts
This preference lets you control when certain alerts appear.
 Show alerts pop-up menu: Choose whether to show disk overload and unsupported
sample rate alerts when the conditions causing these alerts occur.
Project Preferences
These preferences let you set project properties and other default settings for new
projects you create.
 Tempo value slider: Sets the default tempo for new projects in beats per minute
(bpm). The range is 60 to 200 bpm.
 Key pop-up menu: Sets the default key for new projects. The range is any key in the
chromatic scale from A to G#, or None.
74 Chapter 4 Getting Started with Soundtrack

 Time Signature pop-up menu: Sets the default time signature for new projects. The
choices are 3/4, 4/4, 5/4, 6/8, and 7/8.
 Sample Rate pop-up menu: Sets the default sample rate for new projects. The choices
are 32 kHz, 44.1 kHz (CD-quality audio), 48 kHz (DVD-quality audio), and 96 kHz. The
default is 48 kHz.
 Export Bit Depth pop-up menu: Sets the export bit depth for the current project and
new projects. The choices are 16-bit (CD-quality audio) and 24-bit.
 Timescale pop-up menu: Choose whether the overall project uses Time-based or
Beats-based time format.
 Video Frames per Second pop-up menu: Choose which video frame rate to use for
new projects.
 Tracks slider: Sets the default number of tracks for new projects.
 Snap buttons: Turn snap on or off for new projects.
 Snap To pop-up menu: Sets the default Snap To value for new projects. The choices
are Ruler Ticks, 1/4 notes, 1/8 notes, 1/16 notes, 1/32 notes, and 1/64 notes.
 Track Height pop-up menu: Sets the default track height for new projects. The choices
are Reduced, Small, Medium, and Large.
 Overlap Mode pop-up menu: Sets whether overlapped clips are crossfaded or
truncated for new projects.
 Starting Timecode field: Sets the starting timecode value.
Recording Preferences
These preferences let you specify settings for recording audio.
 Input pop-up menu: Displays the available devices for audio input. Choose an input
device from the pop-up menu.
 Monitor pop-up menu: Displays the available devices for monitoring audio output.
Choose an output device from the pop-up menu.
Chapter 4 Getting Started with Soundtrack 75

 Latency Compensation slider: Sets the amount of latency compensation in
milliseconds. If recorded audio is late, drag the slider right. If the recorded audio is
early, drag the slider left.
For information on eliminating latency, see “Eliminating Recording Latency” on page 196.
 Sessions Location display: Displays the default location to which recording sessions
are saved. You can set the save location by clicking the Choose button and
navigating to a new location.
Synchronization Preferences
These preferences let you specify synchronization settings.
Input
 Sync To MIDI Clock checkbox: Sets Soundtrack to receive MIDI Clock signals from a
MIDI application or external device.
 Sync To MIDI Time Code checkbox: Sets Soundtrack to receive MIDI Time Code (MTC)
signals from a MIDI application or external device.
Output
 MIDI Clock pop-up menu: Choose the device to send MIDI Clock to, or choose None.
 MIDI Clock Virtual MIDI Device checkbox: Sets Soundtrack to send MIDI Clock signals
to MIDI applications as “Soundtrack Sync Source.”
 MIDI Time Code pop-up menu: Choose a device to send MTC signals to, or choose None.
 MIDI Time Code Virtual MIDI Device checkbox: Sets Soundtrack to send MTC signals to
MIDI applications as “Soundtrack Sync Source.”
 Frame Rate pop-up menu: Sets the frame rate for outgoing MTC signals. (Note that
Soundtrack automatically detects the frame rate for incoming MTC signals.)
Time Code Offset
 Bar 1 At field: Sets the offset of Measure 1 of your Soundtrack project in SMPTE
format. The offset affects both incoming and outgoing MTC signals. This should be
set to the same value in all applications and devices.
76 Chapter 4 Getting Started with Soundtrack

5 Working with Projects
5
Using Soundtrack, you can create multitrack projects in
which you arrange and mix audio clips. Projects include
tracks, busses, and outputs that you can use to create
sophisticated mixes.
When you create a project, you can set the project’s properties and the project length.
You locate and add media to your project using the Media and Effects Manager.
Creating and Opening Projects
When you open Soundtrack, a new, blank project appears. You can change the default
startup behavior in the Preferences window. For information about setting preferences,
see “Setting Soundtrack Preferences” on page 73.
To create a new project:
m Choose File > New > Multitrack Project (or press Command-N).
A new, untitled project appears. You can name the project when you save it. For
information on saving projects, see “Saving Projects” on page 82.
To open an existing project:
1 Choose File > Open (or press Command-O).
2 Locate and select the project, then click Open.
You can also open a recently open project by choosing it from the File > Open Recent
menu, and can open a project by dragging it onto the Soundtrack icon in the Dock.
You can have multiple projects open in Soundtrack, and cut and paste between them, but
you can only play one project at a time. You can open projects created with Soundtrack
version 1.x that have the extension .loop, but can only save them as multitrack projects
(with the extension .stmp). You can also open Soundtrack Pro v1.x multitrack projects (with
the file extension .stmp) with Soundtrack, but they may not include all of the effects.
(Additionally, Soundtrack projects can be opened from Soundtrack Pro.)
77

Closing Projects
To close a project:
m Select the project’s tab in the Project window, then choose File > Close Project (or press
Command-Shift-W).
Setting Project Properties
Each project has a set of project properties, which include time format, sample rate,
tempo, time signature, key, and overlap mode. Each project property has a default
setting, described below. You can change the project properties using the project
controls in the Project window in the Timeline.
The most important project properties are time format and sample rate. The remaining
properties (tempo, time signature, and key) are important for projects set to Beatsbased format. For projects set to Time-based format, you can usually leave the tempo,
time signature, and key properties at their default settings.
You can change the default project properties for new projects in the Project pane of
the Preferences window. For information on setting preferences, see “Setting
Soundtrack Preferences” on page 73.
Time Format
Each project has a project time format, which can be either Time-based or Beats-based
format. Setting the time format controls the appearance of the Time display, Time ruler,
Timeline gridlines, and available Snap To values. For projects set to Time-based format,
time is displayed using the Time ruler units chosen in the View menu. For projects set
to Beats-based format, the time is displayed in measures, beats, and beat divisions. The
default format is Time-based.
Setting the format to Time-based lets you align clips and other items in the Timeline
with specific points in time, for example, specific frames in a video file. Setting the
format to Beats-based lets you align items in the Timeline with measures, beats, and
other musical units of time, regardless of tempo. You can switch between Time-based
and Beats-based format while working on a project.
78 Chapter 5 Working with Projects

To set the time format:
m Click the Time-based Format button to set the format to Time-based, or click the
Beats-based Format button to set the format to Beats-based.
Beats-based
Format button
Time-based
Format button
You can also set individual tracks to use a different time format than the project’s time
format. For information on setting a track’s time format, see “Changing Track Time
Format” on page 98.
Sample Rate
The project sample rate determines the number of samples per second Soundtrack
uses for audio playback and export. When you add audio files to your project, their
sample rate is matched (upsampled or downsampled) on the fly to the project sample
rate. The available sample rates are 32 kHz, 44.1 kHz, 48 kHz, 88.2 kHz, and 96 kHz. The
default is 48 kHz, which is the standard for DVD-quality audio.
Note: Digital video projects, including video for DVD, often use a 48 kHz sample rate.
When creating a score for a video, be sure you save and export your project at the
same sample rate the final video project will use.
To set the sample rate:
m Choose the sample rate from the Sample Rate pop-up menu.
Sample Rate
pop-up menu
Note: If you open your project on a computer that cannot support the project sample
rate, the project is resampled to the nearest rate the hardware supports for playback.
When you export your project, it is exported at the project sample rate, regardless of
hardware limitations. For more information on hardware sample rates, see Chapter 2,
“Setting Up Your System,” on page 21.
Chapter 5 Working with Projects 79

Tempo
The tempo sets the rate of the basic beat value for the project. When you add looping
files to a project, their tempo is matched to the project tempo. The tempo range is
from 60 to 200 beats per minute (bpm). The default tempo is 120 bpm (which equals
two beats per second). You set the project tempo using the Tempo value slider in the
project controls.
To set the project tempo, do one of the following:
m Click the left arrow in the Tempo value slider to decrease the tempo, or click the right
arrow to increase the tempo.
m Click the value in the value slider, then drag the slider that appears left or right to
change the tempo.
m Double-click the value in the value slider to select it, then type a new value.
Tempo value slider
You can change the project tempo over time using the Master Tempo envelope. For
information about creating tempo changes, see “Master Envelopes” on page 144.
Time Signature
The time signature controls how measures and beats appear in the Time display and
Time ruler. A project can have only one time signature, which lasts from the beginning
to the end of the project. The default time signature is 4/4 (four beats per measure,
with a quarter note as the beat value).
To set the project time signature:
m Choose a time signature from the Time Signature pop-up menu.
If you want to use a time signature not included in the list, choose Other, enter the
time signature in the dialog that appears, then click OK.
Time Signature
pop-up menu
Note: The project time signature affects the format of the Playhead Position value
slider. For projects using Beats-based time format, it also affects the appearance of the
Time ruler and the gridlines in the Timeline. It does not affect the rhythm of audio clips.
If your project uses audio clips with music in a definite time signature, make sure that
the project time signature matches the time signature of the clips used in the project.
80 Chapter 5 Working with Projects

Key
The project key sets the root note (or tonic) for the project. When you add looping files
to a project, their key is matched to the project key. You can set the project key to any
note of the chromatic scale (from A through G#), or to None (–). The default key is A.
Note: The key does not determine the scale used (major, minor, or another scale), only
the tonic or root note of the project.
To set the project key:
m Choose a key from the Key pop-up menu.
Key pop-up menu
Overlap Mode
The project overlap mode determines what happens when you move an audio clip so
that it partially or completely overlaps another clip on the Timeline. There are two
overlap modes: crossfade mode and truncate mode.
In crossfade mode, when you drag an audio clip so that it partially overlaps another
audio clip in a track in the Timeline, a crossfade is created for the overlapped part of
the two audio files. You can adjust the boundaries of the crossfade in the Timeline. In
truncate mode, when you drag an audio clip so that it partially overlaps another audio
clip in a track in the Timeline, the overlapped part of the clip is truncated.
To set the project overlap mode:
m Click the Crossfade Mode button to set the project to crossfade mode, or click the
Truncate Mode button to set the project to truncate mode.
Crossfade Mode
button
Truncate Mode
button
Chapter 5 Working with Projects 81

Setting the Project Length
By default, the length of a project depends on the media in the project. The project
length is set to the end of the last clip in the project. If the project uses a time-based
effect, and the effect extends past the end of the last clip, the project length extends to
include the effect’s “tail.” Adding a clip to the end of the project, or adding an effect
that produces a “tail,” extends the project length to include the new clip or the effect’s
tail. You can optionally set the project to a definite length.
To set the project length:
m In the Timeline, place the playhead at the point where you want the project to end,
then choose Mark > Set End of Project.
End-of-project marker
You can move the end-of-project marker to change the length of the project, or delete
it if you decide you no longer want it in the project.
To delete the end-of-project marker:
m Select the marker in the Timeline, then choose Edit > Delete (or press the Delete key.)
Saving Projects
To save your project:
m Choose File > Save.
Soundtrack projects are saved as documents with the extension .stmp.
Important: When you save a project, the audio files used by the project are not saved
as part of the project file. To play a project on another computer, you must install the
audio files the project uses on that computer, or on a disk it can access. If you remove
the audio files used in a project so that your computer cannot access them, you cannot
play back the project.
You can save a project and the media files the project uses together. This makes it easy
to move projects between computers, and ensures that all needed audio files are
available for playback.
 When you select Collect Audio Files, the project file and all the audio files the project
uses are saved in the same folder.
 When you select Collect Video File, the video file is included with the project and its
audio files.
82 Chapter 5 Working with Projects

To save a project and its audio files together:
1 Choose File > Save.
2 In the dialog that appears, select the Collect Audio Files checkbox.
3 Navigate to the folder in which you want to save the project and its audio files, then
click Save.
The project file, and a copy of every audio file the project uses, are saved to the
selected location.
4 You can optionally click the New Folder button to create a new folder for the collected
project. It’s a good idea to save each collected project in its own folder.
5 If the project includes a video file, you can optionally select the Collect Video File
checkbox to save the video to the selected location.
If the folder already contains any of the media files, an alert appears, asking if you want
to replace the existing files.
Note: Because video files are typically very large files, saving a copy of the video file
may take several minutes and may require a large amount of disk space.
You can also save a compressed version of the project. When you save a project
compressed, the data used to draw the audio waveforms in the Timeline is not saved.
This reduces the size of the project, but means that the waveforms must be redrawn
each time the project is opened.
To save a project compressed:
m In the Save dialog, select the Save Compressed checkbox.
Adding Audio Files to a Project
Once you’ve located and previewed an audio file you want to add, you drag the file to the
Timeline to add it to the project. When you drag an audio file to the Timeline, Soundtrack
creates an audio clip from the audio file, and adds the clip to the project. An audio clip
does not contain the actual audio data; instead, it contains a reference to the file stored
on disk. Editing an audio clip in the Timeline does not change the source audio file.
Each audio clip has a playback mode. For untagged files and files tagged as non-looping
files, the clip playback mode is non-looping. For files tagged as looping files, the clip
playback mode is looping. If the playback mode of a clip is looping, the clip appears with
notched edges to indicate where the audio file repeats when you resize the clip.
Chapter 5 Working with Projects 83

To add an audio file from the Media and Effects Manager, do one of the following:
m Drag the file from the File list in the Media and Effects Manager to a track in the Timeline.
m Drag the file from the File list between two existing tracks.
A new track is created and the clip is added to the track.
m Drag the file from the File list to the empty part of the Timeline below the outputs.
A new track is created and the clip is added to the track.
m Drag a file from the File list to a track or to the part of the Timeline below the existing tracks.
To add an audio file from the Finder:
m Drag the file from the Finder to the Timeline to a track, between two existing tracks, or
to the area below all existing tracks.
When the Bin tab of the Media and Effects Manager is active, the Bin shows all of the
audio clips in the project. You can drag a clip from the list to the Timeline to add a new
clip from the same audio file at a different point in time, or to a different track.
To add an audio file from the Bin tab:
m Drag the file from the Bin tab to the Timeline, either to a track or to the area below the
existing tracks.
Note: When you drag an audio file to the Timeline, the file snaps to the nearest Snap To
position if snap is turned on. For information on setting the Snap To value, see “Using
Snap” on page 70.
84 Chapter 5 Working with Projects
Drag the file from the
Media and Effects Manager
to the Timeline.

Viewing and Editing Clip Properties
When you create an audio clip by dragging an audio file to the Timeline, the audio clip
has a set of properties. These properties are specific to the clip, and can be different for
two clips created from the same source audio file.
The following properties for the selected clip are displayed, and can be edited, in the
Clip tab of the Details tab:
 Playback buttons: Set whether the clip is looping or non-looping. When you add an
audio file to the Timeline, the clip will be non-looping unless the audio file is tagged
as a looping file.
 Measure in pop-up menu: Sets the units shown in the Position, Duration, and Offset
value sliders.
 Position value slider: Sets the start point for the clip in the Timeline.
 Duration value slider: Sets the duration of the clip. The duration of looping files is
displayed in number of beats; the duration of non-looping files is displayed in seconds.
 Offset value slider: Sets the number of beats (for looping files) or seconds (for non-
looping files) from the beginning of the source file at which the clip begins playing.
 Transpose pop-up menu: Sets the transposition in semitones for looping files; the
range is –12 to +12 semitones.
 Clip Speed pop-up menu: Sets the playback speed for looping files, which can be
Quadruple, Double, Normal, Half, or Quarter.
Some properties can be changed by editing the clip in the Timeline. For detailed
information on editing audio clips, see “Editing Audio Clips” on page 101.
Chapter 5 Working with Projects 85

The name of an audio clip appears on the clip in the Timeline. By default, the entire
name appears on the clip if the clip is long enough to display it. You can change the
default behavior in the General pane of the Preferences window, so that long clip
names are truncated from the center. For information on setting preferences, see
“Setting Soundtrack Preferences” on page 73.
Tracks, Busses, and Outputs
Soundtrack projects contain tracks, busses, and outputs, which appear as horizontal
rows in the Timeline. Tracks, busses, and outputs are grouped together by category in
the Timeline, with a separator between each category. You can move each type within
its own category, but cannot move one to either of the other categories. Each track,
bus, and output has a header with its icon, name, and a set of controls.
Tracks
Tracks contain the audio you add to your project in the Timeline. Each track has a drag
handle, a name, an icon, and a set of controls that appear in the track’s header in the
Timeline. Track controls include a volume slider, a pan control, an output pop-up menu,
and buttons to mute or solo the track, add effects, and enable the track for recording.
Busses
Using busses, you can create submixes, letting you adjust volume and pan and add
effects to groups of related tracks. You use busses by adding sends to effects chains in
the Effects tab, then routing audio from each send to a bus.
Each bus has a drag handle, a name, an icon, and a set of controls that appear in the
bus’s header in the Timeline. Bus controls are the same as track controls, except that a
bus does not have a Record Enable button (because you can’t record audio to a bus).
The bus controls affect the audio of every track sent to that bus.
You route audio from a track to a bus by adding a send to the track in the Effects tab.
When you add a send, the send is assigned to a bus. You can change the bus to which
a send is assigned, and can adjust the volume and pan for the send.
Sends allow you to route audio from multiple tracks to the same bus to create
submixes. For example, you could route every dialogue track for a particular actor to a
bus with the actor’s name. You could adjust the volume of all the actor’s dialogue using
the bus volume fader, and add an EQ effect that brings out the actor’s voice in the mix.
You could then send (route) the bus to a particular output.
86 Chapter 5 Working with Projects

Outputs
Outputs let you route the audio from tracks and busses to physical outputs. If you are
using external audio hardware that supports multiple physical outputs, you can add
outputs to a project and choose the physical output to which each output in the
project sends its audio. You can also send audio from multiple tracks or busses to a
single output, control volume and pan for all the tracks using the output’s controls, and
add effects to the output.
For example, you could have a bus with the dialogue tracks for each actor, and route all
the dialogue busses to a single output. You could route all sound effects tracks to
another output, and adjust the volume or add effects to each output. For a final stereo
mix, you could route both outputs to the same pair of physical output channels
(channels 1 and 2, for example).
Each output has a drag handle, a name, an icon, and a set of controls that appear in the
output’s header in the Timeline. Output controls include a volume slider, a pop-up
menu where you can choose the physical output channels for the output, and buttons
to mute or solo the output and add effects. Outputs do not have pan controls or
Record Enable buttons.
Tracks, busses, and
outputs in the Timeline
For information about working with tracks, busses, and outputs in the Timeline, see
“Working with Tracks, Busses, and Outputs” on page 94.
Chapter 5 Working with Projects 87


6 Working in the Timeline
6
The Timeline is where you arrange audio clips to build your
soundtrack. You can also adjust volume and panning, add
effects, and edit envelopes to control automation.
The Timeline displays a visual representation of a project, showing the point in time
when audio clips start playing and their duration. You control when and how long clips
play by moving and resizing them in the Timeline.
The Timeline is arranged in three sets of horizontal rows: tracks, busses, and outputs.
You add audio clips to tracks, create submixes using busses, and send audio to physical
output devices using outputs. For information about working with tracks, busses, and
outputs, see “Tracks, Busses, and Outputs” on page 86.
The Timeline also displays vertical gridlines that make it easy to position clips
precisely in time. The gridlines correspond to the divisions of time in the Time ruler.
The units of time the gridlines display change depending on the time format and the
current zoom level.
Moving Around in the Timeline
Soundtrack provides several controls that let you change the view of the Timeline
and move to different parts of your project. You can zoom in or out for a closer or
wider view of the Timeline, control how many tracks are displayed in the Timeline,
and change which part of the project is currently visible using the scroll bars and
Timeline controls. You can use the Global Timeline view to quickly move to different
parts of your project.
Using the Scroll Bars
If the entire project cannot be displayed in the Timeline, you can scroll through the
project using the horizontal scroll bar located at the bottom of the Timeline. Drag the
horizontal scroll bar left or right to move the visible part of the Timeline.
89

If your project contains more tracks than can be displayed in the Timeline, a vertical
scroll bar appears along the right edge of the Timeline. Drag the vertical scroll bar up
or down to change which tracks are visible.
Vertical scroll bar
Horizontal scroll bar
In the lower left of the Timeline are the Timeline controls, including the Track Height
control and Zoom control.
Using the Zoom Control
You can zoom in to make precise edits in the Timeline, or zoom out for a wider view of
your project using the Zoom control.
The Zoom control features a slider on a graduated scale. Moving the slider to the left or
clicking the left side of the control zooms in for a closer view, displaying a smaller area
of the Timeline close up. Moving the slider to the right or clicking the right side of the
control zooms out for a wider view, displaying a wider area of the Timeline.
You can also zoom in and out using menu commands or keyboard shortcuts. If your
mouse has a scroll wheel, you can use it to zoom in and out. You can also fit the entire
project in the visible area of the Timeline.
To zoom in, do one of the following:
m Move the Zoom slider to the left.
m Click the left side of the Zoom control.
m Choose View > Zoom In.
m Press the Up Arrow key.
m Press Command-plus (+).
m If the mouse connected to your computer has a scroll wheel, move the scroll wheel up.
90 Chapter 6 Working in the Timeline

To zoom out, do one of the following:
m Move the Zoom slider to the right.
m Click the right side of the Zoom control.
m Choose View > Zoom Out.
m Press the Down Arrow key.
m Press Command-minus (–).
m If your mouse has a scroll wheel, move the scroll wheel down.
By default, when you use the scroll wheel, the playhead remains in the same position,
and the Timeline zooms in or out on both sides of the playhead. You can change the
default scrollwheel behavior in the General Preferences pane so that using the
scrollwheel scrolls the document rather than zooming it.
To fit the project in the visible area of the Timeline:
m Choose View > Fit in Window (or press Shift-Z).
Setting Track Height
You set the height of tracks, busses, and outputs in the Timeline using the Track Height
control. The Track Height control has four settings. The smallest rectangle sets the track
height to a minimized setting, with each track (and track header) reduced to half-height,
allowing more tracks to be displayed in the Timeline.
To set the height of tracks, busses, and outputs:
m Click one of the four rectangles on the Track Height control.
Reduced track height
Large track height
Chapter 6 Working in the Timeline 91

Drag this rectangle
to a new position.
Using the Global Timeline View
The Global Timeline view, located above the Time display and Time ruler, shows a
miniature view of the entire project. The playhead appears as a black vertical line with a
triangular handle. The part of the project currently visible in the Timeline is indicated
by a blue rectangle in the Global Timeline view.
To move to a new area of the Timeline using the Global Timeline view:
m Drag the visible area rectangle to a new position.
You can quickly move to different parts of the Timeline by dragging the blue rectangle.
This is especially useful when working on longer projects. You can also drag the
rectangle up or down to move vertically in the Global Timeline view. This is useful if
your project contains more tracks, busses, and outputs than can be displayed in the
Project window.
Using the Time Ruler
The Timeline has a Time ruler that shows the divisions of time in a project. You can set
the playhead to a precise frame, point in time, or sample number using the Time-based
units on the Time ruler, or to a specific musical measure or beat using the Beats-based
units, to synchronize playback of audio clips in the Timeline.
The Time ruler changes depending on the time format of the project and the Time ruler
units. If the project is currently set to Time-based format, Time-based units appear in
the upper part of the ruler. If the project is set to Beats-based format, Beats-based units
appear in the upper half of the ruler.
You can use the Time ruler to position clips or the playhead at a precise point in time,
including synchronizing them to a specific timecode reference in a video file.
To set the playhead to a specific point in the Time ruler:
m Click the Time ruler at the point where you want to set the playhead.
92 Chapter 6 Working in the Timeline

Working with the Playback Region
You can create a playback region in a project, an area that plays back repeatedly. This is
sometimes called “cycling” or “looping” playback. A project has only one playback
region, but you can move and resize it as often as you want.
You also use the playback region when recording multiple takes. For information on
recording, see Chapter 10, “Recording Audio in Soundtrack,” on page 159.
To set the playback region:
m Drag in the bottom half of the Time ruler from the beginning of where you want the
playback region to the end.
Drag in the Time ruler to
set the playback region.
Playback region
The playback region is lighter in color than the rest of the Time ruler, with triangular
markers indicating its start and end points. If a playback region already exists, you can
drag anywhere in the Time ruler outside of the current playback region to set the
playback region to a new position.
If cycling is turned off, you must turn it on for the playback region to be active. The
Cycle button darkens to indicate that the playback region is activated.
To activate the playback region:
m Click the Cycle button in the transport controls.
To move the playback region:
m Click in the bottom half of the playback region and drag it to a new position in
the Timeline.
To resize the playback region:
m Select either the start point or end point handle in the Time ruler and drag to resize the
playback region.
To remove the playback region:
m Click in any part of the Time ruler outside of the current playback region.
Chapter 6 Working in the Timeline 93

Working with Tracks, Busses, and Outputs
The Timeline is arranged into three groups of horizontal rows: tracks, busses, and
outputs. You add audio to tracks in your project, use busses to create and control
submixes, and send audio to physical output channels using outputs. Tracks, busses,
and outputs are described in greater detail in “Tracks, Busses, and Outputs” on page 86.
The tracks in a project appear in the upper part of the Timeline. Busses appear below
tracks, and outputs appear below busses. A separator between each group helps
visually distinguish them, and disclosure triangles on each separator let you show or
hide the groups.
Adding Tracks, Busses, and Outputs
To add a track, do one of the following:
m Choose Multitrack > Add Track (or press Command-T).
m Control-click an open area of the Timeline, then choose Add Track from the shortcut menu.
m Control-click a track, then choose either Insert Track Before or Insert Track After from
the shortcut menu.
To add a bus, do one of the following:
m Choose Multitrack > Add Bus.
m Control-click a bus, then choose either Insert Bus Before or Insert Bus After from the
shortcut menu.
To add an output, do one of the following:
m Choose Multitrack > Add Output.
m Control-click an output, then choose either Insert Output Before or Insert Output After
from the shortcut menu.
94 Chapter 6 Working in the Timeline

Selecting Tracks, Busses, and Outputs
You can select a track, bus, or output in order to move, copy, or remove it, and can also
select tracks, busses, and outputs to export. The headers of selected tracks, busses, and
outputs appear darker in the Timeline.
To select a track, bus, or output, do one of the following:
m Click the drag handle along the left edge of the header for the track, bus, or output.
m Click anywhere in the row for the track, bus, or output.
Drag handle
You can select multiple tracks, busses, or outputs.
To select adjacent tracks, busses, or outputs:
m Shift-click the drag handle in the header of each track, bus, or output you want to select.
To select nonadjacent tracks, busses, or outputs:
m Command-click the drag handle in the header of each track, bus, or output you want
to select.
Moving and Copying Tracks, Busses, and Outputs
As you work on your project, you may want to rearrange tracks, busses, and outputs.
You can move and copy them to change their vertical arrangement in the track, bus,
or output section of the Timeline. You cannot move one to the area for another
(as indicated by the rows labeled “Tracks,” “Busses,” and “Outputs”).
You can only move or copy one track, bus, or output at a time.
To move a track, bus, or output:
m Drag the track, bus, or output drag handle up or down to a new vertical position.
A light blue horizontal line in the header area indicates the place the track, bus, or
output will be moved to when you release the mouse button.
To copy a track, bus, or output:
m Option-click the drag handle in the header for the track, bus, or output, then drag it
up or down.
A copy of the track, bus, or output appears when you release the mouse button.
Chapter 6 Working in the Timeline 95

Renaming Tracks, Busses, and Outputs
By default, tracks are numbered when created, and take the name of the first audio clip
you add to them. Busses and outputs are numbered starting from one (Bus 1, Out 1,
and so on). You can rename a track, bus, or output and use the names to distinguish
the type of audio it contains (for example, dialogue, voiceovers, music, or sound
effects), its part in the overall project, or to identify it in some other way.
To rename a track, bus, or output:
m Click the name field in the header for the track, bus, or output and type a new name.
Changing a Track, Bus, or Output Icon
You can choose a new icon from the icon grid, or add your own image to the grid.
To change the icon for a track, bus, or output, do one of the following:
m Click the icon, then select a new icon from the icon grid that appears.
m Drag a graphics file from the Finder to the icon.
Using the Track Controls
Tracks, busses, and outputs have headers, located along the left side of the Timeline. Each
header contains track controls that you can use to mute or solo the track, bus, or output,
adjust its volume level and pan position, add effects, and show or hide its envelopes.
Adjusting Volume
The volume slider controls the volume (the loudness relative to other tracks) of the
track, bus, or output.
To adjust the volume level of a track, bus, or output:
m Drag the volume slider left or right.
Drag the volume
slider left or right.
The range is –96 dB to +6 dB, with the default at 0 dB. Double-clicking the slider resets
it to the 0 dB position.
96 Chapter 6 Working in the Timeline

Adjusting Pan Position
Tracks and busses also include a pan slider. The pan slider controls the pan position (the
left-to-right placement in the stereo field) of the track.
To adjust the pan position of a track or bus:
m Drag the pan slider left or right.
Drag the pan slider
left or right.
The range is –100 (full left) to +100 (full right), with the default at 0 (center position).
Double-clicking the slider resets it to the center position.
Muting and Soloing Tracks, Busses, and Outputs
The Mute button mutes (silences) the track, bus, or output. You can mute multiple
tracks, busses, and outputs, allowing you to hear only the remaining, unmuted ones.
Muting lets you compare the sound of the project using different combinations of
tracks, busses, and outputs, and hearing the result of changes you make to them.
To mute a track, bus, or output:
m Click the Mute button. Click the Mute button again to unmute the track, bus, or output.
Muted tracks, busses, and outputs appear darker in the Timeline, making it easy to
identify which tracks are currently audible.
Click the Mute button to mute
the track, bus, or output.
The Solo button solos the track, bus, or output, muting all others. Soloing a track, bus,
or output lets you quickly isolate it from the rest of the project, so you can adjust the
sound of the soloed track, bus, or output and make changes.
Soundtrack supports multiple solo and exclusive solo. Clicking the Solo button for multiple
tracks, busses, or outputs solos them and mutes all others. When you exclusively solo a
track, bus, or output, all others are muted, regardless of whether they are soloed.
Chapter 6 Working in the Timeline 97

To solo a track, bus, or output (multiple solo):
m Click the Solo button. Click the Solo button again to unsolo the track, bus, or output.
Click the Solo button to solo
the track, bus, or output.
To exclusively solo a track, bus, or output:
m Option-click the Solo button. Click the Solo button again to unsolo the track, bus, or output.
When you solo tracks, busses, or outputs, the ones not soloed appear darker in
the Timeline.
Changing Track Time Format
By default, tracks use the same time format as the project (Time-based or Beats-based).
You can change the time format of a track, which changes the behavior of tagged clips
when you change the project tempo.
When the track time format is Time-based, clips remain at the same time position (the
same second or frame) when you change the project tempo. When the track time
format is Beats-based, clips remain at the same beat position (the same measure, beat,
and beat division) when you change the project tempo.
When you set a track to Beats-based time format, a metronome appears in the corner
of the track icon.
To change a track’s time format:
1 Select the track.
2 Choose Multitrack > Track Time Base, then choose a format from the submenu.
98 Chapter 6 Working in the Timeline

Adding Effects to a Track, Bus, or Output
Clicking the Effects button in the header for a track, bus, or output displays the Effects
tab, which you use to add effects. The Effects tab also displays any effects currently
assigned to the track, bus, or output.
To add effects to a track, bus, or output:
1 Click the Effects button in the header for the track, bus, or output.
Click the Effects button
to show the Effects tab.
2 In the Effects tab, select a category in the Category list to display the effects for that
category in the Effect list.
Select the category
of effects you want to
use from this list.
3 In the Effect list, do one of the following:
 Double-click the effect you want to add.
 Select the effect name, then click the Add Effect button.
 Drag the effect to the Effect Parameters area.
Drag the effect from
the Effect list...
...to the Effect
Parameters area.
The effect now appears in the Effect Parameters area with its checkbox selected.
Chapter 6 Working in the Timeline 99

Click the envelopes
disclosure triangle.
When you add effects to a track, bus, or output, the Effects button changes color to
indicate that the track, bus, or output contains effects.
For detailed information about adding and adjusting effects, see Chapter 8, “Working
with Audio Effects,” on page 125.
Showing and Hiding Track, Bus, and Output Envelopes
Clicking the automation disclosure triangle for a track or bus shows the volume and
pan envelopes, which you can use to automate changes to pan position and volume
level over the course of the project. Clicking the triangle for an output shows the
output’s volume envelope. The envelopes appear in the Timeline below the track, bus,
or output. You can also add envelopes for effect parameters, which appear below the
other envelopes. For information on adding envelopes for effect parameters, see
Chapter 8, “Working with Audio Effects,” on page 125.
To show the envelopes for a track, bus, or output:
m Click the envelopes disclosure triangle in the header for a track, bus, or output. Click
the disclosure triangle again to hide the envelopes.
Note: If you automate controls or effects using envelopes, you hear the results whether
or not the envelopes are visible.
For information on automating changes to volume, pan, and other settings, see
Chapter 9, “Working with Automation,” on page 143.
100 Chapter 6 Working in the Timeline
The envelopes appear
below the track in the
Timeline.
 Loading...