


PowerBook


 Dock
Dock
User’s Guide
For the PowerBook Duo Dock and Duo Dock II

K Apple Computer, Inc.
This manual is copyrighted, with all rights reserved. Under the copyright laws, this manual may not be copied, in whole or in part, without the written consent of Apple Computer, Inc. This exception does not allow copies to be made for others, whether or not sold, but all of the material purchased may be sold, given, or lent to another person. Under the law, copying includes translating into another language or format.
The Apple logo is a trademark of Apple Computer, Inc., registered in the U.S. and other countries. Use of the “keyboard” Apple logo (Option-Shift-K) for commercial purposes without the prior written consent of Apple may constitute trademark infringement and unfair competition in violation of federal and state laws.
Every effort has been made to ensure that the information in this manual is accurate. Apple is not responsible for printing or clerical errors.
© 1993 Apple Computer, Inc. 20525 Mariani Avenue Cupertino, CA 95014-6299 (408) 996-1010
Apple, the Apple logo, AppleTalk, EtherTalk, ImageWriter, LocalTalk, Macintosh, MacTCP, and TokenTalk are trademarks of Apple Computer, Inc., registered in the U.S. and other countries.
AppleColor, Apple Desktop Bus, Macintosh Duo, PowerBook, PowerBook Duo, and System 7 are trademarks of Apple Computer, Inc.
Adobe, Adobe Illustrator, Adobe Photoshop, and PostScript are trademarks of Adobe Systems Incorporated, which may be registered in certain jurisdictions.
Exposure is a registered trademark of Preferred Publishers, Inc.
NuBus is a trademark of Texas Instruments.
QMS is a registered trademark of QMS, Inc.
QuarkXPress is a registered trademark of Quark, Inc.
SuperPaint is a registered trademark of Aldus Corporation.
Tektronix is a registered trademark of Tektronix, Inc.
Simultaneously published in the United States and Canada.
Mention of third-party products is for informational purposes only and constitutes neither an endorsement nor a recommendation. Apple assumes no responsibility with regard to the performance or use of these products.

Contents
Radio and television interference iv
m Using the PowerBook Duo Dock 1
Building a PowerBook Duo system 1
Duo Dock features 2
Setting up the Duo Dock 4
Inserting the PowerBook Duo into the Duo Dock 7 Trouble? 7
Turning on the PowerBook Duo System 8 Trouble? 8
Working with the PowerBook Duo System 9 Your preferences 9
Battery recharging 9
Power conservation 9
Hard disks 10
SCSI devices 10
Virtual memory 10
Networking 11
Modem 11
RAM cache 11 |
|
|
If you have system problems 11 |
|
|
Using security features |
12 |
|
Ejecting the PowerBook Duo from the Duo Dock 13 |
||
A useful shortcut |
13 |
|
Trouble? 14 |
|
|
Using your Duo Dock on an EtherTalk network |
15 |
|
Connecting your Duo Dock to Ethernet |
16 |
|
Connecting the Duo Dock between two devices on an |
||
Ethernet network 17 |
|
|
Connecting the Duo Dock to the end |
|
|
of an Ethernet network 18 |
|
|
Connecting the Duo Dock directly to your printer 18 |
||
Checking your networking software 19 |
|
|
Installing networking system software 20 |
||
Selecting a network connection 22 |
|
|
Installing a NuBus card |
23 |
|
Getting ready 23 |
|
|
Installing the card |
23 |
|
iii

Important
This equipment has been tested and found to comply with the limits for a Class B digital device in accordance with the specifications in Part 15 of FCC rules. See instructions if interference to radio or television reception is suspected.
Radio and television interference
The equipment described in this manual generates, uses, and can radiate radiofrequency energy. If it is not installed and used properly—that is, in strict accordance with Apple’s instructions—it may cause interference with radio and television reception.
This equipment has been tested and found to comply with the limits for a Class B digital device in accordance with the specifications in Part 15 of FCC rules. These specifications are designed to provide reasonable protection against such interference in a residential installation. However, there is no guarantee that interference will not occur in a particular installation.
You can determine whether your computer system is causing interference by turning it off. If the interference stops, it was probably caused by the computer or one of the peripheral devices.
If your computer system does cause interference to radio or television reception, try to correct the interference by using one or more of the following measures:
mTurn the television or radio antenna until the interference stops.
mMove the computer to one side or the other of the television or radio.
mMove the computer farther away from the television or radio.
mPlug the computer into an outlet that is on a different circuit from the television or radio. (That is, make certain the computer and the television or radio are on circuits controlled by different circuit breakers or fuses.)
If necessary, consult the service and support information that came with your computer for instructions on how to contact an Apple-authorized service provider or Apple for assistance. Or consult an experienced radio/television technician for additional suggestions. You may find helpful the following booklet, prepared by the Federal Communications Commission: Interference Handbook (stock number 004-000-00345-4). This booklet is available from the U.S. Government Printing Office, Washington, DC 20402.
SImportant: Changes or modifications to this product not authorized by Apple Computer, Inc., could void the FCC Certification and negate your authority to operate the product.
This product was tested for FCC compliance under conditions that included the use of shielded cables and connectors between system components. It is important that you use shielded cables and connectors to reduce the possibility of causing interference to radios, television sets, and other electronic devices. For Apple peripheral devices, you can obtain the proper shielded cables through an Apple-authorized Apple dealer. For non-Apple peripheral devices, contact the manufacturer or dealer for assistance. S
DOC Class B Compliance This digital apparatus does not exceed the Class B limits for radio noise emissions from digital apparatus set out in the radio interference regulations of the Canadian Department of Communications.
Observation des normes—Classe B Le présent appareil numérique n’émet pas de bruits radioélectriques dépassant les limites applicables aux appareils numériques de la Classe B prescrites dans les règlements sur le brouillage radioélectrique édictés par le Ministère des Communications du Canada.
iv

Using the PowerBook Duo Dock
The PowerBook Duo Dock and Duo Dock II are the most versatile expansion options for the PowerBook Duo. A Duo Dock itself is not a computer—you need a PowerBook Duo to use it. But the dock and the PowerBook together provide the video, storage, and input/output capabilities available on most desktop Macintosh computers.
This guide explains how to set up a Duo Dock or Duo Dock II and connect other components to it to create a PowerBook Duo System. Although the illustrations in this guide show the Duo Dock II, all explanations and instructions are correct for the Duo Dock, Duo Dock II, and Duo Docks that have been upgraded to a Duo Dock II (except where specifically noted). In this guide the term Duo Dock is used to refer to the three configurations of Duo Dock, Duo Dock II, and an upgraded Duo Dock. For information about using the Macintosh system software or the PowerBook Duo, consult your PowerBook User’s Guide.
Building a PowerBook Duo System
The Duo Dock is the desktop “base” you can use to add components to your PowerBook Duo. For example, your system might include
ma color or monochrome monitor
ma keyboard, mouse, and specialized input device, such as a graphics tablet
man external storage device, such as a CD-ROM drive
man external modem
ma hard disk (optional on the Duo Dock II)
mconnection to a shared printer on an AppleTalk network
mconnection to a specialized network (with installation of a NuBus™ card that supports EtherTalk or TokenTalk, for example, or with a direct EtherTalk connection using the Duo Dock II Ethernet port)
1

The drawing shows one of many possible PowerBook Duo Systems. The Duo Dock can accommodate any Macintoshcompatible monitor, keyboard, mouse, printer, hard disk drive, CD-ROM drive, scanner, or other device.
The following sections include information about
mthe features of the Duo Dock
mhow to set it up
mhow to use it with the PowerBook Duo
mhow to install a NuBus card in the Duo Dock
Duo Dock features
The Duo Dock comes with many features built in, and several optional features are also available. These features include:
man internal 1.4 MB floppy disk drive ( For information about using your floppy disk drive, see your PowerBook User’s Guide that came with your PowerBook Duo.)
man optional internal SCSI hard disk drive (any available capacity that meets Apple’s specifications: up to 1" high. An optional 500 megabyte hard disk is available for the Duo Dock II.)
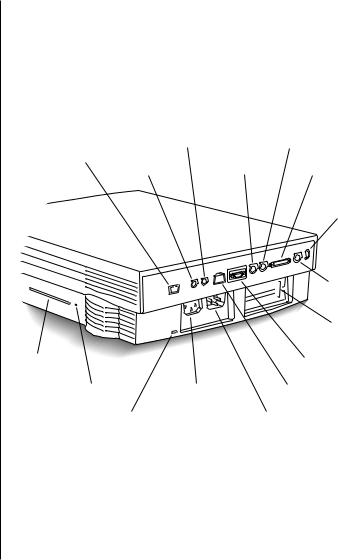
mstandard ports including SCSI (with an HDI-30 connector), monitor, printer, modem, Apple Desktop Bus (ADB), sound in, and sound out. An EtherTalk port is also provided on the Duo Dock II or upgraded Duo Dock.
ma separate mouse and optional microphone
Manual eject hole
Eject button
Key lock
2
mbuilt-in video support for the following monitors: Macintosh 12" Monochrome Display
Macintosh 12" RGB Display
AppleColor High-Resolution RGB Monitor (13") Macintosh Color Display (14")
Apple Macintosh Portrait Display (15") Macintosh 16" Color Display
VGA monitors Super VGA (56 Hz)
19" RGB monitors (Duo Dock II or upgraded Duo Dock only) Macintosh Two-Page Display (Duo Dock II or
upgraded Duo Dock only)
Macintosh 21" Color Display (Duo Dock II or upgraded Duo Dock only)
mslots for two NuBus cards (for Ethernet, Token Ring, additional video, or other capabilities)
ma math coprocessor on the Duo Dock II or upgraded Duo Dock (a socket for an optional math coprocessor is provided on the Duo Dock)
m1MB VRAM for 16-bit color on Apple 13" and 16" RGB monitors, and 8-bit grayscale on the Apple 15" portrait monitor. The Duo Dock requires a 512K VRAM SIMM expansion card for 16-bit color.
man automatic insert/eject feature to ensure reliable docking
ma key-operated lock to prevent theft of the docked PowerBook Duo
ma 32K RAM cache function that automatically speeds up the performance of a docked PowerBook Duo by as much as 20 percent (Duo Dock II and upgraded Duo Docks only)
Q Internal |
- Sound out |
W External modem |
|
modem |
≈ Sound in |
[ Printer |
™ Monitor |
|
|||
I Power
button
|
|
|
V ADB |
|
|
|
port |
|
|
|
NuBus |
|
|
|
slots |
Floppy |
|
|
G Ethernet |
disk drive |
|
|
|
Eject hole |
Monitor power |
g SCSI |
|
|
|
socket |
|
Ç Security slot |
≤ Power socket |
||
mA slot door that protects the interior of your Duo Dock II when your PowerBook is not docked
3

Setting up the Duo Dock
If you need to install a NuBus card inside the dock, do it before following the steps below. See “Installing a NuBus Card” in this guide for instructions.
1.Place the dock on a hard, flat surface.
While you set up, you’ll need access to the connectors on the back panel.
SImportant: Don’t attempt to use the dock on its side, or in any position other than those pictured. Don’t block the ventilation slots on the sides or bottom of the dock. S
2.Plug one end of the dock’s power cord into the power receptacle (≤) on the back of the dock, and the other end into an electrical outlet or power strip.
3.Put your monitor on top of the dock, and connect the monitor and power cables.
The Duo Dock can hold a monitor weighing up to 55 lb. The Duo Dock II (or Duo Dock with the top cover upgrade) can hold a monitor weighing up to 85 lb.
If you installed a monitor card in the dock, connect the monitor cable to the card. Otherwise, connect the monitor cable to the dock’s monitor port (marked with the icon ™). If you are connecting a VGA monitor, you need a 15-pin to 9-pin adapter.
Connect the monitor’s power cord to the power receptacle on the back of the dock.
4

4.Connect your mouse, keyboard, or other input device to the Apple Desktop Bus (ADB) port.
You can chain devices together if you have more than one. For example, you can connect a keyboard to the ADB port, and then connect a mouse to the keyboard.
Monitor port
Monitor card connector (if card is installed)
continues .
5

5.Now connect any other equipment you have, such as an external hard disk drive or printer.
Follow the instructions that came with the equipment.
If you are connecting a SCSI device, you’ll need an HDI-30 SCSI System Cable to attach it to the dock. See the section on using SCSI devices in this chapter for complete information about connecting such equipment to your PowerBook Duo System.
6.If you will be using network services, connect your LocalTalk (or other network) cable.
Follow the instructions that came with the cable, or check with your network administrator. If you will be connecting your Duo Dock II (or upgraded Duo Dock) to an Ethernet network, you need to connect the dock to the Ethernet network and check that your PowerBook Duo has the correct networking software. See “Using your Duo Dock on an EtherTalk Network” later in this guide.
Once you have connected all your equipment, the Duo Dock is ready to use.
6
Inserting the PowerBook Duo into the Duo Dock
1.Shut down the PowerBook Duo by choosing Shut Down from the Special menu.
2.Close the display.
3.Open the door that covers the docking connector on the back panel of the PowerBook.
4.If the elevation feet are down, flip them up.
5.Hold the PowerBook with its latch toward you, and slide it into the Duo Dock as shown.
Don’t force the PowerBook into the dock. When the PowerBook is in most of the way, the dock pulls it in the rest of the way.
Trouble?
mThe dock won’t accept the PowerBook.
Power to the dock may be off. Make sure the dock is plugged in. If it is plugged into a power strip, make sure the power strip is turned on.
The docking connector may not be accessible. Make sure you have opened the connector door on the back panel of the PowerBook.
The dock may be locked. Unlock it by turning the key to the vertical (unlocked) position, and insert the PowerBook again.
You can use only the PowerBook Duo with the Duo Dock. Other PowerBook models cannot be docked.
mThe dock ejects the PowerBook.
The PowerBook may not be shut down. Open the display, respond to any messages on the screen, and choose Shut Down from the Special menu. Then wait a moment to make sure the PowerBook is really shut down, close the display, and try again.
7
 Loading...