


Follow the instructions in this
chapter to set up your computer
and learn the basics.
1 Getting Started
The illustration on the next page shows all the equipment you will need to set up your computer and begin using it. (Note that your monitor and keyboard may look slightly different depending on what you purchased.)
Place your equipment on a sturdy, flat surface near a grounded wall outlet. (Your Power Macintosh was designed to be used and carried in the horizontal position, as shown on the next page—it should not be used tipped on its side.) You may place monitors weighing up to 70 lb. (31.75 kg) on top of the computer.
Before following the setup instructions in this chapter, you may want to read “Arranging Your Office” in Appendix A (in the section on health-related information) for tips on adjusting your work furniture so that you’re comfortable when using the computer.
1

Macintosh computer
Monitor
Keyboard cable
(sometimes built into the keyboard as shown here)
Keyboard
Mouse
|
Monitor cable |
Apple PlainTalk Microphone (optional) |
(sometimes built into the monitor) |
Monitor power cord
Computer power cord |
(sometimes built into the monitor) |

IMPORTANT When picking up your computer, be sure to grasp it by the sides. Grasping it by the front or back can cause the computer’s cover to lift off.
When lifting or carrying the computer, always grasp it by the sides, as shown. Do not lift or carry the computer by grasping the front and back.
Plugging in the computer
Before you plug your Macintosh into a wall socket, carefully read all the setup instructions in this chapter. Then, before you connect anything to your Macintosh, follow the instructions in this section to plug it in. The plug grounds the computer and protects it from electrical damage while you are setting up. When you are ready to begin, follow these steps:
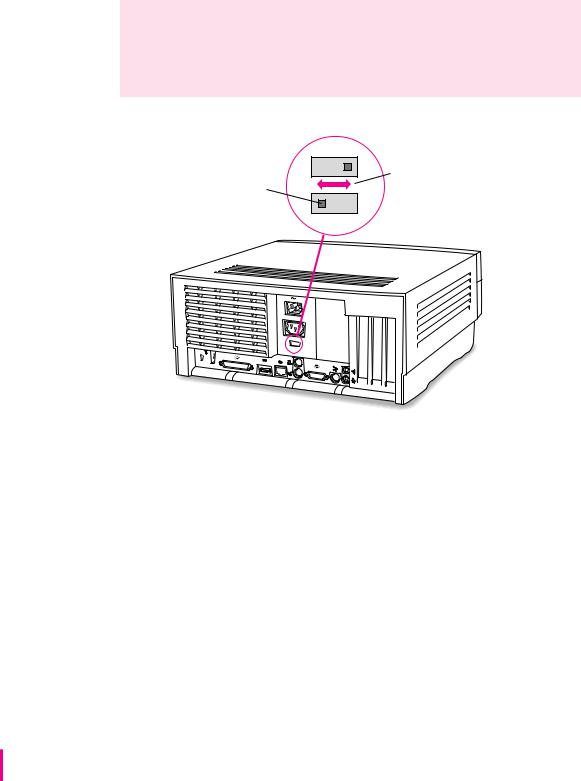
1Make sure the voltage switch on the back of the computer is set for the kind of voltage system you will be connecting to.
The voltage switch must be set correctly to avoid damaging your computer. If you don’t know the voltage used in the country you’re in, refer to the table, “Voltages for Different Locations,” later in this chapter.
Getting Started |
3 |
WARNING Setting the correct voltage for your computer does not set the voltage for your monitor even if the monitor’s power cord is connected directly to your computer. To protect your monitor, be sure to use the appropriate adapter or voltage converter, if necessary.
Check to see that the voltage switch on the back of your computer is properly set before you plug it in.
If you need to change the setting, insert a small screwdriver here and slide the switch.
Set the switch to show “115” for voltages in the 100–130V range. Set the switch to show “230” for voltages in the 200–270V range.
4 Chapter 1

Voltages for different locations
Country |
Single voltage |
Japan |
100 |
S. Korea |
100/220 |
Jamaica, Taiwan |
110 |
Peru |
110/220 |
Brazil, Lebanon |
110–220 |
Phillipines |
115 |
Bermuda, Canada, Puerto Rico, United States, Venezuela |
120 |
Mexico |
127 |
Saudi Arabia |
127/220 |
Hong Kong |
200 |
India, South Africa |
220–250 |
Israel, Pakistan, Singapore |
230 |
Australia, Kuwait, Malta, New Zealand, Northern Ireland, |
|
Papua New Guinea, Oman, Qatar, United Kingdom |
240 |
Austria, Belgium, Denmark, Finland, France, Germany, Greece, |
|
Italy, Luxembourg, Netherlands, Norway, Portugal, Spain, |
|
Sweden, Switzerland |
220–230 |
Bahrain, Chile, China (People’s Republic), Czechoslovakia, |
|
Egypt, Greenland, Hungary, Iceland, Indonesia, Iran, Jordan, |
|
Liechtenstein, Nepal, Paraguay, Poland, Romania, |
|
United Arab Emirates, Russia and the Commonwealth of Independent |
|
States (CIS),Yemen, Yugoslavia |
220 |
|
|
|
|
Getting Started |
5 |

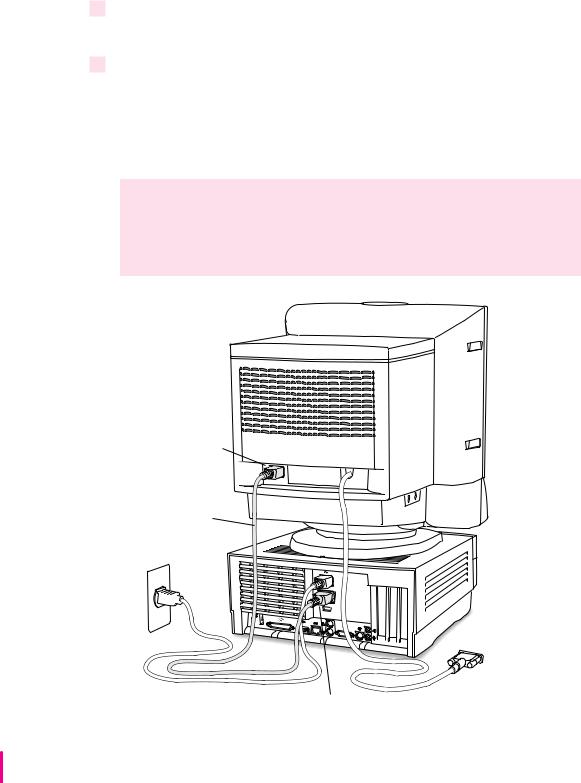
2Plug the socket end of the computer’s power cord into the recessed power socket (marked with the symbol ≤) on the back of the computer.
3Plug the other end of the power cord into a three-hole grounded outlet or power strip.
WARNING Be sure to set the voltage switch on the back of your computer for the voltage system to which you’re connecting the computer.
This equipment is intended to be electrically grounded. Your Macintosh is equipped with a three-wire grounding plug—a plug that has a third (grounding) pin. This plug will fit only a grounded AC outlet. This is a safety feature. If you are unable to insert the plug into the outlet, contact a licensed electrician to replace the outlet with a properly grounded outlet. Do not defeat the purpose of the grounding plug!
Power cord plug |
Power cord socket |
IMPORTANT The only way to disconnect power completely is to unplug the power cord. Make sure that at least one end of the power cord is within easy reach so that you can unplug the computer when you need to.
6 Chapter 1

Installing an expansion card
If you purchased a PCI expansion card for your Macintosh, install it now. (See Appendix B, “Installing an Expansion Card,” for instructions.)
If you don’t have to install an expansion card, go on to the next section, “Connecting a Monitor.”
Connecting a monitor
You can connect many types of monitors (often called displays) to your
Macintosh computer, including most standard monitors. See the Technical
Information booklet that came with your computer for a complete list.
This section contains instructions on connecting most types of monitors. Monitors from manufacturers other than Apple may require adapters for their monitor cables and power cords. If you are connecting a non-Apple monitor, also refer to the instructions that came with the monitor.
Connecting the monitor power cord
Monitors have two cords to connect: a monitor power cord and a monitor cable. To connect the monitor power cord, follow these steps:
1Place the monitor on top of the computer.
Keep these considerations in mind:
m You can place monitors weighing up to 70 lb. (31.75 kg) on top of the computer.
m Allow a few inches for air circulation around the computer and monitor.
m Make sure that the top of the screen is slightly below eye level when you’re sitting at the keyboard.
m Position the monitor to minimize glare and reflections on the screen from overhead lights and windows.
For further suggestions about placement of your computer equipment, consult “Arranging Your Office” in Appendix A (in the section on health-related information).
Getting Started |
7 |
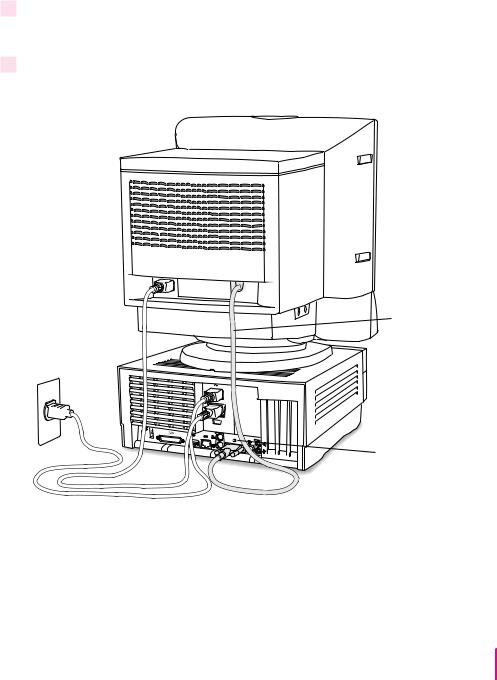
2Connect the monitor power cord to the monitor.
On some monitors, the cord is already attached.
3Plug in the monitor power cord.
Some monitor power cords are designed to plug into the back of your computer.
Some monitor power cords must be connected to a grounded electrical outlet, not to the computer. Check the information that came with the monitor.
WARNING Setting the correct voltage for your computer does not set the voltage for your monitor even if the monitor’s power cord is connected directly to your computer. To protect your monitor, be sure to use the appropriate adapter or voltage converter, if necessary.
Monitor power socket
Monitor power cord
Monitor power socket
8 Chapter 1
Connecting the monitor cable
After you plug in the monitor power cord, you connect the monitor cable to the computer’s monitor port.
To connect the monitor cable, follow these steps:
1Attach the monitor cable to the monitor.
On some monitors, the cable is already attached.
2Attach the monitor cable to the monitor port on the back panel of the computer.
See the information that came with the monitor to use its special features.
Monitor cable
™ Monitor port
Getting Started |
9 |
Connecting the mouse and keyboard
You have a choice of several keyboards for your Macintosh. The way you connect the mouse and keyboard depends on whether the keyboard has a separate cable or a built-in cable.
Connecting a keyboard with a built-in cable
1Plug the mouse cable into the recessed port on the back of the keyboard.
The plug and the port are marked with the ◊ icon (symbol). The positions of the port and icon on your keyboard may be different from those pictured.
By the way: A port marked with the ◊ icon is called an Apple Desktop Bus (ADB) port.
Plug the mouse cable into the recessed port on the keyboard. The flat part of the plug should be pointing down, as shown here.
This cable plugs into the Apple Desktop Bus (ADB) port, marked with the ◊ icon, on the back of the computer.
2Plug the keyboard cable into the port marked with the ◊icon on the back of the computer.
Some monitors have a port to which you can connect the keyboard or mouse. See the information that came with your monitor.
10 Chapter 1
Connecting a keyboard with a separate cable
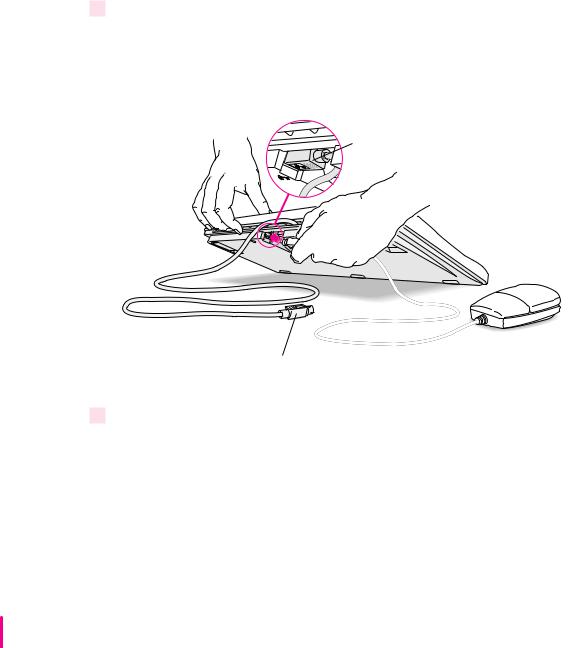
1Plug the mouse cable into the port on either side of the keyboard.
Most right-handed people prefer to use the mouse with their right hand; most left-handed people prefer to use their left hand. Plug the mouse into the port on the side you prefer.
The plug and the port are marked with the ◊ icon (symbol). Align the symbols before you insert the plug. (The positions of the port and icon on your keyboard may be different from those pictured here.)
By the way: A port marked with the ◊ icon is called an Apple Desktop Bus (ADB) port.
ADB icon 


2 |
Plug the |
are the same) into the other port on the keyboard. |
If you plugged the mouse cable in on the right, for example, plug the keyboard cable in on the left.
3Plug the keyboard cable into the port marked with the ◊icon on the back of the computer.
Some monitors have a port to which you can connect the keyboard or mouse. See the information that came with your monitor.
Getting Started |
11 |

Connecting other equipment
If you are new to the Macintosh, it’s a good idea to get some experience using your computer before you connect other equipment, such as a printer or scanner. To learn basic Macintosh skills, continue with the instructions in this chapter.
When you’re ready to connect other equipment to your Macintosh, see the instructions in Chapter 3.
Turning the computer on
WARNING Before turning on the computer for the first time, be sure the voltage switch is set correctly for the type of voltage system to which you are connecting. See “Plugging In the Computer,” earlier in this chapter, for instructions on setting the voltage switch. If the switch is not set correctly, you can damage your computer.
To turn on the computer for the first time, follow these steps:
1Turn on your monitor.
See the information that came with your monitor for the location of the power switch. On Apple monitors, the power switch is usually located on the front of the unit.
By the way: When the monitor is plugged into the computer, you only need to turn on the monitor once. From now on, the monitor will turn off automatically when you shut down the computer, and it will turn on automatically when you start up the computer. (If the monitor is not plugged into the computer, it must be turned on separately each time you turn on the computer.)
12 Chapter 1
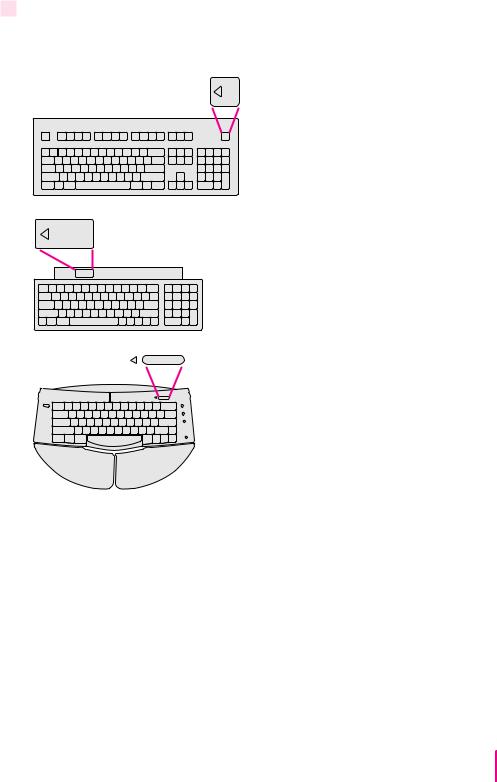
2Turn on your computer by pressing the Power key on the keyboard.
The Power key is marked with a triangle. Its location depends on which keyboard you have.
You hear a tone from the computer as it starts up.
Getting Started |
13 |
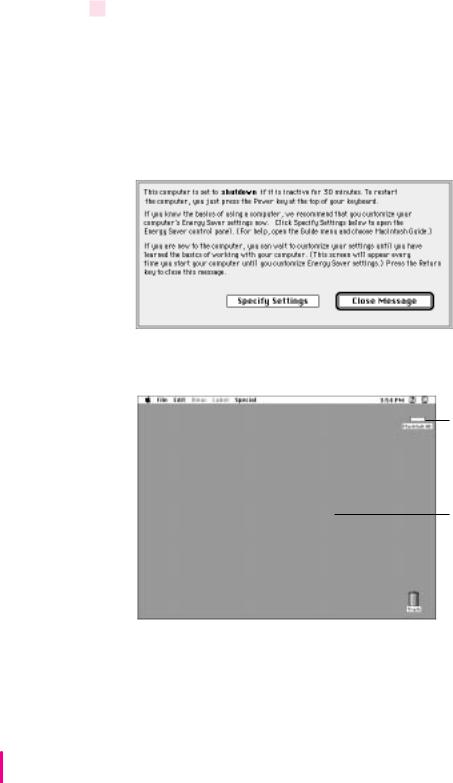
3Check to see what’s on your screen.
You’ll see a sequence of messages describing what is happening, followed by the Energy Saver dialog box.
m If you’re a beginning Macintosh user, press the Return key.
m If you’re an experienced Macintosh user, you may want to set your energy-
saving options now (refer to the information about saving energy in Macintosh Guide, available in the Guide [h] menu, and “Saving Energy With the Energy Saver Control Panel,” later in this chapter).
mIf, when you press Return, you see the Macintosh desktop (shown here), your system software is already set up correctly.
Hard disk icon
Macintosh desktop
14 Chapter 1

Skip now to “What’s Next?”
mIf you see a blinking question mark, see “Solutions to Common Problems” in Chapter 6.
mIf you see anything else on your screen, or if you see nothing at all, see the next section, “Problems Turning Your Computer On?”
Note: To save energy, your computer is automatically set to put itself to sleep if you haven’t used it for 30 minutes or more (the screen dims). If your computer attempts to go to sleep while you’re setting it up, simply press any key on the keyboard to “wake it up.”
Problems turning your computer on?
If you don’t see anything on the screen, check these items to see if you can identify the problem:
mIs the computer plugged into a power source? If it is plugged into a power strip, is the power strip turned on?
mIs the computer turned on? The power-on light on the front panel should be on. If it isn’t on, press the power button (marked with the symbol I).
mAre the keyboard and mouse cables connected correctly? (Don’t connect or disconnect the keyboard or mouse cable while the computer is on. You could damage your equipment.)
mIs the monitor power cord plugged in?
mIs the monitor cable attached firmly to both the monitor and computer?
mIs the monitor turned on? (Check the power-on light on the front of the monitor.)
mIs the brightness control on the monitor adjusted correctly? (On most monitors, the brightness control is marked with the symbol ¤.)
mIs the computer asleep? (Press a key on the keyboard to wake the computer. It may take a moment or two for the computer to wake up.)
Getting Started |
15 |

What’s next?
You’ve finished setting up your computer. Continue with one of the following steps:
mIf you are new to the Macintosh, turn to the next section, “Learning the Basics.” When you’ve learned the basic Macintosh skills, turn to the
section “Saving Energy With the Energy Saver Control Panel” to learn how to set energy-saving options for your computer.
mIf you are an experienced Macintosh user, turn to the section “Saving Energy With the Energy Saver Control Panel,” later in this chapter, to learn how to set energy-saving options for your computer. Then turn to Chapter 2, “Getting Help,” to learn about Macintosh Guide, your main source of information when you’re working with the Macintosh.
mIf you want to connect additional equipment, such as a microphone, to your computer, see Chapter 3, “Connecting Additional Equipment,” for instructions.
mIf you want to install application software on your computer, see Chapter 4, “Installing and Using Application Programs,” for information on setting up your programs. You’ll need this information to properly set up any software programs specifically designed for Power Macintosh computers.
IMPORTANT If you need to turn off your computer at any point, please see “Turning the Computer Off” later in this chapter. It is very important to use the correct procedure for shutting down your Macintosh before turning it off.
16 Chapter 1

Learning the basics
If you are new to the Macintosh, you should begin by looking at the easy-to-use program called the Macintosh Tutorial. The tutorial teaches you the basic skills you’ll need to use your computer. To start the tutorial, follow these steps:
1Slide your mouse along your mouse pad or desk.
Hold the mouse as shown, with the cable pointing away from you. Rest the heel of your palm on the desk and grasp the sides of the mouse between your thumb and fingers. Use your wrist and fingers to slide the mouse around with
the index finger resting on the mouse button. Don’t press the mouse button (under your index finger). Notice that the arrow (8) on the screen moves in the same direction that you move the mouse.
Mouse button
If |
that the cables connecting the mouse |
and keyboard are secure and that your mouse is positioned as shown in the illustration.
2Move the tip of the arrow (8) to the question mark (h) in the upper-right portion of the screen.
If you run out of room on your mouse pad or desk while moving the mouse, pick up the mouse and place it where there’s more room. (The arrow on the screen moves only when the mouse is moved while in contact with the mouse pad or desk.)
Getting Started |
17 |
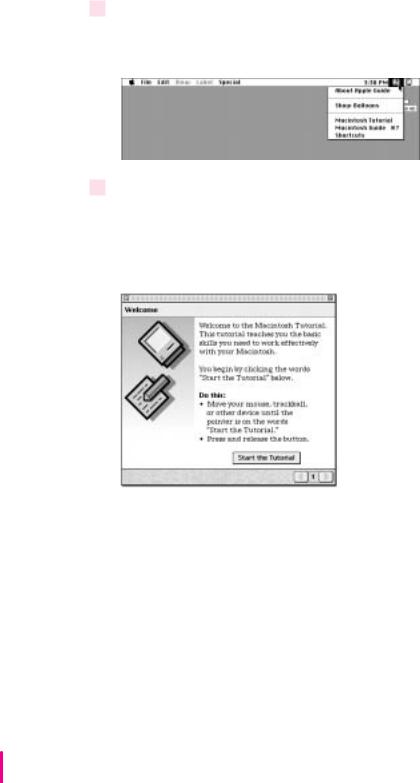
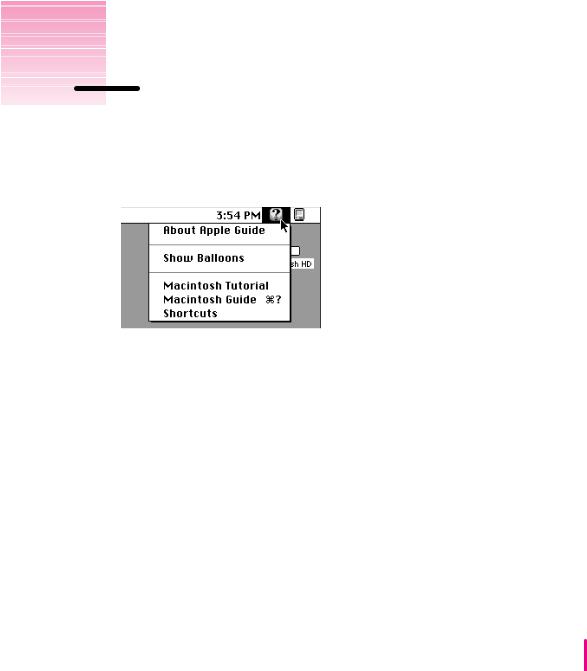
3With the tip of the arrow on the question mark, press and hold down the mouse button.
A list of choices (called a menu) appears. This is the Guide (h) menu, which is the place to go when you have a question about how to use your computer.
4While holding down the mouse button, move the arrow until the words “Macintosh Tutorial” are highlighted, then release the mouse button.
A window appears welcoming you to the tutorial. You can set this book aside for now and follow the instructions on the screen. When you have completed the tutorial, return to this book.
18 Chapter 1
Reviewing the basics
You can use the following illustrations to review the elements you use on your screen to do work with your computer.
Icons
Menu
Window
Menus
The strip across the top of the screen is called the menu bar. The symbols and words in it represent menus of commands. To open a menu, place the pointer on the symbol or word for the menu and press the mouse button.
Guide menu
To find an answer to a question, look in the Guide (h) menu.
Application menu
You can have several application programs open at once. To see which program is active or to switch from one program to another, use this menu (called the Application menu).
Getting Started |
19 |
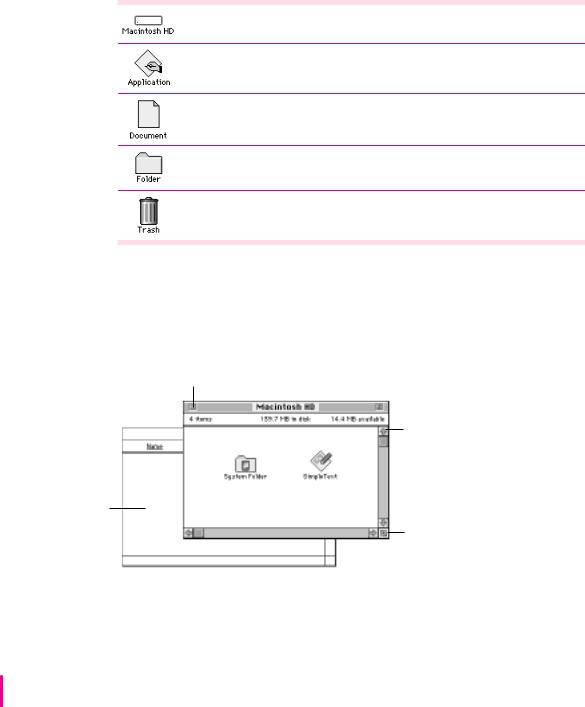
Icons
Icons are small pictures that represent disks, programs, documents, and folders. You can double-click any icon to open it and see what it contains.
This icon represents your computer’s internal hard disk.
Icons like this one represent application programs, which you use to create documents and do other work.
Icons like this one represent documents, which you can create and edit.
Icons like this one represent folders. A folder contains other icons.
To throw away an item you no longer want, drag it to the Trash icon and choose Empty Trash from the Special menu.
To bring a partially covered window to the front, click anywhere in it.
Windows
Windows are boxes that display text, graphics, or icons. To change the shape or position of a window, or to close the window, use the elements shown here.
Close box |
Title bar |
To close a window, |
To move a window, drag it by the middle of the title |
click the close box. |
bar (anywhere in the bar except the small boxes). |
|
|
Scroll arrow
To bring hidden portions of a window’s contents into view, click one of the four scroll arrows.
Size box
To change the shape or size of a window, drag the size box.
20 Chapter 1
Saving energy with the Energy Saver control panel
When you save energy, you save natural resources and reduce pollution. Your Power Macintosh contains features that automatically save energy. You can increase the energy savings by using the Energy Saver control panel to turn your computer off if you won’t be using it for a while—for example, overnight or over the weekend.
The Energy Saver dialog box (shown in step 3 of “Turning the Computer On,” earlier in this chapter) appears every time you start your computer until you open the Energy Saver control panel. Once you open the control panel, you can accept the pre-set options shown there, or set your own energy-saving options. If you do not want to set your energy-saving options when the Energy Saver dialog box is displayed, you can click Close Message or press Return (the Energy Saver dialog box continues to appear when you start your computer).
Setting energy-saving options
You can get to the Energy Saver control panel by clicking Specify Settings in the Energy Saver dialog box that appears when you start your computer or by choosing Control Panels in the Apple ( ) menu.
The Energy Saver control panel displays the pre-set options, which you can accept or change. To learn more about the Energy Saver control panel, see the information on saving energy in Macintosh Guide, available in the Guide (h) menu.
Putting your computer to sleep
Your Power Macintosh is pre-set to put itself to sleep after 30 minutes of inactivity. When your computer goes to sleep, the screen dims to save energy and to prevent images from “burning” into the screen. You do not lose any of the information you were working on, even if you did not save it before the computer went to sleep.
To put your computer to sleep immediately, press the Power key on the keyboard or choose the Sleep command from the Special menu. You can set sleep options using the Energy Saver control panel, available under Control Panels in the Apple ( ) menu.
Getting Started |
21 |

Waking your computer from sleep
To wake the computer from sleep, press any key on the keyboard. (It may take a moment or two for the computer to awaken.) The documents and application programs you had open when the computer went in to sleep are still open and unsaved changes are preserved.
Accessing a sleeping computer over a network
If your computer is being used as a server, other users can still access it over a network while it is asleep. (The network connection does not have to be established before the computer goes to sleep.) You can set server options in the Energy Saver control panel.
Scheduling automatic startup and shutdown
You can set your computer to start up and shut down at specified times using the Energy Saver control panel. To learn about the Energy Saver control panel, refer to the information about saving energy in Macintosh Guide, available in the Guide (h) menu.
22 Chapter 1

Turning the computer off
Using the Power key
To turn the computer off using the Power key on the keyboard, follow these instructions:
1If the computer is in sleep, press the Power key (or any key on the keyboard except Caps Lock) to wake it.
For information on the sleep feature of your Macintosh see “Saving Energy With the Energy Saver Control Panel,” earlier in this chapter.
2Press and hold the Power key on the keyboard for about 2 seconds.
The following dialog box appears on the screen:
3 Press the Return key on the keyboard (or click the Shut Down button in the dialog box).
Using the Shut Down command
You can also turn your computer off by using the Shut Down command in the Special menu. Follow these steps:
1If the computer is in sleep, press the Power key (or any key on the keyboard except Caps Lock) to wake it.
2Move the tip of the arrow to the word “Special” at the top center of the screen.
If the word “Special” does not appear in the menu bar at the top of the screen, you’re not working in the Finder, the program you need to be in when you shut down your computer. Choose Finder from the Application menu (at the far right of the menu bar). Then try step 2 again.
Getting Started |
23 |

3With the tip of the arrow on the word Special, press and hold down the mouse button.
4While holding down the mouse button, move the arrow until the words “Shut Down” are highlighted, then release the button.
Trouble? If a problem with the computer prevents you from using the Power key on the keyboard or choosing Shut Down—for example, if the computer “freezes” so that the pointer does not respond to the mouse—you can turn off the computer by pressing the power button (marked with an I) on the front of the computer. Use this method only if you cannot choose Shut Down or Restart when you press the Power key on the keyboard, or when you open the Special menu.
IMPORTANT You could lose unsaved work if you use the power button on the front of the computer to turn off your computer. Only use the power button when there is a problem that prevents the computer from being turned off with the Power key on the keyboard or the Shut Down command. To make sure your work is saved, use the Power key on the keyboard or the Shut Down command.
To turn the computer on again, just press the Power key on the keyboard.
24 Chapter 1
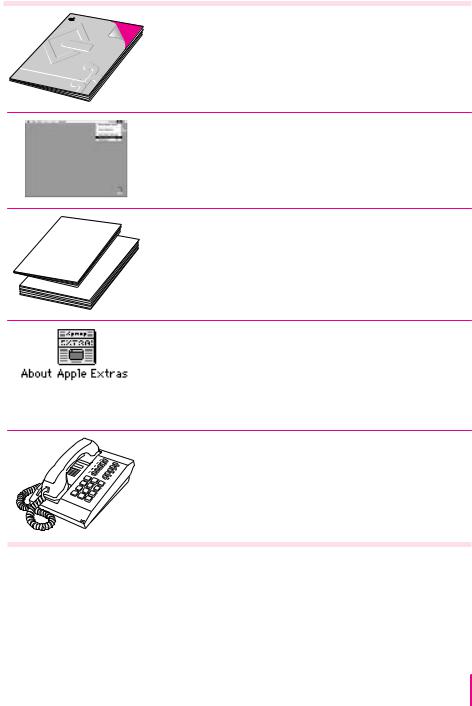
Where to find answers
When you have questions about using your Macintosh, there are several places you can look for answers.
Power
User’s
Macintosh
Guide
In this book
Use this book to help you set up and learn about your computer, and to find solutions to problems.
In the Guide menu
The Guide menu (marked with the hicon) is your main source of information about the Macintosh. To learn how to get different kinds of help from the Guide menu, see Chapter 2 in this book.
In other manuals
For answers to questions about other equipment or about application programs you have purchased, see the manuals that came with the equipment or programs.
In the About Apple Extras file
The Apple Extras folder on your hard disk contains a SimpleText document called About Apple Extras (often called a “Read Me” file) with important information about some of the application programs included with your computer. Read Me files can also be found inside application folders.
From Apple’s customer support hotline
If you can’t find an answer in any of the materials provided, call the customer support hotline. (The phone number for the hotline is in the service and support information that came with your computer.)
If you have problems with a particular application program, contact the manufacturer of the program. Refer to the section “Obtaining Updated Apple Software” in Chapter 6 for information about getting updated Apple software. Refer to “Ask Apple Online Technical Support,” in Chapter 6, for information about getting answers to your computer questions using eWorld.
Getting Started |
25 |
Use the instructions in this chapter to learn about the help available to you in the Guide menu.
2 Getting Help
The Guide menu is your main source of information when you’re working with your computer. The menu is identified by a question mark (h) in the upper-right corner of the screen.
27
Getting answers to your questions
When you have a question while working with your computer, you can get the answer by choosing Macintosh Guide from the Guide (h) menu.
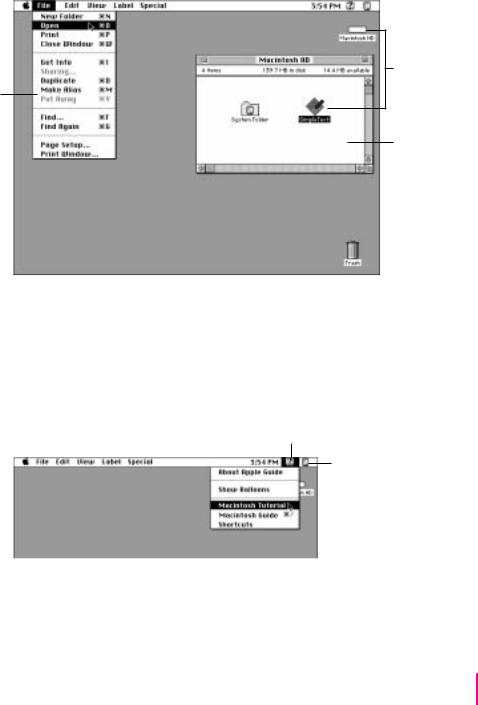
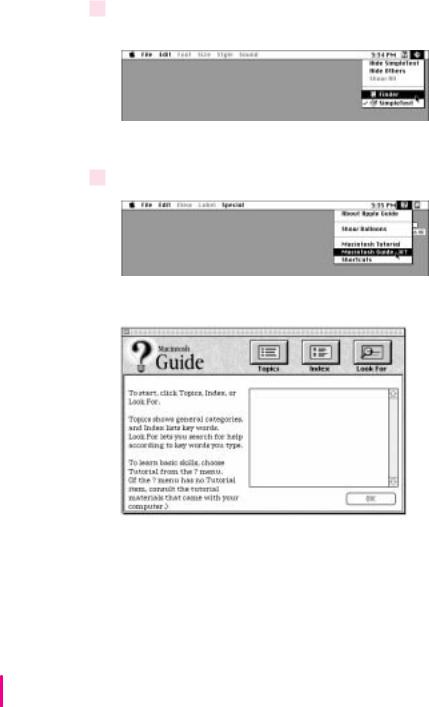
1Pull down the Application menu (in the upper-right corner of the screen) and choose Finder to make it the active application program.
A checkmark in the menu indicates that the Finder is the active program.
2 Pull down the Guide menu (marked with the hicon) and choose Macintosh Guide.
The Macintosh Guide window appears.
Whenever you use Macintosh Guide, its window remains in front of other windows. If the window gets in your way, you can move it by dragging its title bar (the gray bar across the top of the window).
28 Chapter 2
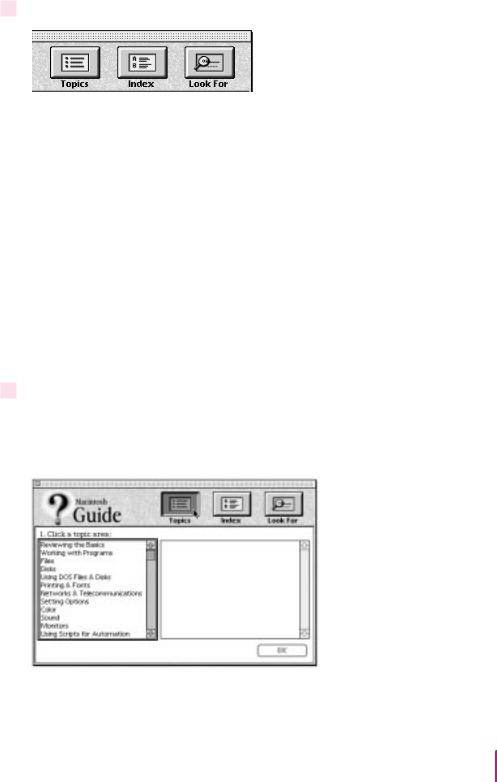
3Notice the three buttons at the top of the window: Topics, Index, and Look For.
Macintosh Guide gives you three ways of finding information:
m Topics lets you choose from a list of general subjects; it is like the table of contents in a book.
m Index lets you choose from an alphabetical list of more specific subjects; it is like the index in a book.
m Look For lets you search for information related to a specific word or phrase that you type.
In the following sections you will practice using each method.
If you have problems while using Macintosh Guide, see “Tips for Using Macintosh Guide” at the end of this section.
Getting answers with the Topics button
1In the Macintosh Guide window, click the Topics button.
A list of general topics appears on the left side of the Macintosh Guide window. (Depending on the hardware and software you have, the list of topics may look different.)
Getting Help |
29 |
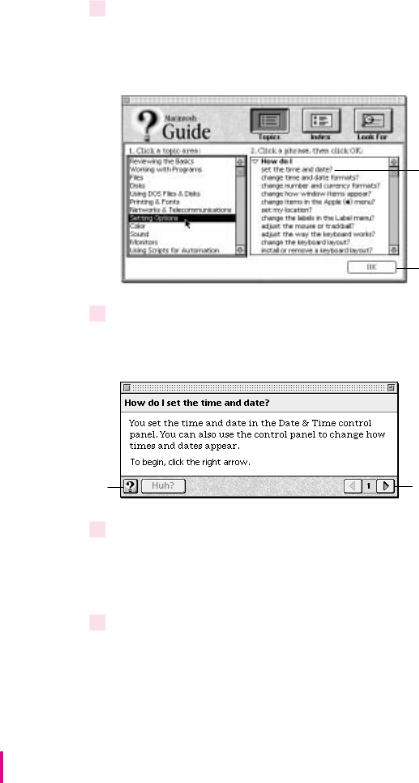
2Click “Customizing Your Computer” or “Setting Options,” whichever is available, in the list of topics.
When you click any topic area, a list of related questions appears on the right side of the Macintosh Guide window.
To get instructions, click a question…
…and then click OK.
3Click the question “How do I set the time and date?” and then click OK. Or double-click the question.
A small window appears with instructions for you to follow.
If you want to return to the main Macintosh Guide window, click this Topics button. (On some computers, it
says “Topics.”)
Click here to see the next step (if there is one).
4Read and follow the instructions in this window.
Macintosh Guide provides step-by-step instructions to answer the question you selected. When you have completed each step, click the right arrow in the lower-right corner to see the next step.
5When you have completed all the steps, click the Topics (or h) button in the lower-left corner to return to the main Macintosh Guide window.
Now continue with the next section.
30 Chapter 2
 Loading...