


Service Source
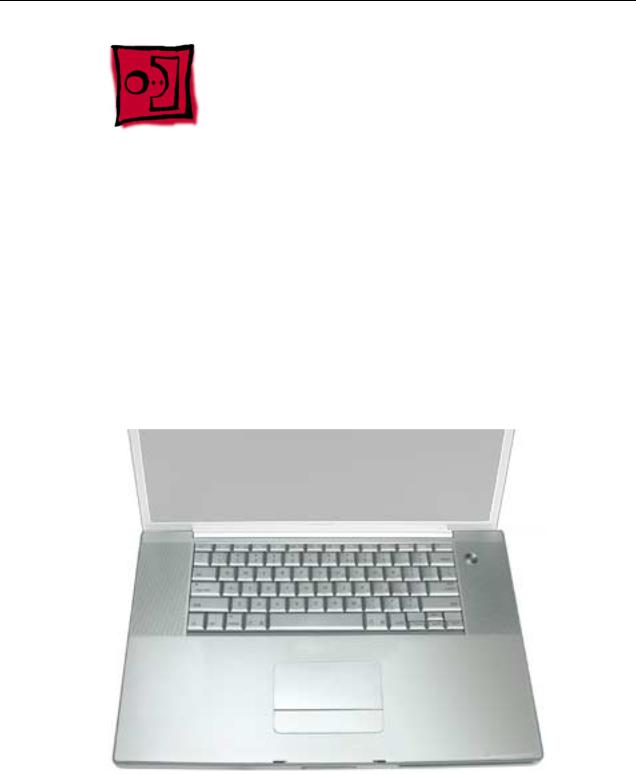
PowerBook G4 (17-inch)
17 March 2003
© 2003 Apple Computer, Inc. All rights reserved.

Service Source
Take Apart
PowerBook G4 (17-inch)
© 2003 Apple Computer, Inc. All rights reserved.
General Information
Overview
Some key features that distinguish this computer from earlier PowerBook models include:
•17-inch TFT widescreen display in aluminum alloy enclosure
•Built-in Bluetooth
•Built-in AirPort Extreme card
•Added FireWire 800 port
•Uses double-data rate (DDR) memory
•Fiber optic backlit keyboard with ambient light sensor
New Procedures
If you are familiar with taking apart notebook computers, you will notice some differences with this model:
•The keyboard is secured with screws accessible from under the top case.
•Memory cards are easily accessible from the bottom of the computer.
•The AirPort Extreme card is not user replaceable.
•The quantity and types of screws differ from earlier models.
PowerBook G4 (17-inch) Take Apart - 1

Important Notes
•Memory from previous PowerBook models is not compatible with this computer. Do not use older SDRAM DIMMs or SDIMMs even if they fit into the slot.
•The Bluetooth module is different from the PowerBook G4 (12-inch).
•The AirPort Extreme card assembly has a flex cable glued to the card, making it unique and specific to this computer.
Tools
The following tools are recommended for the take apart procedures.
•ESD wrist strap and mat
•Soft cloth
•#00 Phillips screwdriver (magnetized)
•#0 Phillips screwdriver (magnetized)
•#1 Phillips screwdriver (magnetized)
•4 mm socket wrench
•Needlenose pliers
•Torx T6 screwdriver
•Torx T8 screwdriver
•Black stick (nylon probe tool 922-5065) (or other nonconductive nylon or plastic flatblade tool)
•X-Acto® knife with straight edge blade
•Multi-compartment screw tray (such as a plastic ice cube tray)
•Kapton® tape
•Voltmeter (for troubleshooting)
•Small low-power magnet (for troubleshooting)
•Apple Pro keyboard and mouse (for troubleshooting)
2 - PowerBook G4 (17-inch) Take Apart
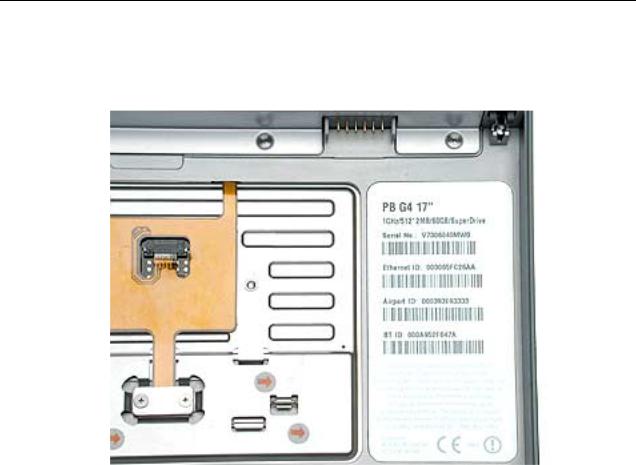
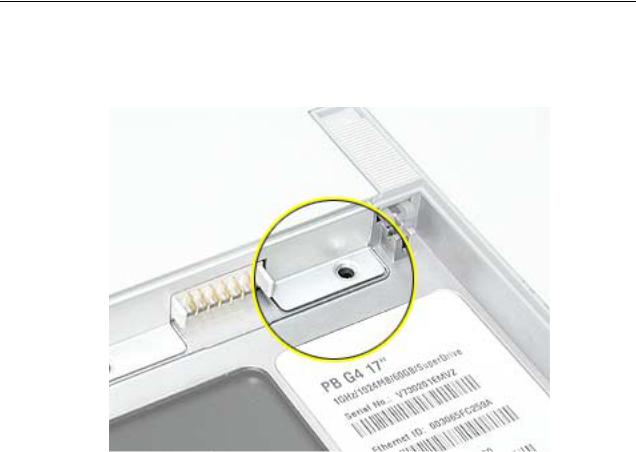
Serial Number Location
The serial number is located in the battery bay.
PowerBook G4 (17-inch) Take Apart - 3
 03-03 Service Manual")
Zero Insertion Force Connectors
Zero insertion force (ZIF) connectors are used in several locations in the computer.
Important: The locking bar on the ZIF connector is extremely fragile and is not intended to separate from the connector. When releasing a bar, use extreme care and a restrained light pressure to move the bar only slightly.
Warning: If a locking bar breaks, you will need to replace the board.
To release the flex cable
Use a flat-blade tool to move the bar on both sides.
4 - PowerBook G4 (17-inch) Take Apart
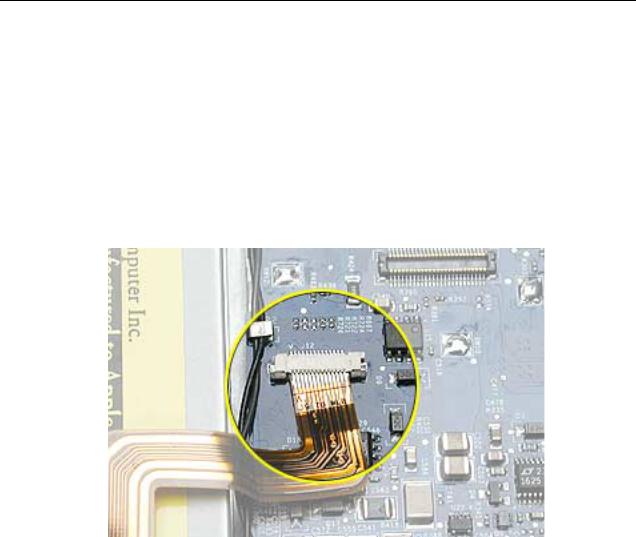
To connect a flex cable
Make sure the locking bar is released, then slide the end of the flex cable all the way into the connector. Hold the cable in place, then slide the locking bar into the connector on both sides to secure.
Important: Verify that the cable is straight. Use either the alignment mark, if present, or the metal edge on the cable as a guide to ensure the cable is straight.
Warning: If the flex cable is inserted crooked, some signals may not be connected or signals may short together (a bad connection is shown below.)
Note: If a cable is not securing properly, verify that it is inserted on the correct side of the locking bar.
PowerBook G4 (17-inch) Take Apart - 5
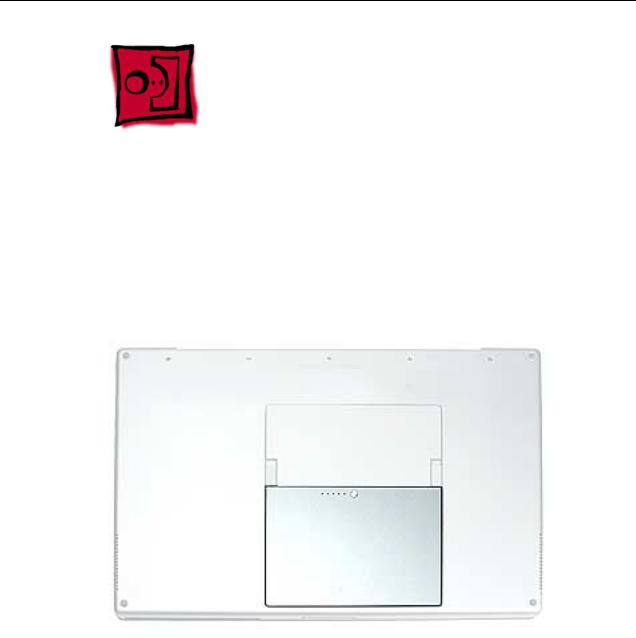
Battery
Tools
This procedure requires the following tools:
• Soft cloth
Part Location
Preliminary Steps
Warning: Always shut down the computer before opening it to avoid damaging its internal components or causing injury. After you shut down the computer, the internal components can be very hot. Let the computer cool down before continuing.
6 - PowerBook G4 (17-inch) Take Apart |
Battery |
Procedure
Warning: If the computer has been recently operating, allow it to cool down before performing this procedure.
1.Shut down the computer.
2.Disconnect the power cord and any other cables connected to the computer.
3.Place the computer face down on a soft cloth.
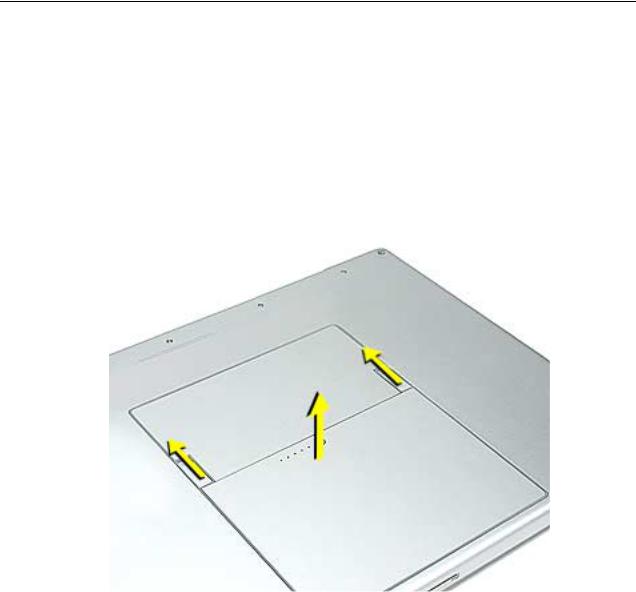
4.Slide both battery latches away and lift the battery out of the battery bay.
Battery |
PowerBook G4 (17-inch) Take Apart - 7 |
Memory Door and
Memory Cards
Tools
This procedure requires the following tools:
•Soft cloth
•#0 Phillips screwdriver
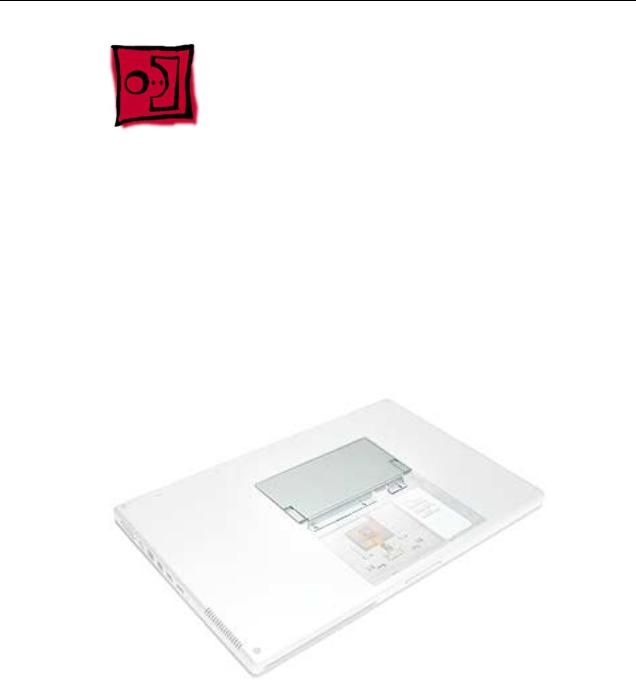
Part Location
Preliminary Steps
Before you begin, remove the battery.
8 - PowerBook G4 (17-inch) Take Apart |
Memory Door and Memory Cards |
Procedure
Warning: If the computer has been recently operating, allow it to cool down before performing this procedure.
1.Place the computer face down on a soft cloth.
2.Remove the three screws from the memory door.
Note: Check for lost screws caught by magnets inside the front edge of the battery well.
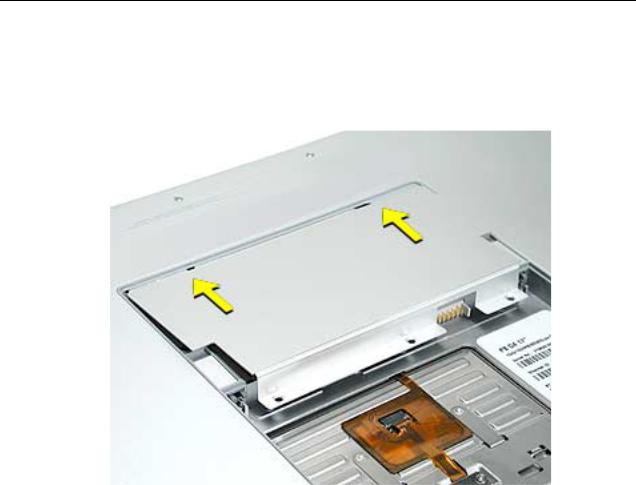
3. Lift the memory door up slightly and slide it straight back to remove.
Memory Door and Memory Cards |
PowerBook G4 (17-inch) Take Apart - 9 |
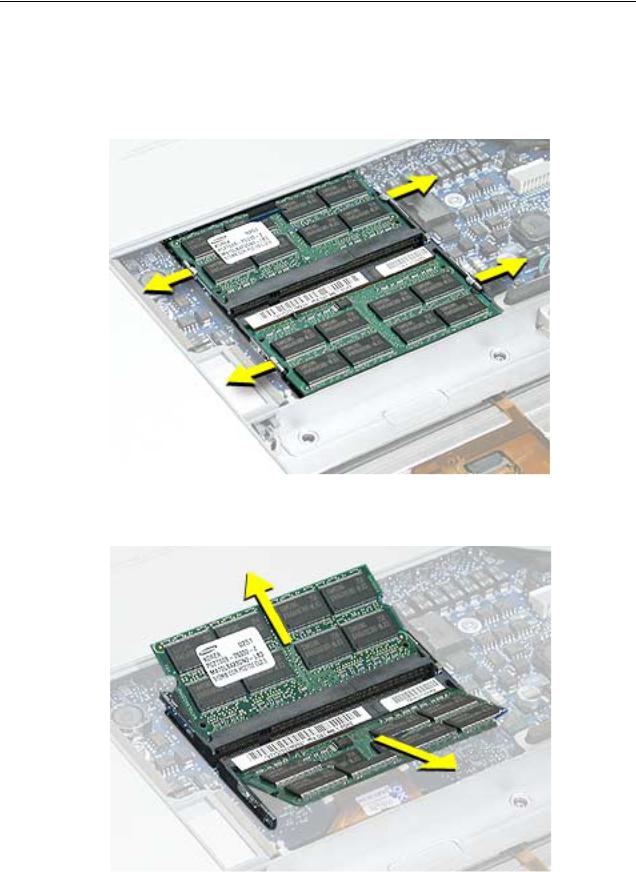
Note: If only one memory card is installed, it’s factory installed in the top memory slot (nearest to outside edge of the computer).
4.To remove either memory card, first release it by spreading apart the tabs in the memory slot from the notches in the card until the card pops up slightly.
5. Pull the card straight out of the memory slot.
10 - PowerBook G4 (17-inch) Take Apart |
Memory Door and Memory Cards |
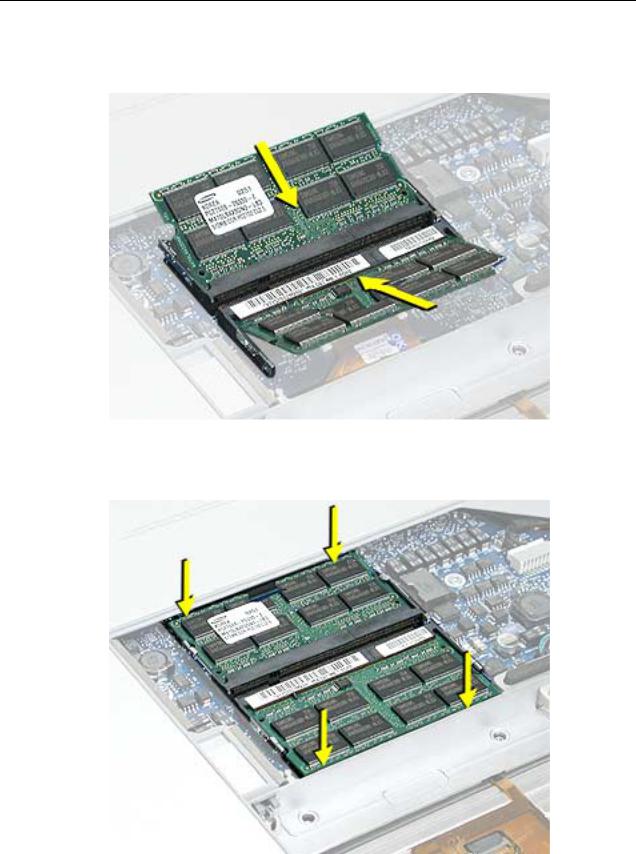
6.Align the notch in the board with the tab in the slot and insert the replacement memory cards at a 30-degree angle, pushing the card firmly until fully seated.
7.Check that the notches in the card clear the tabs as you press down on the sides of the card to lock it into place.
Memory Door and Memory Cards |
PowerBook G4 (17-inch) Take Apart - 11 |
8.To reinstall the memory door, hold it at a low angle to the battery bay and slide it in under the back edge, then lay it flat. If the door springs up and does not lay flat without tension, remove it and reinstall at a lower angle.
12 - PowerBook G4 (17-inch) Take Apart |
Memory Door and Memory Cards |
9.Install the memory door screws.
Note: Before securing, check that the door edge rests flush and inside the ridge.
10.Replace the battery.
11.Use Apple System Profiler to verify that the memory is recognized. (Choose the menu bar Apple logo ( ) > About This Mac, click More Info..., select the System Profile tab,
open the Memory Overview.)
Memory Door and Memory Cards |
PowerBook G4 (17-inch) Take Apart - 13 |
Top Case
Tools
This procedure requires the following tools:
•#0 Phillips screwdriver (magnetized)
•#1 Phillips screwdriver (magnetized)
•Torx T8 screwdriver (magnetized)
•Black stick (or other nonconductive nylon or plastic flat-blade tool)
•Soft cloth
•Multi-compartment screw tray (21 screws to remove the top case)
Part Location
14 - PowerBook G4 (17-inch) Take Apart |
Top Case |
Preliminary Steps
Before you begin, remove the following:
•Battery
•Memory door
•Lower memory card (nearest to battery bay), if present
Procedure
Note: This procedure removes the top case and keyboard assembly. The keyboard is attached to the top case and is not removed.
1.Place the computer face down on a soft cloth.
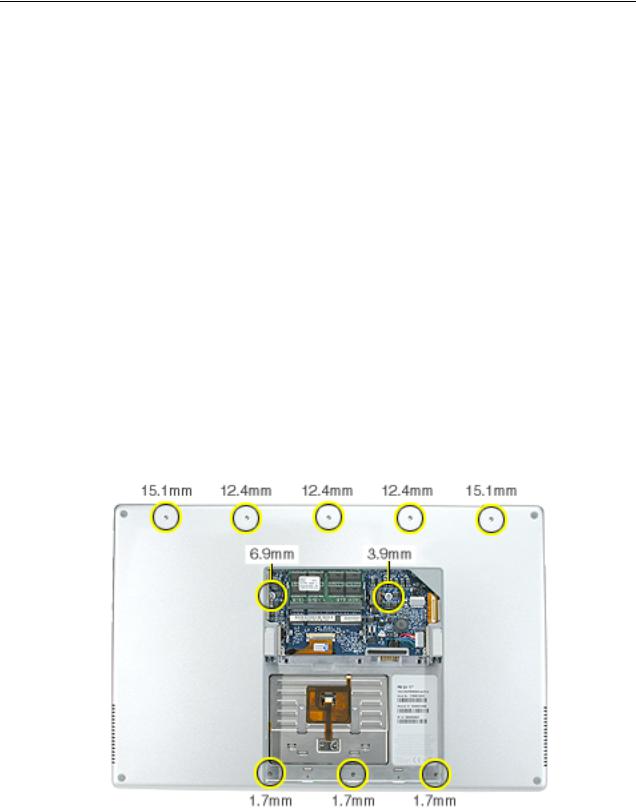
2.Remove the three screws inside the battery bay.
Note: These screws are shorter than on the memory door. Use care not to lose the screws into holes along the battery bay.
Note: Check for lost screws caught by magnets inside the front edge of the battery well.
3.Remove the five screws along the back edge (the two outside screws are longer and have “shoulders”).
4.Remove the two screws on the logic board.
Top Case |
PowerBook G4 (17-inch) Take Apart - 15 |
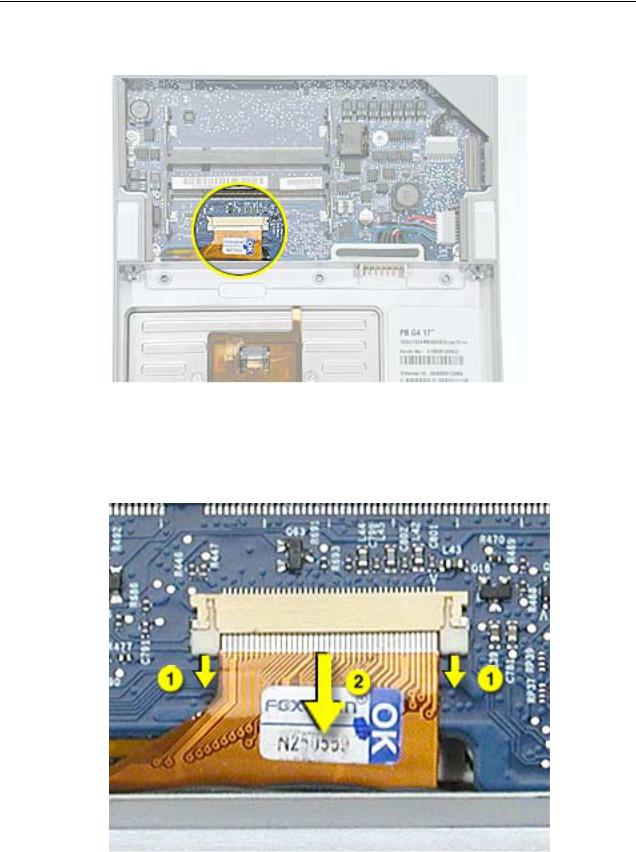
5. Locate the top case flex cable and ZIF connector.
6.Very carefully disconnect and remove the cable from the connector.
Important: The ZIF connector and locking bar are fragile and can easily break if too much force is used. (See “Zero Insertion Force Connectors” heading.)
16 - PowerBook G4 (17-inch) Take Apart |
Top Case |
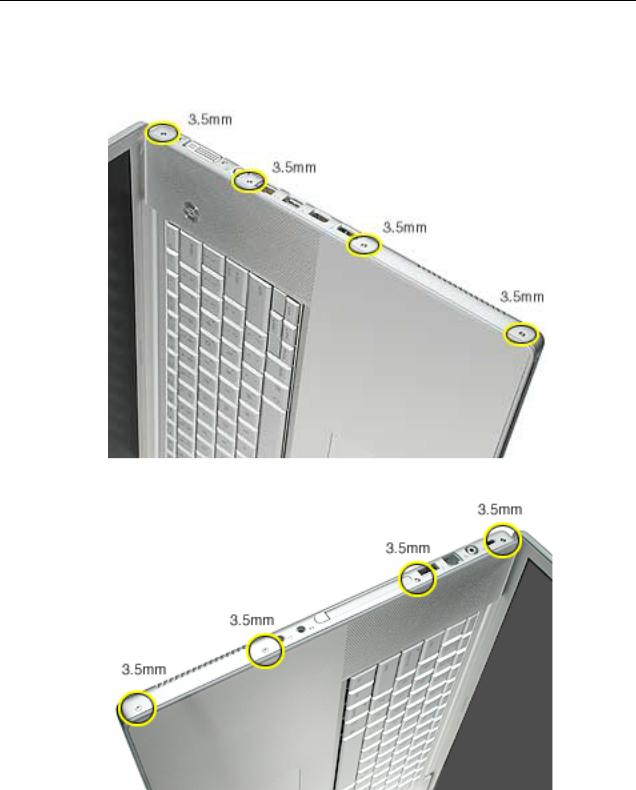
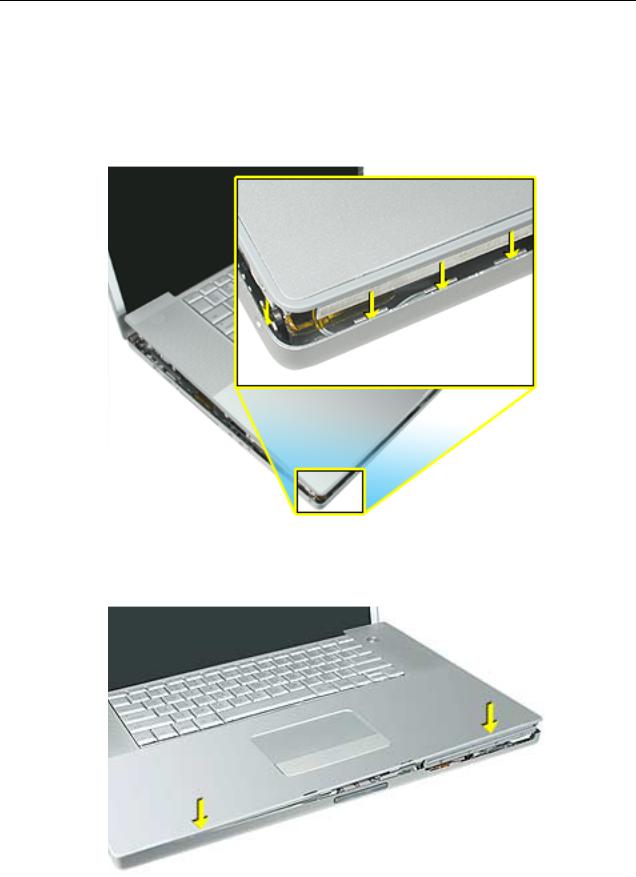
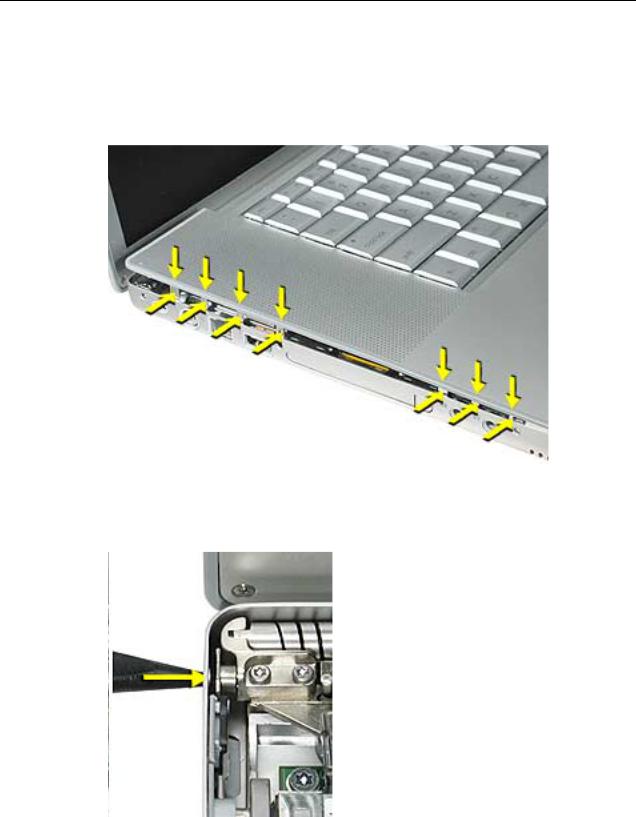
7.Open the display and place the computer on its side.
8.Remove four side screws from both sides.
Top Case |
PowerBook G4 (17-inch) Take Apart - 17 |
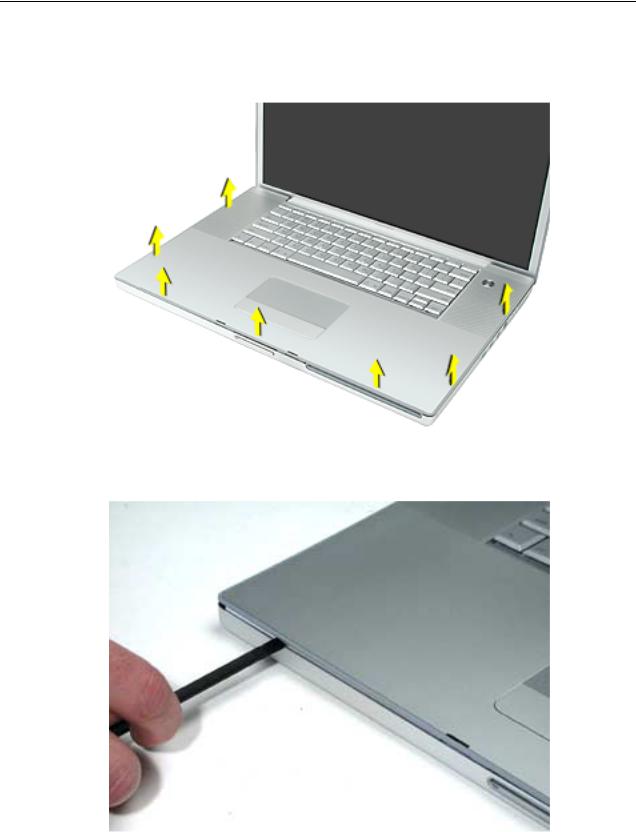
9.Turn the computer over.
10.Pull up on the top case along the sides and front until it releases.
Note: A black stick inserted and twisted under the top case seam may be helpful.
18 - PowerBook G4 (17-inch) Take Apart |
Top Case |
Replacement Procedure
Note: If replacing the top case, remove the keyboard and transfer it to the replacement top case.
1.Verify the thermal pad shown here is in place. If not, check whether it is stuck under the removed top case and replace. If not, install a new pad.
2.Visually check to verify that all cables (highlighted below) are connected and routed correctly with nothing raised up or incorrectly over a component.
Top Case |
PowerBook G4 (17-inch) Take Apart - 19 |
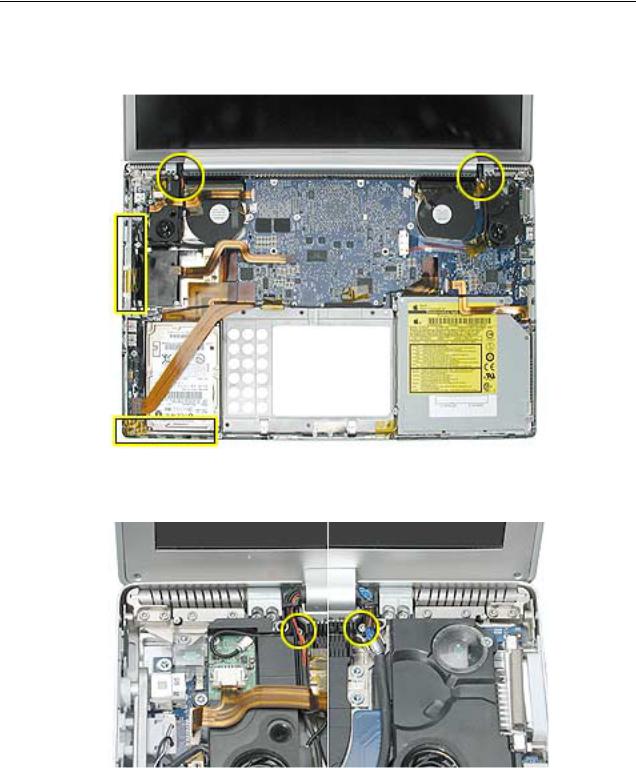
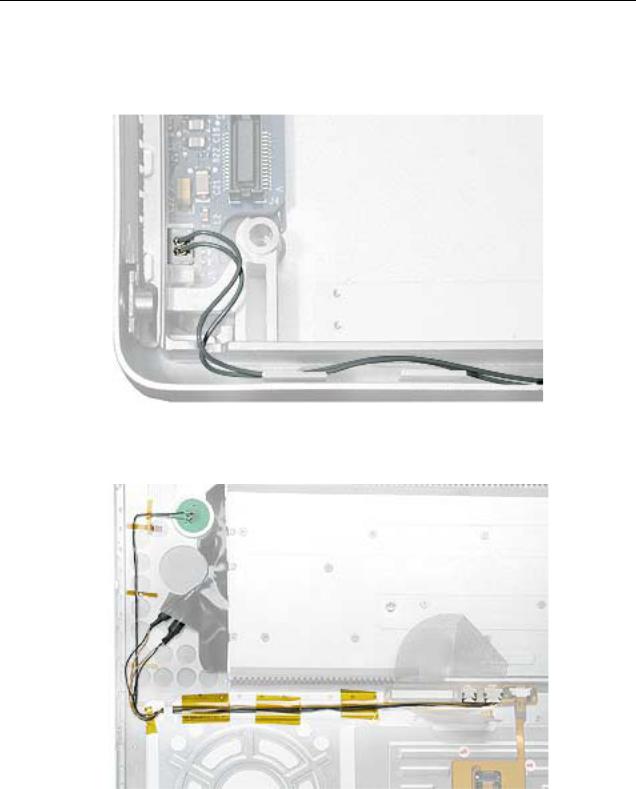
3.Check perimeter wiring, where shown, to verify that it will not be caught or pinched by the top case during replacement.
4. Check that display cable brackets are properly seated and secured with screws.
20 - PowerBook G4 (17-inch) Take Apart |
Top Case |
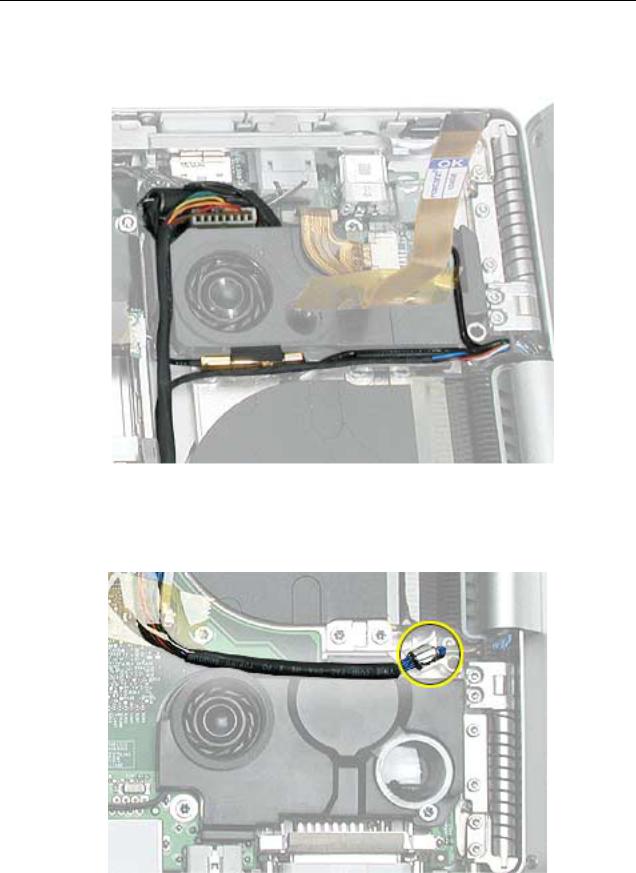
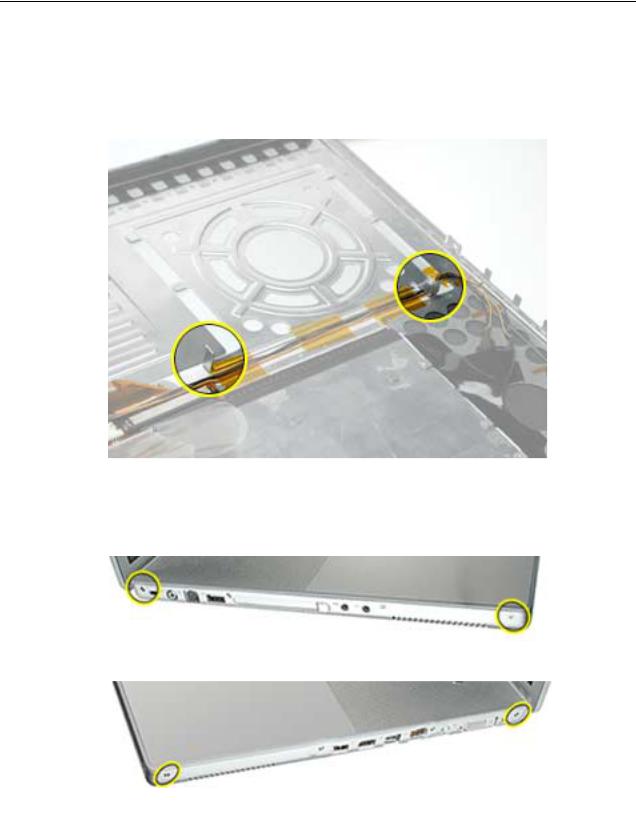
5.Verify that cables for Bluetooth, AirPort Extreme, inverter and power cable from the DC-in board are routed and seated correctly in channels around the left speaker.
6.Verify that the LVDS cable’s metal bead fits into the metal channel (rounded side up so that its teeth secure it) and that the cable is secured into the channel along the right speaker.
Top Case |
PowerBook G4 (17-inch) Take Apart - 21 |
7.Verify that the sleep LED wires route over the notch in the frame (secure with Kapton tape) and along the inside channel away from the front edge so that it will not be damaged when replacing the top case.
8. On the top case, check cable connections and routing.
22 - PowerBook G4 (17-inch) Take Apart |
Top Case |
9.Check that the perimeter metal tabs are not bent.
Note: Do not bend the tabs; the metal quickly fatigues and can break off easily.
10.Lay the top case upside down and locate the flex cable.
11.While pulling the cable up, run a finger along its base to crease it at a 90-degree angle.
Top Case |
PowerBook G4 (17-inch) Take Apart - 23 |
12. The cable should point straight up.
13.Open the display to 90-degrees and tilt the computer back so it rests on the back of the display.
14.Guide the top case flex cable through the slot between the logic board and the bottom case frame.
24 - PowerBook G4 (17-inch) Take Apart |
Top Case |
Note: For the following procedures, you will want to keep the top case close to the bottom case so the flex cable will not pull out of the slot.
15.Turn the computer to rest on the bottom case.
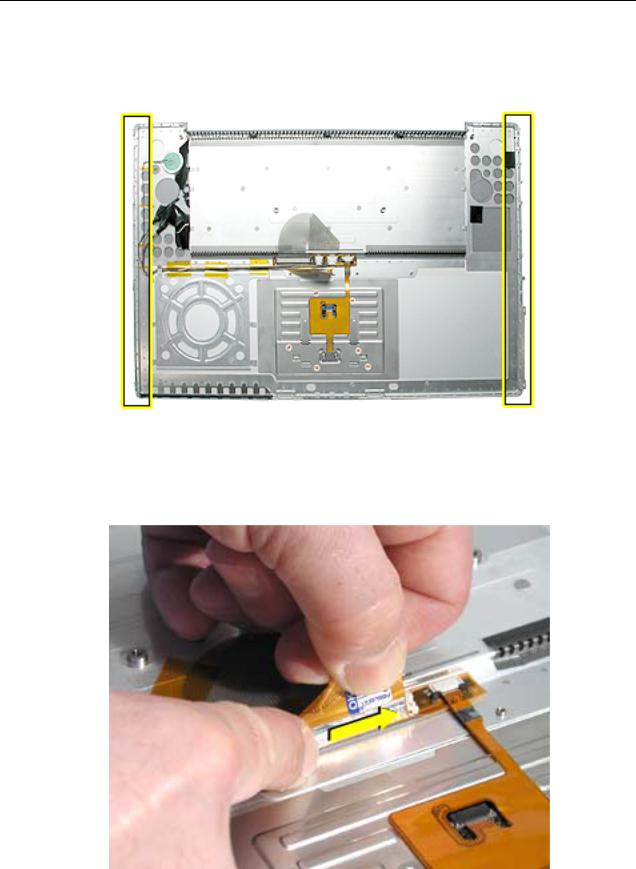
16.At the left front corner of the computer, insert the top case edges into the bottom case channels, shown.
17.Hold the front of the top case along the front edge of the bottom case and lower into place.
Top Case |
PowerBook G4 (17-inch) Take Apart - 25 |
18.Note: If the tabs along the sides of the top case catch on the bottom case, use a narrow tool and work from front to back to carefully push or pull the tabs very slightly to help slide them into place.
Important: The tabs are fragile. Do not apply too much pressure or bend them.
Note: Some side screws have a flexible screw boss. If they block a tab from seating, use a narrow tool to push the boss slightly.
26 - PowerBook G4 (17-inch) Take Apart |
Top Case |
Important: The top case should lay flat along the sides and top, if not, make sure that cables and components are not interfering.
Also, make sure it is not held up by one of the metal tabs protruding down from the top case. Carefully bend them slightly to fit if needed.
19. Install the front and rear side screws on both sides to hold the top case in place.
Top Case |
PowerBook G4 (17-inch) Take Apart - 27 |

20.Carefully close the display, without forcing. If it does not close easily, reinstall the top case, checking for cable routing and clearances.
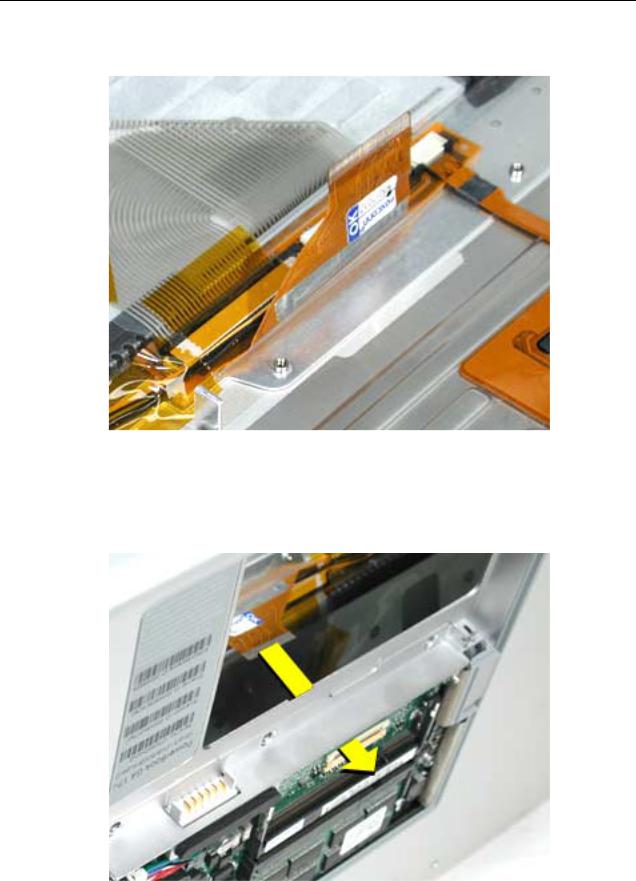
21.Turn the computer over.
22.Check that the top case flex cable is still through the slot. If not, use the round shaft of a small Phillips screwdriver to carefully pull it through, as shown.
Important: If the cable does not fully reach the ZIF connector, the cable is trapped under the frame. Reinstall the top case.
28 - PowerBook G4 (17-inch) Take Apart |
Top Case |
 Loading...