


Setting UpYour
PowerBook
Includes setup, expansion, and troubleshooting information for PowerBook computers
K Apple Computer, Inc.
© 2000 Apple Computer, Inc. All rights reserved.
Under the copyright laws, this manual may not be copied, in whole or in part, without the written consent of Apple.
The Apple logo is a trademark of Apple Computer, Inc., registered in the U.S. and other countries. Use of the “keyboard” Apple logo (Option-Shift-K) for commercial purposes without the prior written consent of Apple may constitute trademark infringement and unfair competition in violation of federal and state laws.
Every effort has been made to ensure that the information in this manual is accurate. Apple is not responsible for printing or clerical errors.
Apple Computer, Inc. 1 Infinite Loop
Cupertino, CA 95014-2084 408-996-1010 http://www.apple.com
Apple, the Apple logo, AppleTalk, FireWire, Mac, Macintosh, and PowerBook are trademarks of Apple Computer, Inc., registered in the U.S. and other countries.
AirPort, The Apple Store, and Final Cut Pro are trademarks of Apple Computer, Inc.
ENERGY STAR® is a U.S. registered trademark.
PowerPC is a trademark of International Business Machines Corporation, used under license therefrom.
Other company and product names mentioned herein are trademarks of their respective companies. Mention of third-party products is for informational purposes only and constitutes neither an endorsement nor a recommendation. Apple assumes no responsibility with regard to the performance or use of these products.
Manufactured under license from Dolby Laboratories. “Dolby,” “Pro Logic” and the double-D symbol are trademarks of Dolby Laboratories. Confidential Unpublished Works, © 1992–1997 Dolby Laboratories, Inc. All rights reserved.
The product described in this manual incorporates copyright protection technology that is protected by method claims of certain U.S. patents and other intellectual property rights owned by Macrovision Corporation and other rights owners. Use of this copyright protection technology must be authorized by Macrovision Corporation and is intended for home and other limited viewing uses only unless otherwise authorized by Macrovision Corporation. Reverse engineering or disassembly is prohibited.
Apparatus Claims of U.S. Patent Nos. 4,631,603, 4,577,216, 4,819,098 and 4,907,093 licensed for limited viewing uses only.
Simultaneously published in the United States and Canada.

Contents
1Getting Started 7
Plugging In the Computer |
8 |
|
|
|
|
Connecting the Internal Modem |
8 |
|
|
||
Opening the Display 9 |
|
|
|
|
|
Turning the Computer On |
10 |
|
|
|
|
Problems Turning the Computer On? 10 |
|
||||
Moving Items on the Screen |
11 |
|
|
|
|
Tips for Using the Trackpad |
11 |
|
|
|
|
Adjusting the Internal Display 12 |
|
|
|
||
Adjusting the Brightness |
12 |
|
|
|
|
Adjusting the Display Resolution |
12 |
|
|||
Where to Go From Here 13 |
|
|
|
|
|
Additional Information in Online Help and Apple Web Sites |
14 |
||||
What to Do When You Are Finished Working 16 |
|
||||
Put Your PowerBook to Sleep |
16 |
|
|
||
Shut Down Your PowerBook |
16 |
|
|
||
2 Features of Your PowerBook |
17 |
|
|||
Basic Features of Your PowerBook |
18 |
|
|
||
Additional Features of Your PowerBook |
20 |
|
|||
Internal Expansion Capabilities of Your PowerBook 22 |
|
||||
Keyboard Controls, Hot Function Keys, and Numeric Keypad |
24 |
||||
Assigning Hot Function Keys |
24 |
|
|
||
Using the Standard Function Keys |
24 |
|
|||
Using the Embedded Numeric Keypad 25 |
|
||||
3
For More Information on Keyboard Controls |
25 |
|
|
||||||
Universal Serial Bus (USB) 26 |
|
|
|
|
|
|
|
||
Connecting and Using a USB Device |
26 |
|
|
|
|
||||
USB Devices and Battery Power |
26 |
|
|
|
|
|
|||
Using Multiple USB Devices at the Same Time |
27 |
|
|
||||||
For More Information on USB |
27 |
|
|
|
|
|
|||
FireWire 28 |
|
|
|
|
|
|
|
|
|
Connecting FireWire Devices 28 |
|
|
|
|
|
|
|||
FireWire Devices and Battery Power |
29 |
|
|
|
|
||||
FireWire Target Disk Mode |
29 |
|
|
|
|
|
|
|
|
For More Information on FireWire |
29 |
|
|
|
|
||||
AirPort Wireless Internet and Networking |
30 |
|
|
|
|
||||
How AirPort Provides Wireless Internet Access |
30 |
|
|
||||||
For More Information on AirPort |
30 |
|
|
|
|
|
|||
Installing an AirPort Card |
31 |
|
|
|
|
|
|
|
|
External Monitor Support ( VGA and S-Video) |
38 |
|
|
|
|||||
Connecting an External Monitor |
|
38 |
|
|
|
|
|
||
Switching Between Extended Desktop and Video Mirroring Modes 39 |
|||||||||
Connecting a Television, VCR, or Other Video Device |
39 |
||||||||
Using Your PowerBook With the Display Closed |
39 |
|
|||||||
For More Information on Using an External Monitor |
39 |
||||||||
Battery and Dual Battery Support |
40 |
|
|
|
|
|
|||
Monitoring Battery Charge Level |
40 |
|
|
|
|
|
|||
Removing or Replacing a Battery |
40 |
|
|
|
|
|
|||
Charging a Battery |
40 |
|
|
|
|
|
|
|
|
Battery-Saving Tips |
41 |
|
|
|
|
|
|
|
|
For More Information on Your PowerBook Battery |
41 |
||||||||
Expansion Bay Modules |
42 |
|
|
|
|
|
|
|
|
Determining Whether a Module Can Be Removed |
42 |
||||||||
Ejecting an Expansion Bay Module |
43 |
|
|
|
|
||||
For More Information on Expansion Bay Modules |
43 |
|
|||||||
DVD Drive 44 |
|
|
|
|
|
|
|
|
|
Inserting Discs 44 |
|
|
|
|
|
|
|
|
|
Ejecting a Disc From the DVD Drive |
45 |
|
|
|
|
||||
4Contents
Playing DVD Discs |
45 |
|
|
|
|
|
|
|
For More Information on Your DVD Drive |
45 |
|||||||
Infrared (IrDA) |
46 |
|
|
|
|
|
|
|
Making an Infrared Connection |
46 |
|
|
|
||||
For More Information on Infrared |
46 |
|
|
|||||
PC Cards 47 |
|
|
|
|
|
|
|
|
Inserting a PC Card |
47 |
|
|
|
|
|
|
|
Ejecting a PC Card |
47 |
|
|
|
|
|
|
|
For More Information on PC Cards |
47 |
|
|
|||||
Ethernet (10/100 Base-T) |
48 |
|
|
|
|
|
||
For More Information on Using Ethernet |
48 |
|||||||
Security Slot and Keyboard Lock |
49 |
|
|
|
||||
Installing Additional Memory |
50 |
|
|
|
|
|||
RAM Specifications |
50 |
|
|
|
|
|
|
|
Maximum RAM Configurations |
50 |
|
|
|
||||
Installing RAM in the Upper RAM Slot |
51 |
|
||||||
Checking to See if Your Computer Recognizes the New Memory 57 |
||||||||
Replacing RAM in the Lower RAM Slot |
58 |
|
||||||
Removable Hard Disk |
60 |
|
|
|
|
|
|
|
PowerBook Specifications |
62 |
|
|
|
|
|||
3 Troubleshooting |
65 |
|
|
|
|
|
||
Information in This Chapter |
65 |
|
|
|
|
|||
Problems That Prevent You From Using Your Computer 66 |
||||||||
Other Problems |
67 |
|
|
|
|
|
|
|
Appendix
Cleaning, Storage, Safety, and Ergonomic Information 69
Cleaning Your PowerBook |
69 |
Cleaning Your PowerBook Display 69 |
|
Storing Your PowerBook |
69 |
Safety Instructions for Setting Up and Using Your Computer 70 Plugging In the Power Adapter 70
Connecting a Phone Line to the Internal Modem 70
Using Your PowerBook 70
Contents 5
General Safety Instructions 71
Ergonomics 72
Communications Regulation Information 75
Laser Information 80
High-Risk Activities Warning 80
ENERGY STAR 80
6Contents

C H A P T E R
1
Getting Started
Your PowerBook has been designed so that you can set it up quickly and start using it right away. If you have never used a PowerBook or are new to Macintosh computers, read this section for instructions on getting started and where to get more information.
If you are an experienced user, you may already know enough to get started. Be sure to look over the information in this book to find out about the new features of this PowerBook.
Macintosh monitor adapter
|
Phone cord |
Power cord |
Power adapter |
Composite-to-S-video cable |
Expansion bay weight-saving device |
Important Read all the installation instructions and safety information (see page 70) carefully before you plug your computer into a wall socket.
7

Plugging In the Computer
Plugging in the power adapter recharges the computer’s battery. You should plug in the power adapter in case the battery has been drained during shipping or storage.
1Plug one end of the power cord into the power adapter and the other end into an outlet.
2Plug the power adapter plug into the power adapter port (marked with the icon ¯) on the back of the computer.
¯ Power adapter port Power adapter plug
¯
√ |
- |
G
Æ |
™ |
|
W 
 WInternal modem
Telephone
cord
Power cord |
Power adapter |
Connecting the Internal Modem
If you want to get connected to the Internet right away, connect one end of the phone cord to the internal modem port (marked with the icon W) and the other end to an analog telephone line (the type of telephone line found in most residences).
Warning Do not connect a digital telephone line to the modem, because the wrong type of line could damage the modem.
8 Chapter 1
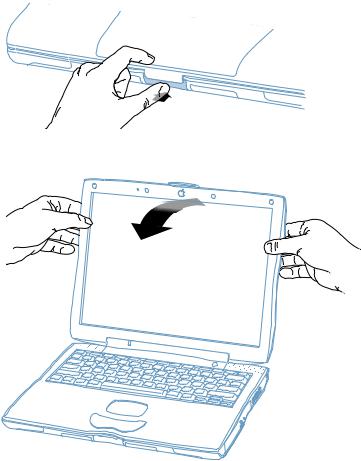
Opening the Display
1Push the display release button.
2Open the display and position it at a comfortable viewing angle.
®
Getting Started |
9 |

Turning the Computer On
To turn on the computer, press the Power button (®) above the keyboard.
®Power button
®
You should hear a tone when you turn on the computer. It takes the computer a few moments to start up.
Problems Turning the Computer On?
Nothing happens when you press the Power button.
mThe battery may be drained. Make sure that you plugged in the power adapter, and that the adapter is firmly connected to both the computer and a power source.
mIf the computer still doesn’t start up when you press the Power button, use the tip of a pen to press the reset button (see page 20) on the back of the computer. Wait a few seconds and then press the Power button again.
mIf the computer still doesn’t start up, see “If the computer won’t turn on or start up” on page 67.
After you press the Power button, there is a slight delay before the computer starts up.
mThis is normal. When you press the Power button, the PowerBook checks its memory before it starts up. The more memory installed in the PowerBook, the longer the delay.
You see a picture of a disk or a folder with a blinking question mark.
mThis icon usually means that the computer can’t find system software on the hard disk or any disks attached to the computer. You may need to reinstall system software. See “If the computer freezes during startup or you see a flashing question mark” on page 66.
10 Chapter 1
Moving Items on the Screen
You use your PowerBook trackpad to move items and select items on the screen, much as you use a mouse with a desktop computer. To move the arrow pointer on the screen, slide your finger across the trackpad. To select, click, or double-click an item on the screen, use the trackpad button.
®
Trackpad |
Trackpad button |
The trackpad is sensitive to how quickly you move your finger. To move the pointer a short distance across the screen, move your finger slowly across the trackpad. The faster you move your finger, the farther the pointer moves on the screen.
Tips for Using the Trackpad
For best results when using the trackpad, keep in mind these tips:
mUse only one finger.
mUse only your finger on the trackpad. Do not use a pen or any other object.
mKeep your finger and the trackpad dry. If the trackpad becomes moist from humidity or condensation, gently wipe it with a clean cloth before you use it.
mNever use any kind of cleaning solution on the trackpad.
For more information on using the trackpad, see Mac Help, available in the Help menu.
Getting Started 11

Adjusting the Internal Display
Before you begin working with your new PowerBook, you may need to adjust your display so that items on the screen are easy to see.
Adjusting the Brightness
Use the keys labeled with the ¤icon to adjust screen brightness.
¤ Brightness controls
®
Adjusting the Display Resolution
You can increase the size of images on your display by switching from the standard resolution to a scaled resolution. Click the Resolution portion of the Control Strip.
Resolution icon
When you switch to a scaled resolution, items on the screen appear larger, making them easier to see. However, scaled resolutions may not be as sharp as the standard display resolution.
12 Chapter 1
Where to Go From Here
That’s everything you need to know to get your PowerBook up and running for the first time. The first time that you turn your computer on, the Macintosh Setup Assistant will take you through the rest of the process of configuring your computer for the first time and setting up for the Internet.
If you would like additional information, see the following:
mTo learn about the additional information available in the onscreen help and on the Internet, see “Additional Information in Online Help and Apple Web Sites” on page 14.
mFor instructions on shutting down your computer or putting it to sleep, see “What to Do When You Are Finished Working” on page 16.
mFor information about what you can do with your PowerBook, see Chapter 2, “Features of Your PowerBook.”
mIf you have a problem with your PowerBook, see Chapter 3, “Troubleshooting.”
Getting Started 13

Additional Information in Online Help and Apple Web Sites
14 Chapter 1
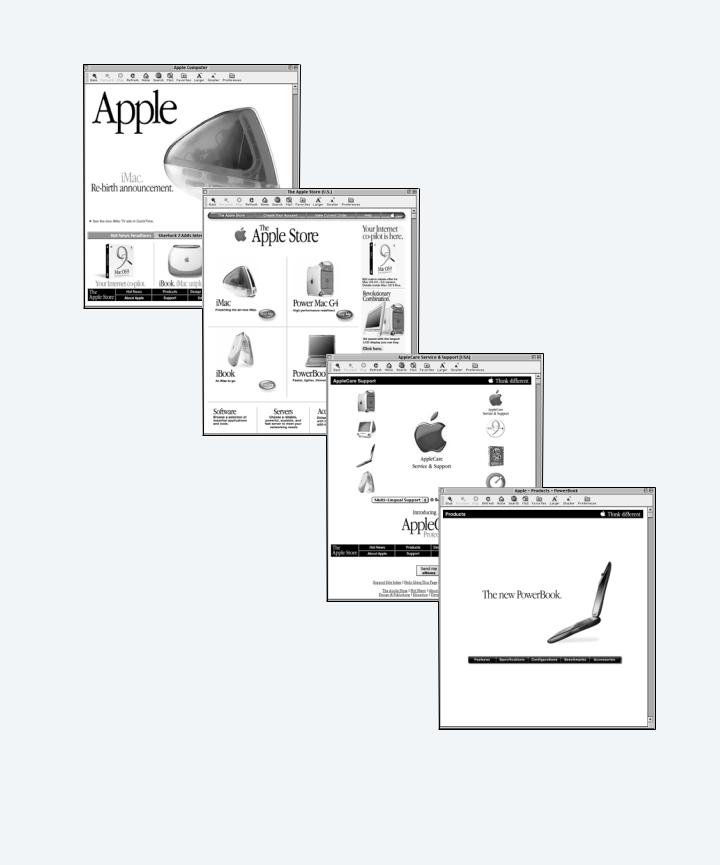
Apple Web Site
www.apple.com
Links to everything Apple.
The Apple Store www.apple.com/store
The latest Apple hardware, software, and accessories.
Apple Support Web Site www.apple.com/support
Need extra help? Visit here for product support, software updates, and technical information.
Apple PowerBook Web Site
www.apple.com/powerbook
News and information specifically for
PowerBook users.
Getting Started 15

What to Do When You Are Finished Working
When you have finished working with your PowerBook, you have two options.
Put Your PowerBook to Sleep
If you are only going to be away from your PowerBook for a short period of time, put the computer to sleep. When the computer is in sleep, you can quickly wake it and bypass the startup process. When the computer is in sleep, its screen is dark and appears to be off and a small green light on the case pulsates.
To quickly put the computer to sleep, do one of the following:
mClose the display.
mChoose Sleep from the Special menu.
Warning Wait a few seconds until the Apple logo on the top of the case stops glowing (indicating that the computer is in sleep and the hard disk has stopped spinning) before you move your PowerBook. Moving your computer while the hard disk is spinning can damage your computer.
To wake the computer:
mIf the display is closed, open it. Your PowerBook will automatically wake from sleep when you open the display. ( You can turn off this option in the Energy Saver control panel.)
mIf the display is already open, press the Power button (®) or any key on the keyboard.
Shut Down Your PowerBook
If you are not going to use your PowerBook for a day or two, you should shut it down. To shut down the PowerBook, do one of the following:
mChoose Shut Down from the Special menu.
mPress the Power button and click Shut Down in the dialog box that appears on the screen:
16 Chapter 1

C H A P T E R
2
Features of Your PowerBook
Your PowerBook has many built-in features and expansion capabilities you can use to customize and expand your PowerBook to fit your needs. These include the following:
mUniversal Serial Bus (USB) for connecting additional equipment to your PowerBook, such as printers, scanners, joysticks, keyboards, digital cameras, and floppy drives.
mFireWire for connecting high-speed equipment, such as digital video cameras and external hard disks.
mThe latest in communications technologies such as a 56K modem, infrared, 10/100 Base-T Ethernet, and optional AirPort wireless Internet and networking.
mThe ability to use your PowerBook with an external monitor, video projector, or television, including support for video mirroring and creating an extended desktop. Use your PowerBook’s built-in video support to do presentations, work with an external monitor, or play DVD-Video discs on your television.
mLong-lasting battery and the ability to use two batteries at the same time.
mRemovable expansion bay modules, one Type II PC Card/CardBus slot, and userupgradable memory.
To learn about what you can do with your PowerBook, start with the information in this chapter. Additional information can be found in Mac Help (see page 14) and on Apple’s many Internet Web sites.
17

Basic Features of Your PowerBook
Microphone
Sleep indicator |
Keyboard lock |
-Volume |
Num Lock key |
controls |
|
¤ Brightness |
—Mute control |
|
|
controls |
Keyboard |
|
|
Built-in |
release tab |
|
|
speaker |
|
Keyboard |
®Power button |
|
|
release tab |
|
|
® |
Built-in speaker
Function 


 key
key 


|
|
|
Security slot |
|
|
|
Expansion bay |
Battery bay |
|
|
|
|
|
|
|
release lever |
|
|
|
Trackpad |
Trackpad |
Display |
Expansion bay |
|
button |
release button |
release lever |
18 Chapter 2

¤
-
—
Brightness controls
Increase or decrease the brightness of your PowerBook display using these keys on your PowerBook keyboard.
Volume controls
Increase or decrease the volume of the sound coming from the built-in speakers and sound output port.
Mute control
Turns the sound from the PowerBook built-in speakers and sound output port off and on.
Expansion bay with a DVD-ROM drive module inserted
Dual-function expansion bay that accepts removable modules or a PowerBook battery. Use the DVD-ROM drive to install and run programs, play music CDs, play DVD-Video discs, or reinstall system software. To eject an expansion bay module, pull the expansion bay release lever toward you.
Function (Fn) key
Hold down this key to activate the function keys (F1–F12).
Keyboard release tabs
When you need to install memory, install an AirPort Card, or remove the hard disk, pull these tabs down to release the PowerBook keyboard.
Microphone
Record sounds directly on your PowerBook hard disk with this built-in microphone.
®
Ç
Num Lock key
Activates the numeric keypad embedded in the PowerBook keyboard.
Power button
Turns your PowerBook on and off or puts it to sleep.
Security slot
Protect your PowerBook by connecting a security cable.
Sleep indicator
A pulsating green light indicates when the PowerBook is in sleep.
Trackpad
Moves the pointer on the PowerBook display. With the Trackpad control panel, you can set the trackpad to double-click and select items directly instead of using the trackpad button.
Keyboard lock
Protect the internal components of your PowerBook (such as memory and the hard disk drive) by preventing the keyboard from being easily removed.
Features of Your PowerBook |
19 |
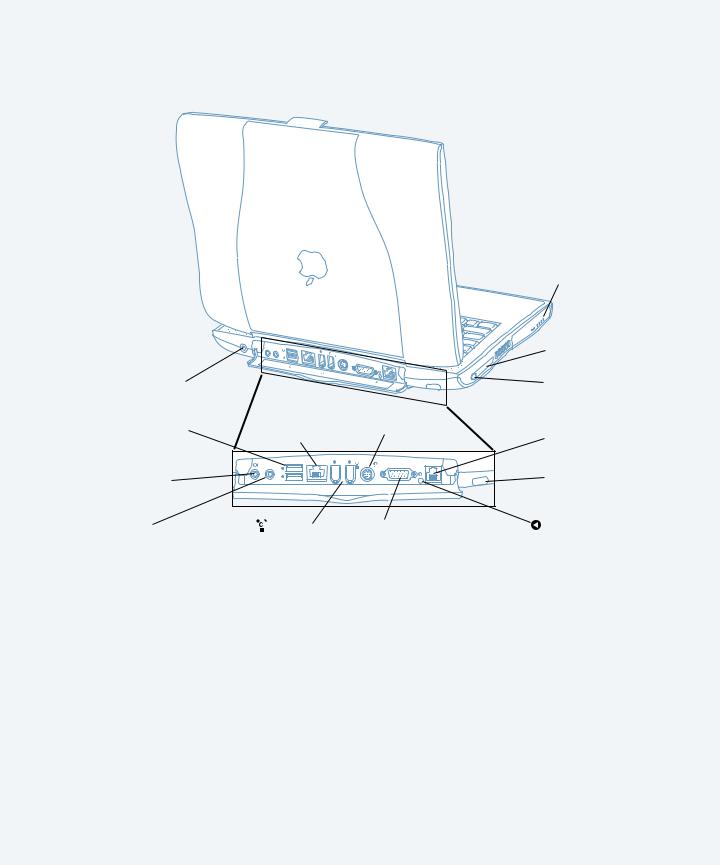
Additional Features of Your PowerBook
¯Power adapter port
 USB ports (2)
√Sound input port
-Sound output port
Battery with LED status lights
¯ |
- |
G |
|
|
PC Card slot |
√ |
|
|
|||
√ |
- |
Æ |
™ |
|
|
|
|
G |
|
W |
|
|
|
|
|
|
|
|
|
Æ |
™ |
|
PC Card |
|
|
|
|
||
|
|
|
|
W |
|
|
|
|
|
|
eject button |
G Ethernet port |
|
Æ TV out port |
W Internal |
|||
(10/100Base-T) |
|
|
|
|
modem port |
|
- |
G |
1 |
2 |
™ |
W |
|
1 |
|
|
|
|||
|
|
|
|
|
|
|
|
2 |
|
|
|
|
Infrared |
|
|
|
|
|
|
|
|
|
|
|
|
|
window |
FireWire |
™ External |
Reset |
ports (2) |
monitor port |
button |
20 Chapter 2
™
Æ
G
W
√
-
External monitor port
Connect to any external monitor or projection device that uses a VGA-style connector or to any older Macintosh monitor using the video adapter included with your PowerBook.
TV out port
Connect your PowerBook to a television, VCR, or other video device. You can use TV out for presentations or to play DVD-Video on your television.
Ethernet port (10/100 Base-T)
Connect to a high-speed 10/100Base-T Ethernet network or connect to another computer and transfer files.
Infrared window
Use infrared (IR) communication to send files to another IR-equipped computer, print on an IR-equipped printer, or connect to an IR network that uses the IrDA standard. You can also use IR to synchronize with certain handheld personal assistants and cellular telephones.
PC Card slot
Expand the capabilities of your PowerBook using this Type II PC Card slot that supports both PCMCIA and CardBus formats.
Internal modem port
Connect a standard phone line directly to the internal modem.
PowerBook reset button
Reset the computer with this button when you cannot shut it down using the Power button.
Sound input port
Connect an external line-level microphone or other sound input device.
Sound output port
Connect external speakers, headphones, or other sound output device.
Two FireWire ports
Connect digital video and other high-speed external devices, such as digital video cameras, printers, and external storage devices.
Two USB (Universal Serial Bus) ports
Connect additional equipment to your PowerBook, such as printers, external storage devices, modems, keyboards, and joysticks. Up to 127 devices can be connected at the same time using USB hubs.
Features of Your PowerBook |
21 |
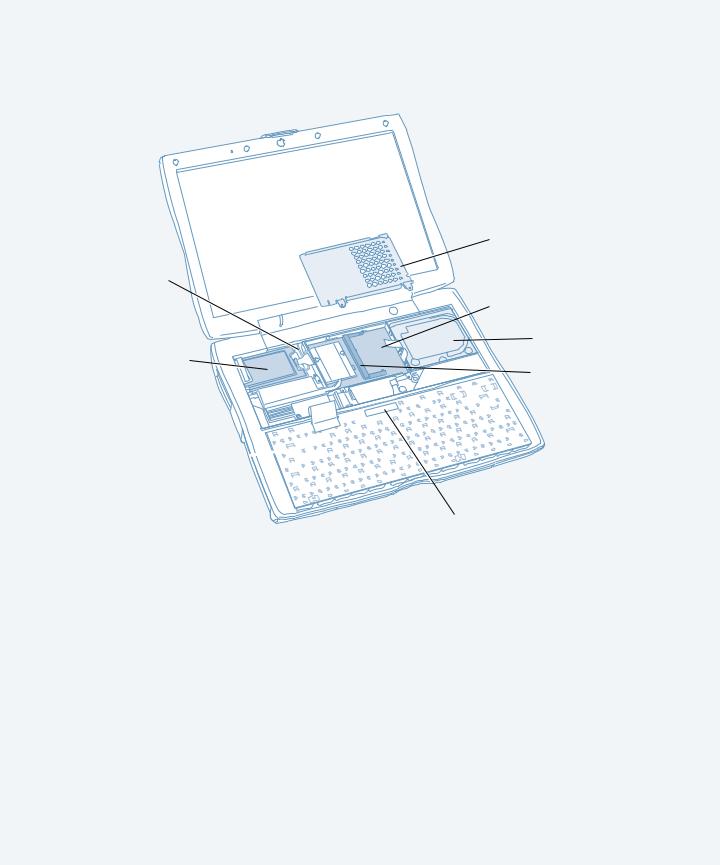
Internal Expansion Capabilities of Your PowerBook
|
Heat shield |
AirPort |
|
antenna |
|
cable |
|
|
Processor module |
Optional |
Hard disk |
|
|
AirPort Card |
|
|
Additional |
|
memory |
|
slot |
Keyboard 
Ethernet ID label
22 Chapter 2

Optional AirPort Card
Installing an AirPort Card in your computer allows access to a wireless network. After removing the heat shield, connect the end of the antenna cable to the AirPort Card and then insert the card into the AirPort Card slot. For instructions, see “Installing an AirPort Card” on page 31.
AirPort antenna cable
The end of the built-in AirPort antenna attaches to the back of the optional AirPort Card.
Additional memory slot
You can install up to a 256 megabyte (MB) memory module in this slot (unless your PowerBook already has additional RAM installed). For instructions, see “Installing Additional Memory” on page 50.
Processor module with main memory slot
You can replace the memory located in the main slot on the bottom of the processor module. To upgrade your PowerBook to the maximum memory (512 MB), remove the memory and replace it with a 256 MB memory module. For instructions, see “Replacing RAM in the Lower RAM Slot” on page 58.
Removable hard disk
You can remove the internal hard disk for service or security. To remove the internal hard disk, you need to remove the processor module and then disconnect the hard disk cable from the main logic board. For instructions, see “Removable Hard Disk” on page 60.
Features of Your PowerBook |
23 |

Keyboard Controls, Hot Function Keys, and Numeric Keypad
You can quickly adjust settings such as volume and screen brightness using the keyboard controls for volume and brightness.
Your PowerBook also has six additional keys that you can set up to open your frequently used applications or documents. These keys are known as hot function keys. For example, you can use hot function keys to open your Web browser, word processor, or favorite game. Once applications are open, you can use the hot function keys to switch quickly between them.
¤ Brightness controls |
- Volume controls |
Hot function keys |
Function (Fn) key
Assigning Hot Function Keys
Assigning an application to a function key is simple. The first time you press one of the function keys, a dialog box appears that lets you assign any of the function keys to an application. After that, you can change function key assignments using the Keyboard control panel.
Using the Standard Function Keys
You can quickly change a key from a control or hot function key to a standard function key by pressing the Fn key while you press the other key. You can also use the Keyboard control panel to reverse the keys so that the standard function keys are primary and the screen controls and hot function keys are secondary. ( You would hold down the Fn key to change the screen brightness, for example.)
24 Chapter 2
 Loading...