


DM8
HIGH-DEFINITION DRUM MODULE WITH DYNAMIC ARTICULATION
OPERATOR'S MANUAL
TABLE OF CONTENTS |
|
INTRODUCTION............................................................................................................................................. |
3 |
GETTING STARTED....................................................................................................................................... |
4 |
RESETTING THE MODULE TO FACTORY DEFAULTS .......................................................................... |
4 |
CHECK FOR UPDATES ........................................................................................................................... |
4 |
CALIBRATE YOUR HI-HAT PEDAL.......................................................................................................... |
4 |
DEACTIVATE WRITE PROTECTION ....................................................................................................... |
4 |
THE BASICS................................................................................................................................................... |
5 |
NAVIGATING MENUS & ADJUSTING SETTINGS ................................................................................... |
5 |
KITS .......................................................................................................................................................... |
5 |
VOICES: LAYERS & INSTRUMENTS....................................................................................................... |
6 |
VOLUME ................................................................................................................................................... |
6 |
SEQUENCES............................................................................................................................................ |
6 |
STORING DATA ....................................................................................................................................... |
7 |
UTILITY..................................................................................................................................................... |
7 |
REAR PANEL FEATURES ............................................................................................................................. |
8 |
TOP PANEL FEATURES................................................................................................................................ |
8 |
KITS, VOICES, ACCOMPANIMENT & INSTRUMENTS............................................................................... |
10 |
SELECTING A KIT .................................................................................................................................. |
10 |
EDITING INSTRUMENTS IN A KIT......................................................................................................... |
10 |
EDITING ACCOMPANIMENT IN A KIT................................................................................................... |
11 |
EDITING VOICE & ACCOMPANIMENT PARAMETERS......................................................................... |
12 |
EDITING MIDI PARAMETERS................................................................................................................ |
14 |
EDITING EFFECTS PARAMETERS ....................................................................................................... |
15 |
DRUM KIT SETUP .................................................................................................................................. |
18 |
SEQUENCES................................................................................................................................................ |
19 |
PLAYING SEQUENCES ......................................................................................................................... |
19 |
RECORDING SEQUENCES ................................................................................................................... |
20 |
EDITING SEQUENCES (DRUMS) .......................................................................................................... |
20 |
EDITING SEQUENCES (ACCOMPANIMENT)........................................................................................ |
21 |
SETTING UP THE CLICK TRACK .......................................................................................................... |
22 |
EDITING QUANTIZATION SETTINGS.................................................................................................... |
23 |
STORING & COPYING DATA ...................................................................................................................... |
24 |
NAMING.................................................................................................................................................. |
24 |
STORING & COPYING KITS .................................................................................................................. |
24 |
COPYING INSTRUMENTS ..................................................................................................................... |
25 |
STORING SEQUENCES......................................................................................................................... |
25 |
STORING TRIGGER SETTINGS ............................................................................................................ |
25 |
EXT. TRIG MENU ......................................................................................................................................... |
26 |
TRIGGER INPUT PARAMETERS........................................................................................................... |
26 |
TRIGGERING PARAMETERS ................................................................................................................ |
27 |
VELOCITY CURVE ................................................................................................................................. |
28 |
MODE (RIDE BOW & BELL) ................................................................................................................... |
28 |
HI-HAT CALIBRATION............................................................................................................................ |
29 |
STORING EXT. TRIG SETTINGS........................................................................................................... |
29 |
EXPLORING OPTIMAL SENSITIVITY AND THRESHOLD SETTINGS .................................................. |
29 |
UTILITY MENU ............................................................................................................................................. |
30 |
GENERAL ............................................................................................................................................... |
30 |
METRONOME (F1) ................................................................................................................................. |
30 |
MIDI (F2) ................................................................................................................................................. |
32 |
TRIG (F3) ................................................................................................................................................ |
33 |
SYS (F4) ................................................................................................................................................. |
33 |
UPDATING THE MODULE ........................................................................................................................... |
34 |
MIDI SETUP.................................................................................................................................................. |
35 |
RESTORING BACKUP SYSEX FILES ......................................................................................................... |
36 |
MIDI IMPLEMENTATION CHART ................................................................................................................ |
37 |
DM8 KITS ..................................................................................................................................................... |
38 |
DM8 SEQUENCES ....................................................................................................................................... |
39 |
DM8 INSTRUMENTS .................................................................................................................................... |
40 |

INTRODUCTION
Welcome to the Alesis DM8 drum module! The DM8 includes lots of high-fidelity drum, percussion, and accompaniment sounds giving you the sonic realism of acoustic drums but with the convenience and flexibility of electronic drums.
This manual details all the DM8 module's features. If you want to learn fast so you can dive right into playing, refer to the included Quickstart Guide. Or, for a brief overview of the module's features, see the BASICS chapter. Of course, we also recommend reading through this manual so you can take full advantage of all the amazing functions of the DM8.
Happy drumming!
The Alesis Team
CONNECTION DIAGRAM
DRUM KIT |
MIDI KEYBOARD |
HEADPHONES iPod* |
POWER
WARNING: Use only the |
|
included Alesis power supply |
|
with the DM8 module. |
COMPUTER |
|
HOUSE AMP
Headphones, iPod*, keyboard, amp, and computer not included.
*iTunes and iPod are trademarks of Apple, Inc., registered in the U.S.A. and other countries.
•Connect the 1/4" cables of your kit's cable snake to the drum pads and cymbal pads of your kit. Each cable is labeled with its proper trigger.
•If you have additional drum pads, cymbal pads, or other triggers, you can use standard 1/4" cables to connect them to the "RIDE 2/PERC1" or "PERC2" TRIGGER INPUTS on the module's rear panel. Dual-zone pads or cymbals (e.g., a drum with head and rim triggers or a cymbal that can produce bow and bell sounds) will require TRS cables to trigger both zones.
•Plug 1/4” TRS cables from the MAIN OUT to an amplifier, mixer, or speaker system. (For mono sound, connect a cable to the Left output.)
•You can connect a set of 1/4” TRS headphones to the PHONES output.
•You can connect another audio device to the AUX IN using a standard 1/8" stereo cable.
Refer to your electronic drum kit's assembly manual for more information on connecting it to the DM8 module.
IMPORTANT:
•Always turn down your volume level(s) to zero before plugging or unplugging your cables from your triggers or the module.
•The DM8 module may be affected by static electricity. If this occurs, simply turn the module off and wait at least a few seconds before turning it on again.
3
GETTING STARTED
Please read the following instructions to set up your DM8 module for its first use!
RESETTING THE MODULE TO FACTORY DEFAULTS
If you ever need to return the module to its original default factory settings, press and hold the EXIT and STORE buttons simultaneously while turning it on.
CHECK FOR UPDATES
Since the initial release of this module, we may have released new firmware or sound ROM files. To ensure your DM8 module has the latest sounds and software features, we recommend checking the "Docs & Downloads" tab of www.alesis.com/dm8 for available updates. See the UPDATING THE MODULE chapter for more information.
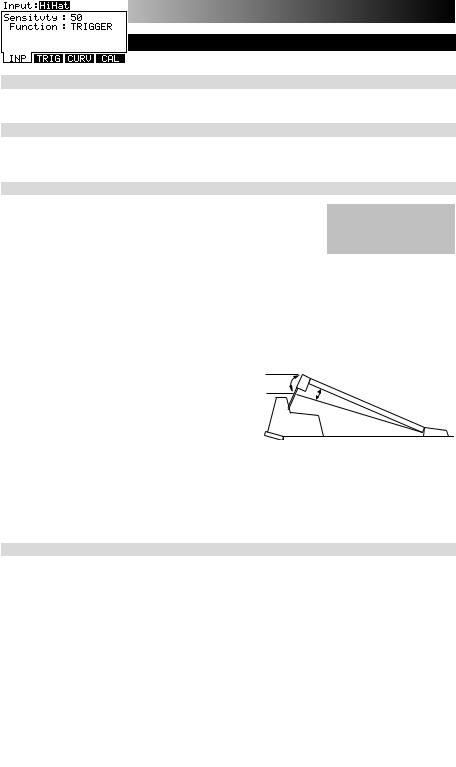
CALIBRATE YOUR HI-HAT PEDAL
The first time you connect a hi-hat pedal to the DM8 module, we recommend calibrating it so the module can "read" the pedal's movement optimally. If you use the same hi-hat each session (even if you have disconnected and reconnected it), then you shouldn't need to calibrate each time as long as you store your trigger settings after calibrating (see STORING TRIGGER SETTINGS in the STORING & COPYING chapter for more information). However, anytime
you connect a different hi-hat from the previously connected one, you should calibrate it.
To calibrate the hi-hat pedal:
1.Connect the hi-hat pedal to the module but do not press it down.
2.On the module, press EXT TRIG.
3.Use the CURSOR UP / DOWN buttons to highlight the "Input" field at the top of the screen then use the VALUE UP / DOWN buttons or VALUE DIAL to select "HiHat."
4.Press CAL (F1).
5.With the hi-hat pedal completely raised ("open"), press OPEN (F1) and wait for a message saying the process is complete.
6.With the hi-hat pedal completely pressed ("closed"), press CLOS (F2) and wait for a message saying the process is complete.
Open
Pedal (side view)
Closed
7. If you want to fine-tune how the module detects your pedal's "open" and "closed" positions, press TRIM
(F3). Use the CURSOR UP / DOWN buttons to select "Open" or "Closed" and use the VALUE UP / DOWN buttons or VALUE DIAL to adjust the setting. (Tip: Increasing the "Closed" value makes it easier to close the hi-hat or "choke" it.)
8.If you want to adjust the response curve of the pedal, press CURV (F4). Use the VALUE UP / DOWN buttons or VALUE DIAL to select the curve that best suits your playing style. (Tip: We recommend using LINEAR, LOG1 or LOG2 for conventional hi-hat performance.)
9.When you have adjusted the hi-hat settings to your preference, press EXIT to exit the calibration page (or press DRUM KIT to return to the main screen).
DEACTIVATE WRITE PROTECTION
Out of the box, the DM8 module is write-protected, so you will be unable to save any changes you make to the Kits, Instruments, Sequences, etc.
To turn write protection off:
1. Press UTILITY.
2.Press SYS (F4).
3.Press O/S (F3).
4.Press MEM (F4).
5.Press VALUE DOWN or move the VALUE DIAL counterclockwise until the "WriteProt" field says "OFF."
6.Press DRUM KIT to return to the main page.
4

THE BASICS
This section of the manual outlines the basic features and concepts of the DM8. Each section below refers to another part of this manual that will explain the features in greater depth.
NAVIGATING MENUS & ADJUSTING SETTINGS
We designed the DM8's user interface to be as simple and as easy to use as possible.
•DRUM KIT – Press this button to select the Main Screen, where you can select the current Kit. (From this page, you can press CURSOR DOWN to enter the Drum Kit Setup Menu, where you can adjust the overall Kit volume level, MIDI Program Change settings, or restore the current Kit's factory settings.)
•SEQ – Press this button to enter the sequencer, where you can select a Sequence to play and adjust overall settings for the module's sequencer.
•EDIT INST or EDIT ACCOMP – Press one of these buttons to reassign the sound for a trigger or to edit the sound of the Accompaniment track. You can also adjust other settings such as effects, velocity-related parameters, MIDI settings, and more.
•EXT TRIG – Press this button to adjust sensitivity, crosstalk, thresholds, velocity curves, and other settings for the triggers.
•UTILITY – Press this button to enter the Utility Menu, where you can adjust metronome and MIDI settings, update or reset the module, and more.
You can navigate the menus and adjust settings and parameters shown on the module's LCD with the following controls:
•F-BUTTONS – Pressing the F1, F2, F3, and F4 buttons will select whatever "tab" is displayed above it on the LCD.
•CURSOR UP / DOWN – Press either of these buttons to move up or down through the menu on the screen. (Pressing the CURSOR DOWN button while on the Main Screen will call up the Kit Setup screen where you can adjust the volume and MIDI settings of the current Kit.)
•VALUE DIAL – Turn the wheel clockwise or counterclockwise to adjust the selected menu item (usually highlighted). This allows for quick adjustment of settings and parameters – the faster you turn the wheel, the faster it will scroll through the options.
•VALUE UP / DOWN – Press the VALUE UP or VALUE DOWN buttons to adjust the selected menu item (usually highlighted) one increment at a time. These buttons are better for more precise adjustment of settings than the VALUE DIAL.
•EXIT – Press this to return to the previous menu.
See the TOP PANEL FEATURES chapter for more information about these and other controls.
KITS
The DM8 module includes 100 Preset Kits and 100 empty User Kits. A Kit is a set of sounds that you can select in the module that will be triggered by your drums when you play them. The Preset Kits come preprogrammed so you can start playing with premium sounds right away. The empty User Kits are for you to create your own by assigning individual sounds to each trigger in the Kit. Furthermore, you can save over the Preset Kits in user memory, allowing for even more creative space. (The defaults can be easily restored by reinitializing the module).
To select a Kit, simply press DRUM KIT to enter the Main Screen, then use the VALUE UP / DOWN buttons or VALUE DIAL to select a new Kit number.
For more information on selecting and editing Kits, see the KITS, VOICES, ACCOMPANIMENT & INSTRUMENTS chapter.
Important: At any given time, the DM8 module has a Kit selected and a Sequence selected. If you change the Sequence, this will change your current Kit to the one that is associated with that Sequence. If you change the Kit, this will NOT change the current Sequence. However, if you then play the current Sequence, the chords or "hit groups" may sound unusual. In this case, we recommend muting Layer B of that Kit's Accompaniment (see EDITING VOICE & ACCOMPANIMENT PARAMETERS for more information) or muting the Accompaniment altogether by pressing MUTE ACCOMP.
5
VOICES: LAYERS & INSTRUMENTS
Whenever you strike a trigger on your electronic drum set (e.g., a cymbal, a drum pad, etc.), it will trigger a Voice in the module. A Voice is the sound assigned to that trigger. Each Voice consists of two Layers, and each Layer has its own Instrument (a drum sound such as a tom, snare, hi-hat, etc.) which can be selected or edited.
We created the dual-layer feature in the DM8 so you can play with
more powerful composite and layered sounds and timbres using your electronic drum kit. You can make subtle or dramatic changes to the sound of your Kits by changing the Instruments in each Layer. Furthermore, you can adjust certain parameters of the drum Voices (e.g., tuning, velocity, reverb, panning, etc.) in the module.
For more information on selecting and editing Voices, see the KITS, VOICES, ACCOMPANIMENT & INSTRUMENTS chapter.
VOLUME
You may have noticed that there are several ways to adjust the volume of your performance when using the DM8. You can:
•Adjust the levels of the Voices in the Kit: Press DRUM KIT to enter the main screen then EDIT INST. Select the Voice to edit (top of the LCD) with the VALUE UP / DOWN buttons or VALUE DIAL (or by striking the trigger with NOTE CHASE on). Press LVL (F2) to enter the Level page. (Remember that each Voice has two Layers, A and B, which you can toggle between by pressing the EDIT INST button.)
•Adjust the level of the entire Kit: Press DRUM KIT to enter the main screen then CURSOR DOWN to enter the Drum Kit Setup Menu, where you can set the overall Kit level.
Please note the module's trigger sensitivity, threshold, velocity curve settings can also affect the dynamics of your performance. See the EXT. TRIG MENU chapter for more information on adjusting these other settings.
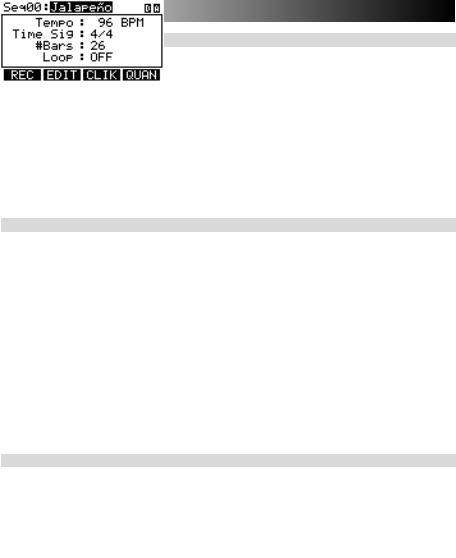
SEQUENCES
The DM8's built-in sequencer lets you record, overdub, edit, play back, and loop Sequences (drum patterns). You can adjust settings like the tempo, time signature, and quantization for a Sequence.
To access the sequencer, press the module's SEQ button and navigate the menus or adjust the settings accordingly.
For more information on using the sequencer, see the SEQUENCES chapter.
Important: At any given time, the DM8 module has a Kit selected and a Sequence selected.
If you change the Sequence, this will change your current Kit to the one that is associated with that Sequence.
If you change the Kit, this will NOT change the current Sequence. However, if you then play the current Sequence, the chords or "hit groups" may sound unusual. In this case, we recommend muting Layer B of that Kit's Accompaniment (see EDITING VOICE & ACCOMPANIMENT PARAMETERS for more information) or muting the Accompaniment altogether by pressing MUTE ACCOMP.
6
STORING DATA
The DM8 module can store the information you enter for use in future sessions. This includes Kits you edit or record, Sequences you edit or record, Instrument or Kit parameters, and more. Furthermore, while there are several slots for User Kits and Sequences, you can also save over the Presets (the first 100 Kits or the first 75 Sequences).
To store a Kit, Instrument, or Sequence, press the DRUM KIT or SEQ button (respectively) to select the item you want to store, then press the STORE button. (If you are storing a Kit or Instrument, you will be asked to specify which.)
Use the CURSOR UP / DOWN buttons and VALUE UP / DOWN buttons or VALUE DIAL to select the "From" Kit or Sequence (the one you want to save) and the "To" Kit or Sequence (where you want to save it to).
For more information on using storing data, see the STORING & COPYING DATA chapter.
UTILITY
The Utility Menu lets you control global settings such as the output routing as well as metronome, MIDI, and tempo settings. You can also transmit SysEx data in this menu as well as re-initialize the DM8 (i.e., return it to its factory settings).
To access the Utility Menu, press the module's UTILITY button and navigate the menus or adjust the settings accordingly.
For more information, see the UTILITY MENU chapter.
7
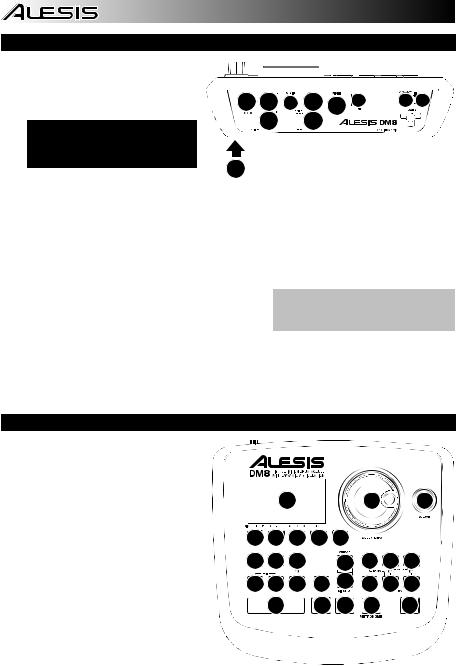
REAR PANEL FEATURES
1.POWER SWITCH – Turns the module on and off.
2.POWER IN – Connect the included AC
adapter to this input, then connect the adapter to a power source.
WARNING: Use only the included Alesis power supply with the DM8 module.
9 |
3 |
4 |
8 |
6 |
5 |
2 |
1 |
 3
3
 8
8
7
3. MAIN OUT – Use 1/4" TRS cables to
connect these outputs to an amplifier or speaker system. The volume of these outputs is controlled by the VOLUME knob on the top panel.
4. AUX IN – Connect an external sound source, such as a CD player, to this input using a stereo 1/8" cable.
5. USB – Use a standard USB cable to connect the module to your computer via this USB port. This connection allows the module to send MIDI messages via USB to an external drum software module. You can also transmit SysEx files over this connection.
6. MIDI IN – Use a standard five-pin MIDI cable to connect this input to the MIDI OUT of an external MIDI device.
7.CABLE SNAKE CONNECTION – Connect the included cable snake to this connector, then connect the cables to their respective triggers.
Note: The module's HI-HAT CONTROL TRIGGER INPUT does not support keyboard-style expression pedals.
8.TRIGGER INPUTS – If you have additional drum pads,
cymbal pads, or other triggers, you can use standard 1/4" cables to connect them to the "RIDE 2/PERC1" or "PERC2" TRIGGER INPUTS. Dual-zone pads or cymbals (e.g., a drum with head and rim triggers or a cymbal that can produce bow and bell sounds) will require TRS cables to trigger both zones.
9.HEADPHONES OUTPUT – Connect your 1/4" headphones to this output. You can adjust the volume of this output with the VOLUME knob on the module's top panel.
TOP PANEL FEATURES
1.VOLUME – Adjusts the volume level of the MAIN OUT and HEADPHONES OUTPUT.
2.METRONOME ON / OFF – Turns the metronome on or off.
3.LCD – Displays system menus, parameters, and other settings as you use the DM8.
4.F-BUTTONS (1-4) – These buttons allow you to navigate the menus shown in the LCD. Press an F-BUTTON to select the "virtual" button or tab shown above it in the LCD.
5.CURSOR UP / DOWN – Use these buttons to move (vertically) through the available parameters shown in menus in the LCD.
Note: Pressing CURSOR DOWN from the Main Screen allows you to adjust overall parameters for the current Kit.
|
|
3 |
|
|
|
6 |
1 |
4 |
4 |
4 |
4 |
8 |
|
|
|
10 11 12 |
|
5 |
17 18 19 |
||||
|
|
|
5 |
|
|||
13 14 15 |
16 |
20 21 22 |
|||||
|
9 |
|
|
7 |
7 |
2 |
23 |
6.VALUE DIAL – Turn this wheel to increase and decrease values and settings shown in the LCD.
7.VALUE UP / DOWN – Use these buttons to increase and decrease values and settings shown in the LCD. These may be easier to use than the VALUE DIAL when making incremental adjustments to your parameters.
8.EXIT – Press this button to return to the previous menu shown in the LCD.
8

9.DRUM KIT – Returns the LCD to the Main Screen. From here, you can select the current Kit with the VALUE DIAL or VALUE UP / DOWN buttons.
10.UTILITY – Enters the Utility Menu, which allows you to set certain "global" parameters that affect the DM8's overall operation (e.g., tempo, MIDI, output routing, trigger sensitivity, etc.). (See the Reference Manual for more information.)
11.EXT TRIG – Allows you to adjust parameters related to triggering. Customizing these parameters changes the feel and responsiveness of the Kit.
Note: Changes to these parameters will affect ALL Kits.
12.NOTE CHASE – Turns Note Chase on or off. When Note Chase is on, striking a trigger automatically selects it for editing. Alternatively, you can select a trigger by highlighting the trigger field in the LCD with the CURSOR UP / DOWN buttons then using the VALUE UP / DOWN buttons or VALUE DIAL.
13.EDIT INST – Press this button to edit the Instrument assigned to a trigger input. While editing, pressing it toggles between the two Layers of the trigger. The current Layer (A or B) will be highlighted on the top-right corner of the LCD.
14.EDIT ACCOMP – Press this button to adjust the settings for your Accompaniment. The adjustable parameters will be shown in the LCD.
15.PREVIEW – Press this button to preview the sound of the current trigger. This can be useful when programming the DM8 if it is not connected to your drum kit, if it is not convenient to strike the pads, etc.
16.STORE – Press this button to save changes made to the current Kit, Sequence, trigger settings, or global settings. Use the VALUE DIAL or VALUE UP / DOWN buttons to select a destination where the current Kit or Sequence will be stored. When saving a Kit, its Instruments and all its parameters will also be stored. When saving a Sequence, it will remember its corresponding Kit and Accompaniment.
17.SEQ – Press this button to access the module's Sequencer where you can create and edit drum and accompaniment patterns.
18.MUTE DRUMS – Press this button to mute the drum track of a Sequence.
19.MUTE ACCOMP – Press this button to mute the Accompaniment track of a Sequence.
20.STOP – Stops playback of the current Sequence. Hold down STOP and turn the VALUE DIAL to "scrub" forwards and backwards through the Sequence. Hold down STOP and press VALUE UP / DOWN to "step" forwards or backwards through each "event" in the Sequence. While navigating the Sequence in these ways, you will hear the Sequence play as you move through it.
21.PLAY / – Plays the current Sequence. You can also hold down STOP and press this button to move back to the previous bar in the Sequence.
22.RECORD / – Records a new Sequence. You can also hold down STOP and press this button to move to the next bar in the Sequence.
23.TAP TEMPO – Tap this button at the desired rate to enter a new tempo for the Sequence. You can also change the tempo by holding down the TAP TEMPO button and using the VALUE DIAL or VALUE UP / DOWN buttons.
9
KITS, VOICES, ACCOMPANIMENT & INSTRUMENTS
The DM8 Module has 100 Preset Kits and 100 User Kits, which you can select from the Main Screen. Each Kit is a collection of Voices – or drum sounds – that are assigned to each trigger on the DM8. When a trigger is struck, that Voice will sound.
Each Voice consists of two Layers, each with its own Instrument. Both Layers sound together, helping to create powerful composite and layered sounds and timbres for a more dynamic performance.
You can change the sound of your performance by selecting different Kits or by editing the Kits by changing the Instruments that make up each Voice. You can also edit various parameters of each Instrument themselves (e.g., level, panning, decay, reverb, etc.) in each Kit.
IMPORTANT: At any given time, the DM8 module has a Kit selected and a Sequence selected. If you change the Sequence, this will change your current Kit to the one that is associated with that Sequence. If you change the Kit, this will NOT change the current Sequence. However, if you then play the current Sequence, the chords or "hit groups" may sound unusual. In this case, we recommend muting Layer B of that Kit's Accompaniment (see EDITING VOICE & ACCOMPANIMENT PARAMETERS for more information) or muting the Accompaniment altogether by pressing MUTE ACCOMP.
SELECTING A KIT
1.Press the DRUM KIT button to bring up the Main Screen.
2.Use the VALUE UP / DOWN buttons or the VALUE DIAL to select a Kit. The Kit number, name, and graphic will change as you move through the different Kits.
3.Hit the triggers to try out the sounds of the Kit.
To set levels that can be recalled with the Kit, set the "Level" parameters for the individual triggers (see EDITING VOICE &
ACCOMPANIMENT PARAMETERS in this chapter) and/or the entire Kit (see DRUM KIT SETUP in this chapter).
EDITING INSTRUMENTS IN A KIT
1.Press DRUM KIT to go to the Main Screen.
2.Press EDIT INST. The top of the screen will show the number and name of the Kit whose Instruments (drum voices) you will be editing.
3.Select INST (F1). The new screen will show:
a.the trigger Voice you are editing (the Kit number and name of the Voice will be shown)
b.the Layer (each Voice consists of two layers, each with its own Instrument)
c.the Category (the type or "class" of drum sound currently assigned to that Layer)
d.the Instrument (the drum sound for that Layer)
4.Select the Voice whose Instrument you want to change by pressing NOTE CHASE then striking the desired trigger. Alternatively, you can highlight the Voice (next to the Kit number) using the CURSOR UP / DOWN buttons to highlight it and use the VALUE UP / DOWN buttons or VALUE DIAL to change it.
5.Select which Layer of that Voice you will edit by pressing EDIT INST. It will toggle between Layer A and B.
6.Select the Category you want to assign to that Voice by pressing CURSOR UP / DOWN to highlight the Category field, then use the VALUE UP / DOWN buttons or VALUE DIAL to change it.
7.Select the Instrument for that Layer by pressing CURSOR UP / DOWN to highlight the Instrument field, then use the VALUE UP / DOWN buttons or VALUE DIAL to change it. To hear the currently selected sound, strike the corresponding trigger or press PREVIEW on the module.
|
|
|
|
|
|
a |
|
b |
|
c
d
Note: The available Instruments for the hi-hat and ride cymbal Categories are pre-defined sets of sounds designed to work together (e.g., the hi-hat can produce open, closed, "chick" or splash sounds). You can assign any Category or Instrument you like for the hi-hat and ride cymbal triggers, but because other Instruments are designed to work differently, the results will vary.
10
EDITING ACCOMPANIMENT IN A KIT
1. When you are in the Kit whose Accompaniment you want |
a |
|
b |
|
|
to edit, press EDIT ACCOMP. The screen will show: |
|
|
|
|
|
a. the number of the Kit whose Accompaniment you |
|
|
|
|
|
will be editing |
|
|
|
|
c |
b.the Layer (the Accompaniment consists of two
layers, each with its own Instrument) |
d |
|
c.the Category (the type or "class" of sound currently assigned to that Layer)
d.the Instrument (the sound for that Layer)
2.Select which Layer of the Accompaniment you will edit by pressing EDIT ACCOMP. It will toggle between Layer A and B.
3.Select the Category you want to assign to that Voice by pressing CURSOR UP / DOWN to highlight the Category field, then use the VALUE UP / DOWN buttons or VALUE DIAL to change it.
4.Select the Instrument for that Layer by pressing CURSOR UP / DOWN to highlight the Instrument field, then use the VALUE UP / DOWN buttons or VALUE DIAL to change it. To hear the currently selected sound, strike the corresponding trigger or press PREVIEW on the module.
Useful information about Accompaniment:
The Accompaniment track includes the bass line and other synthesizer sounds that you hear when the module is playing a Sequence. The drum track and Accompaniment track play simultaneously, and you can mute either of the tracks as they play with the MUTE DRUMS or MUTE ACCOMP buttons.
Just as each drum Instrument of a Kit belongs to a Category (e.g., KICKS, SNARES, LATIN PERC, etc.) Accompaniment Instruments are also grouped into several Categories: BASS, SYN BASS, FX, and HIT GROUPS.
Also, just like drum Voices, the Accompaniment has two Layers of Instruments. Layer A is usually the bass line. Layer B is often something different – another melodic line, chords, or "hits."
Instrument changes within or between the BASS and SYN BASS Categories may sometimes be desirable – the bass will have a different tone or quailty while the bass line itself (the notes you hear) remains the same. However, if you edit the Instruments in the FX or HIT GROUPS Categories, it may dramatically change the way a Sequence sounds if it uses that Kit.
In this case, we recommend muting that Layer of that Kit's Accompaniment (see EDITING VOICE & ACCOMPANIMENT PARAMETERS for more information) or muting the Accompaniment altogether by pressing MUTE ACCOMP.
11

EDITING VOICE & ACCOMPANIMENT PARAMETERS
While editing your Kits by changing the Instruments in a drum Voice or the Accompaniment, you can also edit various parameters that affect each Layer and, therefore, the Instrument on that Layer. You can do this for the drum
Voices or the Accompaniment, though some parameters below may only be editable for one of these.
1.Press DRUM KIT to go to the Main Screen.
2.Press EDIT INST to edit drum Voice parameters or EDIT ACCOMP to edit Accompaniment parameters. The top of the screen will show the number and name of the Kit whose Instruments (drum Voices or Accompaniment) you will be editing.
3.Select INST (F1). The new screen will show:
a.the trigger Voice you are editing (the Kit number and
|
name of the Voice will be shown). If you are editing |
a |
|
b |
|
|
|
|
|
|
the Accompaniment, this will read "Accomp." |
|
|
|
|
|
|
|
|
b. |
the Layer (each trigger sound or Accompaniment |
|
|
|
|
track consists of two Layers, each with its own |
|
|
|
|
Instrument) |
|
|
|
c. |
the Category (the type or "class" of drum sound or |
|
|
|
|
Accompaniment currently assigned to that Layer) |
|
|
|
c
d
d.the Instrument (the drum or Accompaniment sound for that Layer)
4.If you are editing a Voice, select the Voice whose Instrument you want to change by pressing NOTE CHASE then striking the desired trigger. Alternatively, you can highlight the Voice (next to the Kit number) using the CURSOR UP / DOWN buttons to highlight it and use the VALUE UP / DOWN buttons or VALUE DIAL to change it. (This step is not necessary when editing Accompaniment.)
Note: You can also change the current Voice in this fashion in any of the subsequent menus. You can also toggle between Layers by pressing EDIT INST whenever the "Layer: A B" selector is shown on the upper right corner of the LCD.
5.Select any of the options at the bottom of the LCD using the F-BUTTONS. Use CURSOR UP / DOWN to move through the menu items and VALUE UP / DOWN or the VALUE DIAL to adjust the settings.
• LVL (F2, 1st page):
Level: The volume level for the selected Layer (0199 or "OFF").
Pan: The panning for the selected Layer ("L50" to "MID" to "R50").
Attack: The volume level of the initial attack of the note (00-99). This parameter is only available when editing Accompaniment.
Decay: How long the sound can be heard before decaying to silence (00-99 or "OFF").
Note: Setting this parameter to "OFF" disables the Decay parameter and the sound will be heard for its entire duration with no "shaping."
•FX (F3, 1st page):
Reverb: The amount of reverb on the Voice (0099).
Effects: The Voice volume level sent to the DM8's effects processor (00-99).
EQ/Comp: This sends the Voice to the DM8's equalizer and compressor ("ON" or "OFF").
•TONE (F1, 2nd page):
Semitone: Tunes the Instrument ±12 semitones.
Fine Tune: Tunes the Instrument ±50 cents.
Filter: The cutoff frequency for the type of filter (see below) (00-99).
Type: The type of filter ("LOPASS" or "HIPASS").
12
•DYN (F2, 2nd page):
Vel>Decay: The velocity of a note will control the decay time of its sound (±00-99). With a positive value, higher-velocity notes will have a longer decay time. With a negative value, higher-velocity notes will have a shorter decay time.
Vel>Filtr: The velocity of a note will control the filter cutoff (±00-99).
Vel>Level: This lets you set how velocity-sensitive the Instrument is (00-99). The higher the setting, the greater the dynamic range you'll have while playing. At "00," there will be no dynamic variation at all.
Vel>Pitch: The velocity with which you strike the trigger will control the sound's pitch (±00-99). With a positive value, stronger hits will increase the pitch. With a negative value, stronger hits will decrease the pitch. (This parameter is not available for anything in the BASS or SYN BASS Categories when editing the Accompaniment.)
•OTHR (F3, 2nd page):
Output: The output through which the Voice or Accompaniment will be sent. When "MAIN" is selected, the Voice or Accompaniment will be sent out of the MAIN OUT. When "AUX" is selected, the Voice or Accompaniment will be sent out of the AUX OUT.
Note: If your Utility Menu setting for the "Output" is set to "Main>Aux," the "AUX" option here will
show up as "AUX (N/A)." This is because the AUX OUT signal is "mirroring" the MAIN OUT signal. See the GENERAL menu part of the UTILITY MENU section for more information.
Priority: How high the Voice's or Accompaniment's "polyphony priority" is – "LOW," "MEDIUM," or "HIGH." "Polyphony" is the simultaneous sounding of Instruments (e.g., if you strike multiple triggers at the same time, like the hi-hat, snare, and kick drum). The DM8 has 64-voice polyphony, meaning up to 64 voices can sound at the same time. After exceeding that limit, Voices or Accompaniment with lower polyphony priority may be silenced so the ones with higher priority can sound.
MuteGroup: The MuteGroup the Voice is assigned to, if any (01-09 or "OFF"). When two or more triggers are assigned to a MuteGroup, a Voice that is currently sounding will be silenced when another Voice from that MuteGroup begins. There are nine available MuteGroups.
Example: If your "Kick1" (kick drum) and "SnrHd" (snare drum head) are assigned to the same MuteGroup, the decay of your snare drum will be cut off when you hit the kick drum and vice versa.
Note: The MuteGroup function is especially useful for setting up multiple sounds shared by the same instruments, like "open" vs. "closed" triangle sounds or struck vs. stroked güiros.
Note: The default Playback setting is POLY, which is more natural for acoustic drums. MONO is a useful setting for synth drums or for emulating older drum machines.
Playback: Indicates whether repeated strikes of the same trigger will be considered polyphonic (POLY) or monophonic (MONO). When set to "POLY" (the default), successive strikes of the same trigger will be allowed to sound simultaneously as polyphony (see "Priority" above). When set to "MONO," successive strikes of the same trigger will silence previous ones.
13
EDITING MIDI PARAMETERS
This page allows you to edit various MIDI-related settings for each trigger. To edit them,
1.Press DRUM KIT to go to the Main Screen.
2.Press EDIT INST. The top of the screen will show the number and name of the Kit whose Instruments (drum voices) you will be editing.
3.Select MIDI (F2). The top of the new screen will show the trigger Voice you are editing. You can select another trigger by pressing NOTE CHASE then striking the desired trigger. Alternatively, you can highlight the Voice (next to the Kit number) using the CURSOR UP / DOWN buttons to highlight it and use the VALUE UP / DOWN buttons or VALUE DIAL to change it.
Note: You can also change the current Voice in this fashion in any of the subsequent menus.
4.When you have selected the Voice you want to edit, select either of the options at the bottom of the LCD using the F-BUTTONS. Use CURSOR UP / DOWN to move through the menu items and VALUE UP / DOWN or the VALUE DIAL to adjust the settings:
a.MIDI
MIDI Chan: The MIDI channel over which the trigger will transmit MIDI messages.
MIDI Note: The MIDI note that will be transmitted. The number is the MIDI Note number; the corresponding musical note is shown next to it. (Note: The MIDI note for the hi-hat and ride cymbals is fixed and can not be reassigned.)
Gate Time: The duration of the note sent from the trigger when struck. The available range is from 00-99 ms, then note values (1/32, 1/16, 1/8, 1/4, and 1/2 – with regular and triplet divisions for each value), or "OFF."
Note Off: How the MIDI Note Off message is sent. When "NOT SENT" is selected, a MIDI Note Off will not be transmitted. When "SENT" is selected, a MIDI Note Off will be sent after the length of time specified by the Gate Time (above). When "ALTERNATE" is selected, striking a trigger once will cause it to send its MIDI Note; striking it a second time will cause it to send a MIDI Note Off.
b.CHORD / ARP: Select "OFF," "CHORD," or "ARPEGGIO." (Note: The CHORD / ARP function is not available for the hi-hat and ride cymbals.)
OFF: The trigger will transmit only the MIDI note assigned to it.
CHORD: The trigger will transmit up to four MIDI notes simultaneously whenever it is struck. You can select the additional three notes here. The number is the MIDI Note number; the corresponding musical note is shown next to it in parentheses.
ARPEGGIO: The trigger will transmit up to four MIDI notes but will "rotate" through them with each strike (e.g., the first time the trigger is struck, it will send its first MIDI note; the next time, it will send Note #2; the next time, it will send Note #3). You can select the three additional notes here. The number is the MIDI Note number; the corresponding musical note is shown next to it in parentheses.
14
EDITING EFFECTS PARAMETERS
On this page, you can apply a variety of effects such as reverb, chorus, or delay to the entire Kit:
1.Press DRUM KIT to go to the Main Screen.
2.Press EDIT INST. The top of the screen will show the number and name of the Kit whose effects you will be editing.
3.Select FX (F4).
4.Select any of the options at the bottom of the LCD using the F-BUTTONS. Use CURSOR UP / DOWN to move through the menu items and VALUE UP / DOWN
or the VALUE DIAL to adjust the settings:
a.RVB (reverb)
Type: The kind of reverb applied (most often, types of reverb are named after the kind of room whose reverb is being emulated). To disable effects on the Kit, select "OFF."
Size: The size of the virtual "room" as designated by the reverb Type.
Color: The amount of high-frequency dampening of the reverb, which affects its tone.
Level: The level of the reverb.
b.FX (other effects)
Type: The kind of effect applied. To disable effects on the Kit, select "OFF." The effects – and their editable parameters – are as follows:
FLANGER: Flanging is a kind of phasing or phase-shifting. The DM8's flangers have the same editable parameters.
Mono Flanger: Traditional flanging effect.
Stereo Flanger: Flanger with a simulated stereo effect, creating a "wider" sound.
XOver Flanger: The flanging effect "moves" around the stereo field.
Rate: The speed at which the sound will "flange."
Depth: How much of the delayed (or phase-shifted) signal is added to the original.
Feedback: How much of the flanging signal will be routed back into the flanger again, which intensifies the effect.
Level: The volume level of the flanging signal.
CHORUS: A chorus effect is produced by adding a slightly delayed and slightly pitchshifted "wet" signal to the original ("dry") signal, producing a sound with a depth similar to that of a string section or choir. The DM8's chorus effects have the same editable parameters.
Mono Chorus 1: Traditional chorus effect.
Mono Chorus 2: A variation of the traditional chorus effect.
Stereo Chorus: Chorus with a simulated stereo effect, creating a "wider" sound.
XOver Chorus: The chorus effect "moves" around the stereo field.
Rate: The speed of the modulation of the chorus (or how much the signal is delayed).
Depth: How much the chorus's delay varies.
Feedback: How much of the delayed signal will be routed back into the processor again, which creates a thicker chorus effect.
Level: The volume level of the chorus signal.
15
 Loading...