


3C905C-TX
Table of contents
 Loading...
EtherLink® 10/100 PCI for
Complete PC Management
Network Interface Cards
User Guide
3C905C-TX and 3C905C-TX-M
EtherLink 10/100 PCI NICs for
Complete PC Management
http://www.3com.com/
http://www.3com.com/productreg
Part No. 09-1488-000
Published March 1999

3Com Corporation ■ 5400 Bayfront Plaza ■ Santa Clara, California ■ 95052-8145
Copyright © 1999, 3Com Corporation. All rights reserved. No part of this documentation may be
reproduced in any form or by any means or used to make any derivative work (such as translation,
transformation, or adaptation) without written permission from 3Com Corporation.
3Com Corporation reserves the right to revise this documentation and to make changes in content
from time to time without obligation on the part of 3Com Corporation to provide notification of such
revision or change.
3Com Corporation provides this documentation without warranty, term, or condition of any kind,
either implied or expressed, including, but not limited to, the implied warranties, terms or conditions
of merchantability, satisfactory quality, and fitness for a particular purpose. 3Com may make
improvements or changes in the product(s) and/or the program(s) described in this documentation
at any time.
If there is any software on removable media described in this documentation, it is furnished under a
license agreement included with the product as a separate document, in the hard copy documentation,
or on the removable media in a directory file named LICENSE.TXT or !LICENSE.TXT. If you are unable to
locate a copy, please contact 3Com and a copy will be provided to you.
UNITED STATES GOVERNMENT LEGEND
If you are a United States government agency, then this documentation and the software described
herein are provided to you subject to the following:
All technical data and computer software are commercial in nature and developed solely at private
expense. Software is delivered as “Commercial Computer Software” as defined in DFARS
252.227-7014 (June 1995) or as a “commercial item” as defined in FAR 2.101(a) and as such is
provided with only such rights as are provided in 3Com’s standard commercial license for the Software.
Technical data is provided with limited rights only as provided in DFAR 252.227-7015 (Nov 1995) or
FAR 52.227-14 (June 1987), whichever is applicable. You agree not to remove or deface any portion of
any legend provided on any licensed program or documentation contained in, or delivered to you in
conjunction with, this User Guide.
Unless otherwise indicated, 3Com registered trademarks are registered in the United States and may
or may not be registered in other countries.
3Com, the 3Com logo, Dynamic
trademarks of 3Com Corporation. Intelligent Auto Install is a trademark of 3Com Corporation.
3Com Facts is a service mark of 3Com Corporation.
Magic Packet is a trademark of Advanced Micro Devices, Inc. Wake on LAN is a trademark
of International Business Machines Corporation. Microsoft, Windows, and Windows NT are
trademarks of Microsoft Corp. Novell and NetWare are trademarks of Novell, Inc. SCO is a
trademark of The Santa Cruz Operation, Inc.
All other company and product names may be trademarks of the respective companies with which
they are associated.
Access
, EtherDisk, EtherLink, and Parallel Tasking are registered

ONTENTS
C
A
BOUT THIS GUIDE
Conventions 9
Year 2000 Compliance 10
1
I
NTRODUCTION
3C905C NIC Overview 11
Features 12
Using Remote Wake-Up 12
Remote Wake-Up Requirements 13
Multiple NIC Installations and Remote Wake-Up 13
Using the Managed PC Boot Agent (MBA) Software 13
Using Dynamic
Using the Workgroup Keep-Alive Packet 15
Using Remote System Alerts 15
Remote System Alerts Requirements 15
Supported Remote System Alerts 15
Using Desktop Management Interface (DMI) 2.0 16
Access
Software 14
2
N
ETWORK INTERFACE CARD INSTALLATION
Overview 17
Preparing for Installation 18
Running the Preinstallation Program 19
Inserting the NIC 19
Connecting the Remote Wake-Up Cable 22
Connecting SOS or SMBus Cables for Remote System Alerts 24
Connecting to the Network 24

3
W
INDOWS
D
RIVER INSTALLATION
Overview 27
Installing the Driver 27
Windows 95 27
Windows 98 30
Windows NT 4.0 32
Windows NT 3.51 33
Verifying Successful Installation 35
Windows 95 and Windows 98 35
Windows NT 4.0 35
Windows NT 3.51 36
Installing Multiple NICs 36
Windows 95 and Windows 98 36
Windows NT 4.0 37
4
NETW
Installing the NetWare Client Driver 39
About 3Com Intelligent Auto Install Software 39
Intelligent Auto Install Requirements 40
Running the Intelligent Auto Install Program 40
Installing the NetWare Server Driver 41
Obtaining NetWare Loadable Modules 41
NetWare 3.12 41
NetWare 4.10 and 4.11 42
Multiple NICs 42
Verifying the PCI Slot Number 43
95/98
ARE CLIENT AND SERVER DRIVER INSTALLATION
AND WINDOWS
NT
5
NIC C
ONFIGURATION
Configuration Methods 45
Default NIC Settings 46
Changing General NIC Configuration Settings 47
Configuring the Managed PC Boot Agent (MBA) 49
Enabling or Disabling the Boot ROM Setting 49
Booting From the Network 50
BBS BIOS-Compatible PCs 50
Non-BBS BIOS-Compatible PCs 51

6
T
ROUBLESHOOTING AND DIAGNOSTICS
Troubleshooting the Installation 53
Accessing 3Com Support Databases 54
Accessing the 3Com Knowledgebase 54
Accessing the 3Com NIC Help System 54
Accessing Release Notes and Frequently Asked
Questions 55
Interpreting the LEDs 56
Running the NIC Diagnostics Tests 57
To Run the Network Test 58
To Run the NIC Test 59
To Run the Remote Wake-Up Test 59
Troubleshooting Remote Wake-Up 61
Viewing Network Statistics 62
Using the 3Com Icon in the Windows System Tray 63
Removing NIC Software 64
Windows 95 and Windows 98 64
Windows NT 4.0 64
Windows NT 3.51 65
Frequently Asked Questions 66
A
S
PECIFICATIONS AND CABLING REQUIREMENTS
Hardware Specifications 69
Network Interface 69
Physical Dimensions 69
Environmental Operating Range 69
Power Requirements 69
Standards Conformance 70
Cabling Requirements 70
Twisted-Pair Cable 70
10BASE-T Operation 71
100BASE-TX Operation 72
RJ-45 Connector Pin Assignments 72

B
D
YNAMIC
AND CONFIGURATION
Client PC Requirements 73
Installing Dynamic
Verifying Successful Installation 75
Configuring Dynamic
Removing Dynamic
C
3C
OM
Overview 77
System Requirements 78
Client PC Requirements 78
Network Management Requirements 78
Installing the 3Com DMI Agent 79
D
T
ECHNICAL SUPPORT
Support from Your Network Supplier 81
Online Technical Services 81
World Wide Web Site 81
3Com FTP Site 82
3Com Bulletin Board Service 82
3Com Facts Automated Fax Service 83
Access
DMI A
Access by Analog Modem 82
Access by Digital Modem 83
S
OFTWARE INSTALLATION
Access
Software 74
Access
Software 75
Access
Software 76
GENT INSTALLATION
I
NDEX
3COM C
FCC C
FCC D
ORPORATION LIMITED WARRANTY
LASS
B S
ECLARATION OF CONFORMITY
3COM END U
TATEMENT
SER SOFTWARE LICENSE AGREEMENT

IGURES
F
1
3C905C Network Interface Cards 11
2
Installing the NIC 21
3
Connecting the Remote Wake-Up Cable 23
4
Connecting to the RJ-45 Port 25
5
Add New Hardware Wizard 30
6
Network Settings Window 34
7
Selected NIC Screen 44
8
General Screen 48
9
Configuration Screen 48
10
Support Screen 55
11
Diagnostics Screen 58
12
Remote Wake-Up Test Screen 60
13
Statistics Screen 62
14
RJ-45 Connector Pin Assignments 72
15 DynamicAccess Software Setup Screen — Traffic
Prioritization 76

TABLES
1 Notice Icons 9
2 Text Conventions 10
3 Installation Overview 17
4 Cable Specifications 24
5 NetWare NLMs 41
6 NIC Configuration Methods 45
7 NIC Configuration Settings 46
8 Installation Troubleshooting Tips 53
9 LED Interpretations 56
10 Frequently Asked Questions 66
11 Unshielded Twisted-pair Cable Categories 71
12 DynamicAccess Software Minimum Client Requirements 74

ABOUT THIS GUIDE
This guide describes how to install, configure, and
troubleshoot the 3Com® EtherLink® 10/100 PCI for Complete
PC Management (3C905C) network interface card (NIC).
This guide is intended for those who install and configure
Ethernet NICs. Some familiarity with Ethernet networks
and NICs is assumed.
If release notes are shipped with your product and the
information there differs from the information in this
guide, follow the instructions in the release notes.
Most user guides and release notes are available in
Adobe Acrobat Reader Portable Document Format (PDF)
or HTML on the 3Com World Wide Web site:
http://www.3com.com/
You can download Acrobat Reader from the Adobe
Systems Incorporated Web site:
http://www.adobe.com/
Conventions
Table 1 and Table 2 list conventions that are used throughout
this guide.
Table 1 Notice Icons
Icon Notice Type Description
Information note Information that describes important features
Caution Information that alerts you to potential loss of
Warning Information that alerts you to potential
or instructions
data or potential damage to an application,
system, or device
personal injury

10 ABOUT THIS GUIDE
Table 2 Text Conventions
Convention Description
Screen displays This typeface represents information as it appears on
the screen.
Commands The word “command” means that you must enter the
command exactly as shown and then press Return or
Enter. Commands appear in bold. Example:
To launch the DOS diagnostics program, enter the
following command:
a: install
The words “enter”
and “type”
When you see the word “enter” in this guide, you
must type something, and then press Return or Enter.
Do not press Return or Enter when an instruction simply
says “type.”
Words in italics Italics are used to:
■ Emphasize a point.
■ Denote a new term at the place where it is defined in
the text.
■ Identify menu names, menu commands, and software
button names. Examples:
From the Help menu, select Contents.
Click OK.
Year 2000 Compliance
For information on Year 2000 compliance and 3Com
products, visit the 3Com Year 2000 Web page:
http://www.3com.com/products/yr2000.html
INTRODUCTION
1
This chapter describes the 3Com® EtherLink® 10/100 PCI
for Complete PC Management (3C905C) network
interface card (NIC).
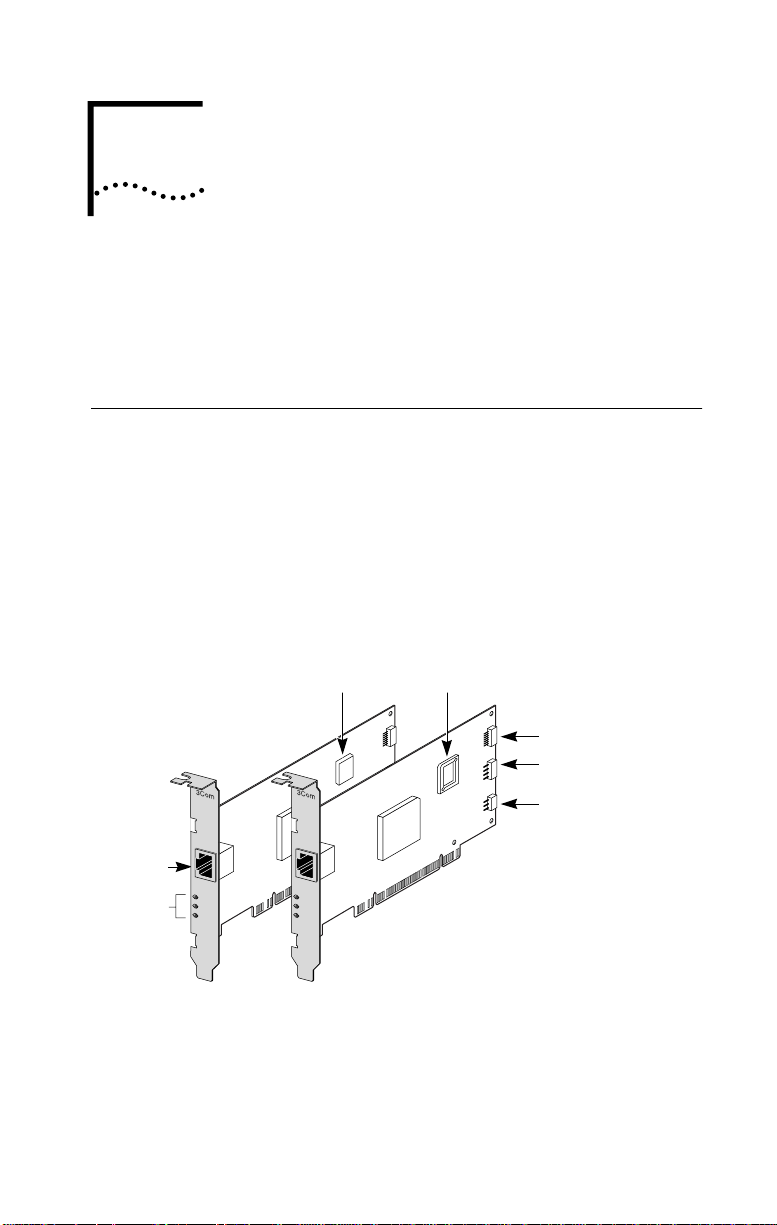
3C905C NIC Overview
The 3C905C NIC is a 10/100 Mbps PCI NIC that includes
a suite of desktop management features, including
Remote Wake-Up, managed PC boot agent, system alerts,
workgroup keep-alive, and DMI 2.0 support.
The two versions of the 3C905C NIC are shown in Figure 1
and described in the next section.
Figure 1 3C905C Network Interface Cards
RJ-45
LEDs
port
TX DATA
ACT
10
L
N
100
K
3C905C-TX-M 3C905C-TX
TX DATA
ACT
10
100
MBA
Boot ROM
L
N
K
Boot ROM
socket
SOS pin connector
System Management
Bus (SMB) connector
Remote Wake-Up
(RWU) connector

12 CHAPTER 1: INTRODUCTION
Features
The 3C905C NIC supports the following features:
■ Remote Wake-Up
■ Managed PC Boot Agent (MBA) software (integrated
as a boot ROM on the 3C905C-TX-M NIC; available
separately for installation and use with the
3C905C-TX NIC)
■ DynamicAccess® software
■ Remote system alerts
■ Workgroup keep-alive packet
■ Desktop Management Interface (DMI) 2.0 and 2.0s
■ PCI 2.2
■ Wired for Management 2.0
■ Advanced Configuration Power Interface (ACPI)
■ Parallel Tasking
■ 802.3x Flow Control
■ TCP/IP Checksum
For a complete list of the standards that the 3C905C NIC
supports, see “Standards Conformance” in Appendix A.
Unless specifically indicated, 3C905C is used throughout
this guide to refer to both NICs.
®
and Parallel Tasking II technology
Using Remote Wake-Up
Remote Wake-Up is the ability to remotely power-on a PC
for after-hours administration.
Remote Wake-Up support is enabled in one of two ways:
■ If your PC is compliant with PCI 2.2, Remote Wake-Up is
automatically enabled through the PCI bus. No special
installation is required. (See your PC documentation if
you are unsure whether your PC is compliant with
PCI 2.2.)
■ If your PC is not compliant with PCI 2.2, you must
connect a Remote Wake-Up cable from the NIC
Remote Wake-Up (RWU) connector (see Figure 1)
to a 3-pin Remote Wake-Up connector on the PC
motherboard. See “Connecting the Remote Wake-Up
Cable” in Chapter 2 for instructions.

3C905C NIC Overview 13
Remote Wake-Up Requirements
Your PC or server must have the following items to use
Remote Wake-Up:
■ BIOS that supports Remote Wake-Up
■ PCI 2.2-compliant bus or a 3-pin Remote Wake-Up
connector on the PC motherboard and a 5-volt standby
power supply unit rated at a minimum of
375 milliamperes
If you are unsure whether your PC meets the requirements
listed above, refer to your PC documentation or contact
your PC manufacturer.
For more information on Remote Wake-Up, including a list
of PCs that currently support this feature, go to the
following 3Com World Wide Web site:
http://www.3com.com/partners/acpi
Multiple NIC Installations and Remote Wake-Up
To use multiple NICs as Remote Wake-Up NICs in the same
PC, the PC must have a power supply that can support
multiple Remote Wake-Up devices.
See your PC documentation if you are unsure whether your
PC power supply can accommodate more than one
Remote Wake-Up device.
Using the Managed PC Boot Agent (MBA) Software
The 3C905C-TX-M NIC has an installed boot ROM
(see Figure 1) that contains Managed PC Boot Agent
(MBA) software.
A boot ROM with MBA software can be purchased
separately for installation and use with the 3C905C-TX NIC.
The MBA adds management capabilities to the NIC by
enabling the PC to boot from the server, rather than from
its local drive.
This preboot support allows you to use management
applications to remotely:
■ Install and configure a new PC that has never been
connected to the network.
■ Upgrade software.

14 CHAPTER 1: INTRODUCTION
■ Configure or reconfigure multiple systems
simultaneously.
■ Scan for viruses.
■ Back-up hard drives and perform disaster recovery tasks.
For information on configuring the MBA to boot from
the network, see “Configuring the Managed PC Boot
Agent (MBA)” in Chapter 5.
For detailed information on the MBA, see the
Managed PC Boot Agent User Guide, located on
the MBA Utility diskette.
Using DynamicAccess Software
The 3C905C NIC comes with DynamicAccess software,
advanced network software that improves performance,
management, and control of your network.
DynamicAccess software adds intelligence to the NIC by
integrating the following features:
■ Distributed RMON (dRMON) SmartAgents — Enables
full RMON reporting on all network segments, including
switched networks, without the need to place
dedicated RMON probes throughout the network.
■ Traffic prioritization (IEEE 802.1p/Q) — Ensures that
business-critical and delay-sensitive traffic (such as
multimedia applications) has priority over normal data.
■ Fast IP—Eliminates router bottlenecks and improves
performance in switched networks.
■ Efficient multicast control — Prevents flooding of
switched networks by multicast applications such as
video training, stock quotes, or online news.
DynamicAccess software can be installed on a PC running
Windows 95, Windows 98, or Windows NT. See
Appendix B for more information.
For detailed information on DynamicAccess software, go to
the following 3Com World Wide Web site:
http://www.3com.com/dynamicaccess

3C905C NIC Overview 15
Using the Workgroup Keep-Alive Packet
The 3C905C NIC can transmit a workgroup keep-alive
packet periodically while the PC is in a sleep state. This
packet prevents the PCs workstation address from
being aged-out of switch and router tables.
For instructions on enabling or disabling the
workgroup keep-alive packet, see “Configuring the
Workgroup Keep-Alive Packet” in Appendix D.
Using Remote System Alerts
The 3C905C NIC can be configured to continuously
monitor the PC and transmit a remote system alert to an
alert target management station when a specific event,
such as a power problem or a case intrusion, is detected.
Remote System Alerts Requirements
To generate remote system alerts:
■ The 3C905C NIC must be connected to the
PC motherboard using the NIC SOS or SMBus
(SMB) connector.
See your PC documentation or contact your PC
manufacturer if you are unsure whether the NIC can
be connected (or already is connected) to the PC
motherboard using one of these connectors.
■ The alert target management station that is to receive
the alerts must have software that supports the
Platform Event Trap Format (PETF) specification for
remote system alerts.
See your management station software documentation
if you are unsure whether it supports the PETF
specification, the packet format used by the
3C905C NIC.
Supported Remote System Alerts
A PC can support a maximum of seven remote system
alerts. The remote system alerts that are supported by
your PC depend upon your PCs configuration.

16 CHAPTER 1: INTRODUCTION
Using Desktop Management Interface (DMI) 2.0
The 3C905C NIC supports DMI 2.0 and 2.0s, which
enables managed PCs and net PCs to report details about
themselves and their peripheral devices across the network
to a DMI 2.0-compliant management application.
A network administrator can then use this information to
configure and manage a client or server PC remotely.
For instructions on installing the 3Com DMI Agent, see
Appendix C.
For more detailed information on DMI, go to the following
3Com World Wide Web site:
http://www.3com.com/managedpc

NETWORK INTERFACE CARD
2
INSTALLATION
This chapter describes how to install the 3C905C NIC in your
PC and connect it to an Ethernet or Fast Ethernet network.
CAUTION: Do NOT physically install the NIC in your PC until
you have run the preinstallation program, as described in
“Running the Preinstallation Program” later in this chapter.
Overview
Table 3 provides an overview of how to install the
3C905C NIC, depending on your PC configuration.
Table 3 Installation Overview
Installation Task Instructions
Installing the NIC in
a new PC
Installing multiple NICs To install multiple 3C905C NICs in a Windows 95/98 or
Replacing an
installed NIC
(continued)
To install the 3C905C NIC in a new PC or in a PC that
never has had a NIC installed:
1 Run the NIC preinstallation program before installing
the NIC in the PC, as described in this chapter.
2 Install the NIC in the PC and connect it to the network,
as described in this chapter.
3 Install the NIC driver and software. See Chapter 3 or
Chapter 4 for instructions.
Windows NT 4.0 PC, follow the instructions in “Installing
Multiple NICs” in Chapter 3.
To install multiple 3C905C NICs in a NetWare server,
follow the instructions in “Multiple NICs” in Chapter 4.
To install the 3C905C NIC in a PC in which a NIC has
previously been installed:
1 Remove the drivers and the NIC before installing the
3C905C NIC in the PC. See “Removing NIC Software”
in Chapter 6 for instructions.
2 Install the 3C905C NIC in the PC, following the
instructions in “Installing the NIC in a new PC” earlier
in this table.

18 CHAPTER 2: NETWORK INTERFACE CARD INSTALLATION
Table 3 Installation Overview (continued)
Upgrading Windows 95
to Windows 98
Updating EtherDisk
software
To upgrade a PC from Windows 95 to Windows 98 in
which a 3C90x NIC has already been installed, follow the
instructions in the WIN98.TXT file located in the HELP
directory on EtherDisk diskette 3.
To update EtherDisk 4.x or earlier software to EtherDisk 5.x
software, follow the instructions in the text file appropriate
for your operating system in the HELP directory on
EtherDisk diskette 3.
Preparing for Installation
Before you install the NIC in your PC, make sure that you
have the following items:
■ 3C905C NIC
■ 3Com EtherDisk diskettes 1, 2, and 3
■ Remote Wake-Up cable (This cable is optional. Install it
only if you want to use Remote Wake-Up and your PC is
not compliant with PCI 2.2. Contact your PC
manufacturer for the Remote Wake-Up cable.)
■ SOS or SMBus cable (This cable is optional. Install it
only if you want to use remote system alerts and your
PC has a matching connector on its motherboard.
Contact your PC manufacturer for cabling and
installation instructions.)
If the 3C905C NIC or the EtherDisk diskettes are damaged
or missing, contact your shipper or network supplier.
You also need to know the following about your
network environment:
■ The kind of network cabling that is used to connect to
the network at your site (10BASE-T or 100BASE-TX).
■ Your network protocol (IPX, NetBEUI, or TCP/IP).

Running the Preinstallation Program 19
Running the Preinstallation Program
Before you physically install the NIC in your PC, you must
run the following preinstallation program to properly set up
your system environment.
CAUTION: If you do not run the preinstallation program,
the NIC driver and software will not be installed correctly.
To run the preinstallation program:
1 Do not install the NIC in the PC.
2 Turn on the power to the PC and start Windows.
3 Insert EtherDisk diskette 1 in drive A.
4 From the Windows Start menu, select Run.
5 Run the preinstallation program. Enter:
a:\preinstl
6 After the preinstallation program finishes, turn off
the power to the PC and remove EtherDisk diskette 1.
The next step is to install the NIC in the PC.
Inserting the NIC
The following instructions apply to installing the NIC in most
PCs. If these instructions are not appropriate for your PC,
refer to the documentation that accompanied your PC.
CAUTION: Do NOT install the NIC in your PC until you
have run the preinstallation program, as described in the
previous section, “Running the Preinstallation Program.”
Before handling the NIC, touch the bare metal case of your
PC to discharge static electricity from your body. While you
are handling the NIC, wear a wrist strap grounded to the
PC chassis.

20 CHAPTER 2: NETWORK INTERFACE CARD INSTALLATION
To install the NIC in your PC:
1 Make sure that you have run the preinstallation
program, as described in the previous section.
2 Remove all jewelry from your hands and wrists. Use
only insulated or nonconducting tools.
3 Make sure that the power to the PC is turned off and
that the power cord is unplugged.
4 Remove the cover from your PC.
5 Locate an empty, nonshared bus mastering PCI slot
and remove the corresponding slot cover. Save
the screw.
Do not install the NIC in a shared PCI slot. Avoid any
PCI slot next to an ISA slot. This is often a shared slot and
does not support bus mastering.
If you do not know how to identify a PCI slot, check your
PC documentation or ask your system administrator.
If you are planning to install the Remote Wake-Up cable or
a cable for the SOS or SMBus connector, choose an empty
PCI slot that is close to the matching connector on the
PC motherboard.
6 Carefully insert the NIC into the empty PCI slot (see
Figure 2). Press firmly to ensure that the NIC is fully
seated in the slot.
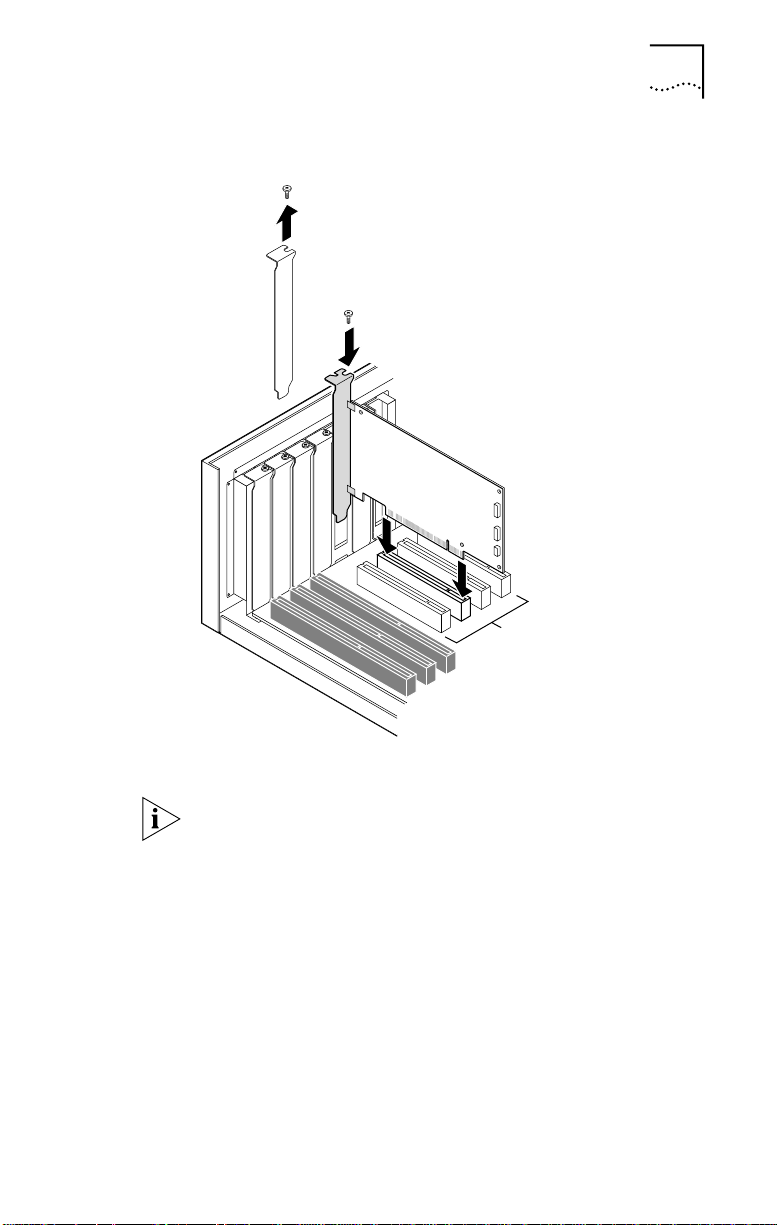
Figure 2 Installing the NIC
1 Remove slot cover
2 Insert NIC
Inserting the NIC 21
PCI slots
7 Secure the NIC with the screw you removed in step 5.
If you want to install the Remote Wake-Up cable, go to the
next section, “Connecting the Remote Wake-Up Cable” to
continue the installation. If you want to connect a cable from
the SOS or SMBus connector, see your PC documentation or
contact your PC manufacturer for instructions.
If you do not want to connect a cable, continue with step 8.
8 Replace the PC cover and plug in the power cord.
Do not turn on the power to the PC.
9 Go to “Connecting to the Network” later in this chapter.

22 CHAPTER 2: NETWORK INTERFACE CARD INSTALLATION
Connecting the Remote Wake-Up Cable
This section describes how to connect the Remote Wake-Up
cable from the NIC to the PC motherboard.
Contact your PC manufacturer for the Remote
Wake-Up cable.
Connecting the Remote Wake-Up cable is optional.
Connect this cable only if you want to use this feature
and your PC has the following items:
■ 3-pin Remote Wake-Up connector on the
PC motherboard
■ 5-volt standby power supply unit rated at a minimum
of 375 milliamperes
■ BIOS that supports Remote Wake-Up
If your PC is compliant with PCI 2.2, Remote Wake-Up is
automatically enabled through the PCI bus. You do not
need to connect the Remote Wake-Up cable.
WARNING: Make sure that the PC power cord is unplugged.
Only properly trained and authorized personnel should
perform service. Contact your PC manufacturer for
information about safe service techniques.
To connect the Remote Wake-Up cable:
1 Make sure that the NIC is properly installed in a PCI slot.
2 Insert the Remote Wake-Up cable into the
RWU connector on the NIC (see Figure 3).
Twist the cable twice before attaching the cable to the PC.
3 Attach the other end of the cable to the connector on
the PC motherboard (see Figure 3).
Refer to your PC documentation if you need help locating
the connector.
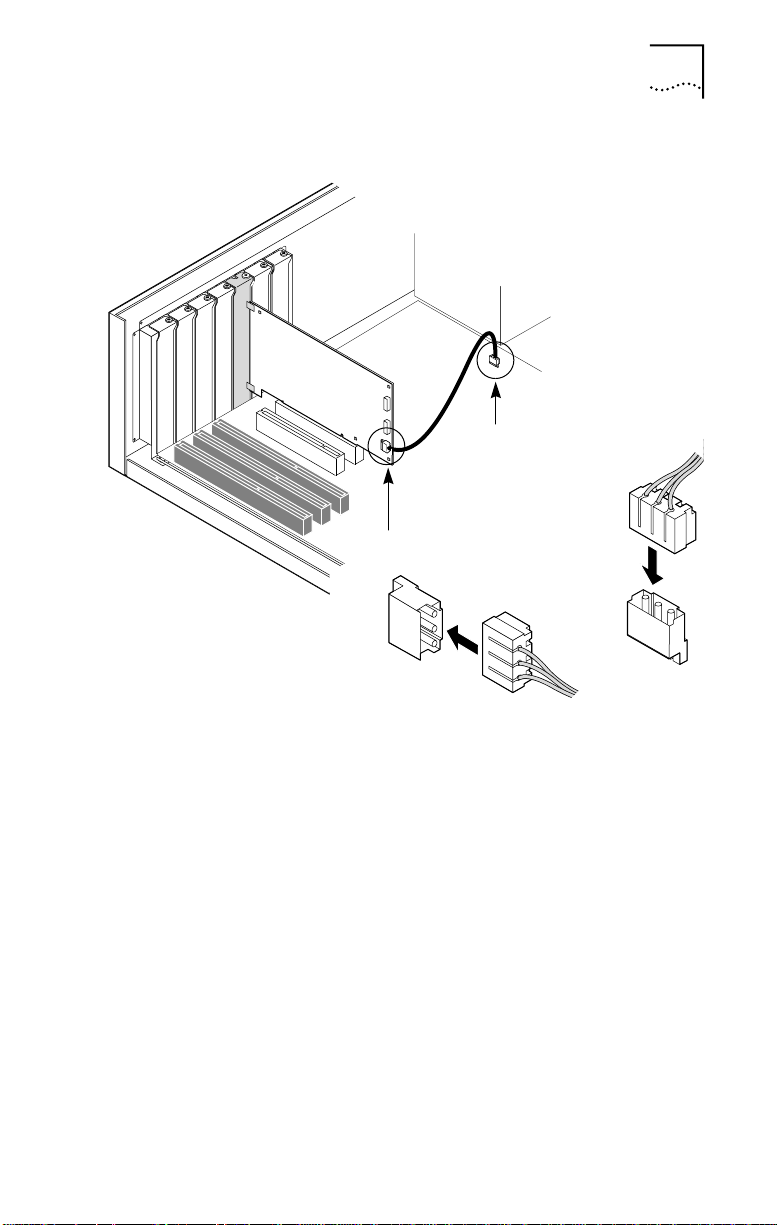
Connecting the Remote Wake-Up Cable 23
Figure 3 Connecting the Remote Wake-Up Cable
Power
supply
Connect Remote Wake-Up
cable from NIC to motherboard connector
Plug in Remote Wake-Up
cable to RWU connector
4 Replace the PC cover and plug in the power cord.
Do not turn on the power to the PC.
5 Go to the next section, “Connecting SOS or SMBus
Cables for Remote System Alerts” or go directly to
the following section, “Connecting to the Network.”

24 CHAPTER 2: NETWORK INTERFACE CARD INSTALLATION
Connecting SOS or SMBus Cables for
Remote System Alerts
Connecting the SOS or SMBus cables is optional, and
requires a matching connector on your PC motherboard.
Connect one of these cables only if you want to use
Remote System Alerts and if your PC supports this feature.
Contact your PC manufacturer for these cables.
To connect the SOS or SMBus cable for Remote System
Alerts, confirm that your PC supports one of these
cables and follow the instructions provided with the
PC documentation.
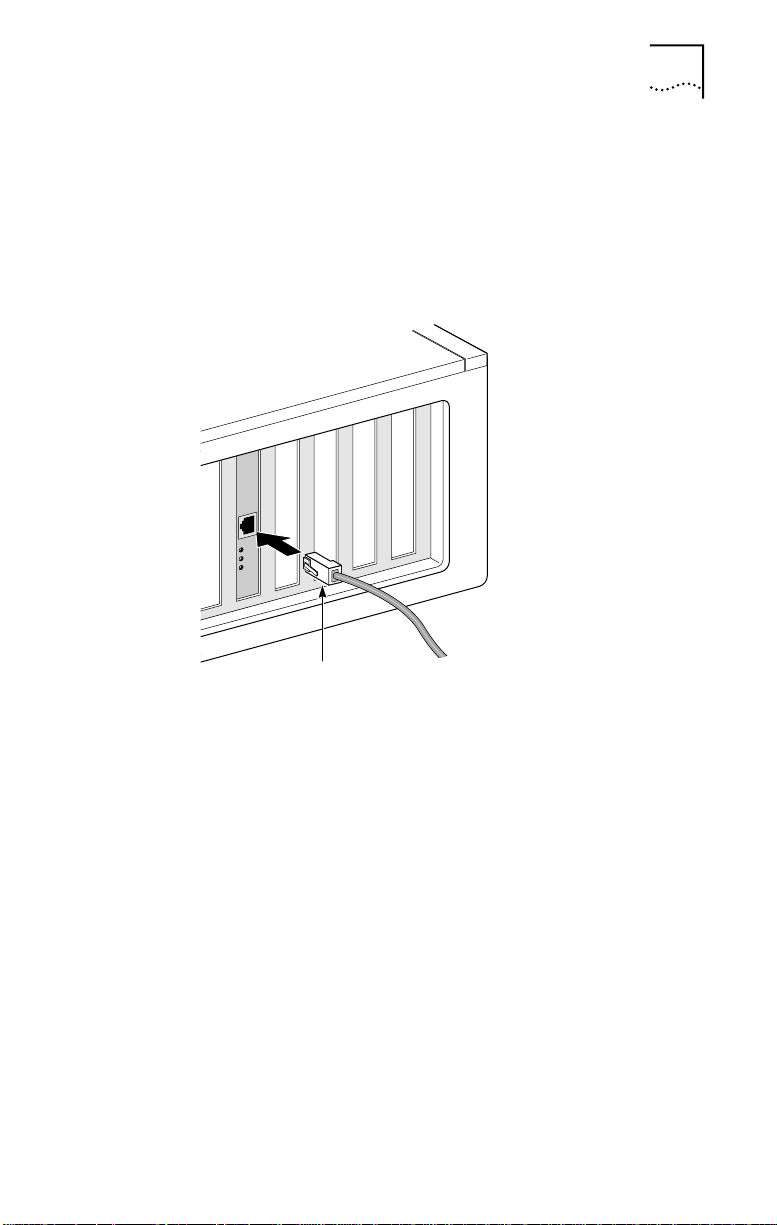
Connecting to the Network
This section describes how to connect the 3C905C NIC
RJ-45 port to an Ethernet or Fast Ethernet network.
The RJ-45 port provides a 10 Mbps or 100 Mbps connection
automatically, depending on the speed of the connected
hub or switch.
Table 4 shows the cable requirements and maximum
network cable lengths for the 3C905C NIC.
Table 4 Cable Specifications
Network
Environment
10 Mbps
(10BASE-T)
100 Mbps
(100BASE-TX)
Cable Required
Category 3, 4, or 5
unshielded twisted-pair
Category 5 unshielded
twisted-pair
Maximum
Cable Length
100 m (328 ft)
100 m (328 ft)
Connecting to the Network 25
TX Data
ACT
10
100
L
N
K
To connect the 3C905C NIC to a 10 Mbps Ethernet or
100 Mbps Fast Ethernet network:
1 Plug the RJ-45 connector on the twisted-pair network
cable into the RJ-45 port on the NIC backplate (see
Figure 4).
Figure 4 Connecting to the RJ-45 Port
RJ-45 connector
2 Connect the other end of the network cable to an
active network port.
The next step is to install the NIC driver and software.
Go to the appropriate chapter for your operating system.


WINDOWS 95/98 AND
3
Overview
WINDOWS NT
DRIVER INSTALLATION
This chapter describes how to install the NIC driver and
software on a PC running Windows 95, Windows 98,
Windows NT 4.0, or Windows NT 3.51.
To obtain the latest shipping version of a driver, contact
your PC manufacturer.
You install the NIC driver and software using the
EtherDisk diskettes after you have run the preinstallation
program and installed the NIC in your PC, as described
in Chapter 2.
The NIC driver can be used in both Microsoft and NetWare
network environments.
Do not use the 3Com Intelligent Auto Install software to
install the NIC driver under Windows 95, Windows 98,
or Windows NT. The Intelligent Auto Install software
is for Windows 3.x and DOS clients connecting to a
NetWare server. See Chapter 4 for more information.
Installing the Driver
To install the NIC driver and software, follow the steps
in the section appropriate for your operating system.
Windows 95
If you encounter problems during the installation, see
the W95NDIS.TXT file located in the HELP directory
on EtherDisk diskette 3 for troubleshooting tips.
Before installing the NIC driver and software:
■ Make sure that you have run the preinstallation
program, as described in Chapter 2.
■ Make sure that the NIC is installed in the PC and
that it is connected to the network.

28 CHAPTER 3: WINDOWS 95/98 AND WINDOWS NT DRIVER INSTALLATION
■ Make sure that you have the Windows 95 installation
files. These files may be on a CD or diskettes, or they
may have been copied to your hard drive when
Windows 95 was installed on your PC.
To install the NIC driver and software on a PC running
Windows 95:
1 Turn on the power to the PC.
Windows 95 detects the NIC.
Depending on the version of Windows 95 that you have
installed, the New Hardware Found dialog box appears or
the Update Device Driver Wizard starts.
If the New Hardware Found dialog box appears:
a Select Driver from disk provided by hardware
manufacturer, and then click OK.
b Insert EtherDisk diskette 1 in drive A, make sure that A:\
appears in the entry box, and then click OK.
c Go to step 2 when prompted for EtherDisk diskette 2.
If the Update Device Driver Wizard starts:
a Insert EtherDisk diskette 1 in drive A, and then click Next.
Windows finds the driver and asks if you want to use
this driver.
b Click Finish, and then click OK when prompted for
EtherDisk diskette 1.
c Go to step 2 when prompted for EtherDisk diskette 2.
2 Remove EtherDisk diskette 1 from drive A, insert
EtherDisk diskette 2, and then click OK.
Files are copied.
■ If this is the first time that networking is being installed
on your PC, the Identification tab of the Network screen
appears. Go to step 3.
■ If networking has already been installed, you are
prompted for the Windows 95 CD. Go to step 4.

Installing the Driver 29
3 In the specified fields of the Identification tab
screen, enter the following information, and then
click OK:
■ Computer Name — Identifies the PC on the network for
other users. This entry must be a unique name of 15
characters or fewer, containing no spaces.
■ Workgroup — Identifies the group (for example, your
department name) to which your PC belongs. If you
belong to a peer-to-peer network, this entry must be
exactly the same for all the PCs in your network.
■ Computer Description — Displays additional details to
other users on the network about this PC. For example,
you could specify that the PC has a printer attached.
Filling in this field is optional.
4 Insert the Windows 95 CD or diskette, and then
click OK.
If you do not have the Windows 95 CD or diskette, but the
Windows 95 installation files are on your hard drive, click
OK. Enter the directory in the Copy Files From entry box
(usually C:\WINDOWS\OPTIONS\CABS), and then click OK.
Files are copied. You are prompted for EtherDisk diskette 2.
5 Make sure that EtherDisk diskette 2 is in drive A, and
then click OK.
Files are copied. You are prompted to restart the PC.
6 Remove EtherDisk diskette 2 from drive A, and then
click Yes to restart the PC.
You must restart the PC to complete the installation.
The installation is complete. Go to “Verifying Successful
Installation” later in this chapter to confirm that the NIC
is properly installed.
After Windows restarts, double-click the Network icon
in the Windows Control Panel and make sure that the
configuration settings are properly set for your network
environment. Contact your system administrator
for assistance.
Loading...