


 Loading...
Motorola
iDEN®
Digital Multi-Service Data Capable Phone
i2000plus User’s Guide
@NTN9487A@
NTN9487A


Patent and Trademark Information
Patent and Trademark Information
This product is protected under one or more of the following patents:
4817157, 4896361, 4857928, 5041793, 5060294, 5066923, 5134718, 5140156, 5239963, 5257411, 5287387, 5265219, 5289504, 5316168, 5317247, 5338396, 5389927, 5406588, 5424921, 5457376, 5460906, 5551063, 5557079, 5596487, 5615412, 5638403, 5559468, 5469465, 5170413, 5140615, 5519730, 5241544, 5584059, 5574992, 5396656, 5487091, 5533004, 5299199, 5343499, 5369501, 5509031, 5515379, 5528723, 5598417, 5066923, 5241650, 5278833, 5359696, 5548631, 5410632, 5440582, 5457735, 5457818, 5471670, 5477550, 5481537, 5566181, 5229767, 5208804, 5295140, 5381449, 5440590, 5467398, 5490230, 5620242, 5623523, 5655913, 5715240, 5771440, 5854578, 5675281, 5721787, 5729539, 5788523, 5869204, 5911124, 5946620, 5949774, 5949821, 5951317, 5987332, 6002948
Additional patents are pending.
MOTOROLA, the stylized M logo, and all other trademarks indicated as such herein are trademarks of Motorola, Inc. ®Reg. U.S. Pat. & Tm. Off.
Manufactured under one or more of the U.S. patents listed in the User’s Guides.
T9 is a trademark owned by Tegic Communications, Inc.
All other trademarks mentioned in this manual are trademarks of their respective companies.
© Copyright 2000, Motorola, Inc. All rights reserved.
i

www.motorola.com
ii

Contents
CONTENTS |
|
Patent and Trademark Information ............................ |
i |
Wireless Phone Safety Tips....................................... |
viii |
Welcome ....................................................................... |
11 |
Setting Up Your i2000plus Phone for Use................................ |
12 |
TTY Access............................................................................... |
12 |
Large Print Manuals.................................................................. |
12 |
Features of Your i2000plus Phone ........................................... |
13 |
Inserting the SIM Card.............................................................. |
15 |
Charging and Attaching the Battery.......................................... |
16 |
Turning On Your i2000plus Phone........................................... |
17 |
Light Sensor .............................................................................. |
18 |
SIM Card PIN ........................................................................... |
19 |
Entering the PIN ................................................................... |
19 |
Unblocking the PIN.............................................................. |
19 |
Changing the PIN ................................................................. |
20 |
Disabling the PIN Requirement............................................ |
21 |
Enabling the PIN Requirement............................................. |
21 |
Keypad Lock ............................................................................. |
22 |
Display Icons............................................................................. |
22 |
About Modes and Menus .......................................................... |
23 |
Setting the Time and Date......................................................... |
24 |
Changing the Display Language ............................................... |
25 |
Selectable Backlight Timer....................................................... |
26 |
Making Phone Calls .................................................... |
27 |
International Phone Calls Using Plus Dialing ...................... |
27 |
Inserting Pauses into Phone Numbers .................................. |
27 |
Using Other Dialing Methods ................................................... |
27 |
Scroll..................................................................................... |
28 |
Speed Dial ............................................................................ |
28 |
Name Search......................................................................... |
28 |
Last Number Redial.............................................................. |
28 |
Turbo Dial® ......................................................................... |
28 |
Automatic Redial.................................................................. |
29 |
Emergency Dial .................................................................... |
29 |
Hands-Free Speakerphone ........................................................ |
29 |
Receiving a Phone Call ............................................................ |
30 |
iii

Missed Call Indicator ................................................................ |
30 |
What Is My Phone Number?..................................................... |
31 |
VibraCall® Alert....................................................................... |
31 |
Selecting VibraCall Alert for All Incoming Calls |
|
and Messages........................................................................ |
32 |
Selecting VibraCall Alert for Individual Services................ |
32 |
Setting the Ringer Volume........................................................ |
33 |
Selecting a Ring Style ............................................................... |
33 |
Additional Call Services ............................................. |
35 |
Call Forwarding ........................................................................ |
35 |
Unconditional Call Forwarding............................................ |
35 |
Conditional Call Forwarding................................................ |
36 |
Call Waiting .............................................................................. |
37 |
Call Hold ................................................................................... |
37 |
3-Way Calling ........................................................................... |
37 |
Call Barring............................................................................... |
38 |
Barring Incoming Calls ........................................................ |
38 |
Barring Outgoing Calls......................................................... |
39 |
Viewing Call Barring Status................................................. |
40 |
Changing Your Call Barring Passcode................................. |
40 |
Alternate Phone Line (iDEN Only) .......................................... |
41 |
Setting the Active Line ......................................................... |
41 |
Receiving a Call ................................................................... |
41 |
Receiving a Call on Your Alternate Line ............................. |
42 |
Phone Only Mode (iDEN Only) ............................................... |
42 |
Creating, Editing, and Using Stored Lists ................ |
44 |
Combined Phone Number and Private ID List..................... |
44 |
Pre-Pend Feature ....................................................................... |
44 |
Last 10 Calls Received and Sent Lists ................................. |
48 |
Quickstore of Phone Numbers.............................................. |
49 |
Traveling Between Systems........................................ |
51 |
Searching for a Network....................................................... |
51 |
Storing Your Preferred List of Networks ............................. |
52 |
Storing New Networks to Your Known List ............................ |
53 |
Making Private Calls (iDEN Only) ........................... |
55 |
Receiving a Private Call............................................................ |
55 |
Private/Group Mode Speaker.................................................... |
56 |
Call Alert................................................................................... |
56 |
www.motorola.com |
|
iv

|
Contents |
Sending a Call Alert ............................................................. |
56 |
Receiving a Call Alert .......................................................... |
56 |
Call Alert Queuing ............................................................... |
57 |
Clearing or Queueing a Call Alert........................................ |
57 |
Responding to a Queued Call Alert...................................... |
57 |
Quickstore of Private IDs.......................................................... |
57 |
Viewing Your Private ID .......................................................... |
58 |
Making Group Calls (iDEN Only) ............................. |
59 |
Receiving a Group Call............................................................. |
59 |
Adding and Storing a Talkgroup............................................... |
59 |
Area Selection ........................................................................... |
60 |
Private/Group Mode Speaker.................................................... |
60 |
Using Mail Services. .................................................... |
61 |
Net Mail .................................................................................... |
61 |
Voice Mail................................................................................. |
62 |
Alert Receipt ............................................................................. |
63 |
Message Mail ............................................................................ |
63 |
Saving and Erasing Mail ...................................................... |
64 |
Auto Call Back ..................................................................... |
64 |
Mail Memory Full ................................................................ |
64 |
Using Your Phone as a Modem .................................. |
65 |
Setting Programming Menus...................................... |
66 |
About Status Messages................................................ |
73 |
Accessories.................................................................... |
75 |
Batteries ............................................................................... |
75 |
Charging Lithium Ion Batteries............................................ |
75 |
Battery Operating Instructions ............................................. |
76 |
Travel Charger .......................................................................... |
76 |
Using the Travel Charger ..................................................... |
77 |
Travel Charger Operating Specifications ............................. |
77 |
Vehicular Battery Charger ........................................................ |
77 |
Using the Vehicular Battery Charger ................................... |
78 |
Removing the Vehicular Battery Charger ............................ |
78 |
Vehicular Battery Charger Operating Specifications ........... |
79 |
Desktop Dual-Pocket Charger .................................................. |
79 |
Charging a Battery................................................................ |
79 |
v

Audio Adapter........................................................................... |
80 |
Using the Audio Adapter...................................................... |
80 |
Attaching/Detaching the Earpiece Microphone ................... |
80 |
Removing the Audio Adapter.............................................. |
80 |
Hands-Free Car Kit .................................................... |
81 |
Using the Hands-Free Car Kit................................................... |
82 |
Dash Mount Holder................................................................... |
83 |
Using the Dash Mount Holder.............................................. |
84 |
Safety and General Information................................ |
85 |
RF Operational Characteristics ................................................. |
85 |
Exposure To Radio Frequency Energy ..................................... |
85 |
Portable Radio Product Operation and EME Exposure ............ |
86 |
Antenna Care ........................................................................ |
86 |
Phone Operation ................................................................... |
86 |
Two-way radio operation ..................................................... |
86 |
Body-worn operation............................................................ |
86 |
Data operation ...................................................................... |
86 |
Approved Accessories .......................................................... |
87 |
Electro Magnetic Interference/Compatibility ........................... |
87 |
Facilities ............................................................................... |
88 |
Aircraft ................................................................................. |
88 |
Medical Devices........................................................................ |
88 |
Pacemakers ........................................................................... |
88 |
Hearing Aids......................................................................... |
88 |
Other Medical Devices ......................................................... |
88 |
Use While Driving .................................................................... |
89 |
Operational Warnings ................................................ |
90 |
For Vehicles Equipped with an Air Bag ................................... |
90 |
Potentially Explosive Atmospheres .......................................... |
90 |
Blasting Caps and Areas ........................................................... |
90 |
Operational Cautions ................................................. |
91 |
Antennas.................................................................................... |
91 |
Batteries .................................................................................... |
91 |
Cleaning and Drying Considerations ........................................ |
91 |
Accessory Safety Information.................................... |
93 |
Limited Warranty Motorola Communication Products |
|
(U.S.)............................................................................. |
95 |
www.motorola.com |
|
vi

|
Contents |
Limited Warranty Motorola Communication Products |
|
(international) .............................................................. |
99 |
Owner’s Information................................................. |
103 |
Private Number Directory .................................................. |
104 |
Talkgroup Directory ........................................................... |
104 |
European Union Directives Conformance |
|
Statement.................................................................... |
105 |
Index ............................................................................ |
107 |
vii

Wireless Phone Safety Tips
“Safety is your most important call!”
Your Motorola wireless telephone gives you the powerful ability to communicate by voice--almost anywhere, anytime, wherever wireless phone service is available and safe conditions allow. But an important responsibility accompanies that benefits of wireless phones, one that every user must uphold.
When driving a car, driving is your first responsibility. If you find it necessary to use your wireless phone while behind the wheel of a car, practice good common sense and remember the following tips:
1.Get to know your Motorola wireless phone and its features such as speed dial and redial. If available, these features help you to place your call without taking your attention off the road.
2.When available, use a hands-free device. If possible, add an additional layer of convenience to your wireless phone with one of the many Motorola Original hands-free accessories available today.
3.Position your wireless phone within easy reach. Be able to access your wireless phone without removing your eyes from the road. If you receive an incoming call at an inconvenient time, if possible, let your voice mail answer it for you.
4.Let the person you are speaking with know you are driving; if necessary, suspend the call in heavy traffic or hazardous weather conditions. Rain, sleet, snow, ice, and even heavy traffic can be hazardous.
5.If you receive an incoming call at an inconvenient time do not take notes or look up phone numbers while driving. Jotting down a “to do” list or going through your address book takes attention away from your primary respon- sibility--driving safely.
6.Dial sensibly and assess the traffic; if possible, place calls when you are not moving or before pulling into traffic. Try to plan calls when your car will be stationary. If you need to make a call while moving, dial only a few numbers, check the road and your mirrors, then continue.
7.Do not engage in stressful or emotional conversations that may be distracting. Make people you are talking with aware you are driving and suspend conversations which have the potential to divert your attention away from the road.
8.Use your wireless phone to call for help. Dial 9-1-1 or other local emergency number in the case of fire, traffic accident or medical emergencies.*
9.Use your wireless phone to help others in emergencies. If you see an auto accident, crime in progress or other serious emergency where lives are in danger, call 9-1-1 or other local emergency number, as you would want others to do for you.*
* Wherever wireless phone service is available.
www.motorola.com
viii
Wireless Phone Safety Tips
10.Call roadside assistance or a special non-emergency wireless assistance number when necessary. If you see a broken-down vehicle posing no serious hazard, a broken traffic signal, a minor traffic accident where no one appears injured, or a vehicle you know to be stolen, call roadside assistance or other special non-emergency wireless number.*
* Wherever wireless phone service is available.
ix

I M P O R T A N T !
Be sure to read “Safety and General Information” on page 85 before using your i2000plus phone.
www.motorola.com
x

Welcome
WELCOME
ongratulations on purchasing your Motorola iDEN i2000plus Cmulti-service, data-capable, digital, portable global phone. The
use of two state-of-the-art technologies, iDEN and GSM (Global System for Mobile communications), provides worldwide services to keep you in touch with your business and personal contacts when you travel.
A removable Subscriber Identity Module (SIM) card holds all your personal information, including secure Personal Identification Numbers (PINs), names, and phone numbers. Just as you protect your credit and bank cards with PINs, you can safeguard your SIM card with a PIN.
Exciting new features include a vibration-only key, call barring, and a missed-call indicator to help provide efficient operation of your i2000plus phone. And, new ease-of-dialing features, such as Turbo
Dial® key and the Last Ten Received and Sent lists, as well as stored names and numbers, help you to quickly make and return phone calls.
Your i2000plus phone offers:
•Phone Mode - for cellular phone operation. See Page 27.
•Private Mode - for two-way radio use to talk with one person in your iDEN service area. See Page 55.
•Group Mode - for two-way radio use to talk with several people in your iDEN service area. See Page 59.
•Messaging Services* - for message and voice mail. Page 61
•Net Mode* - for accessing the built-in mini-browser. See the Net
Mode User’s Guide.
•Fax and Data Transfer* - for circuit data faxes and file transfers. See “Using Your Phone as a Modem” on page 65.
N O T E • Some features of your i2000plus phone are available only in the iDEN service area, and are indicated as such in this guide.
•This guide describes the features of the i2000plus phone as they were set up by Motorola. However, your carrier or your organization may have changed or added features. For more information, check with your carrier or your organization.
See the Wireless Data Services User’s Guide for information about data calls and TTY access.
* Network dependent feature. Not available in all areas.
11

Setting Up Your i2000plus Phone for Use
Before you can use your new i2000plus phone, you’ll need to:
1.Insert the SIM card—see Page 15.
2.Attach the battery—see Page 17.
3.Turn on your i2000plus phone—see Page 17.
4.Optional: Enter a PIN for your SIM card—see Page 19.
TTY Access
TTY access is available on your phone. See the Wireless Data Services User’s Guide for complete instructions.
Large Print Manuals
A large-print version of the phone’s User’s Guide is available. For more information on Motorola products for people with disabilities, contact Motorola Customer Care at 1-800-453-0920 or TTY 1-877- 483-2840.
www.motorola.com
12

Welcome
Features of Your i2000plus Phone
1. Antenna
2.Earpiece
3.Volume
4. Push-To-
Talk (PTT)
Button
5.Scroll Key
6.Mode
Key
7.LED 

8.On/Off 
9. *Punctuation
10.*Back Key 

11.Vibe-all Key 

12.Microphone 
 plus
plus
next
13.Alphanumeric Display
14.Light Sensor
15.Option Keys
16.Send/End Key
17.Menu Key
18.Alphanumeric Keypad
19. *Home Key
20. *Next Key
21. Speaker Key
22. Accessory and Data Cable
Connector
NOTE: *These features are available in the Net Mode mini-browser. (Subscription-dependent features are not available in all areas.)
NOTE: Remove the plastic film lens protector from the display before you use your phone for the first time.
13

1. |
Antenna |
Extend for optimal signal. |
2. |
Earpiece |
Listen to calls when the speakerphone |
|
|
is off. |
3. |
Volume |
Press to adjust volume levels in |
|
Control |
Phone, Private, and Group modes. In |
|
Buttons |
mail menus, press to scroll forward |
|
|
and backward. |
|
|
|
4. |
Push-To-Talk |
Transmit a Private or Group Call, or a |
|
(PTT) Button |
Call Alert. Press and hold to talk; |
|
|
release to listen. (iDEN use only) |
|
|
|
5. |
Scroll Key |
Press the left side to scroll backward |
|
|
or the right side to scroll forward |
|
|
through menu options and lists. When |
|
|
entering text, press to erase text or |
|
|
add a space. |
|
|
|
6. |
Mode Key |
Press to change modes. (iDEN use |
|
|
only) |
|
|
|
7. |
LED (Light |
Check the phone’s status. See Table |
|
Emitting |
on page 18 for more information. |
|
Diode) |
|
|
|
|
8. |
On/Off Button |
Press and hold to turn your i2000plus |
|
|
phone on or off. |
|
|
|
9. |
Punctuation |
Add punctuation in the Net Mode mini- |
|
Key* |
browser (within T9TM Text Input). |
10. |
Back* Key |
Return to the previous mini-browser |
|
|
screen. |
11. |
Vibe-All Key |
Press to deactivate or turn on the |
|
|
vibration alert. |
12. |
Microphone |
Use to speak during calls. |
|
|
|
13. |
Alphanumeric |
View up to four lines (up to 12 |
|
Display |
characters per line) on the display. |
14. |
Light Sensor |
When a key is pressed, the light |
|
|
sensor will activate the backlight only |
|
|
when your phone is in poor lighting |
|
|
conditions. |
|
|
|
15. |
Option Keys |
Press the right or left option key to |
|
|
select the menu option that appears |
|
|
directly above the key. |
|
|
|
www.motorola.com
14

|
|
|
Welcome |
|
|
|
|
|
|
|
|
|
|
|
|
16. |
Send/End Key |
Press to answer an incoming Phone |
|
|
|
|
call. After entering a phone number, |
|
|
|
|
press to dial the call or to redial the |
|
|
|
|
entered phone number. Press to end |
|
|
|
|
Phone calls. |
|
|
|
|
|
|
|
17. |
Menu Key |
Press to scroll through menu options. |
|
|
|
|
|
|
|
18. |
Alphanumeric |
Enter telephone numbers, Private Call |
|
|
|
Keypad |
IDs, and alphanumeric characters. |
|
|
|
|
|
|
|
19. |
Home Key* |
Press to return to the mini-browser |
|
|
|
|
Home menu. |
|
|
20. |
Next Key* |
Press to display the next word choice |
|
|
|
|
in the mini-browser (within T9 Text |
|
|
|
|
Input). |
|
|
|
|
|
|
|
21. |
Speaker/ |
Press to switch between the earpiece |
|
|
|
Speakerphone |
and speaker during Private and Group |
|
|
|
Key |
calls. (iDEN use only) |
|
|
|
|
When in a phone call, press to activate |
|
|
|
|
speakerphone (iDEN and GSM) |
|
|
|
|
|
|
|
22. |
Accessory and |
Use to connect accessories or the |
|
|
|
Data Cable |
battery charger. |
|
|
|
Connector |
|
|
|
|
|
|
|
*These features are available in the Net Mode mini-browser. (Subscription-dependent features are not available in all areas.)
Inserting the SIM Card
The SIM card contains all your stored names, numbers, and PINs after you enter them in your i2000plus phone. You can make a phone call only when the SIM card is properly placed in the phone.
N O T E Depending on the network that you are on, you may be able to make an emergency call without a SIM card.
Important! Insert and remove your SIM card with care so that you do not lose it.
To insert the SIM card:
1.If your i2000plus phone is on, press and hold funtil you see the message “Powering Off”.
2.Turn the phone over so that the antenna is at the upper left corner.
15
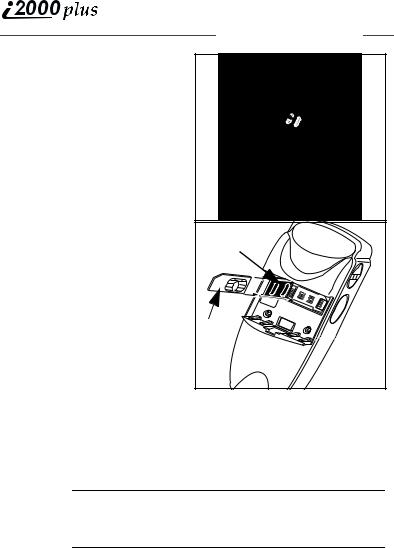
3.If the battery is attached, remove it. For information,
see “Detaching the Battery” on page 17.
4.Slide the latch to the left position and open the SIM card holder.
5.If you have a full-size SIM card, gently punch out the mini SIM card.
6.Position the cut corner of the SIM card as illustrated and slide the card into the holder.
7.Close the card holder and slide the latch to the right.
8.Now, you can attach the
battery. See “Attaching the Battery” on page 17.
Charging and
Attaching the Battery
Latch
SIM card |
holder |
SIM |
card |
Remove the battery from the protective case provided in the original packaging. When the battery is not attached to the phone or being charged, store it in this case.
Charging the Battery
N O T E After attaching the battery, you must charge it before you use it for the first time. After the initial charging, the battery can be charged more quickly.
Attach the charger connector to the i2000plus phone, then flip open the prongs and plug the charger into an electrical outlet. For more information about chargers, see “Travel Charger” on page 76, “Vehicular Battery Charger” on page 77, and “Desktop Dual-Pocket Charger” on page 79.
www.motorola.com
16

Attaching the Battery
To attach the battery to your i2000plus phone, align the battery as shown. Press down on the battery latch until you hear a click.
Battery and Charging Status
A low battery is indicated by a short, chirp-like sound through the
speaker. The battery strength icon shows the remaining charge in the battery. Three bars indicate full
charge. When you have less than
five minutes of talk time remaining, the indicator flashes.
Icon |
Flashes |
Charging |
Low Battery |
0-30% |
31-60% |
61-90% |
91-100% |
Discharging |
Low Battery |
0-10% |
11-40% |
41-70% |
71-100% |
Figure 1. Battery Charging Status
Detaching the Battery
To detach the battery, press the latch to release the battery and pull out the battery.
N O T E Before removing the battery, make sure the phone is turned Off.
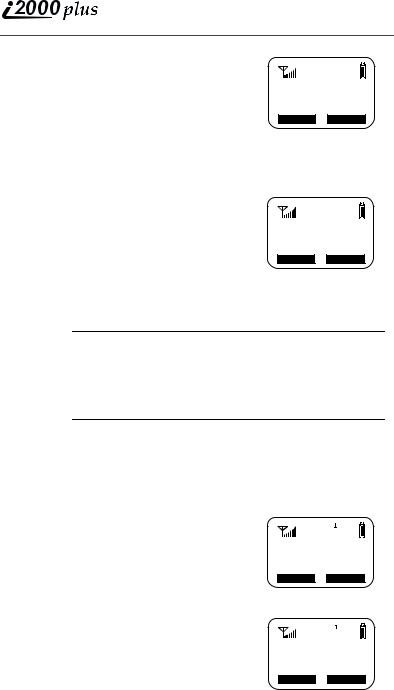
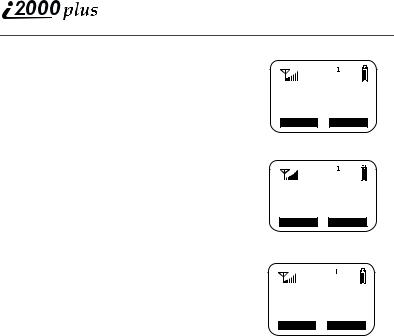
Turning On Your i2000plus Phone
Press funtil a set of icons appears on your display. (For a description of the icons, see Page 22.) Then a message, such as “Please Wait”, displays while the i2000plus phone connects to your carrier’s network.
|
|
|
|
|
|
|
|
|
|
|
|
|
|
|
|
|
|
|
|
|
|
(Your Carrier |
Please Wait |
||||||||
|
|
|
|
|
|
Message) |
|||||||||
|
|
|
|
|
|
Connecting |
|||||||||
|
|
|
|
(888) |
|
|
|
|
|||||||
|
|
|
|
|
|
|
|
|
|
|
|
|
|||
|
|
|
|
|
|
555-1212 |
|
|
|
|
|
|
|
|
|
|
First Screen |
|
|
Second Screen |
Third Screen |
||||||||||
17

The second line of text on the Phone Ready screen displays the System Name, which is the name of the network providing service in the iDEN or GSM service area.
If your Home carrier is an iDEN carrier, then when you are in an iDEN service area, the third line displays the local time and date. When you are in the GSM service area, the third line displays the name of your Home carrier.
The LED indicator located on the front of the i2000plus phone shows the service state. See Table 1 .
Table 1: Status Light (LED) Indicator
LED Indicator |
Status of Your i2000plus Phone |
|
|
Flashing Red |
Registering—your i2000plus phone is |
|
signing on to your carrier’s network. |
|
Please wait. |
|
|
Solid Red |
No service—your i2000plus phone |
|
cannot sign on. It will continue trying to |
|
connect every two minutes as long as |
|
it is turned on. |
|
|
Flashing Green |
In service—your i2000plus phone is |
|
ready to use. |
|
You can now place and receive calls. |
|
|
Solid Green |
In use—your i2000plus phone is |
|
currently being used. Check to make |
|
sure that you ended the last call by |
|
pressing e. |
|
|
Turning Off Your i2000plus Phone
Press and hold funtil you see the message “Powering Off”.
Light Sensor
On your i2000plus phone, when a key is pressed, the light sensor will activate the backlight only when your phone is in low light conditions. If illumination is needed, even when the backlight is not present, you can manually override the sensor by pressing and holding n. This will activate the backlight. In a charger, the backlight will always be illuminated.
www.motorola.com
18
Welcome
SIM Card PIN
To prevent unauthorized use of your phone, you may set a SIM card PIN. After the PIN is set, each time the i2000plus phone is turned on, a PIN must be entered. After you set a PIN, you can later change or disable it.
If your i2000plus phone requires a SIM PIN, follow the steps in
“Entering the PIN” on page 19.
If your i2000plus phone does not require a PIN and you wish to set one, follow the steps in “Enabling the PIN Requirement” on page 21.
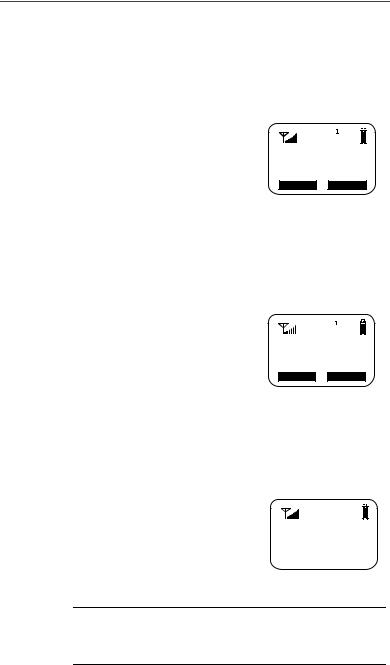
Entering the PIN
N O T E The Time and Date will not appear on your display when operating in GSM phone networks.
1.Carefully enter your PIN. As you enter it, an asterisk appears for each character. This prevents others from seeing your PIN.
Enter SIM PIN
****
If you enter an incorrect PIN, the mes- |
|
|
|
Cancl |
|
Ok |
|
sage, “Wrong PIN” appears. After three |
|
|
|
incorrect attempts, even if you turn off the
phone and turn it on again, the SIM card PIN is blocked. If this happens, see “Unblocking the PIN” on page 19.
2. Select “OK”. Now you are ready to place calls or check your mail.
You can disable the PIN entry requirement. For more information, see “Disabling the PIN Requirement” on page 21.
Phone Ready
(System Name)
2:12p 07/21
Name |
Unblocking the PIN
If you forget your PIN and try unsuccessfully to enter it three times, access to your i2000plus phone with that SIM will be blocked. To gain access, you must first unblock the PIN.
PIN Blocked
Call Your
Provider
Name Mail
19
To unblock the PIN:
1.Call your carrier for your PUK (PIN unblock code).
2.At the “Enter PUK” screen, enter your PIN Unblocking Key (PUK). As you enter it, an asterisk appears for each character. This prevents others from seeing your PUK.
3.Select “OK”.
4.At the “New PIN” screen, enter a new PIN.
5.Select “OK.
6.At the “Repeat New PIN” screen, enter the new PIN again.
7.Select “OK”. After the SIM stores your new PIN, your phone is ready for normal use.
Enter PUK **_______
Cancl |
Ok |
New PIN **_______
Cancl |
Ok |
N O T E If you unsuccessfully enter the PUK number ten times, the PUK is blocked. If this happens, you will get a message to call your service provider.
Depending on the network that you are on, you may be able to make emergency calls without a SIM card.
Changing the PIN
To change your SIM card PIN:
1.From the Phone Ready screen, press nuntil you see the “Prgm” menu option.
2.Select “Prgm”.
3.Press 4, 6.
4.Select “OK”. At the “Change PIN?” screen, select “OK”.
5.At the “Old PIN” screen, enter your current PIN then select “OK”.
46=Change SIM PINs
Exit |
Ok |
6.At the “New PIN” screen, enter your new PIN then select “OK”.
7.At the “Repeat New PIN” screen, enter your new PIN again then select “OK”.
New PIN
****
Cancl |
Ok |
www.motorola.com
20
Welcome
Disabling the PIN Requirement
Important! If you disable the PIN requirement, you remove protection of the personal data on your SIM card each time your i2000plus phone is turned on. Anyone can then use your phone and your personal data.
1.From the Phone Ready screen, press nuntil you see the “Prgm” menu option.
2.Select “Prgm”.
3.Press 4, 7. The “47=Require SIM PIN:On” screen displays, indicating that the PIN requirement is set.
4.Select “Off”.
47=Require SIM PIN:On
Exit |
Off |
5.Enter your SIM PIN (your carrier provides the initial SIM Card PIN).
6.Select “Ok”.
7.Select “Exit”.
Enabling the PIN Requirement
1.From the Phone Ready screen, press n until you see the “Prgm” menu option.
2.Select “Prgm”.
3.Press 4, 7. The 47=Require SIM PIN:Off” screen displays, indicating that the PIN requirement is off.
47=Require SIM PIN:Off
Exit |
On |
4.Select “On”.
5.Enter your SIM PIN (your carrier provides the initial SIM Card PIN).
6.Select “Ok”.
7.Select “Exit”.
When the PIN is enabled, you are prompted to enter your PIN each time you turn on your i2000plus phone. Until a valid PIN is entered, you can use the phone only to enter the emergency number.
After the PIN is accepted, the Phone Ready screen displays.
Enter
SIM PIN
N O T E Important! Incorrectly entering your PIN three times causes the phone to be blocked. To unblock your phone, you must contact your carrier.
21
Keypad Lock
On your i2000plus phone you may lock your keypad in Phone Mode so inadvertent key presses will not result in digits being dialed or a phone call being placed. When in Phone Mode, press nthen * sequentially to activate the Keypad Lock feature. To deactivate the Keypad Lock feature, press nthen *sequentially.
While the keypad is locked, the only keys that may be pressed are fto turn off your phone, or nfollowed by *to turn off the keypad lock. The keypad lock will be automatically suspended if the i2000plus phone receives a Phone, Private, or Group call. At the end of the call, the keypad lock will be automatically re-activated (if in Phone mode).
N O T E : Emergency Calls cannot be placed while the keypad lock is active.
Display Icons
Display icons appear on the screen to inform you of existing conditions. See the following list.
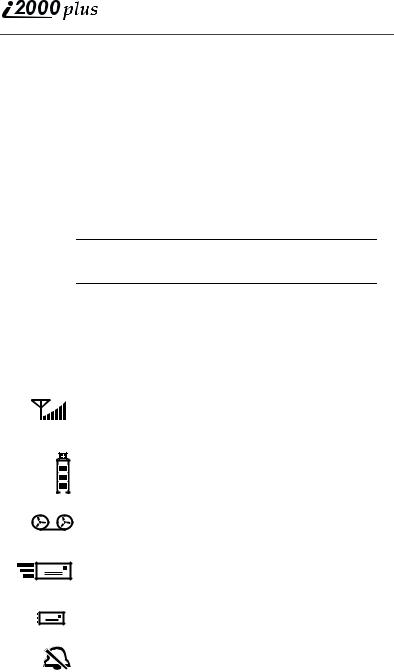
The following icons may appear along the top of the display.
Signal Strength Indicator
Shows the signal strength. Six bars indicate the strongest signal. Calls and messages may not be sent or received in weak signal areas.
Battery Strength Indicator
Shows the remaining charge in your battery. Three bars show full charge. The indicator flashes when you have less than five minutes of talk time remaining.
Voice Mail
Indicates that unplayed messages are waiting in your voice mail box.
New Message Mail
Indicates that you have new text messages in your mail box.
Unread Message Mail
Indicates that you have unread Message Mail.
VibraCall® alert
Indicates that the VibraCall alert option is turned on. You will not hear a ring tone.
www.motorola.com
22

Welcome
Call Forward*
Indicates that incoming phone calls are being forwarded.
Active Line Indication
Displays the active phone line (1 or 2).
Private/Group Speaker
Indicates that the Private/Group speaker is off. You will hear calls through the earpiece.
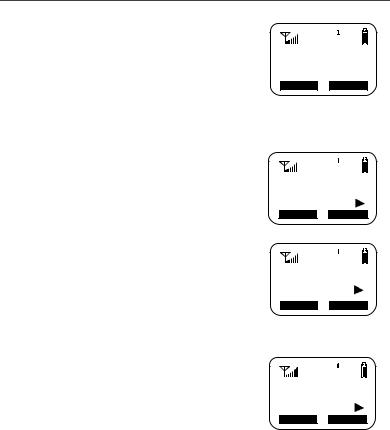
Packet Data*
Indicates packet data registration. The blinking arrows indicate send and receive activity. For more information, see the Wireless Data User’s Guide.
Some of the following icons may appear in the mini-browser.
Secure Packet Data Connection
Indicates that your packet data information is encrypted during transmission.
More Information
Indicates that there is more text to read above, below, or above and below the current screen.
About Modes and Menus
Modes and menus are the navigational tools, providing access to the various features of your i2000plus phone. Pressing mtakes you through the mode choices. Pressing ntakes you through the menu options within each mode.
There are four modes:
•Phone–For cellular phone calls. See Page 27.
•Private–for one-to-one radio calls. See Page 55.
•Group–For radio calls with all individuals in a designated talkgroup. See Page 59.
•Net–for mini-browser use*. See the Net Mode User’s Guide.
To change modes:
Press muntil you see the desired mode.
To select menu options:
*Network and subscription dependent feature. Not available in all areas.
23

Press nuntil you see the desired menu option, then press ounder the desired menu option to select it.
Setting the Time and Date
If your carrier provides this option, you can set your phone to display the current time and date. Unless the phone is turned off, it continues to display the current time during a loss of service.
You have a choice of a 12or a 24-hour clock format. See Table 2.
N O T E When this feature is activated, your phone automatically displays local time.
Table 2: Time Display Options
12-Hour Display |
24-Hour Display |
|
|
12:00a |
00:00 |
|
|
6:25a |
06:25 |
|
|
12:00p |
12:00 |
|
|
6:25p |
18:25 |
|
|
You have a choice of either a MM/DD (month/day) or a DD/MM (day/ month) date format. See Table 3.
Table 3: Date Display Options
|
Month/Day Format |
Day/MonthFormat |
Date |
(MM/DD) |
(DD/MM) |
|
|
|
January 2nd |
01/02 |
02/01 |
|
|
|
January 31st |
01/31 |
31/01 |
|
|
|
October 9th |
10/09 |
09/10 |
|
|
|
December 31st |
12/31 |
31/12 |
|
|
|
If your carrier activates the time and date, they are displayed on the third line in all modes (Phone, Private, and Group). The time of day is also shown during an active Phone call. The time and date are not displayed in Group mode when you select an Area option.
www.motorola.com
24
Welcome
To set the time and date format:
1.From the Phone Ready screen, press n until you see the “Prgm” menu option.
2.Select “Prgm”
3.Press 7, 1.
4.Select “Ok”. The Time/Date screen displays.
The default (preset) time and date format that displays depends on your carrier. You can accept the default format or select an alternate format.
71=Time/ Date
Exit |
Ok |
Time/Date
Display:On
5.Press s until you see the Time Format screen.
6.Do one of the following:
Exit |
Off |
Time Format:
12 Hour
•To use the 12-hour format, go to the next step.
Exit |
24hr |
•To use the 24-hour format, select
“24hr”. See Table 2 on page 24.
7.Press s until you see the Date Format screen.
8.Do one of the following:
•To use the MM/DD format, select “Exit”.
Date Format:
MM/DD 
Exit |
DD/MM |
•Or to use the DD/MM format, select
“DD/MM”. See Table 3 on page 24.
9.Select “Exit”. The Ready screen for each mode (Phone, Group, and Private) now displays the selected time and date formats.
Changing the Display Language
You can customize your i2000plus phone to display one of four languages: English, French, Spanish, or Portuguese. You can manually select one of these languages or have your SIM select it for you (Automatic).
To change the displayed language:
1.From the Phone Ready screen, press nuntil you see the “Prgm” menu option.
2.Select “Prgm”
3.Press 7, 0.
25
4.Select “Ok”.
5.Press s to scroll through the language options.
Selecting “Exit” at any time retains the current language selection.
6.When the desired language appears on your display, select “Ok”. The displayed text immediately changes to the selected language.
70=Language Automatic
Exit |
Ok |
Language
English
Cancl |
Ok |
7. Select “Exit”.
The language that you select will be the displayed language.
Selectable Backlight Timer
70=Language English
Exit |
Ok |
Your Phone’s backlight is what illuminates the display when you, for example, first receive or make calls. Through your Programming Menu.
1.Press nuntil you see “Prgm” on the display.
2.Select “Prgm”.
3.Select 1, 6.
4.Select “Ok”.
5.Press s to scroll through the backlight timer options.
When the desired backlight timer period appears on your display, select “Ok”. The backlight timer value immediately changes to the selected value.
www.motorola.com
26

Making Phone Calls
MAKING PHONE CALLS
In addition to making and receiving phone calls in Phone mode, you can use the speakerphone, set vibration alerts, forward calls*, use call
waiting*, put calls on hold, use three-way calling*, and create and use stored lists. Phone Ready is the main screen.
You can also have an optional, alternate line on your i2000plus phone (iDEN systems only). Your alternate line will have its own unique number so that you can designate special use for each line.
You can place a call by entering the phone number on the keypad.
1.From the “Phone Ready” screen, using the keypad, enter the desired number.
If you make a mistake, press lonce to move back one digit, or select “Cancl” to start over.
2.Press eto place the call.
3.To end the call, press e.
Phone Ready (System Name) 3:15p 08/21
Name |
International Phone Calls Using Plus Dialing
Plus Dialing enables you to place an International call from any country -- without entering the local international access code.
To make an international phone call, press and hold 0before dialing the number. After about two seconds, the international dialing prefix + appears in the display. This allows you to call from any country without knowing the local international access code.
Inserting Pauses into Phone Numbers
To add a three-second pause character to a phone number, press and hold *for two seconds where you want the pause. The pause symbol (P) will appear.
Using Other Dialing Methods
To use Scroll, Speed Dial, or Name Search, names and numbers must be programmed in your phone. See “Creating, Editing, and Using Stored Lists” on page 44.
*Network and subscription dependent feature. Not available in all areas.
27

Scroll
1.From the Phone Ready screen, press s to scroll backward or forward through your stored list of numbers and names.
2.Press eto place the call.
3.To end the call, press e.
Speed Dial
1.From the Phone Ready screen, press n until you see the “Spd#” option on the last line of your display.
2.Select “Spd#”.
3.Enter the assigned speed-dial number (1-100). You will see the stored name and phone number associated with the speed-dial number.
4.Press e to place the call.
5.To end the call, press e.
Name Search
1.From the Phone Ready screen, select “Name”.
2.Using the keypad, enter the first letter of the desired name. For example, to search for the name Bob:
a.Enter “B” by pressing 2twice.
b.Press s to scroll through all the names starting with “B” until you see “Bob”.
3.Press eto place the call.
4.To end the call, press e.
Last Number Redial
To redial the last number that you called, press and hold efor 2 seconds.
Turbo Dial®
Turbo Dial feature enables you to quickly place a phone call by simply pressing and holding the numeric key on the keypad that corresponds to the stored entry in your Phone list directory. There are nine Turbo Dial key positions, 1 through 9.
N O T E If you are in a Phone call, place the call on hold before using Turbo Dial.
www.motorola.com
28
Loading...