


 Loading...
Garmin nuvi2460LMT, EU w/Premium Traffic, nuvi 2350, w/o Data, nuvi 2350, AUS/NZ, AVIS, nuvi 2340LT, Western Europe, w/Premium Traffic, nuvi 2340LMT, Western Europe Manual
...
nüvi® 2200/2300/2400 series
owner’s manual
for use with these nüvi models: 2200, 2240, 2250, 2300, 2310, 2340, 2350, 2360, 2370 2440, 2450, 2460

© 2010–2011 Garmin Ltd. or its subsidiaries
All rights reserved. Except as expressly provided herein, no part of this manual may be reproduced, copied, transmitted, disseminated, downloaded or stored in any storage medium, for any purpose without the express prior written consent of Garmin. Garmin hereby grants permission to download a single copy of this manual onto a hard drive or other electronic storage medium to be viewed and to print one copy of this manual or of any revision hereto, provided that such electronic or printed copy of this manual must contain the complete text of this copyright notice and provided further that any unauthorized commercial distribution of this manual or any revision hereto is strictly prohibited.
Information in this document is subject to change without notice. Garmin reserves the right to change or improve its products and to make changes in the content without obligation to notify any person or organization of such changes or improvements. Go to the GarminWeb site (www.garmin.com) for
current updates and supplemental information concerning the use and operation of this and other Garmin products.
Garmin®, the Garmin logo, nüvi®, and MapSource® are trademarks of Garmin Ltd. or its subsidiaries, registered in the USAand other countries. Garmin Lock™, ecoRoute™, cityXplorer™, myTrends™, nüMaps Guarantee™, nüMaps Lifetime™, nüRoute™, and trafficTrends™ are trademarks of Garmin Ltd. or its subsidiaries.These trademarks may not be used without the express permission of Garmin.
The Bluetooth® word mark and logos are owned by the Bluetooth SIG, Inc., and any use of such name by Garmin is under license.Windows® andWindows NT® are registered trademarks of Microsoft Corporation in the United States and/or other countries. Mac® is a registered trademark ofApple Computer, Inc. microSD™ is a trademark of SanDisk or its subsidiaries.

Table of Contents
nüvi 2200/2300/2400 Series |
|
Models.................................. |
1 |
Getting Started.................... |
2 |
Connecting the Device to |
|
Vehicle Power.......................... |
2 |
Mounting the Device.................. |
4 |
About myDashboard.................. |
4 |
Device Overview........................ |
5 |
Main Menu............................ |
9 |
Using the Main Menu................. |
9 |
About Main Menu |
|
Customization.......................... |
9 |
Choosing a Main Menu............. |
11 |
Finding Locations............. |
12 |
About Points of Interest............ |
12 |
Setting a Home Location.......... |
15 |
Location Searches................... |
16 |
Using the Location Map........... |
19 |
Favorites.................................. |
21 |
Table of Contents |
|
Planning a Trip......................... |
22 |
Editing a Trip Itinerary.............. |
22 |
Voice Command................ |
24 |
About Voice Commands........... |
24 |
Map Pages......................... |
27 |
Viewing the Map While |
|
Navigating.............................. |
27 |
Hands-Free Phone Calls... |
32 |
About Pairing the Devices........ |
32 |
Using the Tools................. |
36 |
Viewing Current Location |
|
Information............................. |
36 |
Using Help................................ |
36 |
About ecoRoute ...................... |
36 |
Using the Picture Viewer.......... |
39 |
Using the World Clock ............. |
40 |
Using the Calculator................. |
40 |
Capturing Screenshots............. |
40 |
Using the Unit Converter ......... |
41 |
nüvi 2200/2300/2400 Series Owner’s Manual |
i |

Table of Contents |
|
|
|
|
Traffic................................. |
42 |
Restoring Settings.................... |
56 |
|
Subscription Activation............. |
42 |
Appendix............................ |
57 |
|
Traffic Receiver........................ |
43 |
Power Cables........................... |
57 |
|
Receiving Traffic Information.... |
43 |
About GPS Satellite Signals..... |
57 |
|
Traffic on Your Route............... |
44 |
Caring for Your Device............. |
57 |
|
Adding a Subscription.............. |
45 |
Locking the Device................... |
59 |
|
About Offers............................. |
46 |
Erasing User Data.................... |
60 |
|
Data Management............. |
47 |
Changing the Fuse in the |
|
|
File Types................................. |
47 |
Vehicle Power Cable............. |
60 |
|
About Memory Cards............... |
47 |
Mounting on Your Dashboard... |
61 |
|
Transferring Files To Your |
|
Removing the Device, Cradle, |
|
|
Computer .............................. |
47 |
and Mount.............................. |
61 |
|
Deleting Files .......................... |
48 |
About nüMaps Lifetime ........... |
62 |
|
Customizing the Device.... |
49 |
Purchasing Additional Maps..... |
63 |
|
System Settings....................... |
49 |
Custom Points of Interest......... |
63 |
|
Navigation Settings.................. |
50 |
Purchasing Accessories........... |
64 |
|
Route Preferences................... |
51 |
Contacting Garmin Product |
64 |
|
Display Settings |
54 |
Support.................................. |
||
Troubleshooting |
65 |
|||
Language Settings................... |
55 |
|||
Viewing Map Information ......... |
55 |
Index................................... |
67 |
|
Bluetooth Settings.................... |
55 |
|
|
|
Enabling Traffic........................ |
56 |
|
|
ii |
nüvi 2200/2300/2400 Series Owner’s Manual |

nüvi 2200/2300/2400 Series Models
nüvi 2200/2300/2400 Series Models
Not all features are supported on all models. Go to www.garmin.com or see the packaging contents on your product box for more information.
Models with “LT,” “LM,” and “LMT” in their name include lifetime subscriptions. See pages 42 and 62.
Model |
Bluetooth© |
Lane Assist |
Junction |
Historical |
Voice |
Technology |
View |
Traffic |
Command |
||
|
|
|
|
|
|
2200 |
|
|
|
|
|
|
|
|
|
|
|
2240/2250 |
|
|
|
|
|
|
|
|
|
|
|
2300 |
|
Europe Only |
Europe |
|
|
|
Only |
|
|
||
2310 |
|
|
|
|
|
|
|
|
|
|
|
2340/2350 |
|
|
|
|
|
|
|
|
|
|
|
2360 |
|
|
|
|
|
|
|
|
|
|
|
2370 |
|
|
|
|
|
|
|
|
|
|
|
2440/2450 |
|
|
|
|
|
|
|
|
|
|
|
2460 |
|
|
|
|
|
|
|
|
|
|
|
nüvi 2200/2300/2400 Series Owner’s Manual |
1 |
Getting Started
Getting Started
‹ WARNING
See the Important Safety and Product Information guide in the product box for product warnings and other important information.
1.Connect the device to vehicle power (page 2).
2.Mount the device (page 4).
3.Register the device (page 5).
4.Check for updates.
•Software updates (page 5).
•Free map update (page 5).
Connecting the Device to Vehicle Power
‹ WARNING
This product contains a lithium-ion battery.To prevent the possibility of personal injury or product damage caused by battery exposure to extreme heat, remove the device from the vehicle when exiting or store it out of direct sunlight.
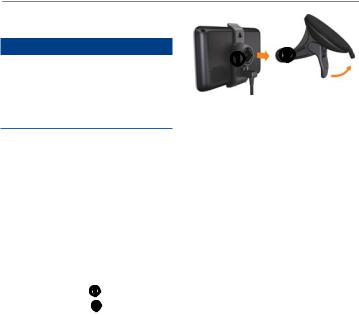
Charge your device before using it on battery power.
1.Fit the bottom of your device into the mount.
2.Tilt your device back until it snaps into place.
2 |
nüvi 2200/2300/2400 Series Owner’s Manual |

Getting Started
3.Plug the vehicle power cable into the USB connector on the mount or device.
5.If you are using a traffic receiver in Europe, connect the external antenna to the traffic receiver and secure it to the windshield using the suction cups.
After the device has been connected to vehicle power, the following occurs.
•The device turns on.
•The device acquires satellite signals.When at least one of the
 bars is green, your device has acquired satellite signals.
• NOTE:The device may need a
clear view of the sky to acquire satellite signals.
• The device charges as you drive.
 in the status bar indicates the
4.Plug the other end of the vehicle power cable into a power outlet in your vehicle.
status of the internal battery.
nüvi 2200/2300/2400 Series Owner’s Manual |
3 |
Getting Started
Mounting the Device
Notice
Before mounting the device, see the Important Safety and Product Information guide for information about laws pertaining to windshield mounting.
1.Remove the clear plastic from the suction cup.
2.Clean and dry your windshield and the suction cup with a lintfree cloth.
3.Place the suction cup on the windshield.
4.Flip the lever back toward the windshield.
5.Snap the mount onto the suction cup arm .
About myDashboard
Use myDashboard to register your device, check for software and map updates, access product manuals and support, and more.
Setting Up myDashboard
1.Connect the USB cable to the USB connector on the device.
2.Connect the USB cable to the USB port on your computer.
3.Go to www.garmin.com /dashboard.
4.Follow the on-screen instructions.
4 |
nüvi 2200/2300/2400 Series Owner’s Manual |
Registering the Device
1.From myDashboard, click
Register Now.
2.Follow on-screen instructions.
Updating the Software
1.Open myDashboard (page 4).
2.Under Software Updates, click
Update Now.
3.Follow the on-screen instructions.
nüMaps Guarantee™
If you register at http://my.garmin
.com within 60 days of acquiring satellites while driving, your device is eligible for one free map update. Go to www.garmin.com/numaps.
Updating Maps
1.Open myDashboard (page 5).
2.Register the device (page 5).
3.Under Map Updates, click
Update Now.
4.Follow the on-screen instructions.
Getting Started
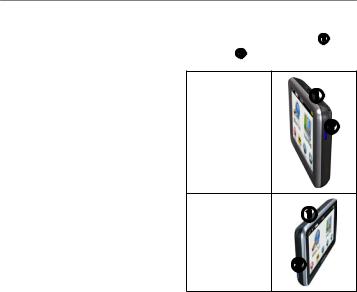
Device Overview
Each model has a power key and a microSD™ card slot.
nüvi 2200
nüvi 2300/2400
nüvi 2200/2300/2400 Series Owner’s Manual |
5 |

Getting Started
USB Connectors on the Devices
Use the USB connector on the device to connect the device to vehicle power or a computer.
The USB connector is in different locations on the nüvi 2200, 2300, and 2400 models.
|
mini-USB |
micro-USB |
|
connector |
connector |
2200 |
Back cover of |
None |
|
the device |
|
2300 |
Back of the |
Bottom of the |
|
mount |
device |
2400 |
Side of the |
Bottom of the |
|
mount |
device |
Turning the Device Off
1.Hold the Power key for four seconds.
2.Touch Off.
Locking the Screen
This feature is only available on the nüvi 2360.You can lock your screen to prevent accidental screen touches.
1.Press and quickly release the
Power key.
2.Touch Lock.
Adjusting the Volume
1.Touch Volume.
2.Select an option:
•Move the slider from left to right to adjust the volume.
•Touch Volume >  to mute all audio.
6 |
nüvi 2200/2300/2400 Series Owner’s Manual |
Adjusting the Screen
Brightness
1.Touch Tools > Settings > Display > Brightness.
2.Touch and move the scroll bar to adjust screen brightness.
Using the On-Screen Buttons
•Touch and hold  to quickly return to the main menu.
•Touch  and
and  to see more choices.
•Touch and hold  and
and  to scroll faster.
Getting Started
Using the On-Screen Keyboard
See “System Settings” to change the keyboard layout (page 49).
•Touch a character on the keyboard to enter a letter or number.
•Touch  to add a space.
•Touch  to change the character case.
•Touch between two characters to select a letter.
•Touch  to delete a character.
•Touch and hold  to erase the entire entry.
•Touch  to select the keyboard language mode.
•Touch  to enter special characters, such as punctuation marks.
•Touch  to change character capitalization.
nüvi 2200/2300/2400 Series Owner’s Manual |
7 |

Getting Started
Orienting the Screen
NOTE:Vertical (portrait) mode is available on the nüvi 2360.
Rotate your device to view in horizontal (landscape) or vertical (portrait) mode.
8 |
nüvi 2200/2300/2400 Series Owner’s Manual |
Main Menu
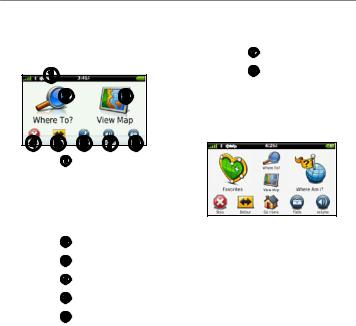
Using the Main Menu
•Touch to change the transportation mode.
Routing is calculated differently based on your transportation mode.
•Touch to find a destination.
•Touch to view the map.
•Touch to stop a route.
•Touch to detour a route.
•Touch to make a call when connected to a compatible mobile phone.
Getting Started
•See www.garmin.com /bluetooth for information.
•Touch to adjust the volume.
•Touch to open the menu of tools and settings.
About Main Menu
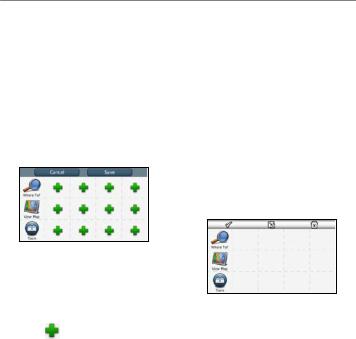
Customization
On 2400 models, you can create a customized main menu by adding icons from other screens on the device, such as location categories or frequently used tools.You can also edit the size and position of the main menu icons.
nüvi 2200/2300/2400 Series Owner’s Manual |
9 |
Getting Started
You can switch between the default main menu and your customized main menu.
Adding an Icon to the Custom Main Menu
The main menu can contain up to 15 icons.
1.Touch Tools > Settings > Custom Main Menu.
NOTE:TheWhereTo?,View Map, andTools icons are automatically included on the main menu, and cannot be deleted.
2. |
Touch |
in the square you |
|
would like to fill. |
|
3. |
Touch an icon. |
|
The icon is added to the custom main menu.
TIP: Select to view additional icons in a category.
4. Touch Save.
Editing the Main Menu Icons
Before you can edit icons, you must create a customized main menu (page 10).
1.Touch Tools > Settings > Custom Main Menu.
2.Select an icon on the page.
3.Touch an option.
•Touch  to delete the icon.
•Touch to enlarge the icon.
10 |
nüvi 2200/2300/2400 Series Owner’s Manual |

Getting Started
The icon expands from one cell to four cells.
NOTE:The main menu can fit up to two large icons.
• Touch |
to shrink a large |
icon. |
|
•Drag an icon across the screen to move the icon.
4.Touch > Save.
Choosing a Main Menu
You can switch between the default main menu and your customized main menu.Your customizations are saved while you use the default main menu.
1.Touch Tools > Settings > Custom Main Menu.
2.Select Use Default Main Menu or Use Custom Main Menu.
nüvi 2200/2300/2400 Series Owner’s Manual |
11 |

Finding Locations
Finding Locations
The device offers many methods for finding locations.
•By category (page 12)
•Near another location (page 14)
•By spelling the name (page 16)
•By address (page 16)
•Using the map (page 17)
•Using recently found locations (page 17)
•Using coordinates (page 18)
•Using photos (page 18)
•Using Favorites (page 21)
About Points of Interest
The detailed maps loaded in your device contain points of interest, such as restaurants, hotels, and auto services. Use the Points of Interest function to browse for nearby businesses and attractions.
Finding a Point of Interest by Category
1.From the main menu, touch
Where To? > Points of Interest.
2.Select a category.
3.If necessary, select a subcategory.
4.Select a destination.
5.Touch Go!.
6.If necessary, select an option:
•Touch Drive.
•Touch Walk.
•Touch Public Transit to calculate a route that combines public transit and walking.
12 |
nüvi 2200/2300/2400 Series Owner’s Manual |

NOTE:You must have cityXplorer™ maps loaded to navigate using public transit (page 31).
7.If necessary, select a route (page 20).
Searching Within a Category
To narrow your search results, you can search within some categories.
1.From the main menu, touch
Where To? > Points of Interest.
2.Select a category.
3.If necessary, select a subcategory.
4.Touch  .
.
5.Enter all or part of the name.
6.Touch Done.
Finding Locations
Adding a Stop While
Navigating a Route
Before you can add a stop, you must be navigating a route inAutomobile mode.
1.While navigating a route, select  to return to the main menu.
2.Touch Where To?.
3.Search for the location (page 12).
4.Touch Go!.
5.Select an option:
•Touch Add to Current Route.
•Touch Start New Route.
nüvi 2200/2300/2400 Series Owner’s Manual |
13 |

Finding Locations
Searching Near Another Location
NOTE:The device automatically searches for places near your present location.
1.From the main menu, touch
Where To? >  > Near.
2.Touch an option.
3.Touch Save.
4.If, necessary, enter search information.
5.Touch a destination.
Taking a Detour
While navigating a route, you can use detours to avoid obstacles ahead of you, such as construction zones.
NOTE: If the route you are currently taking is the only reasonable option, the device might not calculate a detour.
1.While navigating a route, touch  to return to the main menu.
2.Touch Detour or Recalc.
Finding Parking
1.From the main menu, touch
Where To? > Parking > Find Parking.
2.Touch a parking location.
3.Touch Go!.
Finding Your Last Parking Spot
From the main menu, touch
Where To? > Parking > Last
Spot.
14 |
nüvi 2200/2300/2400 Series Owner’s Manual |

Saving a Parking Spot
1.Touch Where To? > Parking.
2.Touch Parking or Last Spot.
3.Touch  > Save.
4.If necessary, enter a name.
Stopping the Route
While navigating a route, touch  > Stop.
Navigating Off Road
If you are not following roadways as you navigate, use Off Road mode.
1.From the main menu, touch Tools
> Settings > Navigation.
2.Touch Automobile > nüRoute > Calculation Mode > Off Road > Save.
The route will be calculated as a straight line to the location.
Finding Locations
Setting a Home Location
You can set your home location for the location you return to most often.
1.From the main menu, touch
Where To? > Go Home.
2.Select Enter MyAddress, Use My Current Location, or Recently Found.
Going Home
Before you can navigate to home, you must set a home location.
From the main menu, touch
Where To? > Go Home.
Resetting Your Home Location
1.From the main menu, touch
Where To? >  > Set Home Location.
2.Select an option.
nüvi 2200/2300/2400 Series Owner’s Manual |
15 |

Finding Locations
Editing Your Home Location
Information
1.From the main menu, touch
Where To? > Favorites > Home.
2.Touch  > Edit.
3.Enter your changes.
4.Touch Done.
Location Searches
You can search for locations by using the on-screen keyboard, entering the location’s address or coordinates, browsing the map, and more.
Finding a Location by Spelling the Name
1.From the main menu, touch
Where To? > Points of Interest > Spell Name.
2.Enter all or part of the name and select Done.
3.Select a destination and select
Go!.
Finding an Address
NOTE: Depending on the version of the built-in map data on your device, the button names and the order of steps could be different than the steps below.
1.From the main menu, touch
Where To? > Address.
2.If necessary, change the state, the country, or the province.
3.Touch Spell City.
4.Enter the city/postal code.
TIP: If you are unsure of the city/ postal code, select SearchAll.
5.Touch Done.
6.If necessary, select the city/postal code.
NOTE: Not all map data provides postal code searching.
7.Enter the number of the address.
8.Touch Done.
16 |
nüvi 2200/2300/2400 Series Owner’s Manual |
9.Enter the street name.
10.Touch Done.
11.If necessary, select the street.
12.If necessary, select the address.
Browsing the Map
•Touch Where To? > Browse Map.
•See “Using the Location Map” (page 19) for information on using map buttons.
Finding a Location Using the
Map
1.From the main menu, touch
Where To? > Browse Map.
2.Select a location.
An information box appears for the location.
3.Touch the information box.
4.Touch Go!.
Finding Locations
Viewing a List of Recently Found Locations
Your device stores the last 50 locations you have found.
From the main menu, touch
Where To? > Recently Found.
Clearing the List of Recently Found Locations
From the main menu, touch
Where To? > Recently Found >  > Clear > Yes.
nüvi 2200/2300/2400 Series Owner’s Manual |
17 |

Finding Locations
Entering Coordinates
If you know the geographic coordinates of your destination, you can use your device to navigate to the destination using the latitude and longitude coordinates.This can be especially helpful when geocaching.
1.From the main menu, touch
Where To? > Coordinates.
2.Select a field to enter the latitude and longitude data.
3.Touch View on Map.
4.Touch Go!.
Changing the Map Coordinate
Format
1.From the main menu, touch
Where To? > Coordinates >  Format.
2.Select a format.
Using Photo Navigation
You can upload pictures onto your device or memory card that include location information and create routes to the pictured locations.
1.Connect your device to your computer (page 47).
2.Go to http://connect.garmin.com /photos.
3.Follow the instructions on the Web site to select and load pictures.
4.Disconnect the device from the computer.
5.Turn on the device.
6.From the main menu, touch
Where To? > Favorites > Photos.
Alist of pictures with location information appears.
7.Select a picture.
18 |
nüvi 2200/2300/2400 Series Owner’s Manual |
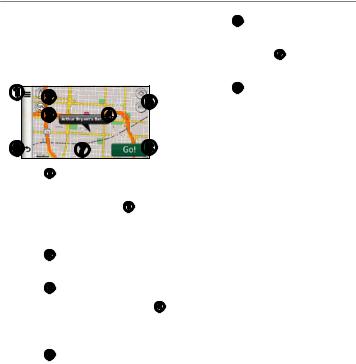
Using the Location Map
The location map opens after you select a location from theWhereTo? menu.
|
|
|
•Touch to save the location to your Favorites.
•On some models, touch to call the selected location when the device is connected to a phone.
•Touch to switch between 2-D and 3-D views.
•Touch to rotate the view.
•Touch the information balloon to view more information for the location.
•Touch to zoom in and out.
Finding Locations
•Touch to return to the previous page.
•Touch and drag to view different parts of the map.
•Touch to create a turn-by-turn route to this location.
Viewing a Route on the Map
1.From the location map, touch the information balloon.
2.Touch the route information box.
Removing an Incorrect Point of Interest from the Map
If your search results contain an outdated or incorrect point of interest, you can remove the location from future searches.
1.From the location map, touch the information balloon.
2.Touch  > Report Error > Yes.
nüvi 2200/2300/2400 Series Owner’s Manual |
19 |
Loading...