


 Loading...
QUATIX® 6
Owner’s Manual
© 2020 Garmin Ltd. or its subsidiaries
All rights reserved. Under the copyright laws, this manual may not be copied, in whole or in part, without the written consent of Garmin. Garmin reserves the right to change or improve its products and to make changes in the content of this manual without obligation to notify any person or organization of such changes or improvements. Go to www.garmin.com for current updates and supplemental information concerning the use of this product.
Garmin®, the Garmin logo, ANT+®, Approach®, Auto Lap®, Auto Pause®, BlueChart®, Edge®, Fusion®, inReach®, quatix®, QuickFit®, TracBack®, VIRB®, Virtual Partner®, and Xero® are trademarks of Garmin Ltd. or its subsidiaries, registered in the USA and other countries. Body Battery™, Connect IQ™, Fusion-Link™, Garmin Connect™, Garmin Explore™, Garmin Express™, Garmin Golf™, Garmin Move IQ™, Garmin Pay™, GNT™, HRM-Run™, HRM-Swim™, HRM-Tri™, tempe™, TruSwing™, TrueUp™, Varia™, Varia Vision™, and Vector™ are trademarks of Garmin Ltd. or its subsidiaries. These trademarks may not be used without the express permission of Garmin.
Android™ is a trademark of Google Inc. Apple®, iPhone®, iTunes®, and Mac® are trademarks of Apple Inc., registered in the U.S. and other countries. The BLUETOOTH® word mark and logos are owned by the Bluetooth SIG, Inc. and any use of such marks by Garmin is under license. The Cooper Institute®, as well as any related trademarks, are the property of The Cooper Institute. Di2™ is a trademark of Shimano, Inc. Shimano® is a registered trademark of Shimano, Inc. iOS® is a registered trademark of Cisco Systems, Inc. used under license by Apple Inc. The Spotify® software is subject to third-party licenses found here: https://developer.spotify.com/legal/third-party-licenses. STRAVA and Strava™ are trademarks of Strava, Inc. Advanced heartbeat analytics by Firstbeat. Training Stress Score™ (TSS), Intensity Factor™ (IF), and Normalized Power™ (NP) are trademarks of Peaksware, LLC. Wi Fi® is a registered mark of Wi-Fi Alliance Corporation. Windows® is a registered trademark of Microsoft Corporation in the United States and other countries. Other trademarks and trade names are those of their respective owners.
This product is ANT+® certified. Visit www.thisisant.com/directory for a list of compatible products and apps.
Table of Contents |
|
Introduction..................................................................... |
1 |
Getting Started ............................................................................ |
1 |
Buttons ................................................................................... |
1 |
Using the Watch ..................................................................... |
1 |
Viewing the Controls Menu ............................................... |
1 |
Viewing Widgets ................................................................ |
1 |
Customizing the Watch .......................................................... |
1 |
Pairing Your Smartphone with Your Watch ................................ |
2 |
Charging the Device ................................................................... |
2 |
Product Updates ......................................................................... |
2 |
Setting Up Garmin Express ................................................... |
2 |
Solar Charging................................................................ |
2 |
Viewing the Solar Widget ............................................................ |
2 |
Tips for Solar Charging ............................................................... |
2 |
Marine Activities............................................................. |
2 |
Marine Maps and Charts ............................................................ |
2 |
Downloading Marine Maps and Charts .................................. |
2 |
Sailing ......................................................................................... |
2 |
Tack Assist ............................................................................. |
2 |
Calibrating the Tack Assist ................................................ |
3 |
Entering a Fixed Tack Angle or True Wind Direction ........ |
3 |
Tips for Getting the Best Lift Estimate ............................... |
3 |
Sail Racing ............................................................................. |
3 |
Setting the Starting Line .................................................... |
3 |
Starting a Race ................................................................. |
3 |
Setting the Sailing Units .................................................... |
3 |
Tides ........................................................................................... |
3 |
Viewing the Tide Data ............................................................ |
3 |
Fishing ........................................................................................ |
4 |
Going Fishing ......................................................................... |
4 |
Anchor ........................................................................................ |
4 |
Marking Your Anchor Location ............................................... |
4 |
Anchor Settings ...................................................................... |
4 |
Anchor Assist Settings ........................................................... |
4 |
Autopilot ...................................................................................... |
4 |
Pairing With an Autopilot ........................................................ |
4 |
Controlling the Autopilot ......................................................... |
4 |
Boat Data .................................................................................... |
4 |
Streaming Boat Data .............................................................. |
4 |
Marking a Waypoint on Your Chartplotter .............................. |
4 |
GNT™ 10 .................................................................................... |
4 |
Streaming GNT 10 Data ........................................................ |
4 |
Fusion-Link™ App ...................................................................... |
5 |
Connecting to a Fusion Stereo .............................................. |
5 |
Activities and Apps........................................................ |
5 |
Starting an Activity ...................................................................... |
5 |
Tips for Recording Activities .................................................. |
5 |
Changing the Power Mode .................................................... |
5 |
Stopping an Activity .................................................................... |
5 |
Adding or Removing a Favorite Activity ...................................... |
5 |
Creating a Custom Activity ......................................................... |
5 |
Indoor Activities .......................................................................... |
5 |
Calibrating the Treadmill Distance ......................................... |
6 |
Recording a Strength Training Activity ................................... |
6 |
Outdoor Activities ........................................................................ |
6 |
Viewing Your Ski Runs .......................................................... |
6 |
Recording a Backcountry Skiing Activity ................................ |
6 |
Using the Metronome ............................................................. |
6 |
Playing Audio Prompts During an Activity .............................. |
7 |
Jumpmaster ........................................................................... |
7 |
Multisport .................................................................................... |
7 |
Triathlon Training ................................................................... |
7 |
Creating a Multisport Activity ................................................. |
7 |
Swimming ................................................................................... |
7 |
Swim Terminology ................................................................. |
7 |
Stroke Types .......................................................................... |
7 |
Tips for Swimming Activities .................................................. |
7 |
Resting During Pool Swimming ............................................. |
7 |
Auto Rest ............................................................................... |
8 |
Training with the Drill Log ...................................................... |
8 |
Turning Off Wrist-based Heart Rate While Swimming ........... |
8 |
Golfing ........................................................................................ |
8 |
Playing Golf ............................................................................ |
8 |
Hole Information ..................................................................... |
8 |
Big Numbers Mode ........................................................... |
8 |
Measuring Distance with Button Targeting ............................ |
8 |
Changing Holes ..................................................................... |
8 |
Moving the Flag ..................................................................... |
8 |
Viewing Measured Shots ....................................................... |
9 |
Viewing Layup and Dogleg Distances ................................... |
9 |
Saving Custom Targets ..................................................... |
9 |
Keeping Score ....................................................................... |
9 |
Updating a Score .............................................................. |
9 |
Setting the Scoring Method ............................................... |
9 |
Setting Your Handicap ...................................................... |
9 |
Enabling Statistics Tracking .............................................. |
9 |
TruSwing™ ............................................................................ |
9 |
Using the Golf Odometer ....................................................... |
9 |
Viewing PlaysLike Distance ................................................. |
10 |
Viewing the Direction to the Pin ........................................... |
10 |
Starting an Expedition .............................................................. |
10 |
Changing the Track Point Recording Interval ...................... |
10 |
Recording a Track Point Manually ....................................... |
10 |
Viewing Track Points ........................................................... |
10 |
Connected Features..................................................... |
10 |
Enabling Bluetooth Notifications ............................................... |
10 |
Viewing Notifications ............................................................ |
11 |
Receiving an Incoming Phone Call ...................................... |
11 |
Replying to a Text Message ................................................ |
11 |
Managing Notifications ......................................................... |
11 |
Turning Off the Bluetooth Smartphone Connection .................. |
11 |
Turning On and Off Smartphone Connection Alerts ................. |
11 |
Locating a Lost Mobile Device .................................................. |
11 |
Garmin Connect ........................................................................ |
11 |
Updating the Software Using the Garmin Connect App ...... |
12 |
Updating the Software Using Garmin Express .................... |
12 |
Using Garmin Connect on Your Computer ..................... |
12 |
Manually Syncing Data with Garmin Connect ..................... |
12 |
Garmin Golf™ App ............................................................... |
12 |
Garmin Explore™ ..................................................................... |
12 |
Safety and Tracking Features..................................... |
12 |
Adding Emergency Contacts .................................................... |
12 |
Adding Contacts ....................................................................... |
12 |
Turning Incident Detection On and Off ..................................... |
12 |
Requesting Assistance ............................................................. |
13 |
Starting a GroupTrack Session ................................................. |
13 |
Tips for GroupTrack Sessions ............................................. |
13 |
GroupTrack Settings ............................................................ |
13 |
Wi Fi® Connected Features........................................ |
13 |
Connecting to a Wi Fi Network ................................................. |
13 |
Connect IQ Features.................................................... |
13 |
Downloading Connect IQ Features .......................................... |
13 |
Downloading Connect IQ Features Using Your Computer ....... |
13 |
Garmin Pay................................................................... |
14 |
Setting Up Your Garmin Pay Wallet ......................................... |
14 |
Paying for a Purchase Using Your Watch ................................ |
14 |
Adding a Card to Your Garmin Pay Wallet ............................... |
14 |
Table of Contents |
i |
Managing Your Garmin Pay Cards ...................................... |
14 |
Changing Your Garmin Pay Passcode ..................................... |
14 |
Music............................................................................. |
14 |
Connecting to a Third-Party Provider ....................................... |
14 |
Downloading Audio Content from a Third-Party Provider .... |
14 |
Downloading Audio Content from Spotify® ......................... |
14 |
Changing the Music Provider ............................................... |
15 |
Disconnecting from a Third-Party Provider .......................... |
15 |
Downloading Personal Audio Content ...................................... |
15 |
Listening to Music ..................................................................... |
15 |
Music Playback Controls .......................................................... |
15 |
Connecting Bluetooth Headphones .......................................... |
15 |
Changing the Audio Mode ........................................................ |
15 |
Heart Rate Features..................................................... |
15 |
Wrist-based Heart Rate ............................................................ |
15 |
Wearing the Device .............................................................. |
15 |
Tips for Erratic Heart Rate Data ........................................... |
15 |
Viewing the Heart Rate Widget ............................................ |
16 |
Broadcasting Heart Rate Data to Garmin Devices .............. |
16 |
Broadcasting Heart Rate Data During an Activity ........... |
16 |
Setting an Abnormal Heart Rate Alert ................................. |
16 |
Turning Off the Wrist-based Heart Rate Monitor ................. |
16 |
Running Dynamics .................................................................... |
16 |
Training with Running Dynamics ......................................... |
16 |
Color Gauges and Running Dynamics Data ........................ |
17 |
Ground Contact Time Balance Data ............................... |
17 |
Vertical Oscillation and Vertical Ratio Data ..................... |
17 |
Tips for Missing Running Dynamics Data ............................ |
17 |
Performance Measurements .................................................... |
17 |
Turning Off Performance Notifications ................................. |
18 |
Detecting Performance Measurements Automatically ......... |
18 |
Syncing Activities and Performance Measurements ........... |
18 |
About VO2 Max. Estimates .................................................. |
18 |
Getting Your VO2 Max. Estimate for Running ................ |
18 |
Getting Your VO2 Max. Estimate for Cycling .................. |
18 |
Viewing Your Predicted Race Times ................................... |
18 |
About Training Effect ........................................................... |
19 |
Heart Rate Variability and Stress Level ............................... |
19 |
Viewing Your Heart Rate Variability and Stress Level .... |
19 |
Performance Condition ........................................................ |
19 |
Viewing Your Performance Condition ............................. |
19 |
Lactate Threshold ................................................................ |
19 |
Performing a Guided Test to Determine Your Lactate |
|
Threshold ........................................................................ |
19 |
Getting Your FTP Estimate .................................................. |
20 |
Conducting an FTP Test ................................................. |
20 |
Training Status .......................................................................... |
20 |
Training Status Levels ......................................................... |
20 |
Tips for Getting Your Training Status .............................. |
21 |
Heat and Altitude Performance Acclimation ........................ |
21 |
Training Load ....................................................................... |
21 |
Training Load Focus ............................................................ |
21 |
Recovery Time ..................................................................... |
21 |
Viewing Your Recovery Time .......................................... |
21 |
Recovery Heart Rate ....................................................... |
22 |
Body Battery™ .......................................................................... |
22 |
Viewing the Body Battery Widget ......................................... |
22 |
Tips for Improved Body Battery Data ................................... |
22 |
Pulse Oximeter............................................................. |
22 |
Getting Pulse Oximeter Readings ............................................ |
22 |
Turning On All-Day Pulse Oximeter Readings ......................... |
22 |
Turning Off Automatic Pulse Oximeter Readings ..................... |
22 |
Turning On Pulse Oximeter Sleep Tracking ............................. |
23 |
Tips for Erratic Pulse Oximeter Data ........................................ |
23 |
Training......................................................................... |
23 |
Setting Up Your User Profile ..................................................... |
23 |
Fitness Goals ....................................................................... |
23 |
About Heart Rate Zones ...................................................... |
23 |
Setting Your Heart Rate Zones ....................................... |
23 |
Letting the Device Set Your Heart Rate Zones ............... |
23 |
Heart Rate Zone Calculations ......................................... |
23 |
Setting Your Power Zones ................................................... |
24 |
Activity Tracking ........................................................................ |
24 |
Auto Goal ............................................................................. |
24 |
Using the Move Alert ............................................................ |
24 |
Sleep Tracking ..................................................................... |
24 |
Using Automated Sleep Tracking .................................... |
24 |
Using Do Not Disturb Mode ............................................ |
24 |
Intensity Minutes .................................................................. |
24 |
Earning Intensity Minutes ................................................ |
24 |
Garmin Move IQ™ ............................................................... |
24 |
Activity Tracking Settings ..................................................... |
24 |
Turning Off Activity Tracking ........................................... |
25 |
Workouts ................................................................................... |
25 |
Following a Workout From Garmin Connect ........................ |
25 |
Starting a Workout ............................................................... |
25 |
About the Training Calendar ................................................ |
25 |
Using Garmin Connect Training Plans ............................ |
25 |
Adaptive Training Plans .................................................. |
25 |
Interval Workouts ...................................................................... |
25 |
Creating an Interval Workout ............................................... |
25 |
Starting an Interval Workout ................................................ |
26 |
Stopping an Interval Workout ............................................... |
26 |
PacePro Training ...................................................................... |
26 |
Downloading a PacePro Plan from Garmin Connect ........... |
26 |
Starting a PacePro Plan ....................................................... |
26 |
Stopping a PacePro Plan ................................................ |
26 |
Creating a PacePro Plan on Your Watch ............................ |
26 |
Segments .................................................................................. |
26 |
Strava™ Segments .............................................................. |
26 |
Viewing Segment Details ..................................................... |
26 |
Racing a Segment ............................................................... |
27 |
Setting a Segment to Adjust Automatically .......................... |
27 |
Using Virtual Partner® .............................................................. |
27 |
Setting a Training Target .......................................................... |
27 |
Cancelling a Training Target ................................................ |
27 |
Racing a Previous Activity ........................................................ |
27 |
Personal Records ..................................................................... |
27 |
Viewing Your Personal Records .......................................... |
27 |
Restoring a Personal Record ............................................... |
27 |
Clearing a Personal Record ................................................. |
28 |
Clearing All Personal Records ............................................. |
28 |
Clocks............................................................................ |
28 |
Setting an Alarm ....................................................................... |
28 |
Deleting an Alarm ................................................................ |
28 |
Starting the Countdown Timer .................................................. |
28 |
Deleting a Timer ................................................................... |
28 |
Using the Stopwatch ................................................................. |
28 |
Adding Alternate Time Zones ................................................... |
28 |
Navigation..................................................................... |
28 |
Saving Your Location ............................................................... |
28 |
Editing Your Saved Locations .............................................. |
28 |
Projecting a Waypoint ............................................................... |
28 |
Navigating to a Destination ....................................................... |
29 |
Navigating to a Point of Interest ............................................... |
29 |
Points of Interest .................................................................. |
29 |
Creating and Following a Course on Your Device .................... |
29 |
Creating a Round-Trip Course .................................................. |
29 |
Viewing or Editing Course Details ............................................ |
29 |
Using ClimbPro ......................................................................... |
29 |
ii |
Table of Contents |
Marking and Starting Navigation to a Man Overboard |
|
Location .................................................................................... |
30 |
Navigating with Sight 'N Go ...................................................... |
30 |
Navigating to Your Starting Point During an Activity ................ |
30 |
Viewing Route Directions ..................................................... |
30 |
Navigating to the Starting Point of a Saved Activity ................. |
30 |
Stopping Navigation ................................................................. |
30 |
Map ........................................................................................... |
30 |
Viewing the Map .................................................................. |
30 |
Saving or Navigating to a Location on the Map ................... |
30 |
Navigating with the Around Me Feature .............................. |
31 |
Changing the Map Theme ................................................... |
31 |
Compass ................................................................................... |
31 |
Setting the Compass Heading ............................................. |
31 |
Altimeter and Barometer ........................................................... |
31 |
History........................................................................... |
31 |
Using History ............................................................................ |
31 |
Multisport History ................................................................. |
31 |
Viewing Your Time in Each Heart Rate Zone ...................... |
31 |
Viewing Data Totals .................................................................. |
32 |
Using the Odometer .................................................................. |
32 |
Deleting History ........................................................................ |
32 |
Customizing Your Device............................................ |
32 |
Activities and App Settings ....................................................... |
32 |
Customizing the Data Screens ............................................ |
33 |
Adding a Map to an Activity ................................................. |
33 |
Alerts .................................................................................... |
33 |
Setting an Alert ................................................................ |
33 |
Activity Map Settings ............................................................ |
33 |
Routing Settings ................................................................... |
34 |
Auto Lap ............................................................................... |
34 |
Marking Laps by Distance ............................................... |
34 |
Enabling Auto Pause ........................................................... |
34 |
Enabling Auto Climb ............................................................ |
34 |
3D Speed and Distance ....................................................... |
34 |
Turning On and Off the Lap Key .......................................... |
34 |
Using Auto Scroll ................................................................. |
35 |
Changing the GPS Setting ................................................... |
35 |
GPS and Other Satellite Systems ................................... |
35 |
UltraTrac ......................................................................... |
35 |
Power Save Timeout Settings .............................................. |
35 |
Changing the Order of an Activity in the Apps List ................... |
35 |
Widgets ..................................................................................... |
35 |
Customizing the Widget Loop .............................................. |
36 |
inReach Remote .................................................................. |
36 |
Using the inReach Remote ............................................. |
36 |
VIRB Remote ....................................................................... |
36 |
Controlling a VIRB Action Camera .................................. |
36 |
Controlling a VIRB Action Camera During an Activity ..... |
36 |
Using the Stress Level Widget ............................................. |
37 |
Customizing the My Day Widget .......................................... |
37 |
Customizing the Controls Menu ................................................ |
37 |
Watch Face Settings ................................................................. |
37 |
Customizing the Watch Face ............................................... |
37 |
Sensors Settings ....................................................................... |
37 |
Compass Settings ................................................................ |
37 |
Calibrating the Compass Manually ................................. |
37 |
Setting the North Reference ............................................ |
37 |
Altimeter Settings ................................................................. |
38 |
Calibrating the Barometric Altimeter ............................... |
38 |
Barometer Settings .............................................................. |
38 |
Calibrating the Barometer ............................................... |
38 |
Xero Laser Location Settings ............................................... |
38 |
Map Settings ............................................................................. |
38 |
Map Themes ........................................................................ |
38 |
Marine Map Settings ............................................................ |
38 |
Showing and Hiding Map Data ............................................ |
38 |
Navigation Settings ................................................................... |
39 |
Customizing Map Features .................................................. |
39 |
Setting Up a Heading Bug ................................................... |
39 |
Setting Navigation Alerts ...................................................... |
39 |
Power Manager Settings .......................................................... |
39 |
Customizing the Battery Saver Feature ............................... |
39 |
Customizing Power Modes .................................................. |
39 |
Restoring a Power Mode ..................................................... |
39 |
System Settings ........................................................................ |
39 |
Time Settings ....................................................................... |
40 |
Setting Time Alerts .......................................................... |
40 |
Syncing the Time ............................................................ |
40 |
Changing the Backlight Settings .......................................... |
40 |
Customizing the Hot Keys .................................................... |
40 |
Changing the Units of Measure ........................................... |
40 |
Viewing Device Information ...................................................... |
40 |
Viewing E-label Regulatory and Compliance Information .... |
40 |
Wireless Sensors......................................................... |
40 |
Pairing Your Wireless Sensors ................................................. |
40 |
Extended Display Mode ............................................................ |
41 |
Using an Optional Bike Speed or Cadence Sensor .................. |
41 |
Training with Power Meters ...................................................... |
41 |
Using Electronic Shifters ........................................................... |
41 |
Situational Awareness .............................................................. |
41 |
Foot Pod ................................................................................... |
41 |
Improving Foot Pod Calibration ........................................... |
41 |
Calibrating Your Foot Pod Manually .................................... |
41 |
Setting Foot Pod Speed and Distance ................................. |
41 |
tempe™ .................................................................................... |
41 |
Club Sensors ............................................................................ |
41 |
Device Information....................................................... |
42 |
Specifications ............................................................................ |
42 |
Battery Information ............................................................... |
42 |
Data Management .................................................................... |
42 |
Deleting Files ....................................................................... |
42 |
Device Maintenance..................................................... |
42 |
Device Care .............................................................................. |
42 |
Cleaning the Device ............................................................. |
42 |
Changing the QuickFit® Bands ................................................ |
42 |
Metal Watch Band Adjustment ................................................. |
42 |
Troubleshooting........................................................... |
42 |
My device is in the wrong language ......................................... |
42 |
Is my smartphone compatible with my device? ........................ |
43 |
My phone will not connect to the device ................................... |
43 |
Can I use my Bluetooth sensor with my watch? ....................... |
43 |
My headphones will not connect to the device ......................... |
43 |
My music cuts out or my headphones do not stay connected .. |
43 |
Restarting Your Device ............................................................. |
43 |
Resetting All Default Settings ................................................... |
43 |
Acquiring Satellite Signals ........................................................ |
43 |
Improving GPS Satellite Reception ...................................... |
43 |
The temperature reading is not accurate .................................. |
43 |
Maximizing the Battery Life ....................................................... |
44 |
Activity Tracking ........................................................................ |
44 |
My daily step count does not appear ................................... |
44 |
My step count does not seem accurate ............................... |
44 |
The step counts on my device and my Garmin Connect |
|
account don't match ............................................................. |
44 |
The floors climbed amount does not seem accurate ........... |
44 |
Getting More Information .......................................................... |
44 |
Appendix....................................................................... |
44 |
Data Fields ................................................................................ |
44 |
VO2 Max. Standard Ratings ..................................................... |
48 |
Table of Contents |
iii |
FTP Ratings .............................................................................. |
49 |
Wheel Size and Circumference ................................................ |
49 |
Symbol Definitions .................................................................... |
49 |
Index.............................................................................. |
50 |
iv |
Table of Contents |
Introduction
 WARNING
See the Important Safety and Product Information guide in the product box for product warnings and other important information.
Always consult your physician before you begin or modify any exercise program.
Getting Started
When using your watch the first time, you should complete these tasks to set it up and get to know the basic features.
1 Press LIGHT to turn on the watch (Buttons, page 1).
2Follow the on-screen instructions to complete the initial setup.
During the initial setup, you can pair your smartphone with your watch to receive notifications, set up your Garmin Pay™ wallet, and more (Pairing Your Smartphone with Your Watch, page 2).
3Charge the device completely (Charging the Device, page 2).
4 Start an activity (Starting an Activity, page 5).
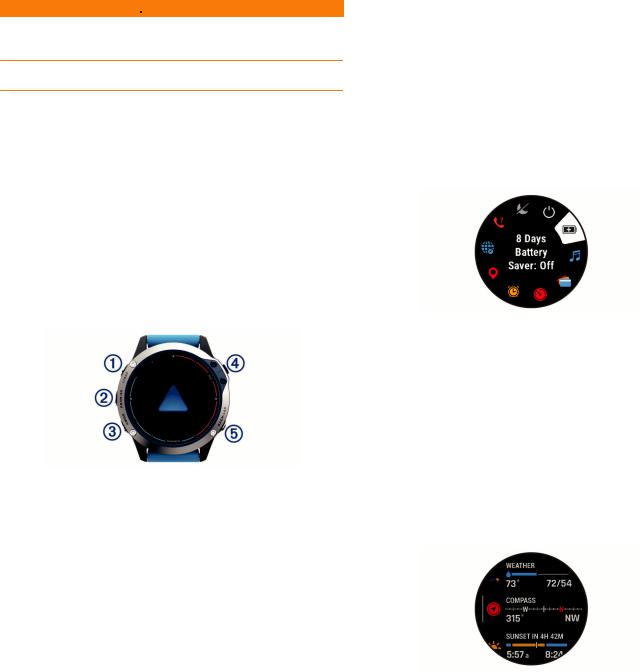
Buttons
 LIGHT
LIGHT
•Press to turn the backlight on and off.
•Press to turn the device on.
•Hold to view the controls menu.
 UP·MENU
•Press to scroll through the widget loop and menus.
•Hold to view the menu.
 DOWN
DOWN
•Press to scroll through the widget loop and menus.
•Hold to view the music controls from any screen.
 MOB
MOB
•Press to view the activity list and start or stop an activity.
•Press to choose an option in a menu.
•Hold to mark your current location as a man overboard (MOB) location and activate navigation.
 BACK·LAP
•Press to return to the previous screen.
•Press to record a lap, rest, or transition during a multisport activity.
•Hold to view the watch face from any screen.
Using the Watch
•Hold LIGHT to view the controls menu.
The controls menu provides quick access to frequently used functions, such as opening the Garmin Pay wallet, turning on do not disturb mode, and turning the watch off.
•From the watch face, press UP or DOWN to scroll through the widget loop.
Your watch comes preloaded with widgets that provide at-a- glance information. More widgets are available when you pair your watch with a smartphone.
•From the watch face, press MOB to start an activity or open an app (Activities and Apps, page 5).
•Hold MENU to customize the watch face, adjust settings, and pair wireless sensors.
Viewing the Controls Menu
The controls menu contains options, such as turning on do not disturb mode, locking the keys, and turning the device off. You can also open the Garmin Pay wallet.
NOTE: You can add, reorder, and remove the options in the controls menu (Customizing the Controls Menu, page 37).
1 From any screen, hold LIGHT.
2 Press UP or DOWN to scroll through the options.
Enabling Airplane Mode
You can enable airplane mode to disable all wireless communications.
NOTE: You can add options to the controls menu (Customizing the Controls Menu, page 37).
1 Hold LIGHT.
2 Select  .
.
Viewing Widgets
Your device comes preloaded with several widgets, and more are available when you pair your device with a smartphone.
•Press UP or DOWN.
The device scrolls through the widget loop and displays summary data for each widget.
•Press MOB to view widget details.
TIP: You can press DOWN to view additional screens for a widget, or press MOB to view additional options and functions for a widget.
•From any screen, hold BACK to return to the watch face.
•If you are recording an activity, press BACK to return to the activity data pages.
Customizing the Watch
•From the watch face, hold MENU to change the watch face.
•From the widget screens, hold MENU to customize the widget options.
•From the controls menu, hold MENU to add, remove, and reorder the controls.
•From any screen, hold MENU to change additional settings.
Introduction |
1 |
Pairing Your Smartphone with Your Watch
To use the connected features on your watch, you must pair it directly through the Garmin Connect™ app, instead of from the Bluetooth® settings on your smartphone.
1From the app store on your smartphone, install and open the Garmin Connect app.
2 Bring your smartphone within 10 m (33 ft.) of your watch.
3Press LIGHT to turn on the watch.
The first time you turn on the watch, it is in pairing mode.
TIP: You can hold LIGHT, and select  to manually enter pairing mode.
4Select an option to add your watch to your Garmin Connect account:
•If this is the first time you are pairing a device with the Garmin Connect app, follow the on-screen instructions.
•If you already paired another device with the Garmin Connect app, from the  or
or 
 menu, select Garmin Devices > Add Device, and follow the on-screen instructions.
Charging the Device
 WARNING
This device contains a lithium-ion battery. See the Important Safety and Product Information guide in the product box for product warnings and other important information.
NOTICE
To prevent corrosion, thoroughly clean and dry the contacts and the surrounding area before charging or connecting to a computer. Refer to the cleaning instructions (Device Care, page 42).
1Plug the small end of the USB cable into the charging port on your device.
2Plug the large end of the USB cable into a USB charging port.
3 Charge the device completely.
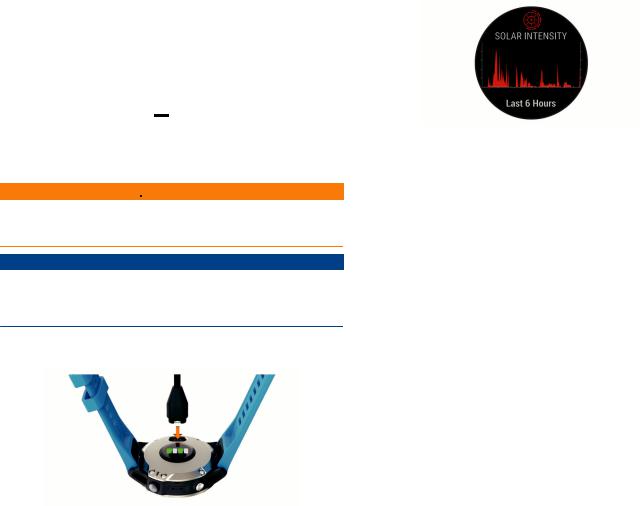
Solar Charging
The quatix 6X Solar watch has a transparent solar charging lens that charges your watch while you use it.
Viewing the Solar Widget
1From the watch face, press UP or DOWN to scroll to the solar widget.
2Press MOB to view a graph of the intensity of solar input for the last 6 hours.
Tips for Solar Charging
The quatix 6X Solar watch has a transparent solar charging lens that charges your watch while you use it. To maximize the battery life of your watch, follow these tips.
•When you are wearing the watch, avoid covering the face with your sleeve.
•When you are not wearing the watch, point the face toward a source of bright light, such as sunlight or fluorescent light.
The watch will charge faster when exposed to sunlight, because the solar charging lens is optimized for the spectrum of sunlight.
•For maximum battery performance, charge the watch in bright sunlight.
NOTE: The watch protects itself from overheating and stops charging automatically if the internal temperature exceeds the solar charging temperature threshold (Specifications, page 42).
NOTE: The watch does not solar charge when connected to an external battery source or when the battery is full.
Marine Activities
Your watch comes preloaded with apps for marine activities, such as boating, sailing, and interacting with Garmin marine devices. You can pair with compatible Garmin marine devices using the marine apps preloaded on your watch.
See the owner's manual for your Garmin marine device for more information about pairing with that device.
Product Updates
On your computer, install Garmin Express™ (www.garmin.com /express). On your smartphone, install the Garmin Connect app.
This provides easy access to these services for Garmin® devices:
•Software updates
•Map updates
•Course updates
•Data uploads to Garmin Connect
•Product registration
Setting Up Garmin Express
1 Connect the device to your computer using a USB cable. 2 Go to www.garmin.com/express.
3 Follow the on-screen instructions.
Marine Maps and Charts
Optional premium charts, such as BlueChart® g3 and LakeVü g3, allow you to get the most out of your quatix device.
Downloading Marine Maps and Charts
1Go to maps.garmin.com/marine to search for and purchase a marine map or chart.
2Download Garmin Express (Setting Up Garmin Express, page 2).
3Follow the on-screen instructions to install purchased maps and charts on your device.
Sailing
Tack Assist
While cruising or racing into the wind, the tack assist feature can help you determine if your boat is being lifted or headed. When
2 |
Solar Charging |
you calibrate tack assist, the device captures your boat's port  and starboard
  course over ground (COG) measurements, and uses the COG data to calculate the mean true wind direction
  and the boat's tack angle
  .
.
The device uses this data to determine whether your boat is being lifted or headed due wind shifts.
By default, the device tack assist is set to automatic. Each time you calibrate the port or starboard COG, the device recalibrates the opposite side and true wind direction. You can change the tack assist settings to enter a fixed tack angle or true wind direction.
NOTE: The device uses GPS-based course over ground to determine your course in the tack assist feature, and does not account for other factors that can affect your boat's direction, such as currents and tides.
Calibrating the Tack Assist
1 From the watch face, select MOB.
2 Select Sail Race or Sail.
3 Select UP or DOWN to view the tack assist screen.
NOTE: You may need to add the tack assist screen to the data screens for the activity (Customizing the Data Screens, page 33).
4 Select MOB.
5Select an option:
•To calibrate the starboard side, select MOB.
•To calibrate the port side, select DOWN.
TIP: If the wind is coming from the starboard side of the vessel, you should calibrate starboard. If the wind is coming from the port side of the vessel, you should calibrate port.
6Wait while the device calibrates the tack assist.
An arrow appears and indicates if your boat is being lifted or headed.
Entering a Fixed Tack Angle or True Wind Direction
1 From the watch face, select MOB.
2 Select Sail Race or Sail.
3 Select UP or DOWN to view the tack assist screen. 4 Hold MENU.
5 Select Tack Angle or True Wind Direction.
6 Select Fixed.
7 Select UP or DOWN to set the value.
Tips for Getting the Best Lift Estimate
To get the best lift estimate when using the tack assist feature, you can try these tips. See Entering a Fixed Tack Angle or True Wind Direction, page 3 and Calibrating the Tack Assist, page 3 for more information.
•Enter a fixed tack angle, and calibrate the port side.
•Enter a fixed tack angle, and calibrate the starboard side.
•Use the Auto tack angle setting, and calibrate both the port and starboard side.
Sail Racing
You can use the device to help you cross the start line of a race exactly when the race begins. When you synchronize the regatta timer in the sail racing app with the official race countdown timer, you are alerted at one-minute intervals as the race start approaches. When you set the starting line, the device uses GPS data to indicate whether your boat will cross the start line before, after, or at the correct time to start the race.
Setting the Starting Line
1 From the watch face, select MOB > Sail Race. 2 Wait while the device locates satellites.
3 Hold MENU.
4 Select Ping Start Line.
5Select Mark Port to mark the port starting line mark as you sail past it.
6Select Mark Starboard to mark the starboard starting line mark as you sail past it.
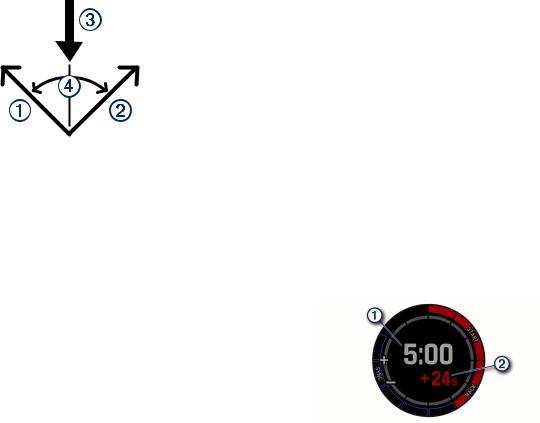
Starting a Race
Before you can view the time to burn, you must set the starting line (Setting the Starting Line, page 3).
1 From the watch face, select MOB > Sail Race.
2Wait while the device locates satellites.
The screen displays the regatta timer  and time to burn
  .
.
3 Select MOB.
4Select UP and DOWN to synchronize the regatta timer with the official race countdown.
NOTE: When the burn time is negative, you will arrive at the start line after the race starts. When the burn time is positive, you will arrive at the start line before the race starts.
5 Select MOB to start the timer.
Setting the Sailing Units
1 From the watch face, select MOB > Sail Race. 2 Hold MENU.
3 Select the activity settings.
4 Select Nautical Units.
5Select an option:
•To use nautical units for speed and distance, select On.
•To use the system units of measure for speed and distance, select Use Sys. Settings.
Tides
Viewing the Tide Data
When you pair your device with a smartphone, you can download up to seven days of tide data for your current location. You can update your location and download new tide data by selecting MOB from the tide screen.
1From the watch face, select MOB > Tides.
A 24-hour tide chart appears, showing the high tides  and low tides
  for the current date.
Marine Activities |
3 |
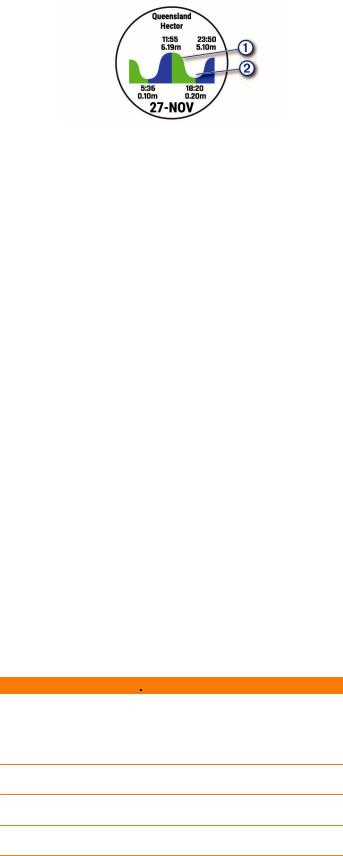
2 Select UP or DOWN to view the tide data from other days.
Fishing
Going Fishing
You can keep track of your daily fish count, count down your competition time, or set an interval timer to keep track of your fishing pace.
1 From the watch face, select MOB > Fish.
2Select an option:
•To count down your remaining competition time, select
Set Timers.
•To track your daily fish count, select Start Fishing > New Count, and select MOB to increase or BACK to decrease your fish count.
Anchor
Marking Your Anchor Location
1 From the watch face, select MOB > Anchor.
2 Select MOB > Drop Anchor.
Anchor Settings
Select MOB > Anchor > MOB.
Drift Radius: Sets the allowable drift distance while anchored. Update interval: Sets the time interval for updating anchor data.
Anchor Assist Settings
From the anchor assist screen, select MOB.
Scope: Sets the first number in the anchor scope ratio. The ratio is the length of anchor rode in use to the vertical distance from the bow of the boat to the bottom of the water.
Depth: Sets the depth of the water.
Bow Offset: Sets the distance between the bow of your boat and the location of your GPS antenna.
Autopilot
 WARNING
You are responsible for the safe and prudent operation of your vessel. The autopilot is a tool that enhances your capability to operate your boat. It does not relieve you of the responsibility of safely operating your boat. Avoid navigational hazards and never leave the helm unattended.
Always be prepared to promptly regain manual control of your boat.
Learn to operate the autopilot on calm and hazard-free open water.
Use caution when operating the autopilot near hazards in the water, such as docks, pilings, and other boats.
Pairing With an Autopilot
1 From the watch face, select MOB > Autopilot > MOB.
2Bring your quatix device within 3 m (10 ft.) of the marine device.
3Set your compatible Garmin autopilot helm control to search for a remote control.
See your autopilot helm control owner's manual for more information.
After you pair the devices, they connect automatically when turned on, within range, and the app is open on the watch. If you need to pair with another autopilot helm control, in the autopilot app, hold MENU and select Settings > Pair New.
Controlling the Autopilot
1 From the watch face, select MOB > Autopilot.
2Select an option:
•To engage the autopilot heading hold, hold a steady course, select MOB, and release the helm.
•To change the heading, with the autopilot engaged, select UP for starboard and DOWN for port.
•To change the steering mode, hold MENU, select Steering Mode, and select an option.
•To perform a steering pattern, hold MENU, select Pattern Steering, and select a pattern.
NOTE: You can change the steering patterns available on your quatix device from your autopilot.
•To take the helm and place the autopilot in standby mode, select MOB.
Boat Data
Streaming Boat Data
You can stream data fields from your compatible chartplotter to your quatix device. The device displays up to three data fields per page, and up to six pages of data.
1 From the watch face, select MOB > Boat Data.
2 Bring your quatix device within 3 m (10 ft.) of the chartplotter.
3Set the chartplotter to enter pairing mode.
See your chartplotter owner's manual for more information.
4If necessary, on the quatix device, select MOB to modify a data page.
After the devices are paired, they connect automatically when they are turned on, within range, and the app is open on the watch. If you need to pair with another chartplotter, in the boat data app, hold MENU and select Pair New.
Marking a Waypoint on Your Chartplotter
You can mark a waypoint on your compatible chartplotter using your quatix device.
1 From the watch face, select MOB > Boat Data.
2 Select MOB > Mark Plotter Wpt.
GNT™ 10
Streaming GNT 10 Data
Before you can stream data fields from your compatible GNT 10 transceiver to your quatix device, you must download the GNT 10 app (Connect IQ Features, page 13).
1 From the watch face, select MOB > GNT 10.
2 Bring your quatix device within 3 m (10 ft.) of the transceiver.
3Set the transceiver to enter pairing mode.
See your transceiver owner's manual for more information.
4If necessary, on the quatix device, select MOB to modify a data page.
The quatix device displays up to three data fields per page, and up to six pages of data. After the devices are paired, they connect automatically when they are turned on, within range, and the app is open on the watch.
TIP: To pair your quatix device with another transceiver, from the GNT 10 app, hold MENU and select Pair New.
4 |
Marine Activities |
Fusion-Link™ App
You can use the Fusion-Link app on your quatix device to control the audio playback on your Fusion® device.
Connecting to a Fusion Stereo
1Set the Fusion stereo to be discoverable.
See your stereo owner's manual for more information.
2 Bring your quatix device within 3 m (10 ft.) of the stereo. 3 From the watch face, select MOB > FUSION-Link.
The first time you open the app on the watch, the watch automatically pairs with and connects to the stereo. If you need to pair with another stereo, in the Fusion-Link app, select Settings > Pair New.
After you pair the devices, they connect automatically when turned on, within range, and the app is open on the watch.
Activities and Apps
Your device can be used for indoor, outdoor, athletic, and fitness activities. When you start an activity, the device displays and records sensor data. You can save activities and share them with the Garmin Connect community.
You can also add Connect IQ™ activities and apps to your device using the Connect IQ app (Connect IQ Features, page 13).
For more information about activity tracking and fitness metric accuracy, go to garmin.com/ataccuracy.
Starting an Activity
When you start an activity, GPS turns on automatically (if required).
1 From the watch face, press MOB.
2If this is the first time you have started an activity, select the checkbox next to each activity to add to your favorites, and select Done.
3Select an option:
•Select an activity from your favorites.
•Select 
 , and select an activity from the extended activity list.
4If the activity requires GPS signals, go outside to an area with a clear view of the sky, and wait until the device is ready.
The device is ready after it establishes your heart rate, acquires GPS signals (if required), and connects to your wireless sensors (if required).
5Press MOB to start the activity timer.
The device records activity data only while the activity timer is running.
Tips for Recording Activities
•Charge the device before starting an activity (Charging the Device, page 2).
•Press LAP to record laps, start a new set or pose, or advance to the next workout step.
•Press UP or DOWN to view additional data pages.
Changing the Power Mode
You can change the power mode to extend battery life during an activity.
1 During an activity, hold MENU.
2 Select Power Mode.
3Select an option.
The watch displays the hours of battery life gained with the selected power mode.
Stopping an Activity
1 Press MOB.
2Select an option:
•To resume your activity, select Resume.
•To save the activity and return to watch mode, select
Save > Done.
•To suspend your activity and resume it at a later time, select Resume Later.
•To mark a lap, select Lap.
•To navigate back to the starting point of your activity along the path you traveled, select Back to Start > TracBack.
NOTE: This feature is available only for activities that use GPS.
•To navigate back to the starting point of your activity by the most direct path, select Back to Start > Route.
NOTE: This feature is available only for activities that use GPS.
•To discard the activity and return to watch mode, select
Discard > Yes.
NOTE: After stopping the activity, the device saves it automatically after 30 minutes.
Adding or Removing a Favorite Activity
The list of your favorite activities appears when you press MOB from the watch face, and it provides quick access to the activities you use most frequently. The first time you press MOB to start an activity, the device prompts you to select your favorite activities. You can add or remove favorite activities at any time.
1 Hold MENU.
2 Select Activities & Apps.
Your favorite activities appear at the top of the list with a white background. Other activities appear in the extended list with a black background.
3Select an option:
•To add a favorite activity, select the activity, and select
Set as Favorite.
•To remove a favorite activity, select the activity, and select
Remove from Favorites.
Creating a Custom Activity
1 From the watch face, press MOB.
2 Select Add.
3Select an option:
•Select Copy Activity to create your custom activity starting from one of your saved activities.
•Select Other to create a new custom activity.
4 If necessary, select an activity type.
5 Select a name or enter a custom name.
Duplicate activity names include a number, for example: Bike(2).
6Select an option:
•Select an option to customize specific activity settings. For example, you can customize the data screens or auto features.
•Select Done to save and use the custom activity.
7 Select Yes to add the activity to your list of favorites.
Indoor Activities
The quatix device can be used for training indoors, such as running on an indoor track or using a stationary bike. GPS is turned off for indoor activities.
Activities and Apps |
5 |
When running or walking with GPS turned off, speed, distance, and cadence are calculated using the accelerometer in the device. The accelerometer is self-calibrating. The accuracy of the speed, distance, and cadence data improves after a few outdoor runs or walks using GPS.
TIP: Holding the handrails of the treadmill reduces accuracy. You can use an optional foot pod to record pace, distance, and cadence.
When cycling with GPS turned off, speed and distance are not available unless you have an optional sensor that sends speed and distance data to the device (such as a speed or cadence sensor).
Calibrating the Treadmill Distance
To record more accurate distances for your treadmill runs, you can calibrate the treadmill distance after you run at least 1.5 km (1 mi.) on a treadmill. If you use different treadmills, you can manually calibrate the treadmill distance on each treadmill or after each run.
1Start a treadmill activity (Starting an Activity, page 5), and run at least 1.5 km (1 mi.) on the treadmill.
2 After you complete your run, select MOB.
3Select an option:
•To calibrate the treadmill distance the first time, select
Save.
The device prompts you to complete the treadmill calibration.
•To manually calibrate the treadmill distance after the firsttime calibration, select Calibrate & Save > Yes.
4Check the treadmill display for the distance traveled, and enter the distance on your device.
Recording a Strength Training Activity
You can record sets during a strength training activity. A set is multiple repetitions (reps) of a single move.
1 From the watch face, press MOB.
2 Select Strength.
3 Select a workout.
The first time you record a strength training activity, you must select which wrist your watch is on.
4 Select View to view a list of workout steps (optional).
TIP: While viewing workout steps, you can press MOB to view an animation of the selected exercise, if available.
5 Select Do Workout.
6 Press MOB to start the set timer.
7Start your first set.
The device counts your reps. Your rep count appears when you complete at least four reps.
TIP: The device can only count reps of a single move for each set. When you want to change moves, you should finish the set and start a new one.
8Press LAP to finish the set and move to the next exercise, if available.
The watch displays the total reps for the set. After several seconds, the rest timer appears.
9If necessary, press DOWN, and edit the number of reps. TIP: You can also add the weight used for the set.
10When you are done resting, press LAP to start your next set.
11Repeat for each strength training set until your activity is complete.
12After your last set, press MOB to stop the set timer. 13Select Save.
Outdoor Activities
The quatix device comes preloaded with outdoor activities, such as running and cycling. GPS is turned on for outdoor activities. You can add new activities based on default activities, such as walking or rowing. You can also add custom activities to your device (Creating a Custom Activity, page 5).
Viewing Your Ski Runs
Your device records the details of each downhill skiing or snowboarding run using the auto run feature. This feature is turned on by default for downhill skiing and snowboarding. It automatically records new ski runs based on your movement. The timer pauses when you stop moving downhill and when you are on a chairlift. The timer remains paused during the chairlift ride. You can start moving downhill to restart the timer. You can view run details from the paused screen or while the timer is running.
1 Start a skiing or snowboarding activity.
2 Hold MENU.
3 Select View Runs.
4Press UP and DOWN to view details of your last run, your current run, and your total runs.
The run screens include time, distance traveled, maximum speed, average speed, and total descent.
Recording a Backcountry Skiing Activity
The backcountry skiing activity lets you manually switch between climbing and descending tracking modes so you can accurately track your statistics.
1 From the watch face, press MOB.
2 Select Backcountry Ski.
3Select an option:
•If you are starting your activity on a climb, select
Climbing.
•If you are starting your activity moving downhill, select
Descending.
4 Press MOB to start the activity timer.
5Press LAP to switch between climbing and descending tracking modes.
6 After your activity is finished, press MOB to stop the timer. 7 Select Save.
Using the Metronome
The metronome feature plays tones at a steady rhythm to help you improve your performance by training at a faster, slower, or more consistent cadence.
NOTE: This feature is not available for all activities. 1 From the watch face, press MOB.
2 Select an activity.
3 Hold MENU.
4 Select the activity settings.
5 Select Metronome > Status > On.
6Select an option:
•Select Beats / Minute to enter a value based on the cadence you want to maintain.
•Select Alert Frequency to customize the frequency of the beats.
•Select Sounds to customize the metronome tone and vibration.
7If necessary, select Preview to listen to the metronome feature before you run.
8Go for a run (Starting an Activity, page 5). The metronome starts automatically.
6 |
Activities and Apps |

9During your run, press UP or DOWN to view the metronome screen.
10If necessary, hold MENU to change the metronome settings.
Playing Audio Prompts During an Activity
You can enable your quatix device to play motivational status announcements during a run or other activity. Audio prompts play on your connected headphones using Bluetooth technology, if available. Otherwise, audio prompts play on your smartphone paired through the Garmin Connect app. During an audio prompt, the device or smartphone mutes the primary audio to play the announcement.
NOTE: This feature is not available for all activities. 1 Hold MENU.
2 Select Audio Prompts.
3Select an option:
•To hear a prompt for each lap, select Lap Alert.
NOTE: The Lap Alert audio prompt is enabled by default.
•To customize prompts with your pace and speed information, select Pace/Speed Alert.
•To customize prompts with your heart rate information, select Heart Rate Alert.
•To customize prompts with power data, select Power Alert.
•To hear prompts when you start and stop the timer, including the Auto Pause® feature, select Timer Events.
•To hear activity alerts play as an audio prompt, select
Activity Alerts.
•To change the language or the dialect of the voice prompts, select Dialect.
Jumpmaster
 WARNING
The jumpmaster feature is for use by experienced skydivers only. The jumpmaster feature should not be used as a primary skydiving altimeter. Failure to input the appropriate jump related information can lead to serious personal injury or death.
The jumpmaster feature follows military guidelines for calculating the high altitude release point (HARP). The device detects automatically when you have jumped to begin navigating toward the desired impact point (DIP) using the barometer and electronic compass.
Multisport
Triathletes, duathletes, and other multisport competitors can take advantage of the multisport activities, such as Triathlon or Swimrun. During a multisport activity, you can transition between activities and continue to view your total time and distance. For example, you can switch from biking to running and view your total time and distance for biking and running throughout the multisport activity.
You can customize a multisport activity, or you can use the default triathlon activity set up for a standard triathlon.
Triathlon Training
When you participate in a triathlon, you can use the triathlon activity to quickly transition to each sport segment, to time each segment, and to save the activity.
1 From the watch face, press MOB.
2 Select Triathlon.
3 Press MOB to start the activity timer.
4Press LAP at the beginning and end of each transition.
The transition feature can be turned on or off for the triathlon activity settings.
5After you complete your activity, press MOB, and select
Save.
Creating a Multisport Activity 1 From the watch face, press MOB.
2 Select Add > Multisport.
3 Select a multisport activity type, or enter a custom name.
Duplicate activity names include a number. For example, Triathlon(2).
4 Select two or more activities.
5Select an option:
•Select an option to customize specific activity settings. For example, you can select whether to include transitions.
•Select Done to save and use the multisport activity.
6 Select Yes to add the activity to your list of favorites.
Swimming
NOTICE
The device is intended for surface swimming. Scuba diving with the device may damage the product and will void the warranty.
Swim Terminology
Length: One trip down the pool.
Interval: One or more consecutive lengths. A new interval starts after a rest.
Stroke: A stroke is counted every time your arm wearing the device completes a full cycle.
Swolf: Your swolf score is the sum of the time for one pool length and the number of strokes for that length. For example, 30 seconds plus 15 strokes equals a swolf score of 45. For open water swimming, swolf is calculated over 25 meters. Swolf is a measurement of swimming efficiency and, like golf, a lower score is better.
Critical swim speed (CSS): Your CSS is the theoretical speed that you can maintain continuously without exhaustion. You can use your CSS to guide your training pace and monitor your improvement.
Stroke Types
Stroke type identification is available only for pool swimming. Your stroke type is identified at the end of a length. Stroke types appear in your swimming history and in your Garmin Connect account. You can also select stroke type as a custom data field (Customizing the Data Screens, page 33).
Free |
Freestyle |
Back |
Backstroke |
|
|
Breast |
Breaststroke |
|
|
Fly |
Butterfly |
Mixed |
More than one stroke type in an interval |
|
|
Drill |
Used with drill logging (Training with the Drill Log, page 8) |
|
|
Tips for Swimming Activities
•Before starting a pool swimming activity, follow the on-screen instructions to select your pool size or enter a custom size.
The next time you start a pool swimming activity, the device uses this pool size. You can hold MENU, select the activity settings, and select Pool Size to change the size.
•Press LAP to record a rest during pool swimming.
The device automatically records swim intervals and lengths for pool swimming.
•Press LAP to record an interval during open water swimming.
Resting During Pool Swimming
The default rest screen displays two rest timers. It also displays time and distance for the last completed interval.
Activities and Apps |
7 |

NOTE: Swim data is not recorded during a rest.
1 During your swim activity, press LAP to start a rest.
The display reverses to white text on a black background, and the rest screen appears.
2During a rest, press UP or DOWN to view other data screens (optional).
3 Press LAP, and continue swimming.
4 Repeat for additional rest intervals.
Auto Rest
The auto rest feature is available only for pool swimming. Your device automatically detects when you are resting, and the rest screen appears. If you rest for more than 15 seconds, the device automatically creates a rest interval. When you resume swimming, the device automatically starts a new swim interval. You can turn on the auto rest feature in the activity options (Activities and App Settings, page 32).
TIP: For best results using the auto rest feature, minimize your arm motions while resting.
If you do not want to use the auto rest feature, you can select LAP to manually mark the beginning and end of each rest interval.
Training with the Drill Log
The drill log feature is available only for pool swimming. You can use the drill log feature to manually record kick sets, one-arm swimming, or any type of swimming that is not one of the four major strokes.
1During your pool swim activity, press UP or DOWN to view the drill log screen.
2 Press LAP to start the drill timer.
3 After you complete a drill interval, press LAP.
The drill timer stops, but the activity timer continues to record the entire swim session.
4 Select a distance for the completed drill.
Distance increments are based on the pool size selected for the activity profile.
5Select an option:
•To start another drill interval, press LAP.
•To start a swim interval, press UP or DOWN to return to the swim training screens.
Turning Off Wrist-based Heart Rate While Swimming
Wrist-based heart rate is turned on by default for swim activities. The device is also compatible with the HRM-Tri™ accessory and the HRM-Swim™ accessory. If both wrist-based heart rate and chest heart rate data are available, your device uses the chest heart rate data.
1 From the heart rate widget, hold MENU.
NOTE: You may need to add the widget to your widget loop (Customizing the Widget Loop, page 36).
2 Select Options > While Swimming > Off.
Golfing
Playing Golf
Before you play golf, you should charge the device (Charging the Device, page 2).
1 From the watch face, press MOB.
2 Select Golf.
3 Go outside, and wait while the device locates satellites. 4 Select a course from the list of available courses.
5 If necessary, set your driver distance.
6 Select Yes to keep score.
7 Select a tee box.
8After you complete your round, press MOB, and select End Round.
Hole Information
The device shows the current hole you are playing, and automatically transitions when you move to a new hole.
NOTE: Because pin locations change, the device calculates the distance to the front, middle, and back of the green, but not the actual pin location.
Current hole number
Distance to the back of the green
Distance to the middle of the green
Distance to the front of the green
Par for the hole
Map of the green
Driver distance from the tee box
Big Numbers Mode
You can change the size of the numbers on the hole information screen.
Hold MENU, select the activity settings, and select Big Numbers.
The distance to the back of the green
The distance to the middle of the green or selected pin position
The distance to the front of the green
The current hole number
The par for the current hole
Measuring Distance with Button Targeting
From the hole information screen, you can use the button targeting feature to measure the distance to a point on the map.
1 Press UP or DOWN to measure the distance to the target. 2 If necessary, select  or
or  to zoom in or out.
Changing Holes
You can change holes manually from the hole view screen. 1 While playing golf, press MOB.
2 Select Change Hole.
3 Select a hole.
Moving the Flag
You can take a closer look at the green and move the pin location.
8 |
Activities and Apps |
1 From the hole information screen, press MOB.
2 Select Move Flag.
3 Press UP or DOWN to move the pin position.
4Press MOB.
The distances on the hole information screen are updated to show the new pin location. The pin location is saved for only the current round.
Viewing Measured Shots
Before the device can automatically detect and measure shots, you must enable scoring.
Your device features automatic shot detection and recording. Each time you take a shot along the fairway, the device records your shot distance so you can view it later.
TIP: Automatic shot detection works best when you wear the device on your leading wrist and make good contact with the ball. Putts are not detected.
1 While playing golf, press MOB.
2Select Measure Shot.
Your last shot distance appears.
NOTE: The distance automatically resets when you hit the ball again, putt on the green, or move to the next hole.
3 Press DOWN to view all recorded shot distances.
Viewing Layup and Dogleg Distances
You can view a list of layup and dogleg distances for par 4 and 5 holes. Custom targets also appear in this list.
1 From the hole information screen, press MOB.
2Select Layups.
Each layup and the distance until you reach each layup appear on the screen.
NOTE: Distances are removed from the list as you pass them.
Saving Custom Targets
While playing a round, you can save up to five custom targets for each hole. Saving a target is useful for recording objects or obstacles that are not shown on the map. You can view the distances to these targets from the layup and dogleg screen (Viewing Layup and Dogleg Distances, page 9).
1 Stand near the target you want to save.
NOTE: You cannot save a target that is far from the currently selected hole.
2 From the hole information screen, press MOB.
3 Select Custom Targets.
4 Select a target type.
Keeping Score
1 From the hole information screen, press MOB.
2Select Scorecard.
The scorecard appears when you are on the green.
3 Press UP or DOWN to scroll through the holes. 4 Press MOB to select a hole.
5Press UP or DOWN to set the score. Your total score is updated.
Updating a Score
1 From the hole information screen, press MOB.
2 Select Scorecard.
3 Press UP or DOWN to scroll through the holes. 4 Press MOB to select a hole.
5Press UP or DOWN to change the score for that hole. Your total score is updated.
Setting the Scoring Method
You can change the method the device uses to keep score. 1 From the hole information screen, hold MENU.
2 Select the activity settings.
3 Select Scoring Method.
4 Select a scoring method.
About Stableford Scoring
When you select the Stableford scoring method (Setting the Scoring Method, page 9), points are awarded based on the number of strokes taken relative to par. At the end of a round, the highest score wins. The device awards points as specified by the United States Golf Association.
The scorecard for a Stableford scored game shows points instead of strokes.
Points |
Strokes Taken Relative to Par |
0 |
2 or more over |
|
|
1 |
1 over |
|
|
2 |
Par |
3 |
1 under |
|
|
4 |
2 under |
|
|
5 |
3 under |
Setting Your Handicap
1 From the hole information screen, hold MENU.
2 Select the activity settings.
3 Select Handicap Scoring.
4Select a handicap scoring option:
•To enter the number of strokes to be subtracted from your total score, select Local Handicap.
•To enter the player's handicap index and the course slope rating used to calculate your course handicap, select
Index/Slope.
5 Set your handicap.
Enabling Statistics Tracking
The Stat Tracking feature enables detailed statistics tracking while playing golf.
1 From the hole information screen, hold MENU.
2 Select the activity settings.
3 Select Stat Tracking to enable tracking statistics.
Recording Statistics
Before you can record statistics, you must enable statistics tracking (Enabling Statistics Tracking, page 9).
1 From the scorecard, select a hole.
2 Enter the number of strokes taken, and press MOB. 3 Set the number of putts taken, and press MOB.
4If necessary, select an option:
NOTE: If you are on a par 3 hole, fairway information does not appear.
•If your ball hit the fairway, select In Fairway.
•If your ball missed the fairway, select Missed Right or
Missed Left.
5 If necessary, enter the number of penalty strokes.
TruSwing™
The TruSwing feature allows you to view swing metrics recorded from your TruSwing device. Go to www.garmin.com/golf to purchase a TruSwing device.
Using the Golf Odometer
You can use the odometer to record the time, distance, and steps traveled. The odometer automatically starts and stops when you start or end a round.
Activities and Apps |
9 |
1 From the hole information screen, press MOB.
2 Select Odometer.
3 If necessary, select Reset to reset the odometer to zero.
Viewing PlaysLike Distance
The "plays like" distance feature accounts for elevation changes on the course by showing the adjusted distance to the green.
1 From the hole information screen, hold MENU.
2 Select the activity settings.
3Select PlaysLike.
An icon appears next to each distance.
Distance plays longer than expected due to a change in elevation.
Distance plays as expected.
Distance plays shorter than expected due to a change in elevation.
Viewing the Direction to the Pin
The PinPointer feature is a compass that provides directional assistance when you are unable to see the green. This feature can help you line up a shot even if you are in the woods or in a deep sand trap.
NOTE: Do not use the PinPointer feature while in a golf cart. Interference from the golf cart can affect the accuracy of the compass.
1 From the hole information screen, press MOB.
2Select PinPointer.
The arrow points to the pin location.
Starting an Expedition
You can use the Expedition app to prolong the battery life while recording a multi-day activity.
1 From the watch face, press MOB.
2 Select Expedition.
3Press MOB to start the activity timer.
The device enters low power mode and collects GPS track points once an hour. To maximize battery life, the device turns off all sensors and accessories, including the connection to your smartphone.
Changing the Track Point Recording Interval
During an expedition, GPS track points are recorded once an hour by default. You can change how often GPS track points are recorded. Recording track points less frequently maximizes battery life.
NOTE: To maximize battery life, GPS track points are not recorded after sunset. You can customize this option in the activity settings.
1 From the watch face, press MOB.
2 Select Expedition.
3 Hold MENU.
4 Select the activity settings.
5 Select Recording Interval.
6 Select an option.
Recording a Track Point Manually
During an expedition, track points are recorded automatically based on the selected recording interval. You can manually record a track point at any time.
1During an expedition, press UP or DOWN to view the map page.
2 Press MOB.
3 Select Add Point.
Viewing Track Points
1During an expedition, press UP or DOWN to view the map page.
2 Press MOB.
3 Select View Points.
4 Select a track point from the list.
5Select an option:
•To start navigating to the track point, select Go To.
•To view detailed information about the track point, select
Details.
Connected Features
Connected features are available for your quatix device when you connect the device to a compatible smartphone using Bluetooth technology. Some features require you to install the Garmin Connect app on the connected smartphone. Go to www.garmin.com/apps for more information. Some features are also available when you connect your device to a wireless network.
Phone notifications: Displays phone notifications and messages on your quatix device.
LiveTrack: Allows friends and family to follow your races and training activities in real time. You can invite followers using email or social media, allowing them to view your live data on a Garmin Connect tracking page.
GroupTrack: Allows you to keep track of your connections using LiveTrack directly on screen and in real time.
Activity uploads to Garmin Connect: Automatically sends your activity to your Garmin Connect account as soon as you finish recording the activity.
Connect IQ: Allows you to extend your device features with new watch faces, widgets, apps, and data fields.
Software Updates: Allows you to update your device software.
Weather: Allows you to view current weather conditions and weather forecasts.
Bluetooth sensors: Allows you to connect Bluetooth compatible sensors, such as a heart rate monitor.
Find my phone: Locates your lost smartphone that is paired with your quatix device and currently within range.
Find my device: Locates your lost quatix device that is paired with your smarphone and currently within range.
Enabling Bluetooth Notifications
Before you can enable notifications, you must pair the quatix device with a compatible mobile device (Pairing Your Smartphone with Your Watch, page 2).
1 Hold MENU.
2 Select Phone > Smart Notifications > Status > On. 3 Select During Activity.
4 Select a notification preference.
5 Select a sound preference.
6 Select Not During Activity.
7 Select a notification preference.
8 Select a sound preference.
9 Select Privacy.
10Select a privacy preference.
11Select Timeout.
12Select the amount of time the alert for a new notification appears on the screen.
13Select Signature to add a signature to your text message replies.
10 |
Connected Features |
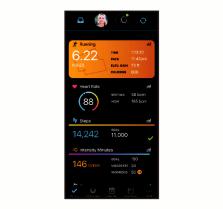
Viewing Notifications
1From the watch face, press UP or DOWN to view the notifications widget.
2 Press MOB.
3 Select a notification.
4 Press DOWN for more options.
5 Press BACK to return to the previous screen.
Receiving an Incoming Phone Call
When you receive a phone call on your connected smartphone, the quatix device displays the name or phone number of the caller.
•To accept the call, select Accept.
NOTE: To talk to the caller, you must use your connected smartphone.
•To decline the call, select Decline.
•To decline the call and immediately send a text message reply, select Reply, and select a message from the list.
NOTE: This feature is available only if your device is connected to an Android™ smartphone.
Replying to a Text Message
NOTE: This feature is available only for smartphones with Android.
When you receive a text message notification on your quatix device, you can send a quick reply by selecting from a list of messages. You can customize messages in the Garmin Connect app.
NOTE: This feature sends text messages using your phone. Regular text message limits and charges from your carrier and phone plan may apply. Contact your mobile carrier for more information about text message charges or limits.
1From the watch face, press UP or DOWN to view the notifications widget.
2 Press MOB, and select a text message notification. 3 Press DOWN.
4 Select Reply.
5Select a message from the list.
Your phone sends the selected message as an SMS text message.
Managing Notifications
You can use your compatible smartphone to manage notifications that appear on your quatix device.
Select an option:
•If you are using an iPhone® device, go to the iOS® notifications settings to select the items to show on the device.
•If you are using an Android smartphone, from the Garmin Connect app, select Settings > Notifications.
Turning Off the Bluetooth Smartphone Connection
You can turn off the Bluetooth smartphone connection from the controls menu.
NOTE: You can add options to the controls menu (Customizing the Controls Menu, page 37).
1 Hold LIGHT to view the controls menu.
2Select  to turn off the Bluetooth smartphone connection on your quatix device.
Refer to the owner's manual for your mobile device to turn off Bluetooth technology on your mobile device.
Turning On and Off Smartphone Connection Alerts
You can set the quatix device to alert you when your paired smartphone connects and disconnects using Bluetooth wireless technology.
NOTE: Smartphone connection alerts are turned off by default. 1 Hold MENU.
2 Select Phone > Alerts.
Locating a Lost Mobile Device
You can use this feature to help locate a lost mobile device that is paired using Bluetooth wireless technology and currently within range.
NOTE: You can add options to the controls menu (Customizing the Controls Menu, page 37).
1 Hold LIGHT to view the controls menu.
2 Select  .
.
The quatix device begins searching for your paired mobile device. An audible alert sounds on your mobile device, and the Bluetooth signal strength displays on the quatix device screen. The Bluetooth signal strength increases as you move closer to your mobile device.
3 Select BACK to stop searching.
Garmin Connect
Your Garmin Connect account allows you to track your performance and connect with your friends. It gives you the tools to track, analyze, share, and encourage each other. You can record the events of your active lifestyle, including runs, walks, rides, swims, hikes, golf games, and more.
You can create your free Garmin Connect account when you pair your device with your phone using the Garmin Connect app. You can also create an account when you set up the Garmin Express application (www.garmin.com/express).
Store your activities: After you complete and save a timed activity with your device, you can upload that activity to your Garmin Connect account and keep it as long as you want.
Analyze your data: You can view more detailed information about your fitness and outdoor activities, including time, distance, heart rate, calories burned, cadence, an overhead map view, and pace and speed charts. You can view more detailed information about your golf games, including scorecards, statistics, and course information. You can also view customizable reports.
NOTE: To view some data, you must pair an optional wireless sensor with your device (Pairing Your Wireless Sensors, page 40).
Track your progress: You can track your daily steps, join a friendly competition with your connections, and meet your goals.
Connected Features |
11 |

Share your activities: You can connect with friends to follow each other's activities or post links to your activities on your favorite social networking sites.
Manage your settings: You can customize your device and user settings on your Garmin Connect account.
Updating the Software Using the Garmin Connect App
Before you can update your device software using the Garmin Connect app, you must have a Garmin Connect account, and you must pair the device with a compatible smartphone (Pairing Your Smartphone with Your Watch, page 2).
Sync your device with the Garmin Connect app (Manually Syncing Data with Garmin Connect, page 12).
When new software is available, the Garmin Connect app automatically sends the update to your device.
Updating the Software Using Garmin Express
Before you can update your device software, you must download and install the Garmin Express application and add your device (Using Garmin Connect on Your Computer, page 12).
1 Connect the device to your computer using the USB cable.
When new software is available, the Garmin Express application sends it to your device.
2After the Garmin Express application finishes sending the update, disconnect the device from your computer.
Your device installs the update.
Using Garmin Connect on Your Computer
The Garmin Express application connects your device to your Garmin Connect account using a computer. You can use the Garmin Express application to upload your activity data to your Garmin Connect account and to send data, such as workouts or training plans, from the Garmin Connect website to your device. You can also install device software updates and manage your Connect IQ apps.
1 Connect the device to your computer using the USB cable. 2 Go to www.garmin.com/express.
3 Download and install the Garmin Express application.
4Open the Garmin Express application, and select Add Device.
5 Follow the on-screen instructions.
Manually Syncing Data with Garmin Connect
NOTE: You can add options to the controls menu (Customizing the Controls Menu, page 37).
1 Hold LIGHT to view the controls menu.
2 Select 
 .
.
Garmin Golf™ App
The Garmin Golf app allows you to upload scorecards from your compatible Garmin device to view detailed statistics and shot analyses. Golfers can compete with each other at different courses using the Garmin Golf app. More than 41,000 courses have leaderboards that anyone can join. You can set up a tournament event and invite players to compete.
The Garmin Golf app syncs your data with your Garmin Connect account. You can download the Garmin Golf app from the app store on your smartphone.
Garmin Explore™
The Garmin Explore website and mobile app allow you to plan trips and use cloud storage for your waypoints, routes, and tracks. They offer advanced planning both online and offline, allowing you to share and sync data with your compatible Garmin device. You can use the mobile app to download maps for offline access, and then navigate anywhere without using your cellular service.
You can download the Garmin Explore app from the app store on your smartphone, or you can go to explore.garmin.com.
Safety and Tracking Features
 CAUTION
Incident detection and assistance are supplemental features and should not be relied on as a primary method to obtain emergency assistance. The Garmin Connect app does not contact emergency services on your behalf.
The quatix device has safety and tracking features that must be set up with the Garmin Connect app.
NOTICE
To use these features, you must be connected to the Garmin Connect app using Bluetooth technology. You can enter emergency contacts in your Garmin Connect account.
For more information about incident detection and assistance, go to garmin.com/safety.
Assistance: Allows you to send an automated message with your name, LiveTrack link, and GPS location to your emergency contacts.
Incident detection: When the quatix device detects an incident during an outdoor walk, run, or bike activity, the device sends an automated message, LiveTrack link, and GPS location to your emergency contacts.
LiveTrack: Allows friends and family to follow your races and training activities in real time. You can invite followers using email or social media, allowing them to view your live data on a Garmin Connect tracking page.
Live Event Sharing: Allows you to send messages to friends and family during an event, providing real-time updates.
NOTE: This feature is available only if your device is connected to an Android smartphone.
GroupTrack: Allows you to keep track of your connections using LiveTrack directly on screen and in real time.
Adding Emergency Contacts
Emergency contact phone numbers are used for the incident detection and assistance features.
1 From the Garmin Connect app, select  or
or 
 .
.
2Select Safety & Tracking > Incident Detection & Assistance > Add Emergency Contact.
3 Follow the on-screen instructions.
Adding Contacts
You can add up to 50 contacts to the Garmin Connect app. Contact emails can be used with the LiveTrack feature. Three of these contacts can be used as emergency contacts (Adding Emergency Contacts, page 12).
1 From the Garmin Connect app, select  or
or 
 .
.
2 Select Contacts.
3 Follow the on-screen instructions.
After you add contacts, you must sync your data to apply the changes to your quatix device (Manually Syncing Data with Garmin Connect, page 12).
Turning Incident Detection On and Off
1 Hold MENU.
2 Select Safety & Tracking > Incident Detection.
3Select an activity.
NOTE: Incident detection is available only for outdoor walk, run, and bike activities.
12 |
Safety and Tracking Features |
Loading...