


 Loading...
STEADYCAST™ HEADING SENSOR
Installation Instructions
Important Safety Information
 CAUTION
Always wear safety goggles, ear protection, and a dust mask when drilling, cutting, or sanding.
NOTICE
When drilling or cutting, always check what is on the opposite side of the surface.
Registering Your Device
Help us better support you by completing our online registration today.
•Go to my.garmin.com.
•Keep the original sales receipt, or a photocopy, in a safe place.
Tools Needed
•Safety glasses
•Drill
•3.2 mm (1/8 in.) drill bit (a larger pilot hole drill bit may be required for hard or brittle mounting surfaces)
•25 mm (1 in.) drill bit for a cable-passthrough hole (optional)
•Phillips screwdriver
•Cable ties
•Portable or handheld compass (to test for magnetic interference)
•Additional screws appropriate for the mounting surface, if needed
Software Update
You should update the software on all of your Garmin® devices when you install this device.
The software update requires a Garmin NMEA 2000® Network Updater accessory or a Garmin chartplotter connected over the NMEA 2000 network (sold separately).
Garmin devices support up to a 32 GB memory card, formatted to FAT32.
Loading the New Software on a Memory Card
You must copy the software update to a memory card using a computer that is running Windows® software.
NOTE: You can contact Garmin customer support to order a preloaded software update card if you do not have a computer with Windows software.
1 Insert a memory card into the card slot on the computer. 2 Go to www.garmin.com/support/software/marine.html.
3 Select GPSMAP Series with SD Card.
4 Select Download next to GPSMAP Series with SD Card.
5 Read and agree to the terms.
6 Select Download.
7 Choose a location, and select Save.
8 Double-click the downloaded file.
9 Select Next.
10Select the drive associated with the memory card, and select
Next > Finish.
A Garmin folder containing the software update is created on the memory card. The software update can take several minutes to load onto the memory card.
Updating the Device Software
Before you can update the software, you must obtain a software-update memory card or load the latest software onto a memory card.
1 Turn on the chartplotter.
2After the home screen appears, insert the memory card into the card slot.
NOTE: In order for the software update instructions to appear, the device must be fully booted before the card is inserted.
3 Follow the on-screen instructions.
4Wait several minutes while the software update process completes.
5When prompted, leave the memory card in place and restart the chartplotter manually.
6Remove the memory card.
NOTE: If the memory card is removed before the device restarts fully, the software update is not complete.
Mounting Considerations
 CAUTION
Do not install or store the sensor near strong magnets, including speakers. A strong magnetic field can damage the sensor.
You can install the sensor with the cable either routed through the side of the sensor housing, or with the cable routed through the mounting surface under the sensor.
For best performance, observe these considerations when selecting a mounting location.
•The sensor should not be mounted near known ferrous metal objects such as a toolbox or compass.
•The sensor is not a GPS device, and is not required to have a clear view of the sky.
•A handheld compass should be used to test for magnetic interference in the area where the sensor is to be mounted. Your boat, motors, and devices must be on during the test.
If the needle on the handheld compass moves when you hold it where you intend to mount the sensor, magnetic interference is present. You must choose another location and test again.
•Mounting screws are provided with the sensor. If you use mounting hardware other than the provided screws, the hardware must be made of quality stainless steel or brass material to avoid magnetic interference with the sensor.
NOTE: Test all mounting hardware with a handheld compass to make sure no magnetic fields are present in the hardware.
•The sensor can be mounted in any orientation, and is not required to be installed in the same horizontal plane as the boat.
NOTE: You can set the heading alignment automatically if a GPS source is connected to the NMEA 2000 network. If you are not using a compatible Garmin chartplotter, the boat must be able to reach a cruising speed of at least 6.4 km/h (4 mph). You can set or fine-tune the heading alignment using Fine Heading Alignment with a compatible Garmin
March 2017 190-02192-02 _ 0A
chartplotter. If these options are not available, you must align the heading by adjusting the sensor installation manually to point the arrow parallel to the front of the boat.
Mounting the Sensor
You can mount the sensor with the cable along the mounting surface or with the cable routed through the mounting surface under the sensor.
1Select a mounting location (Mounting Considerations, page 1).
2If you plan to route the cable through the mounting surface, use a 25 mm (1 in.) drill bit to drill the cable-passthrough hole into the mounting surface at the selected mounting location.
3If necessary, route the cable through the cable passthrough hole.
4Using a bit appropriate for the mounting surface and mounting hardware, drill two pilot holes (optional).
5Secure the sensor to the mounting surface, observing these guidelines for best performance:
•If you are using your own mounting hardware instead of the included screws, test the hardware for magnetic interference (Mounting Considerations, page 1).
•Do not use excessive force when installing mounting screws. Use only the amount of force needed to keep the sensor in place.
•Apply force evenly between the mounting screws.
•Install the mounting screws perpendicular to the mounting surface (not at an angle). The heads of the screws should rest in the center of the grooves.
6 Route the cable to the NMEA 2000 network.
7If you routed the cable through the mounting surface, fill the cable hole in the side of the sensor with marine sealant (optional).
NMEA 2000 Connection Considerations
•This sensor connects to an existing NMEA 2000 network on your boat.
•If the integrated NMEA 2000 drop cable is not long enough to reach your NMEA 2000 network, a drop cable extension of up to 4 m (13 ft.) can be used, according to the NMEA 2000 guidelines.
|
|
|
|
|
|
|
|
|
|
|
|
|
|
|
|
|
|
|
|
|
|
|
|
|
|
|
|
|
|
|
|
|
|
|
|
|
|
|
|
|
|
|
|
|
|
|
|
|
|
|
|
|
|
|
|
|
|
|
|
|
|
|
|
|
|
|
|
|
|
|
|
|
|
|
|
|
|
|
|
|
|
|
|
|
|
|
|
|
|
|
|
|
|
|
|
|
|
|
|
|
|
|
|
|
|
|
|
|
|
|
|
|
|
|
|
|
|
|
|
|
|
|
|
|
|
|
|
|
|
|
|
|
|
|
|
|
|
|
|
|
|
|
|
|
|
|
|
|
|
|
|
|
|
|
|
|
|
|
|
|
|
|
|
|
|
|
|
|
|
|
|
|
|
|
|
|
|
|
|
|
|
|
|
|
|
|
|
|
|
|
|
|
|
|
|
|
|
|
|
|
|
|
|
|
|
|
|
|
|
|
|
|
|
|
|
|
|
|
|
|
|
|
|
|
|
|
|
|
|
|
|
|
|
|
|
|
|
|
|
|
|
|
|
|
|
|
|
|
|
|
|
|
|
|
|
|
|
|
|
|
|
|
|
|
|
|
|
|
|
|
|
|
|
|
|
|
|
|
|
|
|
|
|
|
|
|
|
|
|
|
|
|
|
|
|
|
|
|
|
|
|
|
|
|
|
|
|
|
|
|
|
|
|
|
|
|
|
|
|
|
|
|
|
|
|
|
|
|
|
|
|
|
|
|
|
|
|
|
|
|
|
|
|
|
|
|
|
|
|
|
|
|
|
|
|
|
|
|
|
|
|
|
|
|
|
|
|
|
|
|
|
|
|
|
|
|
|
|
|
|
|
|
|
|
|
|
|
|
|
|
|
|
|
|
|
|
|
|
|
|
|
|
|
|
|
|
|
|
|
|
|
|
|
|
|
|
|
|
|
|
|
|
|
|
|
|
|
|
|
|
|
|
|
|
|
|
|
|
|
|
|
|
|
|
|
|
|
|
|
|
|
|
|
|
|
|
|
|
|
|
|
|
|
|
|
|
|
|
|
|
|
|
|
|
|
|
|
|
|
|
|
|
|
|
|
|
|
|
|
|
|
|
|
|
|
|
|
|
|
|
|
|
|
|
|
|
|
|
|
|
|
|
|
|
|
|
|
|
|
|
|
|
|
|
|
|
|
|
|
|
|
|
|
|
|
|
|
|
|
|
|
|
|
|
|
|
|
|
|
|
|
|
|
|
|
|
|
|
|
|
|
|
|
|
|
|
|
|
|
|
|
|
|
|
|
|
|
|
|
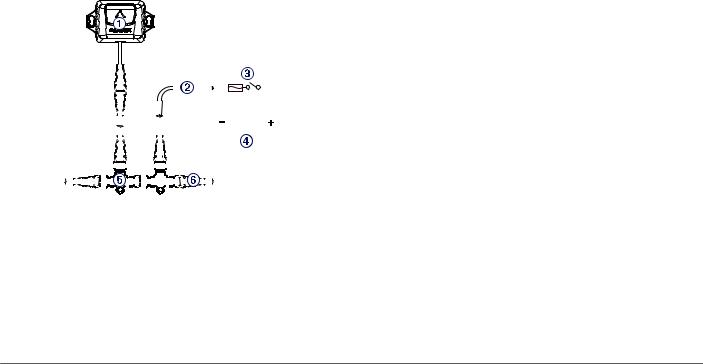
Item |
Description |
||||||||||||||||||||||||||||||||||||||||||||||||||||||||
À |
Heading sensor |
||||||||||||||||||||||||||||||||||||||||||||||||||||||||
|
|
|
|
|
|
|
|
|
|
|
|
|
|
|
|
|
|
|
|
|
|
|
|
|
|
|
|
|
|
|
|
|
|
|
|
|
|
|
|
|
|
|
|||||||||||||||
Á |
NMEA 2000 power cable (existing; not included) |
||||||||||||||||||||||||||||||||||||||||||||||||||||||||
|
|
|
|
|
|
|
|
|
|
|
|
|
|
|
|
|
|
|
|
|
|
|
|
|
|
|
|
|
|
|
|
|
|
|
|
|
|
|
|
|
|
|
|||||||||||||||
 |
Ignition or in-line switch (existing; not included) |
||||||||||||||||||||||||||||||||||||||||||||||||||||||||
|
|
|
|
|
|
|
|
|
|
|
|
|
|
|
|
|
|
|
|
|
|
|
|
|
|
|
|
|
|
|
|
|
|
|
|
|
|
|
|
|
|
|
|||||||||||||||
à |
12 Vdc power source |
||||||||||||||||||||||||||||||||||||||||||||||||||||||||
|
|
|
|
|
|
|
|
|
|
|
|
|
|
|
|
|
|
|
|
|
|
|
|
|
|
|
|
|
|
|
|
|
|
|
|
|
|
|
|
|
|
|
|||||||||||||||
Ä |
NMEA 2000 T-connector (included) |
||||||||||||||||||||||||||||||||||||||||||||||||||||||||
|
|
|
|
|
|
|
|
|
|
|
|
|
|
|
|
|
|
|
|
|
|
|
|
|
|
|
|
|
|
|
|
|
|
|
|
|
|
|
|
|
|
|
|||||||||||||||
Å |
NMEA 2000 terminator or backbone cable (existing; not included) |
||||||||||||||||||||||||||||||||||||||||||||||||||||||||
|
|
|
|
|
|
|
|
|
|
|
|
|
|
|
|
|
|
|
|
|
|
|
|
|
|
|
|
|
|
|
|
|
|
|
|
|
|
|
|
|
|
|
|
|
|
|
|
|
|
|
|
|
|
|
|
|
|
Calibration
After installation is complete, you must calibrate the heading sensor for best results. Depending on the types of devices connected to the NMEA 2000 network, you can calibrate the sensor using either a menu-based method or a basic method.
When you connect the sensor to the same NMEA 2000 network as a compatible Garmin chartplotter, you are prompted to begin menu-based calibration when the chartplotter detects the new sensor (Performing Menu-Based Calibration, page 2). Go to www.garmin.com for a list of compatible chartplotters.
NOTE: A software update available in mid-2017 enables you to perform menu-based calibration using a compatible chartplotter. If your chartplotter has software that predates this update, you must perform basic calibration.
If you connect the sensor to a NMEA 2000 network without a compatible Garmin chartplotter, you must perform basic calibration instead of menu-based calibration (Performing Basic Calibration, page 3).
Performing Menu-Based Calibration
Before you can perform menu-based calibration, you must connect the sensor to the same NMEA 2000 network as a compatible Garmin chartplotter.
If the sensor has not been calibrated successfully, a message appears each time you turn on a compatible Garmin chartplotter.
1 From the sensor calibration screen, select Compass Cal..
TIP: You can open the calibration page at any time by selecting the device from Menu > Settings >
Communications > NMEA 2000 Devices.
2 Select Begin.
3Follow the on-screen instructions until the compass calibration is complete, taking care to keep the boat as steady and level as possible.
The boat should not list during calibration.
If possible, you can turn the vessel in place by engaging two engines in opposite directions.
When the compass calibration is complete, a value appears near the Compass Cal. setting. A value near 100 indicates the sensor was installed in a perfect magnetic environment and calibrated correctly. If the heading performance is unacceptable, and the value is closer to 0 than it is to 100, you might need to relocate the sensor and calibrate the compass again.
4 Select Auto Heading Alignment.
NOTE: Auto Heading Alignment is available only if there is a GPS source connected to the NMEA 2000 network. If you do not have a GPS source connected, you must perform the Fine Heading Alignment instead (Adjusting the Fine Heading Alignment, page 2).
5 Select Begin.
6Follow the on-screen instructions until the alignment is complete.
Adjusting the Fine Heading Alignment
If you do not have a GPS source connected to the NMEA 2000 network, Auto Heading Alignment is not available as part of menu-based calibration, and you must adjust the Fine Heading Alignment instead.
You can adjust the Fine Heading Alignment in conjunction with Auto Heading Alignment to fine-tune the heading output (optional).
1From the sensor calibration screen, select Fine Heading Alignment.
2Using a landmark or a known good compass, determine the heading of your boat.
3 Adjust the heading until it matches your measurement.
2
Loading...