Braun Aesculap Sterile Technology User Manual

Aesculap Sterile Technology
Sterile container system
Edition 07/2009
Instructions for use/Technical description
Sterile container system
Gebrauchsanweisung/Technische Beschreibung
Sterilcontainer-System
Mode d’emploi/Description technique
Système de containers de stérilisation
Instrucciones de manejo/Descripción técnica
Sistema de contenedores estériles
Istruzioni per l’uso/Descrizione tecnica
Sterile container system
Gebruiksaanwijzing/Technische beschrijving
Steriele container-systeem
Brugsanvisning/Teknisk beskrivelse
Sterilcontainer-system
Bruksanvisning/Teknisk beskrivning
Sterilcontainersystem

1
2
3
4
5
6
7
8
9 |
9 |
10
11
12 |
13 |
14 |
15 |
20 |
|||
|
|
|
|
||
|
|
|
|
|
|
|
|
|
|
|
|
|
|
|
|
|
|
19
21
18
21
17 16
Aesculap Sterile Technology
Sterile container system
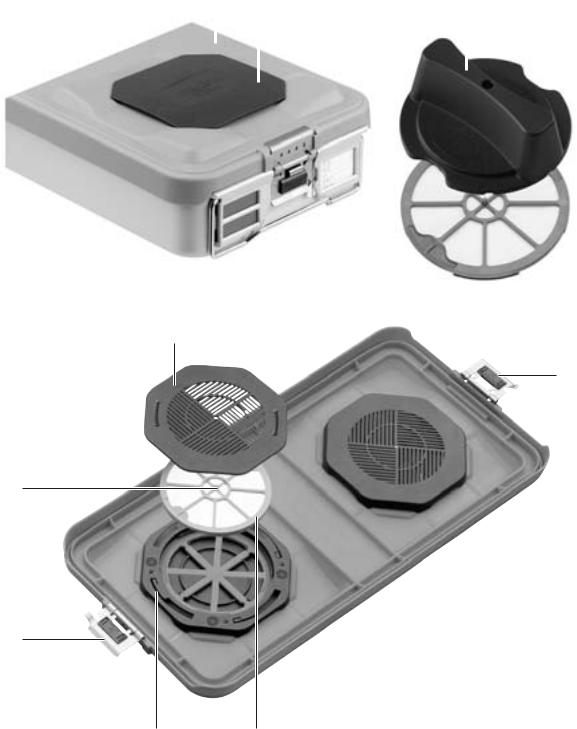
Legend |
|
Contents |
|
||||
1 |
Outer lid |
|
1. |
Safe handling .................................................................................................. |
3 |
||
2 |
Outer lid lock |
|
2. |
Product description ....................................................................................... |
3 |
||
3 |
Inner lid |
|
2.1 |
Intended use .................................................................................................... |
3 |
||
|
2.2 |
Operating principle |
3 |
||||
4 |
Inner lid lock |
|
|||||
|
3. |
Preparation and setup |
4 |
||||
5 |
Bottom |
|
|||||
|
3.1 |
First use |
4 |
||||
|
Indicator seal retainer |
||||||
6 |
4. |
Working with the sterile container .......................................................... |
4 |
||||
7 |
Indicator seal |
|
4.1 |
System set-up ................................................................................................. |
4 |
||
8 |
Handle |
|
|
Removing the outer lid/inner lid/plastic cover...................................... |
4 |
||
|
|
Filter change |
4 |
||||
9 |
Slot (for the indicator seal on the inner lid lock) |
|
|||||
4.2 |
Function checks |
4 |
|||||
10 |
Universal filter retainer |
||||||
4.3 |
Safe operation |
4 |
|||||
11 |
Cap |
|
|||||
|
|
Loading the sterile containers.................................................................... |
5 |
||||
12 |
Push buttons |
|
|
Inserting the indicator seal......................................................................... |
5 |
||
13 |
Lid latch (for optional outer lid of BASIS container) |
|
Loading the sterilizer .................................................................................... |
5 |
|||
14 |
Plastic cover |
|
|
Sterilization method and parameters ...................................................... |
5 |
||
|
|
Unloading the sterilizer |
6 |
||||
15 |
Perforation field cover |
|
|||||
|
Transporting the sterile container |
6 |
|||||
16 |
Germ barrier system (permanent filter) |
|
|||||
|
Storing the sterile containers |
6 |
|||||
|
Adapter frame |
|
|
||||
17 |
|
|
Checking and commissioning the sterile materials ............................. |
6 |
|||
18 |
Handling pin |
|
5. |
Validated processing procedure ................................................................ |
6 |
||
19 |
Ribbed cover grid |
5.1 |
General notes .................................................................................................. |
6 |
|||
5.2 |
Cleaning/Disinfecting |
7 |
|||||
20 |
Mounting handle |
|
|||||
|
5.3 |
Manual cleaning/disinfecting |
8 |
||||
21 |
Plastic cover lock |
||||||
|
Manual cleaning and wipe disinfection |
8 |
|||||
|
|
|
|
|
|||
Symbols on product and packages |
5.4 |
Mechanical neutral or mild-alkaline cleaning and thermal |
|
||||
|
disinfection |
9 |
|||||
|
|
|
|
|
|||
|
|
|
|
5.5 |
Inspection, maintenance and checks ....................................................... |
9 |
|
Symbol |
|
Explanation |
6. |
Troubleshooting list .................................................................................... |
10 |
||
|
|
|
|
7. |
Technical Service ......................................................................................... |
11 |
|
|
|
|
Caution: See documentation supplied with the |
||||
|
|
|
8. |
Accessories and replacement parts |
11 |
||
|
|
|
product |
||||
|
|
|
9. |
Technical specifications |
11 |
||
|
|
|
|
||||
|
|
|
|
10. |
Extracts from relevant standards ............................................................ |
11 |
|
|
|
|
Follow the instructions for use |
10.1 |
............................................................................................Standards cited |
11 |
|
|
|
|
|
|
|
|
|
2

|
|
|
|
|
|
|
|
|
|
|
|
|
|
|
|
|
|
|
|
|
|
|
|
|
|
|
|
|
|
|
|
|
|
|
|
|
|
|
|
|
|
|
|
|
|
|
|
|
|
|
1. Safe handling |
|
2. Product description |
|
|
||||||||||||
Risk of contamination of sterile materials due to sealing failure of sterile container!
The sealing of the sterile container and its germ WARNING barrier function will be compromised if the sterile container is combined with components from
other manufacturers.
¾Only combine Aesculap sterile container products with each other.
¾Prior to use, check for proper condition and functioning of the product.
¾To avoid damaging the product through improper setup or operation and mitigating the warranty and liability on the part of the product’s manufacturer:
–Use the product only according to these instructions for use.
–Follow the safety instructions and maintenance advisories.
–Never use damaged or faulty sterile containers. Replace any damaged components immediately with original spare parts.
–If sterile container components are repaired in a way that could affect the container’s germproof qualities: Inspect the sterile container thoroughly before use.
¾Ensure that only persons with the requisite training, expertise or experience will handle the product and its accessories.
¾Keep the instructions accessible for personnel.
¾Follow general guidelines and aseptic principles when handling contaminated items that have undergone or are to undergo sterilization.
2.1 Intended use
The Aesculap sterile container system is a reusable sterile barrier system that preserves the sterility of medical products until they are used or reach their use-by date. Medical products can be sterilized, stored and transported in the Aesculap optics container. The container can also be used for transporting medical products back to sterile processing after use. The Aesculap sterile container System is suitable for steam sterilization.
Note
Please contact your Aesculap representative if your Aesculap sterile containers are to be used in any other steam sterilization process.
2.2 Operating principle
The Aesculap sterile container system meets the requirements of DIN 58953-9 and EN ISO 11607.
Sterile containers with a perforated lid and a closed bottom have been validated for steam sterilization in a sterilizer acc. to EN 285 through the:
• fractionated vacuum process.
Sterile containers with a perforated lid and a perforated bottom are also suitable for steam sterilization in a sterilizer acc. to EN 285 through:
• gravitational procedures
Note
The suitability of any specific process must be validated at the site of application.
3
Aesculap Sterile Technology
Sterile container system
3. Preparation and setup
¾Lift the germ barrier system 16, gripping it at the handling pin 18, and remove it.
¾Install the germ barrier system 16 by the reverse sequence of steps.
3.1 First use
¾Thoroughly clean the new sterile container prior to first use.
¾After cleaning, use a suitable filter, see Filter change. Sterile container system PrimeLine:
The germ barrier system 16 (permanent filter) is integrated in the system.
4. Working with the sterile container
4.1 System set-up
Removing the outer lid/inner lid/plastic cover
If an outer lid is used, it can be removed to clean the sterile container and, if it is soiled, it can be separated from the inner lid.
VARIO container (by default with outer and inner lid):
¾Push down the outer lid lock 2 and remove the outer lid 1 and the inner lid 3.
BASIS container (with retrofitted outer lid):
¾Dismount the combined outer lid 1 and inner lid 3 from the bottom 5.
¾Loosen the lid latch 13 and remove the outer lid 1.
Sterile container system PrimeLine:
¾ Remove the plastic cover 14 from the bottom 5.
Filter change
Replace the filter at the following intervals, depending upon the filter type:
•Disposable filter: prior to each sterilization cycle
•PTFE permanent filter: after max. 1 000 processing cycles
•PrimeLine germ barrier system: after max. 5 000 processing cycles VARIO container and BASIS container:
¾Press simultaneously both push buttons 12 on the universal filter retainer 10.
¾Remove the universal filter retainer 10.
¾Insert a new filter and remount the universal filter retainer 10.
¾Push down the cap 11 on the universal filter retainer 10 until you hear it click into place.
Sterile container system PrimeLine:
¾Turn the ribbed cover grid 19 anticlockwise until it is unlocked.
¾Remove the ribbed cover grid 19 of the germ barrier system 16.
¾Turn the germ barrier anticlockwise system 16 with the mounting handle 20 until it is unlocked from the adapter frame 17.
4
4.2 Function checks
Note
With the PrimeLine sterile container system, the ribbed cover grid 19 must be removed prior to checks!
¾Visually inspect all components of the sterile containers for damage and correct functioning prior to each use. Check that:
–metal parts are not deformed
–aluminum lids are not warped
–the edges of the universal filter retainer 10 are seated in full-surface contact
–the seals are intact (no cracks, ...)
–plastic parts are not cracked
–the permanent filter/PrimeLine sterile barrier system is undamaged (no kinks, holes, cracks or gaps)
–the lock functions properly (engages)
¾Use sterile containers only if they are in mint condition. Replace any damaged components immediately with original spare parts or have the parts repaired.
4.3 Safe operation
Risk of contamination of sterile materials due to sealing failure of sterile container!
The sealing of any sterile container and its function as WARNING a germ barrier will be compromised if the sterile
container is combined with components from other manufacturers.
¾Only combine Aesculap sterile container products with each other.
|
Risk of non-sterility of container contents! |
|
¾ Always carry the sterile containers by their handles. |
CAUTION |
¾ Never carry or lift the sterile container at the lid. |
|
¾ Transport the sterile container in such a way that |
|
mechanical damage will not occur. |

Loading the sterile containers
Instruments
According to DIN EN 868-8 and DIN 58953-9 we recommend the following maximum load for the containers:
•Standard container: 10 kg
•Half container: 5 kg
•3/4-container: 7 kg
¾Store instruments in appropriate storage devices in a tray,
with hollow components, bowls, dishes, etc. with their openings at a downward angle.
VARIO container and BASIS container:
¾Load the sterile containers in such a way that their universal filter retainers 10 remain unobstructed. Max. loading height: Up to about 2 cm below the edge of the container bottom.
¾Use the inner lid lock 4 to fasten the inner lid 3 to the container bottom 5.
The inner lid lock 4 has to engage perceptibly. If this is not the case: Have the sterile container repaired, see Technical Service.
Sterile container system PrimeLine:
¾Load the sterile container in such a way that the ribbed cover grid 19 in the plastic cover 14 remains unobstructed. Max. loading height: up to approx. 2 cm below the rim of the container base.
¾Lock the plastic lid 14 with the plastic lid lock 21 on the bottom 5. The plastic lid lock 21 must engage perceptibly. If this is not the case: Have the sterile container repaired, see Technical Service.
Textiles
¾Pack folded textiles in such a way that they fit vertically in the sterile container.
¾Make certain that when the sterile container is fully loaded, it is still possible to insert a flat hand between the individual items without difficulty.
¾Load sterile containers in such a way that their universal filter retainers 10 remain unobstructed.
¾Use the inner lid lock 4 to fasten the inner lid 3 to the container bottom 5.
The inner lid lock 4 has to engage perceptibly. If this is not the case: Have the sterile container repaired, see Technical Service.
Sterile container system PrimeLine:
¾Load the sterile container in such a way that the ribbed cover grid 19 in the plastic cover 14 remains unobstructed.
¾Lock the plastic lid 14 with the plastic lid lock 21 on the bottom 5. The plastic lid lock 21 must engage perceptibly. If this is not the case: Have the sterile container repaired, see Technical Service.
Inserting the indicator seal
¾After loading of the sterile container, enter the following data on the indicator seal 7: Date of sterilization, sterilization number, expiry date, name and signature.
¾Slide the indicator seal 7 from outside into the indicator seal retainer 6 so that the indicator segment engages in the slot on the lid lock and seals the lock.
- or -
¾Insert a plastic seal (e.g. JG739) at the lock of the closed container.
Loading the sterilizer
Risk of vacuum damage to the sterile container due to inadequate pressure equalization!
¾ Do not use outer packaging for the sterile
WARNING containers.
¾Do not obstruct the air flow through the perforation fields in the bottom and in the inner lid under any circumstances (applicable to all container versions).
¾Do not put foil packaging directly on the sterile container.
Note
VARIO containers and BASIS containers can be sterilized with the outer lid in place!
¾Follow the sterilizer manufacturer’s recommendations.
¾Always place heavy sterile containers at the bottom of the sterilizer.
¾Always carry the sterile containers by their handles.
Note
Sterile containers can be stacked in the sterilizer.
¾Transport stacks of sterile containers in such a way that the stacks do not topple over.
Sterilization method and parameters
Risk of sterilization failure!
¾ Sterilize the containers only by approved and
validated sterilizing processes.
CAUTION
¾Sterilize with steam, taking note of the following:
Sterilization must be carried out through a validated steam sterilizing process (e.g. in a steam sterilizer according to DIN EN 285, validated according to DIN EN ISO 17665).
5
Aesculap Sterile Technology
Sterile container system
Unloading the sterilizer
Risk of burns due to a hot sterile container after sterilization!
¾ Always wear protective gloves when unloading the
WARNING sterilizer.
Transporting the sterile container
|
Risk of non-sterility of container contents! |
|
¾ Always carry the sterile containers by their handles. |
CAUTION |
¾ Never carry or lift the sterile container at the lid. |
|
¾ Transport the sterile container in such a way that |
|
mechanical damage will not occur. |
Storing the sterile containers
Note
The sterile containers may be stored in stacks.
¾Store sterile containers in a dry, clean and protected place.
¾Observe storage periods and storage conditions acc. to DIN 58953-9.
Checking and commissioning the sterile materials
The contents of a sterile container can be commissioned as sterile only if the container has been properly sterilized, stored and transported.
If this is not the case, the sterile materials must be processed again.
|
Risk of contamination from improperly sterilized |
|
|
materials! |
|
DANGER |
¾ Prior to commissioning the sterile materials, check |
|
to ensure that the sterilization was successful. |
||
|
¾Make certain that the color of the indicator point has changed.
¾Make certain that all container components, particularly the lid locks, are intact.
¾Ensure the container seal is intact.
6
5. Validated processing procedure
Note
Adhere to national statutory regulations, national and international standards and directives, and local, clinical hygiene instructions for sterile processing.
Note
For patients with Creutzfeldt-Jakob disease (CJD), suspected CJD or possible variants of CJD, observe the relevant national regulations concerning the reprocessing of the products.
Note
Up-to-date information on processing can be found on the Aesculap Extranet at www.aesculap-extra.net
Note
Successful processing of this medical product can only be ensured if processing is performed through a validated processing procedure. The user/processor is responsible for the validation.
Due to process tolerances, the manufacturer’s specifications can only serve as an approximate guide for assessing the processing procedures applied by the individual operator/processors.
5.1 General notes
Encrusted or fixated residues from surgery can make the cleaning process more difficult or ineffective, and can cause corrosion of stainless steels. To avoid this, the time interval between application and processing should not exceed 6 h, and neither fixating pre-cleaning temperatures >45 °C nor any fixating disinfecting agents (active ingredients: aldehyde, alcohol) be used.
Excessive doses of neutralizers or basic detergents can cause chemical degradation and/or fading and obliteration of laser inscriptions on stainless steel surfaces, regarding visual reading and machine-readability of the inscriptions.
Residues containing chlorine or chlorides e.g. in surgical residues, medicines, saline solutions and in the service water used for cleaning, disinfection and sterilization will cause corrosion damage (pitting, stress corrosion) and result in the destruction of stainless steel products. To remove such residues, the products must be rinsed sufficiently with fully desalinated water and dried thoroughly.
Only process chemicals that have been tested and approved (e.g. VAH/ DGHM or FDA approval or CE mark) and which are compatible with the product’s materials according to the chemical manufacturers’ recommendations may be used for processing the product. All process parameters specified by the chemical’s manufacturer, such as temperatures, concentrations and exposure times, must be strictly observed. Failure to do so can result in the following problems:
•optical changes of materials, e.g. fading or discoloration of aluminum. For aluminum, pH >8 in the application/process solution is sufficient to cause visible surface changes.
•material damage such as corrosion, cracks, fracturing, premature aging or swelling.
¾Do not use process chemicals that cause stress cracking of plastics such as PPSU, or attack softeners e.g. in silicone and cause brittleness of the material.
5.2 Cleaning/Disinfecting
Damage to the product due to inappropriate cleaning/disinfecting agents and/or excessive temperatures!
CAUTION ¾ Use cleaning and disinfecting agents according to the manufacturer’s instructions. The cleaning and disinfecting agent must
-be approved for plastics and high-grade steel
-not attack softeners (e.g. in silicone).
¾Observe specifications regarding concentration, temperature and exposure time.
7

Aesculap Sterile Technology
Sterile container system
5.3 Manual cleaning/disinfecting
¾Inspect visible surfaces for residual contamination after manual cleaning/disinfecting.
¾Repeat the cleaning process if necessary.
Manual cleaning and wipe disinfection
Stage |
|
Step |
T |
t |
Conc. |
Water |
|
Chemical |
|
|
|
|
[°C/°F] |
[min] |
[%] |
quality |
|
|
|
|
|
|
|
|
|
|
|
|
|
I |
|
Cleaning |
RT |
- |
- |
D–W |
- |
|
|
|
|
|
(cold) |
|
|
|
|
|
|
|
|
|
|
|
|
|
|
|
|
II |
|
Drying |
RT |
- |
- |
- |
- |
|
|
|
|
|
|
|
|
|
|
|
|
III |
|
Wipe disinfection |
- |
>1 |
- |
- |
I |
|
II |
|
|
|
|
|
|
|
Alcohol Denat. 70 % |
|
Aldehyde-free surface |
|
|
|
|
|
|
|
(ethanol B|BRAUN) |
|
disinfectant (Stabimed) |
|
|
|
|
|
|
|
|
|
|
IV |
|
Final rinse |
RT |
- |
- |
FD–W |
not required |
|
Rinse off cleaning |
|
|
|
(cold) |
|
|
|
|
|
chemicals; do not leave |
|
|
|
|
|
|
|
|
|
residues |
|
|
|
|
|
|
|
|
|
|
V |
|
Drying |
RT |
- |
- |
- |
- |
|
- |
|
|
|
|
|
|
|
|
|
|
D–W: |
Drinking water |
|
|
|
|
|
|
|
|
FD–W: |
Fully desalinated water (demineralized) |
|
|
|
|
|
|
||
RT: |
Room Temperature |
|
|
|
|
|
|
|
|
Stage I
¾ Wipe off gross debris prior to cleaning.
Stage II
¾Dry the product with lint-free tissue or medical-quality filtered compressed air.
Stage III
¾ Carry out wipe disinfection.
Stage IV
¾When using aldehyde-free disinfectants:
After the specified exposure time (at least 1 minute), rinse the disinfected surfaces under running FD water.
¾Allow water to drip off for a sufficient length of time.
Stage V
¾ Dry the product with lint-free tissue or in a heating cabinet.
8

5.4 Mechanical neutral or mild-alkaline cleaning and thermal disinfection
Machine type: Single-chamber washer/disinfector without ultrasound
Stage |
Step |
T |
t |
Water |
Chemical |
|
|
[°C/°F] |
[min] |
quality |
|
|
|
|
|
|
|
I |
Prerinse |
<25/77 |
3 |
D–W |
- |
|
|
|
|
|
|
II |
Cleaning |
55/131 |
10 |
FD–W |
Neutral: |
|
|
|
|
|
BBRAUN HELIMATIC CLEANER |
|
|
|
|
|
neutral, pH-neutral, |
|
|
|
|
|
process solution 0.5 % |
|
|
|
|
|
Mild-alkaline: |
|
|
|
|
|
- Concentrate: |
|
|
|
|
|
pH = 9.5 |
|
|
|
|
|
< 5 % anionic tensides |
|
|
|
|
|
- 0.5 % solution |
|
|
|
|
|
Alkaline: |
|
|
|
|
|
Processing possible at pH up to 10.5, provided the cleaning |
|
|
|
|
|
agent is manufacturer-approved for container cleaning. |
|
|
|
|
|
Note |
|
|
|
|
|
Application of mild-alkaline or alkaline cleaning agents |
|
|
|
|
|
may cause discoloration of colored anodized aluminum, |
|
|
|
|
|
which however will not affect the functionality of the |
|
|
|
|
|
product. |
|
|
|
|
|
|
III |
Intermediate rinse |
>10/50 |
1 |
FD–W |
Especially for PrimeLine it must be ensured that the |
|
|
|
|
|
surface is rinsed without leaving any residues. |
|
|
|
|
|
|
IV |
Thermal disinfecting |
90/194 |
5 |
FD–W |
Other process parameters may be feasible with agreement |
|
|
|
|
|
by the hospital hygienist. |
|
|
|
|
|
|
V |
Drying |
- |
- |
- |
According to mechanical cleaning program |
|
|
|
|
|
|
D–W: Drinking water
FD–W: Fully desalinated (demineralized) water
¾Check visible surfaces for residues after mechanical cleaning/ disinfecting.
¾Repeat the cleaning process if necessary.
Note
Ultrasonic treatment can be applied in manual processing as well as in mechanical processing. Temperatures of up to 120 °C are permissible for mechanical drying with hot air.
5.5 Inspection, maintenance and checks
Note
The sterile containers may be tested and repaired only by persons with the appropriate training, expertise or experience.
The seals in the container lids were tested according to DIN EN 868-8, Annex G, for a minimum service life of 5 000 sterilization cycles.
¾In case of visible damage, change the seal immediately.
¾Have the lid sent to Aesculap, see Technical Service.
¾If necessary, lightly lubricate moving metal parts, e.g. latch hinges, with sterilizable and steam-permeable maintenance oil (e.g. STERILIT® oil spray JG600 or STERILIT® I drip feed oiler JG598).
9

Aesculap Sterile Technology
Sterile container system
6. Troubleshooting list
Malfunction |
Cause |
|
|
|
Remedy |
|
|
|
|||
Excessive amounts of condensate inside the |
Temperature of sterile materials too low prior |
Allow sterile materials to come to room |
|||
sterile container |
to sterilization |
|
|
temperature (appr. 20 °C) before sterilization |
|
|
|
|
|
|
|
|
Textiles too damp |
|
|
Sterilize dry textiles only |
|
|
|
|
|
||
|
Sterile container too heavy |
|
Normal container |
||
|
|
|
|
|
with instruments: max. load 10 kg |
|
|
|
|
|
with textiles: max. load 8 kg |
|
|
|
|
|
|
|
|
|
|
|
Half container with instruments: |
|
|
|
|
|
max. load 5 kg |
|
|
|
|
|
|
|
|
|
|
|
3/4-container with instruments: max. load 7 kg |
|
|
|
|||
|
Sterile materials improperly positioned |
Lay hollow components, bowls, plates etc. face |
|||
|
|
|
|
|
down and on a slant |
|
|
|
|
|
|
|
|
|
|
|
Arrange textiles in loose vertical piles, do not |
|
|
|
|
|
press them together |
|
|
|
|||
|
Sterile container incorrectly positioned in |
Always place heavy sterile containers at the |
|||
|
sterilizer |
|
|
|
bottom |
|
|
|
|
|
|
|
Sterile |
containers |
processed |
immediately |
Allow sterile containers to cool down to room |
|
after sterilization |
|
|
temperature prior to processing |
|
|
|
|
|
|
|
|
Sterile |
containers |
improperly |
positioned |
Do not store sterile containers on a floor or in a |
|
during cooling phase |
|
|
drafty place |
|
|
|
|
|
|
Store sterile containers in air-conditioned areas |
|
|
|
|
|
according to DIN 58953-9 |
|
|
|
|||
|
Sterilizer properties do not meet DIN EN 285 |
Have sterilizer serviced regularly |
|||
|
standards |
|
|
Check drying vacuum |
|
|
|
|
|
|
Check drying time |
|
|
|
|
|
|
|
|
|
|
|
Check steam quality and upgrade if necessary |
|
|
|
|||
|
Empty-cycle and vacuum test not run daily |
Run empty-cycle and vacuum test daily before |
|||
|
before sterilization begins |
|
beginning sterilization |
||
|
|
|
|||
|
Unsuitable sterilizer cycle selected |
Select a program according to the load |
|||
|
|
|
|||
|
Sterilizer door left open too long, sterilizer |
Load and unload sterilizer quickly |
|||
|
cooled down |
|
|
|
|
|
|
|
|||
Condensate in groove of (inner) lid |
Multiple sterile containers or heavy sterile |
Subdivide sterilizer with shelving |
|||
|
materials stacked |
|
|
Use outer lid |
|
|
|
|
|||
|
Sterilization performed incorrectly |
Have sterilizer repaired by manufacturer |
|||
Indicator seal color unchanged |
Sterilizer defective |
|
|
|
|
|
|
|
|
||
|
Indicator seals stored improperly |
|
Observe storage conditions as specified on the |
||
|
|
|
|
|
packaging of the indicator seals |
|
|
|
|
|
|
10 |
|
|
|
|
|
|
|
|
|
|
|
|
|
|
|
|
|
|
|
|
|
|
|
|
|
|
|
|
|
|
|
|
|
|
|
|
|
|
|
|
|
|
|
|
|
|
|
|
|
|
|
|
|
|
|
|
|
|
|
|
|
|
|
|
|
|
|
|
|
Malfunction |
Cause |
Remedy |
|
||||||||||||
|
|
|
|
||||||||||||
Basis/Vario sterile container or PrimeLine |
Perforations covered during sterilization |
Never cover perforations |
|
||||||||||||
sterile container system deformed |
|
|
|
|
|
|
|
|
|
|
|
|
|
|
|
|
|
|
|
||||||||||||
Inner or outer lid cannot be positioned or |
Container lid or bottom deformed or |
Replace container lid or bottom, or have |
|
||||||||||||
locked on the bottom component |
damaged due to improper handling |
components repaired by the manufacturer |
|
||||||||||||
|
(e.g. carrying by the lid) |
|
|
|
|
|
|
|
|
|
|
|
|
||
|
|
|
|
|
|
|
|
|
|
|
|
|
|
|
|
7. Technical Service 9. Technical specifications
Risk of injury and/or malfunction!
¾ Do not modify the product.
WARNING
¾For service and repairs, please contact your national B. Braun/Aesculap agency.
Modifications carried out on medical technical equipment may result in loss of guarantee/warranty rights and forfeiture of applicable licenses.
Service addresses
Aesculap Technischer Service Am Aesculap-Platz
78532 Tuttlingen / Germany Phone: +49 7461 95-1602 Fax: +49 7461 16-5621 E-mail: ats@aesculap.de
Other service addresses can be obtained from the address indicated above.
The variants and sizes of sterile containers are listed in brochure no. C40401.
10. Extracts from relevant standards
10.1 Standards cited
The following standards are cited in connection with the sterile containers:
•DIN 58953-9
•EN 285
•EN 868-8
•EN 285 in combination with EN ISO 17665
•EN ISO 11607
8. Accessories and replacement parts
Accessories and supplies are listed in brochure no. C40401.
11
Aesculap Sterile Technology
Sterilcontainer-System
Legende
1Oberdeckel
2Oberdeckel-Verschluss
3Unterdeckel
4Unterdeckel-Verschluss
5Wanne
6Indikatorplombenhalter
7Indikatorplombe
8Griff
9Schlitz (für Indikatorplombe am Unterdeckel-Verschluss)
10Universal-Filterhalter
11Kappe
12Druckknöpfe
13Rastkralle (bei optionalem Oberdeckel an BASIS-Container)
14Kunststoffdeckel
15Perforationsfeld-Abdeckung
16Keimrückhaltesystem (Dauerfilter)
17Aufnahmerahmen
18Griffbolzen
19Abdecklamellengitter
20Montagegriff
21Kunststoffdeckel-Verschluss
Symbole an Produkt und Verpackung
Symbol Erklärung
Achtung, Begleitdokumente beachten
Gebrauchsanweisung befolgen
12
Inhaltsverzeichnis |
|
|
1. |
Sichere Handhabung ................................................................................... |
13 |
2. |
Produktbeschreibung .................................................................................. |
13 |
2.1 |
Verwendungszweck ..................................................................................... |
13 |
2.2 |
Funktionsweise ............................................................................................. |
13 |
3. |
Vorbereiten und Aufstellen ....................................................................... |
14 |
3.1 |
Erstinbetriebnahme ..................................................................................... |
14 |
4. |
Arbeiten mit dem Sterilcontainer ........................................................... |
14 |
4.1 |
Bereitstellen .................................................................................................. |
14 |
|
Oberdeckel/Unterdeckel/Kunststoffdeckel abnehmen...................... |
14 |
|
Filter wechseln............................................................................................. |
14 |
4.2 |
Funktionsprüfung ........................................................................................ |
14 |
4.3 |
Bedienung ...................................................................................................... |
14 |
|
Sterilcontainer beladen............................................................................. |
15 |
|
Indikatorplombe einsetzen....................................................................... |
15 |
|
Sterilisator beladen .................................................................................... |
15 |
|
Sterilisation .................................................................................................. |
15 |
|
Sterilisator entladen................................................................................... |
16 |
|
Sterilcontainer transportieren................................................................. |
16 |
|
Sterilcontainer lagern................................................................................ |
16 |
|
Sterilgut prüfen und bereitstellen.......................................................... |
16 |
5. |
Validiertes Aufbereitungsverfahren ........................................................ |
16 |
5.1 |
Allgemeine Hinweise .................................................................................. |
16 |
5.2 |
Reinigung/Desinfektion .............................................................................. |
17 |
5.3 |
Manuelle Reinigung/Desinfektion ........................................................... |
18 |
|
Manuelle Reinigung und Wischdesinfektion ...................................... |
18 |
5.4Maschinelle neutrale oder mildalkalische Reinigung und
|
thermische Desinfektion ............................................................................ |
19 |
5.5 |
Kontrolle, Wartung und Prüfung ............................................................. |
19 |
6. |
Fehler erkennen und beheben .................................................................. |
20 |
7. |
Technischer Service ..................................................................................... |
21 |
8. |
Zubehör/Ersatzteile ..................................................................................... |
21 |
9. |
Technische Daten ......................................................................................... |
21 |
10. |
Normenauszüge ........................................................................................... |
21 |
10.1 |
Zitierte Normen ............................................................................................ |
21 |

1. Sichere Handhabung
Gefahr der Kontamination von Sterilgut durch undichten Sterilcontainer!
Bei Kombination des Sterilcontainers mit Bautei- WARNUNG len anderer Hersteller ist die Dichtigkeit des Ste-
rilcontainers und seine Funktion als Keimbarriere nicht mehr gewährleistet.
¾Nur Aesculap-Sterilcontainer-Produkte miteinander kombinieren.
¾Vor der Anwendung des Produkts Funktionsfähigkeit und ordnungsgemäßen Zustand prüfen.
¾Um Schäden durch unsachgemäßen Aufbau oder Betrieb zu vermeiden und die Garantie und Haftung nicht zu gefährden:
–Produkt nur gemäß dieser Gebrauchsanweisung verwenden.
–Sicherheitsinformationen und Instandhaltungshinweise beachten.
–Keine beschädigten oder defekten Sterilcontainer verwenden. Beschädigte Einzelteile sofort durch Originalersatzteile ersetzen.
–Wenn der Sterilcontainer an Teilen repariert wurde, die die Keimdichtigkeit beeinflussen: Vor dem Gebrauch Sterilcontainer visuell genau prüfen.
¾Sicherstellen, dass nur Personen mit entsprechender Ausbildung, Kenntnis oder Erfahrung Produkt und Zubehör handhaben.
¾Gebrauchsanweisung für das Personal zugänglich aufbewahren.
¾Allgemeine Richtlinien und Hygienegrundsätze im Umgang mit kontaminiertem, zu sterilisierendem und sterilisiertem Gut beachten.
2. Produktbeschreibung
2.1 Verwendungszweck
Das Aesculap-Sterilcontainer-System ist ein mehrfach verwendbares Sterilbarrieresystem, das die Sterilität der Medizinprodukte bis zu deren Verwendung bzw. dem Verfallsdatum erhält. In ihm können Medizinprodukte sterilisiert, gelagert und transportiert werden. Außerdem ist der Rücktransport von Medizinprodukten nach deren Gebrauch möglich. Das Aesculap-Sterilcontainer-System ist geeignet für die Sterilisation in Dampf.
Hinweis
Wenden Sie sich bitte an Ihre Aesculap-Vertretung, falls die Aesculap-Ste- rilcontainer in anderen Sterilisationsverfahren verwendet werden sollen.
2.2 Funktionsweise
Das Aesculap-Sterilcontainer-System entspricht den Anforderungen der DIN 58953-9 und EN ISO 11607.
Sterilcontainer mit perforiertem Deckel und geschlossener Wanne sind validiert für die Dampfsterilisation in einem Sterilisator gemäß EN 285 im:
• Fraktionierten Vakuumverfahren
Sterilcontainer mit perforiertem Deckel und perforierter Wanne sind zusätzlich geeignet für die Dampfsterilisation in einem Sterilisator gemäß EN 285 im:
• Gravitationsverfahren
Hinweis
Die Eignung des spezifischen Verfahrens muss durch eine Validierung vor Ort nachgewiesen werden.
13
Aesculap Sterile Technology
Sterilcontainer-System
3. Vorbereiten und Aufstellen
3.1 Erstinbetriebnahme
¾Fabrikneuen Sterilcontainer vor der ersten Anwendung gründlich reinigen.
¾Nach der Reinigung passenden Filter einsetzen, siehe Filter wechseln. Sterilcontainer-System PrimeLine:
Das Keimrückhaltesystem 16 (Dauerfilter) ist integriert.
4. Arbeiten mit dem Sterilcontainer
4.1 Bereitstellen
Oberdeckel/Unterdeckel/Kunststoffdeckel abnehmen
Wenn ein Oberdeckel verwendet wird, kann dieser zum Reinigen des Sterilcontainers und bei Verschmutzung vom Unterdeckel abgenommen werden.
VARIO-Container (standardmäßig mit Unterund Oberdeckel):
¾Oberdeckel-Verschluss 2 drücken, Oberdeckel 1 und Unterdeckel 3 abnehmen.
BASIS-Container (mit nachgerüstetem Oberdeckel):
¾Kombination Oberdeckel 1 und Unterdeckel 3 von der Wanne 5 abnehmen.
¾Rastkralle 13 lösen und Oberdeckel 1 abnehmen.
Sterilcontainer-System PrimeLine:
¾ Kunststoffdeckel 14 von der Wanne 5 abnehmen.
Filter wechseln
Je nach Filtertyp Filter in folgenden Intervallen wechseln:
•Einmalfilter: vor jeder Sterilisation
•Dauerfilter aus PTFE: nach max. 1 000 Aufbereitungszyklen
•PrimeLine-Keimrückhaltesystem: nach max. 5 000 Aufbereitungszyklen
VARIO-Container und BASIS-Container:
¾Druckknöpfe 12 am Universal-Filterhalter 10 gleichzeitig drücken.
¾Universal-Filterhalter 10 abnehmen.
¾Neuen Filter einlegen und Universal-Filterhalter 10 wieder aufsetzen.
¾Kappe 11 am Universal-Filterhalter 10 drücken, bis sie hörbar einrastet.
Sterilcontainer-System PrimeLine:
¾Abdecklamellengitter 19 nach links drehen, bis es entriegelt ist.
¾Abdecklamellengitter 19 des Keimrückhaltesystems 16 abnehmen.
14
¾Keimrückhaltesystem 16 mit Montagegriff 20 nach links drehen, bis es vom Aufnahmerahmen 17 entriegelt ist.
¾Keimrückhaltesystem 16 am Griffbolzen 18 anheben und entnehmen.
¾Keimrückhaltesystem 16 in umgekehrter Reihenfolge einbauen.
4.2 Funktionsprüfung
Hinweis
Beim Sterilcontainer-System PrimeLine muss zur Prüfung das Abdecklamellengitter 19 abgenommen werden!
¾Alle Bestandteile des Sterilcontainers vor jedem Einsatz visuell auf Beschädigung und korrekte Funktion prüfen:
–Metallteile nicht verformt
–Aluminiumdeckel nicht verzogen
–Universal-Filterhalter 10 liegt am Rand vollflächig auf
–Dichtungen unversehrt (keine Risse, ...)
–Kunststoffteile ohne Risse
–Dauerfilter/PrimeLine-Keimrückhaltesystem unbeschädigt (keine Knicke, Löcher, Risse oder Spalten)
–Verschluss funktionstüchtig (rastet ein)
¾Nur einwandfreie Sterilcontainer verwenden. Beschädigte Teile sofort durch Originalersatzteile ersetzen oder reparieren.
4.3 Bedienung
Gefahr der Kontamination von Sterilgut durch undichten Sterilcontainer!
Bei Kombination des Sterilcontainers mit Bauteilen WARNUNG anderer Hersteller sind die Dichtigkeit des Sterilcontainers und seine Wirkung als Keimbarriere nicht mehr
gewährleistet.
¾Nur Aesculap-Sterilcontainer-Produkte miteinander kombinieren.
Gefahr der Unsterilität des Sterilguts!
¾ Sterilcontainer immer an den Griffen transportie-
ren.
VORSICHT ¾ Sterilcontainer niemals am Deckel tragen oder anheben.
¾Sterilcontainer so transportieren, dass mechanische Beschädigungen ausgeschlossen sind.

Sterilcontainer beladen
Instrumente
Nach DIN EN 868-8 und DIN 58953-9 empfehlen wir folgende maximale Beladung des Containers:
•Normalcontainer: 10 kg
•Halbcontainer: 5 kg
•3/4-Container: 7 kg
¾Instrumente mit geeigneten Lagerungshilfen in Siebkorb lagern. Dabei Hohlkörper, Schalen, Teller u. Ä. mit der Öffnung nach schräg unten lagern.
VARIO-Container und BASIS-Container:
¾Sterilcontainer so beladen, dass die Universal-Filterhalter 10 frei bleiben. Max. Beladungshöhe: Bis ca. 2 cm unterhalb des Containerwannenrands.
¾Unterdeckel 3 mit Unterdeckel-Verschluss 4 auf der Wanne 5 verriegeln.
Der Unterdeckel-Verschluss 4 muss spürbar einrasten. Falls nicht: Sterilcontainer instand setzen lassen, siehe Technischer Service.
Sterilcontainer-System PrimeLine:
¾Sterilcontainer so beladen, dass das Abdecklamellengitter 19 im Kunststoffdeckel 14 frei bleibt. Max. Beladungshöhe: Bis ca. 2 cm unterhalb des Containerwannenrands.
¾Kunststoffdeckel 14 mit Kunststoffdeckel-Verschluss 21 auf der Wanne 5 verriegeln.
Der Kunststoffdeckel-Verschluss 21 muss spürbar einrasten. Falls nicht: Sterilcontainer instand setzen lassen, siehe Technischer Service.
Textilien
¾Zusammengelegte Wäschestücke so packen, dass sie senkrecht in den Sterilcontainer passen.
¾Sicherstellen, dass bei voll beladenem Sterilcontainer noch eine gestreckte Hand zwischen die einzelnen Wäschestücke passt.
¾Sterilcontainer so beladen, dass die Universal-Filterhalter 10 frei bleiben (bei VARIO-Container und BASIS-Container).
¾Unterdeckel 3 mit Unterdeckel-Verschluss 4 auf der Wanne 5 verriegeln.
Der Unterdeckel-Verschluss 4 muss spürbar einrasten. Falls nicht: Sterilcontainer instand setzen lassen, siehe Technischer Service.
Sterilcontainer-System PrimeLine:
¾Sterilcontainer so beladen, dass das Abdecklamellengitter 19 im Kunststoffdeckel 14 frei bleibt.
¾Kunststoffdeckel 14 mit Kunststoffdeckel-Verschluss 21 auf der Wanne 5 verriegeln.
Der Kunststoffdeckel-Verschluss 21 muss spürbar einrasten. Falls nicht: Sterilcontainer instand setzen lassen, siehe Technischer Service.
Indikatorplombe einsetzen
¾Nach dem Beladen des Sterilcontainers auf der Indikatorplombe 7 Folgendes eintragen: Sterilisierdatum, Sterilisiernummer, Verfallsdatum sowie Namen und Unterschrift.
¾Indikatorplombe 7 von der Außenseite in den Indikatorplombenhalter 6 schieben, so dass das Indikatorteil in den Schlitz am Deckelverschluss greift und den Verschluss versiegelt.
- oder -
¾Nach dem Verschließen des Sterilcontainers Kunststoffplombe (z. B. JG739) am Verschluss einsetzen.
Sterilisator beladen
Gefahr von Vakuumschäden am Sterilcontainer durch unzureichenden Druckausgleich!
¾ Keine Außenverpackungen für Sterilcontainer ver-
WARNUNG wenden.
¾Perforationsfelder in Wanne und Unterdeckel keinesfalls luftdicht verschließen (bei allen ContainerVersionen).
¾Keine Folienverpackungen direkt auf den Sterilcontainer legen.
Hinweis
Sowohl VARIO-Container als auch BASIS-Container können mit aufgesetztem Oberdeckel sterilisiert werden!
¾Anweisungen des Sterilisator-Herstellers beachten.
¾Schwere Sterilcontainer immer unten in den Sterilisator stellen.
¾Sterilcontainer immer an den Griffen transportieren.
Hinweis
Sterilcontainer können im Sterilisator gestapelt werden.
¾ Sterilcontainer-Stapel so transportieren, dass die Stapel nicht kippen.
Sterilisation
Gefahr der Unsterilität!
¾ Sterilcontainer nur in den dafür zugelassenen
und validierten Sterilisationsverfahren steriliVORSICHT sieren.
¾Sterilisieren mit Dampf, dabei Folgendes beachten:
Die Sterilisation hat nach einem validierten Dampfsterilisationsverfahren (z. B. in einem Dampfsterilisator gemäß DIN EN 285 und validiert gemäß DIN EN ISO 17665 zu erfolgen.
15

Aesculap Sterile Technology
Sterilcontainer-System
Sterilisator entladen
Verbrennungsgefahr durch heiße Sterilcontainer nach dem Sterilisieren!
¾ Immer mit Schutzhandschuhen arbeiten.
WARNUNG
Sterilcontainer transportieren
Gefahr der Unsterilität des Sterilguts!
¾ Sterilcontainer immer an den Griffen transportie-
ren.
VORSICHT ¾ Sterilcontainer niemals am Deckel tragen oder anheben.
¾Sterilcontainer so transportieren, dass mechanische Beschädigungen ausgeschlossen sind.
Sterilcontainer lagern
Hinweis
Sterilcontainer können gestapelt gelagert werden.
¾Sterilcontainer an einem trockenen, sauberen und geschützten Platz aufbewahren.
¾Lagerdauer und Lagerbedingungen gemäß DIN 58953-9 einhalten.
Sterilgut prüfen und bereitstellen
Der Inhalt eines Sterilcontainers ist nur dann als steril zu betrachten, wenn der Container ordnungsgemäß sterilisiert, gelagert und transportiert wurde.
Wenn dies nicht der Fall ist, muss das Sterilgut neu aufbereitet werden.
Gefahr von Kontaminationen durch nicht korrekt sterilisiertes Sterilgut!
GEFAHR |
¾ Vor Bereitstellen des Sterilguts prüfen, ob die Steri- |
|
lisation erfolgreich war. |
||
|
¾Sicherstellen, dass die Farbe des Indikatorpunkts umgeschlagen ist.
¾Sicherstellen, dass alle Containerbestandteile, insbesondere die Deckelverschlüsse, unversehrt sind.
¾Sicherstellen, dass die Containerverplombung unversehrt ist.
16
5. Validiertes Aufbereitungsverfahren
Hinweis
Nationale gesetzliche Vorschriften, nationale und internationale Normen und Richtlinien und die eigenen Hygienevorschriften zur Aufbereitung einhalten.
Hinweis
Bei Patienten mit Creutzfeldt-Jakob-Krankheit (CJK), CJK-Verdacht oder möglichen Varianten bezüglich der Aufbereitung der Produkte die jeweils gültigen nationalen Verordnungen einhalten.
Hinweis
Aktuelle Informationen zur Aufbereitung siehe auch Aesculap Extranet unter www.aesculap-extra.net
Hinweis
Es ist zu beachten, dass die erfolgreiche Aufbereitung dieses Medizinproduktes nur nach vorheriger Validierung des Aufbereitungsprozesses sichergestellt werden kann. Die Verantwortung hierfür trägt der Betreiber/Aufbereiter.
Durch Prozesstoleranzen bedingt, dienen die Angaben des Herstellers nur als Richtwert für die Beurteilung der beim Betreiber/Aufbereiter vorhandenen Aufbereitungsprozesse.
5.1 Allgemeine Hinweise
Angetrocknete bzw. fixierte OP-Rückstände können die Reinigung erschweren bzw. unwirksam machen und bei nicht rostendem Stahl zu Korrosion führen. Demzufolge sollten ein Zeitraum zwischen Anwendung und Aufbereitung von 6 h nicht überschritten, keine fixierenden Vorreinigungstemperaturen >45 °C angewandt und keine fixierenden Desinfektionsmittel (Wirkstoffbasis: Aldehyd, Alkohol) verwendet werden.
Überdosierte Neutralisationsmittel oder Grundreiniger können zu einem chemischen Angriff und/oder zur Verblassung und visuellen oder maschinellen Unlesbarkeit der Laserbeschriftung bei nicht rostendem Stahl führen.
Bei nicht rostendem Stahl führen Chlorbzw. chloridhaltige Rückstände, z. B. in OP-Rückständen, Arzneimitteln, Kochsalzlösungen, im Wasser zur Reinigung, Desinfektion und Sterilisation zu Korrosionsschäden (Lochkorrosion, Spannungskorrosion) und somit zur Zerstörung der Produkte. Zur Entfernung muss eine ausreichende Spülung mit vollentsalztem Wasser mit anschließender Trocknung erfolgen.
Es dürfen nur Prozess-Chemikalien eingesetzt werden, die geprüft und freigegeben sind (z. B. VAH/DGHModer FDA-Zulassung bzw. CE-Kenn- zeichnung) und vom Chemikalienhersteller hinsichtlich Materialverträglichkeit empfohlen wurden. Sämtliche Anwendungsvorgaben des Chemikalienherstellers über Temperatur, Konzentration und Einwirkzeit sind strikt einzuhalten. Im anderen Fall kann dies zu nachfolgenden Problemen führen:
•optische Materialveränderungen wie z. B. Verblassen oder Farbveränderungen bei Aluminium. Bei Aluminium können sichtbare Oberflächenveränderungen bereits bei einem pHWert von >8 in der Anwen- dungs-/Gebrauchslösung auftreten.
•Materialschäden, wie z. B. Korrosion, Risse, Brüche, vorzeitige Alterung oder Quellung.
¾Keine Prozess-Chemikalien verwenden, die bei Kunststoffen, z. B. PPSU, Spannungsrissen auslösen oder, wie z. B. bei Silikon, Weichmacher angreifen und zur Versprödung führen.
5.2 Reinigung/Desinfektion
Schäden am Produkt durch ungeeignete Reini- gungs-/Desinfektionsmittel und/oder zu hohe Temperaturen!
VORSICHT ¾ Reinigungsund Desinfektionsmittel nach
Anweisungen des Herstellers verwenden,
-die für Kunststoffe und Edelstahl zugelassen sind,
-die keine Weichmacher (z. B. Silikon) angreifen.
¾Angaben zu Konzentration, Temperatur und Einwirkzeit beachten.
17

Aesculap Sterile Technology
Sterilcontainer-System
5.3 Manuelle Reinigung/Desinfektion
¾Nach der manuellen Reinigung/Desinfektion einsehbare Oberflächen visuell auf Rückstände prüfen.
¾Falls nötig, den Reinigungsprozess wiederholen.
Manuelle Reinigung und Wischdesinfektion
Phase |
|
Schritt |
T |
t |
Konz. |
Wasser- |
Chemie |
|
|
|
|
[°C/°F] |
[min] |
[%] |
Qualität |
|
|
|
|
|
|
|
|
|
|
|
I |
|
Reinigung |
RT |
- |
- |
T–W |
- |
|
|
|
|
(kalt) |
|
|
|
|
|
|
|
|
|
|
|
|
|
|
II |
|
Trocknung |
RT |
- |
- |
- |
- |
|
|
|
|
|
|
|
|
|
|
III |
|
Wischdesinfektion |
- |
>1 |
- |
- |
I |
II |
|
|
|
|
|
|
|
Alkohol denat. 70 % (Etha- |
Aldehydfreies Flächendesin- |
|
|
|
|
|
|
|
nol B|BRAUN) |
fektionsmittel (Stabimed) |
|
|
|
|
|
|
|
|
|
IV |
|
Schlussspülung |
RT |
- |
- |
VE–W |
nicht notwendig |
Reinigungschemie rück- |
|
|
|
(kalt) |
|
|
|
|
standsfrei abspülen |
|
|
|
|
|
|
|
|
|
V |
|
Trocknung |
RT |
- |
- |
- |
- |
- |
|
|
|
|
|
|
|
|
|
T–W: |
Trinkwasser |
|
|
|
|
|
|
|
VE–W: |
Vollentsalztes Wasser (demineralisiert) |
|
|
|
|
|
||
RT: |
Raumtemperatur |
|
|
|
|
|
|
|
Phase I
¾ Vor der Reinigung grobe Verschmutzungen durch Wischen entfernen.
Phase II
¾ Produkt mit flusenfreiem Tuch oder medizinischer Druckluft trocknen.
Phase III
¾ Wischdesinfektion durchführen.
Phase IV
¾Bei Verwendung aldehydfreier Desinfektionsmittel:
Desinfizierte Oberflächen nach Ablauf der vorgeschriebenen Einwirkzeit (mindestens 1 Minute) unter fließendem VE-Wasser spülen.
¾Restwasser ausreichend abtropfen lassen.
Phase V
¾ Produkt mit flusenfreiem Tuch oder im Wärmeschrank trocknen.
18

5.4 Maschinelle neutrale oder mildalkalische Reinigung und thermische Desinfektion
Gerätetyp: Einkammer-Reinigungs-/Desinfektionsgerät ohne Ultraschall
Phase |
Schritt |
T |
t |
Wasser- |
Chemie |
|
|
[°C/°F] |
[min] |
Qualität |
|
|
|
|
|
|
|
I |
Vorspülen |
<25/77 |
3 |
T–W |
- |
|
|
|
|
|
|
II |
Reinigung |
55/131 |
10 |
VE–W |
Neutral: |
|
|
|
|
|
BBRAUN HELIMATIC CLEANER |
|
|
|
|
|
neutral, pH-neutral, |
|
|
|
|
|
Gebrauchslösung 0,5 % |
|
|
|
|
|
Mildalkalisch: |
|
|
|
|
|
- Konzentrat: |
|
|
|
|
|
pH = 9,5 |
|
|
|
|
|
< 5 % anionische Tenside |
|
|
|
|
|
- 0,5 %-ige Lösung |
|
|
|
|
|
Alkalisch: |
|
|
|
|
|
Aufbereitung bis pH = 10,5 möglich, wenn der Reiniger |
|
|
|
|
|
vom Hersteller für die Containerreinigung freigegeben ist. |
|
|
|
|
|
Hinweis |
|
|
|
|
|
Bei Verwendung von mildalkalischen bzw. alkalischen Rei- |
|
|
|
|
|
nigern kann es bei farbig eloxiertem Aluminium zu Verfär- |
|
|
|
|
|
bungen kommen, die aber keinen Einfluss auf die |
|
|
|
|
|
Gebrauchstauglichkeit haben. |
|
|
|
|
|
|
III |
Zwischenspülung |
>10/50 |
1 |
VE–W |
Insbesondere bei PrimeLine muss gewährleistet sein, dass |
|
|
|
|
|
die Oberfläche rückstandsfrei abgespült wird. |
|
|
|
|
|
|
IV |
Thermodesinfektion |
90/194 |
5 |
VE–W |
Andere Prozessparameter für die Thermo-Desinfektion sind |
|
|
|
|
|
in Absprache mit dem Klinikhygieniker möglich. |
|
|
|
|
|
|
V |
Trocknung |
- |
- |
- |
Entsprechend zeitgemäßem Maschinenprogramm. |
|
|
|
|
|
|
T–W: Trinkwasser
VE–W: Vollentsalztes Wasser (demineralisiert)
¾Nach der maschinellen Reinigung/Desinfektion einsehbare Oberflächen auf Rückstände prüfen.
¾Falls nötig, den Reinigungsprozess wiederholen.
Hinweis
Sowohl in der manuellen als auch in der maschinellen Aufbereitung ist die Behandlung mit Ultraschall möglich. Bei der maschinellen Trocknung mit Heißluft sind Temperaturen bis 120 °C erlaubt.
5.5 Kontrolle, Wartung und Prüfung
Hinweis
Nur Personen mit entsprechender Ausbildung, fachlicher Kenntnis oder Erfahrung dürfen Sterilcontainer prüfen und reparieren.
Die Dichtungen in den Containerdeckeln wurden nach DIN EN 868-8, Anhang G auf eine Mindestlebensdauer von 5 000 Sterilisationszyklen getestet.
¾Bei visuell erkennbarer Beschädigung Dichtung sofort austauschen.
¾Deckel einschicken an Aesculap, Adresse siehe Technischer Service.
¾Bewegliche Metallteile (z. B. Verschlussscharniere) im Bedarfsfall mit sterilisierbarem, dampfdurchlässigem Pflegeöl leicht ölen (z. B. STERILIT® I-Ölspray JG600 oder STERILIT® I-Tropföler JG598).
19

Aesculap Sterile Technology
Sterilcontainer-System
6. Fehler erkennen und beheben
Störung |
Ursache |
Behebung |
|
|
|
Zu viel Kondensat im Sterilcontainer-Innen- |
Temperatur des Sterilisierguts vor dem Sterili- |
Sterilisiergut auf Raumtemperatur (ca. 20 °C) |
raum |
sieren zu niedrig |
vorwärmen |
|
|
|
|
Textilien zu feucht |
Nur trockene Textilien sterilisieren |
|
|
|
|
Sterilcontainer zu schwer |
Normalcontainer |
|
|
mit Instrumenten: max. 10 kg beladen |
|
|
mit Textilien: max. 8 kg beladen |
|
|
|
|
|
Halbcontainer mit Instrumenten: |
|
|
max. 5 kg beladen |
|
|
|
|
|
3/4-Container mit Instrumenten: max. 7 kg |
|
|
beladen |
|
|
|
|
Sterilisiergut falsch gelagert |
Hohlkörper, Schalen, Teller u. Ä. mit der Öff- |
|
|
nung nach schräg unten lagern |
|
|
|
|
|
Textilien senkrecht schichten, nicht pressen |
|
|
|
|
Sterilcontainer im Sterilisator falsch positio- |
Schwere Sterilcontainer immer unten positio- |
|
niert |
nieren |
|
|
|
|
Sterilcontainer sofort nach dem Sterilisieren |
Sterilcontainer vor dem Bereitstellen auf |
|
zum Gebrauch bereitgestellt |
Raumtemperatur abkühlen lassen |
|
|
|
|
Sterilcontainer beim Abkühlen schlecht gela- |
Sterilcontainer nicht auf dem Boden oder in |
|
gert |
Zugluft lagern |
|
|
Sterilcontainer in klimatisierten Räumen |
|
|
gemäß DIN 58953-9 lagern |
|
|
|
|
Sterilisator-Eigenschaften entsprechen nicht |
Sterilisator regelmäßig warten lassen |
|
DIN EN 285 |
Trocknungsvakuum prüfen |
|
|
Trocknungszeit prüfen |
|
|
|
|
|
Dampfqualität prüfen, falls nötig verbessern |
|
|
|
|
Leersterilisation und Vakuumtest nicht täg- |
Täglich vor dem Sterilisieren Leersterilisation |
|
lich vor Sterilisierbeginn durchgeführt |
und Vakuumtest durchführen |
|
|
|
|
Falsches Programm am Sterilisator gewählt |
Programm entsprechend der Beladung wählen |
|
|
|
|
Sterilisatortür zu lange geöffnet, Sterilisator |
Sterilisator schnell beund entladen |
|
kühlt aus |
|
|
|
|
Kondensat in der Rinne des (Unter-)Deckels |
Mehrere Sterilcontainer oder schweres Sterili- |
Sterilisator mit Einlegeböden unterteilen |
|
siergut gestapelt |
Oberdeckel verwenden |
|
|
|
|
Sterilisation nicht korrekt ausgeführt |
Sterilisator vom Hersteller instand setzen las- |
Kein Farbwechsel an der Indikatorplombe |
Sterilisator defekt |
sen |
|
|
|
|
Indikatorplomben falsch gelagert |
Lagerbedingungen auf der Verpackung der |
|
|
Indikatorplomben beachten |
|
|
|
20 |
|
|

|
|
|
|
|
|
|
|
|
|
|
|
|
|
|
|
|
|
|
|
|
|
|
|
|
|
|
|
|
|
|
|
|
|
|
|
|
|
|
|
|
|
|
|
|
|
|
|
|
|
|
|
|
|
|
|
|
|
|
|
|
|
|
|
|
|
|
|
Störung |
Ursache |
|
Behebung |
|
||||||||||||
|
|
|
|
|
||||||||||||
Basis-/Vario-Sterilcontainer oder PrimeLine- |
Perforationsfeld während der Sterilisation |
|
Perforationsfeld nie abdecken |
|
||||||||||||
Sterilcontainer-System deformiert |
abgedeckt |
|
|
|
|
|
|
|
|
|
|
|
|
|
||
|
|
|
|
|
||||||||||||
Unterbzw. Oberdeckel lässt sich nicht auf |
Containerdeckel bzw. -Wanne durch unsach- |
|
Containerdeckel bzw. -Wanne austauschen |
|
||||||||||||
der Wanne aufsetzen bzw. verriegeln |
gemäße Handhabung (z. B. Tragen am Deckel) |
|
oder vom Hersteller instand setzen lassen |
|
||||||||||||
|
deformiert/beschädigt |
|
|
|
|
|
|
|
|
|
|
|
|
|
||
|
|
|
|
|
|
|
|
|
|
|
|
|
|
|
|
|
7. Technischer Service 9. Technische Daten
Verletzungsgefahr und/oder Fehlfunktion!
¾ Produkt nicht modifizieren.
WARNUNG
¾Für Service und Instandsetzung wenden Sie sich an Ihre nationale B. Braun/Aesculap-Vertretung.
Modifikationen an medizintechnischer Ausrüstung können zu einem Verlust der Garantie-/Gewährleistungsansprüche sowie eventueller Zulassungen führen.
Service-Adressen
Aesculap Technischer Service Am Aesculap-Platz
78532 Tuttlingen / Germany Phone: +49 7461 95-1602 Fax: +49 7461 16-5621 E-mail: ats@aesculap.de
Weitere Service-Adressen erfahren Sie über die oben genannte Adresse.
Die Varianten und Abmessungen der Sterilcontainer finden Sie im Prospekt Nr. C40401.
10. Normenauszüge
10.1 Zitierte Normen
Folgende Normen werden in Bezug auf die Sterilcontainer zitiert:
•DIN 58953-9
•EN 285
•EN 868-8
•EN 285 mit geltend EN ISO 17665
•EN ISO 11607
8. Zubehör/Ersatzteile
Zubehör und Verbrauchsmaterial finden Sie im Prospekt Nr. C40401.
21
Aesculap Sterile Technology
Système de containers de stérilisation
Légende
1Sur-couvercle
2Fermeture du sur-couvercle
3Couvercle perforé
4Fermeture du couvercle perforé
5Cuve
6Support de plomb indicateur
7Plomb indicateur
8Poignée
9Fente (pour plomb indicateur sur la fermeture du couvercle perforé)
10Porte-filtre universel
11Capuchon
12Boutons pressoirs
13Griffe à encoche (pour sur-couvercle en option sur les containers BASIS)
14Couvercle en plastique
15Recouvrement pour zone de perforation
16Système de rétention des germes (filtre permanent)
17Cadre d’accueil
18Goupille de préhension
19Grille de recouvrement à lamelles
20Poignée de montage
21Fermeture du couvercle en plastique
Symboles sur le produit et emballage
Symbole Déclaration
Attention, tenir compte des documents d’accompagnement
Respecter le mode d’emploi
22
Sommaire |
|
|
1. |
Manipulation sûre ....................................................................................... |
23 |
2. |
Description du produit ............................................................................... |
23 |
2.1 |
Champ d’application ................................................................................... |
23 |
2.2 |
Mode de fonctionnement .......................................................................... |
23 |
3. |
Préparation et installation ........................................................................ |
23 |
3.1 |
Première mise en service ........................................................................... |
23 |
4. |
Utilisation du container de stérilisation ............................................... |
24 |
4.1 |
Mise à disposition ........................................................................................ |
24 |
|
Retrait du sur-couvercle/couvercle perforé/couvercle en |
|
|
plastique........................................................................................................ |
24 |
|
Remplacer le filtre ...................................................................................... |
24 |
4.2 |
Vérification du fonctionnement .............................................................. |
24 |
4.3 |
Manipulation ................................................................................................ |
24 |
|
Chargement du container de stérilisation ........................................... |
25 |
|
Mise en place du plomb indicateur ....................................................... |
25 |
|
Chargement du stérilisateur .................................................................... |
25 |
|
Stérilisation .................................................................................................. |
25 |
|
Déchargement du stérilisateur................................................................ |
26 |
|
Transport des containers de stérilisation ............................................. |
26 |
|
Stockage des containers de stérilisation.............................................. |
26 |
|
Contrôle et mise à disposition du matériel stérile ............................ |
26 |
5. |
Procédé de traitement stérile validé ...................................................... |
26 |
5.1 |
Remarques générales .................................................................................. |
26 |
5.2 |
Nettoyage/Décontamination .................................................................... |
27 |
5.3 |
Nettoyage/Décontamination manuels ................................................... |
28 |
|
Nettoyage manuel et décontamination par essuyage...................... |
28 |
5.4Nettoyage neutre ou alcalin doux en machine et désinfection
|
thermique ....................................................................................................... |
29 |
5.5 |
Vérification, maintenance et contrôle ................................................... |
29 |
6. |
Identification et élimination des pannes .............................................. |
30 |
7. |
Service technique ........................................................................................ |
31 |
8. |
Accessoires/Pièces de rechange ............................................................... |
31 |
9. |
Caractéristiques techniques ..................................................................... |
31 |
10. |
Extraits de normes ....................................................................................... |
31 |
10.1 |
Normes citées ............................................................................................... |
31 |
|
|
|
|
|
|
|
|
|
|
|
|
|
|
|
|
|
|
|
|
|
|
|
|
|
|
|
|
|
|
|
|
|
|
|
|
|
|
|
|
|
|
|
|
|
|
|
|
|
|
|
1. Manipulation sûre |
|
2. Description du produit |
|
|
||||||||||||
Risque de contamination de matériel stérile en cas de containers de stérilisation non étanches!
En cas de combinaison du container de AVERTISSEMENT stérilisation avec des pièces provenant d’autres
fabricants, l’étanchéité du container de stérilisation et sa fonction de barrière anti-germes ne sont plus garanties.
¾Ne combiner entre eux que des produits pour containers de stérilisation Aesculap.
¾Vérifier le bon fonctionnement et le bon état du produit avant de l’utiliser.
¾Pour éviter les dommages provoqués par un montage ou une utilisation incorrects et ne pas remettre en cause les droits à garantie et les prestations de responsabilité:
–N’utiliser ce produit que conformément au présent mode d’emploi.
–Respecter les informations et les consignes de sécurité et de maintenance.
–Ne pas utiliser de containers de stérilisation endommagés ni défectueux. Remplacer immédiatement les pièces défectueuses par des pièces de rechange d'origine.
–Si des réparations ont été effectuées sur les containers de stérilisation au niveau de pièces influant sur l’étanchéité aux germes: faire un examen visuel attentif du container de stérilisation avant l’utilisation.
¾S’assurer que seules des personnes possédant la formation, les connaissances ou l’expérience requises manipulent le produit et les accessoires.
¾Conserver le mode d'emploi en un lieu accessible pour le personnel.
¾Observer les directives générales et les principes d’hygiène relatifs à la manipulation du matériel contaminé, devant être stérilisé et ayant été stérilisé.
2.1 Champ d’application
Le système de containers stériles Aesculap est un système de barrière stérile utilisable à plusieurs reprises, qui conserve la stérilité des produits médicaux jusqu’à leur utilisation ou jusqu'à leur date de péremption. Il permet de stériliser, de stocker et de transporter les produits médicaux. Il rend également possible le réacheminement de produits médicaux après leur utilisation. Le système Aesculap de containers de stérilisation est conçu pour la stérilisation à la vapeur.
Remarque
Veuillez consulter votre représentation Aesculap si les containers de stérilisation Aesculap doivent être utilisés avec d’autres procédés de stérilisation.
2.2 Mode de fonctionnement
Le système Aesculap de containers de stérilisation est conforme aux exigences des normes DIN 58953-9 et EN ISO 11607.
Les containers de stérilisation avec couvercle perforé et cuve fermée sont validés pour la stérilisation à la vapeur dans un stérilisateur conforme à EN 285 selon le:
• procédé de vide fractionné.
Les containers de stérilisation avec couvercle perforé et cuve perforée sont en outre agréés pour la stérilisation à la vapeur dans un stérilisateur conforme à EN 285 selon le:
• procédé de gravitation
Remarque
L’adéquation du procédé spécifique doit être attestée par une validation sur place.
3. Préparation et installation
3.1 Première mise en service
¾Nettoyer minutieusement avant la première utilisation les containers de stérilisation neufs sortant d’usine.
¾Après le nettoyage, introduire le filtre adéquat, voir Remplacer le filtre. Système de containers de stérilisation PrimeLine:
Le système de rétention des germes 16 (filtre permanent) est intégré.
23
Aesculap Sterile Technology
Système de containers de stérilisation
4. Utilisation du container de stérilisation
4.1 Mise à disposition
Retrait du sur-couvercle/couvercle perforé/couvercle en plastique
En présence d’un sur-couvercle, celui-ci peut être retiré du couvercle perforé pour le nettoyage du container de stérilisation et en cas d'encrassement.
Container VARIO (avec couvercle perforé et sur-couvercle en version standard):
¾Appuyer sur la fermeture du sur-couvercle 2, retirer le sur-couvercle 1 et le couvercle perforé 3.
Container BASIS (équipement ultérieur avec un sur-couvercle):
¾Retirer la combinaison sur-couvercle 1 et couvercle perforé 3 de la cuve 5.
¾Desserrer la griffe à encoche 13 et retirer le sur-couvercle 1. Système de containers de stérilisation PrimeLine:
¾Retirer le couvercle en plastique 14 de la cuve 5.
Remplacer le filtre
Remplacer le filtre selon les intervalles prescrits en fonction du type de filtre:
•Filtre à usage unique: avant chaque stérilisation
•Filtre permanent en PTFE: au plus tard après 1 000 cycles de traitement
•Système de rétention des germes PrimeLine: au plus tard après 5 000 cycles de traitement
Container VARIO et container BASIS:
¾Presser simultanément les boutons pressoirs 12 du porte-filtre universel 10.
¾Retirer le porte-filtre universel 10.
¾Insérer le nouveau filtre et remettre en place le porte-filtre universel
10.
¾Appuyer sur le capuchon 11 du porte-filtre universel 10 jusqu’à ce qu’il prenne l’encoche de façon audible.
Système de containers de stérilisation PrimeLine:
¾Tourner la grille de recouvrement à lamelles 19 sur la gauche jusqu’à ce qu’elle soit déverrouillée.
¾Retirer la grille de recouvrement à lamelles 19 du système de rétention des germes 16.
¾Tourner vers la gauche le système de rétention des germes 16 avec la poignée de montage 20 jusqu’à ce qu’il soit détaché du cadre d’accueil 17.
¾Soulever et retirer le système de rétention des germes 16 par la goupille de préhension 18.
¾Monter le système de rétention des germes 16 en suivant l’ordre inverse.
24
4.2 Vérification du fonctionnement
Remarque
Pour le système de containers de stérilisation PrimeLine, la grille de recouvrement à lamelles 19 doit être retirée pour la vérification du fonctionnement!
¾Procéder avant chaque utilisation à un examen visuel de toutes les pièces du container de stérilisation pour en vérifier l’absence de détérioration et le bon fonctionnement:
–Pièces métalliques non déformées
–Couvercle en aluminium non voilé
–Le porte-filtre universel 10 repose avec toute la surface sur le bord
–Les garnitures d’étanchéité sont en parfait état (pas de fissures, ...)
–Pièces en plastique sans fissures
–Le filtre permanent/le système de rétention des germes PrimeLine est intact (pas de pliures, de perforations, de fissures ni d’interstices)
–Fermeture en bon état (s’encliquette)
¾Utiliser uniquement des containers de stérilisation en parfait état. Remplacer immédiatement les pièces endommagées par des pièces d’origine ou les réparer.
4.3 Manipulation
Risque de contamination de matériel stérile en cas de containers de stérilisation non étanches!
En cas de combinaison du container de stérilisation AVERTISSEMENT avec des pièces provenant d’autres fabricants,
l’étanchéité du container de stérilisation et son effet de barrière anti-germes ne sont plus garantis.
¾Ne combiner entre eux que des produits pour containers de stérilisation Aesculap.
Risque d’absence de stérilité du matériel à stériliser!
¾ Toujours transporter les containers de stérilisation
par les poignées.
ATTENTION ¾ Ne jamais porter ni soulever les containers de stérilisation par le couvercle.
¾Transporter les containers de stérilisation de manière à exclure toute détérioration mécanique.
 Loading...