


7680 |
7680 |
SystemSyncroLogic |
Type 5491 |
||
+ |
|
|
|
|
|
|
|
Braun Infoline |
English |
4, |
8, 73 |
TR Türkiye’deki Tüketici Danıs¸ ma Servisi: |
||
Français |
9, 14, 73 |
0 800 261 19 53 |
|||
|
|
|
|||
Magyar |
15, 20, 73 |
|
|
|
|
âesk˘ |
21, 26, 73 |
|
|
|
|
Slovensk˘ |
27, 32, 73 |
|
|
|
|
Hrvatski |
33, 38, 73 |
|
|
|
|
Polski |
39, 44, 73 |
|
|
|
|
Türkçe |
45, |
73 |
|
|
|
|
51, 56, 73 |
|
|
|
|
|
58, 63, 73 |
|
|
|
|
|
72, 65, 73 |
|
|
|
|
Internet:
www.braun.com
5-491-426/00/III-02 GB/F/H/CZ/SK/HR/PL/TR/RUS/UA/Arab Printed in Germany

Syncro 7680 
1
2
3
 Syncro
Syncro 
No. 7000
4 |
4 |
|
5 |
||
|
6
7
8
9
10
11
7680

English |
7570 |
0 |
1 |
2 |
+35°C |
+15°C |
4 |
Our products are designed to meet the highest standards of quality, functionality and design. We hope you enjoy your new Braun shaver. Your Braun Syncro is supplied with a Braun Clean&Charge (please see separate use instructions).
SmartLogic Inside
The «SmartLogic» electronics inside your shaver analyzes your personal shaving patterns and the type of beard you have, and then adapts the battery care and cleaning cycles to ensure optimal performance.
Warning
Your shaver is provided with a low voltage adaption system. Therefore you must not exchange or manipulate any part of it. Otherwise there is risk of electric shock.
Technical specifications:
•Wattage via low voltage cord: 7 W
•Power supply via mains adapter, input voltage: 100-240 V2/ 50 or 60 Hz (automatic adaptation)
•Shaver input voltage: 12 V
Description
1 |
Foil protection cap |
7 |
Display |
2 |
Shaver foil |
8 |
Info key |
3 |
Cutter block |
9 |
Pilot light |
4 |
Foil release button |
10 |
Shaver socket |
5 |
Long hair trimmer |
11 |
Power supply cord set |
6 |
Switch |
|
|
Charging the shaver
•First charging: Using the power supply cord set, connect the shaver to the mains with the switch on position «0» and charge it for at least 4 hours
(plug might get warm). From now on, the «SmartLogic» inside your shaver will ensure optimal care of the battery.
•A full charge will give up to 50 minutes of cordless shaving time depending on your beard growth. However, the maximum battery capacity will only be reached after several charging/discharging cycles.
•Best environmental temperature range for charging is 15 °C to 35°C.
•Do not expose the shaver to temperatures of more than 50 °C for longer periods of time.

Display
The pilot light shows that the shaver is connected to the mains.
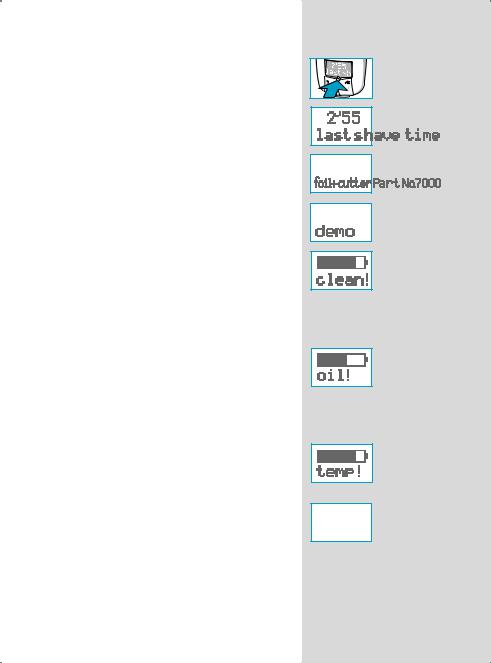
The display shows the operation mode and charging conditions of the shaver: During charging the display shows the battery capacity symbol increasing by 20% segments and the remaining charging time (flashing):
First charging (4 h):
The display counts down in 20 min. steps.
Subsequent chargings (1 h):
The display counts down in 5 min. steps.
The battery is fully charged. «SmartLogic» inside monitors the battery and communicates «Test...ok» when it is still well charged. Below 10 minutes remaining shaving time, the display shows the minutes left. The «moving» plug symbol indicates that you should charge your shaver. If there is insufficient battery charge for a cordless shave, either recharge the shaver or shave via the lpower supply cord connected to the mains.
* The display changes to this format when the shaver is in the Clean&Charge.
The «SmartLogic» inside your shaver automatically monitors the condition of the batteries as well as the charging/dis-charging processes and adapts them to your personal shaving patterns. For instance, if it is your routine to never let the batteries run low, the «SmartLogic» will recognize this, look for a pause when you are likely to not use the shaver and completely discharge and then recharge your shaver to recondition the batteries (every six months at the most, and only when necessary).
For additional information, press the info key:
press once:
– to display the duration of the last shave
*
5

1 |
2 |
1 |
2 |
1 |
2 |
k |
c |
o |
l |
c |
i |
t |
a |
m |
o |
t |
u |
a |
3 |
6 |
press again:
–to display the key part number for shaver foil and cutter block
hold for 3 secs:
– to run a display demo
The «SmartLogic» inside your shaver will detect when the shaver needs to be cleaned (refer to paragraph «Manual cleaning» or to separate «Clean&Charge» use instructions). To reset the display, push the info key.
The «SmartLogic» inside will recognize when the shaver has to be lubricated (refer to paragraph «Manual cleaning» or to separate «Clean&Charge» use instructions). To reset the display, push the info key.
The shaver cannot be charged if the environmental temperature is too low (<0 °C) or too high (>55 °C). Allow the shaver to remain for some time at room temperature for optimal charging conditions.
No display: The rechargeable battery is completely discharged and has to be recharged.
Shaving
Switch positions
0 = Off (switch is locked)
Press and push up the switch to operate the shaver 1 = Shaving with the pivoting head
The pivoting cutting system automatically adjusts to every contour of your face.
2 = Shaving with the pivoting head locked at an angle (to permit shaving in difficult areas, e.g. under the nose).
3 = The long hair trimmer is activated
(for trimming sideburns, moustache and beard).
Shaving with the cord
If the rechargeable battery is discharged, you may also shave with the shaver connected to the mains via the power supply cord set.
(If the shaver does not run immediately, charge it with the switch on position «0» for approx. 1 minute.)

Tips for the perfect shave
•We recommend that you shave before washing,
as the skin tends to be slightly swollen after washing.
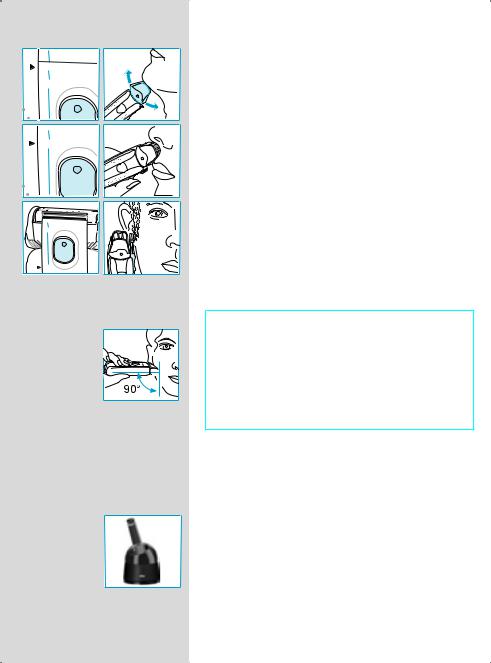
•Hold the shaver at right angles (90°) to the skin.
•Stretch your skin and shave against the direction of beard growth.
•Replace the shaver foil and cutter block every 11/2 years, or when the parts are worn, to ensure optimum shaving performance.
Keeping your shaver in top shape
Automated cleaning
The Braun Clean&Charge takes care of all cleaning and lubrication needs of your shaver. Please refer to the separate use instructions.
Manual cleaning
For easy cleaning after each shave, switch the shaver off. Press the release buttons to lift the shaver foil (do not remove the foil completely). Switch on the shaver for approx. 5-10 seconds so that the shaved stubbles can fall out.
For a thorough cleaning (weekly), remove the shaver foil and tap it out on a flat surface. Using the brush, clean the cutter block and the inner area of the pivoting head. About every four weeks, clean the cutter block with Braun cleaning agents.
If your skin is very dry and you notice a reduced operation time of the shaver or if the display shows «oil!», apply a drop of light machine oil onto the shaver foil.
Replacing the shaving parts
The shaver foil and cutter block are precision parts that, in time, are subject to wear. Replace your foil and cutter block every 18 months and get a 25% better shave.* (Shaver foil and cutter block: part No. 7000. Available at your dealer or Braun Service Centres.)
(* Overall evaluation from Braun users comparing their shave with new parts and those used for 18 months.)
Accessories
Available at your dealer or Braun Service Centers:
• Shaver foil and cutter block (part No. 7000)
0 |
1 |
0 |
1 |
oil |
Syncro |
7000 |
7000 |
7 |

1 |
2 |
3 |
4 |
5 |
6 |
Environmental notice
This appliance is provided with nickel-hydride rechargeable batteries. To protect the environment, do not dispose of the appliance in the household waste at the end of its useful life. Open the housing as shown, remove and dispose of the batteries at your retail store or at appropriate collection sites according to national or local regulations.
Subject to change without notice.
This product conforms to the EMC-Require- ments as laid down by the Council Directive 89/336/EEC and to the Low Voltage Regulation (73/23 EEC).
Guarantee
We grant 2 years guarantee on the product commencing on the date of purchase. Within the guarantee period we will eliminate, free of charge, any defects in the appliance resulting from faults in materials or workmanship, either by repairing or replacing the complete appliance as we may choose.
This guarantee extends to every country where this appliance is supplied by Braun or its appointed distributor.
This guarantee does not cover: damage due to improper use, normal wear or use as well as defects that have a negligible effect on the value or operation of the appliance. The guarantee becomes void if repairs are undertaken by unauthorised persons and if original Braun parts are not used.
To obtain service within the guarantee period, hand in or send the complete appliance with your sales receipt to an authorised Braun Customer Service Centre.
For UK only:
This guarantee in no way affects your rights under statutory law.
8

Nos produits sont conçus pour satisfaire aux plus hautes exigences en matière de qualité, fonctionnalité et design. Nous espérons que vous serez pleinement satisfait
de votre nouveau rasoir Braun.
Le rasoir Braun Syncro est livré accompagné d’un chargeur nettoyant Braun Clean&Charge (voir notice distincte).
Dispositif intégré SmartLogic
Le dispositif électronique « SmartLogic » intégré au rasoir analyse les habitudes de rasage individuelles de l'utilisateur et son type de barbe, puis adapte la gestion de la batterie et les cycles de nettoyage pour assurer des performances optimum.
Avertissement
Le rasoir est livré avec un système d'adaptateurs basse tension. Il ne faut donc remplacer ni manipuler aucun élément de l'appareil. Sinon, il y a risque d'électrocution.
Caractéristiques techniques :
•Puissance avec le câble basse tension : 7 W
•Alimentation par adaptateur secteur, tension d'entrée : 100-240 V2/ 50 ou 60 Hz (adaptation automatique)
•Tension d'entrée du rasoir : 12 V
Description
1 |
Capot de protection |
6 |
Interrupteur central |
|
de la grille |
7 |
Ecran LCD de fonctions |
2 |
Grille de rasage |
8 |
Bouton d’informations |
3 |
Bloc-couteaux |
9 |
Témoin lumineux |
4 |
Bouton d’ouverture |
10 |
Prise du rasoir |
|
de la tête de rasage |
11 |
Jeu de câbles |
5 |
Tondeuse rétractable |
|
d'alimentation |
Recharge du rasoir
•Première charge : Utilisez le cordon d’alimentation, branchez le rasoir sur le secteur en mettant l’interrupteur central en position «0 » et laissez-le se charger pendant au moins 4 heures (la prise pourrait devenir tiède). A partir de ce jour, le dispositif «SmartLogic» du rasoir garantira une gestion optimale de la batterie.
•Une pleine charge procurera environ 50 minutes de rasage sans fil en fonction du type de barbe. Cependant, la capacité maximum des batteries sera atteinte seulement après plusieurs cycles de charge et de décharge.
Français |
7570 |
0 |
1 |
2 |
9 |

+35°C 
+15°C 
*
10
•La température idéale pour la mise en charge est comprise entre 15°C et 35°C.
•Ne pas exposer le rasoir de façon prolongée à des températures supérieures à 50°C.
Ecran LCD de fonctions
Le témoin lumineux indique que le rasoir est branché sur le secteur.
L’écran à affichage digital indique le fonctionnement et le niveau de charge du rasoir : pendant la recharge l’écran indique la capacité de la batterie par des segments égaux augmentant par tranches de 20% ainsi que le temps de charge restant (clignotement).
Première charge (4 h) :
L’écran compte à rebours par tranches de 20 minutes.
Charges suivantes (1 h) :
L’écran compte à rebours par tranches de 5 minutes.
La batterie est à pleine charge. Le dispositif intégré
« SmartLogic » vérifie la batterie et signale «Test...ok» lorsqu'elle est encore suffisamment chargée. Arrivé à moins de 10 minutes de temps de rasage restant, l'afficheur indique le temps restant en minutes. Le symbole de prise « animé » signale à l'utilisateur qu'il doit recharger le rasoir. Si le niveau de charge de la batterie est insuffisant pour un rasage sans fil, il faut soit recharger le rasoir, soit se raser en branchant le câble d'alimentation au secteur.
* L’écran change de format quand le rasoir est dans le Clean&Charge.
Le dispositif « SmartLogic » intégré au rasoir gère automatiquement l'état des batteries ainsi que les opérations de recharge/décharge et les adapte aux habitudes personnelles de rasage de l'utilisateur. Si, par exemple, l'utilisateur a pris l'habitude de ne jamais laisser les batteries se décharger, le dispositif « SmartLogic » le repérera, recherchant une période d'interruption au cours de laquelle l'utilisateur est susceptible de ne pas utiliser le rasoir, puis déchargera entièrement le rasoir et le rechar-era afin de régénérer les batteries (ce qu'il fera tous les six mois tout au plus, et uniquement lorsque ce sera nécessaire).
Pour plus de précisions, appuyez sur le bouton d’informations :
Appuyez une fois :
– pour visualiser la durée du dernier rasage
Appuyez à nouveau :
– pour visualiser la référence de la grille et du bloccouteaux de votre rasoir
Maintenez le bouton appuyé pendant 3 secondes :
– pour lancer la démonstration de l’écran de contrôle LCD
Le dispositif «SmartLogic » intégré détectera le moment où il faudra nettoyer le rasoir (cf. paragraphe «Nettoyage manuel» ou la notice d'utilisation spécifique du chargeur nettoyant). Pour réinitialiser l'afficheur, appuyer sur la touche Info.
Le dispositif «SmartLogic » intégré détectera le moment où il faudra lubrifier le rasoir (cf. paragraphe «Nettoyage manuel» ou la notice d'utilisation spécifique du chargeur nettoyant). Pour remettre l'afficheur à l'état initial, appuyer sur la touche Info.
Le rasoir ne peut pas être chargé lorsque la température ambiante pendant la recharge est trop basse (< 0°C) ou trop élevée (> 55°C).
Si c’est le cas, mettez votre rasoir pendant quelques temps dans une pièce où la température ambiante se trouve dans l’intervalle ci-dessus pour optimiser la recharge.
Pas d’information sur l’écran de contrôle LCD :
la batterie rechargeable est complètement vide et doit être rechargée.
11
1 |
2 |
1 |
2 |
1 |
2 |
k |
c |
o |
l |
c |
i |
t |
a |
m |
o |
t |
u |
a |
3 |
12 |
Rasage
Positions de l’interrupteur central
0 = Arrêt (l’interrupteur central est verrouillé) Appuyez et poussez l’interrupteur central pour mettre en marche le rasoir
1 = Rasage avec la tête pivotante
Le système de coupe pivotant s’adapte automatiquement aux contours du visage
2 = Rasage avec la tête pivotante bloquée en angle (pour faciliter le rasage sur les zones difficiles, telles que sous le nez)
3 = Tondeuse en fonctionnement
(pour tailler les pattes, la moustache et la barbe)
Rasage avec le cordon d’alimentation
Lorsque la batterie est déchargée, vous pouvez également vous raser avec le rasoir branché sur le secteur grâce au cordon d’alimentation. (Si le rasoir ne fonctionne pas immédiatement, rechargez-le en le mettant sur position
« 0 » pendant 1 minute environ.)
Conseils d’utilisation pour un rasage parfait
•Toujours se raser avant la toilette faciale car la peau a tendance à légèrement gonfler lorsqu’elle est humide.
•Tenir le rasoir perpendiculairement (90°) au visage.
•Tendre la peau et se raser dans le sens contraire de la pousse du poil.
•Remplacer la grille et le bloc-couteaux de votre rasoir tous les ans et demi, ou avant s’ils sont usés, afin d’assurer des performances de rasage optimales.
Pour conserver votre rasoir en bon état
Nettoyage automatique
Le chargeur auto-nettoyant Braun Clean&Charge prend soin de tous les besoins de votre rasoir en termes de nettoyage et de lubrification. Merci de vous référer au mode d’emploi séparée.

Nettoyage manuel
Pour un nettoyage facile après chaque rasage, arrêtez votre rasoir. Appuyez sur les boutons d’éjection pour soulever la grille du rasoir (ne pas enlever complètement la grille). Mettez votre rasoir en marche pendant 5 à
10 secondes environ afin que les résidus de barbe puissent tomber.
Pour un nettoyage plus approfondi (hebdomadaire), enlevez la grille du rasoir et tapez la légèrement sur une surface plane. En utilisant la brosse, nettoyez le bloccouteaux et la partie interne de la tête pivotante.
Toutes les 4 semaines environ, nettoyez le bloc-couteaux avec du liquide nettoyant Braun.
Si votre peau est très sèche et si vous constatez une baisse d’efficacité de votre rasoir, ou si l’écran indique « oil! » (huile), appliquez une goutte d’huile de machine à coudre sur la grille du rasoir.
Remplacement des pièces détachées du rasoir
La grille et le bloc-couteaux de votre rasoir sont des pièces de précision qui, dans le temps, sont amenées à s’user. Le remplacement de la grille et du bloc-couteaux tous les 18 mois augmente l’efficacité de rasage de 25%.* (Grille et bloc-couteaux: référence No. 7000. Accessoires disponibles chez votre revendeur ou auprès de votre Centre-Service agréé Braun.)
(* Appréciation globale des utilisateurs Braun lorsqu’ils comparent un rasage avec des pièces neuves à un rasage avec des pièces utilisées pendant 18 mois).
Accessoires
Offerts chez les dépositaires et aux centres de service après-vente Braun:
• Grille et bloc de coup du rasoir (pièce no 7000)
0 |
1 |
0 |
1 |
oil |
Syncro |
7000 |
7000 |
13 |

1 |
2 |
3 |
4 |
5 |
6 |
Respect de l’environnement
Cet appareil est équipé de batteries rechargeables nickelhydrure. Afin de protéger l’environnement, ne jetez jamais l’appareil dans les ordures ménagères à la fin de sa durée de vie. Ouvrez le boîtier comme indiqué, retirez la batterie et remettez-la à votre Centre-Service agréé Braun ou déposez-la dans des sites de récupération appropriés conformément aux réglementations locales ou nationales.
Sujet à modifications sans préavis.
Cet appareil est conforme aux normes Européennes fixées par les Directives 89/336/EEC et la Directive Basse Tension 73/23/EEC.
Garantie
Nous accordons une garantie de 2 ans sur ce produit, à partir de la date d'achat.
Pendant la durée de la garantie, Braun prendra gratuitement à sa charge la réparation des vices de fabrication ou de matière en se réservant le droit de décider si certaines pièces doivent être réparées ou si l'appareil lui-même doit être échangé.
Cette garantie s'étend à tous les pays où cet appareil est commercialisé par Braun ou son distributeur exclusif.
Cette garantie ne couvre pas : les dommages occasionnés par une utilisation inadéquate et l'usure normale. Cette garantie devient caduque si des réparations ont été effectuées par des personnes non agréées par Braun et si des pièces de rechange ne provenant pas de Braun ont été utilisées.
Pour toute réclamation intervenant pendant la période de garantie, retournez ou rapportez l'appareil ainsi que l'attestation de garantie à votre revendeur ou à un Centre Service Agréé Braun.
Appelez au 01.47.48.70.00 pour connaître le Centre Service Agréé Braun le plus proche de chez vous.
Clause spéciale pour la France
Outre la garantie contractuelle exposée ci-dessus, nos clients bénéficient de la garantie légale des vices cachés prévue aux articles 1641 et suivants du Code civil.
14

Termékeink tervezése során a legfontosabb szempont, hogy azok a legmagasabb színvonalat képviseljék mind a minŒség, mind pedig a funkcionalitás és a formatervezés terén. Reméljük, hogy új Braun borotvája Önnek is örömet szerez majd. Az Ön Braun Syncro bortvájához egy Braun Clean & Charge, azaz Tisztító és TöltŒ berendezés is tartozik. (Kérjük, olvassa el az ehhez tartozó külön használati utasítást)
SmartLogic rendszer
A borotvába beépített «SmartLogic»rendszer elemzi a z Ön borotválkozási szokását és a szakállának típusátha Önnek van, és ehhez alkalmazkodva végzi el az akkumulátor karbantartását, garantálva az optimális használatot.
Figyelmeztetés
A borotva alacsony feszültségı rendszerı. Ezért tilos bármely részét kicserélni, vagy szerkezeti egységét megbontani. Ezek figyelmen kívül hagyása áramütés veszélyét vonhatják maguk után.
Mıszaki adatok:
•A vezeték elektromos teljesítménye: 7 Watt
•Felvett energia vezetéken keresztül: 100-240 V2/ 50-60 Hz (automatikus feszültségilleszkedés)
•Bemeneti feszültség-érték: 12 V
Leírás
1 |
SzitavédŒ fedél |
7 |
KijelzΠ|
2 |
Szita |
8 |
Információs gomb |
3 |
Kés |
9 |
Készenléti jelzŒfény |
4 |
Szita-kioldó gomb |
10 |
Csatlakozó aljzat |
5 |
Hosszúhaj-vágó |
11 |
Elektromos vezeték |
6 |
Kapcsológomb |
|
|
A borotva töltése
•ElsŒ töltés: a vezeték segítségével csatlakoztassa a borotvát az aljzathoz, miközben a kapcsoló a «0», azaz kikapcsolt állapotban van, és töltse legalább 4 órán keresztül. (Eközben a csatlakozó felmelegedhet.) Ezentúl a «SmartLogic» rendszer biztosítja Önnek az akkumulátor megfelelŒ gondozását.
•Teljes feltöltés után maximálisan 50 percnyi vezeték nélküli borotválkozásra használhatja a borotvát, a szakállszŒrzet erŒsségétŒl függŒen. A maximális akkumulátor-kapacitás azonban csak több töltési/ lemerülési ciklus után érhetŒ el.
Magyar |
7570 |
0 |
1 |
2 |
15 |

+35°C 
+15°C 
*
16
•A töltésre legmegfelelŒbb környezeti hŒmérséklet: 15 °C-35 °C.
•Ne használja a borotvát 50 °C foknál magasabb hŒmérsékleten hosszabb ideig.
KijelzŒ
A készenléti jelzŒfény mutatja, hogy a borotva a hálózati csatlakozóhoz csatlakozik.
A kijelzŒ mutatja, hogy milyen üzemmódban van a készülék, valamint jelzi a töltöttségi szintet. Töltés során a kijelzŒ 20%-os egységenként növekedve mutatja az akkumulátor kapacitásának szintjét, valamint villogva a töltésbŒl még hátralévŒ idŒt:
ElsŒ töltés (4 óra):
A kijelzŒn a visszaszámlálás 20 perces egységekben jelenik meg.
További töltések (1 óra):
A kijelzŒn a visszaszámlálás 5 perces egységekben jelenik meg.
Az akkumulátor teljesen fel van töltve. A «SmartLogic» rendszer ellenŒrzi az akkumulátort és visszajelzést ad: «Teszt...ok» amikor az még kellŒ mértékben fel van töltve. 10 percnél kevesebb borotválkozási idŒ esetében a kijelzŒ mutatja a fennmaradó perceket.
A mozgásban lévŒ vezeték szimbólum jelzi, hogy fel kell töltenie a borotvát. Amennyiben nem elegendŒ a készülék kapacitása a vezeték nélküli borotválkozáshoz, vagy töltse fel azt, vagy a vezetéket a hálózatba csatlakoztatva használja a borotvát
* A kijelzŒ ebbe a formátumba vált, mikor a borotva a Clean&Charge, azaz a Tisztító és TöltŒ berendezésben helyezkedik el.
A borotvába beépített «SmartLogic» rendszer ellenŒrzi az akkumulátor állapotát - feltöltés/lemerítés folyamat - és az Ön borotválkozási szokásaihoz igazítja azt.
Ezentúl a «SmartLogic» rendszer biztosítja Önnek az akkumulátor megfelelŒ gondozását. Ha Ön például úgy borotválkozik, hogy soha nem meríti le az akkumulátort, akkor a «SmartLogic» rendszer ezt észleli, s keres egy olyan idŒtartamot, amikor Ön a legnagyobb valószínıséggel nem használja a készüléket, s ekkor teljesen lemeríti, majd feltölti azt - azaz, karbantartja az
akkumulátort. (Legfeljebb minden hatodik hónapban, csak akkor, amikor szükséges)
További információkért nyomja meg az információs gombot:
A kijelzŒ
a gomb egyszeri megnyomására:
– jelzi a legutóbbi borotválkozás idŒtartamát
a gomb következŒ megnyomására:
– jelzi a szita és a kés cikkszámát
a gomb folyamatos nyomvatartására (3 másodpercig):
– futtatni kezdi a kijelzŒ demo programját
A beépített «SmartLogic» rendszer észleli, hogy mikor kell tisztítania a borotvát. (Erre vonatkozóan olvassa el a «Kézi tisztítás» címszó alatti bekezdést, illetve a «Clean & Charge», azaz Tisztító és TöltŒ berendezéshez tartozó külön használati leírást).
A kijelzŒ visszaállításához nyomja meg az információs gombot.
A beépített «SmartLogic» rendszer tájékoztatást ad arról is, hogy meg kell nedvesíteni a borotvát.
(Erre vonatkozóan olvassa el a «Kézi tisztítás» címszó alatti bekezdést, illetve a «Clean & Charge», azaz Tisztító és TöltŒ berendezéshez tartozó külön használati leírást). A kijelzŒ visszaállításához nyomja meg az információs gombot.
A borotva nem tölthetŒ, ha a környezeti hŒmérséklet túl alacsony (< 0 °C) illetve túl magas (> 55 °C). Tartsa a borotvát egy ideig szobahŒmérsékleten az optimális töltési feltételek elérése érdekében.
A kijelzŒn nem jelenik meg semmi: az akkumulátor teljesen lemerült, és újratöltésére van szükség.
17

|
Borotválkozás |
|
|
A kapcsoló lehetséges állásai |
|
1 |
0 = A borotva ki van kapcsolva (a kapcsoló lezárva) |
|
2 |
Nyomja be és tolja fölfelé a kapcsolót a borotva |
|
üzembehelyezéséhez: |
||
|
||
|
1 = Borotválkozás a mozgófejjel |
|
|
A billenŒrendszer automatikusan alkalmazkodik |
|
1 |
az arc vonalához. |
|
2 |
2 = Borotválkozás a rögzített fejjel egy bizonyos szögbe |
|
állítva (a borotválkozás szempontjából problémás |
||
|
||
|
bŒrfelületek borotválásához, mint pl. az orr alatti rész) |
|
|
3 = A hosszúhaj-vágó bekapcsolt állapotban van |
|
|
(a pajesz, szakáll és bajusz nyírására) |
|
1 |
Vezetékes használat |
|
2 |
Ha az akkumulátor lemerült, a vezeték aljzathoz való |
|
t |
csatlakoztatása után használhatja a borotvát hálózatról |
|
k |
|
|
c |
|
|
o |
|
|
l |
|
|
c |
|
|
i |
mıködtetve is. |
|
a |
||
u |
||
m |
|
|
o |
|
|
t |
|
|
a |
(Amennyiben a borotva nem mıködik azonnal, töltse |
|
3 |
||
|
közel egy percig úgy, hogy közben a kapcsoló kikapcsolt |
|
|
állásban van «0».) |
|
|
Ötletek a tökéletes eredmény eléréséhez |
|
|
• Javasoljuk, hogy mosakodás elŒtt borotválkozzon, |
|
|
mivel mosakodás után a bŒr többnyire enyhén |
|
|
felduzzad. |
|
|
• Mindig megrŒlegesen (90°) tartsa a borotvát |
|
|
a bŒréhez. |
|
|
• ArcbŒrét feszítse meg és száliránnyal ellentétes |
|
|
irányban borotválkozzon. |
|
|
• A legjobb eredmény elérése érdekében másfél |
|
|
évente, illetve amikor az adott tartozékok |
|
|
elhasználódnak, cserélje ki a szitát és a kést. |
|
|
A borotva állapotának megŒrzése |
|
|
Automatizált tisztítás |
|
|
A Braun Clean&Charge, azaz a Tisztító és TöltŒ |
|
|
berendezés elvégez minden tisztítási és kenési |
|
|
mıveletet, amire az Ön borotvájának szüksége van. |
|
|
Kérjük, olvassa el a berendezéshez tartozó külön |
|
|
használati utasítást. |
|
18 |
|

Kézi tisztítás
Minden borotválkozás után egyszerıen tisztíthatja borotváját a következŒ módon: kapcsolja ki a készüléket. Nyomja meg a szitakioldó gombokat, hogy a szita felemelkedjék. (Ne távolítsa el teljesen a szitát.) Kapcsolja be a borotvát kb. 5-10 másodpercre, hogy a levágott szŒrszálak kipotyoghassanak belŒle. Alapos tisztításhoz (hetente egyszer) távolítsa el a szitát és lapos felülethez ütögetve várja meg, amíg a szŒrszálak kihullanak. A kefe segítségével tisztítsa meg a kést és a fejet. Kb. négy hetente tisztítsa meg a kést lehetŒség szerint Braun tisztítószerekkel.
Ha a bŒre nagyon száraz és lecsökkent üzemidŒt észlel borotvájánál, illetve a kijelzŒn megjelenik az «oil!» (olaj!) felirat, a szitára cseppentsen finom gépolajat.
A tartozékok cseréje
A szita és a kés precíziós tartozékok, melyek idŒvel elhasználódnak. Másfél évente cserélje ki a szitát és a kést. Ezzel a borotválkozás minŒsége 25%-kal javul.* (Szita és kés: száma 7000)
(* Összefoglaló jellegı adat Braun borotvát használók véleménye alapján, miután összehasonlítottak új,
és másfél éve használatban lévŒ tartozékokat.)
KiegészítŒk
• Szita és kés (cikkszáma 7000)
0 |
1 |
0 |
1 |
oil |
Syncro |
7000 |
7000 |
19 |

1 |
2 |
3 |
4 |
5 |
6 |
Környezetvédelmi megjegyzés
A készülékben nikkel-hidrid akkumulátor található. Környezetünk védelmének érdekében ne dobja a tönkrement készüléket háztartási szemétbe. Nyissa fel a burkolatot az ábrán látható módon, majd vegye ki az akkumulátort és azt vigye egy megfelelŒ szemétgyıjtŒ telepre az országos, illetve helyi szabályzatnak megfelelŒen.
A változtatás jogát fenntartjuk.
Garancia
A garancia hatálya alól kivételt képeznek azok a meghibásodások, amelyek a készülék szakszerıtlen, vagy nem rendeltetésszerı használatára vezethetŒk vissza valamint azok az apróbb hibák, amelyek a készülék értékét, vagy használhatóságát jelentŒsen nem befolyásolják.
A garancia érvényét veszti, ha a készülék a Braun által kijelölt szervizeken kívül kerül javításra. Részletes tájékoztató és a Braun által kijelölt szervizek címjegyzéke a készülékhez melléket garancia-levélben található.
Gillette Group Hungary Kereskedelmi Kft Frankel Leó u. 30-34,
1023 Budapest,
1-345-3800
20
Na‰e v˘robky jsou vyrobeny tak, aby splÀovaly nejvy‰‰í nároky na kvalitu, funkãnost a design. Doufáme, Ïe budete se sv˘m nov˘m holicím strojkem Braun plnû spokojeni. VበBraun Syncro je dodáván s Braun Clean&Charge (viz samostatn˘ návod k pouÏití).
Vestavûná elektronika «SmartLogic»
Elektronika «SmartLogic», vestavûná do tohoto holicího strojku, analyzuje vበosobní styl holení a typ vousÛ, které máte, a tomu pak pfiizpÛsobuje péãi o akumulátorovou baterii a cykly ãi‰tûní tak, aby byl zaji‰tûn optimální v˘kon.
V˘straha
Tento holicí strojek je vybaven speciálním pfievodníkem na nízké napûtí (speciálním síÈov˘m pfiívodem se síÈov˘m adaptérem). Proto nesmíte Ïádnou jeho ãást mûnit, ani ji rozebírat. Jinak by mohlo dojít k úrazu elektrick˘m proudem.
Technické údaje:
•Pfiíkon pfii napájení kabelem nízkého napûtí: 7 W
•Napájení pfies síÈov˘ adaptér, vstupní napûtí:
100-240 V2/ 50 nebo 60 Hz (automatické pfiizpÛsobení)
•Napájecí napûtí holicího strojku: 12 V
Popis
1 |
Ochrann˘ kryt planÏety |
6 |
Spínaã |
2 |
Holicí planÏeta |
7 |
Displej |
3 |
Bfiitov˘ blok |
8 |
Tlaãítko Info |
4 |
UvolÀovací tlaãítko planÏety |
9 |
Kontrolka |
5 |
Zastfiihovaã dlouh˘ch |
10 |
SíÈová zásuvka |
|
vousÛ |
|
na strojku |
6 |
Spínaã |
11 |
Sestava síÈového |
|
|
|
pfiívodu |
Nabíjení holicího strojku
•První nabíjení: Pomocí speciálního síÈového pfiívodu pfiipojte holicí strojek k síti a nabíjejte jej nejménû
4 hodiny, pfiiãemÏ spínaã je v poloze «0» (síÈová vidlice se mÛÏe mírnû zahfiívat). Od nynûj‰ka bude «SmartLogic», vestavûná do va‰eho holicího strojku, zaji‰Èovat optimální péãi o akumulátorovou baterii.
•Plné nabití Vám poskytne kapacitu pro pfiibliÏnû 50 minut holení bez síÈového pfiívodu, v závislosti na vzrÛstu Va‰ich vousÛ. Plné kapacity se v‰ak dosáhne aÏ po nûkolika cyklech nabíjení/vybíjení.
âesk˘ |
7570 |
0 |
1 |
2 |
21 |

+35°C 
+15°C 
*
22
•Nejvhodnûj‰í teplota okolí pro nabíjení je 15 °C aÏ 35 °C.
•Nevystavujte holicí strojek teplotám vy‰‰ím neÏ 50 °C na del‰í dobu.
Displej
Kontrolka ukazuje, Ïe je holicí strojek pfiipojen k síti. Displej informuje o provozním reÏimu a stavu nabití holicího strojku:
Bûhem nabíjení se na displeji znázorÀuje na symbolu baterie kapacita akumulátoru v segmentech po 20%, jakoÏ i zb˘vající doba nabíjení (bliká):
První nabíjení (4 hodiny):
Doba se na displeji odeãítá po 20-minutov˘ch krocích.
Následující nabíjení (1 hodina):
Doba se na displeji odeãítá po 5-minutov˘ch krocích.
Baterie je plnû nabita. Vestavûná «SmartLogic» monitoruje akumulátorovou baterii a oznamuje «Test...ok», kdyÏ je akumulátorová baterie plnû nabita. Pod 10 minut zb˘vající doby holení displej ukazuje, kolik lminut holení zb˘vá. «Pohybující se» symbol síÈové vidlice indikuje, Ïe byste mûli svÛj holicí strojek dobít. JestliÏe není pro holení bez síÈového pfiívodu baterie dostateãnû nabita, buì holicí strojek nabijte nebo se holte se síÈov˘m pfiívodem pfiipojen˘m k síti.
*Displej se zmûní, kdyÏ je holicí strojek v Clean&Charge.
Elektronika «SmartLogic» vestavûná do va‰eho holicího strojku, automaticky monitoruje stav akumulátorov˘ch baterií, stejnû jako procesy nabíjení/ vybíjení a pfiizpÛsobuje je va‰emu osobnímu stylu holení. Pokud je napfiíklad va‰ím zvykem nikdy nenechat akumulátorovou baterii vybít, «SmartLogic» toto rozpozná, vyhledá pauzu, kdy holicí strojek obvykle nepouÏíváte a strojek kompletnû vybije a pak nabije, aby se baterie regenerovala (nanejv˘‰ kaÏd˘ch ‰est mûsícÛ a pouze je-li to nutné).

Dal‰í informace získáte tisknutím tlaãítka Info:
Stisknûte jednou:
– zobrazí se doba trvání posledního holení
Stisknûte znovu:
– zobrazí se ãíslo náhradního dílu holicí planÏety a bfiitového bloku
DrÏte stisknuté 3 sekundy:
– rozebûhne se demo zobrazování funkcí na displeji
Elektronika «SmartLogic», vestavûná do va‰eho holicího strojku, detekuje, kdy holicí strojek potfiebuje vyãistit (viz odstavec «Manuální ãi‰tûní» nebo samostatn˘ návod k pouÏití na «Clean&Charge»). Abyste obnovili nastavení displeje, stisknûte tlaãítko info.
Elektronika «SmartLogic» rozpozná, kdy potfiebuje holicí strojek promazat (viz odstavec «Manuální ãi‰tûní» nebo samostatn˘ návod k pouÏití na «Clean&Charge»). Abyste obnovili nastavení displeje, stisknûte tlaãítko info.
Tento holicí strojek nelze nabíjet, jestliÏe je okolní teplota pfiíli‰ nízká (< 0°C) nebo pfiíli‰ vysoká (> 55°C). Ponechejte holicí strojek nûjakou dobu v pokojové teplotû, aby byly podmínky pro nabíjení optimální.
Îádné zobrazení na displeji:
Akumulátorová baterie je úplnû vybitá a je tfieba ji nabít.
23
 Loading...