


1 off
8590
8585 
|
|
select |
clean |
|
auto |
eco |
|
|
|
normal |
|
|
|
|
intensive |
g |
cartridge |
|
full |
n |
|
|
|
|
|
|
empty |
 100
100  80
80
 60
60  40
40
 20
20  ... 0
... 0
8590
Type 5644
5-644-451/01/IX-03/G2 GB/F/PL/CZ/SK/H/HR/SLO/
TR/RUS/UA/Arab
www.braun.com/register Printed in Germany
|
|
|
|
|
Braun Infoline |
|
English |
4, 10, 96 |
TR Müµteri Hizmetleri Merkezi: |
||||
Français |
11, 17, 96 |
0212 - 473 75 85 |
||||
RUS ÖÒÎË Û Ç‡Ò ÂÒÚ¸ ‚ÓÔ ÓÒ˚ ÔÓ ÔÓ‚Ó‰Û |
||||||
Polski |
18, 24, 96 |
|||||
|
‰‡ММУ„У Ф У‰ЫНЪ‡, Б‚УМЛЪВ |
|||||
âesk˘ |
26, 32, 96 |
(095) 258 62 70 |
||||
|
|
|
||||
Slovensk˘ |
33, 39, 96 |
|
|
|
||
Magyar |
40, 46, 96 |
|
|
|
||
Hrvatski |
47, 53, 96 |
|
|
|
||
Slovenski |
54, 60, 96 |
|
|
|
||
Türkçe |
61, |
96 |
|
|
|
|
кЫТТНЛИ |
68, 74, 96 |
|
|
|
||
ìÍ ‡ªÌҸ͇ |
77, 83, 96 |
|
|
|
||
|
93, 85, 96 |
|
|
|
||
Activator 8590/8585
1 |
2 |
3 |
4 |
|
|
select |
|
clean |
|
auto |
eco |
5 |
|
|
|
|||
|
|
normal |
|
|
start |
|
|
intensive |
6 |
clea |
ning |
|
||
|
|
|||
|
|
|
|
cartridge
full
empty
8
7
12
|
f |
|
|
of |
|
|
1 |
|
|
|
f |
|
2 |
of |
|
|
1 |
|
|
2 |
|
3 |
|
|
|
3 |
16 |
ge |
|
|
|
|
|
char |
|
|
empty |
100 |
17 |
80 |
|
|
60 |
|
|
8585 |
40 |
|
... |
|
|
|
20 |
|
|
0 |
8585 |
|
8590 |
8590
9
10
11
12
13
14
15
16
17
18
19
English
STOP |
Your Activator (shaver with Clean&Charge station)
is a system equipped with highly advanced electronic processors. It ensures unsurpassed closeness and comfort for you and optimum care for your shaver:
•The system automatically adapts to any voltage worldwide.
•The system recognizes when cleaning of your shaver is required, and automatically recognizes which of the three cleaning programs is appropriate.
•While the shaver is connected to the mains, the system automatically takes care of charging and discharging in a way that is optimized for the shaver’s battery capacity and life span.
•The system takes care of lubrication of the shaver’s cutting parts.
•The system tells you when to replace the shaving foil and cutter block.
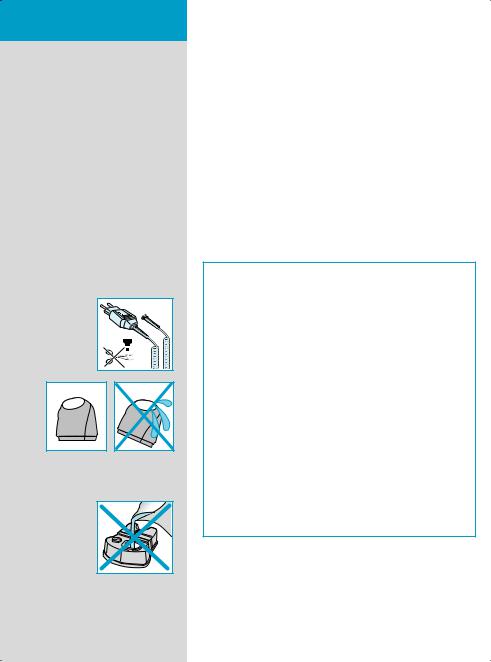
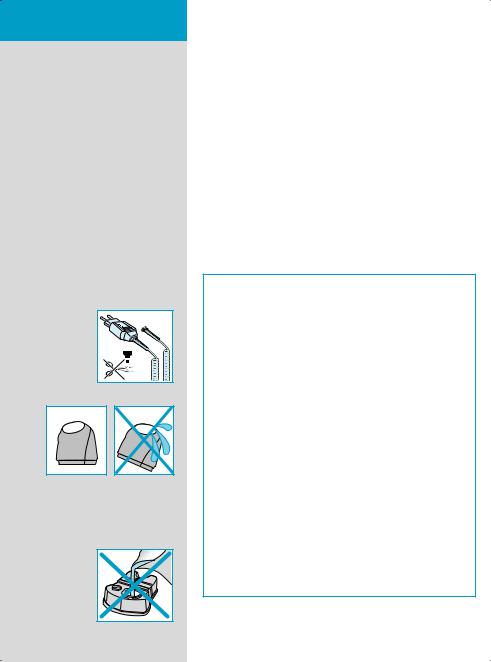
Warning
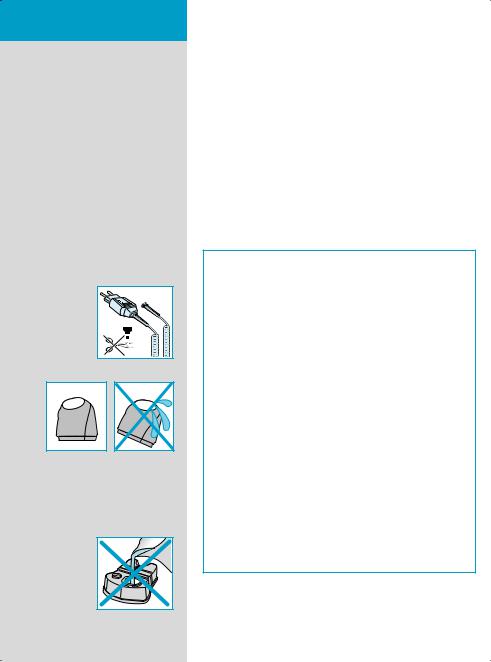
Your Activator is provided with a low-voltage adapter. Therefore you must not exchange or manipulate any part of it. Otherwise there is risk of electric shock.
In order to avoid any leakage of the cleaning fluid, place the Clean&Charge station on a flat, stable surface.
Do not tip, move suddenly or transport the station in any way if a cleaning cartridge is installed.
Do not place the station in a mirror cabinet, nor store it over radiators, nor place it on polished or laquered surfaces. Do not expose to direct sunlight.
The station contains highly flammable liquid. Keep it away from sources of ignition.
No smoking.
Keep out of reach of children.
Do not refill cartridge.
Use only original Braun refill cartridge.
4
Description
1.Low-voltage adapter
2.«start cleaning» button
3.Station-to-shaver connecting contacts
4.Station lift button for cartridge exchange
5.Display for cleaning programs
6.Display for cleaning fluid status
7.Station mains socket
8.Cleaning cartridge
9.Shaver foil protection cap
10.Shaver foil
11.Cutter block
12.Foil release buttons
13.Long hair trimmer
14.Shaver-to-station connecting contacts (shaver backside)
15.Switch
16.Shaver charging lights (green)
17.Shaver low-charge light (red)
18.Pilot light
19.Shaver mains socket
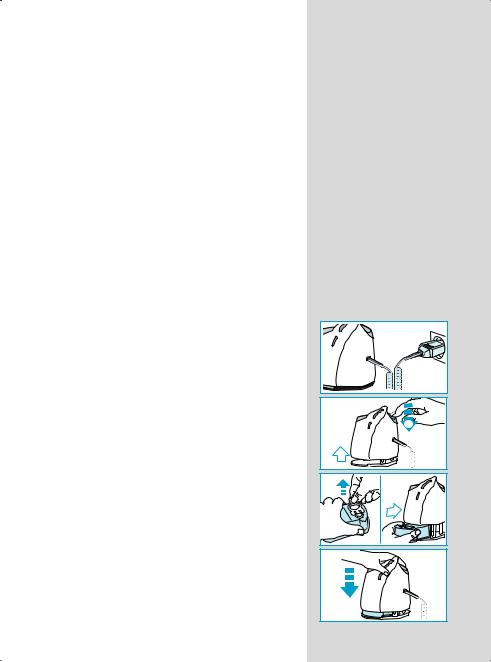
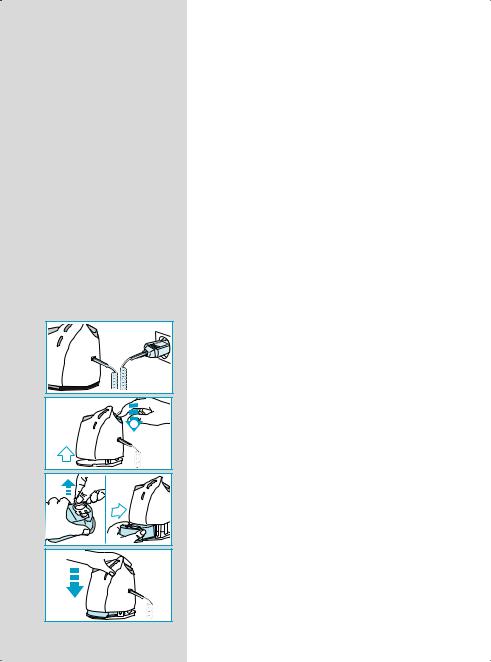
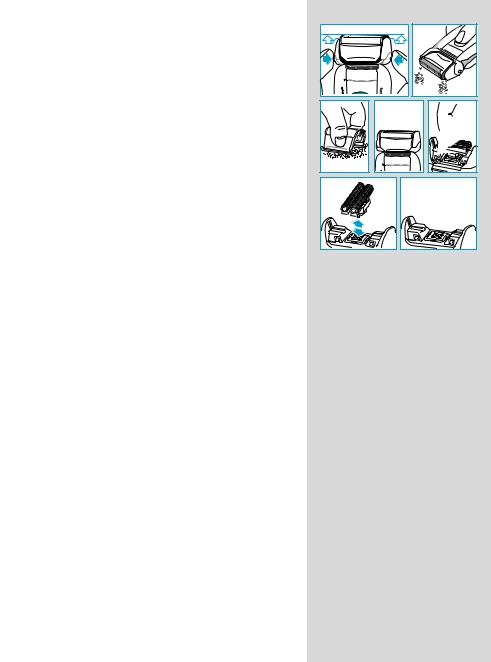
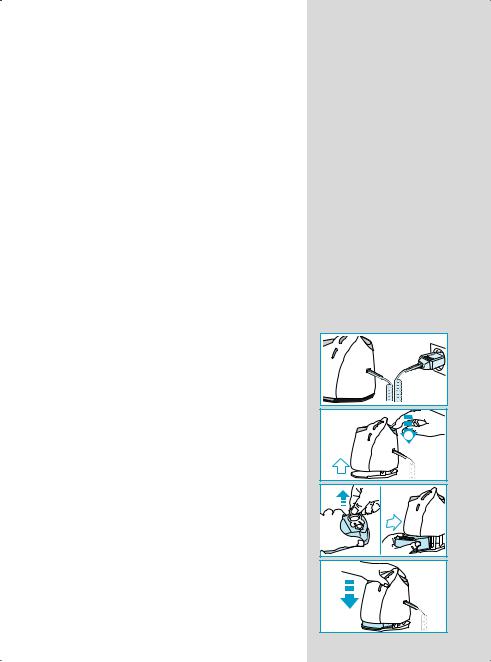
Before shaving
If you wish, you may start shaving right away (if the shaver is charged, see section «Shaver indicator lights»). However, we recommend to follow the procedure described here:
•Using the low-voltage adapter (1), connect the mains socket of the Clean&Charge station (7) to the mains.
•Press the station lift button (4) to open the housing.
•Hold the cleaning cartridge (8) down on a flat, stable surface (e.g. table).
•Carefully remove the lid from the cartridge.
•Slide the cartridge into the base of the station as far as it will go.
•Slowly close the housing by pushing it down until it locks.
eco
normal intensive
cartridge |
full |
|
empty |
1
2
5

|
a |
|
b |
|
|
|
c |
|
|
|
cartridge |
full |
cartridge |
|
|
full |
cartridge |
|
full |
|
|
empty |
|
|
|
empty |
|
empty |
|
3 |
|
|
|
|
|
|
|
|
a |
|
|
|
|
|
select |
|
clean |
||
|
|
|
|
|
|
eco |
|
b |
|
|
|
|
|
|
|
|
|
||
|
|
|
|
auto |
|
normal |
|
c |
|
|
|
clean |
|
|
|
intensive |
|
d |
|
|
select |
eco |
|
|
|
|
|||
|
|
|
|
|
|
|
|||
|
auto |
normal |
|
|
|
|
|
|
|
|
|
intensive |
|
|
|
|
|
|
|
st |
|
|
|
|
|
|
|
|
|
art cleaning |
cartridge |
|
|
|
|
|
|
|
|
|
full |
|
|
|
|
|
|
|
|
|
|
empty |
|
|
|
|
|
|
|
8590 |
|
|
0 |
|
|
... |
|
|
20 |
|
|
40 |
|
|
60 |
|
|
8 |
|
|
01 |
|
|
00 |
|
|
|
3 |
|
|
|
clean |
|
|
eco |
|
|
normal |
|
|
intensive |
start |
g |
|
cleanin |
|
|
|
cartridge |
full |
|
|
|
|
|
empty |
select auto 
clean eco normal intensive
|
select |
clean |
|
auto |
eco |
||
|
|||
|
normal |
||
|
|
||
|
|
intensive |
The display for cleaning fluid (6) will show how much cleaning fluid is in the cartridge:
a)Cleaning solution sufficiently available
b)Up to 7 cleanings left
c)New cartridge required
Make sure the foil protection cap (9) is removed from the shaver. Insert the shaver head down into the station (the contacts on the back of the shaver (14) will correspond to the contacts in the station (3)). If necessary, the system will now charge the shaver.
Also, the cleaning status will be automatically analyzed and one of the four diodes of the cleaning program display
(5)will light up:
a)The shaver is clean
b)Eco(nomic), i.e. short cleaning required
c)Normal cleaning required
d)Intensive cleaning required
If the system has selected one of the three cleaning programs, it will not start until you push down the «start cleaning» button (2). This locks the shaver into the station and starts the cleaning process.
We recommend cleaning after each shave.
While the cleaning is in progress, the respective cleaning program light will flash. Each cleaning consists of several cycles (where the cleaning fluid is flushed through the shaver head) and a heat drying period. The total cleaning time is 33 to 50 minutes.
Cleaning processes in the Clean&Charge should not be interrupted. While the shaver is drying, the metal parts of the shaver may be hot. Also, if the shaver is taken out prematurely and is not dry, its electronics could be harmed.
When the program is finished, the blue «clean» light will shine. You can release the shaver by pushing the «start cleaning» button.
Your shaver is now clean, charged and ready for use.
6

Shaving
If the shaver is locked into the Clean&Charge station, push the «start cleaning» button (2) to release the shaver and take it out.
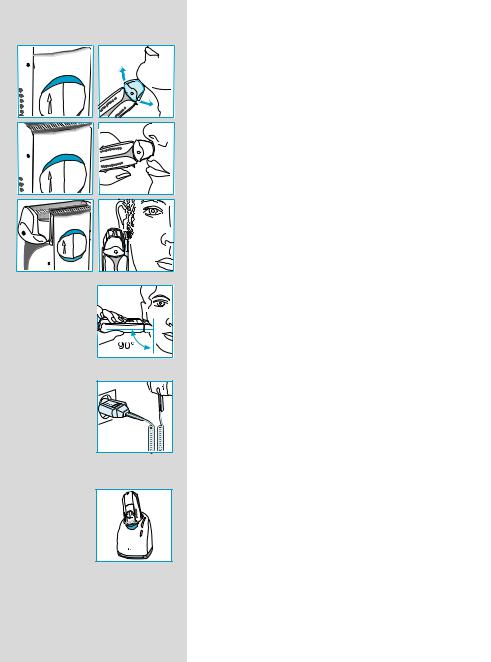
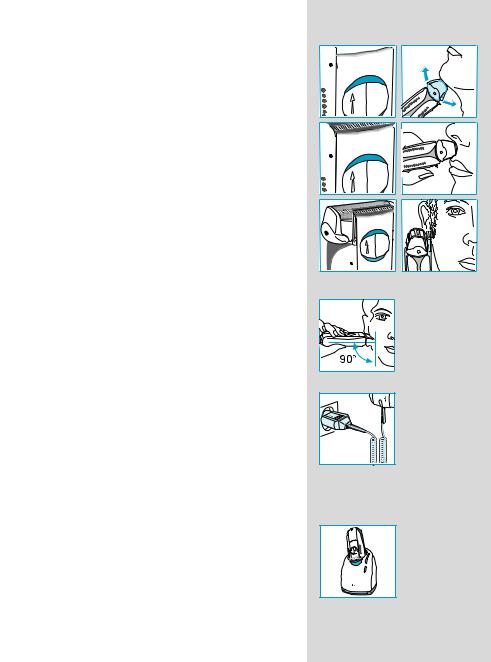
Switch positions
off = (switch is locked)
Press and push up the switch to operate the shaver: 1 = Shaving with the pivoting head
(the pivoting cutting system automatically adjusts to every contour of your face).
2= Shaving with the pivoting head locked at an angle (to permit shaving in difficult areas, e.g. under the nose).
3= The long hair trimmer is activated
(for trimming sideburns, moustache and beard).
Tips for the perfect shave
We recommend that you shave before washing, as the skin tends to be slightly swollen after washing.
Hold the shaver at right angles (90°) to the skin.
Stretch your skin and shave against the direction of beard growth.
To maintain 100% shaving performance, replace your foil and cutterblock every 18 months or when worn.
Shaving with the cord
If the shaver is completely discharged and you do not have the time to recharge in the Clean&Charge station, you may also shave with the shaver connected to the mains via the low-voltage adapter.
After shaving
Automatic cleaning
After each shave, return the shaver to the Clean&Charge station and proceed as described above in the section «Before shaving». All charging and cleaning needs are then taken care of. With daily use, a cleaning cartridge should be sufficient for about 30 cleaning cycles.
The hygienic cleaning solution cartridge contains alcohol which, once opened, will naturally evaporate slowly into the surrounding air. Each cartridge, if not used daily, should be replaced after approximately 8 weeks.
1 2
1 2
1 2
3
8590 |
sta
7

off
1
2
off
1
 old
old
new
|
0...20 40 60 |
|
8590 |
0...20 40 60 |
empty cha |
8590 |
8585 |
Quick cleaning
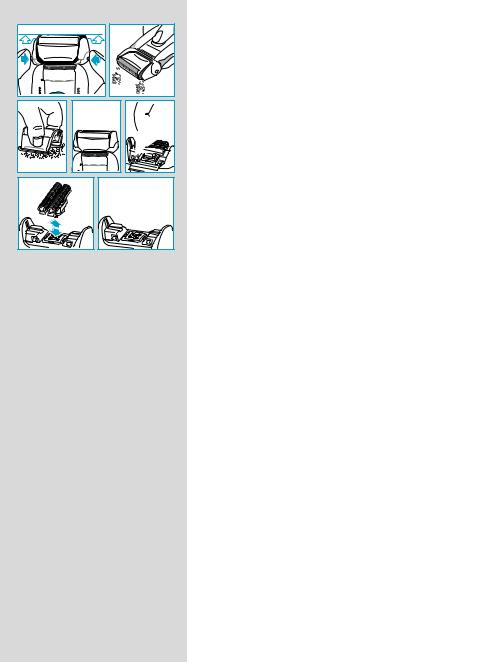
Press the foil release buttons (12) to lift the shaver foil (do not remove the foil completely). Switch on the shaver for approx. 5–10 seconds so that the shaved stubbles can fall out.
Thorough manual cleaning
Manual cleaning is recommended only when the Clean&Charge station is not available, e.g. when travelling. Never use water to clean the shaver.
Remove the shaver foil and tap it out on a flat surface. Using the brush, clean the cutter block and the inner area of the pivoting head. If you do not use the Clean&Charge station for a longer period of time, you should apply a drop of light machine oil onto the shaver foil.
Replacing the cartridge
After having pressed the lift button (4) to open the housing, wait for a few seconds before removing the used cartridge.
Before discarding the used cartridge, make sure to close the openings using the lid of the new cartridge, since the used cartridge will contain contaminated cleaning solution.
Cleaning the housing
Clean the housing of shaver and station from time to time with a damp cloth, especially inside the opening of the station where the shaver rests.
The shaver indicator lights
Pilot light (18): the shaver is connected to the mains. The red low-charge light (17) flashes when the battery capacity has dropped below 20%, provided the shaver is switched on. The remaining capacity will then be sufficient for 2 to 3 shaves.
8
Model 8590: When the shaver is fully charged, all five charging lights (16) will light up (20% per light), provided the shaver is connected to the mains or switched on.
Model 8585: The green single charging light (16) shows that the shaver is being charged. When fully charged, the charging light flashes or goes off. If later on, the charging light comes on again, this indicates that the shaver is being recharged to maintain its full capacity.
Charging information
A full charge will give up to 50 minutes of cordless shaving time, depending on your beard growth.
Best environmental temperature range for charging is 15 °C to 35 °C.
For battery maintenance, the system will automatically initiate full discharging and then recharging of the batteries. This will take place every six months at the most, and only if necessary.
Accessories
Available at your dealer or Braun Service Centres:
•Shaver foil and cutter block No. 8000
To maintain 100% shaving performance, replace your foil and cutterblock every 18 months or when worn. Change both parts at the same time for a closer shave with less skin irritation.
•Cleaning cartridge Clean&Charge CCR
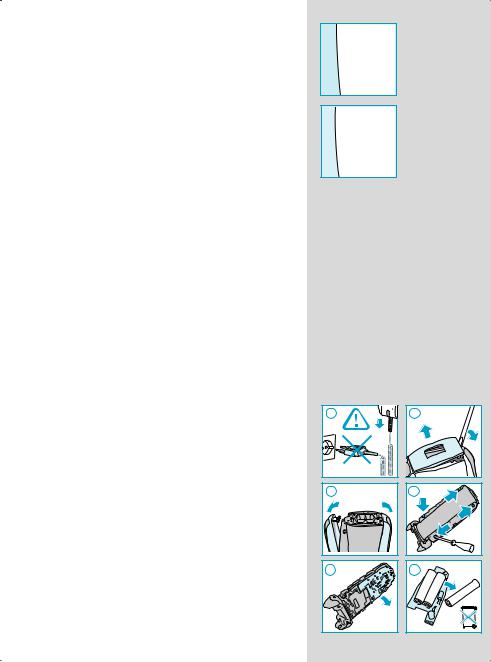
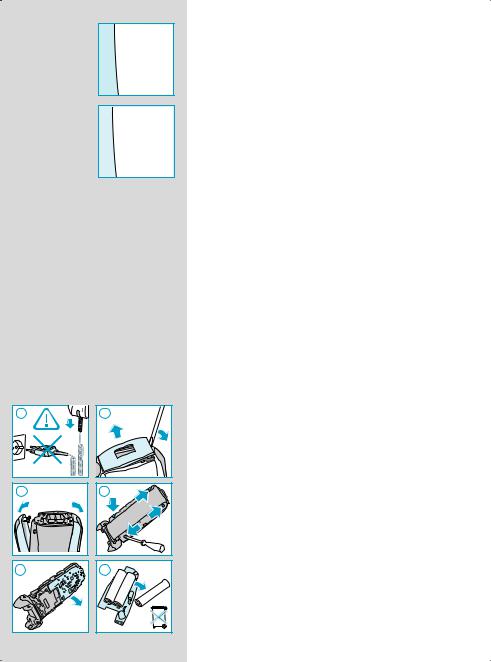
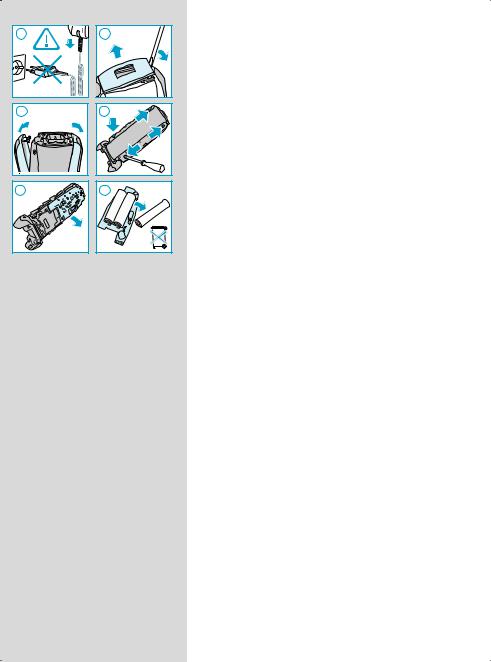
Environmental notice
This appliance is provided with nickel-hydride rechargeable batteries. To protect the environment, do not dispose of the appliance in the household waste at the end of
its useful life. Open the housing as shown, remove and dispose of the batteries at your retail store or at appropriate collection sites according to national or local regulations.
The cartridge can be disposed with regular garbage.
 empty charge 0...20 40 60 80 100
1 |
3 |
5 |
2 |
4 |
6 |
9 |

Subject to change without notice.
This product conforms to the EMC-Directive 89/336/EEC and to the Low Voltage Regulation 73/23 EEC.
Electric specifications see printing housing.
Guarantee
We grant 2 years guarantee on the product commencing on the date of purchase. Within the guarantee period we will eliminate, free of charge, any defects in the appliance resulting from faults in materials or workmanship, either by repairing or replacing the complete appliance as we may choose.
This guarantee extends to every country where this appliance is supplied by Braun or its appointed distributor.
This guarantee does not cover: damage due to improper use, normal wear or use as well as defects that have a negligible effect on the value or operation of the appliance. The guarantee becomes void if repairs are undertaken by unauthorised persons and if original Braun parts are not used.
To obtain service within the guarantee period, hand in or send the complete appliance with your sales receipt to an authorised Braun Customer Service Centre.
For UK only:
This guarantee in no way affects your rights under statutory law.
10
Votre Activator (rasoir avec chargeur Clean&Charge) est un système équipé de micro-processeurs de haute technologie. Il vous assure une précision et un confort inégalés, ainsi qu’un entretien optimal de votre rasoir :
•Le système s’adapte automatiquement à n’importe quelle tension dans le monde.
•Le système détecte quand votre rasoir a besoin d’être nettoyé, et sélectionne automatiquement le programme de nettoyage le plus adapté parmi les trois.
•Lorsque votre rasoir est sous tension, le système gère automatiquement la charge et la décharge de la batterie de façon à optimiser sa capacité et sa durée de vie.
•Le système prend en charge la lubrification des éléments de coupe du rasoir.
•Le système vous indique quand changer la grille et le bloc-couteaux.
Attention
Votre Activator est fourni avec un adaptateur basse tension. Par conséquent, vous ne devez modifier ou manipuler aucun de ses composants, afin d’éviter tout risque d’électrocution.
Placer le chargeur Clean&Charge sur une surface plane et stable afin d’éviter toute fuite du liquide nettoyant.
Ne pas incliner, bouger brusquement ou transporter le chargeur de quelque façon que ce soit s’il contient une cartouche de liquide nettoyant.
Ne pas placer le chargeur sur une surface en verre, ne pas ranger au-dessus d’un radiateur ni poser sur des surfaces polies ou laquées. Ne pas exposer aux rayons du soleil.
Le chargeur contient du liquide hautement inflammable. Tenir éloigné de toute source d‘inflammation. Ne pas fumer.
Tenir hors de portée des enfants.
Ne pas remplir la cartouche lorsqu’elle est vide. Utiliser uniquement des recharges Braun.
Français
STOP |
11
cartridge
Description
1.Cordon d’alimentation
2.Bouton de démarrage du nettoyage « start cleaning »
3.Points de contact chargeur-rasoir
4.Bouton d’ouverture du chargeur pour le remplacement de la cartouche
5.Indicateur de programmes de nettoyage
6.Indicateur du niveau de liquide nettoyant
7.Prise d‘alimentation secteur du chargeur
8.Cartouche de liquide nettoyant
9.Capot de protection de la grille
10.Grille de rasage
11.Bloc-couteaux
12.Bouton d‘éjection de la grille de rasage
13.Tondeuse rétractable
14.Points de contact rasoir-chargeur (au dos du rasoir)
15.Interrupteur
16.Témoins lumineux de charge (vert)
17.Témoin lumineux de faible charge (rouge)
18.Témoin lumineux
19.Prise d‘alimentation secteur du rasoir
eco normal intensive
full
empty
Avant le rasage
Si vous le désirez, vous pouvez commencer à vous raser directement (si le rasoir est chargé, voir section « Le témoins lumineux du rasoir »). Néanmoins, nous recommandons de suivre la procédure décrite cidessous :
• Branchez le cordon d’alimentation (1) sur la prise du chargeur Clean&Charge (7) puis à une prise de courant.
1
• Pressez le bouton d’ouverture du chargeur (4) pour ouvrir le boîtier.
2
•Posez la cartouche de liquide nettoyant (8) sur une surface plane et stable (ex : une table).
•Retirez soigneusement le couvercle de la recharge.
•Glissez la recharge dans le compartiment jusqu’à ce qu’elle soit bien installée.
•Fermez doucement le boîtier en le rabattant jusqu’à ce qu’il soit verrouillé.
12

L’indicateur du niveau de liquide nettoyant (6) rend compte de la quantité de liquide restant dans la cartouche :
a)Liquide nettoyant en quantité suffisante
b)Encore 7 nettoyages possibles
c)Changez la cartouche
Assurez-vous que le capot de protection de la grille (9) a été retiré du rasoir. Insérer le rasoir dans le chargeur, la tête de coupe vers le bas (les points de contact au dos du rasoir (14) correspondent aux points de contact du chargeur (3). Si nécessaire, le système va maintenant charger le rasoir.
De plus, le niveau de nettoyage requis est automatiquement analysé, et un des quatre témoins lumineux de l’indicateur de programmes de nettoyage (5) s’allume :
a)Le rasoir est propre
b)Eco(nomique), c’est-à-dire nettoyage rapide requis
c)Nettoyage normal requis
d)Nettoyage intensif requis
Si le système a sélectionné un des trois programmes de nettoyage, il ne démarrera que lorsque vous appuierez sur le bouton de démarrage du nettoyage « start cleaning »
(2). Cela verrouillera le rasoir dans le chargeur et débutera le programme de nettoyage.
Nous recommendons le nettoyage après chaque rasage.
Pendant que le nettoyage est en cours, l’indicateur lumineux du programme correspondant clignote. Chaque nettoyage est composé de plusieurs cycles (où le liquide nettoyant passe au travers de la tête de coupe) et d’un cycle de séchage à chaud. La durée totale d’un nettoyage varie de 33 à 50 minutes.
Les programmes de nettoyage du chargeur ne doivent pas être interrompus. Lorsque le rasoir est en train de sécher, les parties métalliques du rasoir peuvent être chaudes. De plus, si le rasoir est retiré prématurément et n’est pas sec, ses composants électroniques pourraient être endommagés.
Lorsque le programme est terminé, l’indicateur lumineux bleu « clean » s’allume. Vous pouvez libérer le rasoir en appuyant sur le bouton de démarrage du nettoyage « start cleaning ».
Votre rasoir est alors propre, chargé et prêt pour une nouvelle utilisation.
a |
|
b |
|
|
c |
|
|
cartridge |
full |
cartridge |
full |
|
cartridge |
full |
|
|
empty |
|
empty |
|
|
empty |
|
|
3 |
|
|
|
|
|
a |
|
|
|
|
|
|
clean |
|
|
|
|
|
|
|
eco |
b |
|
|
|
|
auto |
|
normal |
c |
|
|
|
clean |
|
|
intensive |
d |
|
|
|
|
|
|
|
|
|
st |
|
|
|
|
|
|
|
art cl eaning |
cartridge |
|
|
|
|
|
|
|
|
|
|
|
|
|
|
|
|
em |
|
|
|
|
8590 |
|
|
|
|
clean |
20 |
|
|
|
|
|
0 |
|
|
|
|
|
... |
|
|
|
|
|
40 |
|
|
|
select |
|
60 |
|
|
|
|
|
80 |
|
|
|
|
|
100 |
|
|
|
|
eco |
|
|
|
auto |
|
|
|
3 |
|
|
normal |
|
|
|
clean |
|
|
intensive |
|
|
eco |
|
|
|
|
|
normal |
|
|
|
|
|
intensive |
|
|
|
start |
g |
|
|
|
|
cleanin |
|
|
|
|
|
|
cartridge |
full |
|
|
|
|
|
empty |
|
|
|
|
clean |
|
auto |
eco |
|
normal |
||
|
||
|
intensive |
13
1 2
1 2
1 2
3
8590 |
sta
Rasage
Si le rasoir est verrouillé dans le chargeur Clean&Charge, appuyez sur le bouton de démarrage du nettoyage « start cleaning » (2) pour le libérer et le retirer.
Positions de l’interrupteur
off = arrêt (l’interrupteur est verrouillé)
Appuyez et poussez l’interrupteur central pour mettre en marche le rasoir :
1 = Rasage avec la tête pivotante
(le système de coupe pivotant s’adapte automatiquement aux contours du visage).
2= Rasage avec la tête pivotante bloquée en angle (pour faciliter le rasage des zones difficiles, telles que sous le nez).
3= Tondeuse en fonctionnement
(pour tailler les pattes, la moustache et la barbe).
Conseil d’utilisation pour un rasage parfait
Toujours se raser avant la toilette faciale car la peau a tendance à légèrement gonfler quand elle est humide. Tenir le rasoir perpendiculairement (90°) à la peau.
Tendre la peau et se raser dans le sens contraire à la pousse du poil.
Pour conserver 100% de la performance de votre rasoir, remplacez votre grille et votre bloc-couteaux tous les 18 mois, ou dès qu’ils sont usés.
Rasage avec le cordon d’alimentation
Si le rasoir est complètement déchargé et que vous n’avez pas le temps de le recharger dans le chargeur Clean&Charge, vous pouvez également vous raser en reliant le rasoir au courant via le cordon d’alimentation.
Après le rasage
Nettoyage automatique
Après chaque rasage, replacez le rasoir dans le chargeur Clean&Charge et procédez comme indiqué ci-dessus dans la section « Avant le rasage ». Tous les besoins ayant trait au chargement et au nettoyage du rasoir sont alors pris en compte. Sur la base d’une utilisation quotidienne, une cartouche de liquide nettoyant permet de réaliser environ 30 cycles de nettoyage. La cartouche de liquide nettoyant hygiénique contient de l’alcool qui, une fois
la cartouche ouverte, va naturellement et lentement s’évaporer dans l’air environnant. Chaque cartouche, si elle n’est pas utilisée quotidiennement, devra être remplacée environ toutes les 8 semaines.
14
Nettoyage rapide
Appuyer sur les boutons d‘éjection de la tête de rasage (12) pour soulever la grille du rasoir (ne pas enlever complètement la grille). Mettre le rasoir en marche pendant approximativement 5 à 10 secondes tête en bas afin de faire tomber les résidus de barbe.
Nettoyage manuel plus approfondi
Le nettoyage manuel est recommandé seulement lorsque vous ne pouvez pas utiliser le chargeur Clean&Charge, par exemple en voyage. N’utilisez jamais d’eau pour nettoyer votre rasoir.
Retirez la grille du rasoir et tapez-la légèrement sur une surface plane. En utilisant la brosse, nettoyez le bloccouteaux et la partie interne de la tête pivotante. Si vous n’utilisez pas le chargeur Clean&Charge pendant une longue période de temps, appliquez une goutte d’huile de machine à coudre sur la grille du rasoir.
Remplacement de la cartouche
Après avoir appuyé sur le bouton d’ouverture du boîtier (4), attendez quelques secondes avant de retirer la cartouche usagée.
Avant de vous débarrasser de la cartouche usagée, assurez-vous de refermer les ouvertures en utilisant le couvercle de la nouvelle recharge, puisque la recharge usagée contient du liquide nettoyant usagé.
Entretien du boîtier de rangement et du chargeur
Nettoyer le boîtier de rangement et le chargeur de temps en temps avec un tissu humidifié, spécialement la cavité du chargeur où le rasoir est logé.
Les témoins lumineux du rasoir
Témoin lumineux (18): le rasoir est branché au secteur. Si le rasoir est en marche, le témoin lumineux rouge de faible charge (17) clignote quand la capacité de la batterie est descendue en-dessous de 20%. La capacité restante est suffisante pour 2 ou 3 rasages.
off
1
2
off
1

 0...20 40 60
 0...20 40 60
8590
 cha
cha
 empty
empty
8585
15
 empty charge 0...20 40 60 80 100
1 |
3 |
5 |
16 |
2 |
4 |
6 |
Modèle 8590: Si le rasoir est sur secteur ou en marche, quand le rasoir est complètement chargé, les cinq témoins lumineux de charge s’allument (20% de charge par témoin lumineux).
Modèle 8585: Le témoin lumineux de charge vert (16) indique que le rasoir est en cours de recharge. Une fois complètement chargé, le témoin lumineux de charge clignote ou s’éteint. Si, plus tard, le témoin lumineux de charge se rallume, cela indique que le rasoir est à nouveau en charge pour maintenir sa capacité maximale.
Informations sur le chargement de la batterie
Une pleine charge permet jusqu’à 50 minutes de rasage sans fil, en fonction de la taille de votre barbe. La meilleure température environnante pour un programme de charge se situe entre 15 °C et 35 °C. Pour l’entretien de la batterie, le système génèrera automatiquement une décharge totale suivie d’une recharge
de la batterie. Cela a lieu tous les six mois tout au plus, et seulement si nécessaire.
Accessoires
Accessoires disponibles chez votre revendeur ou auprès de votre Centre-Service agréé Braun :
•Grille et bloc-couteaux No. 8000
Pour conserver 100% de la performance de votre rasoir, remplacez votre grille et votre bloc-couteaux tous les 18 mois, ou dès qu’ils sont usés. Pour assurer un rasage plus précis et moins d’irritations, changez les deux pièces en même temps.
•Cartouche de liquide nettoyant Clean&Charge CCR
Respect de l’environnement
Cet appareil est équipé de batteries rechargeables nickel métal hydrure. Afin de protéger l’environnement, ne jetez jamais l’appareil dans les ordures ménagères à la fin de sa durée de vie. Ouvrez le boîtier comme indiqué, retirez les batteries et remettez-les à votre Centre-Service agréé Braun ou déposez-les dans des sites de récupération appropriés conformément aux réglementations locales ou nationales en vigueur.
La cartouche peut être jetée avec les ordures ménagères.

Sujet à modifications sans préavis.
Cet appareil est conforme aux normes européennes fixées par la directive 89/336/EEC et par la directive basse tension (73/23 EEC).
Caractéristiques électriques : voir inscriptions sur le boîtier.
Garantie
Nous accordons une garantie de 2 ans sur ce produit, à partir de la date d’achat.
Pendant la durée de la garantie, Braun prendra gratuitement à sa charge la réparation des vices de fabrication ou de matière en se réservant le droit de décider si certaines pièces doivent être réparées ou si l’appareil lui-même doit être échangé.
Cette garantie s’étend à tous les pays où cet appareil est commercialisé par Braun ou son distributeur exclusif.
Cette garantie ne couvre pas : les dommages occasionnés par une utilisation inadéquate et l’usure normale. Cette garantie devient caduque si des réparations ont été effectuées par des personnes non agréées par Braun et si des pièces de rechange ne provenant pas de Braun ont été utilisées.
Pour toute réclamation intervenant pendant la période de garantie, retournez ou rapportez l’appareil ainsi que l’attestation de garantie à votre revendeur ou à un Centre Service Agréé Braun.
Appelez au 01.47.48.70.00 pour connaître le Centre Service Agréé Braun le plus proche de chez vous.
Clause spéciale pour la France
Outre la garantie contractuelle exposée ci-dessus, nos clients bénéficient de la garantie légale des vices cachés prévue aux articles 1641 et suivants du Code civil.
17
Polski
STOP |
Activator (golarka i urzàdzenie «Clean&Charge» do czyszczenia golarek i ∏adowania akumulatorów) jest zestawem golàcym sterowanym przez elektroniczne procesory wykonane w nowoczesnej technologii.
Zapewnia niezrównanà dok∏adnoÊç i wygod´ golenia a tak˝e w∏aÊciwà dba∏oÊç o golark´.
•Automatyczne dopasowanie do napi´cia sieci zasilajàcej na ca∏ym Êwiecie.
•System rozpoznaje kiedy golarka wymaga czyszczenia i automatycznie wybiera jeden spoÊród trzech dost´pnych programów czyszczenia.
•JeÊli golarka jest pod∏àczona do sieci, system automatycznie optymalizuje warunki ∏adowania i roz∏adowania akumulatora tak aby zapewniç w∏aÊciwà jego pojemnoÊç i czas u˝ytkowania.
•System dba o w∏aÊciwe oliwienie cz´Êci tnàcych.
•Informuje kiedy nale˝y wymieniç foli´ golàcà i blok ostrzy.
Uwaga:
Urzadzenie jest dostarczane z zasilaczem sieciowym. Nie nale˝y manipulowaç przy nim ani wymieniaç ˝adnych jego cz´Êci. W innym przypadku istnieje niebezpieczeƒstwo pora˝enia elektrycznego.
Aby uniknàç wyciekania p∏ynu czyszczàcego z urzàdzenia Clean&Charge nale˝y je umieÊciç na p∏askiej, stabilnej powierzchni.
Nie nale˝y przechylaç, gwa∏townie przesuwaç lub transportowaç urzàdzenia Clean&Charge jeÊli umieszczono w nim pojemnik z p∏ynem.
Nie nale˝y umieszczaç urzàdzenia na szafce z lustrami, wypolerowanych lub lakierowanych powierzchniach ani przechowywaç go nad grzejnikami. Nie wystawiaç na bezpoÊrednie dzia∏anie promieni s∏onecznych. P∏yn czyszczàcy jest ∏atwopalny. Nale˝y przechowywaç go poza zasi´giem dzieci, z dala od êróde∏ ognia i zap∏onu – nie paliç tytoniu w trakcie u˝ywania.
Nie nape∏niaç pojemnika z p∏ynem.
Nale˝y u˝ywaç tylko oryginalnych pojemników Braun z p∏ynem czyszczàcym.
18
Opis urzàdzenia
1.Przewód sieciowy z zasilaczem
2.Przycisk «start cleaning» – rozpocz´cie czyszczenia
3.Styki stacji czyszczàcej
4.Przycisk zwalniajàcy do wymiany pojemnika z p∏ynem
5.Wskaênik programów czyszczenia
6.Wskaênik iloÊci p∏ynu czyszczàcego
7.Gniazdo zasilania stacji
8.Pojemnik z p∏ynem czyszczàcym
9.Os∏ona zabezpieczajàca foli´
10.Folia golàca
11.Blok ostrzy
12.Przyciski zwalniajàce foli´ golàcà
13.Trymer do przycinania d∏ugich w∏osów
14.Styki golarki (z ty∏u golarki)
15.Wy∏àcznik
16.Kontrolka ∏adowania akumulatora (zielona)
17.Kontrolka niskiego stanu na∏adowania akumulatora (czerwona)
18.Kontrolka
19.Gniazdo zasilania golarki
Przed goleniem
Golenie mo˝na rozpoczàç natychmiast (jeÊli tylko akumulator zosta∏ na∏adowany; patrz rozdzia∏ «Wskaêniki kontrolne»). Jednak rekomendujemy post´powanie zgodnie z poni˝szà procedurà:
•Przy u˝yciu przewodu (1) po∏àczyç gniazdo zasilania stacji Clean&Charge (7) z siecià.
•Przycisnàç przycisk zwalniajàcy (4) aby otworzyç obudow´.
•Po∏o˝yç pojemnik z p∏ynem czyszczàcym (8) na p∏askiej, stabilnej powierzchni (np. na stole).
•Ostro˝nie zdjàç pokrywk´ z pojemnika z p∏ynem.
•Wsunàç pojemnik do obudowy urzàdzenia tak, aby wszed∏ do koƒca.
•Zamknàç obudow´ powoli naciskajàc jà a˝ do zatrzaÊni´cia.
eco
normal intensive
cartridge |
full |
|
empty |
1
2
19
|
a |
|
b |
|
|
|
c |
|
|
|
cartridge |
full |
cartridge |
|
|
full |
cartridge |
|
full |
|
|
empty |
|
|
|
empty |
|
empty |
|
3 |
|
|
|
|
|
|
|
|
a |
|
|
|
|
|
select |
|
clean |
||
|
|
|
|
|
|
eco |
|
b |
|
|
|
|
|
|
|
|
|
||
|
|
|
|
auto |
|
normal |
|
c |
|
|
|
clean |
|
|
|
intensive |
|
d |
|
|
select |
eco |
|
|
|
|
|||
|
|
|
|
|
|
|
|||
|
auto |
normal |
|
|
|
|
|
|
|
|
|
intensive |
|
|
|
|
|
|
|
st |
|
|
|
|
|
|
|
|
|
art cleaning |
cartridge |
|
|
|
|
|
|
|
|
|
full |
|
|
|
|
|
|
|
|
|
|
empty |
|
|
|
|
|
|
|
8590 |
|
|
0 |
|
|
... |
|
|
20 |
|
|
40 |
|
|
60 |
|
|
8 |
|
|
01 |
|
|
00 |
|
|
|
3 |
|
|
|
clean |
|
|
eco |
|
|
normal |
|
|
intensive |
start |
g |
|
cleanin |
|
|
|
cartridge |
full |
|
|
|
|
|
empty |
select auto 
clean eco normal intensive
|
select |
clean |
|
auto |
eco |
||
|
|||
|
normal |
||
|
|
||
|
|
intensive |
Wskaênik iloÊci p∏ynu czyszczàcego (6) pokazuje ile p∏ynu jest w pojemniku:
a)Pojemnik pe∏en
b)P∏ynu pozosta∏o na 7 czyszczeƒ
c)Nale˝y wymieniç pojemnik na nowy
Nale˝y upewniç si´, ˝e os∏ona zabezpieczajàca folii (9) zosta∏a zdj´ta z golarki. Nast´pnie w∏o˝yç golark´ do stacji czyszczàcej z g∏owicà skierowanà ku do∏owi (styki golarki (14) powinny zetknàç si´ ze stykami stacji czyszczàcej (3)). JeÊli to konieczne system rozpocznie ∏adowanie akumulatora.
JednoczeÊnie stan zanieczyszczenia golarki zostanie automatycznie przeanalizowany i jedna z czterech diod oznaczajàcych programy czyszczàce (5) zaÊwieci si´:
a)Golarka jest czysta
b)Eco (program ekonomiczny) – tzn. potrzebne jest krótkie czyszczenie
c)Normalny cykl czyszczenia
d)Intensywne czyszczenie
JeÊli system wybra∏ jeden z trzech programów czyszczàcych to program ten zostanie uruchomiony dopiero po przyciÊni´ciu przycisku «start cleaning» – rozpocz´cie czyszczenia (2). To unieruchomi golark´ w stacji i rozpocznie proces czyszczenia.
Rekomendujemy czyszczenie po ka˝dym goleniu.
Kiedy trwa proces czyszczenia, odpowiednia dla danego programu dioda, miga. Ka˝de czyszczenie sk∏ada si´ z kilku cykli (podczas których p∏yn czyszczàcy przep∏ywa przez g∏owic´ golarki) i okresu suszenia. Ca∏kowity czas czyszczenia wynosi od 33 do 50 minut.
Proces czyszczenia nie powinien byç przerywany. W czasie gdy golarka jest suszona, cz´Êci metalowe mogà byç goràce. JeÊli golarka jest wyj´ta ze stacji przedwczeÊnie i nie jest sucha, jej uk∏ad elektroniczny mo˝e ulec uszkodzeniu.
Gdy program zostanie zakoƒczony, niebieski wskaênik «czystej» golarki zaÊwieci si´. Teraz mo˝na zwolniç golark´ przez naciÊni´cie przycisku «start cleaning» – rozpocz´cie czyszczenia. Od tej chwili golarka jest czysta, na∏adowana i gotowa do u˝ycia.
20
Golenie
IJeÊli golarka jest unieruchomiona w stacji «Clean&Charge» nale˝y przycisnàç przycisk «start cleaning» – rozpocz´cie czyszczenia (2) aby zwolniç golark´ i wyjàç jà ze stacji.
Pozycje prze∏àcznika
off = Urzàdzenie wy∏àczone (prze∏àcznik jest zablokowany)
W celu w∏àczenia golarki nale˝y nacisnàç i przesunàç prze∏àcznik do góry:
1= Golenie z wykorzystaniem ruchomej g∏owicy (g∏owica dostosowuje si´ automatycznie do kszta∏tu twarzy).
2 = Golenie z g∏owicà zablokowanà pod kàtem
(w celu wygolenia trudnodost´pnych miejsc, np. pod nosem).
3= W∏àczone ostrza (trymer) do przycinania d∏ugich w∏osów
(do przycinania bokobrodów, wàsów oraz brody).
Wskazówki
Zalecamy goliç si´ przed umyciem twarzy, poniewa˝ po umyciu skóra staje si´ mi´kka i lekko nabrzmia∏a. Golark´ przyk∏adaç do skóry pod kàtem prostym (90°). Skór´ nale˝y napinaç a golark´ prowadziç pod w∏os. Aby utrzymaç 100% jakoÊç golenia, nale˝y wymieniaç foli´ i blok ostrzy co 11/2 miesi´cy lub gdy ulegnà zu˝yciu.
Praca przy zasilaniu sieciowym
IW przypadku ca∏kowitego roz∏adowania akumulatora i braku czasu aby na∏adowaç go w urzàdzeniu Clean&Charge, golarka mo˝e pracowaç przy zasilaniu sieciowym. Nale˝y u˝yç za∏àczony przewód sieciowy z zasilaczem (1).
Po goleniu
Czyszczenie automatyczne
Po ka˝dym goleniu nale˝y w∏o˝yç golark´ do stacji Clean&Charge i post´powaç zgodnie z opisem w rozdziale «Przed goleniem». Wszystkie wymagania w zakresie ∏adowania i czyszczenia golarki zostanà spe∏nione. Przy codziennym u˝ytkowaniu pojemnik z p∏ynem powinien wystarczyç na oko∏o 30 cykli
czyszczàcych. P∏yn czyszczàcy zawiera alkohol, wi´c po otwarciu pojemnika, zawsze troch´ paruje. Ka˝dy pojemnik, jeÊli nie jest u˝ywany codziennie, powinien byç wymieniony co oko∏o 8 tygodni.
1 2
1 2
1 2
3
8590 |
sta
21

off
1
2
off
1
 old
old
new
|
0...20 40 60 |
|
8590 |
0...20 40 60 |
empty cha |
8590 |
8585 |
Szybkie czyszczenie
W celu szybkiego oczyszczenia golarki nacisnàç przyciski zwalniajàce foli´ (12) tak, aby folia wysun´∏a si´ (nie zdejmowaç ca∏owicie folii). W∏àczyç golark´ na oko∏o 5–10 sekund tak, aby resztki w∏osków wypad∏y.
Czyszczenie r´czne
Czyszczenie r´czne jest zalecane tylko wtedy gdy stacja Clean&Charge jest niedost´pna np. w podró˝y. Nigdy nie nale˝y u˝ywaç wody do mycia golarki. Wyjàç foli´ golàcà i oczyÊciç jà stukajàc delikatnie o
p∏askà powierzchni´. Nast´pnie, przy u˝yciu szczoteczki dok∏adnie oczyÊciç blok ostrzy i wewn´trzny obszar g∏owicy. JeÊli stacja Clean&Charge nie jest u˝ywana przez d∏u˝szy okres czasu nale˝y wpuÊciç kropl´
oleju stosowanego w maszynach do szycia na foli´ golàcà.
Wymiana pojemnika
Po naciÊni´ciu przycisku zwalniajàcego (4) otwierajàcego obudow´ nale˝y odczekaç kilka sekund i wyjàç zu˝yty pojemnik.
Pami´tajàc o tym, ˝e zu˝yty pojemnik zawiera zanieczyszczony p∏yn, nale˝y przed jego wyrzuceniem zamknàç go przy pomocy pokrywki zdj´tej z nowego pojemnika.
Czyszczenie obudowy
Od czasu do czasu nale˝y czyÊciç obudow´ golarki i stacji Clean&Charge przy pomocy wilgotnej szmatki, w szczególnoÊci miejsce w stacji, gdzie jest umieszczana golarka.
Wskaêniki kontrolne
Kontrolka (18): golarka jest pod∏àczona do sieci Czerwona kontrolka niskiego stanu na∏adowania (17) miga jeÊli pojemnoÊç akumulatora spadnie poni˝ej 20% pe∏nej wartoÊci (pod warunkiem, ze golarka jest w∏àczona). Pozosta∏a energia wystarczy na oko∏o 2–3 golenia.
22
Model 8590: Zielona kontrolka (16) wskazuje, ze golarka jest ∏adowana. Kiedy akumulator zostanie w pe∏ni na∏adowany, kontrolka miga lub gaÊnie. JeÊli póêniej kontrolka ponownie zaÊwieci si´ to znaczy, ˝e akumulator jest ∏adowany do uzyskania pe∏nej pojemnoÊci.
Model 8585: Zielona kontrolka (16) sygnalizuje, ˝e golarka jest w trakcie ∏adowania. Po zakoƒczeniu pe∏nego procesu ∏adowania kontrolka ta miga lub gaÊnie. JeÊli po up∏ywie pewnego czasu kontrolka ∏adowania ponownie zaÊwieci si´, oznacza to ˝e uruchomiony zosta∏ ponownie proces ∏adowania w celu utrzymania pe∏nej pojemnoÊci akumulatorów golarki.
Informacja o ∏adowaniu
Czas pracy golarki po pe∏nym na∏adowaniu akumulatorów wynosi oko∏o 50 minut, zale˝nie od typu i d∏ugoÊci zarostu.
Najlepszy zakres temperatury otoczenia dla procesu ∏adowania to 15°C–35°C.
W celu zapewnienia w∏aÊciwej obs∏ugi akumulatora system automatycznie rozpoczyna proces jego ca∏kowitego roz∏adowania i na∏adowania. Ma to miejsce co 6 miesi´cy ale tylko w przypadku gdy jest to konieczne.
Akcesoria
Dost´pne w sklepach sprzedajàcych wyroby Braun oraz w zak∏adach serwisowych
•Folia golàca i blok ostrzy: nr 8000
Aby utrzymaç 100% jakoÊç golenia, nale˝y wymieniaç foli´ i blok ostrzy co 18 miesi´cy lub gdy ulegnà zu˝yciu. Nale˝y wymieniaç obie te cz´Êci razem aby zapewniç dok∏adne golenie.
•Pojemnik z p∏ynem czyszczàcym do stacji Clean&Charge: CCR

 empty charge 0...20 40 60 80 100
23
1 |
3 |
5 |
2 |
4 |
6 |
Uwagi dotyczàce ochrony Êrodowiska
Urzàdzenie jest wyposa˝one w akumulatory niklowowodorkowe. W celu ochrony Êrodowiska nie nale˝y wyrzucaç urzàdzenia do Êmieci domowych. W przypadku zu˝ycia akumulatorów lub zniszczenia urzàdzenia, akumulatory nale˝y wyjàç z obudowy urzàdzenia, tak jak to przedstawiono na rysunkach. Ze zu˝ytymi akumulatorami nale˝y post´powaç zgodnie z krajowymi przepisami dotyczàcymi ochrony Êrodowiska.
Uwaga: Otwarcie urzàdzenia powoduje utrat´ gwarancji, mo˝e wi´c byç wykonane tylko w celu utylizacji akumulatorów na zakoƒczenie czasu ˝ycia golarki. Pojemnik z p∏ynem mo˝e byç wyrzucany do normalnych Êmieci.
Zastrzega si´ prawo do wprowadzenia zmian.
Dane elektryczne podane na obudowie urzàdzenia.
Warunki gwarancji
1.Sprzedajàcy gwarantuje sprawne dzia∏anie sprz´tu w okresie 24 miesi´cy od daty wydania. Ujawnione w tym okresie wady b´dà usuwane bezp∏atnie, przez wymieniony przez firm´ Braun autoryzowany warsztat serwisowy, w terminie 14 dni od daty dostarczenia sprz´tu do warsztatu serwisowego.
2.Reklamujàcy mo˝e wys∏aç sprz´t do naprawy do najbli˝ej znajdujàcego si´ autoryzowanego punktu serwisowego wymienionego przez firm´ Braun lub skorzystaç z poÊrednictwa sklepu, w którym dokona∏ zakupu. W takim wypadku termin naprawy ulegnie wyd∏u˝eniu o czas niezb´dny do dostarczenia i odbioru sprz´tu. Reklamujàcy powinien dostarczyç sprz´t w oryginalnym opakowaniu fabrycznym dodatkowo zabezpieczonym przed uszkodzeniem. Uszkodzenia spowodowane niedostatecznym zabezpieczeniem wysy∏ki sprz´tu nie podlegajà naprawom gwarancyjnym. Reklamujàcy nie mo˝e ˝àdaç gratyfikacji je˝eli niew∏aÊciwie oznakuje lub nieodpowiednio ubezpieczy przesy∏k´ sprz´tu.
3.Okres gwarancji przed∏u˝a si´ o czas od zg∏oszenia do naprawy sprz´tu.
24

4.Naprawa gwarancyjna nie obejmuje czynnoÊci przewidzianych w instrukcji, do których zoobowiàzany jest u˝ytkownik we w∏asnym zakresie i na w∏asny koszt.
5.Ewentualne oczyszczenie sprz´tu dokonywane jest na koszt u˝ytkownika wed∏ug cennika danego warsztatu serwisowego i nie b´dzie traktowane jako us∏uga gwarancyjna.
6.Gwarancjà nie sà obj´te:
a)mechaniczne uszkodzenia sprz´tu spowodowane przez u˝ytkownika lub poÊrednika dostarczajàcego sprz´t do naprawy
b)uszkodzenia i wady wynik∏e na skutek:
–u˝ywania sprz´tu do celów profesjonalnych;
–niew∏aÊciwego lub niezgodnego z instrukcjà u˝ytkowania, konserwacji, przechowywania lub instalacji;
–u˝ywania niew∏aÊciwych materia∏ów eksploatacyjnych;
–samowolnych dokonywanych przez u˝ytkownika lub inne nieuprawnione osoby napraw. Stwierdzenie takiej naprawy lub samowolnego otwarcia sprz´tu powoduje utrat´ gwarancji;
–przeróbek, zmian konstrukcyjnych lub u˝ywania do napraw nieoryginalnych cz´Êci zamiennych firmy Braun;
c)cz´Êci szklane, ˝arówki oÊwietlenia
d)ostrza i folie do golarek oraz materia∏y eksploatacyjne
7.Bez daty zakupu potwierdzonej pieczàtkà i podpisem sprzedawcy karta gwarancyjna jet niewa˝na.
25
âesk˘
STOP |
Vበholicí strojek Activator (holicí strojek s jednotkou Clean&Charge) je pfiístroj vybaven˘ nejmodernûj‰ími mikroprocesory. Zaji‰Èuje vám nepfiekonatelnû hladké holení a komfort, jakoÏ i optimální péãi o holicí strojek:
•Tento strojek se automaticky pfiizpÛsobí jakémukoli napájecímu napûtí ve svûtû.
•Systém rozpozná, kdy je potfieba holicí strojek vyãistit a automaticky urãí, kter˘ ze tfií ãistících programÛ je vhodn˘.
•KdyÏ je strojek pfiipojen˘ k síti, systém automaticky peãuje o proces nabíjení a vybíjení tak, aby se optimalizovala kapacita baterie holicího strojku a délka její Ïivotnosti.
•Tento systém peãuje o promazávání holicích dílÛ.
•Tento systém vám indikuje, kdy je jiÏ tfieba vymûnit holicí planÏetu a bfiitov˘ blok.
V˘straha
Tento holicí strojek je vybaven speciálním pfievodníkem na nízké napûtí. Proto nesmíte Ïádnou jeho ãást mûnit, ani ji rozebírat. Jinak by mohlo dojít k úrazu elektrick˘m proudem.
Abyste pfiede‰li pfiípadnému vyteãení ãistící tekutiny, umístûte jednotku Clean&Charge na stabilní vodorovnou podloÏku.
Dbejte na to, abyste zafiízení, pokud je nainstalována ãistící kazeta, nepfievrhli, nebo s ním prudce nepohnuli.
NeumisÈujte zafiízení do zrcadlové skfiíÀky, nad radiátory ani je nepokládejte na le‰tûné ãi lakované povrchy.
Nevystavujte je pfiímému slunci.
Zafiízení obsahuje vysoce hofilavou tekutinu.
DrÏte je v dostateãné vzdálenosti od moÏn˘ch zdrojÛ vznícení.
Nekufite.
DrÏte z dosahu dûtí.
Kazetu nedoplÀujte.
PouÏívejte pouze originální náplÀ kazety Braun.
26

Popis
1.Speciální síÈov˘ pfiívod se síÈov˘m adaptérem
2.Tlaãítko «start cleaning»
3.Propojovací kontakty jednotky a strojku
4.Tlaãítko pro vysunutí ãistící kazety pfii její v˘mûnû
5.Indikace ãistících programÛ
6.Indikace stavu ãistící tekutiny
7.SíÈová pfiívodka jednotky
8.âistící kazeta
9.Ochranná krytka holicí planÏety
10.Holicí planÏeta
11.Bfiitov˘ blok
12.Tlaãítka pro uvolnûní planÏety
13.Zastfiihovaã dlouh˘ch vousÛ
14.Propojovací kontakty jednotky a strojku (zadní strana holicího strojku)
15.Spínaã
16.Kontrolky nabití holicího strojku (zelené)
17.Kontrolka slabého nabití holicího strojku (ãervená)
18.Kontrolka
19.SíÈová pfiívodka holicího strojku
Pfied holením
Pokud chcete, mÛÏete zaãít hned s holením (pokud je holicí strojek nabit˘, viz odstavec «Kontrolky holicího strojku»). Doporuãujeme v‰ak postupovat podle níÏe popsan˘ch bodÛ.
•Pomocí speciálního síÈového pfiívodu (1) pfiipojte síÈovou pfiívodku jednotky Clean&Charge (7) k el. síti.
•Stisknûte tlaãítko pro vysunutí ãistící kazety (4), aby se otevfiel kryt.
•PfiidrÏte ãistící kazetu (8) na ploché, stabilní podloÏce (napfi. na stole).
•Opatrnû sejmûte víãko z kazety.
•ZasuÀte kazetu do základny jednotky tak daleko, jak to pÛjde.
•Pomalu uzavfiete kryt tak, Ïe jej zamáãknete dolÛ, aÏ se zajistí.
eco
normal intensive
cartridge |
full |
|
empty |
1
2
27

|
a |
|
b |
|
|
|
c |
|
|
|
cartridge |
full |
cartridge |
|
|
full |
cartridge |
|
full |
|
|
empty |
|
|
|
empty |
|
empty |
|
3 |
|
|
|
|
|
|
|
|
a |
|
|
|
|
|
select |
|
clean |
||
|
|
|
|
|
|
eco |
|
b |
|
|
|
|
|
|
|
|
|
||
|
|
|
|
auto |
|
normal |
|
c |
|
|
|
clean |
|
|
|
intensive |
|
d |
|
|
select |
eco |
|
|
|
|
|||
|
|
|
|
|
|
|
|||
|
auto |
normal |
|
|
|
|
|
|
|
|
|
intensive |
|
|
|
|
|
|
|
st |
|
|
|
|
|
|
|
|
|
art cleaning |
cartridge |
|
|
|
|
|
|
|
|
|
full |
|
|
|
|
|
|
|
|
|
|
empty |
|
|
|
|
|
|
|
8590 |
|
|
0 |
|
|
... |
|
|
20 |
|
|
40 |
|
|
60 |
|
|
8 |
|
|
01 |
|
|
00 |
|
|
|
3 |
|
|
|
clean |
|
|
eco |
|
|
normal |
|
|
intensive |
start |
g |
|
cleanin |
|
|
|
cartridge |
full |
|
|
|
|
|
empty |
select auto 
clean eco normal intensive
|
select |
clean |
|
auto |
eco |
||
|
|||
|
normal |
||
|
|
||
|
|
intensive |
Indikace ãistící tekutiny (6) bude ukazovat, kolik ãistící tekutiny je v kazetû:
a)MnoÏství ãistícího roztoku je dostateãné.
b)Zb˘vá aÏ 7 ãi‰tûní.
c)Je tfieba nova kazeta.
Ujistûte se, Ïe ochranná krytka holicí planÏety (9) je sejmuta z holicího strojku. VloÏte holicí hlavu dolÛ do jednotky (kontakty na zadní stranû holicího strojku (14) odpovídají kontaktÛm v jednotce (3). V pfiípadû nutnosti se nyní holicí strojek zaãne dobíjet.
Také stav ãi‰tûní bude automaticky analyzován a jedna ze ãtyfi diod pro indikaci programu ãi‰tûní (5) se rozsvítí:
a)Holicí strojek je ãist˘.
b)Eko(nomické), tj. je tfieba krátké ãi‰tûní.
c)Je tfieba normální ãi‰tûní.
d)Je tfieba intenzívní ãi‰tûní.
IJestliÏe systém zvolil jeden ze tfií ãistících programÛ, nezahájí se, dokud nestisknete tlaãítko «start cleaning»
(2). Tím se holicí strojek zajistí v jednotce a zahájí se proces ãi‰tûní.
Doporuãujeme ãi‰tûní po kaÏdém holení.
Zatímco ãi‰tûní probíhá, bliká kontrolka odpovídající danému ãistícímu programu. KaÏdé ãi‰tûní sestává z nûkolika cyklÛ (kdy ãistící tekutina protéká skrz holicí hlavu) a z cyklu su‰ení teplem. Celková doba ãi‰tûní je 33 aÏ 50 minut.
Probíhající ãi‰tûní v jednotce Clean&Charge by nemûlo b˘t pfieru‰ováno. Pfii su‰ení holicího strojku mohou b˘t kovové ãásti strojku horké. Také pokud byste strojek vyjmuli pfiedãasnû, nebyl by such˘ a mohlo by dojít k po‰kození elektroniky.
KdyÏ je program ukonãen˘, rozsvítí se modrá kontrolka «clean». MÛÏete holicí strojek uvolnit stisknutím tlaãítka «start cleaning».
Vበholicí strojek je nyní ãist˘, nabit˘ a pfiipraven˘ k pouÏití.
28
Holení
JestliÏe je holicí strojek zaji‰tûn v jednotce Clean&Charge, stisknûte tlaãítko «start cleaning» (2), aby se strojek uvolnil, a vyjmûte jej.
Polohy pfiepínaãe
off = vypnuto (spínaã je zaji‰tûn)
Stisknutím a posunutím spínaãe nahoru holicí strojek zapnete:
1 = Holení s v˘kyvnou hlavou
(v˘kyvn˘ holicí systém se automaticky nastavuje podle v‰ech kontur obliãeje).
2= Holení s fixovanou v˘kyvnou hlavou v nastaveném úhlu
(umoÏÀuje holení na obtíÏn˘ch partiích, napfi. pod nosem).
3= Je aktivován zastfiihovaã dlouh˘ch vousÛ (pro zastfiihování kotlet, knírku a bradky).
Tipy pro perfektní oholení
Doporuãujeme Vám holit se pfied mytím, protoÏe pokoÏka po umytí není tak pevná a hladká.
DrÏte holicí strojek v pravém úhlu (90°) k pokoÏce. Napnûte pokoÏku a holte proti smûru rÛstu vousÛ. Abyste udrÏeli 100% v˘kon holicího strojku, vymûÀujte holicí planÏetu a bfiitov˘ blok kaÏd˘ch 18 mûsícÛ, nebo v pfiípadû jejich opotfiebení.
Holení se síÈov˘m pfiívodem
IJestliÏe je holicí strojek úplnû vybit˘ a nemáte ãas je dobíjet v jednotce Clean&Charge, mÛÏete se také holit holicím strojkem pfiipojen˘m k síti prostfiednictvím speciálního síÈového pfiívodu.
Po holení
Automatické ãi‰tûní
Po kaÏdém holení vraÈte strojek do jednotky Clean&Charge a pokraãujte, jak je popsáno v˘‰e v odstavci «Pfied holením». O dobíjení a ãi‰tûní je tím postaráno. Pfii denním pouÏívání by mûla ãistící kazeta dostaãovat pro asi 30 cyklÛ ãi‰tûní.
Hygienick˘ ãistící roztok v kazetû obsahuje líh, kter˘, jeli otevfien, pfiirozenû pomalu vyprchává do okolního vzduchu. Kazeta, pokud není dennû pouÏívána, vydrÏí pfiibliÏnû 8 t˘dnÛ.
1 2
1 2
1 2
3
8590 |
sta
29
off
1
2
off
1
 old
old
new
|
0...20 40 60 |
|
8590 |
0...20 40 60 |
empty cha |
8590 |
8585 |
Rychlé ãi‰tûní
Stisknûte tlaãítka pro uvolnûní planÏety (12), aby se nadzdvihla holicí planÏeta (nesnímejte planÏetu úplnû). Zapnûte holicí strojek na cca 5–10 sekund, aby zbytky vousÛ vypadaly ze strojku ven.
DÛkladné manuální ãi‰tûní
Ruãní ãi‰tûní doporuãujeme pouze v pfiípadû, Ïe nemáte jednotku Clean&Charge k dispozici, napfi. pfii cestování. K ãi‰tûní holicího strojku nikdy nepouÏívejte vodu.
Sejmûte holicí planÏetu a jemnû ji vyklepejte na ploché podloÏce. Pomocí kartáãku vyãistûte bfiitov˘ blok a vnitfiní ãást v˘kyvné hlavy. Nebudete-li pouÏívat jednotku Clean&Charge del‰í dobu, doporuãujeme kápnout na holicí planÏetu kapku jemného oleje na ‰icí stroje.
V˘mûna ãistící kazety
Stisknûte tlaãítko pro vysunutí kazety (4), aby se otevfiel kryt, poãkejte nûkolik sekund a pak pouÏitou kazetu vyjmûte.
NeÏ pouÏitou kazetu odloÏíte do odpadu, ujistûte se, Ïe jste uzavfieli otvory pomocí víãka nové kazety, protoÏe pouÏitá kazeta obsahuje zneãi‰tûn˘ ãistící roztok.
âi‰tûní plá‰tû
Obãas oãistûte plá‰È holicího strojku a jednotky navlhãen˘m hadfiíkem, zvlá‰tû místo uvnitfi jednotky, kam se vkládá holicí strojek.
Kontrolky holicího strojku
Kontrolka (18): holicí strojek je pfiipojen k síti. Kontrolka slabého nabití holicího strojku (17) bliká, jestliÏe kapacita baterie poklesla pod 20%, a to pfii zapnutém holicím strojku. Zb˘vající kapacita bude je‰tû dostaãovat pro 2 aÏ 3 holení.
30
 Loading...