

Analogue watch
BN0095


Operating manual
Gebrauchsanweisung
Manuel d’utilisation
Manuale d’uso
Manual de instrucciones
Gebruiksaanwijzing
Manual
使用手册
使用手冊
取扱説明書
설명서
Braun is a registered trademark of Braun GmbH,
Kronberg, Germany used under license by Zeon Ltd

English
Congratulations on your purchase of the Braun Prestige
Analogue watch.
Implementing new technical so lutions for the be net
of functionality has always been an important part of
the Braun design tradition. The case of your watch is
carved of one single block of steel. This ‘monocoque’
construction eliminates the need for a case-back
and in turn removes the element of pote ntial leakage.
The movement is mounted into the case from the top
before being cove red and sealed by the crystal. This
allowed the Braun designers to taper the bottom par t
of the watch more elegantly and attach the bandlugs in such a way, that would not be possible with
conventional watch construction.
The result is not only striking in appearance but
moreover the elimination of a case back gives the watch
an added structural advantage as there is a better
protection against water.
For ser vicing and repairs, the removal of the accessscrew on the back of the watch gives access to
the stem re lease -catch; af ter removal of the crown
and stem, pressured air is inserted to blow-out the
crystal. Thereafte r, the entire movement, together
with the dial and hands are easily removed from the
top. Experienced watchmakers with the necessa ry
equipment should only perform this operation and the
removal of the acce ss-screw by any othe r persons
without the required expertise is highly discouraged.
4
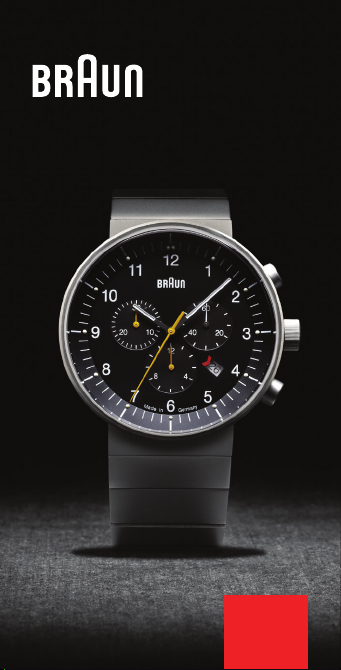
Description of the display and control buttons
CALIBER NO: 5030.D Ronda
Small
second hand
Minute hand
Hour hand
Chronograph
second hand
Minute counter
Hour counter
Date
Setting the time
1. Pull the crown out to the 2nd position.
2. Turn the crown to set hour and minute hands.
3. When the crown is pushed back to the normal position,
small second hand begins to run.
Setting the date
1. Pull the crown out to the 1st position.
2. Turn the crown clockwise to set the date.
3. After the date has been set, push the crown back to
the normal position.
Note: If the date is set between the hours of around
9:00 PM and 1:00 AM, the date may not change on the
following day.
Measuring time with the chronograph
1. The chronograph can be started and stopped each
time the push button A is pressed.
2. Pressing push button B resets the chronograph and
the chronograph second hand and the chronograph
minute hand return to zero position.
Push button A
Normal
crown position
1st crown position
2nd crown position
Push button B
5

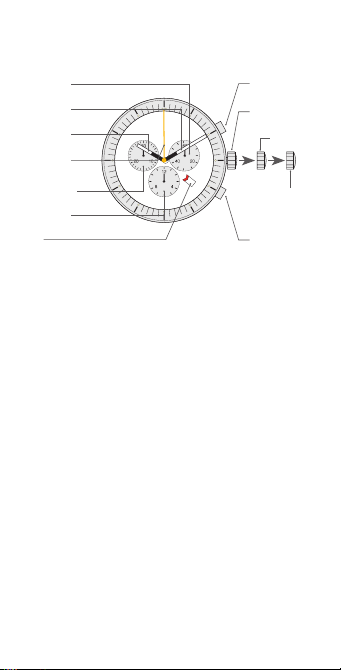
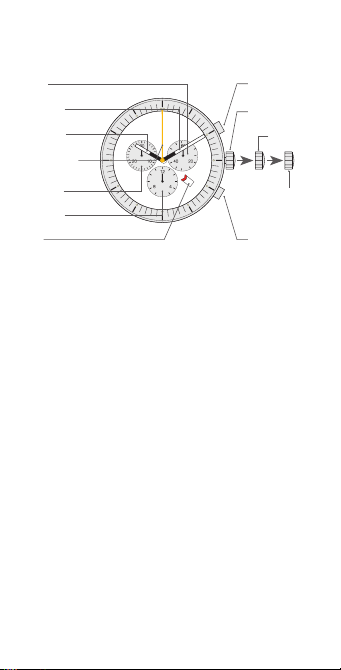
Adjusting the chronograph: hands to zero position
This procedure should be performed when one or several
chronograph hands are not in their corret zero positions
and have to be adjusted (e.g. following a battery change).
1. Pull out the crown to position II (all three chronograph
hands are in their correct or incorrect zero position).
2. Keep push buttons A and B depressed simultaneously
for at least 2 seconds (the centre stop-second
rotates by 360° corrective mode is activated).
Adjusting the chronograph second hand
Single step: press button A 1 x short.
Continuous: press button A long.
Adjusting the next hand: press button B.
Adjusting the hour counter (position 6h)
Single step: press button A 1 x short.
Continuous: press button A long.
Adjusting the next hand: press button B.
Adjusting the minute counter (position 9h)
Single step: press button A 1 x short.
Continuous: press button A long.
Returning the crown to normal position
Termination of the chronograph hands
adjustment (can be carried out at any time).
Guarantee
2 year guarantee against material and workmanship defects. The
guarantee is valid in those countries where the watch is ofcially being
sold.
The warranty is conditional to presentation of an evidence of the date
of purchase, such as the original, correctly lled-in warranty card or the
dealers’ invoice. The service technician appointed by the manufacturer
or its ofcial distributor will be the nal judge in determining, whether
the cause of defect is within the manufacturers responsibility.
Excluded from this guarantee: batteries, crystals, wear and tear,
damage caused by misuse, accidents or neglect.
Warning! Do not dispose of empty batteries in the household waste.
Take them to special local collection site.
6

Deutsch
Wir gratulieren Ihnen zum Erwerb Ihrer Braun Prestige
Analoguhr.
Die Umsetzung von neuen technischen Lösungen zur
Schaffung einer besseren Funktionalität war schon immer
Teil der Designtradition von Braun. Das Gehäuse Ihrer
Uhr wird aus einem einzigen Stahlblock gefertigt. Diese
‚Monocoque‘-Konstruktion sorgt dafür, dass das Gehäuse
keinen Boden benötigt. Das Uhrwerk wird von oben in
das Gehäuse gesetzt, bevor es vom Uhrenglas abgedeckt
und versiegelt wird. So war es den Designern von Braun
möglich, das Unterteil auf eine elegantere Weise zu
verjüngen und die Bandanstöße so anzubringen, wie dies
bei herkömmlicher Konstruktion nicht möglich ist.
Die Uhr besitzt also nicht nur ein auffälliges Äußeres
sondern bietet durch das Einschalen-Gehäuse
verbesserte Wasserdichtigkeit
Bei Wartung und Reparatur ermöglicht die Entfernung
der Zugangsschraube auf der Rückseite der Uhr den
Zugang zum Freigabehaken der Krone; nachdem die
gesamte Krone entfernt wurde, wird Druckluft eingeführt,
um das Uhrenglas herauszublasen. Danach wird das
Uhrwerk, zusammen mit dem Ziffernblatt und den Zeigern
vom Oberteil entfernt. Nur erfahrene Uhrmacher mit
der nötigen Ausrüstung sollten diese Arbeit ausführen.
Von der Entfernung der Zugangsschraube durch
andere Personen, die keine Erfahrung besitzen, wird
ausdrücklich abgeraten.
7
Beschreibung des Ziffernblatts
und der Kontrollknöpfe
KALIBER-NR.: 5030.D Ronda
Kleine
Sekunde
Minutenzeiger
Stundenzeiger
Sekundenzeiger
des Chronographen
Minutenzähler
Stundenzähler
Datum
Einstellen der Zeit
1. Ziehen Sie die Krone bis auf Position 2 heraus.
2. Drehen Sie die Krone, die um Stunden-und
Minutenzeiger einzustellen.
3. Der Sekundenzeiger bewegt sich erst wieder, nachdem
die Krone wieder in ihre normale Position gedrückt wurde.
Einstellen des Datums
1. Ziehen Sie die Krone auf die erste Position heraus.
2. Drehen Sie die Krone im Uhrzeigersinn, um das Datum
einzustellen.
3. Drücken Sie die Krone wieder in ihre normale Position,
nachdem Sie das Datum eingestellt haben.
Hinweis: Wenn das Datum zwischen 21:00 und 01:00
Uhr eingestellt wird, kann es sein, dass es sich zum
nächsten Tag hin nicht ändert.
Zeitmessung mit dem Chronographen
1. Der Chronograph kann zu jeder Zeit durch Drücken des
Knopfes A gestartet und gestoppt werden.
2. Durch Betätigen des Knopfes B wird der Chronograph
zurückgesetzt und Minuten- und Sekundenzeiger des
Chronographen werden auf null zurückgesetzt.
Zeigerstellknopf A
Krone in
normaler Position
Position 1
Position 2
Zeigerstellknopf B
8

Einstellen des Chronographen: Zeiger auf der Null
Diese Einstellung sollte vorgenommen werden, wenn
sich einer oder mehrere Zeiger des Chronographen
nicht auf der Null benden und neu eingestellt werden
müssen (z. B. nach dem Auswechseln der Batterien).
Ziehen Sie die Krone bis zur Position 2 heraus (alle
drei Zeiger des Chronographen benden sich auf
der korrekten oder inkorrekten Nullposition).
Halten Sie Knopf A und B für mindestens 2 Sekunden
gleichzeitig gedrückt (die mittlere Stoppsekunde
dreht sich um 360° Korrekturmodus ist aktiviert).
Einstellen des Sekundenzeigers des Chronographen
In einzelnen Schritten: Drücken Sie 1x kurz Knopf A.
Fortlaufend: Halten Sie Knopf A länger gedrückt.
Nächsten Zeiger einstellen: Knopf B drücken.
Einstellen des Stundenzählers (Position: 6 Uhr)
In einzelnen Schritten: Drücken Sie 1x kurz Knopf A.
Fortlaufend: Halten Sie Knopf A länger gedrückt.
Nächsten Zeiger einstellen: Halten Sie Knopf B länger
gedrückt.
Einstellen des Minutenzählers (Position: 9 Uhr)
In einzelnen Schritten: Drücken Sie 1x kurz Knopf A.
Fortlaufend: Halten Sie Knopf A länger gedrückt.
Die Krone wieder in ihre normale Position drücken
Einstellung des Chronographen-Zeigers beenden
(kann zu jeder Zeit durchgeführt werden).
Gewährleistung
Es besteht eine 2-jährige Gewährleistung auf Material- und
Verarbeitungsfehler. Die Gewährleistung ist in den Ländern gültig, in denen
die Uhr ofziell verkauft wird.
Die Gewährleistung hängt von der Vorlage eines Kaufnachweises ab, wie
z. B. die originale, richtig ausgefüllte Garantiekarte oder die Rechnung des
Händlers. Die letztendliche Entscheidung darüber, ob ein Schaden innerhalb
der Verantwortlichkeit des Herstellers liegt, liegt bei dem Servicetechniker,
der vom Hersteller oder dem ofziellen Händler benannt wurde.
Ausgenommen von der Garantie sind: Batterien, Uhrengläser,
Verschleiß und Abnutzung, Schäden durch falschen Gebrauch, Unfälle
oder Unterlassungen.
Achtung! Die leeren Batterien dürfen nicht über den Hausmüll entsorgt
werden. Bringen Sie leere Batterien bitte zu einer örtlichen Sammelstelle.
9

Français
Félicitations pour votre acquisition d’une montre
analogique Braun Prestige.
L’implémentation de nouvelles solutions techniques an
de sans cesse améliorer le fonctionnement des produits a
de tout temps été un élément important dans la tradition
de conception de Braun. Le boîtier de votre montre
est constitué d’un seul bloc d’acier. Cette conception
monocoque élimine la nécessité d’un couvercle de boîtier,
de même que la possibilité de pénétration de poussières,
de liquides, etc. Le mécanisme est inséré dans le boîtier
par le haut avant d’être couvert et scellé par le verre. Ce
procédé a permis aux designers Braun de biseauter le
bas de la montre de façon plus élégante et de xer les
supports du bracelet d’une manière qui n’aurait pas été
possible avec une montre traditionnelle.
Le résultat est particulièrement stylé. L’élimination du
couvercle du boîtier confère un avantage en termes de
structure : la montre est mieux protégée contre l’eau.
Pour l’entretien et la réparation, le retrait de la vis
d’ouverture située au dos de la montre permet d’accéder
au fermoir-tige. Après retrait de la couronne et de la tige,
de l’air comprimé est injecté pour « pousser » le verre et
le retirer. L’ensemble du mécanisme ainsi que le cadran
et les aiguilles peuvent alors être aisément retirés par le
haut. Cette opération ne peut être réalisée que par des
horlogers expérimentés. Nous déconseillons vivement le
retrait de la vis d’ouverture par quiconque ne possède pas
l’expertise requise.
10

Description du cadran et des commandes de réglage
N° DE CALIBRE : 5030.D Ronda
Trotteuse
Petite aiguille
Grande aiguille
Aiguille du
chronographe
Compte-minutes
Compte-heures
Datet
Réglage de l’heure
1. Tirer la couronne en 2e position.
2. Faire tourner la couronne pour positionner la grande et
la petite aiguille.
3. Lorsque la couronne est repoussée en position
normale, la trotteuse se met à fonctionner.
Réglage de la date
1. Tirer la couronne en 1re position.
2. Faire tourner la couronne dans le sens horaire pour
régler la date.
3. Une fois la date réglée, repousser la couronne en
position normale.
Remarque: Lorsque la date est réglée entre 21 heures
et 1 heure, elle ne changera pas nécessairement le
lendemain.
Chronométrage à l’aide du chronographe
1. Le chronographe peut être démarré et arrêté en
appuyant sur le bouton poussoir A.
2. Le bouton poussoir B permet de réinitialiser le
chronographe: les aiguilles des secondes et des minutes
reviennent alors en position zéro.
Bouton poussoir A
Position normale
de la couronne
1re position
de la couronne
2e position
de la couronne
Bouton poussoir B
11

Réglage du chronographe: aiguilles en position zéro
Cette procédure doit être effectuée lorsqu’une aiguille du
chronographe ou les deux ne se trouve(nt) pas en position
zéro et nécessite(nt) un réglage (par exemple, après un
changement de pile).
1. Tirer la couronne en 2e position.
2. Appuyer simultanément sur les boutons A et B
durant au moins 2 secondes. La trot teuse tourne
de 360° et le mode correctif est acti vé.
Réglage du compte-secondes
Retour automatique à zéro: appuyer brièvement sur le
bouton A
Positionnement manuel: appuyer plus longuement sur
le bouton A
Pour passer au réglage du compteur suivant: appuyer
sur le bouton B.
Réglage du compte-heures (positionné à 6 heures)
Retour automatique à zéro: appuyer brièvement sur le
bouton A.
Positionnement manuel: appuyer plus longuement sur
le bouton A.
Pour passer au réglage du compteur suivant: appuyer
sur le bouton B.
Réglage du compte-minutes (positionné à 9 heures)
Retour automatique à zéro: appuyer brièvement sur le
bouton A.
Positionnement manuel: appuyer plus longuement sur
le bouton A.
Pour terminer le réglage des compteurs du
chronographe, repousser la couronne en position normale
(vous pouvez quitter ce mode de réglage à tout moment).
Garantie
2 ans de garantie contre les défauts matériels et de fabrication. Cette
garantie est valable dans les pays où cette montre est ofciellement
disponible à la vente.
Cette garantie est accordée sur présentation d’une preuve de la
date d’achat, par exemple la che de garantie originale correctement
remplie ou la facture du revendeur. La décision du technicien désigné
par le fabricant ou par son distributeur ofciel prévaudra an de
12

déterminer si la cause du problème relève ou non de la responsabilité
du fabricant.
Sont exclus de cette garantie: les piles, le verre, ainsi que les
dégâts causés par l’usure normale, une utilisation inappropriée, des
accidents ou la négligence de l’utilisateur.
Avertissement! N’évacuez pas les piles usagées via le système
de collecte des déchets ménagers. Utilisez les points de collecte
spécialement prévus à cet effet.
13

Italiano
Congratulazioni per aver acquistato l’orologio analogico
Braun Prestige.
L’adozione di nuove soluzioni tecniche a vantaggio della
funzionalità è sempre stata una scelta importante della
tradizione progettistica di Braun. La cassa dell’orologio
è stata ricavata da un singolo blocco di acciaio. Questa
struttura a scocca previene la necessità della controcassa
ed elimina il rischio di eventuali perdite. Il movimento è
montato nella cassa dall’alto prima di essere chiuso e
sigillato dal cristallo, consentendo così ai progettisti Braun
di denire la parte inferiore dell’orologio in maniera più
elegante e di collegare cinturino e anse con uno stile unico
rispetto alle convenzionali soluzioni degli orologi tradizionali.
Il risultato non è solo molto interessante dal punto di vista
estetico, ma l’eliminazione della controcassa assicura
all’orologio un vantaggio strutturale aggiuntivo grazie alla
migliore protezione dall’acqua.
Per eseguire eventuali interventi di assistenza e
manutenzione, la rimozione della vite di accesso sul
lato posteriore dell’orologio garantisce l’accesso al
gancio di rilascio dell’asse; una volta rimossa la corona
e l’asse, viene utilizzata aria compressa per estrarre
il cristallo. L’intero movimento, con il quadrante e le
lancette possono essere quindi facilmente rimossi
dalla parte superiore. Questa operazione deve essere
effettuata esclusivamente da orologiai qualicati dotati
degli strumenti idonei e la rimozione della vite di accesso
da parte di altri soggetti in assenza della necessaria
competenza è altamente sconsigliata.
14

Descrizione dello schermo e dei pulsanti di comando
CALIBRO N.: 5030.D Ronda
Lancetta piccola
dei secondi
Lancetta dei minuti
Lancetta delle ore
Lancetta dei
secondi cronografo
Contaminuti
Contaore
Data
Impostare l’ora
1. Tirare la corona e collocarla nella seconda posizione.
2. Ruotare la corona per impostare le lancette delle ore
e dei minuti.
3. Quando la corona viene premuta e ricollocata in
posizione normale, la lancetta piccola dei secondi
comincia a funzionare.
Impostare la data
1. Tirare la corona e collocarla nella prima posizione.
2. Ruotare la corona in senso orario per impostare la data.
3. Una volta impostata la data, ricollocare la corona in
posizione normale.
Nota: se la data viene impostata sulle ore (circa) 21:00
e 01:00, la data potrebbe non cambiare il giorno
successivo.
Misurare il tempo con il cronografo
1. Il cronografo può essere avviato ed arrestato premendo
il pulsante A.
2. Premere il pulsante B per resettare il cronografo; la
lancetta dei secondi e dei minuti del cronografo si riporta
in posizione zero.
Pulsante
a pressione A
Posizione normale
della corona
Prima posizione
della corona
Seconda posizione
della corona
Pulsante a pressione B
15

Regolare il cronografo: lancette in posizione zero
Questa operazione deve essere eseguita quando una o
più lancette del cronografo non si trovano nella posizione
zero corretta e devono quindi essere regolate (per
esempio, una volta effettuata la sostituzione della batteria).
1. Tirare la corona e collocarla nella seconda posizione
(tutte e tre le lancette del cronografo si trovano
nella posizione corretta o non corretta allo zero).
2. Tenere premuti contemporaneamente i pulsanti A e
B per almeno 2 secondi (la lancetta dei secondi ruota di
360° la modalità di impostazione è stata attivata).
Regolare la lancetta dei secondi del cronografo
Fase singola: premere brevemente una volta il pulsante A.
Continua: tenere premuto il pulsante A.
Regolare la lancetta successiva: premere il pulsante B.
Regolare il contaore (posizione h 06:00)
Fase singola: premere brevemente una volta il pulsante A.
Continua: tenere premuto il pulsante A.
Regolare la lancetta successiva: premere il pulsante B.
Regolare il contaminuti (posizione h 09:00)
Fase singola: premere brevemente una volta il pulsante A.
Continua: tenere premuto il pulsante A.
Riportare la corona in posizione normale
Fine dell’operazione di regolazione delle lancette del
cronografo (può essere effettuata in qualsiasi momento).
Garanzia
2 anni di garanzia su difetti dei materiali e di produzione. La garanzia è
valida solo nei paesi in cui l’orologio viene venduto ufcialmente.
Per la garanzia deve essere presentata prova della data di acquisto,
come per esempio cartolina originale e correttamente compilata o
scontrino del venditore. Il tecnico addetto all’assistenza nominato
dal produttore o suo distributore ufciale avrà l’ultima parola in sede
di denizione della causa del problema e della relativa responsabilità
del produttore.
Sono esclusi dalla garanzia: batterie, cristalli, usura, danni causati
da uso non corretto, incidenti o negligenza.
Attenzione! Non smaltire le batterie scariche con i comuni riuti
domestici, ma conferirle presso gli speciali siti di raccolta locali.
16

Español
Ante todo, nuestra enhorabuena por haber adquirido el
reloj analógico Braun Prestige.
La aplicación de nuevas soluciones técnicas para
favorecer la funcionalidad siempre ha sido un componente
importante de la tradición diseñadora de Braun. La caja
de su reloj está tallada a partir de un único bloque de
acero. Gracias a su estructura “monocasco”, este reloj no
necesita tapa trasera, con lo que se elimina la posibilidad
de ltraciones. El mecanismo se monta por la parte
superior de la caja antes de cubrir y sellar el oricio con
el cristal. Gracias a ello, los diseñadores de Braun han
podido estrechar la parte inferior del reloj para realzar
su elegancia y unir las asas de una manera que no sería
posible en un reloj de diseño tradicional.
El resultado es un reloj que destaca no solamente por su
aspecto atractivo sino por la ventaja estructural adicional
que le conere la eliminación de la tapa trasera y la
consiguiente mejor protección contra el agua.
Para llevar a cabo revisiones y reparaciones, puede
accederse al trinquete de desbloqueo de la tija retirando
el tornillo de acceso situado en la parte trasera del reloj.
Tras retirar la corona y la tija, se introduce aire a presión
para extraer el cristal. A continuación, puede extraerse
el mecanismo al completo junto con la esfera y las
manecillas por la parte superior. Esta operación solamente
deben llevarla a cabo relojeros con suciente experiencia
y no se recomienda en ningún caso a personas sin la
experiencia necesaria retirar el tornillo de acceso.
17

Descripción de la esfera y de los botones de control
CALIBRE No: 5030.D Ronda
Segundero pequeño
Minutero
Horario
Segundero
del cronógrafo
Contador de minutos
Contador de horas
Fecha
Conguración de la hora
1. Tire de la corona y colóquele en la 2a posición.
2. Gire la corona para congurar el horario y el minutero.
3. Cuando la corona vuelve a colocarse en la posición
normal, el segundero empieza a girar.
Conguración de la fecha
1. Tire de la corona y colóquele en la 1a posición.
2. Gire la corona en el sentido horario para congurar la
fecha.
3. Tras congurar la fecha, apriete la corona y colóquela
de nuevo en la posición normal.
Nota: Si la fecha se modica entre las 21:00 y la 01:00
horas, puede que la fecha no cambie el día siguiente.
Medición del tiempo mediante cronógrafo
1. El cronógrafo puede ponerse en marcha y detenerse
cada vez que se aprieta el pulsador A.
2. Si se aprieta el pulsador B, el cronógrafo se reinincia y
las agujas de los segundos y los minutos del cronógrafo
vuelven a cero.
Ajuste del cronógrafo: agujas a cero
Este procedimiento debería llevarse a cabo cuando una o
18
Pulsador A
Posición normal
de la corona
1a posición
corona
2a posición corona
Pulsador B

varias de las agujas del cronógrafo no estén a cero en la
posición correcta y deban ajustarse (por ejemplo, tras un
cambio de pila).
1. Tire de la corona y colóquela en la 2a posición
(las tres agujas del cronógrafo están en la
posición a cero correcta o incorrecta).
2. Mantenga los pulsadores A y B apretados
simultáneamente durante un mínimo de 2 segundos (el
segundero central del cronógrafo realiza una rotación
de 360° el modo de corrección queda activado).
Ajuste del segundero del cronógrafo
Paso único: Apriete una vez el pulsador A brevemente
Continuo: Apriete el pulsador A de manera prolongada.
Ajuste de la aguja siguiente: Apriete el pulsador B.
Ajuste del contador de horas (posición 6 horas)
Paso único: apriete una vez el pulsador A brevemente.
Continuo: apriete el pulsador A de manera prolongada.
Ajuste de la aguja siguiente: Apriete el pulsador B.
Ajuste del contador de minutos (posición 9 horas)
Paso único: apriete una vez el pulsador A brevemente.
Continuo: apriete el pulsador A de manera prolongada.
Retorno de la corona a la posición normal
Finalización del ajuste de las agujas del cronógrafo (puede
realizarse en cualquier momento)
Garantía
Garantía de 2 años para defectos de materiales o de fabricación. La
garantía es válida solamente en aquellos países en los que este reloj
se venda de manera ocial.
Para la validez de la garantía será necesario presentar un
comprobante de la fecha de compra, como la tarjeta original de la
garantía debidamente rellenada o el recibo del vendedor. El técnico
de reparaciones designado por el fabricante o su distribuidor ocial
serán los encargados de tomar la decisión nal acerca de si la causa
del defecto es responsabilidad del fabricante.
Exclusiones de la garantía: pilas, cristales desgaste derivado del
uso, daños causados por un mal uso, accidentes o descuido.
Precaución No deseche las pilas gastadas en la basura doméstica.
Llévelas al centro de recogida especial más cercano.
19

Nederlands
Gefeliciteerd met de aankoop van uw Braun Prestige
analoge horloge.
Het implementeren van nieuwe technische oplossingen
ter verbetering van de functionaliteit is altijd een belangrijk
onderdeel van de Braun ontwerptraditie geweest. De
kast van uw horloge is gemaakt uit één enkel blok van
staal. Deze constructie neemt de noodzaak van een
achterkant weg en verwijdert het element van potentieel
lekken. Het uurwerk is vanaf de bovenkant in de kast
gemonteerd voordat het door het glas werd bedekt en
verzegeld. Daardoor was het mogelijk dat de Braun
ontwerpers het onderste deel van het horloge smaller en
eleganter konden maken en het horlogebandje op een
manier konden vastmaken, die met een conventionele
horlogebouw niet mogelijk zou zijn.
Het resultaat is niet alleen een indrukwekkend uiterlijk,
maar bovendien heeft de verwijdering van de achterkant
van de kast van het horloge een extra structureel
voordeel: een betere bescherming tegen water.
Voor onderhoud en reparatie geeft het verwijderen van
de toegangsschroef op de achterzijde van het horloge
toegang tot de asklem; na het wegnemen van de kroon
en de as wordt door middel van ingeblazen druklucht het
glas verwijderd. Daarna kan het volledige uurwerk, samen
met de wijzerplaat en de wijzers, gemakkelijk vanaf de
bovenkant worden verwijderd. Deze handelingen dienen
alleen te worden verricht door ervaren horlogemakers
met het benodigde gereedschap, en de verwijdering van
de toegangsschroef door andere personen zonder de
noodzakelijke expertise wordt zeer dan ook ontmoedigd.
20

Beschrijving van de wijzerplaat en controleknoppen
KALIBERNR: 5030.D Ronda
Kleine secondewijzer
Minuutwijzer
Uurwijzer
Chronograsche
secondewijzer
Minutenteller
Urenteller
Datum
Instellen van de tijd
1. Trek de kroon uit naar de 2de positie.
2. Draai aan de kroon om de uur- en minuutwijzers in te
stellen.
3. Zodra de kroon is teruggeduwd in de normale positie,
begint de kleine secondewijzer te lopen.
Instellen van de datum
1. Trek de kroon uit naar de 1ste positie.
2. Draai de kroon met de wijzers van de klok mee om de
datum in te stellen.
3. Duw, zodra de datum ingesteld is, de kroon terug naar
de normale positie.
Opmerking: indien de datum wordt ingesteld tussen
ongeveer 21.00u en 01.00u, kan het voorkomen
dat de datum de volgende dag niet vera nder t.
Tijd meten met de chronograaf
1. De chronograaf kan steeds opnieuw worden gestart en
gestopt door knop A in te drukken.
2. Door op drukknop B te drukken, wordt de chronograaf
gereset en keren de secondewijzer en minuutwijzer van de
chronograaf terug naar de nulposities.
Drukknop A
Normale kroonpositie
1e kroonpositie
2e kroonpositie
Drukknop B
21

Afstellen van de chronograaf: wijzers op nulposities
Deze procedure dient te worden verricht wanneer een
of meerdere chronograafwijzers niet in hun correcte
nulposities staan en afgesteld moeten worden (bijv. na het
vervangen van de batterijen).
1. Trek de kroon uit naar positie 2 (alle drie de
chronograafwijzers bevinden zich in hun correcte of
incorrecte nulpositie).
2. Houd de drukknoppen A en B tenminste 2 seconden
tegelijkertijd ingedrukt (de middelste secondewijzer roteert
360° corrigerende modus is geactiveerd).
Afstellen van de chronograsche secondewijzer
Een stap: Druk 1x kort op drukknop A
Ononderbroken: Druk lang op drukknop A
Afstellen van de volgende wijzer: Druk op k nop B.
Afstellen van de urenteller (positie 6h)
Een stap: druk 1x kort op knop A.
Ononderbroken: druk lang op knop A .
Afstellen van de volgende wijzer: druk op knop B.
Afstellen van de minutenteller (positie 9h)
Een stap: druk 1x kort op knop A.
Ononderbroken: druk lang op knop A .
De kroon weer in de normale positie terugduwen
Beëindiging van de afstelling van de chronograsche
wijzers (kan altijd uitgevoerd worden).
Garantie
2 Jaar garantie op materiaal- en productiefouten. De garantie is geldig
in de landen waar het horloge ofcieel wordt verkocht.
De garantie is voorwaardelijk en alleen bij met bewijs van de datum
van aankoop, zoals de originele, correct ingevulde garantiekaart of
de factuur van de detaillist. De technicus, die door de fabrikant of
de ofciële distributeur is aangesteld, zal als laatste vaststellen of
de oorzaak van het defect binnen de verantwoordelijkheid van de
fabrikant valt.
Uitgesloten van deze garantie: batterijen, glas, slijtage,
beschadiging veroorzaakt door misbruik, ongevallen of verwaarlozing.
Waarschuwing! Gooi lege batterijen niet weg bij het huishoudelijk
afval. Breng deze naar speciale plaatselijke inzamelplaats.
22

Dansk
Tillykke med dit køb af Braun Prestige analogur.
Implementering af nye tekniske løsninger til gavn
for funktionen har altid været en vigtig del af Brauns
designtradition. Urkassen er skåret ud af en enkelt
stålblok. Denne “monocoque” konstruktion eliminerer
behovet for urkassebag, og til gengæld bliver elementet
potentiel læk også elimineret. Værket er monteret i
urkassen ovenfra, før det dækkes og forsegles med
krystal. Det gjorde det muligt for Brauns designere at
afrunde bunddelen af uret mere elegant og fastgøre remørerne på en måde, der ikke ville kunne lade sig gøre med
en konventionel ur-konstruktion.
Resultatet er ikke blot slående for udseende, men udover
at der ikke er en speciel bagside på urkassen, får uret
tilført en konstruktionsmæssig fordel, da der er bedre
beskyttelse mod vand.
Til service og reparation giver udtagning af
adgangsskruen bag på uret mulighed for at få adgang
til skaftudløserkrogen. Efter fjernelse af krone og skaft,
indblæses trykluft for at blæse krystallen ud. Derefter
er det nemt at fjerne hele værket med urskive og
visere oppefra. Erfarne urmagere med det nødvendige
udstyr bør udføre denne operation, og fjernelse af
adgangsskruen af andre personer uden den krævede
ekspertise frarådes på det kraftigste.
23

Beskrivelse af display og kontrolknapper
KALIBER NR.: 5030.D Ronda
Lille anden viser
Minutviser
Timeviser
Chronograph
anden viser
Minuttæller
Timetæller
Dato
Indstilling af tiden
1. Træk kronen ud til 2. position.
2. Drej kronen for at indstille time- og minutviserne.
3. Når kronen trykkes tilbage til normalposition, begynder
den lille anden viser at bevæge sig.
Indstilling af dato
1. Træk kronen ud til 1. position.
2. Drej kronen med uret for at indstille datoen.
3. Når datoen er indstillet, skubbes kronen tilbage til
normal position.
Bemærk: Hvis datoen er sat til mellem 9:00 om
eftermiddagen og 1:00 om formiddagen, skifter datoen
muligvis ikke den følgende dag.
Tidsmåling med Chronograph
1. Chronograph kan startes og stoppes hver gang, knap
A trykkes ind.
2. Et tryk på knap B nulstiller Chronograph, og
Chronograph anden viser og Chronograph minutviser
vender tilbage til nul-positionen.
Justering af Chronograph: Viserne til nul-position
Denne procedure skal udføres, når en eller ere kronograf-
24
Trykknap A
Normal kroneposition
1. kroneposition
2. kroneposition
Trykknap B

visere ikke er i korrekt nul-position og har brug for
justering (f.eks. efter batteriskift).
1. Træk kronen til position II (alle tre kronografvisere
er i korrekt eller ikke korrekt nul-position).
2. Hold knap A og B trykket ned samtidig i
mindst 2 sekunder (midterste stop-sekund roterer
360° korrigeringsmode er aktiveret).
Justering af Chronograph anden hånd
Enkelt trin: Tryk kort 1 gang på knap A.
Konstant: Tryk længe på knap A .
Justering af næste viser: Tryk på knap B.
Justering af timetæller (position 6:00)
Enkelt trin: Tryk kort 1 gang på knap A.
Konstant: Tryk længe knap A.
Justering af næste viser: Tryk på knap B.
Justering af minuttæller (position 9:00)
Enkelt trin: Tryk kort 1 gang på knap A.
Konstant: Tryk længe knap A.
Sætte kronen tilbage til normal position
Afslutning af justering af kronografvisere (kan altid
udføres).
Garanti
2 års garanti mod materiale- og fabrikationsfejl. Garantien gælder i de
lande, hvor uret sælges ofcielt.
Garantien er betinget af fremvisning af bevis for købsdato som
f.eks. original, korrekt udfyldt garantikort eller forhandlerens faktura.
Serviceteknikere, der udpeges af fabrikanten eller dennes ofcielle
forhandler, vil være endelig dommer med hensyn til at beslutte, om
defektens årsag ligger inden for fabrikantens ansvarsområde.
Udelukket fra denne garanti: Batterier, krystaller, slid, skader på
grund af forkert brug, uheld eller forsømmelse.
Advarsel! Bortskaf ikke tømte batterier med husholdningsaffald. Tag
dem med på et lokalt indsamlingssted.
25

简体中文
谢谢您购买Braun Prestige系列指针手表。
为了提升手表功能而加入新的技术方案,
一直是Braun秉承下来的重要传统之一。
您这只手表的外壳是由单件不锈钢雕琢而
成。这种“单体硬壳”结构让手表不再需
要底盖,减低渗水的潜在问题。机芯从表
壳上方装入,再盖上表盖,然后以水晶表
面封嵌。Braun手表设计师将手表底部的线
条和接驳表带的方式, 设计得更高雅优美,
这些是在传统手表结构上不可能做得到。
结果,这款手表不仅外形亮丽夺目,无底
盖的设计更为它增添结构上的优势,令防
水功能更加完美。
至于保养和维修方面,移除手表背面的嵌
入式螺丝,可以看到内部擒纵结构;揭开
表冠和表芯,将高压空气注入,吹出水
晶表面。随后,整个机芯,连同表盘和指
针将可轻易从上方取出。此过程仅限于经
验丰富的制表大师利用必要的工具进行操
作,无相关专业知识者,我们强烈建议请
勿进行移除嵌入式螺丝。
26

指针显示和控制按钮说明
机芯编号: 5030.D Ronda
小秒针
分针
时针
秒針
分钟计时器
小时计时器
日期
按鈕 A
表冠正常位置
位置 1
位置 2
按鈕 B
设定时间
1. 将表冠拉出至位置2。
2. 旋转表冠,设定时针和分针。
3. 将表冠按回常位,小秒针开始走动。
设定日期
1. 将表冠拉出至位置1。
2. 顺时针旋转表冠,设定日期。
3. 日期设定完成后,将表冠按回常位。
注意: 如果日期设定于晚上9:00至凌晨1:00之间,第二天
日期可能不会改变。
使用秒表测量时间
1. 每次按一下按钮A,秒表即可开始和停止。
2. 按一下按钮B,将秒表复位,秒表秒针和秒表分针返
回零位。
秒表调校:秒针分针返回零位
本操作应在一支或多支秒表指针未返回零位时及需要调校
27

时(如更换电池后)执行。
3. 将表冠拉出至位置2(所有三支秒表针均在正确或不
正确零位)
4. 同时按住按钮A和按钮B至少两秒钟(中央的停止指针
会旋转360° 正确模式已激活)
秒表秒针调校
第一步 :短按按钮A。
下一步:长按按钮A。
进行下一个秒针的调校:按按钮B。
小时计时器调校(指向6点)
第一步 :短按按钮A。
下一步:长按按钮A。
进行下一个秒针的调校:按按钮B。
分钟计时器调校(指向9点)
第一步 :短按按钮A。
下一步:长按按钮A。
将表冠按回常位
终止秒表指针调校(此操作任何时间都可进行)。
保修
材料和工艺缺陷保修2年。在手表官方销售所在国家,保修一律
有效。
保修期附有条件,须出示购买日期的证据,如原装、正确填写的保
修卡或者是经销商开具的发票。造成缺陷的原因是否制造商责任
范围内,将由制造商或者官方经销商所指定的服务技术人员作出
最终判定。
保修范围不包含: 电池、表玻璃盖、正常磨损、以及错误使用方法或
者使用者疏忽所造成的损坏。
警告! 请勿将废电池作为生活垃圾处理。请送往当地专门回收站。
28

繁體中文
謝謝您購買Braun Prestige系列指針手錶。
爲了提升手錶功能而加入新的技術方案,
一直是Braun秉承下來的重要傳統之一。您
這隻手錶外殼是由單塊不鏽鋼雕琢而成。
這種「單體硬殼」結構讓手錶不再需要底
蓋,解除滲水的潛在問題。機芯從錶殼上
方裝入,再蓋上錶蓋,然後以水晶錶面封
嵌。Braun手錶設計師將手錶底部的線條和
接駁錶帶的方式,設計得更高雅優美,這
些是在傳統手錶結構上不可能做得到。
結果,這款手錶不僅外形亮麗奪目,無底
蓋的設計更爲它增添結構上的優勢,令防
水功能更加完美。
至於保養和維修方面,移除手錶背面的嵌
入式螺絲,可以看到內部擒縱結構;揭開
錶冠和錶芯,將高壓空氣注入,吹出水
晶錶面。隨後,整個機芯,連同錶盤和指
針將可輕易從上方取出。此過程僅限於經
驗豐富的製錶大師利用必要的工具進行操
作,無相關專業知識者,我們强烈建議請
勿進行移除嵌入式螺絲。
29

指針顯示和控制按鈕說明
機芯編號: 5030.D Ronda
小秒針
分針
時針
秒針
分鐘計時器
小時計時器
日期
按鈕 A
錶冠正常位置
位置 1
位置 2
按鈕 B
設定時間
1. 將錶冠拉出至位置2。
2. 旋轉錶冠,設定時針和分針。
3. 將錶冠按回常位,小秒針開始走動。
設定日期
1. 將錶冠拉出至位置1。
2. 順時針旋轉錶冠,設定日期。
3. 日期設定完成後,將錶冠按回常位。
注意:如果日期設定於晚上9:00至淩晨1:00之間,第二天
日期可能不會改變。
使用秒錶測量時間
1. 每次按一下按鈕A,秒錶即可開始和停止。
2. 按一下按鈕B,將秒錶復位,秒錶秒針和秒錶分針返
回零位。
秒錶調校:秒針分針返回零位
本操作應在一支或多支秒錶指針未返回零位時及需要調校
30

時(如更換電池後)執行。
1. 將錶冠拉出至位置2(所有三支秒錶針均在正確或不
正確零位)。
2. 同時按住按鈕A和按鈕B至少兩秒鐘(中央的停止指針
會旋轉360° 正確模式已激活)
秒錶秒針調校
第一步:短按按鈕A。
下一步:長按按鈕A。
進行下一個秒針的調校:按按鈕B。
小時計時器調校(指向6點)
第一步:短按按鈕A。
下一步:長按按鈕A。
進行下一個秒針的調校:按按鈕B。
分鐘計時器調校(指向9點)
第一步:短按按鈕A。
下一步:長按按鈕A。
將錶冠按回常位
終止秒錶指針調校(此操作任何時間都可進行)。
保修
材料和工藝缺陷保修2年。在手錶官方銷售所在國家,保修一律
有效。
保修期附有條件,須出示購買日期的證據,如原裝、正確填寫的保
修卡或者是經銷商開具的發票。造成缺陷的原因是否製造商責任
範圍內,將由製造商或者官方經銷商所指定的服務技術人員作出
最終判定。
保修範圍不包含:電池、表玻璃蓋、正常磨損、以及錯誤使用方法或
者使用者疏忽所造成的損壞。
警告!請勿將廢電池作爲生活垃圾處理。請送往當地專門回收站。
31

日本語
この度はBRAUNのプレステージコレクションをご購
入 下 さりありがとうござ い ます。
常に新しい技術を取り入れ、機能性を追求し続ける
のが、BRAUNにおけるデザイン哲学の重要な要素
の 一 つ で す。
この時計のケースは、ステンレススチールの削り出
しにより成形されています。「モノコック構造」を採用
し、裏蓋が不要となり、水入などのリスクを著しく軽
減することが可能となりました。内部に装着された
ムーブメントは、サファイヤクリスタルで密閉保護さ
れています。
この工法により、裏蓋の角の滑らかなデザインが可
能となり、従来の時計の構造では難しかかったケー
スとラグの接合部のエレガントさを実現しています。
これにより、外観的な美しさだけではなく、防水性と
いう構造上の利点も得ることが可能となりました。
修理の際は、裏蓋のホールから圧縮空気を封入し、
サファイヤクリス タル の ガラス 部 分 を 浮 き 上 が ら せ て
内部を確認します。経験のある技術者だけが、専用
器具を用いて作業をすることが可能です。
※お客様の誤操作による故障は、保証の対象外とな
りますの で ご 注 意くだ さ い 。
32

ディスプレイ及び操作ボタンの説明
キャリバ ー
秒針
分針
時針
クロノグ ラフ
秒針
分カウンタ ー
時間 カウンター
日付
時刻の設定
1. リュウズ を2 段 目まで 引 き出 しま す。
2. リュウズを回して時針、分針を合わせたい時刻に合わ
せます。
3. リュウズを通常位置(0段)に押し戻しますと秒針が動
き始 めます。
日付の設定
1. リュウズ を1 段 目まで 引 き出 しま す。
2. リュウズを右 に回し(時 計 周り)日付を 合わ せます。
3.
戻します。
注:
日 付 は 翌 日な って も変 わりませ ん 。
クロ ノグ ラフ で 時 間 を測 る
1. ボタンAを押す度 に、クロノグラフがスタート/ストップ
します。
2. ボタンBを 押しますと、クロノグラフはリセットになります。
クロノグラフの秒針及び分針はゼロ位置に戻ります。
: 5030.D Ronda
ボタン A
リュウズ通常位置
(0段)
リュウズ1
段目
リュウズ2 段目
ボタン B
日付を合わせた後に、リュウズを通常位置(0段)に押し
もし午後9時~午前1時の間に日付を合わせた場合、
33

クロノグ ラフ の 調 整:針 が ゼ ロ位 置 に
この手 順は 、クロノグラフの針 が 正しくゼロ位置 にならなかっ
た場合に実行して調整して下さい。(例 電池交換の後など
1. リュウ ズ を2 段 目まで 引き出 して 下 さ い 。
2.
ボタンA及びBを同時に2秒間押し続けて下さい。(セン
タ ーストップ の秒 針 が 360° 回 転 しま す。 正 しいモ ードで
作 動 し て い ま す 。)
クロノグラフ秒針の調整
・最 初 の ステ ッ プ:ボタンAを押して針を正しい 位 置 に合 わ
せ てくだ さ い 。
・次 の 針 を 調 整:ボタンBを 押します。
時間カウンターの調整(6時の位置)
・最 初 の ステ ッ プ:ボタンAを押して針を正しい 位 置 に合 わ
せ てくだ さ い 。
・続 いて 次 の 針を 調 整:ボタンBを 押します。
分カウンター(9時の位置)
・最 初 の ステ ッ プ:ボタンAを押して針を正しい 位 置 に合 わ
せ てくだ さ い 。
リュウズを通常位置(0段)に戻す
クロノグラフの針の調整の終了(いつでも調整できます。)
保証
材料及び製造上の欠陥に対して2年間の品質保証を致します。当該保証
はその時計が正式に販売された国々で有効です。
この保証は、購入日を証するもの(正しく記入された保証書のオリジナル)
を提出されることが条件です。欠陥の原因がメーカーの責任範囲である
かどうかの決定は、メーカー又は正規販売店により指定された修理技術
者の最終判断によります。
この保 証は以 下のもの を含んで おりません。
電池、クリスタル、損耗、誤用・事故・不注意による損傷。
注 意:使用済 み電 池は 家庭ご みとして捨てないで 下さい。
地域のルールに従って処分して下さい。
34

한국어
브라운 프레스티지 라인 시계제품 구매를 감사
드립니다.
새로운 기술을 적용하여, 기능상의 편의성을
향상 시키는 것은 브라운 디자인 전통에서
언제나 중요합니다. 구입하신 시계의 케이스는
일체형인 부드러운 곡선형태의 금속으로
이루어져 있으며, 이러한 일체형 구조는 케이스
뒷면을 별도로 제작할 필요가 없어서, 탁월한
방수효과를 가져올 수 있습니다. 시계의
무브먼트는 크리스털 커버로 밀봉하기 전에
케이스의 윗면에서부터 넣어서 장착을 합니다.
이런 조립방식은 브라운 디자이너에게 케이스
뒷면을 가늘게 하여 품격을 높일 수 있었으며,
기존 조립방식에서는 불가능했던 밴드
연결부위의 디자인을 가능하게 하였습니다.
따라서 결과적으로 디자인을 개선할 뿐 아니라,
케이스 뒷면을 별도 제작하지 않음 으로 해서
방수성을 높이는 효과까지 얻을 수 있습니다.
애프터 서비스와 관련해서도, 케이스 뒷면의
스크류를 분리하고, 스템 및 크라운을 분리한
후, 압축공기를 사용하여 크리스털을 분리하면
됩니다. 따라서 무브먼트 전체가 다이얼 및
바늘과 같이 쉽게 위로부터 분리가 가능합니다.
숙련되고 필요한 장비를 갖춘 시계수리 기술자를
통하여 시계의 분리가 이루어 져야 하며,
숙련되지 않은 사람 및 업체에서의 분리는 삼가
해 주십시오.
35
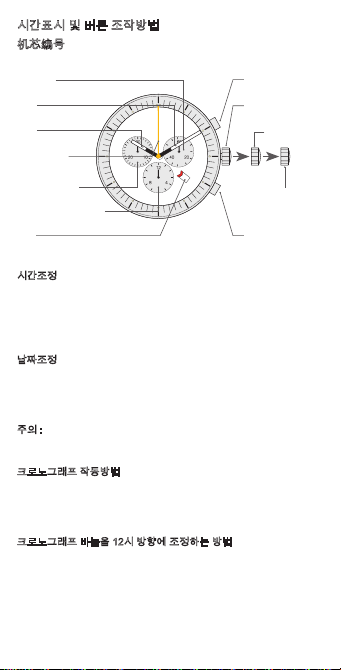
시간표시 및 버튼 조작방법
机芯编号: 5030.D Ronda
작은 초침
분침
시침
크로노그래프
초침
크로노그래프 분
카운터
크로노그래프 시 카운터
날짜
시간조정
1. 크라운을 2번 위치로 당기세요.
2. 크라운을 돌려서 시 및 분을 맞추세요.
3. 크라운을 정상위치로 넣으면, 초침이 작동되며 시계가 움직이기
시작 합니다.
날짜조정
1. 크라운을 1번 위치로 당기세요.
2. 크라운을 시계방향으로 돌려서 날짜를 조정하세요.
3. 크라운을 정상위치로 누르세요.
주의 : 시간이 오후 9시에서 오전 1시 사이에 날짜를 조정할 경우,
다음날 날짜가 변경이 안될 수 있습니다.
크로노그래프 작동방법
1. 크로노그래프는 푸쉬버튼 A를 눌러서 작동 및 정지를 시킵니다.
2. 푸쉬버튼 B를 누르시면 크로노그래프 초침 및 분침은 12시
방향으로 이동하며, 영점을 잡게 됩니다.
크로노그래프 바늘을 12시 방향에 조정하는 방법
동 과정은 한 개 이상의 크로노그래프 바늘이 12시 정방향에
위치하지 않을 경우에 실행합니다. ( 예 : 배터리 교체 후 )
1. 크라운을 2번 위치로 당기세요. ( 3개의 크로노그래프 바늘 중
일부 또는 전부가 12시 정방향에 위치하지 않습니다. )
2. 푸쉬버튼 A와 B를 동시에 최소 2초간 누르세요. ( 크로노그래프
바늘이 360도 회전하여, 12시 정방향에 멈춥니다. )
36
푸쉬버튼 A
정상 위치
1번 위치
2번 위치
푸쉬버튼 B

크로노그래프 초침 조정방법
첫 단계 : 푸쉬버튼 A를 한번 짧게 누르세요.
연속적으로 이어서 : 푸쉬버튼 A를 길게 누르세요.
다른손으로 : 푸쉬버튼 B를 누르세요.
크로노그래프 시침 조정방법(6시방향)
첫 단계 : 푸쉬버튼 A를 한번 짧게 누르세요
연속적으로 이어서 : 푸쉬버튼 A를 길게 누르세요
다른손으로 : 푸쉬버튼 B를 누르세요
크로노그래프 분침 조정방법(9시방향)
첫 단계 : 푸쉬버튼 A를 한번 짧게 누르세요
연속적으로 이어서 : 푸쉬버튼 A를 길게 누르세요
크라운을 정상위치로 돌려놓으세요.
크로노그래프 바늘 조정완료(언제나 조정이 가능합니다.)
품질보증
재질 및 공정상 불량에 대해 2년간 품질을 보장하며, 공식적으로 브라운 시계가
런칭된 국가에 한합니다.
품질보증서에 구매일, 판매점등이 정확히 기재되거나, 구매영수증을 유첨 한
경우에만 서비스가 가능합니다.
제조업체 또는 공식 수입업체가 지정한 기술자가 제조공정상 불량여부를 최종적으로
판단 합니다.
품질보증 제외항목 : 배터리, 유리, 오염, 부주의 또는 사고로 인한 파손
경고 : 배터리는 일반 폐기물과 같이 폐기할 수 없으며, 별도로 폐기 되어야 합니다.
37

Dealer: Händler: Revendeur: Rivenditore: Distribuidor:
Handelaar: Forhandler: 经销商: 經銷商: 販売店: 판매점:
BRAUN Serial: BRAUN-Seriennummer: N° de série BRAUN:
N. seriale BRAUN: BRAUN Serial: BRAUN Serial: BRAUN Serie:
BRAUN系列: BRAUN系列: BRAUN製造番号: 모델번호:
Date of sale: Kaufdatum: Date d’achat: Data di vendita:
Fecha de venta: Verkoopdatum: Salgsdato:
销售日期: 銷售日期: 販売日: 구매일:
BRAUN Helpline
Tel. No. +44 20 8208 1833
www.braun-clocks.com
www.braun-watches.com


 Loading...