


Zeiss OPMI Pentero User Manual

OPMI® Pentero
Software Release 2.2
®
Brief instructions
G-30-1702-en
Issue2.0
Printed on 17. 03. 2008

2
Contents
Key to symbols Page 3
Powering up and positioning the system Page 4
Positioning the microscope Page 5
Attaching sterile drapes Page 6
Balancing the system Page 7
Central user interface (touchscreen) Page 8
Menu structure Page 9
Illumination Page 10
Lamp change
Changing the lamp module
Adjusting the position of the handgrips Page 12
Configuring the handgrips Page 13
Configuring the foot control panel Page 14
Mounting the tube and eyepieces Page 15
Attaching documentation / coobservation equipment Page 16
Adjusting the tubes and eyepieces Page 17
Setting the eyepieces (compensation for ametropia) Page 18
Setting the adjustment speeds of focus and zoom Page 19
OR layout drawings Page 20
Exporting patient data to CD/DVD/USB/DICOM Page 22
Connecting an external monitor Page 24
What to do in an emergency - brief instructions Page 26
Lamp change during power failure
Failure of the zoom function
Failure of the focusing function
Failure of the magnetic brakes
Failure of the touchscreen
Failure of the line voltage
Error messages in the data injection system and on the touchscreen
Failure of all control functions (Emergency mode)
Blocking of individual magnetic brakes
Page 11
Page 11
Page 28
Page 30
Page 31
Page 32
Page 32
Page 32
Page 33
Page 34
Page 35
G-30-1702-en OPMI® Pentero® Software Release 2.2 Issue 2.0
Printed on 17. 03. 2008

Key to symbols
3
Caution:
These brief instructions are only an excerpt from the complete user
manual. They cannot replace the detailed description provided in
the user manual.
Therefore, make yourself thoroughly familiar with the comments
and warning notes included in the complete user manual G-30-1458.
Different symbols used in this manual draw your attention to safety aspects and useful tips. These symbols are explained in the following.
Warning!
The warning triangle indicates potential sources of danger which may
constitute a risk of injury for the user or a health hazard.
Caution:
The square indicates situations which may lead to malfunction, defects,
collision or damage of the system.
Note:
The hand indicates hints on the use of the system or other tips for the
user.
Read the user manual!
®
OPMI
GmbH
and Pentero® are registered trademarks of Carl Zeiss Surgical
.
AutoDrape™, Superlux, FlexiTrack™ and MultiVision™ are trademarks of
Carl Zeiss Surgical GmbH.
G-30-1702-en OPMI® Pentero® Software Release 2.2 Issue 2.0
Printed on 17. 03. 2008

4
O
P
M
I
P
e
n
t
e
r
o
On / Off
2
1
3
Switching on the system
Warning!
– The correct use of the system is absolutely vital for safe operation.
– Before starting, make sure to read the chapters "Safety" and "Prepa-
Therefore, please thoroughly familiarize yourself with the content of
user manual G-30-1458 before starting up the system.
rations for use" of the user manual!
G-30-1702-en OPMI® Pentero® Software Release 2.2 Issue 2.0
Printed on 17. 03. 2008

Positioning the microscope
G-30-1458
AB
G-30-1458
Warning!
For safety reasons, the system must only be used when correctly balanced.
Before starting, make sure to read the chapter "Preparations for use" of
the user manual!
• Press the brake release buttons (AB) to unlock all magnetic brakes.
Keep the brake release buttons (AB) pressed and move the ceiling
mount into the working position required using the handgrips. When
you let go of the brake release buttons (AB), all magnetic brakes are
locked.
5
G-30-1702-en OPMI® Pentero® Software Release 2.2 Issue 2.0
Printed on 17. 03. 2008

6
12
Positioning the system at the operating table
The stand is provided with a handle which allows the reliable and easy
guidance of the system during relocation. Please only use this handle for
this purpose.
The stand base is equipped with the new FlexiTrak technology which
makes it considerably easier for you to move and position the system in
the OR. Two additional pedals on the base allow you to conveniently select the required condition of the stand:
– None of the pedals has been pressed:
Exact and sensitive positioning in the OR and at the operating table in
all directions with a minimum of effort.
– Right-hand pedal (2) is pressed down hard until it snaps in:
Reliable and precise straight-ahead movement, also over low thresholds (elevator). Press this pedal until it snaps in to set the two front
casters for straight-ahead travel. The other casters remain steerable.
When you slightly press pedal (1), all four casters will be steerable
again.
– Pressing left-hand pedal (1) to the stop will lock the stand base in po-
sition, preventing it from inadvertently rolling away. After the system
has been finally positioned at the operating table, you should step on
this pedal.
3 Possible positions for cranial procedures
4 Possible positions for face-to-face procedures (spine)
5 Surgeon
6 Assistant
Note:
The system allows overhead positioning and can therefore be placed in
any position behind the surgeon or assistant.
G-30-1702-en OPMI® Pentero® Software Release 2.2 Issue 2.0
Printed on 17. 03. 2008

7
3
4
5
6
5
6
G-30-1702-en OPMI® Pentero® Software Release 2.2 Issue 2.0
Printed on 17. 03. 2008

8
DRAPE
Hier luftdicht abschließen
Make airtight here
Fermer hermétiquement ici
Cerrar hermélicamente aqui
Effective range
of drape vacuum system
Sterile area
Non-sterile
area
PHOTO
AUTOBALA NCE
PAT-FI LES
USER
REC START
VOICE CTRL
DICTATION
TELEPHONE
FREEZE
FULL SCREEN
FOCUS
359 mm
LIGHT
33%
ZOOM
5.9x
FOCUS
SPEED
ZOOM
SPEED
LIGHT
INTENSITY
DRAPE
CONFIG
MENU
2
1
Attaching sterile drapes
Caution:
When attaching the drape, please ensure that there is sufficient space for
the tilt and rotation movements of the surgical microscope.
G-30-1702-en OPMI® Pentero® Software Release 2.2 Issue 2.0
Printed on 17. 03. 2008

Balancing the system
SB
AB
Fine adjustment for mouth switch
G-30-1458
PHOTO
DRAPE
FREEZE
Autobalance Complete System
MENU
START
START
START
Autobalance Microscope
Drape Compensation
Autobalance
30. 01. 04
17:56
User:
XXXXXXXX
Patient:
XXXXXXX
Recorder Capacity:
Int:.......% Ext:.........%
USER
VOICE CTRL
DICTATION
TELEPHONE
FULL SCREEN
CLOSE
1
2
CONFIG
PAT-FILES
Fine adjustment mouth switch
-3
-
+
REC START
STOP
AUTOBALANCE
9
Warning!
Make sure to observe the instructions in the chapter "Balancing the
system" of user manual G-30-1458.
For safety reasons, the system must only be used when correctly balanced. Despite the autobalance function, it may happen in exceptional
cases that the surgical microscope is not correctly balanced.
With an incorrectly balanced system, brake release may lead to uncontrolled movements of the suspension system. For this reason, the balancing procedure and the subsequent test must not be performed above
the patient and only at a safe distance from other persons and devices.
• Hold the microscope tightly at both handgrips.
• Unlock the magnetic brakes (AB) and swing out the microscope until
indicator (1) is centered in the blue area (2). Then you can perform the
"Autobalance Complete System" procedure.
G-30-1702-en OPMI® Pentero® Software Release 2.2 Issue 2.0
Printed on 17. 03. 2008

10
MENU
USER CONFIG
Start
PAT-FILES
Central user interface (touchscreen)
Note:
For detailed information on the submenus and their configuration, please
see user manual G-30-1458.
G-30-1702-en OPMI® Pentero® Software Release 2.2 Issue 2.0
Printed on 17. 03. 2008

11
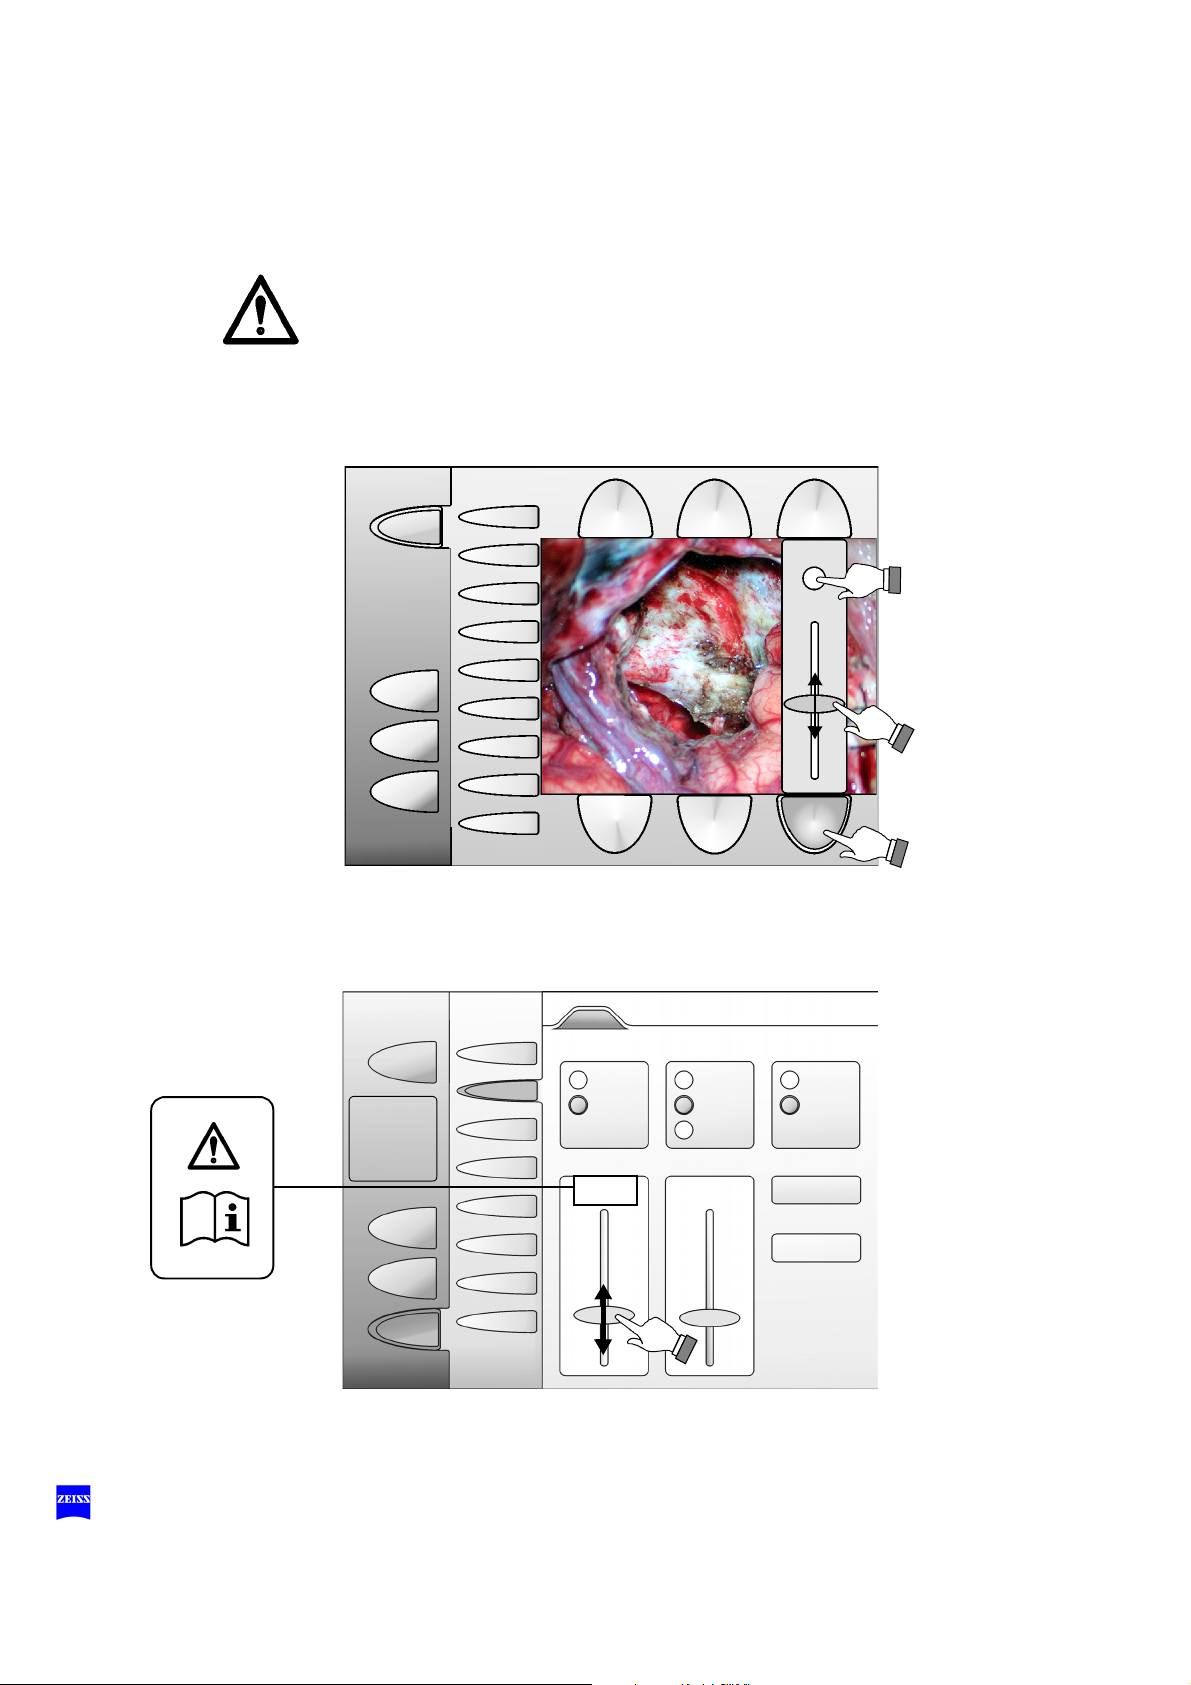
PHOTO
PAT-FILES
USER
CONFIG
VOICE CTRL
TELEPHONE
FREEZE
FULL SCREEN
FOCUS
359 mm
LIGHT
33%
ZOOM
5.9x
45
%
ZOOM
SPEED
LIGHT
INTENSITY
MENU
30. 01. 04
17:56
User:
XXXXXXXX
Patient:
XXXXXXX
Recorder Cap acity:
Int:.......% Ext:.... .....%
FOCUS
359 mm
DRAPE
AUTOBALANCE
REC START
DICTATION
Menu structure
The menu is structured as follows:
MENU
The main menu is constantly displayed after the system has been started.
You can use it for triggering still camera and video recording, for automatic balancing of the system, for activating the drape vacuum system
and for switching the illumination on and off. The full-screen mode permits
you to view images or the live video signal in full display size.
PAT-FILES
Use the Patient Files menu to save, edit and manage patient data, videos
and images.
USER
The USER menu permits you to save user-specific settings for several different users. In addition, you can select several different languages for
user guidance here.
CONFIG
The CONFIG menu permits you to enter the settings for the microscope
and suspension system parameters.
G-30-1702-en OPMI® Pentero® Software Release 2.2 Issue 2.0
Printed on 17. 03. 2008
12
Setting the illumination in the "Light" configuration menu
30. 01. 04
17:56
User:
XXXXXXXX
Patient:
XXXXXXX
Recorder Capacity:
Int:.......% Ext:.... .....%
G-30-1458
STAND
MENU
Intensity
Start Value
Light
On
Off
OPMI
LIGHT
Light Intensity
Control
On
Off
Low
Medium
AUDIO/VIDEO
High
Remaining
lamp lifetime
LIGHT
Brightness
Speed
30. 12. 04
17:56
User:
XXXXXXXX
Patient:
XXXXXXX
Recorder Cap acity:
Int:.......% Ext:........ .%
Threshold Value
Light Warning
SYSTEM INFO
CONFIG
USER
PAT-F ILES
25%
24%
Lamp 2
in use
200h
Yes
MULTIVISION
TELEPHONE
FLUORESCENCE
PHOTO
AUTOBALANCE
PAT-F ILES
USER
REC START
VOICE CRTL
DICTATION
TELEPHONE
FREEZE
FULL SCREEN
FOCUS
359 mm
LIGHT
ON
ZOOM
5.9x
LIGHT
ON/OFF
FOCUS
SPEED
ZOOM
SPEED
LIGHT
INTENSITY
DRAPE
CONFIG
MENU
33%
3
2
1
Illumination
Warning!
Before starting, make sure to read the notes on "Risk of phototoxic injuries
caused by high illumination intensity" in chapter "Safety"!
Setting the illumination on the touchscreen
G-30-1702-en OPMI® Pentero® Software Release 2.2 Issue 2.0
Printed on 17. 03. 2008
 Loading...