


Zeiss CONQUEST HD5 User Manual

This product may be covered by one or more of the following United States patents: US6542302, US6816310, US6906862
<![if ! IE]><![endif]>000000-2005-107 / 02.2013
User Handbook / Warranty Gebrauchshinweise / Garantie Mode d’emploi / Garantie Modo de empleo / Garantía
ZEISS. INNOVATIVE SINCE 1846.
|
(6) |
(5) |
|
(4) |
|
(3) |
|
(2) |
|
(1) |
(7) |
|
|
(4) |
(8) |
|
|
(3) |
|
( 9) |
(11) |
|
|
(10) |
(12) |
|
Fig. 1 |
Fig. 2 |
Fig. 3 |
User Instructions
Congratulations on the purchase of your new Carl Zeiss riflescope. For over 100 years, the name Carl Zeiss has been trusted in the world of sports optics by discerning customers like you, who demand more from their outdoor experience. Every component, from sophisticated optics to elegant, ergonomic bodies is a measured synthesis of intuitive design, legendary German engineering, and supreme craftsmanship. We hope that you will enjoy the use of your new Carl Zeiss product.
Safety Information
Environmental influences
Do not under any circumstances look through the riflescope at the sun or laser light sources! Serious eye injury may otherwise result.
Never leave the device in the sun for extended periods without the protective lens cap. The objective lens and eyepiece can damage the interior components.
Avoid touching the metal surface after exposure to extreme sunlight or cold.
Danger of swallowing
Do not leave removable exterior parts within reach of children (danger of swallowing).
Function
Before working on the mounted riflescope, always check to ensure that the firearm is not loaded.
Be sure to leave sufficient eye relief in the mounted position to prevent injuries from recoil.
Please make sure that the riflescope is functioning properly before use.
Look through the lens to ensure it provides a clear, undisturbed image.
Verify zero and correct adjustments by test shooting before going afield.
Table of contents |
|
Components |
1 |
Scope of delivery |
1 |
Riflescope adjustments |
1 |
Riflescope installation and use |
3 |
Care and maintenance |
4 |
RAPID-Z (USA) |
5 |
Technical data |
16 |
Warranty (USA) |
17 |
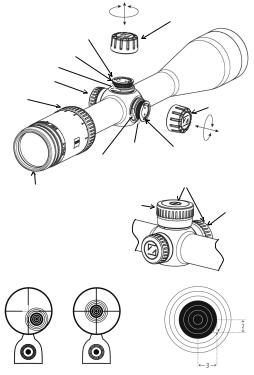
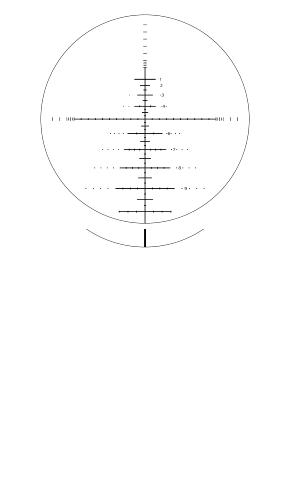
Components
(1)Magnification Ring
(2)Parallax Dial
(3)Index Mark
(4)Graduated Ring
(5)Elevation Dial
(6)Elevation Cap
(7)Windage Cap
(8)Windage Dial
(9)Eyepiece Focus Ring
(10)Lockable Elevation Target Turret
(11)Center Screw
(12)Lockable Windage Target Turret
Scope of delivery
Product |
|
Order number |
Included in Delivery |
|
|
|
|
|
|
CONQUEST HD5 |
2-10x42 |
522611 |
Riflescope |
|
|
|
|
Protective lens cap |
|
|
|
|
||
CONQUEST HD5 |
3-15x42 |
522621 |
Elevation caps |
|
|
|
|
Lens cleaning cloth |
|
|
|
|
||
CONQUEST HD5 |
5-25x50 |
522641 |
User handbook |
|
|
|
|
|
|
|
|
|
|
|
CONQUEST HD5 |
3-15x42 |
522627 |
Riflescope |
|
Protective lens cap |
||||
|
|
|
||
CONQUEST HD5 |
5-25x50 |
522647 |
Lens cleaning cloth |
|
User handbook |
||||
|
|
|
Riflescope adjustments Focusing
Start by looking at a distant object (approx. 75-100 yards) without using your riflescope. Then, hold your scope up and look through it at a plain background with quick glances while turning the eyepiece focus ring (9) clockwise or counter clockwise until the image of the reticle pattern appears clear and sharp.
Note: Focusing should be done at maximum power to ensure that the image will remain sharp within the entire power range.
Elevation and Windage Adjustment
CONQUEST HD5 riflescopes feature audible click elevation and windage adjustments. One click corresponds to ¼ MOA (Minute of Angle). In other terms, one click corresponds to ¼ inch at 100 yards, ½ inch at 200 yards, ¾ inch at 300 yards and so on. In metric adjustment, one MOA (four clicks) moves the point of impact by 29mm at 100 meters. In order to make adjustments, you must first unscrew the protective windage and elevation caps.
1
ELEVATION:
Unscrew protective cap for elevation (6).
If the rifle shoots low, turn elevation dial (5) counter clockwise to move the point of impact up (“U” direction).
If the rifle shoots high, turn elevation dial (5) clockwise to move the point of impact down. WINDAGE:
Unscrew protective cap for windage (7).
If the rifle shoots too far left, turn windage dial (8) counter clockwise to move the point of impact toward the right (“R” direction).
If the rifle shoots too far right, turn windage dial (8) clockwise to move the point of impact toward the left.
Magnification
Change the power by turning the magnification ring (1) on the eyepiece counter clockwise (to increase power) or clockwise (to decrease power). Align the index of the magnification ring with the desired magnification setting on the eyepiece.
Use your riflescope on a lower power setting (resulting in a wider field of view) to make a quick shot at close distance. Increase the magnification level for precision long-range shots.
Parallax Adjustment
Parallax is the apparent movement of the target relative to the reticle when you move your eye away from the center point of the eyepiece. It occurs, when the image of the target does not fall on the same optical plane as the reticle. This can cause a small shift in the point of aim. Parallax causes the greatest problem on small targets at high magnification.
The higher power CONQUEST HD5 3-15x42 and 5-25x50 feature side parallax adjustment dials. The adjustment moves a lens within the scope causing the target image and the reticle to fall on the same optical plane. By turning the parallax dial (2), you can adjust the distance between 50 yards (45.7 m) to infinity. For all distances in between, turn the parallax knob until both, the reticle and the image, are in focus.
CONQUEST HD5 2-10x42 is set parallax-free for 100 yards (91.4 m). For distances below 100 yards we recommend using a lower magnification. There will be no parallax-induced shifts in the point of impact at short or long ranges if you look exactly through the center of the riflescope.
Note: Parallax adjustment for CONQUEST HD5 2-10x42 with RAPID-Z® is factory set for 300 yards.
Reticle
Your riflescope is equipped with a reticle pattern of your choice. The reticles of all Conquest HD5 riflescopes are located in the second image plane. This means, that only the target image is
magnified and changes when the power is changed - the reticle does not change. Therefore, range estimations with second image plane reticles should always be done at consistent power. For Conquest HD5 riflescopes with RAPID-Z® ballistic reticle, please refer to page 5.
2
Riflescope installation and use Centering the Reticle
For the optimum adjustment range, the reticle was factory pre-set at the optical center of your riflescope. We recommend that you verify the center of the optical axis before mounting.
Mounting
CONQUEST HD5 riflescopes require 1-inch rings. Only use high quality rings and bases recommended for your rifle and follow ring manufacturer’s instructions for mounting. The riflescope should be mounted as low as possible, without touching anything except the mounting rings. Before tightening the rings, adjust for maximum eye-relief with full field of view to avoid injury from recoil. Also be certain your scope is mounted level on the 180° axis. For sighting-in, CONQUEST HD5 5-25x50 with RAPID-Z® 1000 may require a 20 MOA rail or mount.
Bore Sighting
Bore sighting saves time and ammunition and is recommended to achieve proper alignment of the riflescope with the rifle’s bore. You can either use a Bore Sighter for this process, or simply remove the bolt and sight through the barrel at a 25 yard target. With the bulls-eye centered in the bore (Fig. 1), make windage and elevation adjustments to move the crosshairs to the bulls-eye on the target (Fig. 2). Be careful not to move rifle during windage and elevation adjustments.
Zeroing
Final sighting-in of your rifle should be done using the exact ammunition you expect to hunt or shoot with.
a.Carefully fire a three-shot group
b.Use the center of that group as a reference point for adjustments to windage and elevation
c.Example (Fig. 3): the center of the group on the target is two inches low and three inches right. If you are sighting-in at 100 yards, you should make a 2-MOA adjustment up, and a 3-MOA adjustment left. 1 click corresponds to ¼ MOA (Minute of Angle).
d.Resetting the Zero mark with Standard Hunting Turret:
The zero mark of the windage and elevation dials are set to the index mark on the tube body. After sighting-in and moving the adjustments, pull up dial (5 or 8) out of the click-stop mechanism and set the zero mark of the graduated ring (4) to the index mark (3). Push the dial back into the click-stop mechanism. The index mark is used to reference or relocate the original zero-setting if the adjustment is made for other ranges while in the field, or for sighting-in with new loads.
e.Resetting the Zero mark with Lockable Target Turret:
Pull up dials (10 or 12) and follow zeroing instructions above. To zero elevation dial after sightingin, loosen screw (11) all the way. Pull up elevation dial (10) and turn the zero mark to the index mark on the tube body without turning the click-stop mechanism. Re-insert screw (11) and tighten it. To set the windage adjustment to the zero mark, loosen screw (11) all the way. Pull up windage dial (12) and turn the zero mark to the index mark on the tube body without turning the click-stop mechanism. Re-insert screw (11) and tighten it. The reticle is now in the zero position as determined during sight-in.
3
Care and maintenance
All CONQUEST HD5 riflescopes are equipped with the protective LotuTec® coating, which repels water so efficiently that raindrops roll right off the glass. To clean, blow off any dust or carefully wipe off larger dirt particle with a soft brush. Fingerprints, and other more stubborn stains should be removed with water or a premium optical lens cleaner, and a soft microfiber cloth. Avoid storing the scope in places with excessive heat. We recommend to store your riflescope in a dry place with good ventilation.
4
Carl zeiss
Sports Optics
User Manual
5
RAPID-Z® 600
RAPID-Z® 800
RAPID-Z® 1000
RAPID-Z® Varmint
Index |
|
|
1. |
Introduction |
8 |
2. |
Classification |
8 |
3. |
Parallax |
9 |
4. |
Zeroing with RAPID-Z® |
9 |
5. |
Holdover / Shot Placement |
10 |
6. |
Features |
12 |
7. |
RAPID-Z® 1000 Sight-In Instructions |
15 |
RAPID-Z® is a registered Trademark of Carl Zeiss Sports Optics.
1. Introduction
Congratulations on the purchase of your new ZEISS riflescope with RAPID-Z® ballistic reticle.
RAPID-Z® combined with the superior optics and performance that Carl Zeiss is known for will provide you with the best riflescope to take afield or to the range.
The key to this system is the Optimal Power Setting as determined by the ZEISS Ballistic Calculator. This will provide you with the ideal power setting in order to provide accurate shot placement while using the holdover bars.
Most other ballistic reticle systems rely on the scope being set to its maximum power setting and corresponding potential loss of accuracy or intuitive placement of the bars. The ZEISS Ballistic Calculator will provide you with the Optimal Power Setting to match the numbered bars of the RAPID-Z® reticle to the specific drop of the ammunition you are using.
Note: Optimum Power Setting will change with variables like elevation, bullet weight, velocity, BC, etc. You only need to set the magnification to the Optimum Power Setting when using the reticle holdover bars.
2. Classification
Each RAPID-Z® Reticle is designed to match a category or type of ammunition. The reticles are not limited to these calibers or uses, but the correct caliber class provides the best performance and reticle selection.
8
RETICLE |
CLASSIFICATION |
CALIBER CLASS (EXAMPLE) |
|
|
|
|
|
RAPID-Z® 600 |
Standard Hunting |
.243, .270, .30-06, 7MM-08, |
|
|
Calibers |
.308 etc. |
|
|
|
|
|
RAPID-Z® 800 |
Magnum Calibers |
7MM REM MAG, .300 WIN MAG, |
|
|
|
.300 |
Wby Mag, .338 RUM, |
|
|
7MM STW, 270 WSM etc. |
|
|
|
|
|
RAPID-Z® 1000 |
Long Range Tactical |
.308 |
Win., 168 & 175 gr. MATCH |
RAPID-Z® Varmint |
Varmint Calibers |
.204 |
Ruger, .220 Swift, |
|
|
.22-250, .223 etc. |
|
|
|
|
|
3. Parallax
All Zeiss RAPID-Z® riflescopes without an adjustable parallax knob are factory set to be parallax free at 300 yards. This is to help compensate for the effects of parallax at longer distances. For those scopes with adjustable parallax, please set your adjustable parallax knob setting as needed until both the reticle and the image are clear.
4. Zeroing with RAPID-Z®
Example
Scope: |
CONQUEST HD5 3-15x42 |
|
|
Reticle: |
RAPID-Z® 800 |
Caliber: |
Factory Loaded .300 Wby Mag |
|
|
Ammo: |
180 gr. Barnes TSX |
|
|
BC: |
.453 |
|
|
Velocity: |
3240 with 24 Inch Barrel |
|
|
Altitude: |
3,500 ft. |
|
|
Temp: |
59 F |
1.If you do not have internet access, please call ZEISS Customer Service to assist you in determining the OPTIMAL POWER SETTING for your scope (1-800-441-3005)
2.If you do have internet access log on to www.zeiss.com/sports, access the ZEISS Ballistic Calculator and follow the online step-by-step instructions to determine the OPTIMAL POWER SETTING for your scope.
9
Here you will:
Select your factory load or bullet (if handloading).
Change any atmospheric conditions that will affect ballistics, i.e. temperature or altitude.
Change any ballistics information related to handloads, i.e. muzzle velocity.
Determine the Optimal Power setting for your scope based on the parameters you have selected.
3.Zero your rifle at 200 yards using the center crosshair.* (For RAPID-Z® 1000 see page 15) If access to a 200 yard range is not available, then shoot at 100 yards and follow the ZEISS Ballistic Calculator’s or manufacturer’s recommended height of shot placement over the target bulls-eye for a 200 yard zero (example 1.5 inches high at 100 yards).
4.Once you have completed your sighting in process and are ready for shooting, remember, you may set your scope to any power setting you wish to shoot at targets from 0 to 300 yards. The point of impact shift between these distances is typically insignificant on big game. For example, if you are hunting in areas with dense cover or reduced visibility, you may not have a need for the holdover lines and simply use the center crosshair.
5.To fine tune your point of aim:
If shots are slightly high, turn the magnification ring up in very small (<1/4) power increments.
If shots are slightly low, turn the magnification ring down in very small (<1/4) power increments until correct zero is achieved.
Note: At extended ranges altitude and temperature affect Point of Impact (Example: 0 to 10,000 ft. = POI shift beyond 500 yards of 8“, or more.)
For a complete list of all factory calibers and handloading bullet types please visit the calculator on the Zeiss web site at www.zeiss.com/sports.
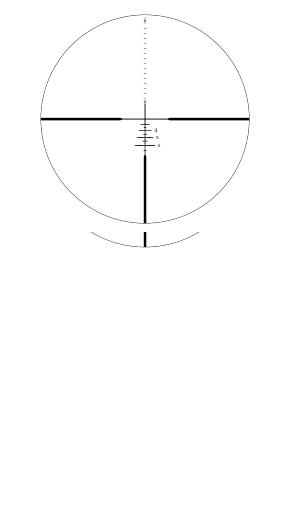
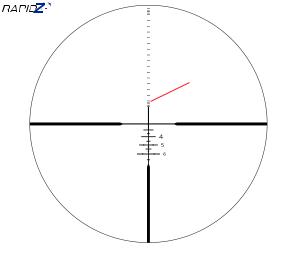
5. Holdover / Shot Placement
RAPID-Z® reticles can be used with numerous caliber and load combinations. Holdover values in the reticle correspond to those exact distances in yards. Once your rifle is zeroed at 200 yards on the center crosshair and with the magnification ring set to the recommended power setting (obtained on the the Zeiss website) the reticle will now be ready for long range shooting. Example: At 600 yards use the „6“ holdover line, at 450 yards use the „4.5“ holdover line (short line between „4“ and „5“). Reference Figures 1 & 2.
10

Figure 1: Correct Holdover – Shot Placement
Bar placement for shot with RAPID-Z® reticle
400 yard bar placement
Figure 2: Correct Holdover – Shot Placement
450 yard bar placement with RAPID-Z® reticle
11
6. Features Ranging:
Your RAPID-Z® reticle also comes with an integrated ranging system etched into the reticle. Note:
All ranging must be done with the riflescope set on the maximum magnification setting regardless of the scope model or reticle choice. The ranging hash marks represent 2 inches at 100 yards. At the top and bottom of the ranging scale, hashmarks are
divided into 1/2 inch increments. Therefore you can range any target of known size such as a whitetail deer’s brisket = 18” or an elk = 24”.
Simply divide the known size of the animal by the total number of inches covered, and multiply the sum by 100 for the range to target. (Page 14: The fast ranging portion or the RAPID-Z® Varmint reticle corresponds to 9” at 300 yards.) Please reference Figure 3, 4 and 5 for an example.
Figure 3
RAPID-Z® 600
 Line for
Range-finding
12
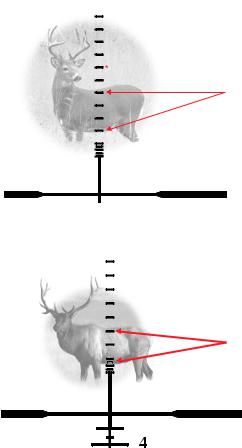
Figure 4: Range Finding Example With RAPID-Z® Reticle – Whitetail Deer
18“6“ X100 = 300 yards
 2”2“ apartt
Deer brisket is bracketed here.
2 18” on average.
2
2
Figure 5: Range Finding Example With RAPID-Z® Reticle – Bull Elk
24“5“ X100 = 480 yards
2 |
Elk brisket is |
|
bracketed here. |
||
|
||
2 |
24” on average. |
1


13
Fast Ranging:
Another ranging feature of the RAPID-Z® reticle is the fast ranging system. Please note that the vertical crosshair directly above center and between the first hash mark is exactly 18” at 300 yards or 6” at 100 yards (corresponding to the standard height of a whitetail deer brisket). This is most useful to the hunter and can be utilized to make a snap measurement in the field (with your scope set on maximum power) to determine if a whitetail is at a distance of 300 yards or closer. „See page 12“. Please reference Figure 6 & 6.1 for an example.
Note: Variations in the size of game animal species can affect ranging and therefore point of impact. It is recommended that electronic range finding devices are used whenever possible.
Figure 6: Fast Range Finding Example With RAPID-Z® Reticle
 18” @ 300 yards
 The deer’s brisket is
  bracketed here.
 300 yard bar
14
7. RAPID-Z® 1000 Sight-In Instructions
The Rapid-Z® 1000 reticle is unique in that it is the only Rapid-Z® reticle that is engineered around a specific caliber and bullet type. This reticle is designed to be used with the .308 Win load in either 168 or 175 gr. Match loads. Other calibers like the .325 WSM and .338 Federal also work but they are the exception to the rule.
This reticle is unique in another way in that is the center crosshair is “zero” for 500 yards. In order to zero the reticle correctly please observe the following instructions.
1.Obtain the Optimum Power Setting form the Zeiss Ballistic Calculator. When you are completed with the calculator also take note of the Zero at 100 Yards Data provided in inches. This number will allow you to actually zero the reticle at 100 yards for 500 yards.
2.Place the firearm in a steady gun vice or sandbag on the rifle range using safe practices.
3.With the scope on your Optimum Power Setting; place the 500 yard center crosshair in the middle of the bullseye. Note the 100 yard bar will be positioned about 12” above the center of the target bullseye. Make certain your target paper is large enough to accommodate this difference.
4.Fire a round with the center crosshair in the bullseye. You want the bullet to cut a hole in the paper target exactly where the 100 yard bar intersection is. Adjust the riflescope windage and elevation as required.
5.The distance between the bullet hole (100 yard bar) and the bullseye (500 yard crosshair) should be the value calculated on the Zeiss Ballistic Calculator for Zero at 100 Yards. This value is normally is between 11”- 13” depending upon your individual ballistic variables.
6.Remember 12” at 100 yards is equal to 60” at 500 yards. This is about how much a .308 Win Match load drops at that distance. The key is to get this calculated spacing correct between the 100 yard bar and the 500 yard bar so you can easily sight and shoot at longer range with the holdover bars while on the Optimum Power Setting. You can fine tune your magnification setting up or down to adjust from this zero point if required.
15
Windage:
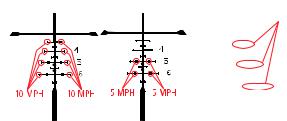
Windage lines on the RAPID-Z® reticles are set to 10 mph bullet drifts. What is unique about the Zeiss RAPID-Z®, is that there are also 5 mph hash marks on the solid 10 mph wind line.
Exception: The RAPID-Z® 1000 has 2.5 mph reference marks out to 20 mph winds for even more precise shooting. You can compensate for distance and windage at the same time by using the corresponding holdover line. Please reference Figure 7 for an example.
Figure 7: Windage Lines On RAPID-Z® Reticles
Each dot +2.5 MPH
Technical data |
|
|
|
|
|
|
|
|
|
|
2-10x42 |
3-15x42 |
5-25x50 |
||||||
Magnification |
2 |
|
10 |
3 |
|
15 |
5 |
|
25 |
Effective lens diameter (mm) |
21,2 |
|
42 |
30 |
|
42 |
42 |
|
50 |
Exit pupil diameter (mm) |
10,6 |
|
4,2 |
10,0 |
|
2,8 |
8,4 |
|
2,0 |
Twilight factor |
5,7 |
|
20,5 |
8,5 |
|
25,1 |
14,1 |
|
35,4 |
Field of view (ft/100yds) |
52 |
|
10 |
35,0 |
|
7 |
21 |
|
4,2 |
Objective viewing angle |
9,9 |
|
1,9 |
6,7 |
|
1,3 |
4,0 |
|
0,8 |
Dioptre adjustment range (dpt.) |
|
|
|
|
-3 / +2 |
|
|
|
|
Eye relief (mm) |
|
|
|
|
90 |
|
|
|
|
Parallax-free (yds) |
100 / 300 (RZ) |
|
50 - ∞ |
|
50 - ∞ |
||||
Square adjustment range (MoA) |
|
80x60 |
|
70x50 |
|
70x50 |
|||
Adjustment per click (MoA) |
|
|
|
|
1/4 |
|
|
|
|
Center tube diameter (mm) |
|
|
|
|
25,4 |
|
|
|
|
Eyepiece tube diameter (mm) |
|
|
|
|
44 |
|
|
|
|
Objective tube diameter (mm) |
|
50 |
|
50 |
|
60 |
|||
Coating |
|
|
|
LotuTec® |
|
|
|
||
Nitrogen filling |
|
|
|
|
Yes |
|
|
|
|
Waterproof (mbar) |
|
|
|
|
400 |
|
|
|
|
Functional temperature range (°F) |
|
|
|
-4 / +140 |
|
|
|
||
Length (in) |
|
13.19 |
|
13.80 |
|
14.00 |
|||
Weight (oz) |
|
17.50 |
|
18.40 |
|
26.60 |
|||
Order Numbers w/o Lockable Target Turret |
|
522611 |
|
522621 |
|
522641 |
|||
Order Numbers with Lockable Target Turret |
|
- |
|
522627 |
|
522647 |
|||
Subject to changes in design and scope of delivery as a result of ongoing technical development.
16
Carl zeiss
Sports Optics
Warranty (U.S. and Canada)
17
Warranty (U.S. and Canada)
Congratulations on the purchase of your new Carl Zeiss product. For over 100 years,
the name Carl Zeiss has been trusted in the world of sports optics by discerning customers like you, who demand more from their outdoor experience. Every component, from the sophisticated optics to the elegant, ergonomic bodies is a measured synthesis of intuitive design, legendary German engineering, and supreme craftsmanship. We hope that you will enjoy the use of your new Carl Zeiss product.
The Carl Zeiss Limited Lifetime Transferable Warranty (“Limited Warranty”)
Subject to limitations on electronic components, camera electronics and accessories described below, your Carl Zeiss sports optics product (“product”) is warranted against defects in workmanship or materials for the life of the product. If a defect that is covered by this Warranty is found, Carl Zeiss will, at its option and without charge, either repair your product or replace it with a Carl Zeiss product of comparable specifications and value. This Warranty is transferable.
Victory PhotoScope and Victory PRF products are not covered under a limited lifetime warranty, but are warranted against defects in workmanship or materials for a period of 2 years from the date of purchase.
Limited Warranty Conditions for Electronic Components, Camera Electronics and Accessories
Electronic components are warranted against defects in workmanship or materials for a period of 5 years from the original date of purchase. Camera electronics are warranted against defects in workmanship or materials for a period of 2 years from the original date of purchase. Carrying straps, lens caps, rubber armoring, plastic parts and similar accessories are warranted against defects in workmanship or materials for a period of 1 year from the date of purchase.
Warranty Disclaimers and Exclusions
This is the exclusive Warranty for the products.
All other warranties, expressed or implied, statutory or otherwise, including, without restriction, those of merchantability or of fitness for use, are excluded.
Only products imported by Carl Zeiss Sports Optics, LLC and purchased in the United States or Canada from authorized Carl Zeiss Sports Optics, LLC dealers carry this Limited Lifetime Transferable Warranty. Carl Zeiss Sports Optics, LLC will not provide warranty service for products purchased through unauthorized dealers.
18
This Warranty excludes claims for any special, punitive, incidental or consequential damages and does not cover damages due to the misuse, neglect, accidental damage, mishandling or alteration of the Product. Some states do not allow the exclusion or
limitation of incidental or consequential damages. In such cases, the above limitations or exclusions may not apply to you.
This Warranty is void, if damage is caused by the use of accessories not sold or authorized by Carl Zeiss Sports Optics, LLC, or from service by persons not authorized by Carl Zeiss Sports Optics, LLC.
This Warranty does not cover claims resulting from natural disasters (e. g. floods, storms, fire), acts of war or terrorism and will not apply to damage arising from combat conditions, including but not limited to, damage due to firearms, explosives, nuclear, chemical,
or biological weapons. It will be at Carl Zeiss’s sole discretion to extend service under this Warranty for damage arising from the above-mentioned conditions. Carl Zeiss’s obligation under this Warranty is limited to repair or replacement by equivalent product in working condition.
Resale of Product and Export Restrictions
Resale of this product to anyone outside the United States of America is subject to export compliance and is not authorized by Carl Zeiss Sports Optics, LLC.
Register Your Product Today
Registering your new Carl Zeiss product is quick and simple and creates a record that can be used if your product needs service or is lost or stolen. Registration for Carl Zeiss optics is voluntary; failure to register will not diminish your limited lifetime transferable warranty rights.
To register your product visit www.zeiss.com/register. If you can’t register your product online, your address has changed, or if you would like to transfer your warranty rights to somebody else, please contact Customer Service at 1-800-441-3005.
Obtain Service For Your Product in North America
To request repair or warranty service, please go to www.zeiss.com/sports/service, call 1-800-441-3005 or email sportsoptics@zeiss.com for service information and specific return instructions.
Please return your product prepaid and insured.
19
Service address for U.S. |
Service address for Canada |
Carl Zeiss Sports Optics |
Gentec International |
Attn. Service Department |
Attn. Service Department |
711 Moorefield Park Drive, Bldg. E |
90, Royal Crest Court |
N. Chesterfield, VA 23236 |
Markham, Ontario L3R 9X6 |
USA |
Canada |
You will be notified in advance of any repair charges for the service being performed that are not covered under warranty.
Any product exported or sold outside the United States and Canada must be returned to the original point of purchase, with a copy of the invoice or your product registration information.
DO NOT return exported items directly to Carl Zeiss Sports Optics, LLC from outside the United States. DO NOT return exported items directly to Gentec International from outside Canada. Carl Zeiss Sports Optics, LLC and Gentec International cannot accept products from, or ship products to, locations outside the United States and Canada.
Carl Zeiss Sports Optics
711 Moorefield Park Drive, Bldg. E
N. Chesterfield, VA 23236
USA
www.zeiss.com/sports
20

Gebrauchshinweise / Garantie
21
Gebrauchshinweise
Wir gratulieren Ihnen zu Ihrem neuen Zielfernrohr. Seit mehr als 100 Jahren verlassen sich die Kunden, die höchste Ansprüche an Ihre Ausrüstung stellen, auf optische Geräte mit dem Namen Carl Zeiss. Jedes einzelne Bauteil, von Linsen aus hochwertigem optischen Glas bis zu den eleganten, ergonomischen Rohrkörpern, stellt eine Symbiose aus intuitivem Design, deutscher Ingenieurskunst und höchster handwerklicher Fertigkeit dar. Wir hoffen, dass Ihr neues Produkt von Carl Zeiss Ihnen viel Freude bereiten wird.
Informationen für Ihre Sicherheit
Umwelteinflüsse
Schauen Sie niemals mit dem Zielfernrohr in die Sonne oder eine Laserlichtquelle, dies kann zu schweren Augenverletzungen führen.
Setzen Sie das Gerät nicht ohne Objektivdeckel längere Zeit der Sonne aus. Das durch Objektiv oder Okular eintretende Sonnenlicht kann innen liegende Bauteile zerstören.
Vermeiden Sie Berührungen der Metalloberfläche nach extremer Sonneneinstrahlung oder Kälte.
Verschluckungsgefahr
Lassen Sie die abnehmbaren Außenteile nicht in die Hände von Kindern geraten (Verschluckungsgefahr).
Funktion
Vor dem Arbeiten am montierten Zielfernrohr stets sicherstellen, dass die Schusswaffe entladen ist.
Zum Schutz vor Rückstoßverletzungen achten Sie im montierten Zustand auf ausreichend Augenabstand.
Vergewissern Sie sich vor der Benutzung, dass Ihr Zielfernrohr einwandfrei funktioniert.
Prüfen Sie durch Hindurchschauen, ob die Optik ein klares, ungestörtes Bild liefert.
Geben Sie zur Überprüfung des Treffpunkts vor der Jagd einen Kontrollschuss ab.
Inhaltsverzeichnis |
|
Bezeichnung der Bauteile |
23 |
Lieferumfang |
23 |
Einstellen des Zielfernrohres |
23 |
Montage und Benutzung des Zielfernrohres |
25 |
Pflege und Wartung |
26 |
RAPID-Z (USA) |
27 |
Technische Daten |
38 |
Garantie (USA) |
39 |
22
Bezeichnung der Bauteile
(1)Vergrößerungsring
(2)Parallaxeneinstellung
(3)Indexmarke
(4)Teilring
(5)Verstellknopf Absehenverstellung (Höhe)
(6)Schutzkappe Absehenverstellung (Höhe)
(7)Schutzkappe Absehenverstellung (Seite)
(8)Verstellknopf Absehenverstellung (Seite)
(9)Dioptrieneinstellring
(10)Verstellknopf ASV (Höhe)
(11)Schraube für ASV
(12)Verstellknopf ASV (Seite)
Lieferumfang
Produkt |
|
Bestellnummer |
Lieferumfang |
|
|
|
|
|
|
CONQUEST HD5 |
2-10x42 |
522611 |
Zielfernrohr |
|
|
|
|
Objektivschutzdeckel |
|
|
|
|
||
CONQUEST HD5 |
3-15x42 |
522621 |
Schutzkappen für Verstelltürme |
|
|
|
|
Optikreinigungstuch |
|
|
|
|
||
CONQUEST HD5 |
5-25x50 |
522641 |
Benutzerhandbuch |
|
|
|
|
|
|
|
|
|
|
|
CONQUEST HD5 |
3-15x42 |
522627 |
Zielfernrohr |
|
Objektivschutzdeckel |
||||
|
|
|
||
CONQUEST HD5 |
5-25x50 |
522647 |
Optikreinigungstuch |
|
Benutzerhandbuch |
||||
|
|
|
Einstellen des Zielfernrohres Scharfstellen des Absehens
Schauen Sie zuerst ohne Zuhilfenahme des Zielfernrohres auf ein ca. 100 m entferntes Objekt. Halten Sie danach ihr Zielfernrohr hoch und schauen Sie durch dieses mit wiederholten kurzen Blicken auf einen einfarbigen Hintergrund, während Sie den Okularring (9) im oder gegen den Uhrzeigersinn drehen, bis das Absehen klar und scharf eingestellt ist.
Hinweis: Das Scharfstellen sollte bei maximaler Vergrößerung erfolgen, damit das Bild im gesamten Vergrößerungsbereich scharf bleibt.
Höhenund Seitenverstellung
Bei den CONQUEST HD5-Zielfernrohren erzeugen die Knöpfe der Höhenund Seiteneinstellung hörbare Klickgeräusche. Ein Klick entspricht einer ¼ Winkelminute (Wm). Anders ausgedrückt entspricht ein Klick ¼ Zoll bei 100 Yard, ½ Zoll bei 200 Yard, ¾ Zoll bei 300 Yard und so weiter. Nach dem metrischen System verlagert eine Wm (vier Klicks) die Treffpunktlage um 29 mm bei 100 Meter. Um Einstellungen vorzunehmen, müssen Sie zuerst die Schutzkappen für die Höhenund Seitenverstellung abschrauben.
23
HÖHENVERSTELLUNG:
Schutzkappe für die Höhenverstellung (6) abschrauben.
Schießt die Waffe tief, drehen Sie zur Verlagerung der Treffpunktlage nach oben die Höhenverstellung (5) gegen den Uhrzeigersinn (Richtung „U“).
Schießt die Waffe hoch, drehen Sie zur Verlagerung der Treffpunktlage nach unten die Höhenverstellung (5) im Uhrzeigersinn.
SEITENVERSTELLUNG:
Schutzkappe für die Seitenverstellung (7) abschrauben.
Schießt die Waffe zu weit nach links, drehen Sie die Seitenverstellung (8) zur Verlagerung der Treffpunktlage nach rechts (Richtung „R“) gegen den Uhrzeigersinn.
Schießt die Waffe zu weit nach rechts, drehen Sie die Seitenverstellung (8) zur Verlagerung der Treffpunktlage nach links im Uhrzeigersinn.
Vergrößerung
Durch Drehen des Vergrößerungsrings (1) am Okular im Uhrzeigersinn können Sie die Vergrößerung erhöhen oder durch Drehen gegen den Uhrzeigersinn verringern. Die eingestellte Vergrößerung können Sie am Index des Vergrößerungsringes ablesen.
Stellen Sie für einen schnellen Schuss aus kurzer Entfernung eine geringe Vergrößerung an Ihrem Zielfernrohr ein, damit Ihnen ein größeres Sichtfeld zur Verfügung steht. Für Präzisionsschüsse aus großer Entfernung sollten Sie dagegen eine höhere Vergrößerung einstellen.
Parallaxeausgleich
Die Parallaxe ist die scheinbare Verschiebung des Ziels gegenüber dem Absehen. Sie tritt dann auf, wenn Sie Ihr Auge vom Mittelpunkt des Okulars wegbewegen. In diesem Fall liegen das Bild des Zieles und das Absehen nicht auf der selben optischen Ebene, was zu einer geringen Verschiebung des Zielpunkts führen kann. Die Parallaxe wirkt sich bei kleinen Zielen und hohen Vergrößerungsstufen am stärksten aus.
Die hochvergrößernden Modelle CONQUEST HD5 3-15x42 und 5-25x50 verfügen über einen seitlichen Knopf für die Parallaxeeinstellung. Dabei wird eine Linse innerhalb des Zielfernrohrs so verstellt, dass Zielobjekt und Absehen auf dieselbe optische Ebene fallen. Durch Drehen des Parallaxenknopfs (2) lassen sich Entfernungen zwischen 50 Yard (45,7 m) bis unendlich paralaxefrei einstellen. Drehen Sie für alle dazwischen liegenden Entfernungen den Parallaxenknopfs so lange, bis sowohl Absehen als auch Zielobjekt scharf abgebildet werden.
Das Modell CONQUEST HD5 2-10x42 ist auf 100 Yard (91,4 m) parallaxfrei eingestellt. Bei Entfernungen unter 100 Yard empfehlen wir eine geringere Vergrößerung. Wenn Sie exakt durch die Mitte des Zielfernrohres sehen, treten weder bei geringen noch bei großen Entfernungen Parallaxenverschiebungen der Treffpunktlage auf.
Hinweis: Die Modelle CONQUEST HD5 2-10x42 mit RAPID-Z® sind werkseitig auf 300 Yard paralaxefrei eingestellt.
24
Absehen
Ihr Zielfernrohr ist mit dem Absehen Ihrer Wahl ausgerüstet. Das Absehen liegt bei allen Conquest HD5-Zielfernrohren in der zweiten Bildebene. Demzufolge wird das Absehen beim Vergrößerungswechsel nicht mit vergrößert, sondern bleibt immer gleich. Daher sollten Entfernungsschätzungen bei Modellen mit den Absehen der zweiten Bildebene immer mit der
selben Vergrößerung erfolgen. Informationen zu Conquest HD5-Zielfernrohren mit ballistischen Absehen RAPID-Z® finden Sie auf Seite 27.
Montage und Benutzung des Zielfernrohres Zentrierung des Absehens
Um einen optimalen Einstellbereich zu erhalten, wurde das Absehen in der Werkseinstellung auf die Mittelachse Ihres Zielfernrohres eingestellt. Wir empfehlen Ihnen, vor der Montage die Mittelachse zu prüfen.
Montage
CONQUEST HD5-Zielfernrohre werden mit 1-Zoll-Ringen montiert. Verwenden Sie ausschließlich hochwertige und für Ihr Gewehr empfohlene Ringe und Montagefüße und halten Sie sich bei der Montage an die Anweisungen des Montageherstellers. Das Zielfernrohr sollte so niedrig wie möglich montiert werden, ohne dass es andere Teile des Gewehrs als die Montageringe berührt.
Um Verletzungen durch den Rückstoß zu vermeiden, stellen Sie vor dem Festziehen der Ringe den unter Berücksichtigung des gesamten Vergrößerungsbereichs möglichen maximalen Augenabstand ein. Stellen Sie ebenfalls sicher, dass Ihr Zielfernrohr korrekt horizontal bzw. vertikal ausgerichtet ist.
Grobeinstellung
Eine Grobeinstellung des Zielfernrohrs auf die Laufachse vor dem Einschießen spart Zeit und Munition. Verwenden Sie dazu entweder Kollimator bzw. Laserpatrone oder entfernen Sie einfach den Verschluss aus der Waffe und schauen Sie durch den Lauf auf ein 25 Meter entferntes Ziel. Wenn der Mittelpunkt des Zieles im Lauf zentriert ist (Abb. 1), nehmen Sie die entsprechenden Höhenund Seiteneinstellung des Absehens vor, um den Zielpunkt auf den Mittelpunkt des Zieles auszurichten (Abb. 2). Achten Sie darauf, dass das Gewehr dabei nicht bewegt wird.
Einschießen
Schießen Sie Ihre Waffe immer mit der Munition ein, mit der Sie auch später jagen oder schießen wollen.
a.Schießen Sie eine Gruppe von drei Schüssen.
b.Stellen Sie das Absehen auf den Mittelpunkt dieser Dreiergruppe ein.
c.Beispiel (Abb. 3): Der Mittelpunkt der Dreiergruppe liegt 2 Zoll unter dem Zielpunkt und 3 Zoll rechts davon. Beim Einschießen auf 100 Yard (91,4 m) müssen Sie nun das Absehen um 2 Wm nach oben und 3 Wm nach links verstellen. 1 Klick entspricht dabei ¼ Wm (Winkelminute).
d.Nullstellen der Abseheneinstellung bei Standard-Jagd-Verstelltürmen:
Die Nullmarkierungen der Höhenund Seitenverstellung werden auf den Indexpunkt des Gehäuses eingestellt. Ziehen Sie nach dem Einschießen und dem entsprechenden Einstellen den Verstellknopf (5 oder 8) aus der Klickrasterung und stellen Sie die Nullmarkierung des Teilringes
25
(4) auf die Indexmarke (3). Drücken Sie den Knopf zurück in die Rastung. Der Index dient dazu, bei späteren Verstellungen des Absehens (für andere Entfernungen oder Munitionsarten) die ursprüngliche Einstellung wiederherstellen zu können.
e.Nullstellung bei ASV-Verstelltürmen:
Ziehen Sie die Verstellknöpfe (10 oder 12) nach oben und folgen Sie der oben genannten Anleitung zum Nullstellen. Um nach dem Einschießen die Höhenverstellung auf Null zu stellen, drehen Sie die Schraube (11) ganz heraus. Ziehen Sie den Höhenverstellknopf (10) nach oben und stellen Sie die Nullmarkierung des Knopfs auf den Indexpunkt am Zielfernrohrgehäuse, ohne dabei die Rastung mitzudrehen. Setzen Sie die Schraube (11) wieder ein und ziehen
Sie sie fest. Um die Seitenverstellung auf Null zu stellen, drehen Sie die Schraube (11) ganz heraus. Ziehen Sie den Seitenverstellknopf (12) nach oben und stellen Sie die Nullmarkierung des Knopfs auf den Indexpunkt am Zielfernrohrgehäuse, ohne dabei die Rastung mitzudrehen. Setzen Sie die Schraube (11) wieder ein und ziehen Sie sie fest. Das Absehen befindet sich nun in der beim Einschießen ermittelten Nullstellung.
Pflege und Wartung
Alle CONQUEST HD5-Zielfernrohre sind mit der LotuTec®-Beschichtung versehen, die dafür sorgt, dass Regentropfen an der Linse einfach abperlen. Beim Reinigen sollten Schmutzpartikel weggeblasen oder mit einem weichen Pinsel entfernt werden. Fingerabdrücke und andere
hartnäckige Flecken sollten mit Wasser oder einem hochwertigen Reiniger für optische Linsen und einem weichen Mikrofasertuch entfernt werden. Bewahren Sie das Zielfernrohr nicht an Orten mit übermäßiger Hitzeentwicklung auf. Wir empfehlen eine Aufbewahrung an einem trockenen Ort mit guter Durchlüftung.
26
 Loading...