


CC600/CC6000
Customer Concierge
User Guide
for Android ™ 8.1.0 Oreo
MN-003313-01

Copyright
ZEBRA and the stylized Zebra head are trademarks of Zebra Technologies Corporation, registered in many jurisdictions worldwide. All other trademarks are the property of their respective owners. ©2019 Zebra Technologies Corporation and/or its affiliates. All rights reserved. Google™, Android, Google Play™ and other marks are trademarks of Google LLC; Oreo is a trademark of Mondelez International, Inc. group. All other trademarks are the property of their respective owners.
COPYRIGHTS & TRADEMARKS: For complete copyright and trademark information, go to www.zebra.com/copyright.
WARRANTY: For complete warranty information, go to www.zebra.com/warranty.
END USER LICENSE AGREEMENT: For complete EULA information, go to www.zebra.com/eula.
Terms of Use
•Proprietary Statement
This manual contains proprietary information of Zebra Technologies Corporation and its subsidiaries (“Zebra Technologies”). It is intended solely for the information and use of parties operating and maintaining the equipment described herein. Such proprietary information may not be used, reproduced, or disclosed to any other parties for any other purpose without the express, written permission of Zebra Technologies.
•Product Improvements
Continuous improvement of products is a policy of Zebra Technologies. All specifications and designs are subject to change without notice.
•Liability Disclaimer
Zebra Technologies takes steps to ensure that its published Engineering specifications and manuals are correct; however, errors do occur. Zebra Technologies reserves the right to correct any such errors and disclaims liability resulting therefrom.
•Limitation of Liability
In no event shall Zebra Technologies or anyone else involved in the creation, production, or delivery of the accompanying product (including hardware and software) be liable for any damages whatsoever (including, without limitation, consequential damages including loss of business profits, business interruption, or loss of business information) arising out of the use of, the results of use of, or inability to use such product, even if Zebra Technologies has been advised of the possibility of such damages. Some jurisdictions do not allow the exclusion or limitation of incidental or consequential damages, so the above limitation or exclusion may not apply to you.
Revision History
Changes to the original guide are listed below:
Change |
Date |
Description |
-01 Rev A |
6/2019 |
Initial Release |
|
|
|
2

Table of Contents
Copyright ......................................................................................................................... |
2 |
Terms of Use .................................................................................................................. |
2 |
Revision History .............................................................................................................. |
2 |
About This Guide.......................................................................................................... |
8 |
Introduction ..................................................................................................................... |
8 |
Configurations ................................................................................................................. |
8 |
Software Versions ........................................................................................................... |
9 |
Chapter Descriptions ...................................................................................................... |
9 |
Notational Conventions ................................................................................................. |
10 |
Related Documents ...................................................................................................... |
10 |
Service Information ....................................................................................................... |
10 |
Provide Documentation Feedback ................................................................................ |
11 |
Getting Started............................................................................................................ |
12 |
Introduction ................................................................................................................... |
12 |
Features ........................................................................................................................ |
12 |
Accessing Device Settings ............................................................................................ |
16 |
Setting the Date and Time ............................................................................................ |
17 |
Display Settings ............................................................................................................ |
17 |
Setting the Screen Brightness ............................................................................... |
17 |
Setting Night Light ................................................................................................. |
18 |
Setting Screen Timeout ......................................................................................... |
18 |
Ambient Display .................................................................................................... |
19 |
Setting Font Size ................................................................................................... |
19 |
Setting Touch Panel Mode .................................................................................... |
20 |
General Sound Settings ........................................................................................ |
20 |
Wake-Up Sources ................................................................................................. |
22 |
3

Table of Contents
Using the Device......................................................................................................... |
23 |
Introduction ................................................................................................................... |
23 |
Google Mobile Services ................................................................................................ |
23 |
Home Screen ................................................................................................................ |
23 |
Customizing the Home Screen .............................................................................. |
24 |
Status Bar .............................................................................................................. |
25 |
Managing Notifications .......................................................................................... |
27 |
Setting App Notifications ....................................................................................... |
28 |
Quick Access Panel .............................................................................................. |
29 |
Editing Icons on Quick Settings ............................................................................. |
31 |
App Shortcuts and Widgets ................................................................................... |
31 |
Folders .................................................................................................................. |
32 |
Home Screen Wallpaper ....................................................................................... |
33 |
Using the Touchscreen ................................................................................................. |
33 |
Keyboards ..................................................................................................................... |
34 |
Keyboard Configuration ......................................................................................... |
34 |
Using the Enterprise Keyboard ............................................................................. |
34 |
Using the Android and Gboard Keyboards ............................................................ |
36 |
Do Not Disturb Feature ......................................................................................... |
37 |
Limit Sounds ................................................................................................................. |
37 |
Silence Sounds During Certain Times .................................................................. |
38 |
Silence Sounds During Events and Meetings ....................................................... |
39 |
Turn Sounds Back On ........................................................................................... |
39 |
Override Do Not Disturb for Specific Apps ............................................................ |
39 |
Apps .............................................................................................................................. |
40 |
Accessing Apps ............................................................................................................ |
43 |
Switching Between Recent Apps .......................................................................... |
45 |
Un-Locking the Screen ................................................................................................. |
46 |
Interactive Sensor Technology .............................................................................. |
51 |
Transferring Files with a Host Computer via USB ........................................................ |
51 |
Transferring Files .................................................................................................. |
52 |
Transferring Photos ............................................................................................... |
52 |
Disconnect from the Host Computer ..................................................................... |
53 |
Applications ................................................................................................................ |
54 |
Introduction ................................................................................................................... |
54 |
Camera ......................................................................................................................... |
54 |
Taking Photos ....................................................................................................... |
54 |
Recording Videos .................................................................................................. |
55 |
Photo Settings ....................................................................................................... |
57 |
Adding a Contact ................................................................................................... |
60 |
4

Table of Contents
Editing Contacts .................................................................................................... |
60 |
Deleting Contacts .................................................................................................. |
60 |
DataWedge Demonstration .......................................................................................... |
62 |
Scanner Selection ................................................................................................. |
64 |
Diagnostic Tool ............................................................................................................ |
65 |
Settings ........................................................................................................................ |
68 |
System Test Information ....................................................................................... |
68 |
WLAN Test Information ......................................................................................... |
68 |
Bluetooth Test Information .................................................................................... |
68 |
Files ............................................................................................................................. |
69 |
Gallery .......................................................................................................................... |
71 |
Working with Albums ............................................................................................. |
73 |
Sharing an Album .................................................................................................. |
73 |
Working with Photos .............................................................................................. |
74 |
Working with Videos .............................................................................................. |
76 |
Photos .......................................................................................................................... |
78 |
Working with Albums ............................................................................................. |
80 |
Working with Photos .............................................................................................. |
81 |
Working with Videos .............................................................................................. |
83 |
PTT Express Voice Client ............................................................................................ |
84 |
PTT Express User Interface .................................................................................. |
84 |
PTT Audible Indicators .......................................................................................... |
85 |
PTT Notification Icons ........................................................................................... |
85 |
Enabling PTT Communication ............................................................................... |
85 |
Selecting a Talk Group .......................................................................................... |
86 |
PTT Communication .............................................................................................. |
86 |
Creating a Group Call ............................................................................................ |
86 |
RxLogger ..................................................................................................................... |
87 |
RxLogger Utility ............................................................................................................ |
88 |
SimulScan Demo ......................................................................................................... |
89 |
Printing the Sample Forms .......................................................................................... |
90 |
Using the Postal, Transportation and Logistics Example ...................................... |
91 |
Using the Manufacturing Example ........................................................................ |
93 |
Creating a Demo Customization ........................................................................... |
95 |
Default Templates ................................................................................................. |
96 |
Settings ................................................................................................................. |
96 |
Advanced Settings ................................................................................................ |
97 |
Sound Recorder ........................................................................................................... |
98 |
Wireless..................................................................................................................... |
100 |
Introduction ................................................................................................................. |
100 |
5

Table of Contents
Sharing the Mobile Data Connection .......................................................................... |
100 |
Configuring the Access Point Name .................................................................... |
102 |
Data Usage ......................................................................................................... |
103 |
Setting Data Usage Warning ............................................................................... |
104 |
Wireless Local Area Networks .................................................................................... |
105 |
Scanning and Connecting to a Wi-Fi Network ..................................................... |
105 |
Removing a Wi-Fi Network .................................................................................. |
107 |
Bluetooth ..................................................................................................................... |
107 |
Adaptive Frequency Hopping .............................................................................. |
107 |
Security ............................................................................................................... |
108 |
Bluetooth Profiles ................................................................................................ |
108 |
Bluetooth Power States ....................................................................................... |
109 |
Bluetooth Radio Power ........................................................................................ |
110 |
Discovering Bluetooth Device(s) ......................................................................... |
110 |
Changing the Bluetooth Name ............................................................................ |
110 |
Selecting Profiles on the Bluetooth Device ......................................................... |
111 |
Unpairing a Bluetooth Device .............................................................................. |
111 |
Near Field Communications (CC6000 Only) ............................................................... |
111 |
Reading NFC Cards ............................................................................................ |
112 |
Sharing Information Using NFC .......................................................................... |
113 |
Cast ..................................................................................................................... |
114 |
Accessories............................................................................................................... |
115 |
Introduction ................................................................................................................. |
115 |
Accessories ................................................................................................................. |
115 |
3.5 mm Audio Adapter (CC6000 Only) ....................................................................... |
116 |
Connecting a Headset to the 3.5 mm Audio Adapter (CC6000 Only) ................. |
116 |
USB I/O Hub ............................................................................................................... |
117 |
Connect USB Cables .......................................................................................... |
118 |
External USB Cable ............................................................................................ |
120 |
Audio Headset Connection .................................................................................. |
120 |
Maintenance and Troubleshooting ......................................................................... |
121 |
Introduction ................................................................................................................. |
121 |
Maintaining the Device ................................................................................................ |
121 |
Cleaning Instructions .................................................................................................. |
121 |
Approved Cleanser Active Ingredients ................................................................ |
121 |
Harmful Ingredients ............................................................................................. |
122 |
Device Cleaning Instructions ...................................................................................... |
122 |
Special Cleaning Notes ....................................................................................... |
122 |
6

Table of Contents
Cleaning Materials Required ............................................................................... |
122 |
Cleaning Frequency ............................................................................................ |
122 |
Cleaning the Device ............................................................................................ |
123 |
Housing ............................................................................................................... |
123 |
Display ................................................................................................................. |
123 |
Camera and Exit Window .................................................................................... |
123 |
Troubleshooting ......................................................................................................... |
124 |
Technical Specifications.......................................................................................... |
126 |
Introduction ................................................................................................................. |
126 |
Technical Specifications ............................................................................................. |
126 |
CC6000 ............................................................................................................... |
126 |
CC600 ................................................................................................................. |
128 |
Decode Distances ...................................................................................................... |
130 |
CC6000 - SE4710 Scan Engine .......................................................................... |
130 |
CC600 - SE2100 Scan Engine ............................................................................ |
131 |
Index |
|
7

About This Guide
Introduction
This guide provides information about using the CC600 and CC6000 Customer Concierge interactive kiosk and accessories.
NOTE: Screens and windows pictured in this guide are samples and can differ from actual screens.
Configurations
This guide covers the configurations listed in Table 1 and Table 2.
Table 1 CC600 Device Configurations
Configuration |
Description |
Front |
Scan |
|
Camera |
Engine |
|||
|
|
|||
CC600-5-3200LNWW |
5 inch, OS: Android ™ 8.1.0 Oreo, 32GB, |
No |
SE2100 |
|
|
Ethernet/Wi-Fi, Imager, Worldwide |
|
|
|
|
Configuration |
|
|
|
|
|
|
|
|
CC600-5-3200LNNA |
5 inch, OS: Android ™ 8.1.0 Oreo, 32GB, |
No |
SE2100 |
|
|
Ethernet/Wi-Fi, Imager, North America |
|
|
|
|
Configuration |
|
|
|
|
|
|
|
|
CC600-5-3200LNIN |
5 inch, OS: Android ™ 8.1.0 Oreo, 32GB, |
No |
SE2100 |
|
|
Ethernet/Wi-Fi, Imager, India Configuration |
|
|
|
|
|
|
|
Table 2 CC6000 Device Configurations
Configuration |
Description |
Front |
Scan |
|
Camera |
Engine |
|||
|
|
|||
CC6000-10-3200LCWW |
10 inch, OS: Android ™ 8.1.0 Oreo, 32GB, |
No |
SE4710 |
|
|
Landscape, Imager, Worldwide Configuration |
|
|
|
|
|
|
|
|
CC6000-10-3200PCWW |
10 inch, OS: Android ™ 8.1.0 Oreo, 32GB, |
Yes |
SE4710 |
|
|
Portrait, Imager, Worldwide Configuration |
|
|
|
|
|
|
|
8

About This Guide
Table 2 CC6000 Device Configurations (Continued)
Configuration |
Description |
Front |
Scan |
|
Camera |
Engine |
|||
|
|
|||
CC6000-10-3200LCNA |
10 inch, OS: Android ™ 8.1.0 Oreo, 32GB, |
Yes |
SE4710 |
|
|
Portrait, Imager, North America Configuration |
|
|
|
|
|
|
|
|
CC6000-10-3200PCNA |
10 inch, OS: Android ™ 8.1.0 Oreo, 32GB, |
Yes |
SE4710 |
|
|
Portrait, Imager, North America Configuration |
|
|
|
|
|
|
|
|
CC6000-10-3200LNNA |
10 inch, OS: Android ™ 8.1.0 Oreo, 32GB, |
No |
SE4710 |
|
|
Landscape, Imager, North America |
|
|
|
|
Configuration |
|
|
|
|
|
|
|
Software Versions
To determine the current software versions:
1.Swipe down from the top to open Quick Settings.
2.Touch  > System.
3.Touch About phone.
4.The following information displays:
•Status
•SWComponents
•Legal Informaiton
•Model
•Android version
•Android security patch level
•Kernel version
•Build Fingerprint
•Build number
To determine the device serial number, touch About phone > Status. Serial number displays.
Chapter Descriptions
Topics covered in this guide are as follows:
•Getting Started provides information on getting the device up and running for the first time.
•Using the Device provides information for operating the device.
•Applications provides information on using applications installed on the device.
•Wireless provides information on the various wireless options.
•Accessories provides information for using the accessories for the device.
•Maintenance and Troubleshooting includes instructions on cleaning and provides troubleshooting solutions for potential problems during device operation.
•Technical Specifications provides the technical specifications for the device.
9

About This Guide
Notational Conventions
The following conventions are used in this document:
•“Device” refers to all configurations of the CC600 Customer Concierge and CC6000 Customer Concierge.
•Bold text is used to highlight the following:
•Dialog box, window and screen names
•Drop-down list and list box names
•Check box and radio button names
•Icons on a screen
•Key names on a keypad
•Button names on a screen.
•Bullets (•) indicate:
•Action items
•Lists of alternatives
•Lists of required steps that are not necessarily sequential.
•Sequential lists (e.g., those that describe step-by-step procedures) appear as numbered lists.
Related Documents
•CC600/CC6000Customer Concierge Quick Start Guide for Android Version 8.1, p/n MN-003314-xx.
•CC600/CC6000 Customer Concierge Integrator Guide for Android Version 8.1, p/n MN-003411-xx.
For the latest version of this guide and all guides, go to: www.zebra.com/support.
Service Information
If you have a problem with your equipment, contact Customer Support for your region. Contact information is available at: zebra.com/support.
When contacting support, please have the following information available:
•Serial number of the unit (found on manufacturing label)
•Model number or product name (found on manufacturing label)
•Software type and version number
•IMEI number.
Customer Support responds to calls by email or telephone within the time limits set forth in support agreements.
If the problem cannot be solved by Customer Support, the user may need to return the equipment for servicing and will be given specific directions. We are not responsible for any damages incurred during shipment if the approved shipping container is not used. Shipping the units improperly can possibly void the warranty.
Remove the SIM card and/or microSD card from the device before shipping for service.
If the device was purchased from a business partner, contact that business partner for support.
10
About This Guide
Provide Documentation Feedback
If you have comments, questions, or suggestions about this guide, send an email to EVM-Techdocs@zebra.com.
11
Getting Started
Introduction
This chapter provides information to get the device up and running for the first time.
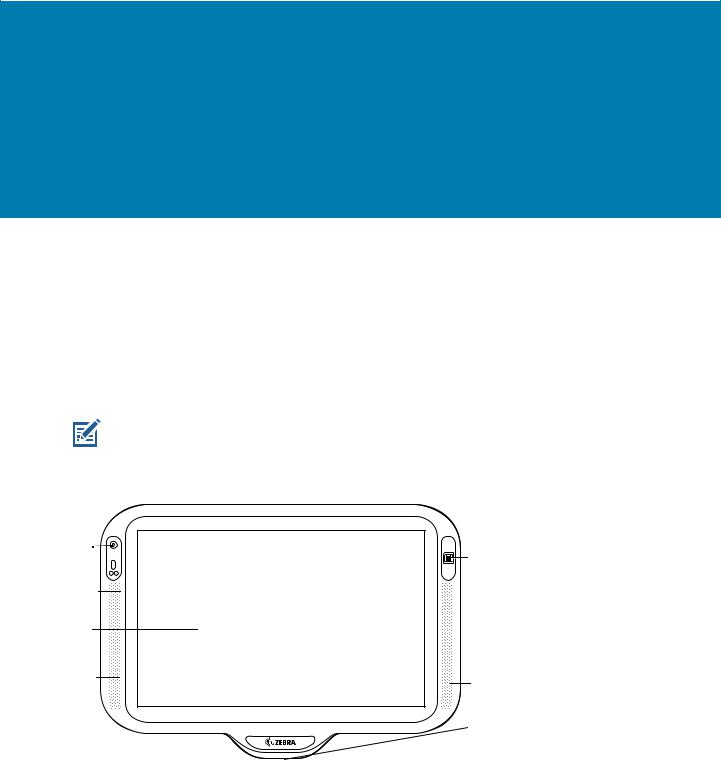
Features
NOTE: Although the orientations differ, the features on the CC6000 landscape and portrait devices are the same.
Figure 1 CC6000 Front View
Front |
|
Facing |
NFC |
Camera |
Antenna |
|
|
Microphone |
|
Touch
Screen and
Display
Speaker |
Speaker |
|
 Exit Window (Scanner)
12
Getting Started
Figure 2 CC6000 Back View
|
Reset Button |
Audio |
Mounting |
Adjustment/ |
|
Programmable |
Bracket |
Buttons |
Screw |
MicroSD |
Holders |
|
|
Card Slot |
|
Figure 3 CC6000 Power and Cable Ports
|
|
|
|
|
|
|
|
|
|
|
|
|
|
|
|
|
|
|
|
|
|
|
|
|
|
|
|
|
|
|
|
|
|
|
|
|
|
|
|
|
|
|
|
|
|
|
|
|
|
|
|
|
|
|
|
|
|
|
|
|
|
|
|
|
|
|
|
|
|
|
|
|
|
|
|
|
|
|
|
|
|
|
|
|
|
|
|
|
|
|
|
|
|
|
|
|
|
|
|
|
|
|
|
|
|
|
|
|
|
|
|
|
|
|
|
|
|
|
Power |
|
|
|
USB C Port |
|
|
USB A |
|
|
Ethernet with POE |
||||||
Audio |
|
|
USB A |
|
|
|||||||||||
Port |
Port |
|
(Used for |
|
|
Port |
Port |
|
|
|
||||||
|
|
|
|
|
|
|
|
|
|
|
|
|||||
|
|
|
|
External |
|
|
|
|
|
|
|
|
||||
|
|
|
|
display or |
|
|
|
|
|
|
|
|
||||
|
|
|
|
OTG) |
|
|
|
|
|
|
|
|
||||
13

Getting Started
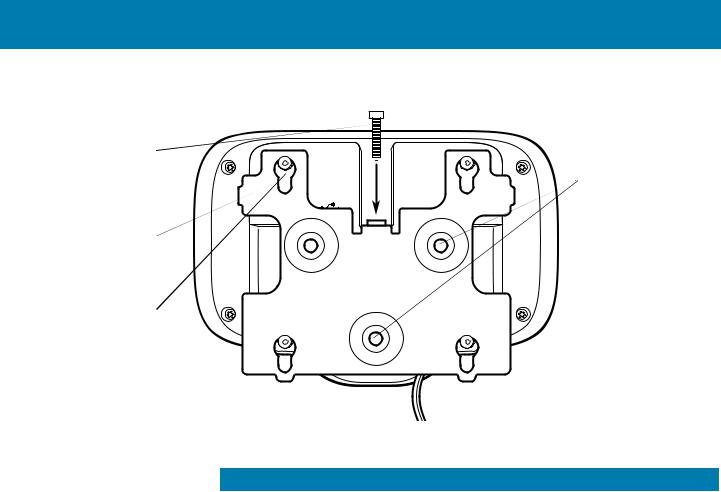
Figure 4 CC6000 Back With Bracket View
Mounting |
|
Bracket |
|
Locking |
WallMount |
Screw |
|
|
Screw |
|
Holes |
Mounting |
|
Bracket |
|
Mounting |
|
Bracket Screw |
|
Holders |
|
Figure 5 CC600 Front Views
Microphone
Proximity Sensor

 Speaker
Touch
 Screenand
Display
Exit Window
(Scanner)
14
Getting Started
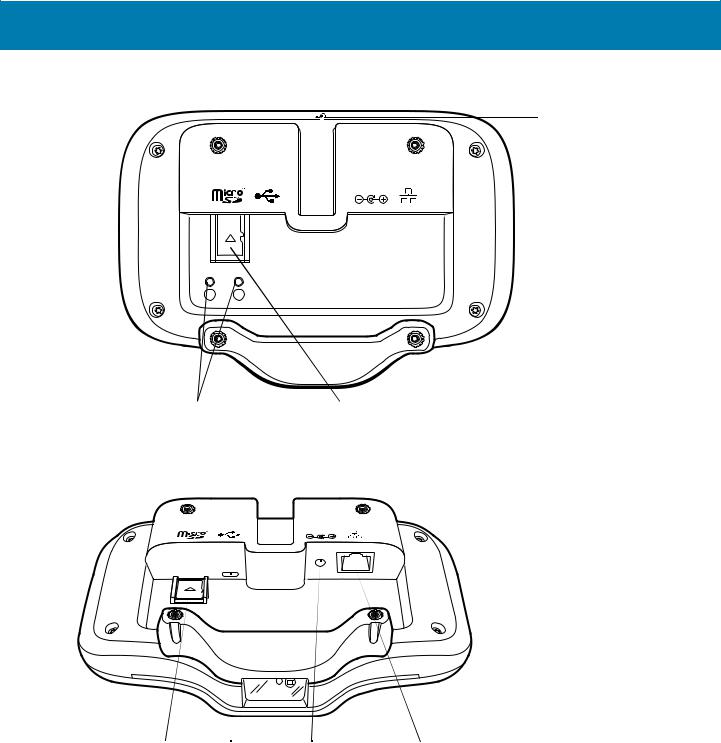
Figure 6 CC600 Back View
Mounting
Bracket
Screw
Holders
(4)
 x
x
Reset Button
Audio |
Micro SD |
Adjustment/Programmable |
Card Slot |
Buttons |
|
Figure 7 CC600 Power and Cable Ports
MicroSD |
USB C Port |
|
Power |
Ethernet with POE |
Card Slot |
(Used for |
|
Port |
|
|
External |
|
|
|
|
display or |
|
|
|
|
OTGandother |
|
|
|
|
USB-2 |
|
|
|
|
peripherals) |
|
|
|
15
Getting Started
Figure 8 CC600 Back With Bracket View
Mounting |
|
|
Bracket |
|
|
Locking |
WallMount |
|
Screw |
||
Screw |
||
|
||
|
Holes |
|
Mounting |
|
|
Bracket |
|
|
Mounting |
|
|
Bracket Screw |
|
|
Holders |
|
Table 3 Feature Descriptions
Item |
Function |
Touch Screen and |
Displays all information needed to operate the device. |
Display |
|
|
|
Exit Window |
Provides data capture using the imager and reads a barcode. |
(Scanner) |
Note: To read a barcode, a scan-enabled app is required on the device. |
|
|
Speaker |
Provides audio output for video and music playback. Provides audio in |
|
speaker-phone mode. |
|
|
NFC Antenna |
Reads NFC tags. (CC6000 Only) |
|
|
Proximity Sensor |
Identifies the proximity of a user for turning up the display. |
|
|
Microphone |
Use for communications in Speakerphone mode. |
|
|
Front Facing Camera |
Captures still photos and videos. |
|
Note: Select CC6000 devices only. |
|
|
Interface Connectors |
See Figure 3 and Figure 7. |
|
|
Volume Up/Down |
Increase and decrease audio volume (programmable). |
Button |
|
|
|
External Display |
Designated for USB-C port utilization. |
|
|
Accessing Device Settings
To access device settings:
1. Swipe up from the bottom of the screen to display the App screen.
16

Getting Started
2. From the App screen swipe up from the bottom of the screen and touch  . or
. or
1. Swipe down from the top of the screen and touch  .
.
Setting the Date and Time
The user is only required to set the time zone or set the date and time if the wireless LAN does not support Network Time Protocol (NTP).
To set the date and time:
1.Swipe down from the top to open Quick Settings and then touch  .
.
2.Touch System > Date & time.
3.Touch Automatic date & time to disable automatic date and time synchronization.
4.Touch Set date.
5.In the calendar, set today’s date.
6.Touch OK.
7.Touch Set time.
8.Touch the hour.
9.Touch the green circle, drag to the current hour and then release.
10.Touch the minutes.
11.Touch the green circle, drag to the current minute and then release. 12.Touch AM or PM.
13.Touch OK.
14.Touch Select time zone.
15.Select the current time zone from the list. 16.Touch  to return to the Home screen.
Display Settings
Use Display settings to change the screen brightness, enable night light, change the background image, set sleep time and change font size.
Setting the Screen Brightness
To manually set the screen brightness:
1. Swipe down with two fingers from the top to open the Quick Access panel.
17

Getting Started
2. Slide the icon to adjust the screen brightness level.
Figure 9 Brightness Slider
Setting Night Light
The Night Light setting tints the screen amber, making the screen easier to look at in low light. To enable night light:
1.Swipe down from the top of the screen to open Quick Settings and then touch  .
.
2.Touch Display.
3.Touch Night Light.
4.Touch Schedule.
5.Select one of the schedule values:
•None (default)
•Turns on at custom time
•Turns on from sunset to sunrise.
6.Touch Status.
By default, Night Light is disabled. Toggle the switch to enable.
7.Adjust the tint using the Intensity slider.
8.Touch  to return to the Home screen.
Setting Screen Timeout
To set the screen sleep time:
1.Swipe down from the top to open the Quick Settings panel and then touch  .
.
2.Touch Display > Advanced > Sleep.
3.Select one of the sleep values.
•15 seconds
•30 seconds
•1 minute
•2 minutes
•5 minutes
•10 minutes
•30 minutes
4.Touch  to return to the Home screen.
18
Getting Started
Ambient Display
The Ambient display setting wakes the screen when you receive notifications.
To disable ambient display:
1.Swipe down from the top to open the Quick Settings panel and then touch  .
.
2.Touch Display > Advanced.
3.Touch Ambient display.
4.In the When to show section, touch New notifications to enable or disable.
5.Touch  to return to the Home screen.
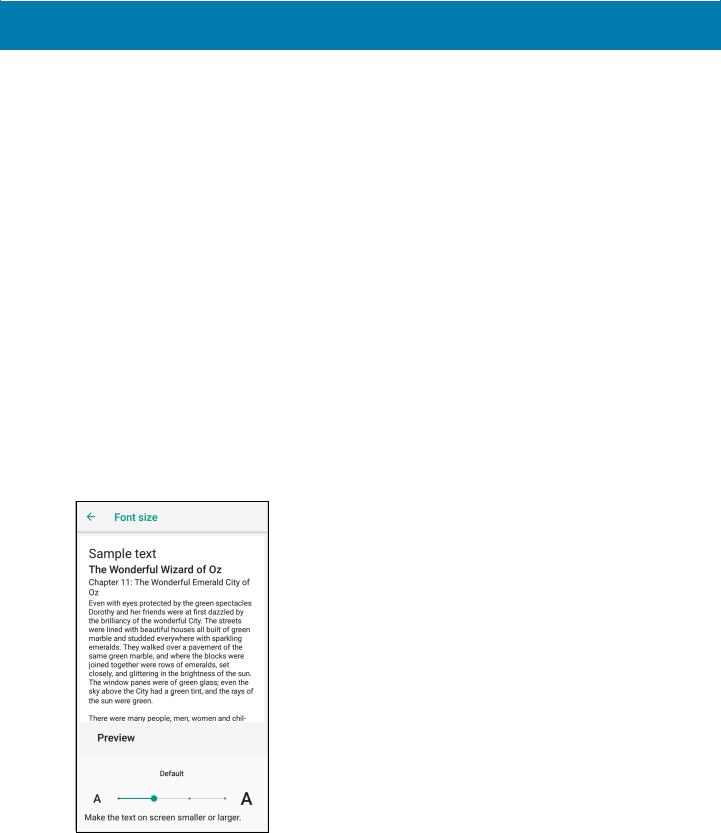
Setting Font Size
To set the size of the font in system apps:
1.Swipe down from the top to open the Quick Settings panel and then touch  .
.
2.Touch Display > Advanced.
3.Touch Font size.
Figure 10 Font Settings
4.Touch the green dot and slide left or right to select a font size.
5.Touch  to return to the Home screen.
19
Getting Started
Setting Touch Panel Mode
The device display is able to detect touches using a finger, or a gloved finger.
NOTE: A glove can be made of medical latex, leather, cotton, or wool. For optimal performance use a Zebra certified stylus.
To configure the touch panel mode:
1.Swipe down from the top to open the Quick Settings panel and then touch  .
.
2.Touch Display.
3.Touch Advanced.
4.Touch Touch panel mode.
5.Select an option to choose the method by which the screen reacts to touch:
•Glove and Finger (Screen Protector off) to use a finger or a gloved finger on the screen without a screen protector.
•Glove and Finger (Screen Protector on) to use a finger or a gloved finger on the screen with a screen protector.
6.Touch  to return to the Home screen.
General Sound Settings
Use the Sound settings to configure media and alarm volumes.
To access sound settings:
1.Swipe down from the top to open the Quick Settings panel and then touch  .
.
2.Touch Sound.
3.Touch an option to set sounds.
Figure 11 Sound Screen - Zebra Volume Controls and Advanced Settings
Advanced
Settings
20
Getting Started
Zebra Volume Controls
•Ring volume - Controls the ringtone volume.
•Media volume - Controls the music, games, and media volume.
•Alarm volume - Controls the alarm clock volume.
•Notifications volume - Controls the notification volume.
•Scanner volume - Controls the scanner volume.
•Volume presets
• - Mutes the ring, notifications, and scanner so that the device does not make sounds.
• - All sounds except media and alarms are silenced.
• - Enables all sounds at the user defined levels.
Do Not Disturb Preferences
•Touch Priority only allows to set the priorities for the following:
•Reminders - Switch on or off.
•Events - Switch on or off.
•Alarms - This is always enabled.
•Messages - Choose to allow messages from anyone, contacts only, starred contacts only, or none. To star contacts, use the Contacts app.
•Repeat callers - Switch on or off.
•Touch Block visual disturbances:
•Block when screen is on - Switch on or off. This option prevents notifications from displaying over the screen (peeking) while you are actively using the device.
•Block when screen is off - Switch on or off. This option prevents notifications from turning on the screen or pulsing the LED light when a new notification is received while you are not using the device.
•Touch Automatic rules - Switch on or off. This option allows you to choose when to automatically silence the device. Touch a default rule, such as Weekend or Weeknight, or create your own rule. To create your own rule tap Add more and then Time rule.
21

Getting Started
Advanced Sound Settings
•Touch Default notification sound to select a sound to play for all system notifications. Touch a sound in the list, then touch OK.
Figure 12 Default Notification Sounds
•Touch Default alarm sound to select a sound to play for alarms. Touch a sound in the list, then touch OK.
Figure 13 Default Alarm Sounds
•Other sounds
•Screen locking sounds - Switch on or off. - Play a sound when locking and unlocking the screen.
•Touch sounds - Switch on or off. Play a sound when making screen selections (enabled by default).
Wake-Up Sources
By default the device wakes from suspend mode when the user touches the display or scans an item.
22

Using the Device
Introduction
This chapter explains the buttons, status icons, and controls on the device, and provides basic instructions for using the device including resetting the device and entering data.
Google Mobile Services
NOTE: This section applies to Google Mobile Services (GMS) devices only.
Devices with GMS contain apps and services that provide additional functionality.
GMS includes:
•Apps - GMS adds a variety of Google apps and associated widgets including Chrome, Gmail, Drive, and Maps.
•Services:
•Speech to Text - Allows for free format speech to text in many languages for both connected and disconnected network. Launch by touching the microphone icon on the keyboard.
•TalkBack Service - Provides spoken feedback on various parts of the user interface. To enable, go to Settings > Accessibility.
•Network Location Provider - Adds a location provider which uses mobile network tower information and Wi-Fi access point information to provide a location. To enable, go to Settings
> Location access.
•Widevine DRM - Enables Digital Rights Management (DRM) so that protected streaming video content can be played. Enable DRM Info from the Google Play ™ store.
•Google Cloud Messaging - Allows the device to receive data from the server and other devices on the same connection.
•Backup and Restore - Allows the users settings and apps to be backed up to a Google server and subsequently restored from that server after a factory reset.
•Google Accounts - Create and use a Google account to synchronize mail, files, music, photos, contacts and calendar events.
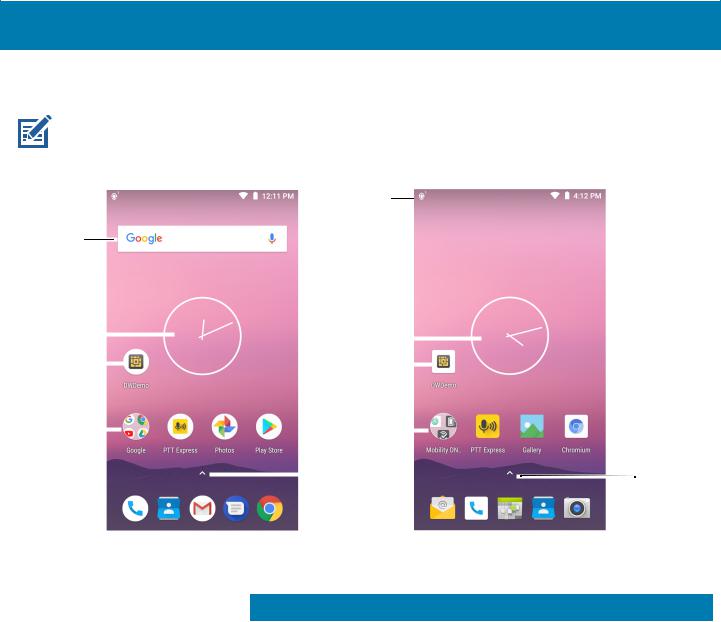
Home Screen
When the device powers on, the Home screen displays. Depending on the configuration, the Home screen may appear different. Contact your system administrator for more information.
23
Using the Device
After a suspend, screen time-out, or restart, the Home screen displays with the lock slider. Touch the screen and slide up to unlock. For screen locking information see Un-Locking the Screen on page 46.
NOTE: By default, non-GMS devices do not have icons on the Home screen. Icons are shown below for example only. Home screen icons can be configured by the user and may look different than shown.
Figure 14 Home Screen
1 |
|
1 |
|
2
2 |
|
|
|
|
|
|
|
2 |
|
|
|
|
|
|
|
|
|
|
|
|
|
|
|
|
|
|
|||
|
|
|
|
|
|
|
|
|
|
|
||||
3 |
|
|
|
|
|
|
|
3 |
|
|
|
|
|
|
|
|
|
|
|
|
|
|
|
|
|
||||
4 |
|
|
|
|
|
|
|
4 |
|
|
|
|
|
|
|
|
|
|
|
|
|
|
|
|
|
||||
|
|
|
|
|
|
|
|
|
5 |
|
|
|
|
5 |
|
|
|
|
|
|
GMS |
|
Non-GMS |
||||||
|
|
|
|
|
|
|
|
|
|
|
|
|||
Table 4 Home Screen Features |
|
|||||||||||||
|
|
|
|
|
|
|
|
|
|
|
|
|
|
|
|
|
|
|
|
Item |
|
|
|
|
Description |
|
|||
1 |
Status Bar |
Displays the time, status icons (right side), and notification icons (left side). |
||||||||||||
|
|
|
|
|
|
|
|
For more information see Status Icons on page 26 and Managing |
||||||
|
|
|
|
|
|
|
|
Notifications on page 27. |
|
|||||
|
|
|
|
|
|
|
|
|
|
|
|
|
|
|
2 |
Widgets |
Launches stand-alone apps that run on the Home screen. |
|
|||||||||||
|
|
|
|
|
|
|
|
|
|
|
|
|
|
|
3 |
Shortcut Icons |
Opens apps installed on the device. |
|
|||||||||||
|
|
|
|
|
|
|
|
|
|
|
|
|
|
|
4 |
Folder |
Contains apps. |
|
|||||||||||
|
|
|
|
|
|
|
|
|
|
|
|
|
|
|
5 |
All Apps |
Opens the APPS window. |
|
|||||||||||
|
|
|
|
|
|
|
|
|
|
|
|
|
|
|
The Home screen provides four additional screens to place widgets and shortcuts. Swipe the screen left or right to view the additional screens.
Customizing the Home Screen
To customize the Home screen:
1. Touch and hold anywhere on the Home screen until the options appear.
24

Using the Device
2.Touch HOME SETTINGS.
3.Touch the Allow Home screen rotation switch.
4.Touch  .
.
5.Rotate the device.
Figure 15 Rotated Home Screen
Status Bar
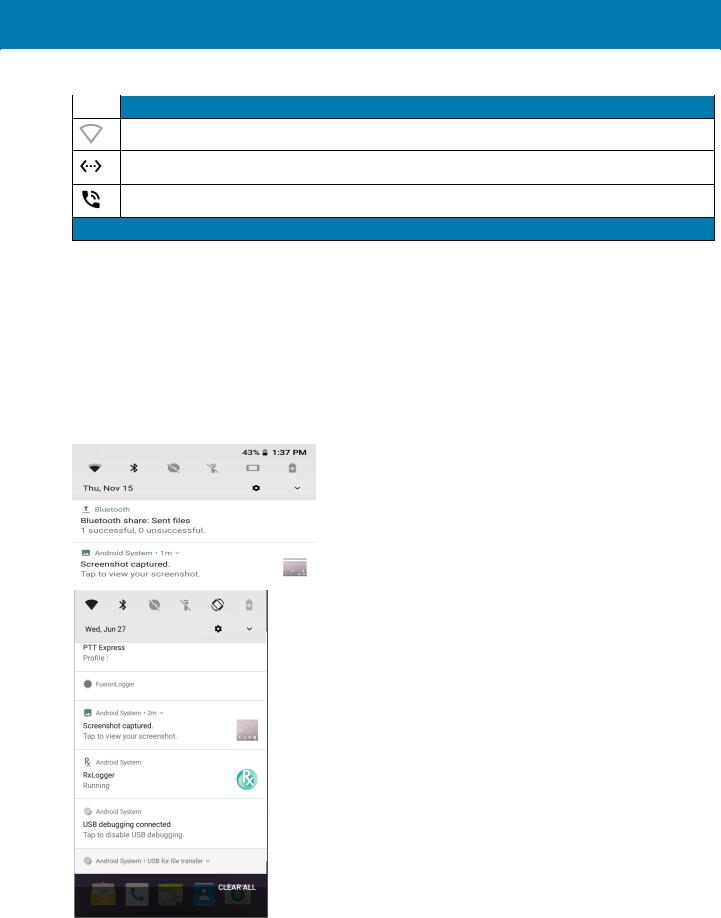
The Status bar displays the time, notification icons (left side), and status icons (right side).
NOTE: Some Status icons may not appear in the Status bar if there are too many icons to display.
Figure 16 Notification and Status Icons
Notification Icons |
Status Icons |
If there are more notifications than can fit in the Status bar, two dots display indicating that more notifications exist. Swipe down from the Status bar to open the Notification panel and view all notifications and status.
Table 5 |
Notification Icons |
|
|
Icon |
Description |
|
|
More notifications are available for viewing.
Data is syncing.
Indicates an upcoming event. Non-GMS devices only.
Indicates an upcoming event. GMS devices only.
Open Wi-Fi network is available.
Song is playing.
25

Using the Device
Table 5 |
Notification Icons (Continued) |
|
|
Icon |
Description |
|
|
Problem with sign-in or sync has occurred.
Device is uploading data.
Device is downloading data when animated and download is complete when static.
Device is connected via USB cable.
Device is connected to or disconnected from virtual private network (VPN).
Preparing internal storage by checking it for errors.
USB debugging is enabled on the device.
Headset is connected to the device.
PTT Express Voice client status. See the PTT Express PTT Notification Icons on page 85 for a complete list.
Indicates that RxLogger app is running.
Indicates the RS6000 is connected to the device.
Indicates the RS507 or RS6000 is connected to the device in HID mode.
Status Icons
Table 6 |
Status Icons |
|
|
Icon |
Description |
|
Alarm is active. |
|
|
|
All sounds, except media and alarms, are silenced and vibrate mode is active. |
|
|
|
Do Not Disturb mode active. |
|
|
|
Airplane Mode is active. All radios are turned off. |
|
|
|
Bluetooth is on. |
|
|
|
The device is connected to a Bluetooth device. |
|
|
|
Connected to a Wi-Fi network. |
|
|
1Cellular |
network icon that appears is dependent upon the carrier/network. |
26
Using the Device
Table 6 |
Status Icons (Continued) |
|
|
Icon |
Description |
|
|
Not connected to a Wi-Fi network or no Wi-Fi signal.
Connected to an Ethernet network.
Speakerphone enabled.
1Cellular network icon that appears is dependent upon the carrier/network.
Managing Notifications
Notification icons report the arrival of new messages, calendar events, alarms, and ongoing events. When a notification occurs, an icon appears in the Status bar with a brief description. See Table 5 on page 25 for a list of possible notification icons and their description. Open the Notification panel to view a list of all the notifications.
To open the Notification panel, drag the Status bar down from the top of the screen.
Figure 17 Notification Panel
27

Using the Device
To respond to a notification, open the Notification panel and then touch a notification. The Notification panel closes and the corresponding app opens.
To clear all notifications, open the Notification panel and then touch CLEAR ALL. All event-based notifications are removed. Ongoing notifications remain in the list.
To close the Notification panel, swipe the Notification panel up.
Setting App Notifications
To set notification settings for a specific app:
1.Swipe down from the Status bar to open the Quick Settings bar and then touch  .
.
2.Touch Apps & notifications > Notifications > App notifications.
3.Select an app.
4.Select an available option:
•On / Off - Select to turn all notifications from this app On (default) or Off.
•Allow notification dot - Do not allow this app to add a notification dot to the app icon.
•Allow interruptions - Do not allow notifications from this app to make sound, vibrate, or pop notifications on the screen.
•Override Do Not Disturb - Allow these notifications to interrupt when Do Not Disturb is set to Priority Only.
•Categories - Do not allow specific types of notifications from this app.
•Additional settings in the app - Open the app settings.
NOTE: To change the notification settings for an app, slide the notification slightly left or right and touch  .
.
Viewing Notification Settings for All Apps
To view the notification settings for all apps:
1.Swipe down from the Status bar to open the Quick Settings bar and then touch  .
.
2.Touch Apps & Notifications.
3.Scroll down to Notifications to view how many apps have notifications turned off.
4.To set or view notifications settings for a specific app, see Setting App Notifications on page 28.
Controlling Lock Screen Notifications
To control whether notifications can be seen when the device is locked:
1.Swipe down from the Status bar to open the Quick Settings bar and then touch  .
.
2.Touch Apps & notifications > Notifications.
3.Touch On the lock screen and select one of the following:
•Show all notification content (default)
•Don’t show notifications at all.
28
Using the Device
Blink Light
The Charging/Notification LED lights blue when an app, such as email and VoIP, generates a programmable notification or to indicate when the device is connected to a Bluetooth device. By default, LED notifications are enabled.
To change the notification setting:
1.Swipe down from the Status bar to open the Quick Settings bar and then touch  .
.
2.Touch Apps & notifications > Notifications.
3.Touch Blink light to toggle the notification on or off.
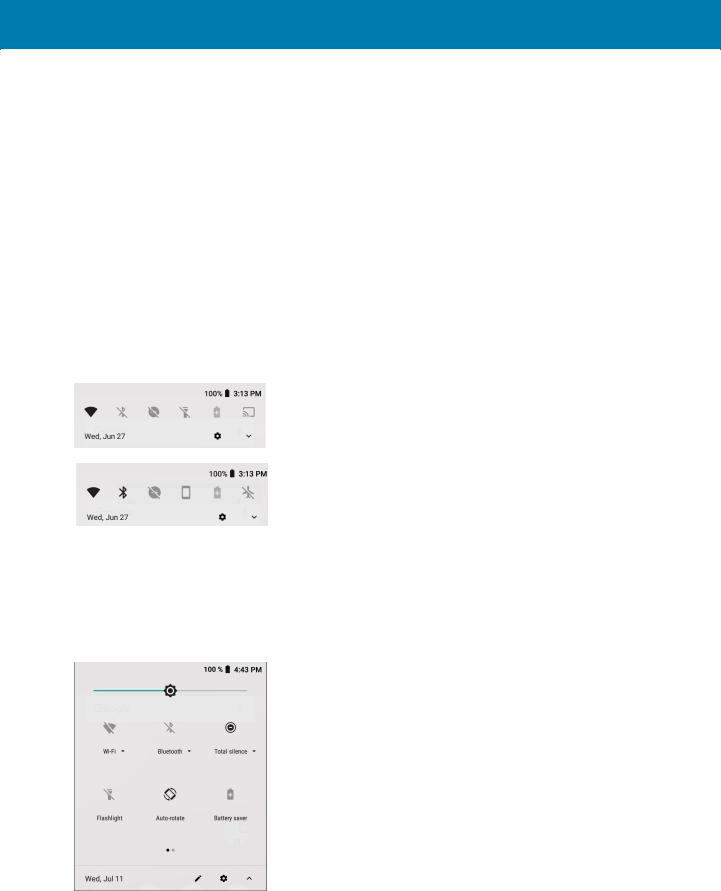
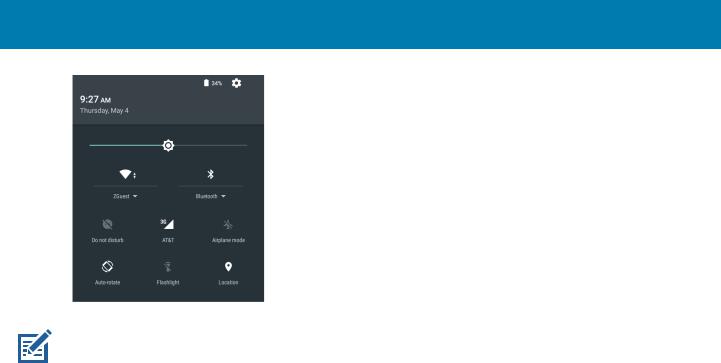
Quick Access Panel
Use the Quick Access panel to access frequently used settings (for example, Airplane mode).
Figure 18 Quick Settings Bar
To see the full Quick Access panel:
•If the device is locked, swipe down once.
•If the device is unlocked, swipe down once with two fingers, or twice with one finger.
•If the Quick Settings bar is open, touch the Down arrow.
Figure 19 Quick Access Panel
29
Using the Device
NOTE: Not all icons are pictured. Icons may vary.
To change a setting, touch the icon:
•Display brightness - Use the slider to decrease or increase the brightness of the screen.
•Wi-Fi network - Turn Wi-Fi on or off. To open Wi-Fi settings, touch the Wi-Fi network name.
•Bluetooth settings - Turn Bluetooth on or off. To open Bluetooth settings, touch Bluetooth.
•Battery power - Not applicable.
•Battery saver - Not applicable.
•Invert colors - Invert the display colors.
•Do not disturb - Control how and when to receive notifications.
•Airplane mode - Turn Airplane mode on or off. When Airplane mode is on the device does not connect to Wi-Fi or Bluetooth.
•Auto-rotate - Lock the device’s orientation in portrait or landscape mode or set to automatically rotate.
•Flashlight - Turn flashlight on or off. Turn camera flash on or off.
The thermal protection safety feature for the camera provides the following behavior if the temperature range is 40°C or above:
•If the flashlight is kept on for a certain period of time, it is automatically turned off and cannot be turned back on for a period of time until it has cooled off.
•During the cooling off period, the camera cannot be turned on. If the user attempts to use the camera, a message displays indicating to try again after a period of time.
•Location - Enable or disable locationing feature.
•Hotspot - Turn on to share the device’s mobile data connection with other devices.
•Data Saver - Turn on to prevent some apps from sending or receiving data in the background.
•Night Light - Tint the screen amber to make it easier to look at the screen in dim light. Set Night Light to turn on automatically from sunset to sunrise, or at other times.
•Nearby - Helps find and interact with services and devices close to the device.
•Cast - Share phone content on Chromecast or a television with Google Cast built-in. Touch cast screen to display a list of devices, then touch a device to begin casting.
•Screenshot - Takes a snapshot of the current screen.
30
 Loading...