


ET51/56
Enterprise Tablet
Quick Reference Guide
2 |
ET51/56 Enterprise Tablet |
Copyright
ZEBRA and the stylized Zebra head are trademarks of Zebra Technologies Corporation, registered in many jurisdictions worldwide. All other trademarks are the property of their respective owners. ©2019 Zebra Technologies Corporation and/or its affiliates. All rights reserved.
COPYRIGHTS & TRADEMARKS: For complete copyright and trademark information, go to www.zebra.com/copyright.
WARRANTY: For complete warranty information, go to www.zebra.com/warranty.
END USER LICENSE AGREEMENT: For complete EULA information, go to www.zebra.com/eula.
Terms of Use
•Proprietary Statement
This manual contains proprietary information of Zebra Technologies Corporation and its subsidiaries (“Zebra Technologies”). It is intended solely for the information and use of parties operating and maintaining the equipment described herein. Such proprietary information may not be used, reproduced, or disclosed to any other parties for any other purpose without the express, written permission of Zebra Technologies.
•Product Improvements
Continuous improvement of products is a policy of Zebra Technologies. All specifications and designs are subject to change without notice.
•Liability Disclaimer
Zebra Technologies takes steps to ensure that its published Engineering specifications and manuals are correct; however, errors do occur. Zebra Technologies reserves the right to correct any such errors and disclaims liability resulting therefrom.
•Limitation of Liability
In no event shall Zebra Technologies or anyone else involved in the creation, production, or delivery of the accompanying product (including hardware and software) be liable for any damages whatsoever (including, without limitation, consequential damages including loss of business profits, business interruption, or loss of business information) arising out of the use of, the results of use of, or inability to use such product, even if Zebra Technologies has been advised of the possibility of such damages. Some jurisdictions do not allow the exclusion or limitation of incidental or consequential damages, so the above limitation or exclusion may not apply to you.
Warranty
For the complete Zebra hardware product warranty statement, go to www.zebra.com/warranty.
Service Information
If you have a problem using the equipment, contact your facility’s Technical or Systems Support. If there is a problem with the equipment, they will contact the Zebra Support at: zebra.com/support.
For the latest version of this guide go to: zebra.com/support.
Quick Reference Guide |
3 |
Introduction
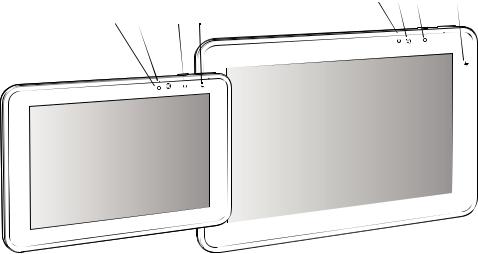
The ET51 is a wireless LAN (WLAN) tablet and the ET56 is a wireless WAN (WWAN) tablet.
Features
1 2 3 4 2 5
1 2 3 4 5 2
Item |
Description |
1 |
Ambient Light Sensor - Recognizes the ambient light and adjusts the |
|
display brightness (if enabled). |
|
|
2 |
Front Microphones - Use for voice communications or audio recordings. |
|
|
3 |
Front Facing Camera - Use for video conferencing or capturing images and |
|
video. |
|
|
4 |
Camera Indicator LED - Lights red when the camera is activate. |
|
Momentarily lights red when the device boots and shuts down. |
|
|
5 |
Charging Indicator LED - Indicates charging status. |
|
OFF - device is not connected to charger. |
|
ORANGE - device is charging. |
|
GREEN - device is connected and fully charged. |
|
RED - charge error. |
|
|
4 |
ET51/56 Enterprise Tablet |
 11
11
|
6 |
7 |
|
|
|
|
|
|
|
8 |
10 |
|
|
9 |
|
|
|
|
|
Item |
|
Description |
|
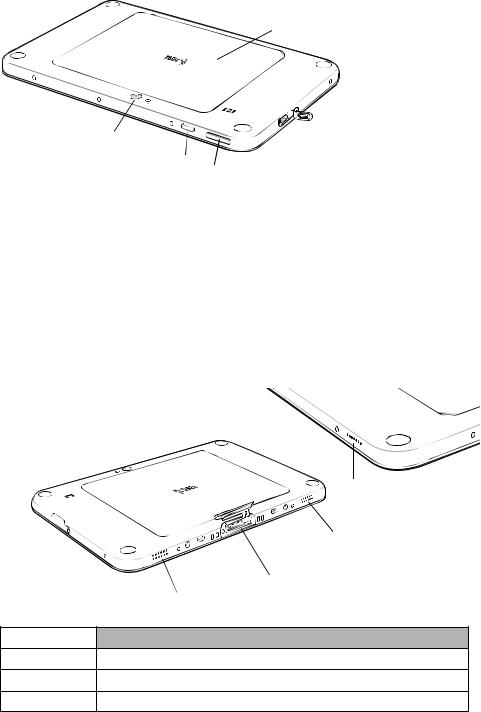
6 |
Rear Camera - Use for high resolution images and video. |
||
|
|
||
7 |
Camera LED Flash - Provides illumination for the camera. |
||
|
|
||
8 |
Power Button - Push once to start the device; push it again to enable sleep |
||
|
mode. Push and hold it to shut down the device. |
|
|
|
|
||
9 |
Volume Key - Push the left side to reduce the volume. Press the right side to |
||
|
increase the volume. |
|
|
|
|
|
|
10 |
USB-C Interface - Provides for communication. |
|
|
|
|
||
11 |
Back Cover - Covers the service replaceable battery. |
||
|
|
|
|
8” Version |
|
13 |
10” Version |
12

13
 14
14
13
Item |
Description |
12NFC Antenna Position - Use to read NFC cards and RFID tags.
13Stereo Speakers - Provides audio playback.
14Docking Connector - Interfaces with the cradle.
Quick Reference Guide |
5 |
Installing a micro SD Card or SIM Card
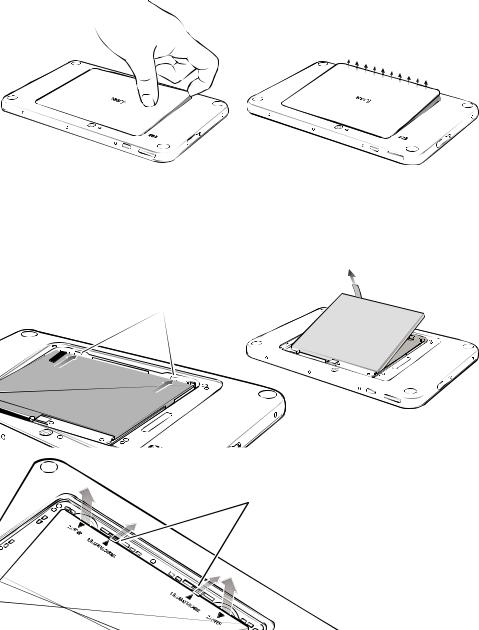
To install a microSD card and/or nano SIM card (ET56 only):
1.Press the Power button to turn off the device.
2.Lift the notched corner of the battery cover.
3.Carefully lift the battery cover off the device.
4.On the 8” version, push the two locking tabs up, then pull up on the tab to remove battery.
On the 10” version, push the two locking tabs up (1), then, using index fingers, lift the battery up (2).
Locking Tabs
8.4” Version
Locking Tabs
10.1” Version

6 |
ET51/56 Enterprise Tablet |
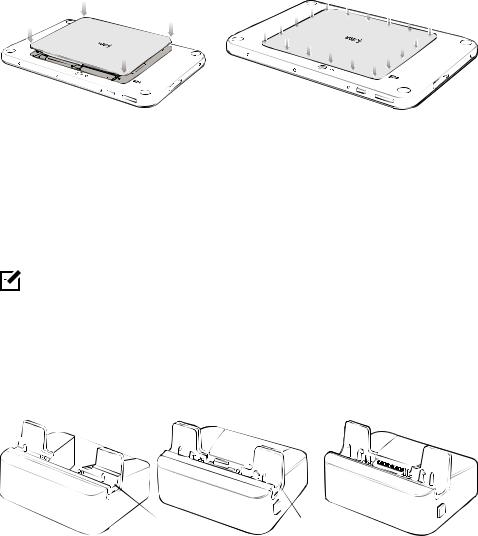
5. Insert the microSD card with contacts facing down.
8.4” Version |
10.1” Version |
6.Push the micro SD card in and ensure that it locks into place.
7.Insert the nano SIM card with contacts facing down.
NANO |
|
|
NANO |
|
|
8.4” Version |
10.1” Version |
8.Push the SIM card in and ensure that it locks into place.
9.Replace the battery.
CAUTION: Be aware of the orientation of the battery cover. Failure to replace the battery cover properly may damage the battery cover.
Quick Reference Guide |
7 |
10.Align the tabs on the underside of the cover with the slot around the battery well. Make sure that the notch on the battery cover is at the bottom left cover of the device.
11.Carefully press down around the edge of the cover. Make sure that the cover is seated properly.
12.Press Power button to turn on the device.
Charging the Device
Use the Communication and Charging Cradle, Rugged Communication and Charging Cradle or Charge Only Cradle to charge the device. See ET51/56 User Guide for more information.

 NOTE: The Charge Only Cradle (CRD-ET5X-1SCG1) and the Communication and

 Charge Cradle (CRD-ET5X-1SCOM1) come with two inserts; tall insert and short insert. Install the tall insert when using a device without a Rugged Frame and Expansion Back. Install the small insert when using a device with an Expansion Back and without a Rugged Frame. Do not install either insert when using the device with the Rugged Frame.
The Rugged Communication and Charge Cradle (CRD-ET5X-1SCOM1R) does not come with inserts. Use with device and Rugged Frame with IO Adapter.
Short Insert |
|
Tall Insert |
Charge Only Cradle |
Communication Cradle |
Rugged Communication Cradle |
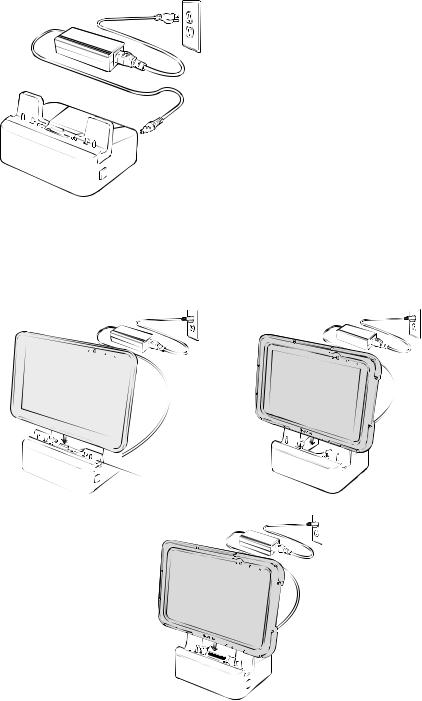
Setup the Charge Only Cradle or Communication Cradle, power supply, PWR-BGA12V50W0WW, DC Line Cord CBL-DC-388A1-01 and country-specific AC line cord, sold separately.
8 |
ET51/56 Enterprise Tablet |
|
|
|
|
1.If using the Communication and Charging Cradle, open the bottom access door and hold it to the back of the tablet.
2.Align the device with the alignment pins on the cradle.
3.Insert the device into the cradle. Note that the Communication Cradle contains a locking mechanism that locks the device to the cradle.
Cradle Insert |
|
|
Cradle Insert |
|
|
|
|||
Required |
|
|
Not Required |
|
Communication and Charging Cradle |
|
Charge Only Cradle |
||
|
|
|
|
|
|
|
|
|
|
Cradle Insert
Not Required
Rugged Communication and Charging Cradle
 Loading...