


YHC5150X
Table of contents
 Loading...
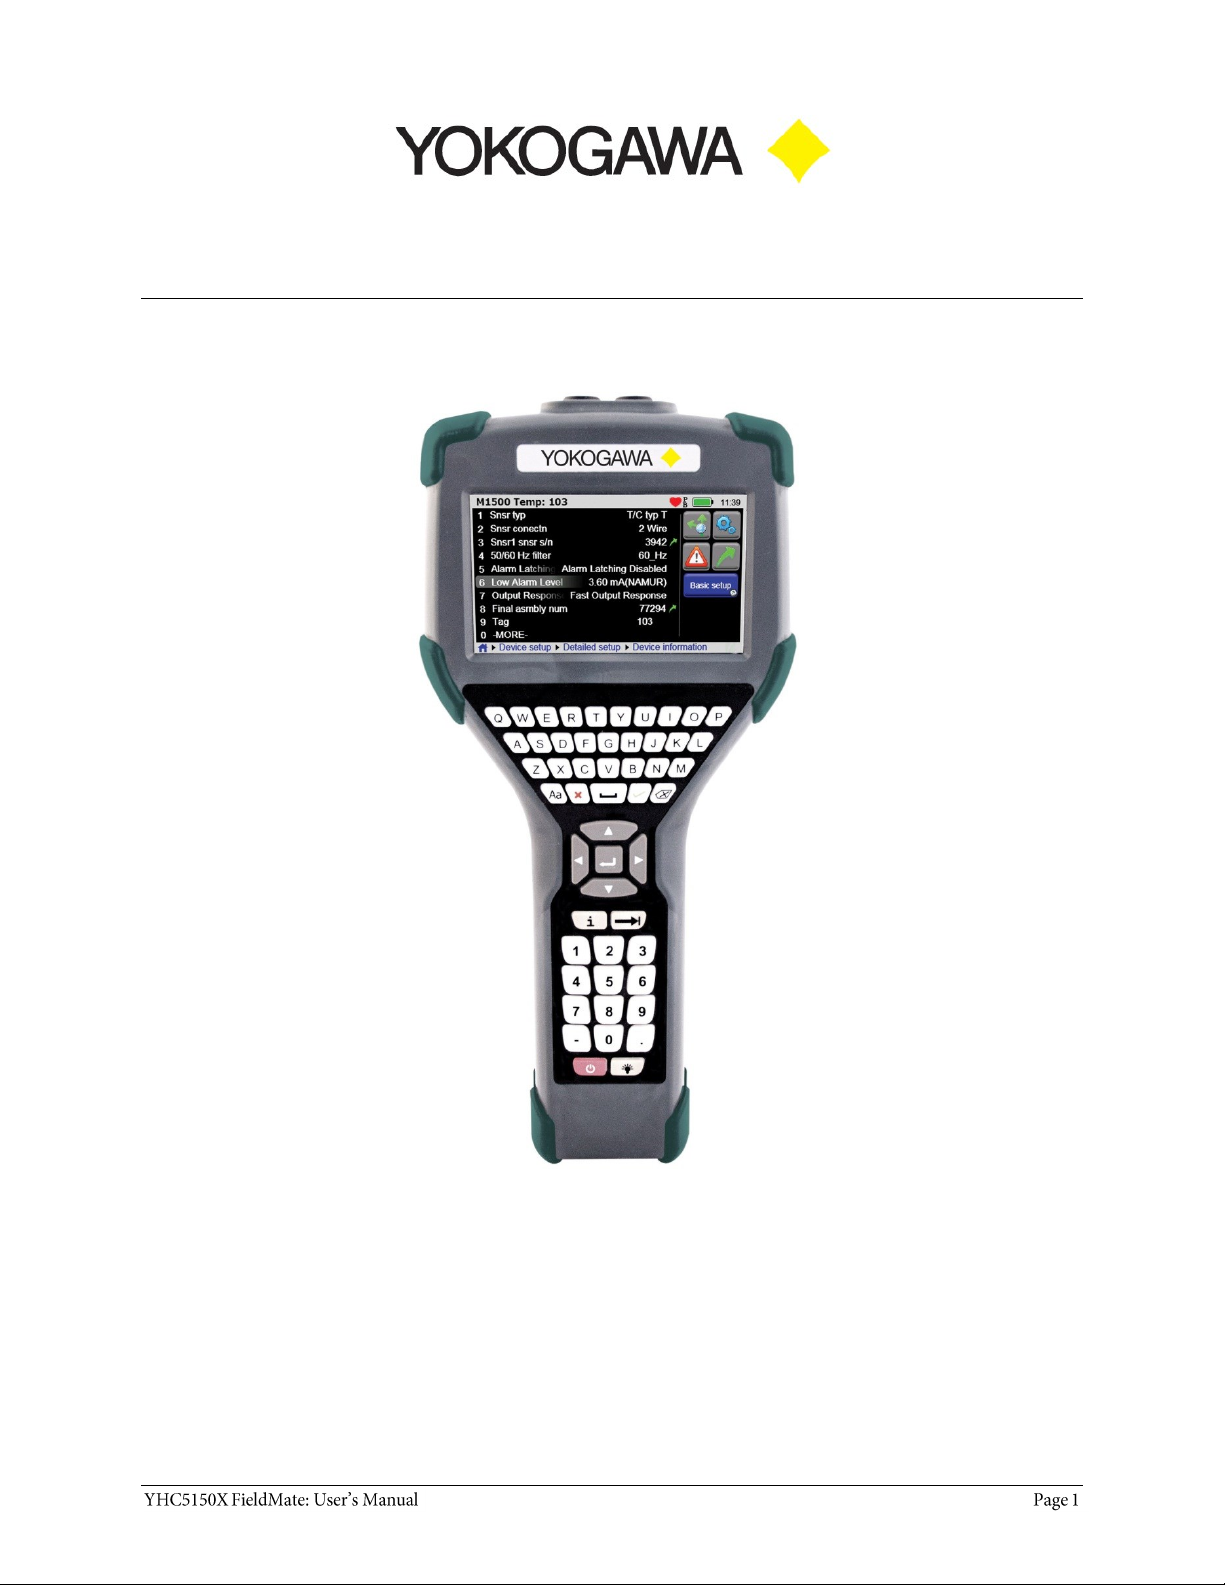
YHC5150X FieldMate Handheld Communicator
User Manual
IM 01R01A30-01EN-B
April, 2015 V 1.4
Safety Information
Preventing injury
Not liable
Safety Symbols
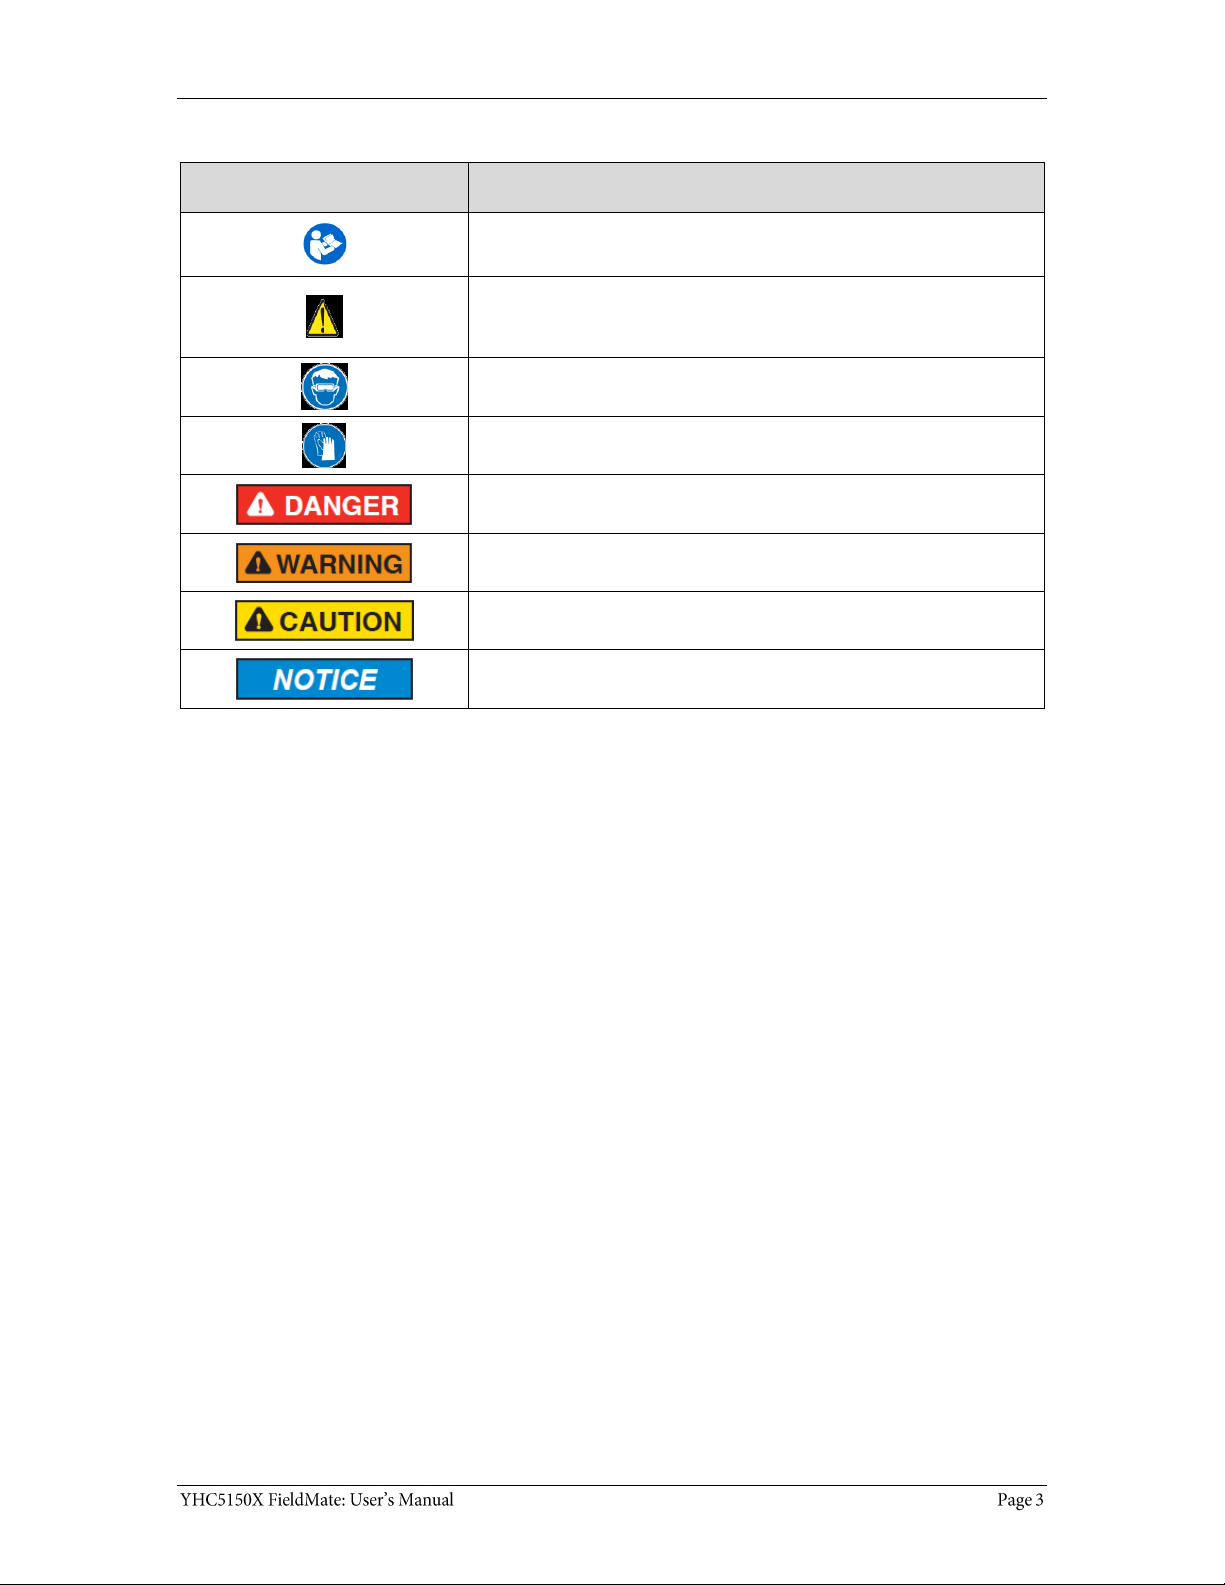
Safety Symbols
Safety Symbols
Explaining the symbols
This is the Read Instruction Manual symbol. This symbol
indicates that you must read the instruction manual.
This is the Safety Alert symbol. This symbol indicates a WARNING.
Warnings alert you to actions that can cause personal injury or
pose a physical threat. Please read these carefully.
This is the Safety Glasses symbol. This symbol indicates that you
must wear approved safety glasses during the task.
This is the Safety Gloves symbol. This symbol indicates that you
must wear approved safety gloves during the task.
Indicates a potentially hazardous situation which, if not avoided,
will result in death or serious injury.
Indicates a potentially hazardous situation which, if not avoided,
could result in death or serious injury.
Indicates a potentially hazardous situation which, if not avoided,
could result in minor or moderate injury.
Indicates information essential for proper product installation,
operation or maintenance.
ATEX Documentation
ATEX Documentation (continued)

Contents
User Manual ....................................................1
Safety Information ...........................................2
Safety Symbols ................................................3
ATEX Documentation .......................................4
ATEX Documentation (continued) ................ 5
Trademarks .....................................................8
HART Communication Foundation ............... 8
Yokogawa Contact Information........................8
Definitions for Terminology ..............................9
Definitions for terminology (continued) ..... 10
Definitions for terminology (continued) ..... 11
Installing or removing the battery pack ......... 12
Charging the battery pack .......................... 13
Memory System Card .................................. 13
Memory System Card (continued).............. 14
YHC5150X Series HART Communicator
Overview ........................................................ 15
Touchscreen — System menus.................. 16
Touchscreen — System menus (continued)
..................................................................... 17
Touchscreen — HART menus ..................... 18
Touchscreen — HART menus (continued) 19
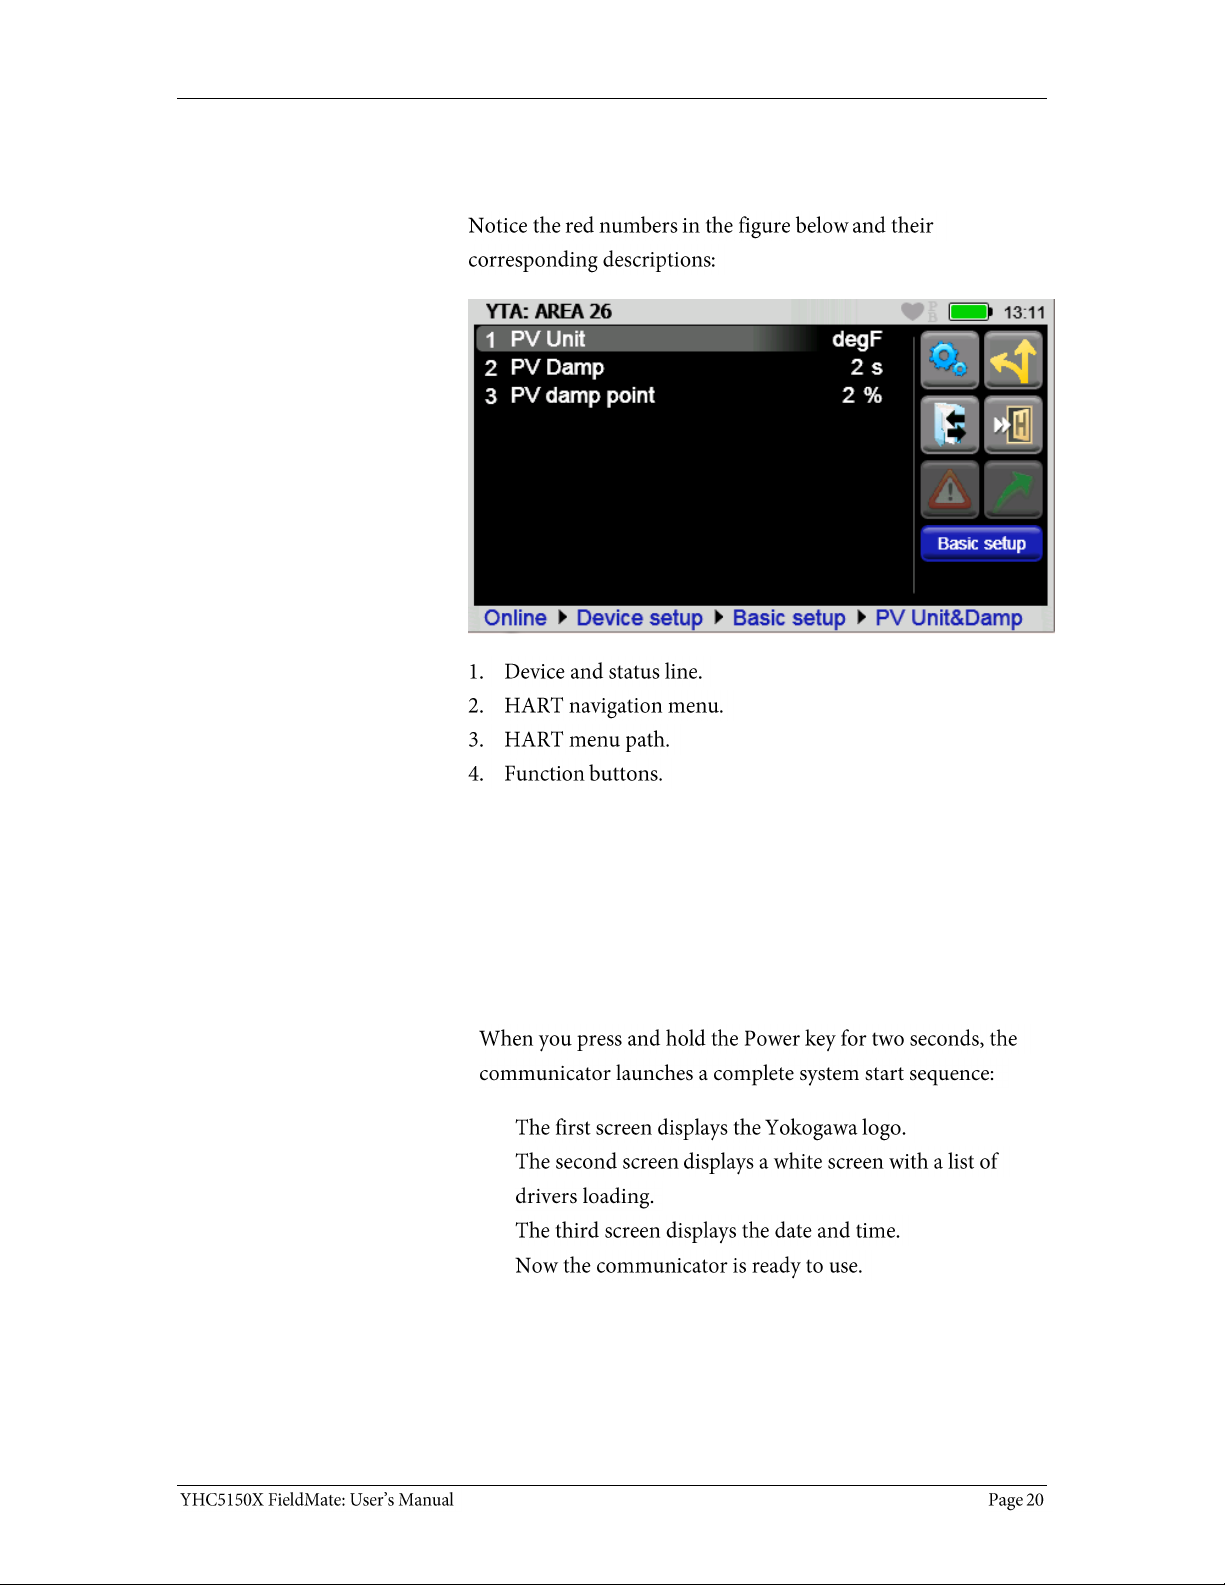
YHC5150X Operating Instructions ................. 19
Power key functions .................................... 19
Power key functions (continued) ................ 20
Backlight — reducing intensity .................. 21
Backlight — settings for timeout ................ 22
Standby — settings for timeout ................. 23
Timeout — Backlight and Standby are
cumulative ................................................... 24
The battery pack life ................................... 25
The battery pack life (continued) .............. 26
Low battery level alerts for the XL Battery 26
Low battery level alerts (continued) .......... 27
The charging cradle ................................... 27
The charging cradle (continued) ............... 28
The charging cradle (continued) ............... 29
Kickstand — useful for viewing the display
..................................................................... 29
Loop Communication Jacks & Field-wiring
practices ..................................................... 30
Keyboard overview ..................................... 31
Keyboard functions .................................... 32
Keyboard functions (continued) ................ 33
Keyboard — the on-screen keyboard ....... 34
ISO Latin-1 Character Set .......................... 34
ISO Latin-1 Character Set (continued) ...... 35
Limited character sets ............................... 36
Limited number of characters ................... 37
Navigating in the screen ............................ 37
Navigating the keysets ............................... 38
Touchscreen — Keyset #1 ........................ 38
Touchscreen — Keysets #2–5 .................. 39
Navigating the Communicator ................... 40
Navigating the Communicator (continued)41
HART connection status ............................ 42
HART navigation and connection status ....... 43
HART connection status (continued) ........ 44
HART list of found HART devices ............... 45
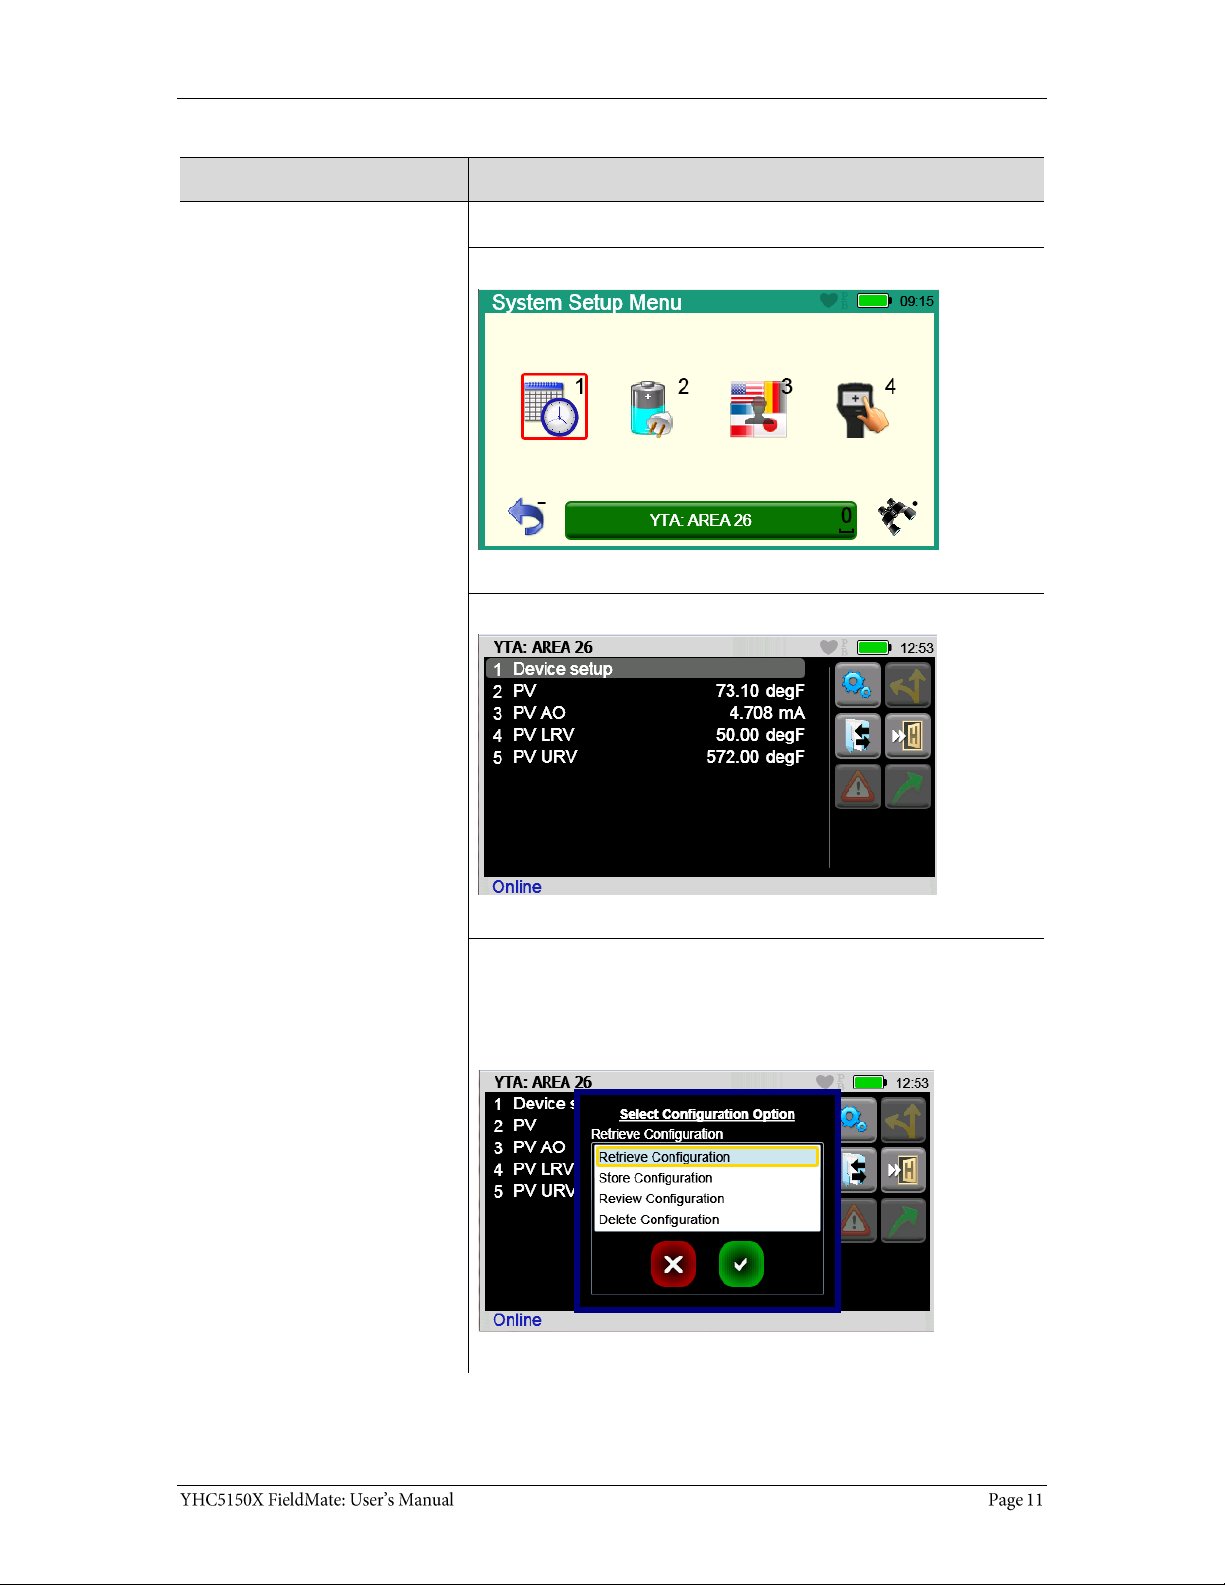
Main system menus ...................................... 46
System Setup Menu ................................... 47
Date/Time Setup — System menu ........... 48
Power Setup — System Menu ................... 49

Language Selection — System Menu ........ 50
Language Selection — Displayed .............. 51
Calibrating the touchscreen — System
Menu ............................................................ 52
System Information — System Menu ........ 53
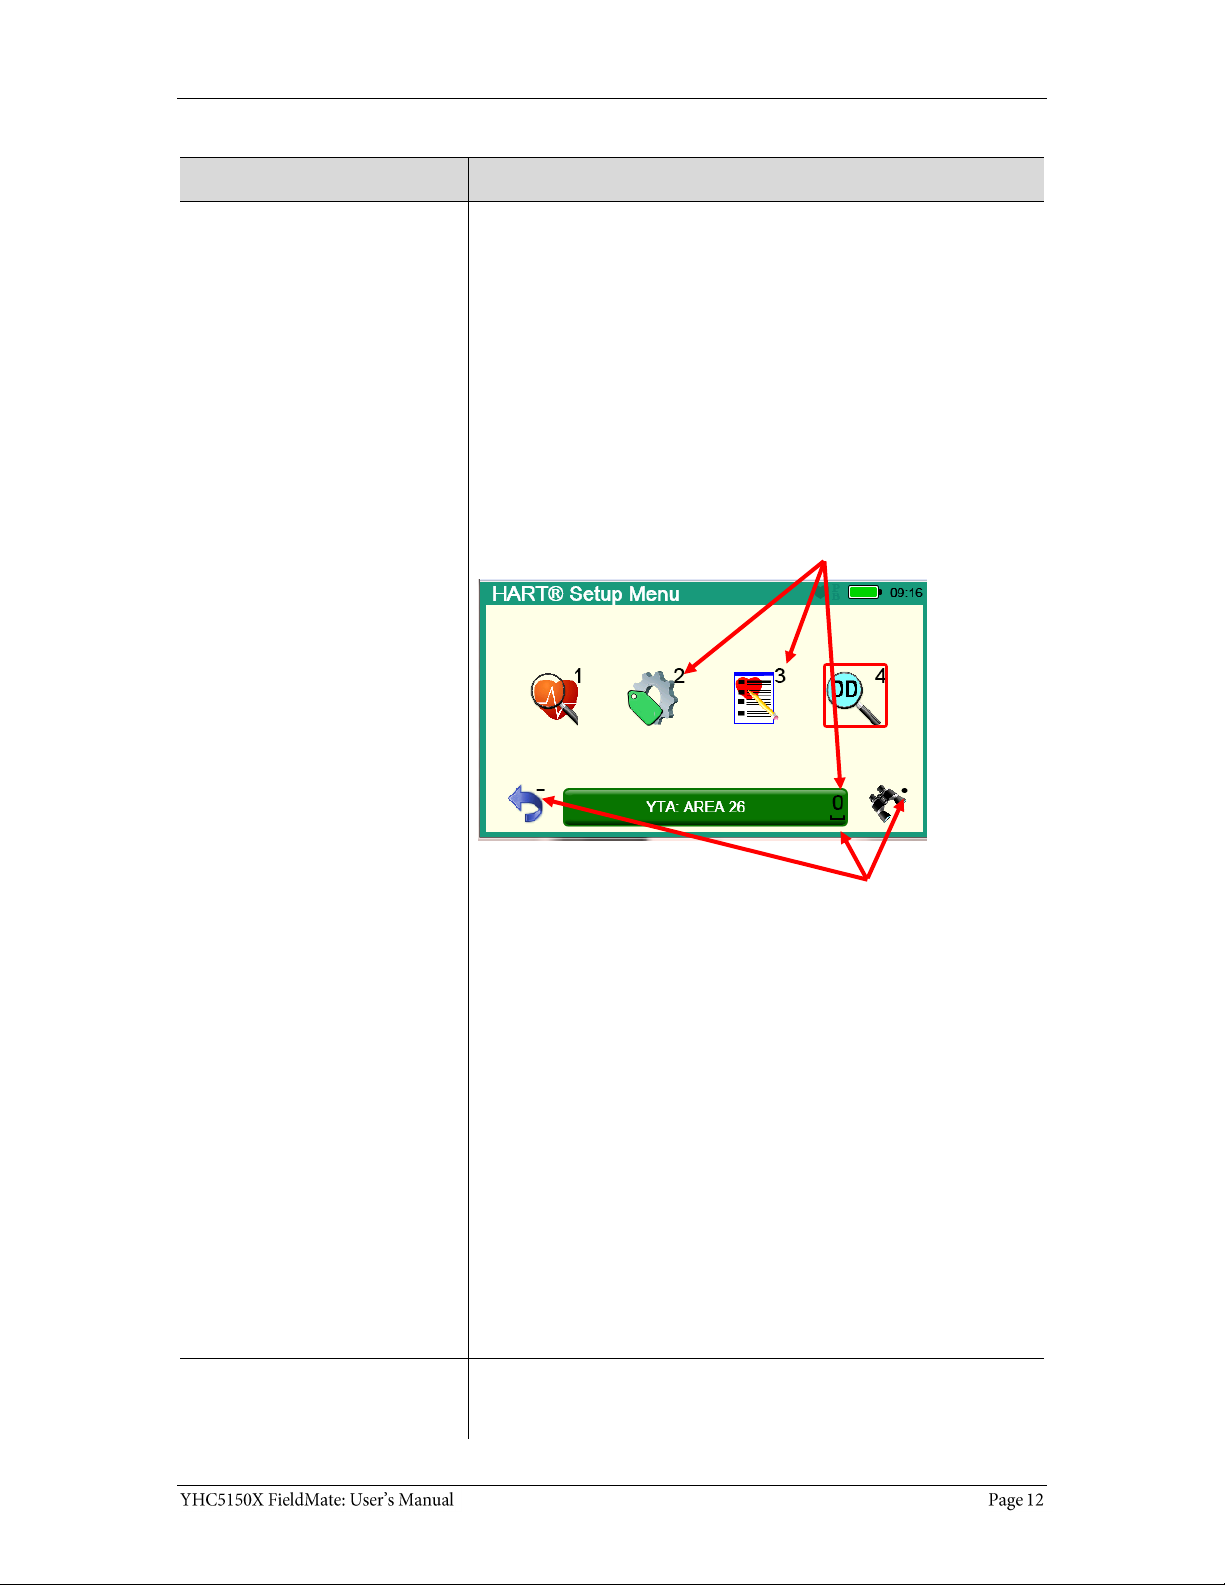
HART Setup Menu ......................................... 54
Shifting the highlight in HART menus ........ 55
Shifting the highlight in HART menus
(continued) .................................................. 56
Shifting the highlight in HART menus
(continued) .................................................. 57
Status Line for the connecting device ....... 57
Status Line for the connecting device
(continued) .................................................. 58
DD files control HART menus ..................... 58
DD files control HART menus ..................... 59
Function buttons in HART menus .............. 60
Function buttons — Explaining the buttons
..................................................................... 61
Function buttons — More buttons ............. 62
Creating Shortcuts ...................................... 63
Creating Shortcuts — Invalid shortcuts ..... 64
HART menu path bar .................................. 64
Advanced Tools for HART — Two Option
buttons ......................................................... 65
Advanced Tools for HART — Two Option
buttons ......................................................... 66
Advanced Tools for HART — DD Browser .. 67
Advanced Tools for HART — View device
names and revisions ................................... 68
View device names and revisions
(continued) .................................................. 69
Advanced Tools for HART — Offline
Configuration ............................................... 70
Advanced Tools for HART — Offline
Configuration ............................................... 71
Advanced Tools for HART — Offline
Configuration ............................................... 72
Advanced Tools for HART — Waiting for the
Offline Configuration .................................. 73
Advanced Tools for HART—Indicators in
Offline Configuration .................................. 74
Advanced Tools for HART—Indicators in
Offline Configuration .................................. 75
Advanced Tools for HART — Function
buttons ........................................................ 76
HART Communication with the YHC5150X
Series ............................................................ 77
Connecting the YHC5150X to Smart
Transmitters with HART technology .......... 78
Loop resistance > 250 Ω........................... 79
Polling: HART Communication ................... 80
Polling: HART Communication (continued)81
Specific and Generic HART communication
..................................................................... 82
Specific and Generic HART communication
(continued) ................................................. 83
Managing Configuration Files.................... 83
Managing Configuration Files (continued) 84
Managing Configuration Files (continued) 85
Managing Configuration Files (continued) 86
Troubleshooting HART Communications .. 87
Troubleshooting HART Communications
(continued) ................................................. 88
Updating communicator software ............. 88
Hazardous area use ................................... 89
Hazardous area — Warnings & Cautions . 90
Hazardous area — Warnings & Cautions
(continued) ................................................. 91
Returning for repair.................................... 92
Appendices ................................................... 93
Product Specifications ............................... 93
Safety notices ............................................. 94
Waste Electrical and Electronic Equipment
(WEEE), Directive 2012/19/EU ............... 95

Spare parts list ............................................ 96
Recommendations for your battery ........... 97
Intrinsic Safety Control Drawing ................. 98
Trademarks
HART Communication Foundation
Yokogawa Contact Information
For customer Assistance
Address
Yokogawa Corporation of America
2 Dart Road
Newnan, GA. 30265USA
Telephone
1-800-888-6400
E-mail
meters-instr@us.yokogawa.com
Website
www.yokogawa.com/us
Information in this document is subject to change without notice.
Check the Yokogawa web site for latest manual revision:
http://www.yokogawa.com/us/products/field-instruments/ia-smart-
communicators/yhc5150x.htm
HART Communication Foundation
HART website
For more information regarding the HART Communication Foundation
topics, go to www.hartcomm.org
Definitions for Terminology
Terminology
Definitions
Button or key
A button always refers to an area on the screen that you can
tap to select functionality.
A key always refers to hardware push-buttons on the
keyboard that you can press.
DD or Device Description files
Manufacturers create HART® compliant Device Description (DD)
files that reside on the YHC5150X. You may need to check for
updates to the DD files from time to time.
DD files “provide a standardized method for host systems to
access and display valuable parameters located in field
instruments so that the full capability of the device can be
accessed via the HART protocol.”
DDs are “used to describe such parameters as device
diagnostics, multi-variable measurements and device
configuration information in a digital format. As applied in
the HART Protocol, this digital information is imposed on top
of the industry-standard, process control 4–20mA signal.”
Note: The two italicized statements come from the HART
Communication Foundation’s web site:
http://en.hartcomm.org/hcp/tech/dd/aboutprotocol_dds.html
Highlight
This manual uses the word highlight in two ways:
1. As a noun: highlight refers to an icon or a menu line that has
the focus on-screen at any given time.
2. As a verb: highlight refers to:
a. Pressing the arrow keys or Advance key to change
the focus to a new button.
b. Pressing and holding a button on-screen for one
second to change the focus to a new button.
Definitions for terminology (continued)
Terminology
Definitions
Highlight colors
Highlights appear in three colors: red, gray, and yellow.
A red rectangle appears in System menus:
A gray highlight appears in the HART Navigation pane.
A yellow border appears in:
Selection boxes when an item is selected.
The HART Function button pane.
The HART menu path bar.
Definitions for terminology (continued)
Terminology
Definitions
Select
This manual uses the word select to refer to:
Navigating the levels of menus in the communicator.
Opening additional screens:
o To navigate the communicator’s menu levels.
o To view information.
o To view additional functions.
Performing some task on the communicator.
Note: Highlight an on-screen button you want to choose and
select it.
You may select items by using one of several methods:
Touchscreen gestures as you do on a smartphone, such as:
Tapping on-screen buttons or icons.
Swiping left or right.
Scrolling up or down.
Navigation keys use:
The Arrows and Advance/Switch buttons to highlight a
button.
The Select button to select the highlighted button.
Numeric keys:
1–9 and 0, minus and decimal.
These Navigation shortcuts select the function directly.
A combination of touchscreen gestures and keys.
Note: The Spacebar is used as a shortcut key only on system
menus. Since it is directly above the Navigation keys, it offers an
easy way to select the connection bar.
Standby or sleep
This manual uses the word standby mode to describe putting the
communicator into an energy-saving mode, where it uses very
little power. Some use the word sleep mode instead of standby.
Navigation numbers
Navigation shortcuts
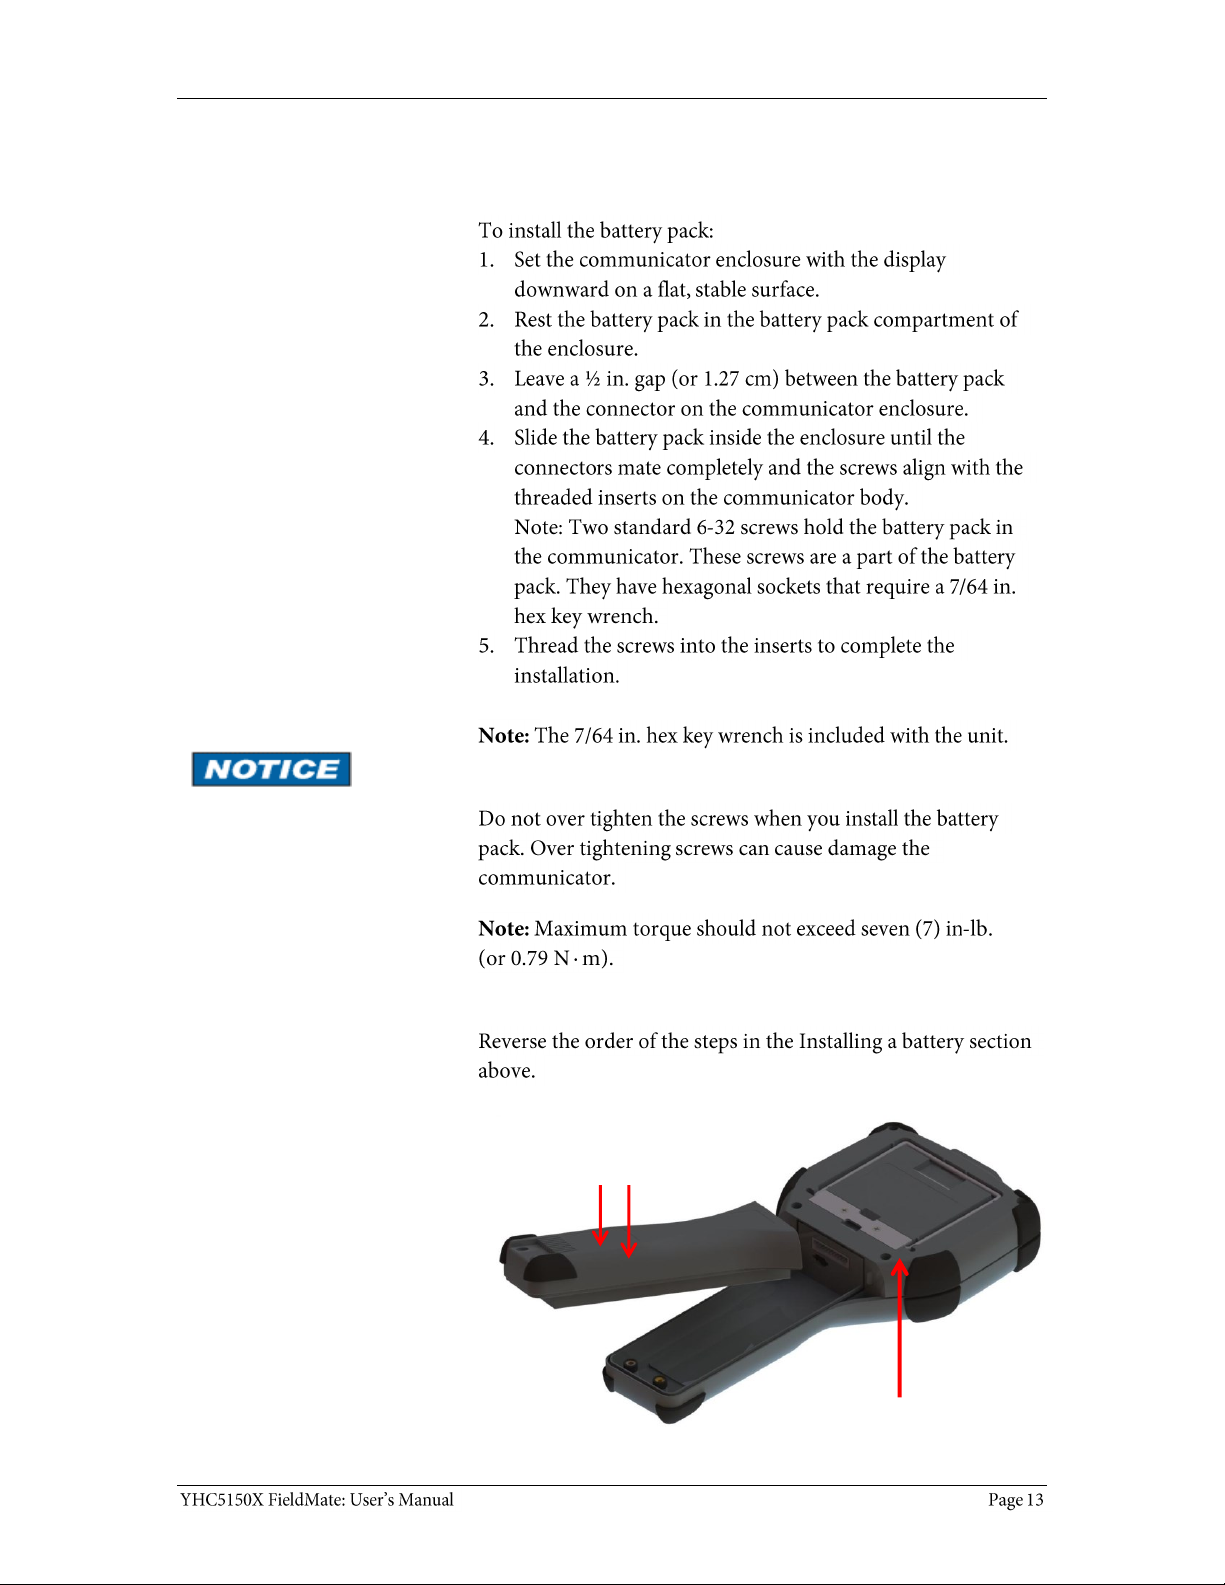
Installing or removing the battery pack
Installing the battery
Don’t over tighten
Removing the battery
6-32 screws with
7/64 in. hexagonal socket
µSD memory card access
Charging the battery pack
Charge six (6) hours
The charging cradle
Memory System Card
Uses for the memory card
Use only with the YHC5150X
Replace with Yokogawa 1W-Z9P780
µ
Memory System Card (continued)
Installing & removing battery pack
Installing or removing the
battery pack
Removing the memory card
—
Replacing the Memory Card
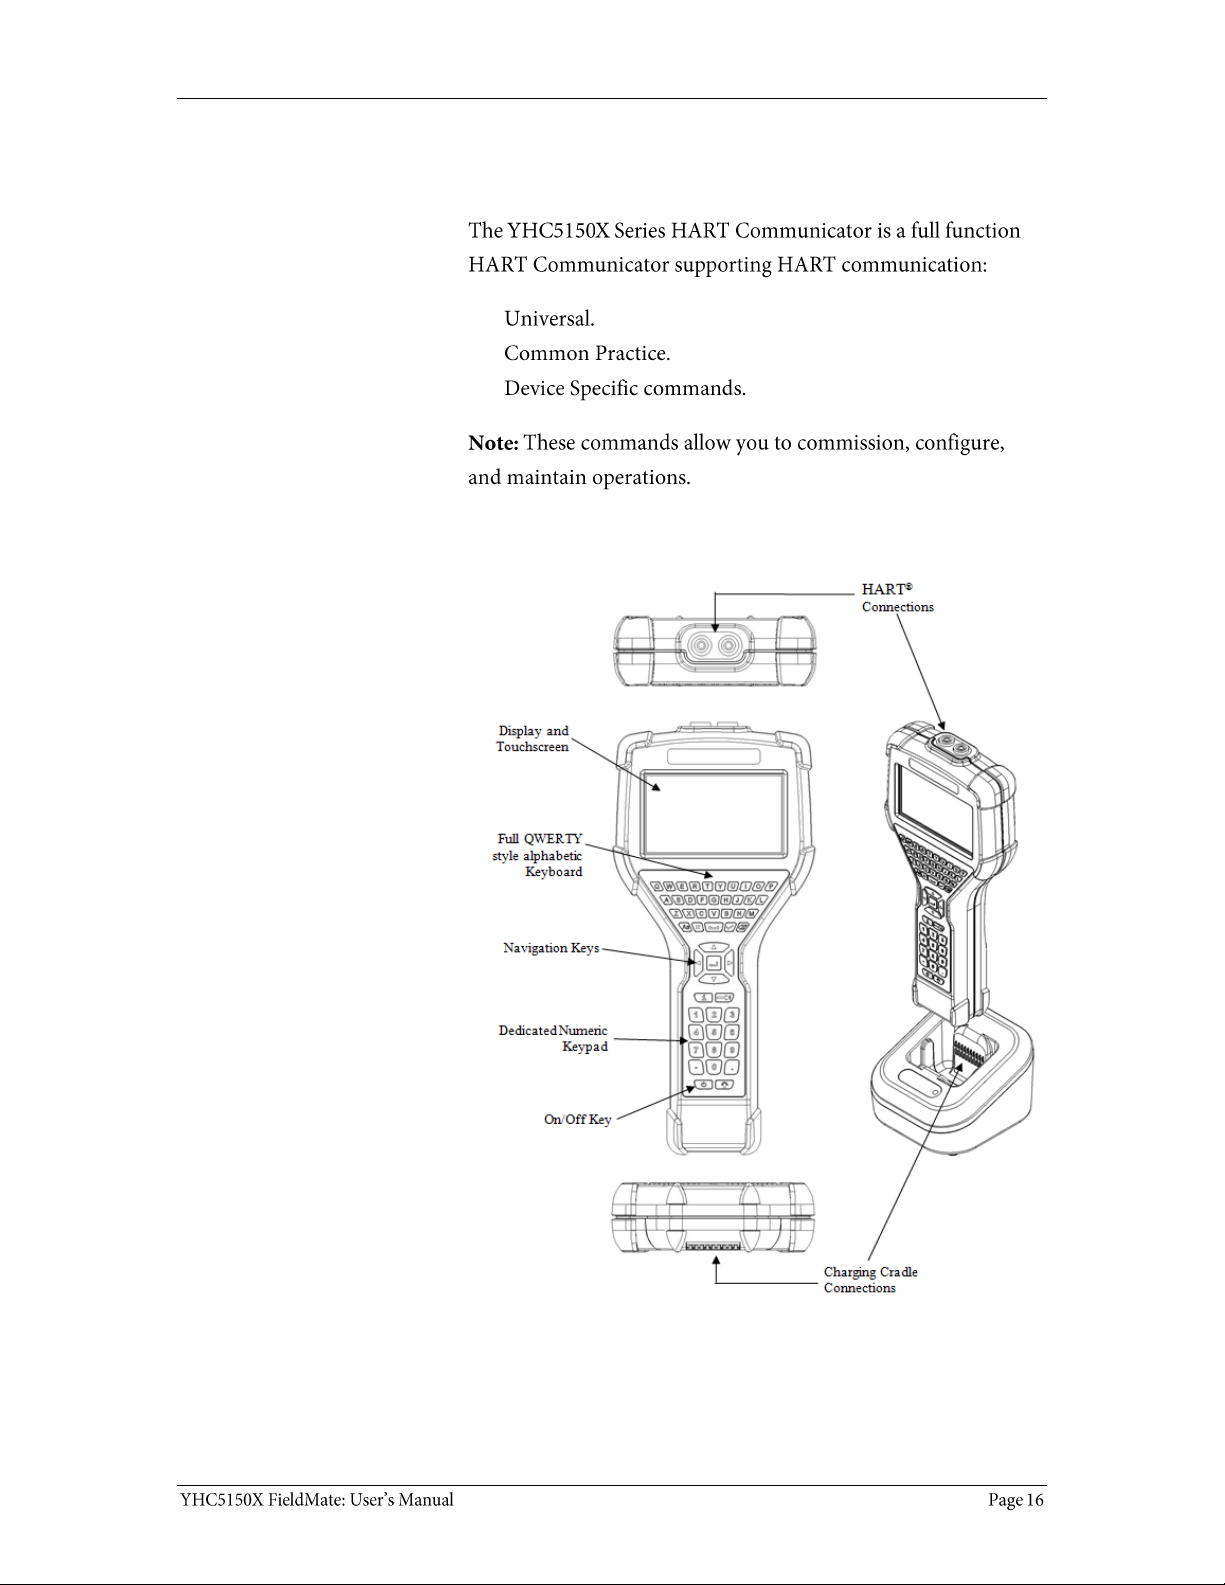
YHC5150X Series HART Communicator Overview
Full function HART
Diagram of the YHC5150X
Touchscreen — System menus
Touchscreen — Display details
Touchscreen — Two menu systems
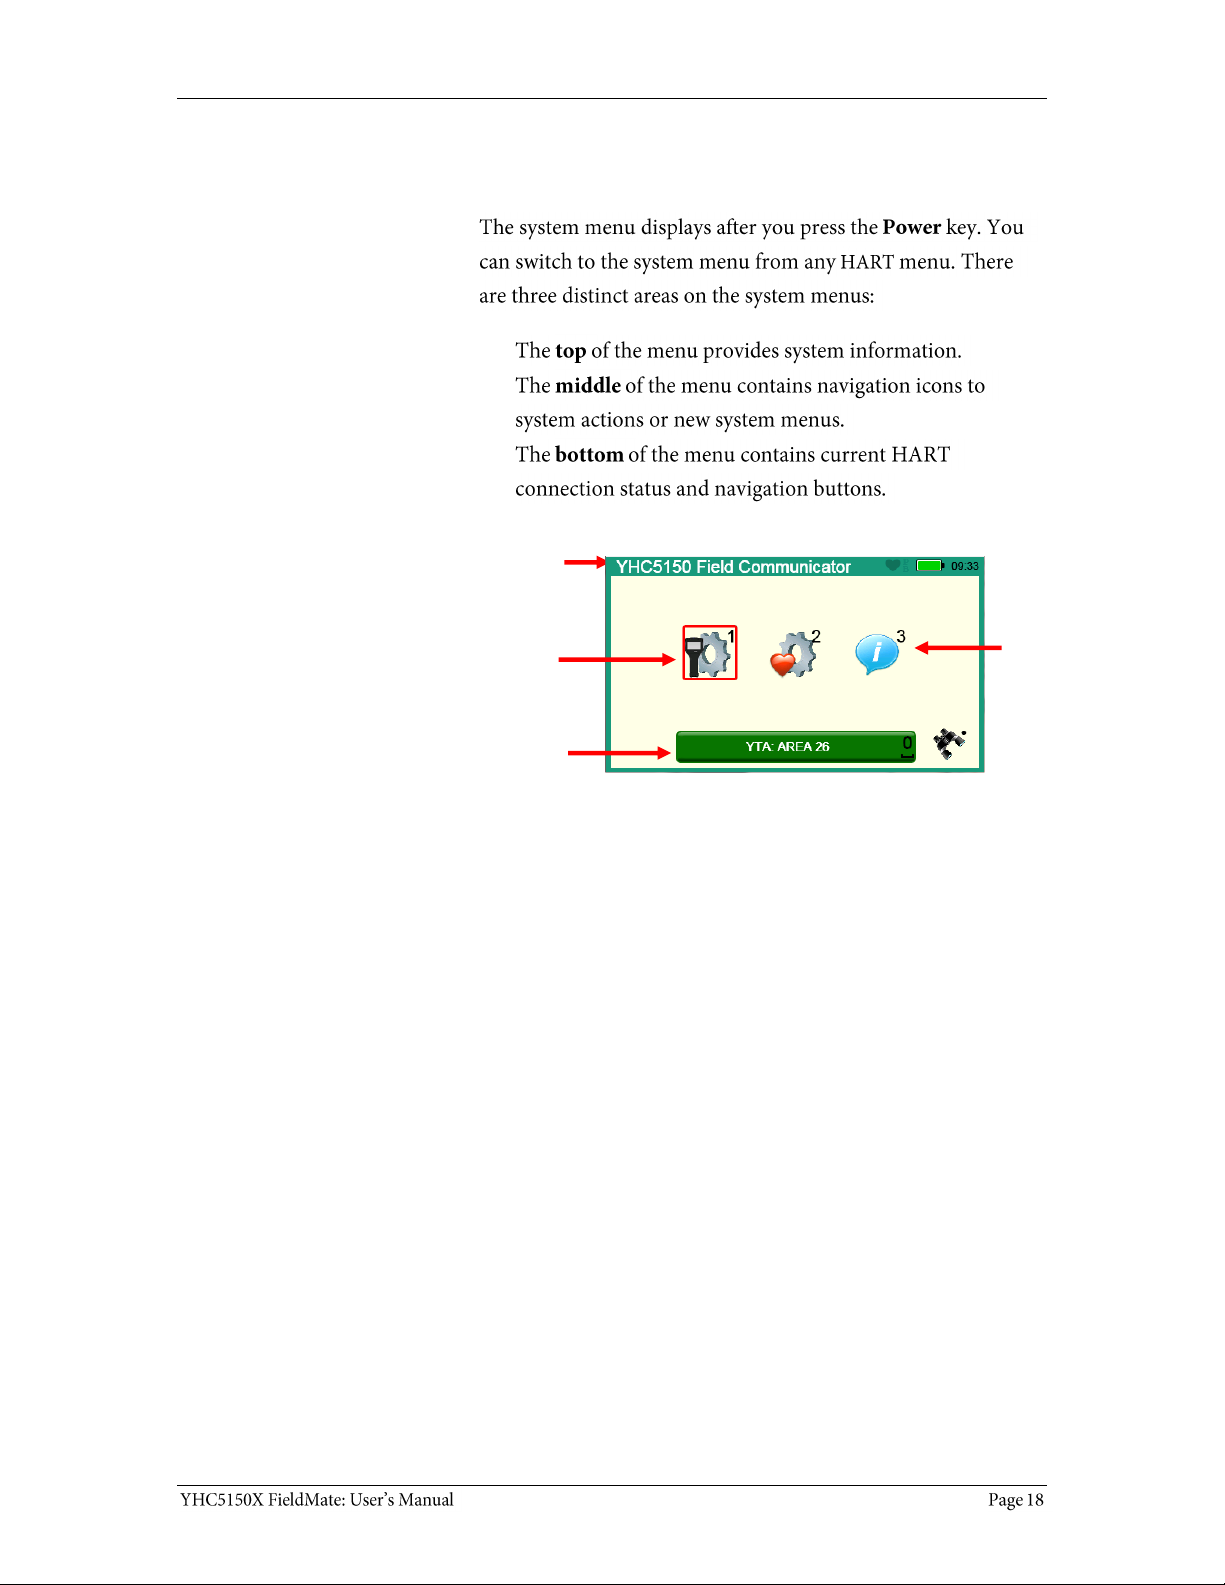
Touchscreen — System menus (continued)
Touchscreen — System menu
Focus
Pane
System
Information
HART
Connection
and
Navigation
Sample system display
System
Navigation
Touchscreen — HART menus
HART menus appear when connected to HART
devices
Touchscreen — HART menus (continued)
Sample HART menu display
YHC5150X Operating Instructions
Power key functions
Turn on
1
2
3
4
Power key functions (continued)
Standby
Resume
Turn off
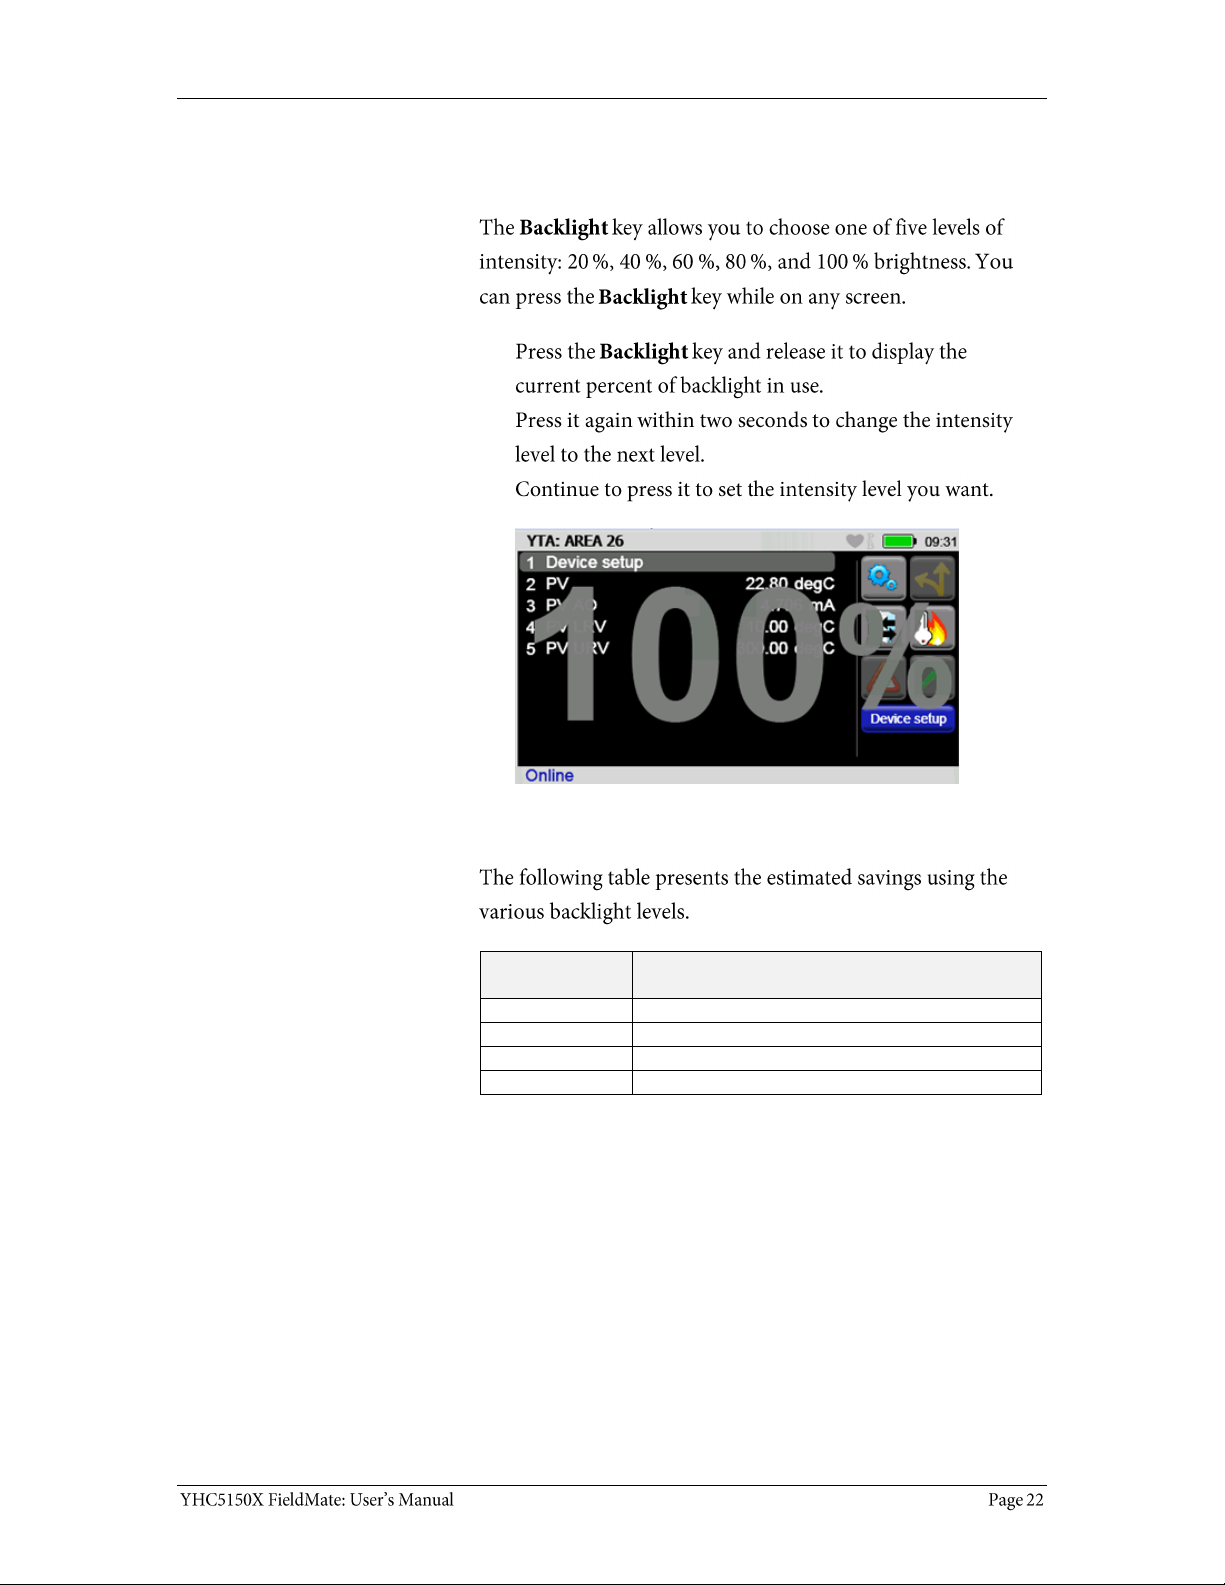
Backlight — reducing intensity
Pressing the Backlight key
Reducing intensity improves battery life
Backlight
intensity at:
While the communicator is on,
the battery life is improved by:
20 %
Up to 80 %
40 %
Up to 50 %
60 %
Up to 30 %
80 %
Up to 12 %
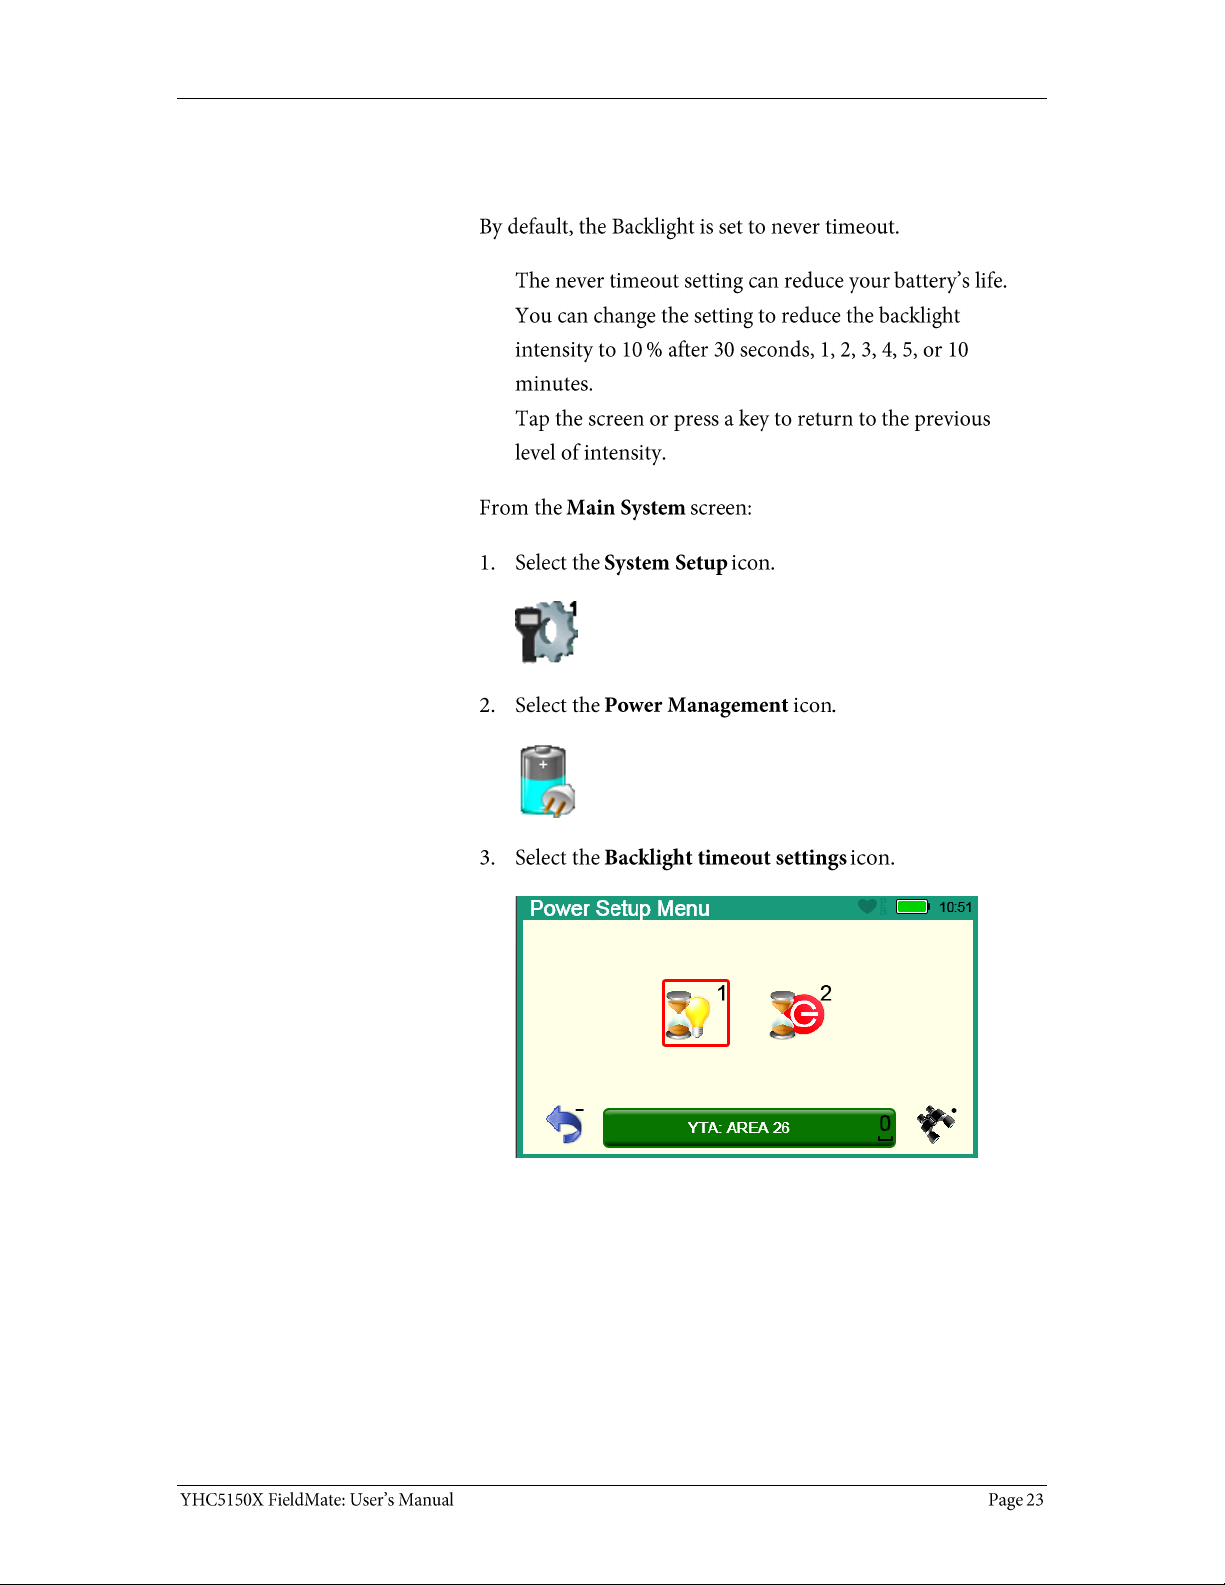
Backlight — settings for timeout
Changing the timeout setting to save battery life
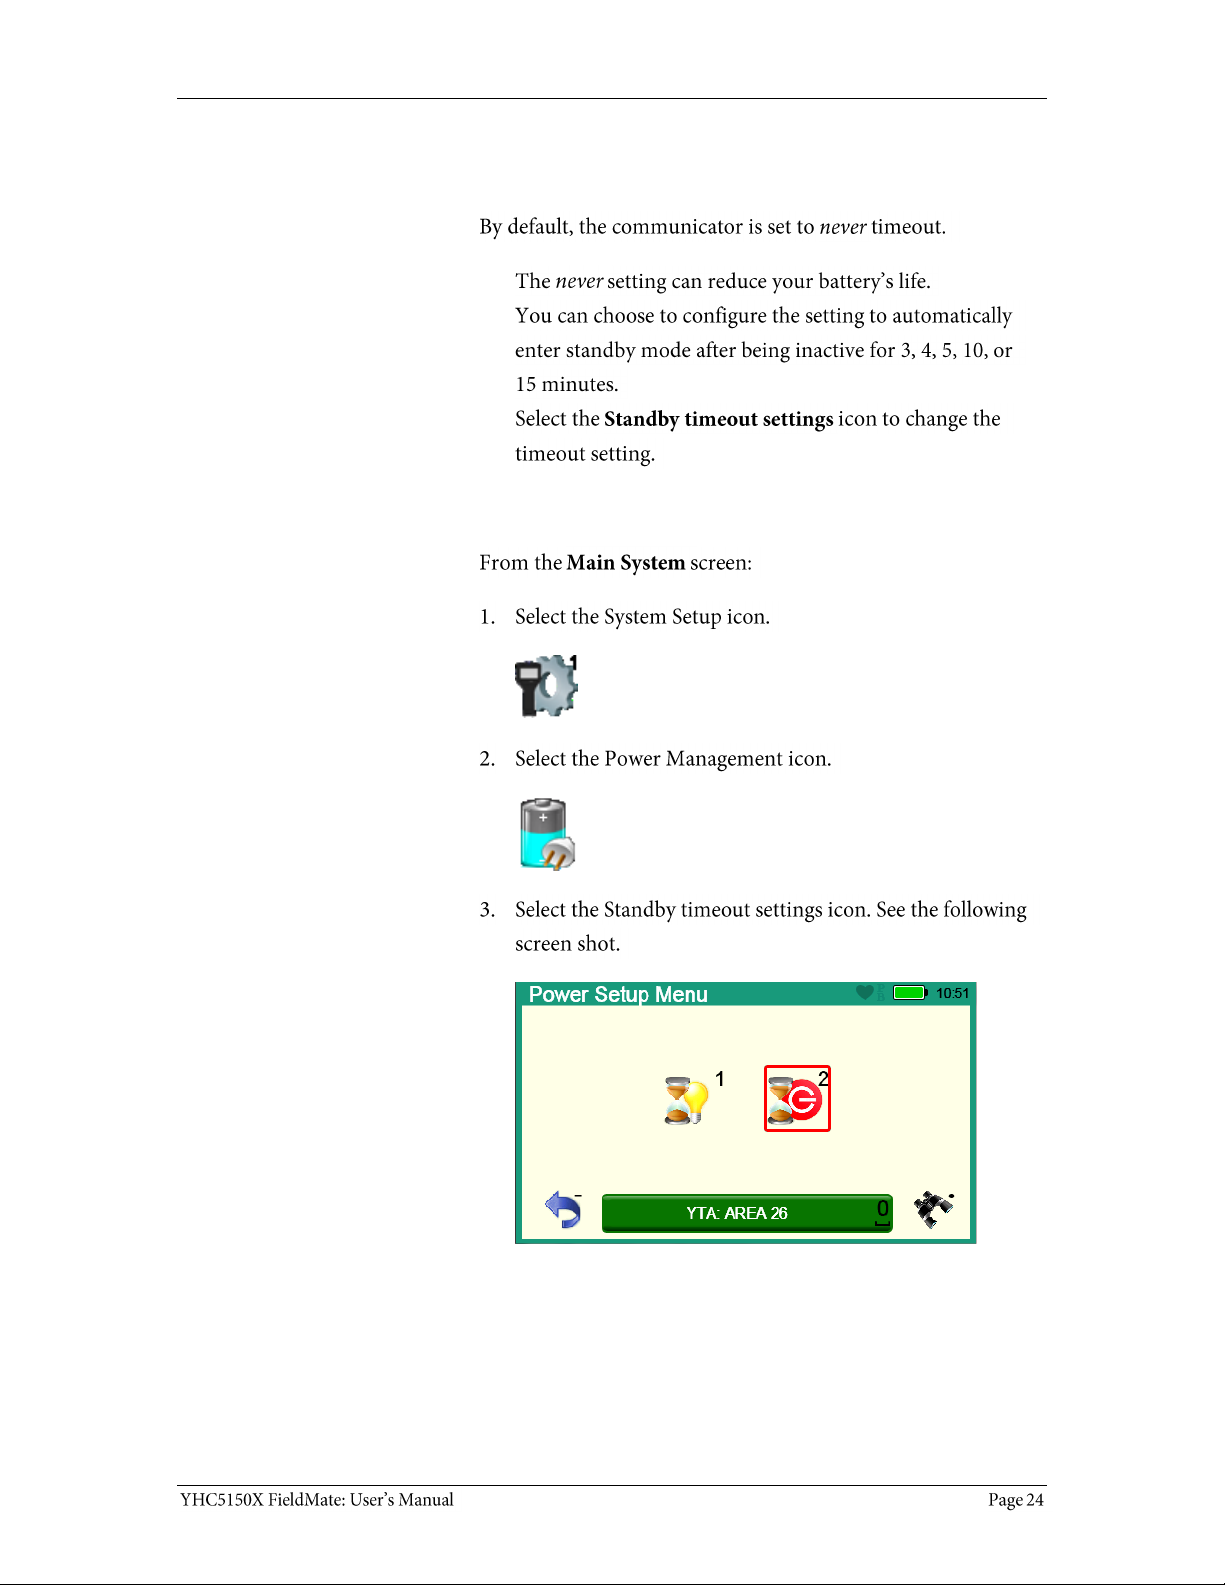
Standby — settings for timeout
Change the timeout settings to save battery life
Navigating to the Standby timeout settings
Timeout — Backlight and Standby are cumulative
An example of the cumulative timeouts
If…
Then…
You set the Backlight
timeout to 30 seconds
After the communicator is out of
the cradle and it has no input for
30 seconds,
The communicator reduces the
intensity to 10 %.
You set the Standby
timeout to 3 minutes
3 minutes and 30 seconds after
the start of the Backlight
timeout,
The communicator enters
Standby mode.
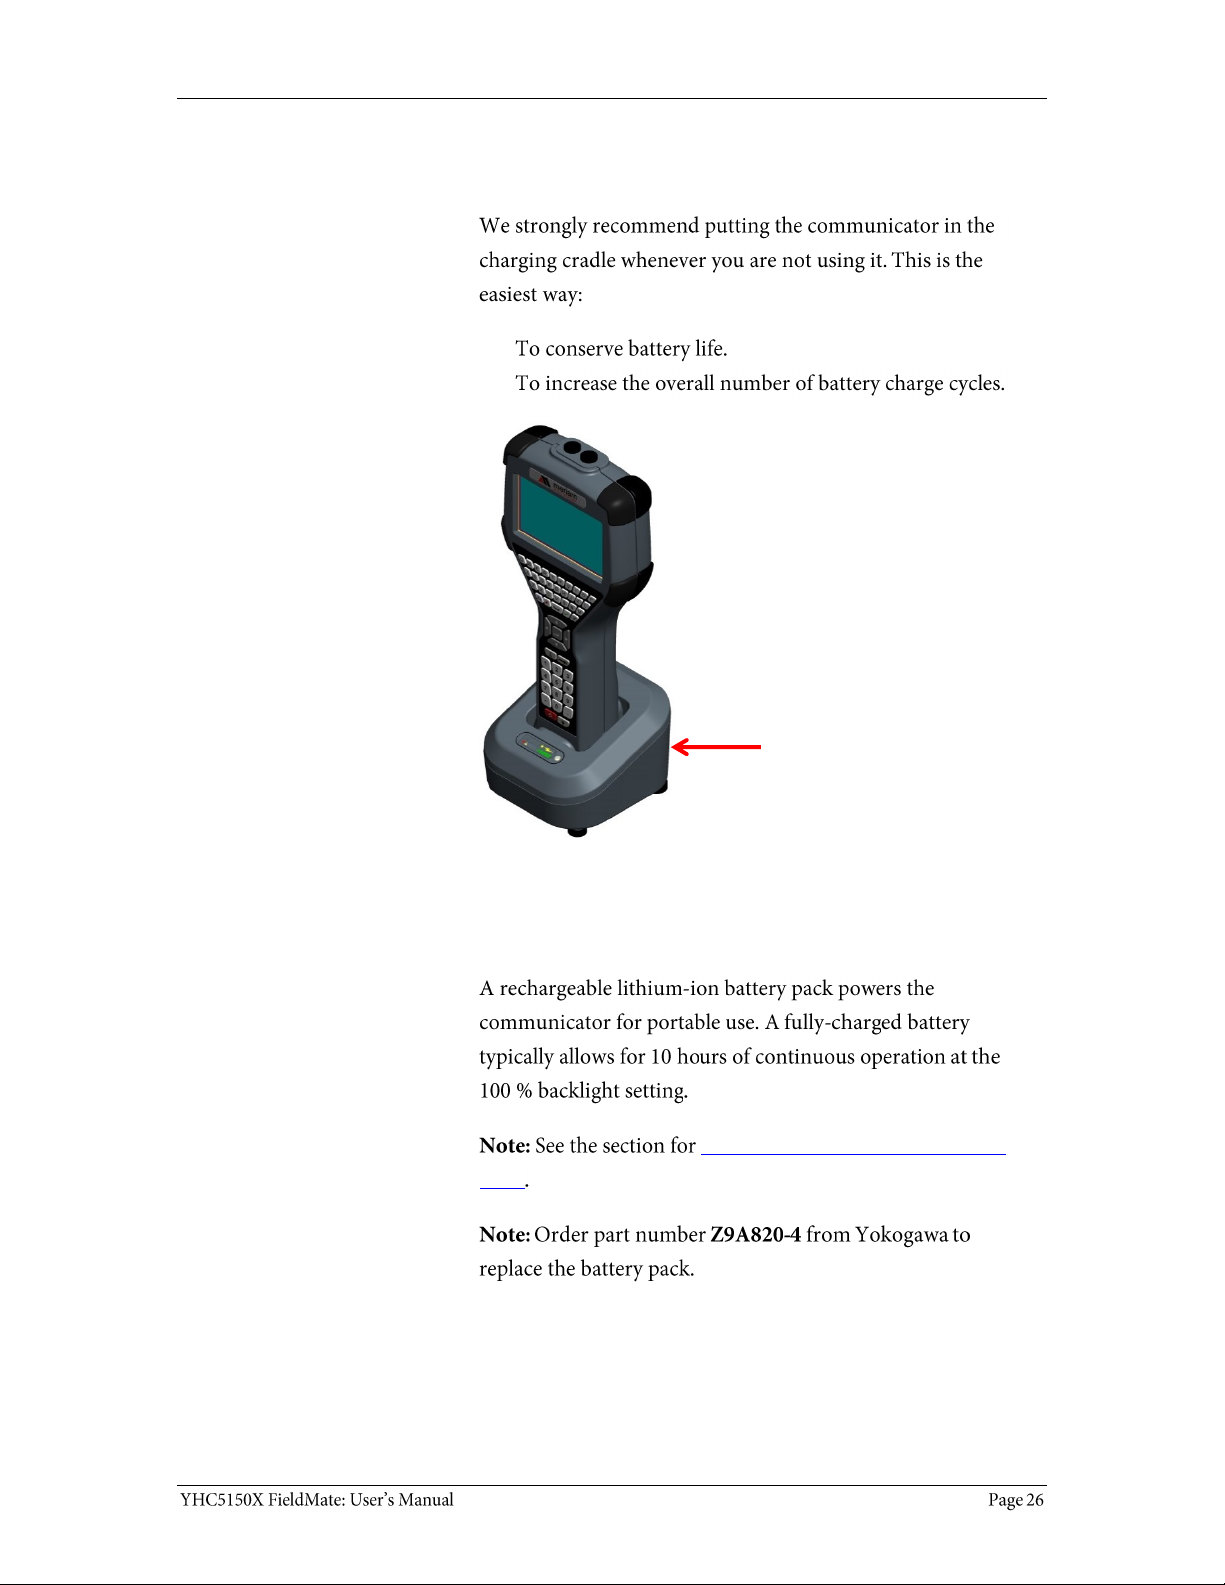
The battery pack life
Keep charging it
For portable use
Installing or removing the battery
pack
YHC5150X in the
charging cradle
The battery pack life (continued)
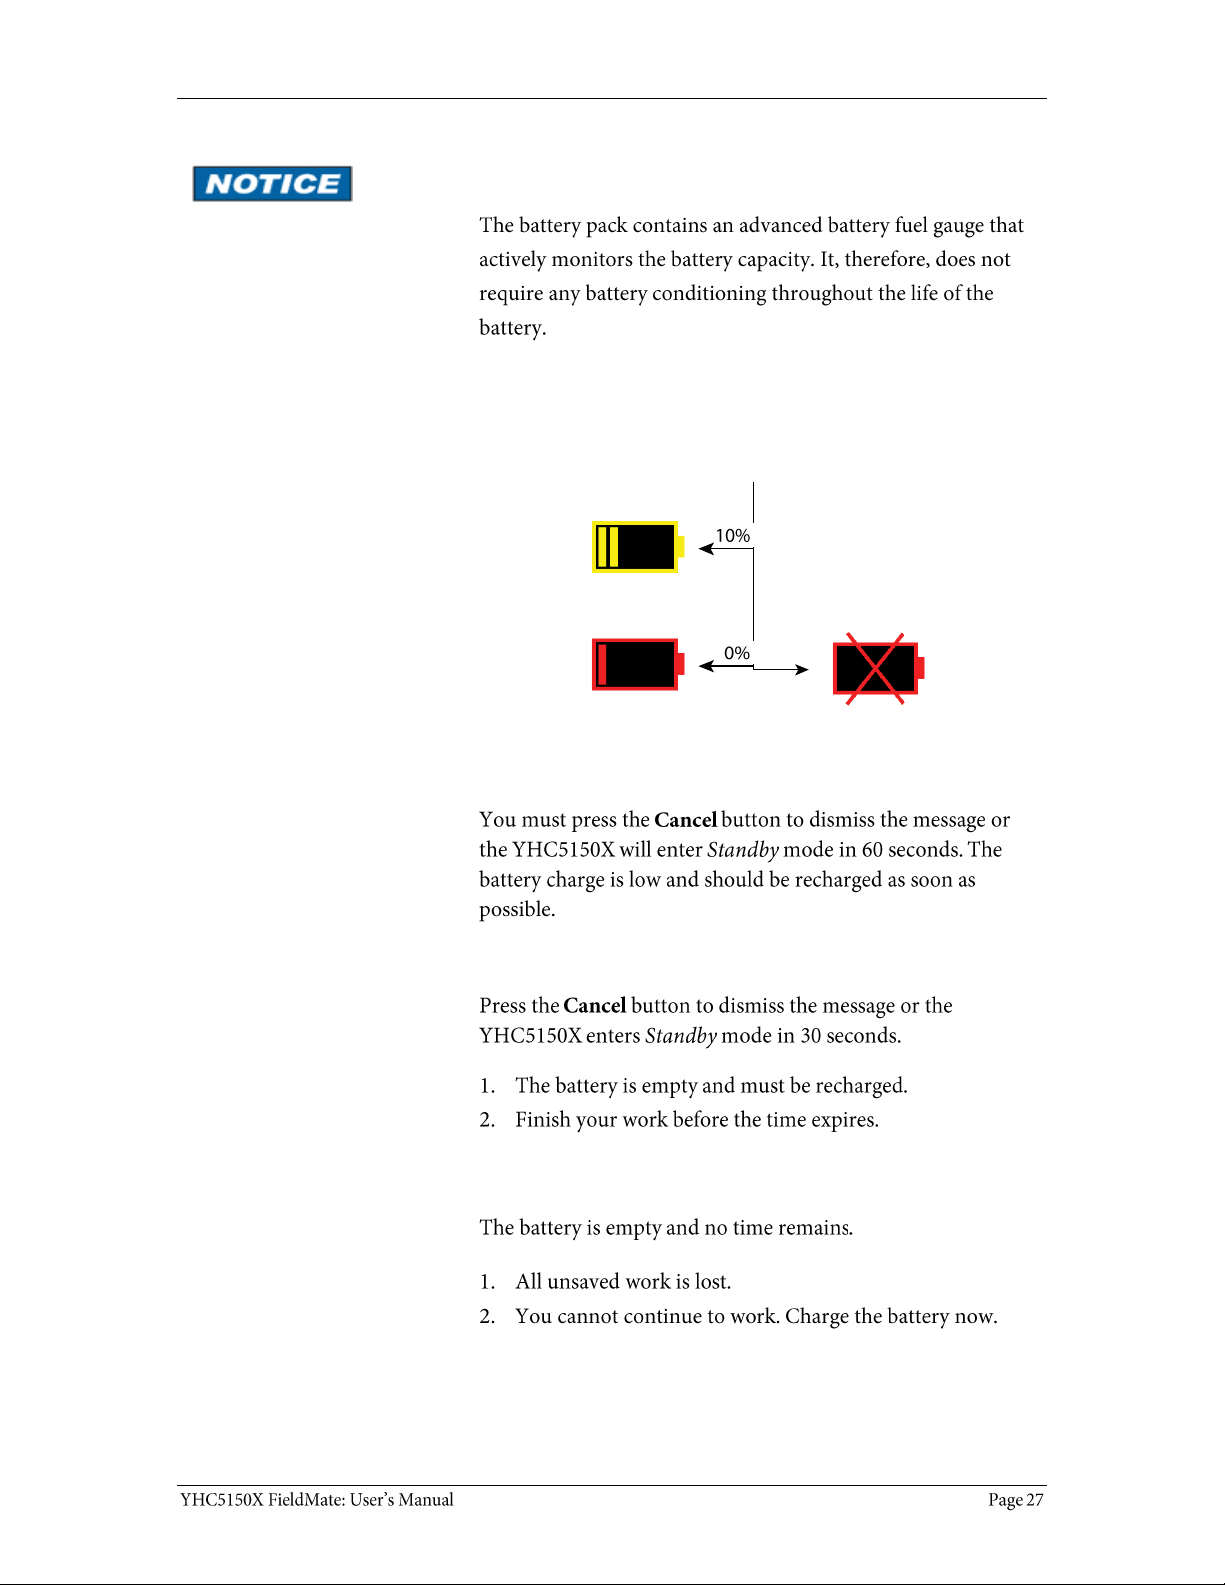
Advanced battery fuel gauge
Low battery level alerts for the XL Battery
Three low battery level alerts
Yellow alert
Red alert
Final alert
Yellow a lert
Red alert
Fin al a lert

Low battery level alerts (continued)
Standby mode and the alerts
Reminder:
The charging cradle
Cradle connection details
Automatically recharges
Power
connection to
AC adapter
USB
connection to
computer
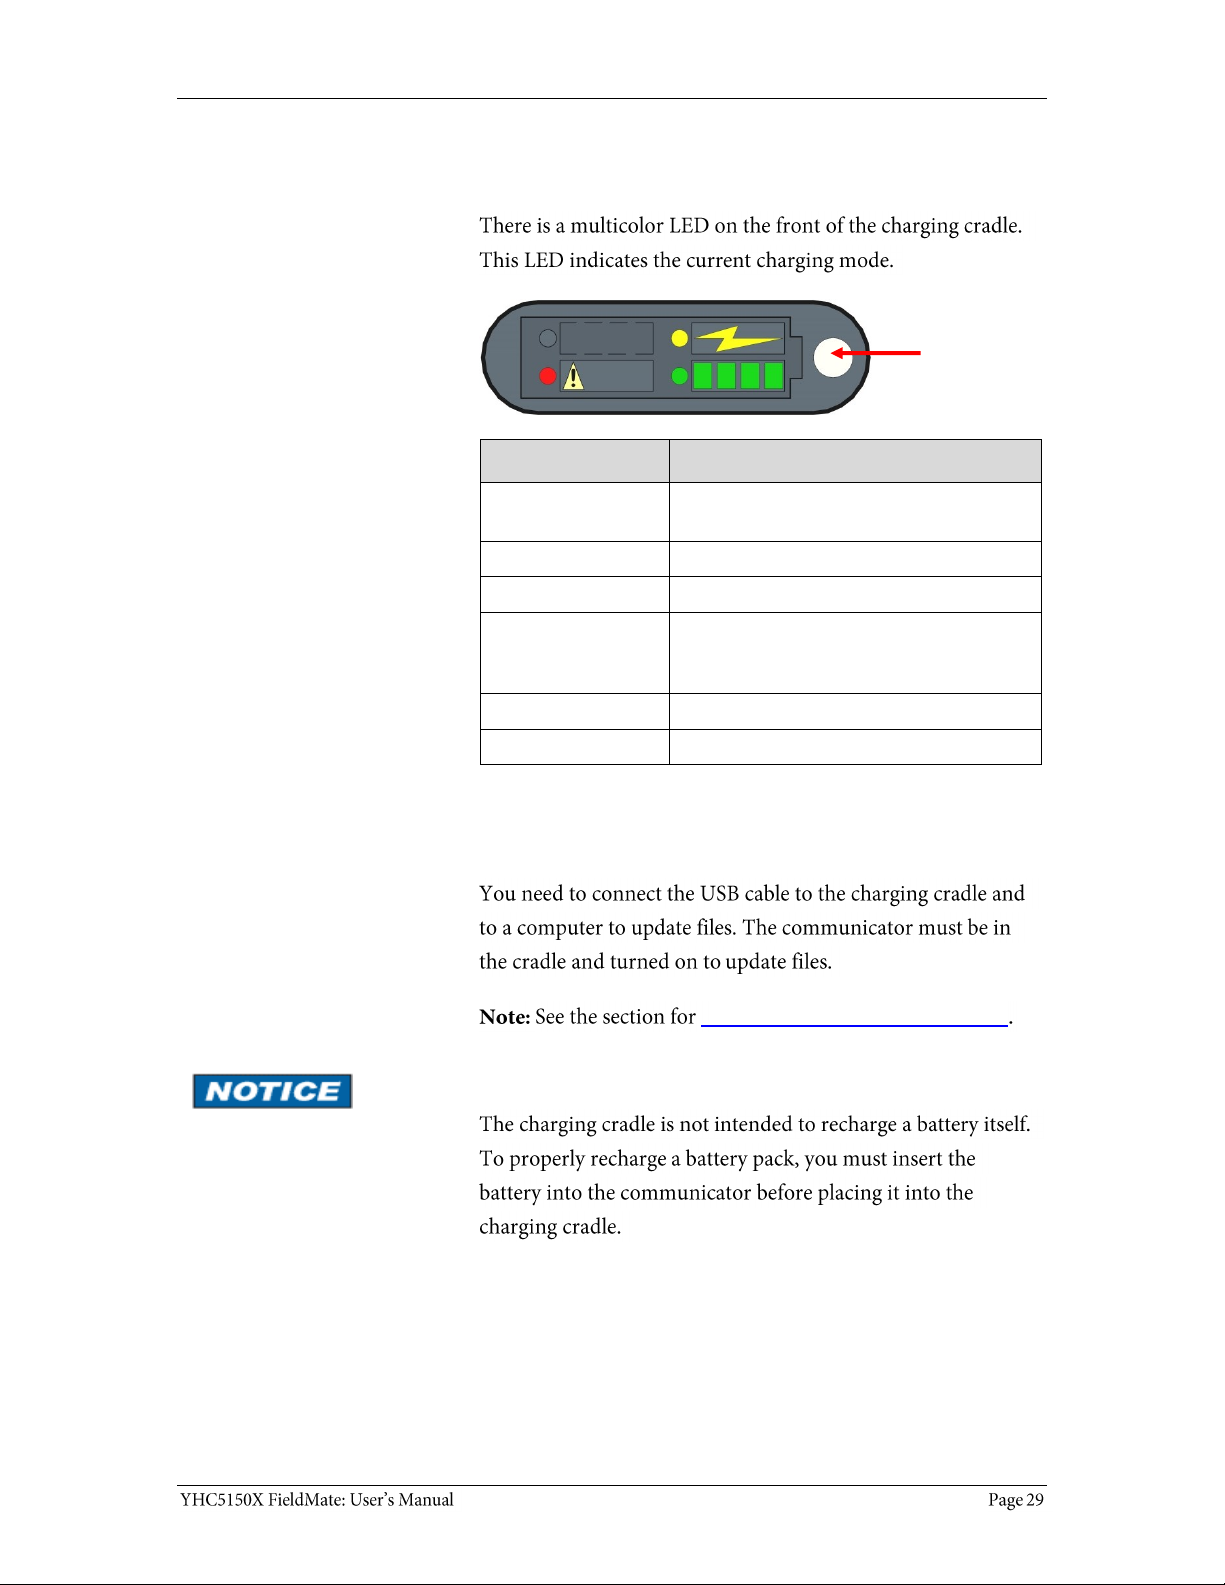
The charging cradle (continued)
Charging indicator
Light Status
Indicates…
Off
The communicator has not been correctly
inserted or the power is disconnected.
Solid Green
The battery is fully recharged.
Flashing Amber
The battery is charging.
Solid Amber
The battery temperature is out of the
charging range. The charging process has
been suspended.
Flashing Red
There is a battery fault.
Solid Red
There is a charging fault.
Connecting to a computer
Updating communicator software
Insert the communicator not the battery
Charging
LED
indicator
light

The charging cradle (continued)
Not intrinsically safe
Hazardous area use section
Intrinsic Safety Control Drawing
Kickstand — useful for viewing the display
Better angle to view the display
Loading...